Category Archives: Mobile Networks

CGrateS in Baby Steps – Part 3 – RatingProfiles & RatingPlans

In our last post we introduced the CGrateS API and we used it to add Rates, Destinations and define DestinationRates.

In this post, we’ll create the RatingPlan that references the DestinationRate we just defined, and the RatingProfile that references the RatingPlan, and then, as the cherry on top – We’ll rate some calls.
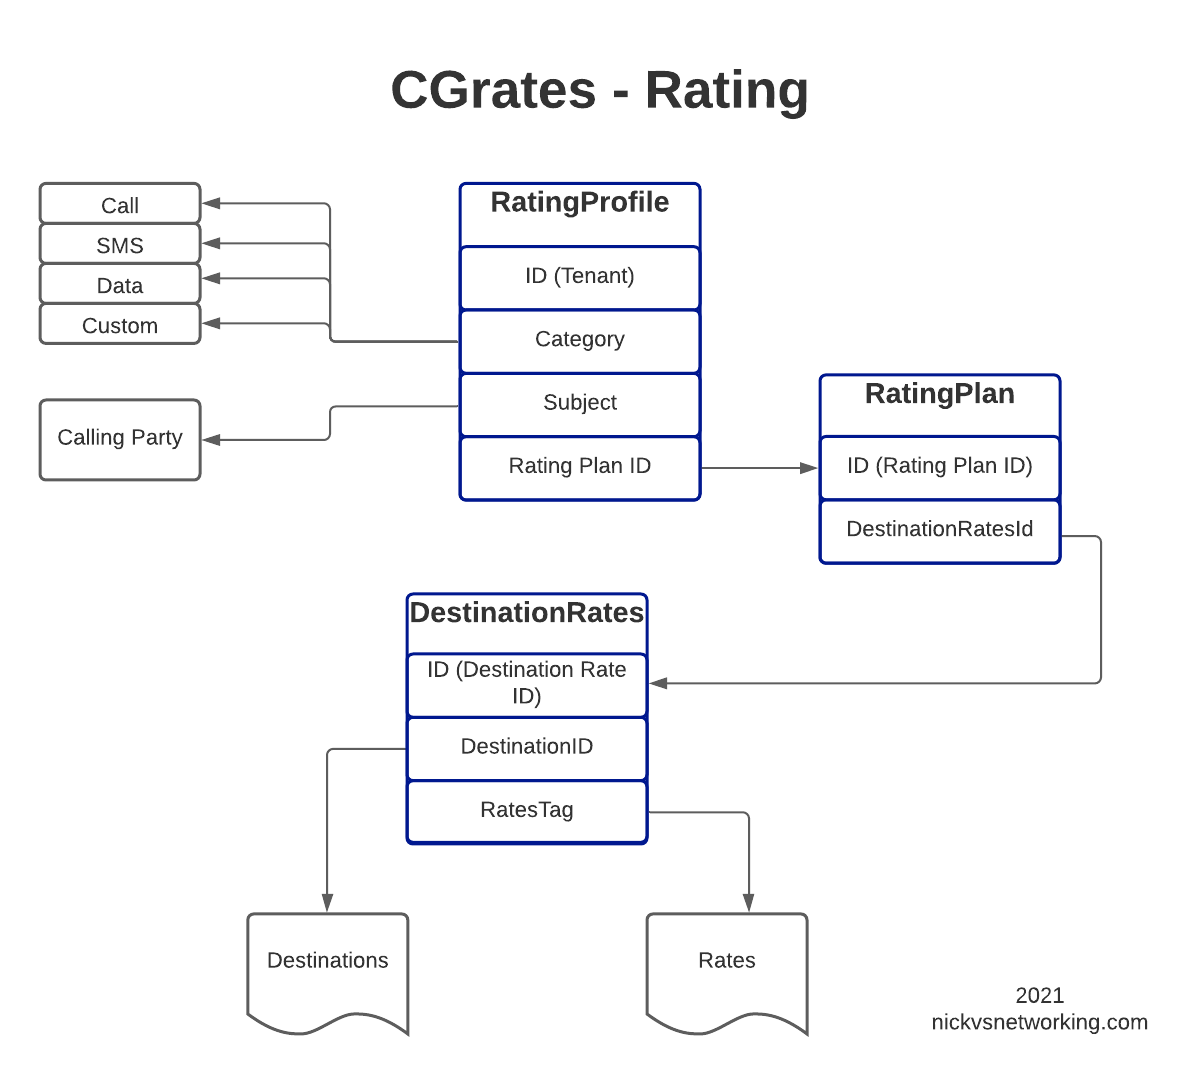
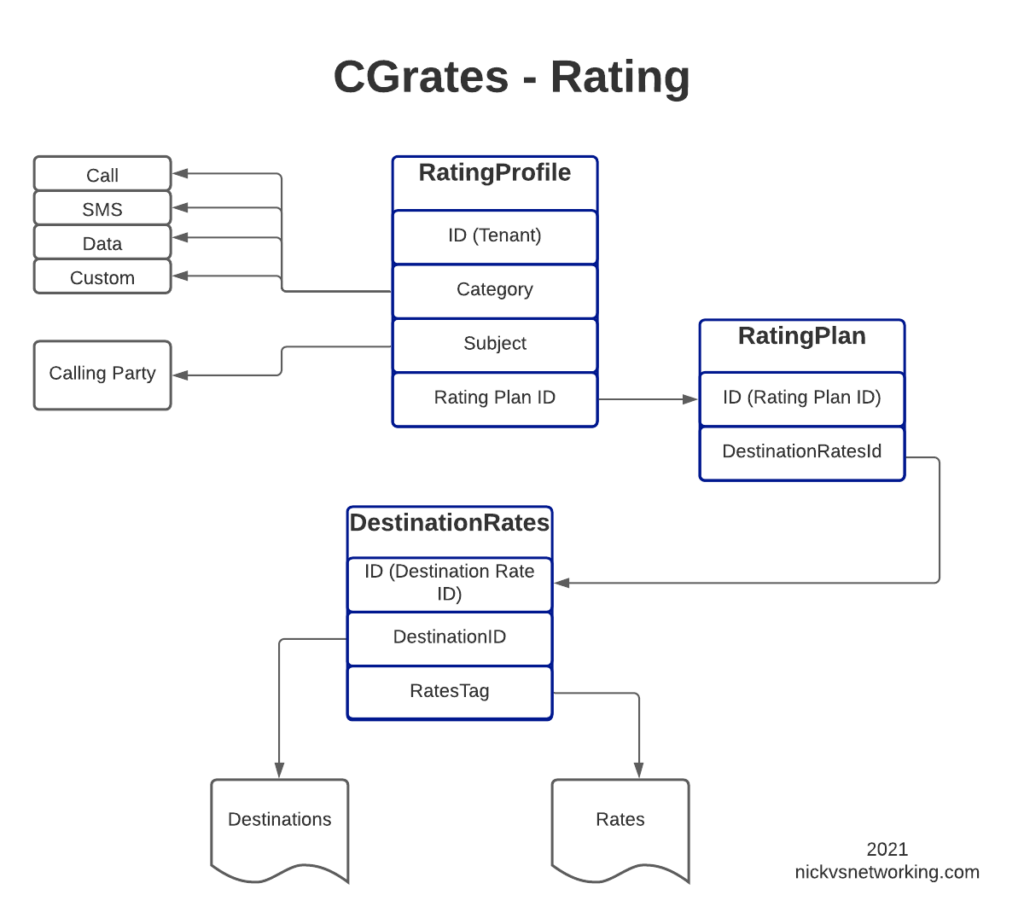
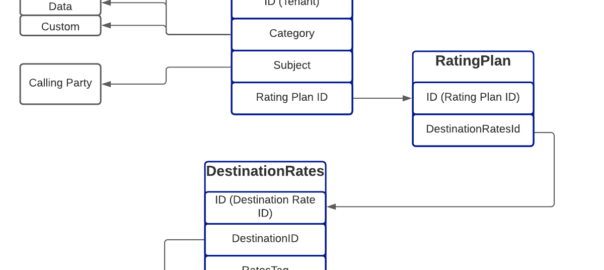
For anyone looking at the above diagram for the first time, you might be inclined to ask why what is the purpose of having all these layers?

This layered architecture allows all sorts of flexibility, that we wouldn’t otherwise have, for example, we can have multiple RatingPlans defined for the same Destinations, to allow us to have different Products defined, with different destinations and costs.

Likewise we can have multiple RatingProfiles assigned for the same destinations to allow us to generate multiple CDRs for each call, for example a CDR to bill the customer with and a CDR with our wholesale cost.

All this flexibility is enabled by the layered architecture.

Define RatingPlan

Picking up where we left off having just defined the DestinationRate, we’ll need to create a RatingPlan and link it to the DestinationRate, so let’s check on our DestinationRates:

print("GetTPRatingProfileIds: ")
TPRatingProfileIds = CGRateS_Obj.SendData({"jsonrpc": "2.0", "method": "ApierV1.GetRatingProfileIDs", "params": [{"TPid": "cgrates.org"}]})
print("TPRatingProfileIds: ")
pprint.pprint(TPRatingProfileIds)

From the output we can see we’ve got the DestinationRate defined, there’s a lot of info returned (I’ve left out most of it), but you can see the Destination, and the Rate associated with it is returned:

OrderedDict([('id', 1),
             ('result',
              OrderedDict([('TPid', 'cgrates.org'),
                           ('ID', 'DestinationRate_AU'),
                           ('DestinationRates',
                            [OrderedDict([('DestinationId', 'Dest_AU_Fixed'),
                                          ('RateId', 'Rate_AU_Fixed_Rate_1'),
                                          ('Rate', None),
                                          ('RoundingMethod', '*up'),
                                          ('RoundingDecimals', 4),
                                          ('MaxCost', 0),
                                          ('MaxCostStrategy', '')]),
                             OrderedDict([('DestinationId', 'Dest_AU_Mobile'),
                                          ('RateId', 'Rate_AU_Mobile_Rate_1'),
                                          ('Rate', None),
                                          ...

So after confirming that our DestinationRates are there, we’ll create a RatingPlan to reference it, for this we’ll use the APIerSv1.SetTPRatingPlan API call.

TPRatingPlans = CGRateS_Obj.SendData({
    "id": 3,
    "method": "APIerSv1.SetTPRatingPlan",
    "params": [
        {
            "TPid": "cgrates.org",
            "ID": "RatingPlan_VoiceCalls",
            "RatingPlanBindings": [
                {
                    "DestinationRatesId": "DestinationRate_AU",
                    "TimingId": "*any",
                    "Weight": 10
                }
            ]
        }
    ]
})

RatingPlan_VoiceCalls = CGRateS_Obj.SendData(
    {"jsonrpc": "2.0", "method": "ApierV1.GetTPRatingPlanIds", "params": [{"TPid": "cgrates.org"}]})
print("RatingPlan_VoiceCalls: ")
pprint.pprint(RatingPlan_VoiceCalls)
print("\n\n\n")

In our basic example, this really just glues the DestinationRate_AU object to RatingPlan_VoiceCalls.

It’s worth noting that you can use a RatingPlan to link to multiple DestinationRates, for example, we might want to have a different RatingPlan for each region / country, we can do that pretty easily too, in the below example I’ve referenced other Destination Rates (You’d go about defining the DestinationRates for these other destinations / rates the same way as we did in the last example).

{
    "id": 3,
    "method": "APIerSv1.SetTPRatingPlan",
    "params": [
        {
            "TPid": "cgrates.org",
            "ID": "RatingPlan_VoiceCalls",
            "RatingPlanBindings": [
                {
                    "DestinationRatesId": "DestinationRate_USA",
                    "TimingId": "*any",
                    "Weight": 10
                },
                    "DestinationRatesId": "DestinationRate_UK",
                    "TimingId": "*any",
                    "Weight": 10
                },
                    "DestinationRatesId": "DestinationRate_AU",
                    "TimingId": "*any",
                    "Weight": 10
                },
                ...

One last step before we can test this all end-to-end, and that’s to link the RatingPlan we just defined with a RatingProfile.

StorDB & DataDB

Psych! Before we do that, I’m going to subject you to learning about backends for a while.

So far we’ve skirted around CGrateS architecture, but this is something we need to know for now.

To keep everything fast, a lot of data is cached in what is called a DataDB (if you’ve followed since part 1, then your DataDB is Redis, but there are other options).

To keep everything together, databases are used for storage, called StorDB (in our case we are using MySQL, but again, we can have other options) but calls to this database are minimal to keep the system fast.

If you’re an astute reader, you may have noticed many of our API calls have TP in method name, if the API call has TP in the name, it is storing it in the StoreDB, if it doesn’t, it means it’s storing it only in DataDB.

Why does this matter? Well, let’s look a little more closely and it will become clear:

ApierV1.SetRatingProfile will set the data only in DataDB (Redis), because it’s in the DataDB the change will take effect immediately.

ApierV1.SetTPRatingProfile will set the data only in StoreDB (MySQL), it will not take effect until it is copied from the database (StoreDB) to the cache (DataDB).

To do this we need to run:

cgr-console "load_tp_from_stordb Tpid=\"cgrates.org\" Cleanup=true Validate=true DisableDestinations=false"

Which pulls the data from the database into the cache, as you may have guessed there’s also an API call for this:

{"method":"APIerSv1.LoadTariffPlanFromStorDb","params":[{"TPid":"cgrates.org","DryRun":False,"Validate":True,"APIOpts":None,"Caching":None}],"id":0}

After we define the RatingPlan, we need to run this command prior to creating the RatingProfile, so it has something to reference, so we’ll do that by adding:

print(CGRateS_Obj.SendData({"method":"APIerSv1.LoadTariffPlanFromStorDb","params":[{"TPid":"cgrates.org","DryRun":False,"Validate":True,"APIOpts":None,"Caching":None}],"id":0}))

Now, on with the show!

Defining a RatingProfile

The last piece of the puzzle to define is the RatingProfile.

We define a few key things in the rating profile:

  • The Tenant – CGrateS is multitenant out of the box (in our case we’ve used tenant named “cgrates.org“, but you could have different tenants for different customers).
  • The Category – As we covered in the first post, CGrateS can bill voice calls, SMS, MMS & Data consumption, in this scenario we’re billing calls so we have the value set to *call, but we’ve got many other options. We can use Category to link what RatingPlan is used, for example we might want to offer a premium voice service with guaranteed CLI rates, using a different RatingPlan that charges more per call, or maybe we’re doing mobile and we want a different RatingPlan for use when Roaming, we can use Category to switch that.
  • The Subject – This is loosely the Source / Calling Party; in our case we’re using a wildcard value *any which will match any Subject
  • The RatingPlanActivations list the RatingPlanIds of the RatingPlans this RatingProfile uses

So let’s take a look at what we’d run to add this:

#Reload data from StorDB
print(CGRateS_Obj.SendData({"method":"APIerSv1.LoadTariffPlanFromStorDb","params":[{"TPid":"cgrates.org","DryRun":False,"Validate":True,"APIOpts":None,"Caching":None}],"id":0}))

#Create RatingProfile
print(CGRateS_Obj.SendData({
    "method": "APIerSv1.SetRatingProfile",
    "params": [
        {
            "TPid": "RatingProfile_VoiceCalls",
            "Overwrite": True,
            "LoadId" : "APItest",
            "Tenant": "cgrates.org",
            "Category": "call",
            "Subject": "*any",
            "RatingPlanActivations": [
                {
                    "ActivationTime": "2014-01-14T00:00:00Z",
                    "RatingPlanId": "RatingPlan_VoiceCalls",
                    "FallbackSubjects": ""
                }
            ]
        }
    ]
}))

print("GetTPRatingProfileIds: ")
TPRatingProfileIds = CGRateS_Obj.SendData({"jsonrpc": "2.0", "method": "ApierV1.GetRatingProfileIDs", "params": [{"TPid": "cgrates.org"}]})
print("TPRatingProfileIds: ")
pprint.pprint(TPRatingProfileIds)

Okay, so at this point, all going well, we should have some data loaded, we’ve gone through all those steps to load this data, so now let’s simulate a call to a Mobile Number (22c per minute) for 123 seconds.

We can do this from the CLI:

cgr-console 'cost Category="call" Tenant="cgrates.org" Subject="1001" Destination="6140000" AnswerTime="2025-08-04T13:00:00Z" Usage="123s"'

We should get the cost back of 66 cents, as 3x 22 cents.
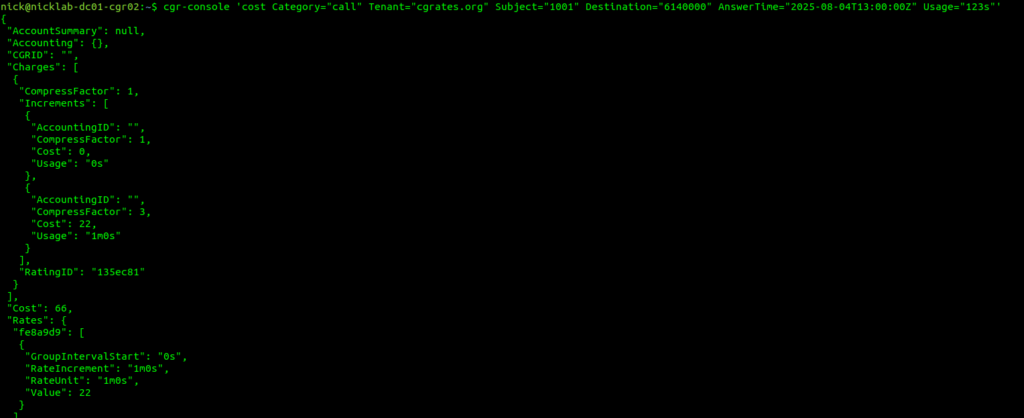
Call showing 66 cent cost

If that’s worked, breath a sigh of relief. That’s the worst done.*

As you may have guessed we can also check this through API calls,

print("Testing call..")
cdr = CGRateS_Obj.SendData({"method": "APIerSv1.GetCost", "params": [ { \
    "Tenant": "cgrates.org", \
    "Category": "call", \
    "Subject": "1001", \
    "AnswerTime": "2025-08-04T13:00:00Z", \
    "Destination": "6140000", \
    "Usage": "123s", \
    "APIOpts": {}
    }], "id": 0})
pprint.pprint(cdr)

And you should get the same output.

If you’ve had issues with this, I’ve posted a copy of the code in GitHub.

We’re done here. Well done. This one was a slog.
CGrateS in Baby Steps – Part 2 – Adding Rates and Destinations through the API

In our last post we dipped a toe into CGrateS.

We cheated a fair bit, to show something that worked, but it’s not something you’d probably want to use in real life, loading static CSV files gets us off the ground, but in reality we don’t want to manage a system through CSV files.

Instead, we’d want to use an API.

Fair warning – There is some familiarity expected with JSON and RESTful APIs required, we’ll use Python3 for our examples, but you can use any programing language you’re comfortable with, or even CURL commands.

So we’re going to start by clearing out all the data we setup in CGrateS using the cgr-loader tool from those imported CSVs:

redis-cli flushall
sudo mysql -Nse 'show tables' cgrates | while read table; do sudo mysql -e "truncate table $table" cgrates; done
cgr-migrator -exec=*set_versions -stordb_passwd=CGRateS.org
sudo systemctl restart cgrates

So what have we just done?
Well, we’ve just cleared all the data in CGrateS.
We’re starting with a blank slate.

In this post, we’re going to define some Destinations, some Rates to charge and then some DestinationRates to link each Destination to a Rate.

But this time we’ll be doing this through the CGrateS API.

Introduction to the CGrateS API

CGrateS is all API driven – so let’s get acquainted with this API.

I’ve written a simple Python wrapper you can find here that will make talking to CGRateS a little easier, so let’s take it for a spin and get the Destinations that are loaded into our system:

import cgrateshttpapi
CGRateS_Obj = cgrateshttpapi.CGRateS('172.16.41.133', 2080) #Replace this IP with the IP Address of your CGrateS instance...

destinations = CGRateS_Obj.SendData({'method':'ApierV1.GetTPDestinationIDs','params':[{"TPid":"cgrates.org"}]})['result']

#Pretty print the result:
print("Destinations: ")
pprint.pprint(destinations)

All going well you’ll see something like this back:

Initializing with host 172.16.41.133 on port 2080
Sending Request with Body:
{'method': 'ApierV2.Ping', 'params': [{'Tenant': 'cgrates.org'}]}
Sending Request with Body:
{'method': 'ApierV2.GetTPDestinationIDs', 'params': [{"TPid":"cgrates.org"}]}
Destinations from CGRates: []

So what did we just do?
Well, we sent a JSON formatted string to the CGRateS API at 172.16.41.133 on port 2080 – You’ll obviously need to change this to the IP of your CGrateS instance.

In the JSON body we sent we asked for all the Destinations using the ApierV1.GetTPDestinationIDs method, for the TPid ‘cgrates.org’,

And it looks like no destinations were sent back, so let’s change that!

Note: There’s API Version 1 and API Version 2, not all functions exist in both (at least not in the docs) so you have to use a mix.

Adding Destinations via the API

So now we’ve got our API setup, let’s see if we can add a destination!

To add a destination, we’ll need to go to the API guide and find the API call to add a destination – in our case the API call is ApierV2.SetTPDestination and will look like this:

{'method': 'ApierV2.SetTPDestination', 'params': [
    {"TPid": "cgrates.org", "ID": "Dest_AU_Mobile",
        "Prefixes": ["614"]}]}

So we’re creating a Destination named Dest_AU_Mobile and Prefix 614 will match this destination.

Note: I like to prefix all my Destinations with Dest_, all my rates with Rate_, etc, so it makes it easy when reading what’s going on what object is what, you may wish to do the same!

So we’ll use the Python code we had before to list the destinations, but this time, we’ll use the ApierV2.SetTPDestination API call to add a destination before listing them, let’s take a look:

import cgrateshttpapi
import pprint
import sys
CGRateS_Obj = cgrateshttpapi.CGRateS('172.16.41.133', 2080)

CGRateS_Obj.SendData({'method':'ApierV2.SetTPDestination','params':[{"TPid":"cgrates.org","ID":"Dest_AU_Mobile","Prefixes":["614"]}]})

destinations = CGRateS_Obj.SendData({'method':'ApierV1.GetTPDestinationIDs','params':[{"TPid":"cgrates.org"}]})['result']
print("Destinations: ")
pprint.pprint(destinations)
print("\n\n\n")

Now if you run the code you’ll see something like this:

Initializing with host 172.16.41.133 on port 2080
Sending Request with Body:

Sending Request with Body:
{'method': 'ApierV2.SetTPDestination', 'params': [{'TPid': 'cgrates.org', 'ID': 'Dest_AU_Mobile', 'Prefixes': ['614']}]}

{'method': 'ApierV1.GetTPDestinationIDs', 'params': [{'TPid': 'cgrates.org'}]}
Destinations: 
['Dest_AU_Mobile']

Boom! There’s our added destination, le’s add a few more using the same process, so we’ve got a few other destinations defined:

CGRateS_Obj = cgrateshttpapi.CGRateS('172.16.41.133', 2080)

CGRateS_Obj.SendData({'method':'ApierV2.SetTPDestination','params':[{"TPid":"cgrates.org","ID":"Dest_AU_Fixed","Prefixes":["612", "613", "617", "618"]}]})
CGRateS_Obj.SendData({'method':'ApierV2.SetTPDestination','params':[{"TPid":"cgrates.org","ID":"Dest_AU_Mobile","Prefixes":["614"]}]})
CGRateS_Obj.SendData({'method':'ApierV2.SetTPDestination','params':[{"TPid":"cgrates.org","ID":"Dest_AU_TollFree","Prefixes":["6113", "6118"]}]})


print("Destinations: ")
for destination in destinations:
    destination = CGRateS_Obj.SendData({'method':'ApierV1.GetTPDestination','params':[{"TPid":"cgrates.org", "ID" : str(destination)}]})['result']
    pprint.pprint(destination)
print("\n\n\n")
sys.exit()

After adding some prettier printing and looping through all the destinations, here’s what your destinations should look like:

OrderedDict([('TPid', 'cgrates.org'),
             ('ID', 'Dest_AU_Fixed'),
             ('Prefixes', ['612', '613', '617', '618'])])

OrderedDict([('TPid', 'cgrates.org'),
             ('ID', 'Dest_AU_Mobile'),
             ('Prefixes', ['614'])])

OrderedDict([('TPid', 'cgrates.org'),
             ('ID', 'Dest_AU_TollFree'),
             ('Prefixes', ['6113', '6118'])])

Notice for AU Fixed, we defined multiple prefixes under the same Destination? Just as items in the list.

So we’ve created a bunch of Destinations, like so:

NamePrefix
Dest_AU_TollFree6113 & 6118
Dest_AU_Fixed612, 613, 617 & 618
Dest_AU_Mobile614
Destinations we just created

Next let’s create some rates which we can then associate with these destinations.

Adding Rates via the API

So to begin with let’s see if we’ve got any rates defined, we can do this with another API call, this time the ApierV1.GetTPRateIds call.

{"method":"ApierV1.GetTPRateIds","params":[{"TPid":"cgrates.org"}]}

And at the moment that returns no results, so let’s add some rates.

For this we’ll use the ApierV1.SetTPRate function:

{"method":"ApierV1.SetTPRate","params":[{"ID":"Rate_AU_Mobile_Rate_1","TPid":"cgrates.org","RateSlots":[{"ConnectFee":0,"Rate":22,"RateUnit":"60s","RateIncrement":"60s","GroupIntervalStart":"0s"}]}],"id":1}

If we post this to the CGR engine, we’ll create a rate, named Rate_AU_Mobile_Rate_1 that bills 22 cents per minute, charged every 60 seconds.

Let’s add a few rates:

CGRateS_Obj.SendData({"method":"ApierV1.SetTPRate","params":[{"ID":"Rate_AU_Mobile_Rate_1","TPid":"cgrates.org","RateSlots":[{"ConnectFee":0,"Rate":22,"RateUnit":"60s","RateIncrement":"60s","GroupIntervalStart":"0s"}]}],"id":1})
CGRateS_Obj.SendData({"method":"ApierV1.SetTPRate","params":[{"ID":"Rate_AU_Fixed_Rate_1","TPid":"cgrates.org","RateSlots":[{"ConnectFee":0,"Rate":14,"RateUnit":"60s","RateIncrement":"60s","GroupIntervalStart":"0s"}]}],"id":1})
CGRateS_Obj.SendData({"method":"ApierV1.SetTPRate","params":[{"ID":"Rate_AU_Toll_Free_Rate_1","TPid":"cgrates.org","RateSlots":[{"ConnectFee":25,"Rate":0,"RateUnit":"60s","RateIncrement":"60s","GroupIntervalStart":"0s"}]}],"id":1})

TPRateIds = CGRateS_Obj.SendData({"method":"ApierV1.GetTPRateIds","params":[{"TPid":"cgrates.org"}]})['result']
print(TPRateIds)
for TPRateId in TPRateIds:
    print("\tRate: " + str(TPRateId))

All going well, when you add the above, we’ll have added 3 new rates:

Rate NameCost
Rate_AU_Fixed_Rate_114c per minute charged every 60s
Rate_AU_Mobile_Rate_122c per minute charged every 60s
Rate_AU_Toll_Free_Rate_125c connection, untimed
Rates we just created

Linking Rates to Destinations

So now with Destinations defined, and Rates defined, it’s time to link these two together!

Destination Rates link our Destinations and Route rates, this decoupling means that we can have one Rate shared by multiple Destinations if we wanted, and makes things very flexible.

For this example, we’re going to map the Destinations to rates like this:

DestinationRate NameDestination NameRate Name
DestinationRate_AUDest_AU_FixedRate_AU_Fixed_Rate_1
DestinationRate_AUDest_AU_MobileRate_AU_Mobile_Rate_1
DestinationRate_AUDest_AU_TollFreeRate_AU_Toll_Free_Rate_1
Destination_Rate_AU we will create

So let’s go about making this link in CGrateS, for this we’ll use the ApierV1.SetTPDestinationRate method to add the DestinationRate, and the ApierV1.GetTPDestinationRateIds to get the list of them.

CGRateS_Obj.SendData({"method": "ApierV1.SetTPDestinationRate", "params": \
    [{"ID": "DestinationRate_AU", "TPid": "cgrates.org", "DestinationRates": \
        [ {"DestinationId": "Dest_AU_Fixed", "RateId": "Rate_AU_Fixed_Rate_1", "Rate": None, "RoundingMethod": "*up", "RoundingDecimals": 4, "MaxCost": 0, "MaxCostStrategy": ""} ]\
    }]})

TPDestinationRates = CGRateS_Obj.SendData({"jsonrpc":"2.0","method":"ApierV1.GetTPDestinationRateIds","params":[{"TPid":"cgrates.org"}]})['result']
for TPDestinationRate in TPDestinationRates:
    pprint.pprint(TPDestinationRate)

All going well, you’ll see the new DestinationRate we added.

Here’s a good chance to show how we can add multiple bits of data in one API call, we can tweak the ApierV1.SetTPDestinationRate method and include all the DestinationRates we need in one API call:

CGRateS_Obj.SendData({"method": "ApierV1.SetTPDestinationRate", "params": [
        {"ID": "DestinationRate_AU", "TPid": "cgrates.org", "DestinationRates": [ \
            {"DestinationId": "Dest_AU_Fixed", "RateId": "Rate_AU_Fixed_Rate_1", "Rate": None, "RoundingMethod": "*up", "RoundingDecimals": 4, "MaxCost": 0, "MaxCostStrategy": ""},\
            {"DestinationId": "Dest_AU_Mobile", "RateId": "Rate_AU_Mobile_Rate_1", "Rate": None, "RoundingMethod": "*up", "RoundingDecimals": 4, "MaxCost": 0, "MaxCostStrategy": ""}, \
            {"DestinationId": "Dest_AU_TollFree", "RateId": "Rate_AU_Toll_Free_Rate_1", "Rate": None, "RoundingMethod": "*up", "RoundingDecimals": 4, "MaxCost": 0, "MaxCostStrategy": ""}\
     ]},
    ]})

As we’ve only created one DestinationRate, let’s take a look at the detail:

TPDestinationRate = CGRateS_Obj.SendData({"jsonrpc":"2.0","method":"ApierV1.GetTPDestinationRate","params":[{"ID":"DestinationRate_AU","TPid":"cgrates.org"}],"id":1})
pprint.pprint(TPDestinationRate)

Phew, okay, if you made it this far, congratulations.

So where we stand now is we’ve created Rates, Destinations and tied the two together.

I’ve put a copy of all the Python code on GitHub here, in case you’re having issues you can work with that.

In our next post, we’ll keep working our way up this diagram, by creating RatingPlans and RatingProfiles to reference the DestinationRate we just created.

MMS Deep Dive – MM1 – Mobile Terminated MMS

In our last post we talked about sending an Multimedia Message, and in this post, we’re going to cover the process of receiving a Multimedia Message.

Carl Sagan once famously said “If you wish to make an apple pie from scratch, you must first invent the universe”, we don’t need to go that far back, but if you want to deliver an MMS to a subscriber, first you must deliver an SMS.

Wait, but we’re talking about MMS right? So why are we talking SMS?

Modern MMS transport relies on HTTP, which is client-server based, the phone / UE is the client, and the MMSc is the Server.

The problem with this client-server relationship, is the client requests things from the server, but the server can’t request things from the client.

This presents a problem when it comes to delivering the MMS – The phone / UE will need to request the MMSc provide it the message to be received, but needs to know there is a message to request in the first place.

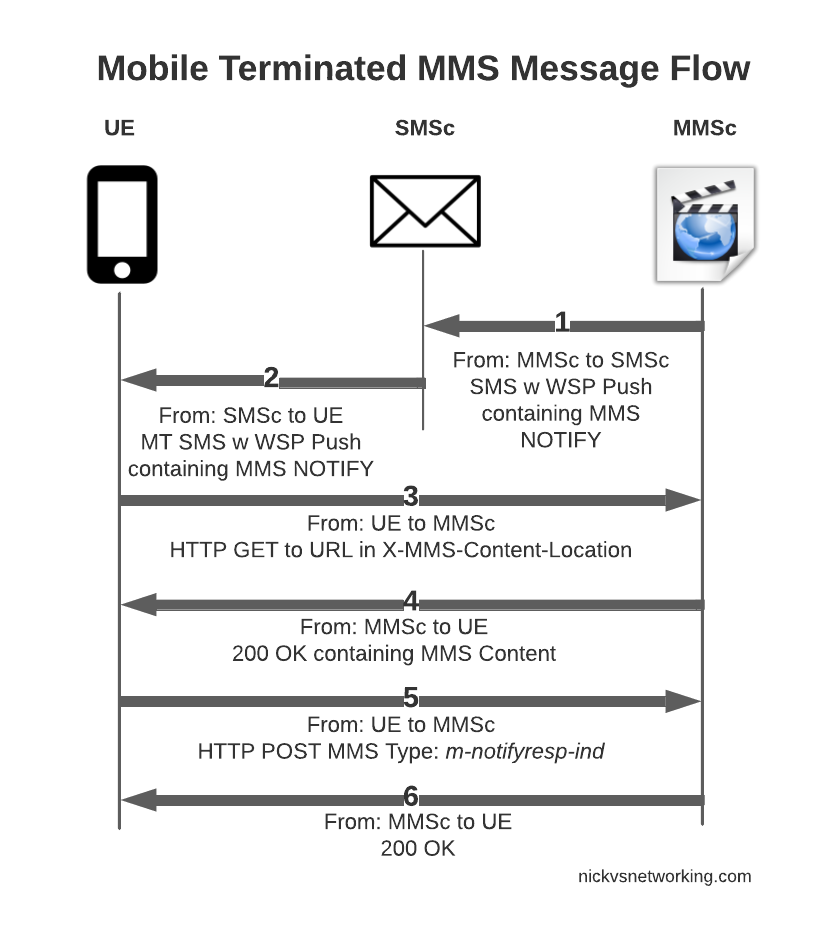
So this is where SMS comes in. When the MMSc has a message destined for a Subscriber, it sends the phone/UE an SMS, informing that there is an MMS waiting, and providing the URL the MMS can be retrieved from.

This is typically done by MAP or SMPP, to link the MMSc to the SMSc to allow it to send these messages.

This SMS contains the URL to retrieve the MMS at, once the UE receives this SMS, it knows where to retrieve the MMS.

It can then send an HTTP GET to the URL to retrieve the MMS, and lastly sends an HTTP POST to confirm to the MMSc it retrieved it all OK.

MMS Mobile Terminated message flow

So that’s the basics, let’s look at each part of the dialog in some more detail, starting with this magic SMS to tell the UE where to retrieve the MMS from.

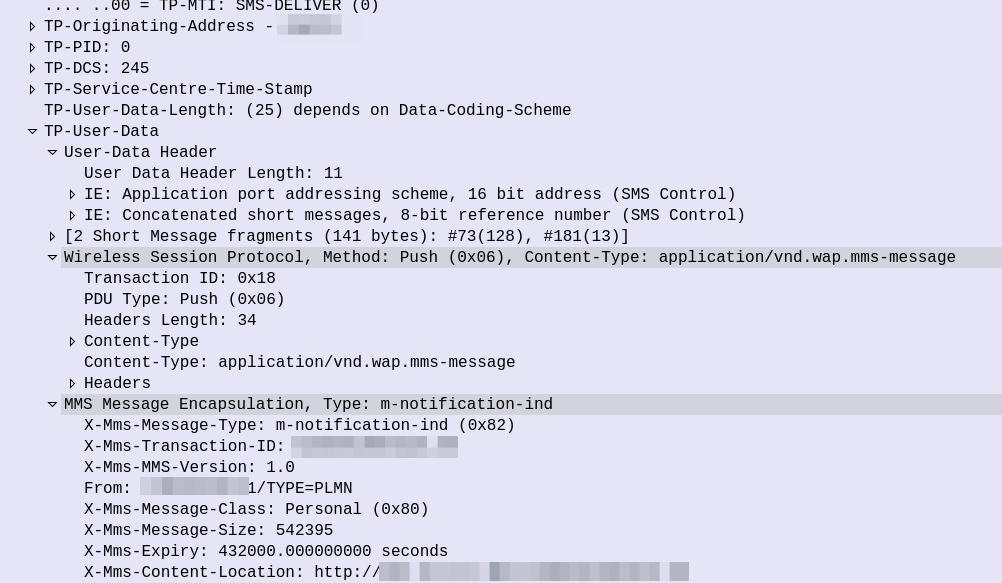
WAP PUSH from MMSc sent via SMS

So some things to notice, the user data, which would usually carry the body of our SMS instead contains another protocol, “Wireless Session Protocol” (WSP), and this is the method “Push”.

That in turn is followed by MMS Message Encapsulation, again inside the SMS message body, this time with the MMS specific data.

The From: header contains the sender of the MMS, this is how you can see who the MMS is from, while it’s still downloading.

The expiry indicates to the handset, it it doesn’t download the MMS within the specified time period, it shouldn’t bother, as the message will have expired.

And lastly, and perhaps most importantly, we have the X-MMS-Content-Location header, which tells our subscriber where to download the MMS from.

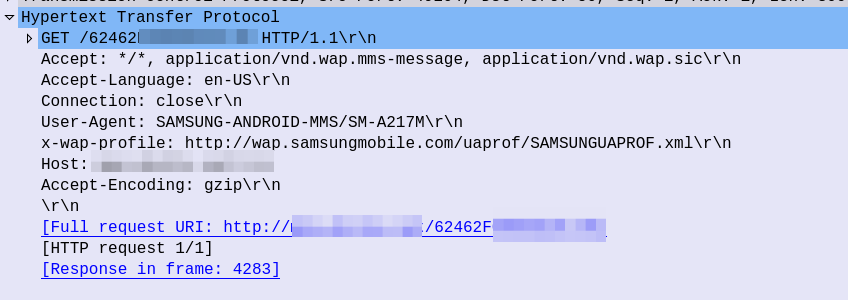
After this, the UE sends an HTTP GET to the URL in the X-MMS-Content-Location header (typically on the “mms” APN), to retrieve the MMS from the MMSc.

HTTP GET from the UE to the MMSc

The HTTP GET is pretty normal, there’s the usual MMS headers we talked about in the last post, and we just GET the path provided by the MMSc in the WAP PUSH.

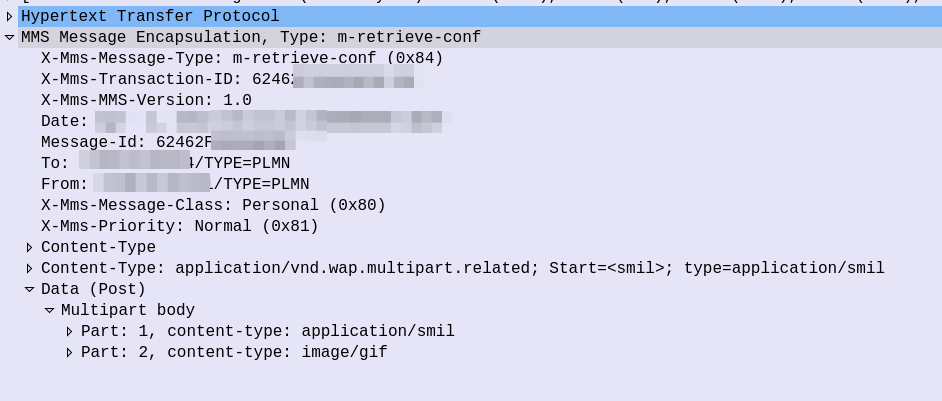
The response from the MMSc contains the actual MMS itself, which is almost a mirror of the sending process (the Data component is unchanged from when the sender sent it).

Response to HTTP GET for message retrieval

At this stage our subscriber has retrieve the MMS, but may not have retrieved it fully, or may have had an issue retrieving it.

Instead the UE sends an HTTP POST with the MMS-Message-Type m-notifyresp-ind with the transaction ID, to indicate that it has successfully retrieved the MMS, and at this point the MMS can notify the sender if delivery receipts are enabled, and delete the message from the cache.

And finally the MMSc sends back a 200 OK with no body to confirm it got that too.

Some notes on MMS Security

Reading about unauthenticated GET requests, you may be left wondering what security does MMS have, and what stops you from just going through and sending HTTP GET requests to all the possible URL paths to vacuum up all the MMS?

In the standard, nothing!

Typically the MMSc has some layer of security added by the implementer, to ensure the user retrieving the MMS, is the user the MMS is destined for.
Because MMS has no security in the standard, this is typically achieved through Header Enrichment, whereby the P-GW adds a HTTP header with the MSISDN or IMSI of the subscriber, and then the MMSc can evaluate if this subscriber should be able to retrieve that URL.

Another attack vector I played with was sending a SMS based MMS-Notify with a different URL, which if retrieved, would leak the subscriber’s IP, as it would cause the UE to try and get data from that URL.

Kamailio I-CSCF – SRV Lookup Behaviour

Recently I had a strange issue I thought I’d share.

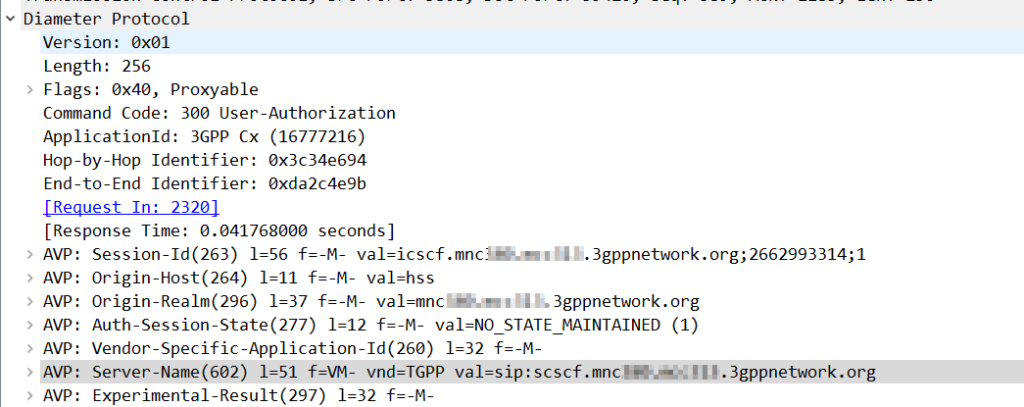
Using Kamailio as an Interrogating-CSCF, Kamailio was getting the S-CSCF details from the User-Authorization-Answer’s “Server-Name” (602) AVP.

The value was set to:

sip:scscf.mnc001.mcc001.3gppnetwork.org:5060

But the I-CSCF was only looking up A-Records for scscf.mnc001.mcc001.3gppnetwork.org, not using DNS-SRV.

The problem? The Server-Name I had configured as a full SIP URI in PyHSS including the port, meant that Kamailio only looks up the A-Record, and did not do a DNS-SRV lookup for the domain.

Dropping the port number saw all those delicious SRV records being queried.

Something to keep in mind if you use S-CSCF pooling with a Kamailio based I-CSCF, if you want to use SRV records for load balancing / traffic sharing, don’t include the port, and if instead you want it to go to the specified host found by an A-record, include the port.

SMS with Alphanumeric Source

Sending SMS with an alphanumeric String as the Source

If you’ve ever received an SMS from your operator, and the sender was the Operator name for example, you may be left wondering how it’s done.

In IMS you’d think this could be quite simple – You’d set the From header to be the name rather than the MSISDN, but for most SMSoIP deployments, the From header is ignored and instead the c header inside the SMS body is used.

So how do we get it to show text?

Well the TP-Originating address has the “Type of Number” (ToN) field which is typically set to International/National, but value 5 allows for the Digits to instead be alphanumeric characters.

GSM 7 bit encoding on the text in the TP-Originating Address digits and presto, you can send SMS to subscribers where the message shows as From an alphanumeric source.

On Android SMSs received from alphanumeric sources cannot be responded to (“no more “DO NOT REPLY TO THIS MESSAGE” at the end of each text), but on iOS devices you can respond, but if I send an SMS from “Nick” the reply from the subscriber using the iPhone will be sent to MSISDN 6425 (Nick on the telephone keypad).

FreeSWITCH – Incompatible Destination

A recent little issue I ran into the other day, that I figured may be of use to someone in the future.

When making a call to FreeSWITCH I would get an “INCOMPATIBLE DESTINATION” response to the SIP INVITE.

Here’s what I saw in the log:

FreeSWITCH showing an “INCOMPATIBLE DESTINATION” error
2022-02-19 13:04:04.027963 99.47% [DEBUG] switch_core_media.c:5650 Audio Codec Compare [GSM:3:8000:20:13200:1]/[opus:116:48000:20:0:1]
2022-02-19 13:04:04.027963 99.47% [DEBUG] switch_core_media.c:5650 Audio Codec Compare [GSM:3:8000:20:13200:1]/[G722:9:8000:20:64000:1]
2022-02-19 13:04:04.027963 99.47% [DEBUG] switch_core_media.c:5650 Audio Codec Compare [GSM:3:8000:20:13200:1]/[PCMU:0:8000:20:64000:1]
2022-02-19 13:04:04.027963 99.47% [DEBUG] switch_core_media.c:5650 Audio Codec Compare [GSM:3:8000:20:13200:1]/[PCMA:8:8000:20:64000:1]
2022-02-19 13:04:04.027963 99.47% [DEBUG] switch_core_media.c:5944 No 2833 in SDP. Liberal DTMF mode adding 101 as telephone-event.
2022-02-19 13:04:04.027963 99.47% [DEBUG] switch_core_media.c:5973 sofia/internal/[email protected]:5060 Set 2833 dtmf send payload to 101 recv payload to 101
2022-02-19 13:04:04.027963 99.47% [NOTICE] switch_channel.c:3993 Hangup sofia/internal/[email protected]:5060 [CS_EXECUTE] [INCOMPATIBLE_DESTINATION]

The hint to the cause of the error is above it – Codec comparison. If we look at the Audio Codec Compare lines, we can see the GSM codec we are trying to use, does not match the codecs configured in FreeSWITCH, hence getting the INCOMPATIBLE_DESTINATION error – None of the codecs offered match the codecs supported in FreeSWITCH.

So where do we go to fix this?

Well the SIP profile itself defines the codecs that are supported on this SIP profile,

FreeSWITCH SIP Profile (Sofia) codec settings

If you’re using a mostly default config, you’ll see this is set to a global variable, called $${global_codec_prefs}, so let’s take a look at vars.xml where this is defined:

FreeSWITCH default codec selection global variable

And there’s our problem, we need to add the GSM codec into that list to allow the calls,

So we change it to add the codecs we want to support, and reload the changes,

The Codec preferences I need for this IMS Application Server

Now when we want to make a call, success!

Successful call
IMS DNS Failing

Kamailio, IMS & DNS Headches

I’m sure I’ve ranted about the importance of DNS in IMS networks in the past on here already.

Recently I was rebuilding a P-CSCF and kept getting an error saying that the DNS was failing to resolve:

 4(5993) CRITICAL: <core> [core/dns_cache.c:3136]: dns_srv_sip_resolve(): unknown proto 0
 4(5993) ERROR: tm [ut.h:284]: uri2dst2(): failed to resolve "ims.mnc001.mcc001.3gppnetwork.org" :bug - critical error (-13)
 4(5993) ERROR: tm [t_fwd.c:1759]: t_forward_nonack(): failure to add branches
 4(5993) ERROR: sl [sl_funcs.c:414]: sl_reply_error(): stateless error reply used: Unresolvable destination (478/SL)

This was a rebuild, another P-CSCF was running fine and handling traffic with the same DNS server set.

I checked the netplan config and confirmed the DNS server was set correctly.

If I did an nslookup on the address that was failing to resolve – pointing it at the correct DNS server, the A & SRV records came back OK, and everything was fine.

Stranger still, after clearing the DNS Cache, and running a packet capture, I couldn’t see any DNS queries at all….

The problem? Kamailio uses resolv.conf by default on Ubuntu Server, and that was pointing to localhost.

After updating resolv.conf to point to the DNS server handling the IMS domains, I was good to go again.

A super valuable resource for all things DNS & Kamailio is this doc.

FreeSWITCH, Kamailio & IMS Extensions

Recently I’ve been doing some work with FreeSWITCH as an IMS Conference Factory, I’ve written a bit about it before in this post on using FreeSWITCH with the AMR codec.

Pretty early on in my testing I faced a problem with subsequent in-dialog responses, like re-INVITEs used for holding the calls.

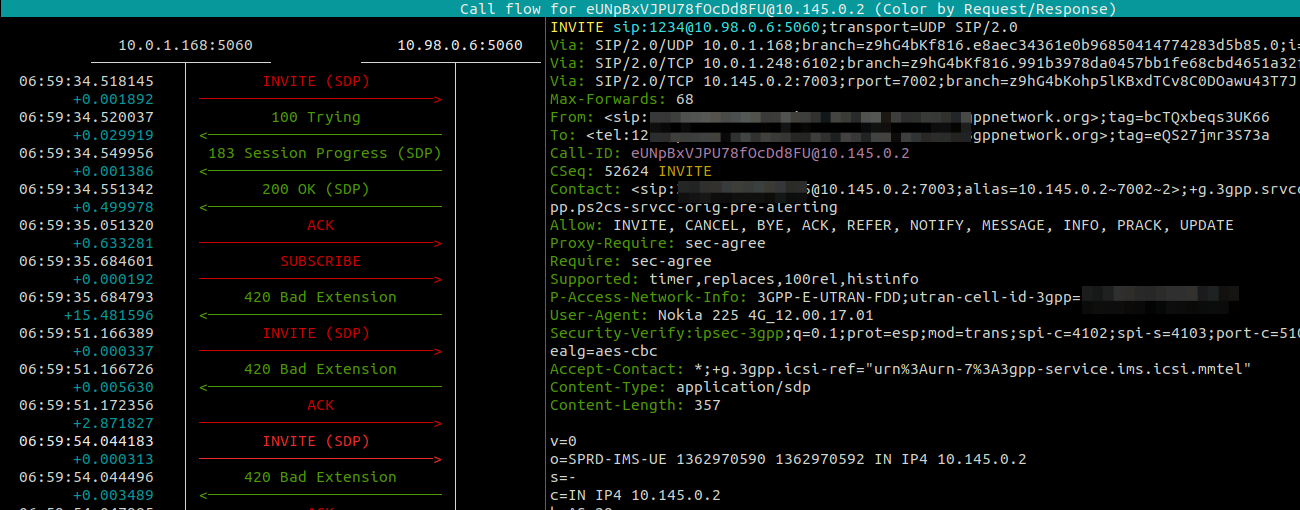
Every subsequent message, was getting a “420 Bad Extension” response from FreeSWITCH.

So what didn’t it like and why was FreeSWITCH generating 420 Bad Extension Responses to these subsequent messages?

Well, the “Extensions” FreeSWITCH is referring to are not extensions in the Telephony sense – as in related to the Dialplan, like an Extension Number to identify a user, but rather the Extensions (as in expansions) to the SIP Protocol introduced for IMS.

The re-INVITE contains a Require header with sec-agree which is a SIP Extension introduced for IMS, which FreeSWITCH does not have support for, and the re-INVITE says is required to support the call (Not true in this case).

Using a Kamailio based S-CSCF means it is easy to strip these Headers before forwarding the requests onto the Application Server, which is what I’ve done, and bingo, no more errors!

CGrates in Baby Steps – Part 1

So you have a VoIP service and you want to rate the calls to charge your customers?

You’re running a mobile network and you need to meter data used by subscribers?

Need to do least-cost routing?

You want to offer prepaid mobile services?

Want to integrate with Asterisk, Kamailio, FreeSWITCH, Radius, Diameter, Packet Core, IMS, you name it!

Well friends, step right up, because today, we’re talking CGrates!

So before we get started, this isn’t going to be a 5 minute tutorial, I’ve a feeling this may end up a big multipart series like some of the others I’ve done.
There is a learning curve here, and we’ll climb it together – but it is a climb.

Installation

Let’s start with a Debian based OS, installation is a doddle:

sudo wget -O - https://apt.cgrates.org/apt.cgrates.org.gpg.key | sudo apt-key add -
echo "deb http://apt.cgrates.org/debian/ nightly main" | sudo tee /etc/apt/sources.list.d/cgrates.list
sudo apt-get update
sudo apt-get install cgrates -y
apt-get install mysql-server redis-server git -y

We’re going to use Redis for the DataDB and MariaDB as the StorDB (More on these concepts later), you should know that other backend options are available, but for keeping things simple we’ll just use these two.

Next we’ll get the database and config setup,

cd /usr/share/cgrates/storage/mysql/
./setup_cgr_db.sh root CGRateS.org localhost
cgr-migrator -exec=*set_versions -stordb_passwd=CGRateS.org

Lastly we’ll clone the config files from the GitHub repo:

https://github.com/nickvsnetworking/CGrates_Tutorial

Rating Concepts

So let’s talk rating.

In its simplest form, rating is taking a service being provided and calculating the cost for it.

The start of this series will focus on voice calls (With SMS, MMS, Data to come), where the calling party (The person making the call) pays, so let’s imagine calling a Mobile number (Starting with 614) costs $0.22 per minute.

To perform rating we need to determine the Destination, the Rate to be applied, and the time to charge for.

For our example earlier, a call to a mobile (Any number starting with 614) should be charged at $0.22 per minute. So a 1 minute call will cost $0.22 and a 2 minute long call will cost $0.44, and so on.

We’ll also charge calls to fixed numbers (Prefix 612, 613, 617 and 617) at a flat $0.20 regardless of how long the call goes for.

So let’s start putting this whole thing together.

Introduction to RALs

RALs is the component in CGrates that takes care of Rating and Accounting Logic, and in this post, we’ll be looking at Rating.

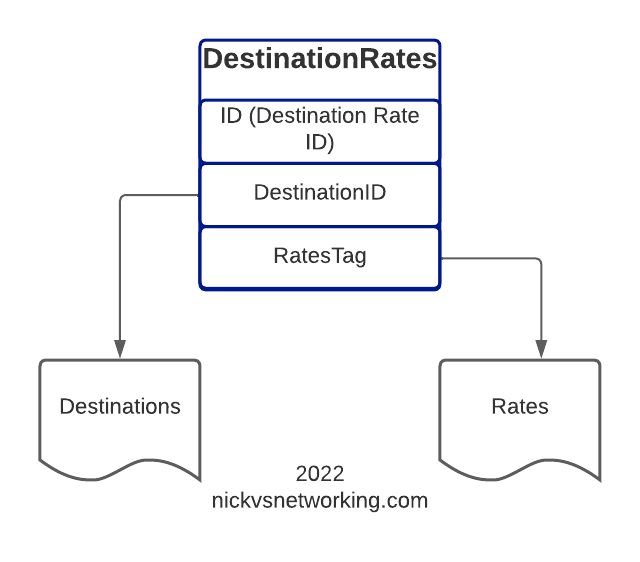
The rates have hierarchical structure, which we’ll go into throughout this post. I took my notepad doodle of how everything fits together and digitized it below:

Destinations

Destinations are fairly simple, we’ll set them up in our Destinations.csv file, and it will look something like this:

#Id,Prefix
DST_AUS_Mobile,614
DST_AUS_Fixed,612
DST_AUS_Fixed,613
DST_AUS_Fixed,617
DST_AUS_Fixed,618
DST_AUS_Toll_Free,611300
DST_AUS_Toll_Free,611800

Each entry has an ID (referred to higher up as the Destination ID), and a prefix.

Also notice that some Prefixes share an ID, for example 612, 613, 617 & 618 are under the Destination ID named “DST_AUS_Fixed”, so a call to any of those prefixes would match DST_AUS_Fixed.

Rates

Rates define the price we charge for a service and are defined by our Rates.csv file.

#Id,ConnectFee,Rate,RateUnit,RateIncrement,GroupIntervalStart
RT_22c_PM,0,22,60s,60s,0s
RT_20c_Untimed,20,0,60s,60s,0s
RT_25c_Flat,25,0,60s,60s,0s

Let’s look at the fields we have:

  • ID (Rate ID)
  • ConnectFee – This is the amount charged when the call is answered / connected
  • The Rate is how much we will charge, it’s loosely cents, but could be any currency. By default CGrates looks down to 4 decimal places.
  • RateUnit is how often this rate is applied in seconds
  • RateIncriment is how often this is evaluated in seconds
  • GroupIntervalStart – Activates an event when triggered

So let’s look at how this could be done, and the gotchas that exist.

So let’s look at some different use cases and how we’d handle them.

Per Minute Billing

This would charge a rate per minute, at the start of the call, the first 60 seconds will cost the caller $0.25.

At the 61 second mark, they will be charged another $0.25.

60 seconds after that they will be charged another $0.25 and so on.

#Id,ConnectFee,Rate,RateUnit,RateIncrement,GroupIntervalStart
RT_25c_PM_PerMinute_Billing,0,25,60s,60s,0s

This is nice and clean, a 1 second call costs $0.25, a 60 second call costs $0.25, and a 61 second call costs $0.50, and so on.

This is the standard billing mechanism for residential services, but it does not pro-rata the call – For example a 1 second call is the same cost as a 59 second call ($0.25), and only if you tick over to 61 seconds does it get charged again (Total of $0.50).

Per Second Billing

If you’re doing a high volume of calls, paying for a 3 second long call where someone’s voicemail answers the call and was hung up, may seem a bit steep to pay the same for that as you would pay for 59 seconds of talk time.

Instead Per Second Billing is more common for high volume customers or carrier-interconnects.

This means the rate still be set at $0.25 per minute, but calculated per second.

So the cost of 60 seconds of call is $0.25, but the cost of 30 second call (half a minute) should cost half of that, so a 30 second call would cost $0.125.

#Id,ConnectFee,Rate,RateUnit,RateIncrement,GroupIntervalStart
RT_25c_PM_PerSecond_Billing,0,25,60s,1s,0s

How often we asses the charging is defined by the RateIncrement parameter in the Rate Table.

We could achieve the same outcome another way, by setting the RateIncriment to 1 second, and the dividing the rate per minute by 60, we would get the same outcome, but would be more messy and harder to maintain, but you could think of this as $0.25 per minute, or $0.004166667 per second ($0.25/60 seconds).

Flat Rate Billing

Another option that’s commonly used is to charge a flat rate for the call, so when the call is answered, you’re charged that rate, regardless of the length of the call.

Regardless if the call is for 1 second or 10 hours, the charge is the same.

#Id,ConnectFee,Rate,RateUnit,RateIncrement,GroupIntervalStart
RT_25c_Flat,25,0,60s,60s,0s

For this we just set the ConnectFee, leaving the Rate at 0, so the cost will be applied on connection, with no costs applied per time period.

This means a 1 second call will cost $0.25, while a 3600 second call will still cost $0.25.

We charge a connect fee, but no rate.

Linking Destinations to the Rates to Charge

Now we’ve defined our Destinations and our Rates, we can link the two, defining what Destinations get charged what Rates.

This is defined in DestinationRates.csv

#Id,DestinationId,RatesTag,RoundingMethod,RoundingDecimals,MaxCost,MaxCostStrategy
DR_AUS_Mobile,DST_AUS_Mobile,RT_22c_PM,*up,4,0.12,*disconnect
DR_AUS_Fixed,DST_AUS_Fixed,RT_20c_Untimed,*up,4,0.12,*disconnect
DR_AUS_Toll_Free,DST_AUS_Toll_Free,RT_25c_Flat,*up,4,0.12,*disconnect

Let’s look at the Fields,

  • ID (Destination Rate ID)
  • DestinationID – Refers to the DestinationID defined in the Destinations.csv file
  • RatesTag – Referes to the Rate ID we defined in Rates.csv
  • RoundingMethod – Defines if we round up or down
  • RoundingDecimals – Defines how many decimal places to consider before rounding
  • MaxCost – The maximum cost this can go up to
  • MaxCostStrategy – What to do if the Maximum Cost is reached – Either make the rest of the call Free or Disconnect the call

So for each entry we’ll define an ID, reference the Destination and the Rate to be applied, the other parts we’ll leave as boilerplate for now, and presto. We have linked our Destinations to Rates.

Rating Plans

We may want to offer different plans for different customers, with different rates.

That’s what we define in our Rating Plans.

#Id,DestinationRatesId,TimingTag,Weight
RP_AUS,DR_AUS_Mobile,*any,10
RP_AUS,DR_AUS_Fixed,*any,10
RP_AUS,DR_AUS_Toll_Free,*any,10
  • ID (RatingPlanID)
  • DestinationRatesId (As defined in DestinationRates.csv)
  • TimingTag – References a time profile if used
  • Weight – Used to determine what precedence to use if multiple matches

So as you may imagine we need to link the DestinationRateIDs we just defined together into a Rating Plan, so that’s what I’ve done in the example above.

Rating Profiles

The last step in our chain is to link Customers / Subscribers to the profiles we’ve just defined.

How you allocate a customer to a particular Rating Plan is up to you, there’s numerous ways to approach it, but for this example we’re going to use one Rating Profile for all callers coming from the “cgrates.org” tenant:

#Tenant,Category,Subject,ActivationTime,RatingPlanId,RatesFallbackSubject
cgrates.org,call,*any,2014-01-14T00:00:00Z,RP_AUS,

Let’s go through the fields here,

  • Tenant is a grouping of Customers
  • Category is used to define the type of service we’re charging for, in this case it’s a call, but could also be an SMS, Data usage, or a custom definition.
  • Subject is typically the calling party, we could set this to be the Caller ID, but in this case I’ve used a wildcard “*any”
  • ActivationTime allows us to define a start time for the Rating Profile, for example if all our rates go up on the 1st of each month, we can update the Plans and add a new entry in the Rating Profile with the new Plans with the start time set
  • RatingPlanID sets the Rating Plan that is used as we defined in RatingPlans.csv

Loading the Rates into CGrates

At the start we’ll be dealing with CGrates through CSV files we import, this is just one way to interface with CGrates, there’s others we’ll cover in due time.

CGRates has a clever realtime architecture that we won’t go into in any great depth, but in order to load data in from a CSV file there’s a simple handy tool to run the process,

root@cgrateswitch:/home/nick# cgr-loader -verbose -path=/home/nick/tutorial/ -flush_stordb

Obviously you’ll need to replace with the folder you cloned from GitHub.

Trying it Out

In order for CGrates to work with Kamailio, FreeSWITCH, Asterisk, Diameter, Radius, and a stack of custom options, for rating calls, it has to have common mechanisms for retrieving this data.

CGrates provides an API for rating calls, that’s used by these platforms, and there’s a tool we can use to emulate the signaling for call being charged, without needing to pickup the phone or integrate a platform into it.

root@cgrateswitch:/home/nick# cgr-console 'cost Category="call" Tenant="cgrates.org" Subject="3005" Destination="614" AnswerTime="2014-08-04T13:00:00Z" Usage="60s"'

The tenant will need to match those defined in the RatingProfiles.csv, the Subject is the Calling Party identity, in our case we’re using a wildcard match so it doesn’t matter really what it’s set to, the Destination is the destination of the call, AnswerTime is time of the call being answered (pretty self explanatory) and the usage defines how many seconds the call has progressed for.

The output is a JSON string, containing a stack of useful information for us, including the Cost of the call, but also the rates that go into the decision making process so we can see the logic that went into the price.

{
 "AccountSummary": null,
 "Accounting": {},
 "CGRID": "",
 "Charges": [
  {
   "CompressFactor": 1,
   "Increments": [
    {
     "AccountingID": "",
     "CompressFactor": 1,
     "Cost": 0,
     "Usage": "0s"
    },
    {
     "AccountingID": "",
     "CompressFactor": 1,
     "Cost": 25,
     "Usage": "1m0s"
    }
   ],
   "RatingID": "febb614"
  }
 ],
 "Cost": 25,
 "Rates": {
  "7d4a755": [
   {
    "GroupIntervalStart": "0s",
    "RateIncrement": "1m0s",
    "RateUnit": "1m0s",
    "Value": 25
   }
  ]
 },
 "Rating": {
  "febb614": {
   "ConnectFee": 0,
   "MaxCost": 0.12,
   "MaxCostStrategy": "*disconnect",
   "RatesID": "7d4a755",
   "RatingFiltersID": "7e42edc",
   "RoundingDecimals": 4,
   "RoundingMethod": "*up",
   "TimingID": "c15a254"
  }
 },
 "RatingFilters": {
  "7e42edc": {
   "DestinationID": "DST_AUS_Mobile",
   "DestinationPrefix": "614",
   "RatingPlanID": "RP_AUS",
   "Subject": "*out:cgrates.org:call:3005"
  }
 },
 "RunID": "",
 "StartTime": "2014-08-04T13:00:00Z",
 "Timings": {
  "c15a254": {
   "MonthDays": [],
   "Months": [],
   "StartTime": "00:00:00",
   "WeekDays": [],
   "Years": []
  }
 },
 "Usage": "1m0s"
}

So have a play with setting up more Destinations, Rates, DestinationRates and RatingPlans, in these CSV files, and in our next post we’ll dig a little deeper… And throw away the CSVs all together!

MMS Deep Dive – MM1 – Mobile Originated MMS

So you want to send a Multimedia Message (Aka MMS or MM)?

Let’s do it – We’ll use the MM1 interface from the UE towards the MMSc (MMS Service Center) to send our Mobile Originated MMS.

Transport & Creation

Out of the box, our UE doesn’t get told by the network anything about where to send MMS messages (Unless set via something like Android’s Carrier Settings).
Instead, this is typically configured by the user in the APN settings, by setting the MMSc address (Typically an FQDN), port (Typically 80) and often a Proxy (Which will actually handle the traffic).
Lastly under the bearer type, if we’re sending the MMS on the default bearer (the one used for general Internet) then the bearer type will need to change from “default” to “default,mms”. Alternately, if you’re using a dedicated APN for MMS, you’ll need to set the bearer type to “mms”.

With the connectivity side setup, we’ll need to actually generate an MMS to send, something that is encapsulated in an MMS – so a picture is a good start.

We compose a message with this photo, put an address in the message and hit send on the UE.

The UE encapsulates the photo and metadata, such as the To address, into an HTTP POST is sent to the IP & Port of your MMSc (Or proxy if you have that set). The body of this HTTP POST contains the MMS Message Body (In this case our picture).

Our MMSc receives this POST, extracts the headers of interest, and the multimedia message body itself (in our case the photo) ready to be forwarded onto their destination.

PCAP Extract showing MMS m-send-req from UE

Header Enrichment / Charging / Authentication

One thing to note is that the From header is empty.

Often times a UE doesn’t know it’s own MSISDN. While there is an MSISDN EF on the SIM file system, often this is not updated with the correct MSISDN, as a customer may have ported over their number from a different carrier, or had a replacement SIM reissued. There’s also some problems in just trusting the From address set by a UE, without verifying it as anyone could change this.

The MMS standards evolved in parallel to the 3GPP specifications, but were historically specified by the Open Mobile Alliance. Because it is at arms length with 3GPP, SIM based authentication was not used on the MM1 interface from a UE to the MMSc.

In fact, there is no authentication on an MMS specified in the standard, meaning in theory, anyone could send one. To counter this, the P-GW or GGSN handling the subscriber traffic often enables “Header Enrichment” which when it detects traffic on the MMS APN, will add a Header to the Mobile Originated request with the IMSI or MSISDN of the subscriber sending it, which the MMSc can use to bill the customer.

m-send-req Request

Let’s take a closer look into the HTTP POST sent by the UE containing the message.

Firstly we have what looks like a pretty bulk-standard HTTP POST header, albeit with some custom headers prefixed with “X-” and the Content-Type is application/vnd.wap.mms-message.

But immediately after the HTTP header in the HTTP message body, we have the “MMS Message Encapsulation” header:

MMS Message Encapsulation Header from MO MMS

This header contains the Destination we set in the MMS when sending it, the request type (m-send-req) as well as the actual content itself (inside the Data section).

So why the double header? Why not just encapsulate the whole thing in the HTTP Post? When MMS was introduced, most phones didn’t have a HTTP stack baked into them like everything does now. Instead traffic would be going through a WAP Gateway.

When usage of WAP fell away, the standard moved to transport the same payload that was transfered over WAP, to instead be transferred over HTTP.

Inside the Data section we can see the MIME Type of the attachments themselves, in this case, it’s a photo of my desk:

With all this information, the MMSc analyses the headers and stores the message body ready for forwarding onto the recipient(/s).

m-send-conf Response

To confirm successful receipt, the MMSc sends back a 200 OK with a matching Transaction ID, so the UE knows the message was accepted.

I’ve attached the PCAP here to view / analyse.

USSD Gateway with Osmocom

Unstructured Supplementary Service Data or “USSD” is the stack used in Cellular Networks to offer interactive text based menus and systems to Subscribers.

If you remember topping up your mobile phone credit via a text menu on your flip phone, there’s a good chance that was USSD*.

For a period, USSD Services provided Sporting Scores, Stock Prices and horoscopes on phones and networks that were not enabled for packet data.

Unlike plain SMS-PP, USSD services are transaction stateful, which means that there is a session / dialog between the subscriber and the USSD gateway that keeps track of the session and what has happened in the session thus far.

T-Mobile website from 2003 covering the features of their USSD based product at the time

Today USSD is primarily used in the network at times when a subscriber may not have balance to access packet data (Internet) services, so primarily is used for recharging with vouchers.

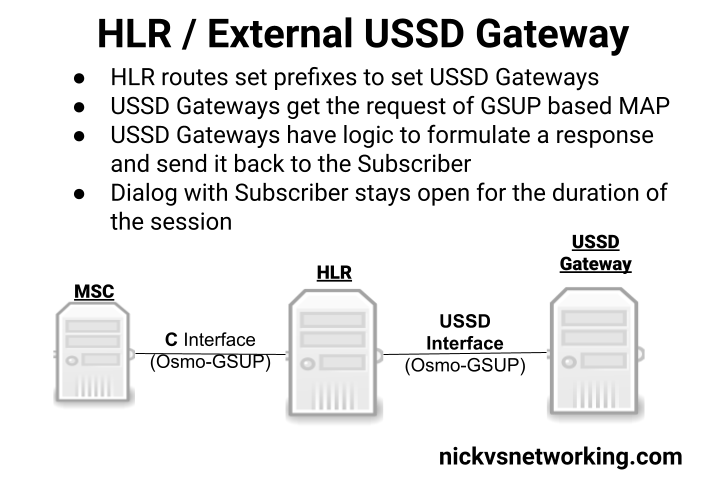
Osmocom’s HLR (osmo-hlr) has an External USSD interface to allow you to define the USSD logic in another entity, for example you could interface the USSD service with a chat bot, or interface with a billing system to manage credit.

Osmocom Osmo-HLR with External USSD Gateway interfaces and MSC Interface

Using the example code provided I made a little demo of how the service could be used:

Communication between the USSD Gateway and the HLR is MAP but carried GSUP (Rather than the full MTP3/SCCP/TCAP layers that traditionally MAP stits on top of), and inside the HLR you define the prefixes and which USSD Gateway to route them to (This would allow you to have multiple USSD gateways and route the requests to them based on the code the subscriber sends).

Here’s my Osmo-HLR config:

ctrl
 bind 127.0.0.1
hlr
 database /var/lib/osmocom/hlr.db
 subscriber-create-on-demand 15 cs+ps
 gsup
  bind ip 10.0.1.201
  ipa-name unnamed-HLR
 euse nicktest-00-00-00-00-00-00
 ussd route prefix *#100# internal own-msisdn
 ussd route prefix *#101# internal own-imsi
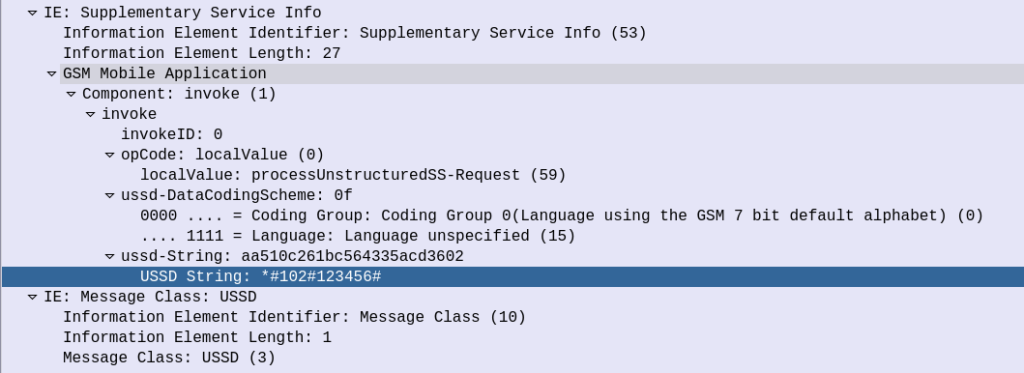
 ussd route prefix *#102# external nicktest-00-00-00-00-00-00
 ussd default-route external nicktest-00-00-00-00-00-00

Then I’m just running a slightly modified version of the example code that ships with Osmo-HLR.

(I had hoped to make a Python example and actually interface it with some external systems, but another day!)

The signaling is fairly straight forward, when the subscriber kicks off the USSD request, the HLR calls a MAP Invoke operation for “processUnstructuredSS-Request”

Unfortunately is seems the stock Android does not support interactive USSD.
This is exposed in the Android SDK so applications can access USSD interfaces (including interactive USSD) but the stock dialer on the few phones I played with did not, which threw a bit of a spanner in the works. There are a few apps that can help with this however I didn’t go into any of them.

(or maybe they used SIM Toolkit which had a similar interface)

Demystifying SS7 & Sigtran – Part 5 – What layer to Split

This is part of a series of posts looking into SS7 and Sigtran networks. We cover some basic theory and then get into the weeds with GNS3 based labs where we will build real SS7/Sigtran based networks and use them to carry traffic.

So, all going well at this point in the tutorial you’ve got your lab setup with SS7 links between our simulated countries, but we haven’t dug too deep into what’s going on.

Most of the juicy stuff happens in the higher layers, but in this post we’ll look at the Data-Link layer for SS7.

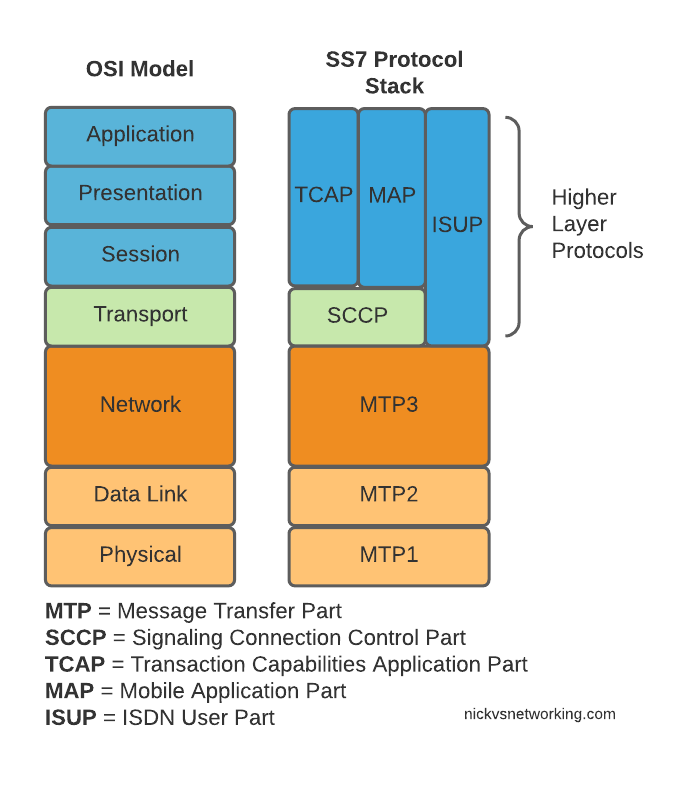
In TDM based SS7 networks, Data Link layer is handled by a layer called “MTP2” – Message Transfer Part 2, which is responsible for flow control and ensuring guaranteed delivery between two points on the network.

MTP2 provides the services you’d typically expect at the Data Link Layer; link alignment, CRC generation/verification, end to end transmission between two points, flow control and sequence verification, etc.

MTP2 is responsible for making the connection between two points capable of carrying those far more interesting upper layers, but it’s really important, particularly when we talk about SIGTRAN/SS7 over IP, to understand how this can be done, so you can understand how the networks fit together.

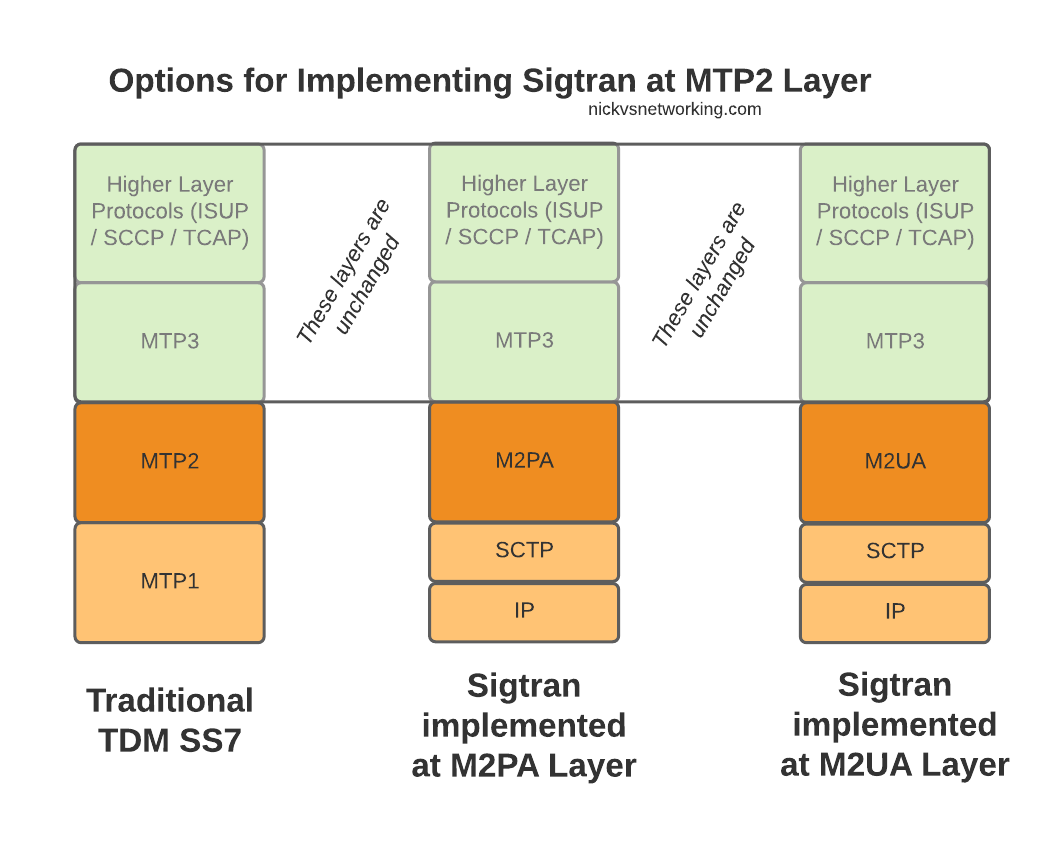
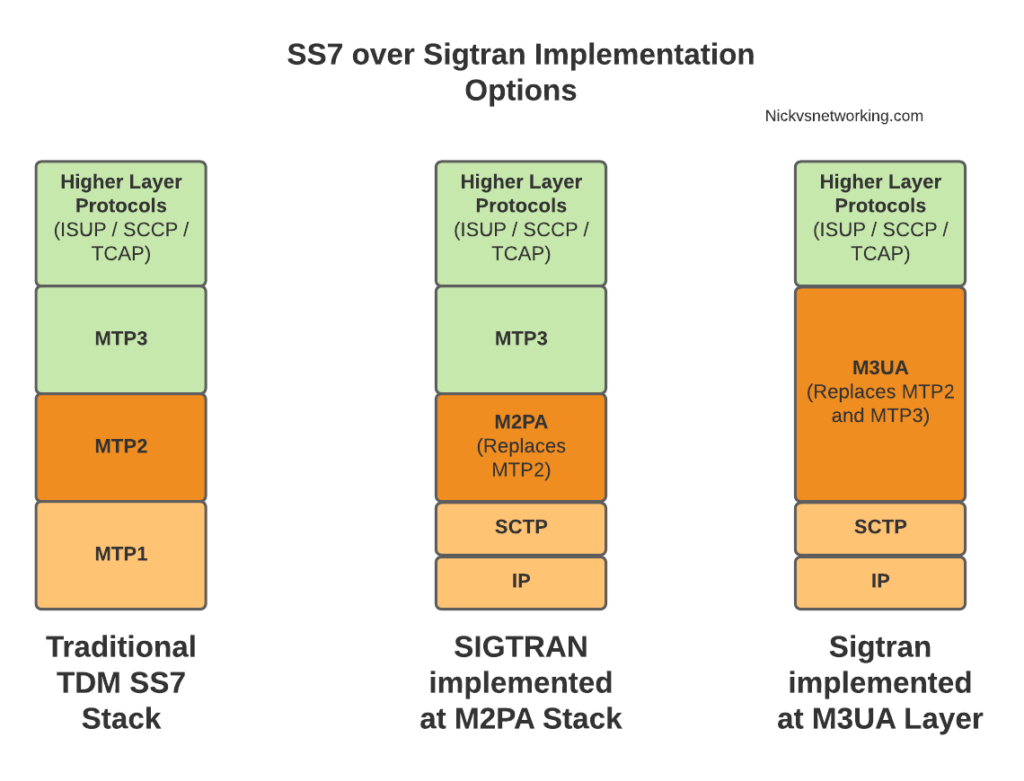
When we move from TDM based SS7 networks to IP based (Sigtran), MTP2 is removed, and can be replaced with one of two options for transporting Layer 2 messaging over IP, M2UA or M2PA.

All the layers above MTP2 on SS7 or M2UA/M2PA on Sigtran, are unchanged, and the upper layers have no visability that underneath, MTP2 has been replaced with M2UA or M2PA.

Taking MTP2 and putting it onto an IP based Layer 2 protocol is only one option for implementing Sigtran, there are others that we’ll look into as we go along, but with this variant the upper layers above Layer 2 (MTP3) remain changed.

Putting SS7 Data Link Layer (MTP2) onto IP

So the two options – M2UA and M2PA. Why do we have two options?

SS7 networks can be really complicated, and different operators may have different needs when converting these networks to IP.

To satisfy those requirements, there’s a bunch of different flavors of SS7 over IP (Sigtran) available to implement, so operators can select the one that meets their needs and use cases.

This means when we’re learning it, there’s a stack of different options to cover.

On the Layer 2 Level, let’s look at the two options we have in some more detail.

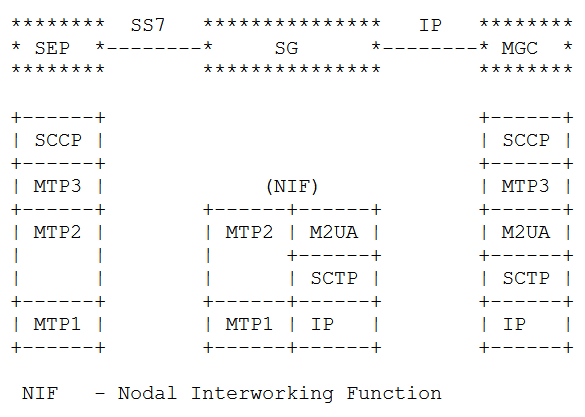
The M2UA Flavour

Image from RFC 4165 / 1.9. Differences Between M2PA and M2UA – Showing M2UA

With a “Nodal Interworking Function” using M2UA, the point codes between our two SS7 nodes remain unchanged.

The SS7 node on the left still talks MTP3 directly with the SS7 node on the right, and the NIF just transparently translates MTP2 into M2UA.

The best analogy I can come up with is that you can think of this as kind of like a Media Converter you’d use for converting between Cat5 to fibre – The devices at each end don’t know they’re not talking over a straight ethernet cable between them, but the media converter changes the transmission medium in between the two in a transparent manner.

M2UA acts in much the same way, except we’re transparently converting the layer 1 & layer 2 signaling, in a way that end devices in the network don’t need to be aware of.

The advantage of this option is that no config changes are needed, we’ve taken our Linksets that were running on TDM and converted them to IP so both ends of the linkset can be moved anywhere with IP connectivity, but transparently to the end devices.

For some carriers this is a real advantage – If you’ve got a dusty SSP running parts of your Customer Access Network, but the engineers who set it up retired long ago and you just want to drop those leased lines, M2UA could be a good option for you.

The disadvantage, as you might have guessed, is that we don’t get much value from just replacing the link from one point to another. It solves one problem, but doesn’t take that much of a step towards converging our network to run over IP.

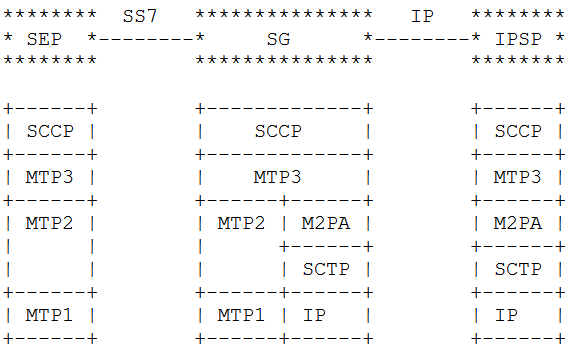
The M2PA Way

The M2PA way looks a bit different. You’ll notice we’ve got MTP3 on the Signaling Gateway we’re introducing into the network.

This means we need to add a point code between the SS7 node on the left and the SS7 node on the right, where there wasn’t one before, and we will need to update the routing tables on both to know to now route to each other via the point code of our Signaling Gateway rather than directly as the would have before we introduced the Signaling Gateway.

Image from RFC 4165 / 1.9. Differences Between M2PA and M2UA – Showing M2PA

We add another point code and an “active” SS7 device, but now we’ve got a lot more flexibility with what we can do, this no longer needs to be a point-to-point link, but with the introduction of the Signaling Gateway can be point-to-multipoint.

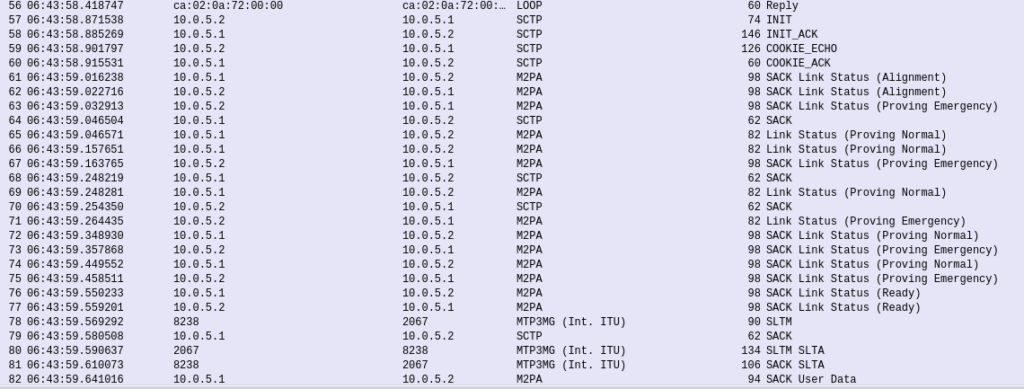
In our lab we setup in GNS3 a few lessons ago, if you take a look at the traffic flowing on these links, you’ll see that it is using M2PA, as we’ve got point codes in between.

Pros and Cons of M2PA and M2UA

So which to chose? Well the answer is (as always) it depends.

If you cannot change any config on the end device (as the person who understood how all this stuff works retired long ago), then M2UA is the answer.
M2UA is just an extension/branch of the MTP2 layer onto IP, it has no understanding / support for the higher-layers of SS7.
M2UA is simpler, it doesn’t require as much understanding, it’s a quick-and-easy “drop-in” replacement for back-hauling SS7 onto IP.
As it’s fairly dumb, M2UA can also allow us to split the load on a high traffic device across two or more SS7 nodes behind it, somewhat like a layer 2 load balancer, but this use case is pretty irrelevant these days.

M2PA on the other hand introduces a new Point Code (Operating on Layer 3 / MTP3) in between the two devices.
This means we introduce a new point code in the path, so have to reconfigure the end devices, but affords us access to a lot of newer features.
We can do all sorts of fancy things like routing of MTP3 messages, on the Signaling Gateway.
This allows us to structure our network in new ways, rather than just doing what we were doing before but over IP.

Summary

When it comes to taking SS7 traffic and putting it onto IP at the Layer 2 level, we looked at the two most common options – M2PA and M2UA, and the pros and cons of each.

In our next post we’ll look at doing away with MTP2 layer entirely when we look at M3UA…

Evolved Packet Core – Analysis Challenge

This post is one of a series of packet capture analysis challenges designed to test your ability to understand what is going on in a network from packet captures.
Download the Packet Capture and see how many of the questions you can answer from the attached packet capture.

The answers are at the bottom of this page, along with how we got to the answers.

This challenge focuses on the Evolved Packet Core, specifically the S1 and Diameter interfaces.

Why is the Subscriber failing to attach?

And what is the behavior we should be expecting to see?

What is the Cell ID of this eNodeB?

What is the Tracking Area?

That the subscriber is trying to attach in.

Does the device attaching to the network support VoLTE?

What type of IP is the subscriber requesting for this PDN session?

Is the device requesting an IPv4 address, IPv6 address or both?

What is the Diameter Application ID for S6a?

You should be able to ascertain this from information from the PCAP, without needing to refer to the standards.

What is the Crytpo RES returned by the HSS, and what is the RES returned by the SIM/UE?

Does this mean the subscriber was authenticated successfully?

Answers

Answer: Why is the Subscriber failing to attach?

The Diameter Update Location Request in frame 10 does not get answered by the HSS. After 5 seconds the MME gives up and rejects the connection.

Instead what should have happened is the HSS should have responded to the Update Location Request with an Update Location Answer, as we covered in the attach procedure.

Answer: What is the Cell ID of this eNodeB?

In Uplink messages from the eNodeB the EUTRAN-GCI field contains the Cell-ID of the eNodeB.

In this case the Cell-ID is 1.

Answer: What is the Tracking Area?

The tracking area is 123.

This information is available in the TAI field in the Uplink S1 messages.

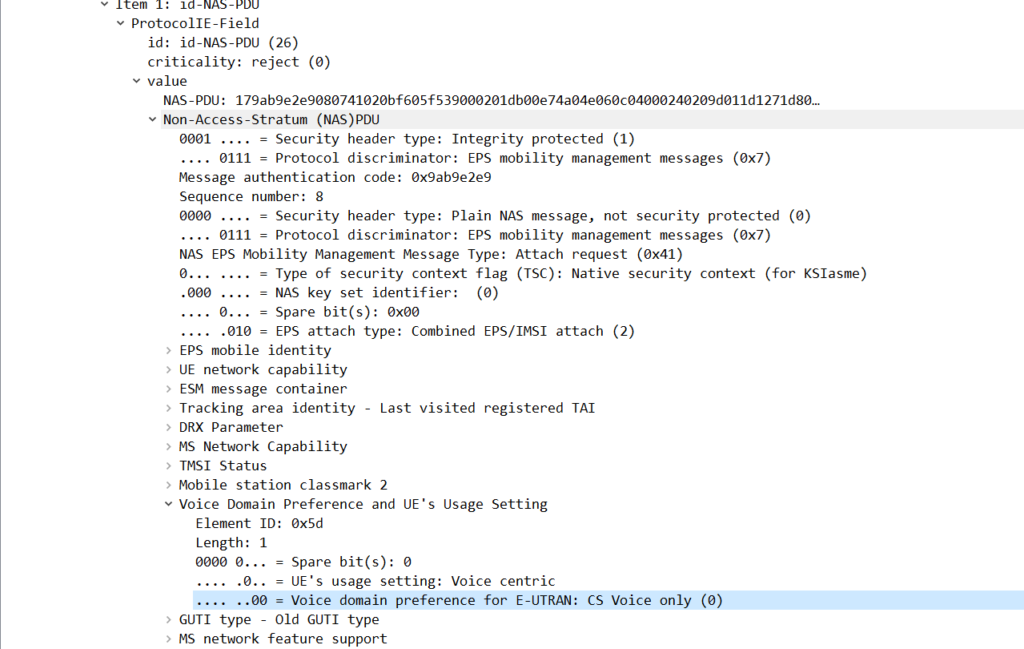
Answer: Does the device attaching to the network support VoLTE?

No, the device does not support VoLTE.

There are a few ways we can get to this answer, and VoLTE support in the phone does not mean VoLTE will be enabled, but we can see the Voice Domain preference is set to CS Voice Only, meaning GSM/UMTS for voice calling.

This is common on cheaper handsets that do not support VoLTE.

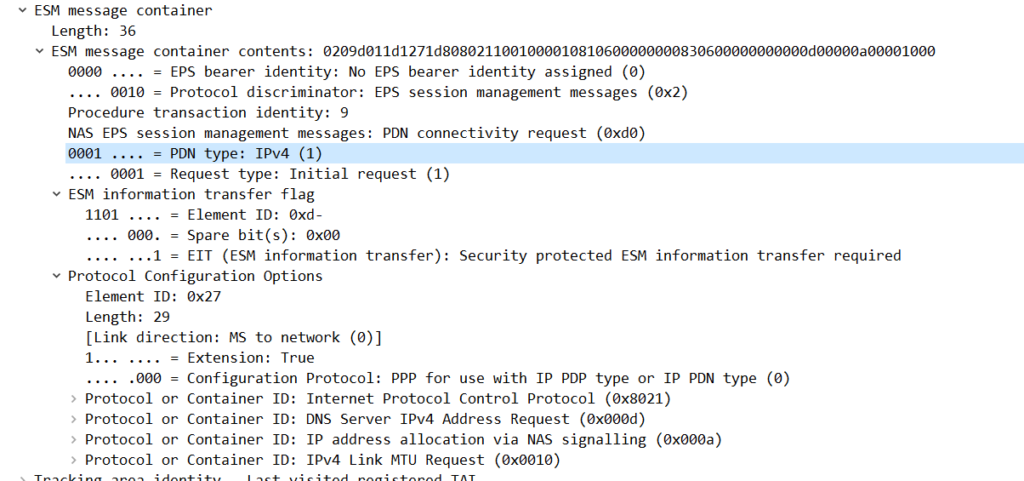
Answer: What type of IP is the subscriber requesting for this PDN session? (IPv4/IPv6/Both)?

The subscriber is requesting an IPv4 address only.

We can see this in the ESM Message Container for the PDN Connectivity Request, the PDN type is “IPv4”.

Answer: What is the Diameter Application ID for S6a?

Answer: 16777251

This is shown for the Vendor-Specific-Application-Id AVP on an S6a message.

Answer: What is the Crytpo RES returned by the HSS, and what is the RES returned by the SIM/UE?

The RES (Response) and X-RES (Expected Response) Both are “dba298fe58effb09“, they do match, which means this subscriber was authenticated successfully.

You can learn more about what these values do in this post.

The Surprisingly Complicated World of SMS: Apple iPhone MT SMS

In iOS 15, Apple added support for iPhones to support SMS over IMS networks – SMSoIP. Previously iPhone users have been relying on CSFB / SMSoNAS (Using the SGs interface) to send SMS on 4G networks.

Getting this working recently led me to some issues that took me longer than I’d like to admit to work out the root cause of…

I was finding that when sending a Mobile Termianted SMS to an iPhone as a SIP MESSAGE, the iPhone would send back the 200 OK to confirm delivery, but it never showed up on the screen to the user.

The GSM A-I/F headers in an SMS PDU are used primarily for indicating the sender of an SMS (Some carriers are configured to get this from the SIP From header, but the SMS PDU is most common).

The RP-Destination Address is used to indicate the destination for the SMS, and on all the models of handset I’ve been testing with, this is set to the MSISDN of the Subscriber.

But some devices are really finicky about it’s contents. Case in point, Apple iPhones.

If you send a Mobile Terminated SMS to an iPhone, like the one below, the iPhone will accept and send back a 200 OK to this request.

The problem is it will never be displayed to the user… The message is marked as delivered, the phone has accepted it it just hasn’t shown it…

SMS reports as delivered by the iPhone (200 OK back) but never gets displayed to the user of the phone as the RP-Destination Address header is populated

The fix is simple enough, if you set the RP-Destination Address header to 0, the message will be displayed to the user, but still took me a shamefully long time to work out the problem.

RP-Destination Address set to 0 sent to the iPhone, this time it’ll get displayed to the user.

FreeSWITCH as an IMS Application Server

After getting AMR support in FreeSWITCH I set about creating an IMS Application Server for VoLTE / IMS networks using FreeSWITCH.

So in IMS what is an Application Server? Well, the answer is almost anything that’s not a CSCF.

An Application Server could handle your Voicemail, recorded announcements, a Conference Factory, or help interconnect with other systems (without using a BGCF).

I’ll be using mine as a simple bridge between my SIP network and the IMS core I’ve got for VoLTE, with FreeSWITCH transcoding between AMR to PCMA.

Setting up FreeSWITCH

You’ll need to setup FreeSWITCH as per your needs, so that’s however you want to use it.

This post won’t cover setting up FreeSWITCH, there’s plenty of good resources out there for that.

The only difference is when you install FreeSWITCH, you will want to compile with AMR Support, so that you can interact with mobile phones using the AMR codec, which I’ve documented how to do here.

Setting up your IMS

In order to get calls from the IMS to the Application Server, we need a way of routing the calls to the Application Server.

There are two standards-compliant ways to achieve this,

The first is to use ENUM to route the calls you want to send to the Application Server, to the application server.

If you want to go down that path using Kamailio as your IMS I’ve got a post on that topic here.

But this is a blunt instrument, after all, it’ll only ever be used at the start of the call, what if we want to send it to an AS because a destination can’t be reached and we want to play back a recorded announcement?

Well that’s where iFCs come into the picture. Through the use of Initial Filter Criterias, we’re able to route different types of SIP traffic, requests and responses, based on our needs. Again we can do this in Kamailio, with a little help from an HSS like PyHSS.

ITU International Point Code Structure

I’ve recently been writing a lot about SS7 / Sigtran, and couldn’t fit this in anywhere, but figured it may be of use to someone…

In our 3-8-3 formated ITU International Point code, each of the parts have a unique meaning.

The 3 bits in the first section are called the Zone section. Being only 3 bits long it means we can only encode the numbers 0-7 on them, but ITU have broken the planet up into different “zones”, so the first part of our ITU International Point Code denotes which Zone the Point Code is in (as allocated by ITU).

The next 8 bits in the second section (Area section) are used to define the “Signaling Area Network Code” (SANC), which denotes which country a point code is located in. Values can range from 0-255 and many countries span multiple SANC zones, for example the USA has 58 SANC Zones.

Lastly we have the last 3 bits that make up the ID section, denoting a single unique point code, typically a carrier’s international gateway. It’s unique within a Zone & SANC, so combined with the Zone-SANC-ID makes it a unique address on the SS7 network. Being only 3 bits long means that we’ve only got 8 possible values, hence so many SANCs being used.

2Europe
3Greenland, North America, the Caribbean, and Mexico
4Middle East and Asia
5South Asia, Australia, and New Zealand
6Africa
7South America
ITU Point Code Zone World Map

Demystifying SS7 & Sigtran – Part 4 – Routing with Point Codes

This is part of a series of posts looking into SS7 and Sigtran networks. We cover some basic theory and then get into the weeds with GNS3 based labs where we will build real SS7/Sigtran based networks and use them to carry traffic.

Having a direct Linkset from every Point Code to every other Point Code in an SS7 network isn’t practical, we need to rely on routing, so in this post we’ll cover routing between Point Codes on our STPs.

Let’s start in the IP world, imagine a router with a routing table that looks something like this:

Simple IP Routing Table
192.168.0.0/24 out 192.168.0.1 (Directly Attached)
172.16.8.0/22 via 192.168.0.3 - Static Route - (Priority 100)
172.16.0.0/16 via 192.168.0.2 - Static Route - (Priority 50)
10.98.22.1/32 via 192.168.0.3 - Static Route - (Priority 50)

We have an implicit route for the network we’re directly attached to (192.168.0.0/24), and then a series of static routes we configure.
We’ve also got two routes to the 172.16.8.0/22 subnet, one is more specific with a higher priority (172.16.8.0/22 – Priority 100), while the other is less specific with a lower priority (172.16.0.0/16 – Priority 50). The higher priority route will take precedence.

This should look pretty familiar to you, but now we’re going to take a look at routing in SS7, and for that we’re going to be talking Variable Length Subnet Masking in detail you haven’t needed to think about since doing your CCNA years ago…

Why Masking is Important

A route to a single Point Code is called a “/14”, this is akin to a single IPv4 address being called a “/32”.

We could setup all our routing tables with static routes to each point code (/14), but with about 4,000 international point codes, this might be a challenge.

Instead, by using Masks, we can group together ranges of Point Codes and route those ranges through a particular STP.

This opens up the ability to achieve things like “Route all traffic to Point Codes to this Default Gateway STP”, or to say “Route all traffic to this region through this STP”.

Individually routing to a point code works well for small scale networking, but there’s power, flexibility and simplification that comes from grouping together ranges of point codes.

Information Overload about Point Codes

So far we’ve talked about point codes in the X.YYY.Z format, in our lab we setup point codes like 1.2.3.

This is not the only option however…

Variants of SS7 Point Codes

IPv4 addresses look the same regardless of where you are. From Algeria to Zimbabwe, IPv4 addresses look the same and route the same.

Standards
XKCD 927: Standards

In SS7 networks that’s not the case – There are a lot of variants that define how a point code is structured, how long it is, etc. Common variants are ANSI, ITU-T (International & National variants), ETSI, Japan NTT, TTC & China.

The SS7 variant used must match on both ends of a link; this means an SS7 node speaking ETSI flavoured Point Codes can’t exchange messages with an ANSI flavoured Point Code.

Well, you can kinda translate from one variant to another, but requires some rewriting not unlike how NAT does it.

ITU International Variant

For the start of this series, we’ll be working with the ITU International variant / flavour of Point Code.

ITU International point codes are 14 bits long, and format is described as 3-8-3.
The 3-8-3 form of Point code just means the 14 bit long point code is broken up into three sections, the first section is made up of the first 3 bits, the second section is made up of the next 8 bits then the remaining 3 bits in the last section, for a total of 14 bits.

So our 14 bit 3-8-3 Point Code looks like this in binary form:

000-00000000-000 (Binary) == 0-0-0 (Point Code)

So a point code of 1-2-3 would look like:

001-00000010-011 (Binary) == 1-2-3 (Point Code) [001 = 1, 00000010 = 2, 011 = 3]

This gives us the following maximum values for each part:

111-11111111-111 (Binary) == 7-255-7 (Point Code)

This is not the only way to represent point codes, if we were to take our binary string for 1-2-3 and remove the hyphens, we get 00100000010011. If you convert this binary string into an Integer/Decimal value, you’ll get 2067.

If you’re dealing with multiple vendors or products,you’ll see some SS7 Point Codes represented as decimal (2067), some showing as 1-2-3 codes and sometimes just raw binary.
Fun hey?

Handy point code formatting tool

Why we need to know about Binary and Point Codes

So why does the binary part matter? Well the answer is for masks.

To loop back to the start of this post, we talked about IP routing using a network address and netmask, to represent a range of IP addresses. We can do the same for SS7 Point Codes, but that requires a teeny bit of working out.

As an example let’s imagine we need to setup a route to all point codes from 3-4-0 through to 3-6-7, without specifying all the individual point codes between them.

Firstly let’s look at our start and end point codes in binary:

100-00000100-000 = 3-004-0 (Start Point Code)
100-00000110-111 = 3-006-7 (End Point Code)

Looking at the above example let’s look at how many bits are common between the two,

100-00000100-000 = 3-004-0 (Start Point Code)
100-00000110-111 = 3-006-7 (End Point Code)

The first 9 bits are common, it’s only the last 5 bits that change, so we can group all these together by saying we have a /9 mask.

When it comes time to add a route, we can add a route to 3-4-0/9 and that tells our STP to match everything from point code 3-4-0 through to point code 3-6-7.

The STP doing the routing it only needs to match on the first 9 bits in the point code, to match this route.

SS7 Routing Tables

Now we have covered Masking for roues, we can start putting some routes into our network.

In order to get a message from one point code to another point code, where there isn’t a direct linkset between the two, we need to rely on routing, which is performed by our STPs.

This is where all that point code mask stuff we just covered comes in.

Let’s look at a diagram below,

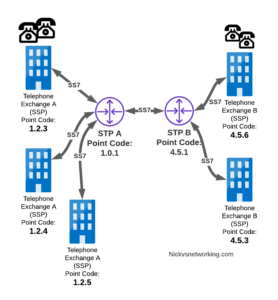
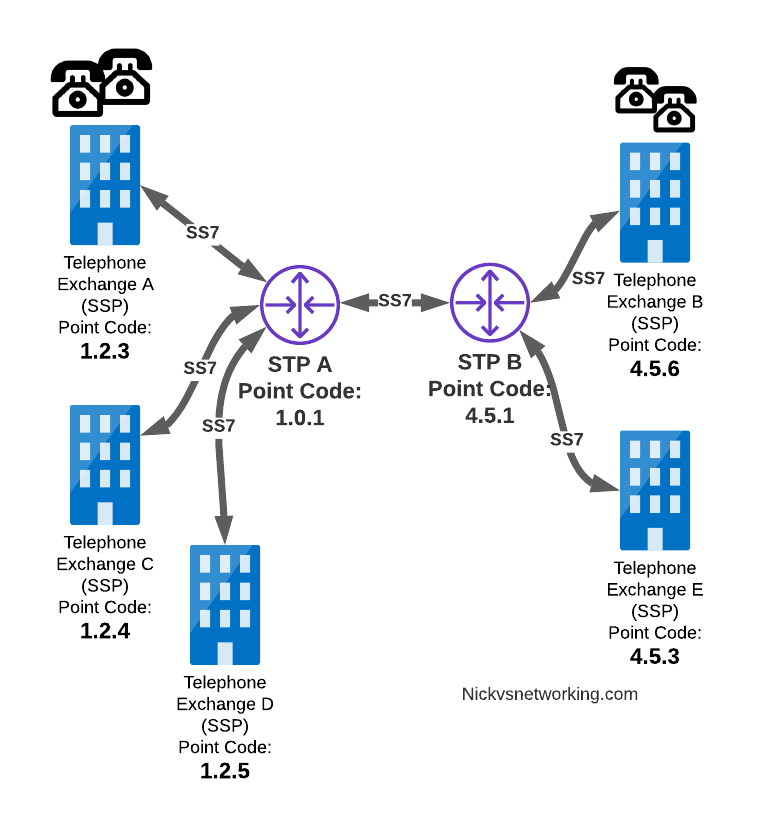
Let’s look at the routing to get a message from Exchange A (SSP) on the bottom left of the picture to Exchange E (SSP) with Point Code 4.5.3 in the bottom right of the picture.

Exchange A (SSP) on the bottom left of the picture has point code 1.2.3 assigned to it and a Linkset to STP-A.
It has the implicit route to STP-A as it’s got that linkset, but it’s also got a route configured on it to reach any other point code via the Linkset to STP-A via the 0.0.0/0 route which is the SS7 equivalent of a default route. This means any traffic to any point code will go to STP-A.

From STP-A we have a linkset to STP-B. In order to route to the point codes behind STP-B, STP-A has a route to match any Point Code starting with 4.5.X, which is 4.5.0/11.
This means that STP-A will route any Point Code between 4.5.1 and 4.5.7 down the Linkset to STP-B.

STP-B has got a direct connection to Exchange B and Exchange E, so has implicit routes to reach each of them.

So with that routing table, Exchange A should be able to route a message to Exchange E.

But…

Return Routing

Just like in IP routing, we need return routing. while Exchange A (SSP) at 1.2.3 has a route to everywhere in the network, the other parts of the network don’t have a route to get to it. This means a request from 1.2.3 can get anywhere in the network, but it can’t get a response back to 1.2.3.

So to get traffic back to Exchange A (SSP) at 1.2.3, our two Exchanges on the right (Exchange B & C with point codes 4.5.6 and 4.5.3) will need routes added to them. We’ll also need to add routes to STP-B, and once we’ve done that, we should be able to get from Exchange A to any point code in this network.

There is a route missing here, see if you can pick up what it is!

So we’ve added a default route via STP-B on Exchange B & Exchange E, and added a route on STP-B to send anything to 1.2.3/14 via STP-A, and with that we should be able to route from any exchange to any other exchange.

One last point on terminology – when we specify a route we don’t talk in terms of the next hop Point Code, but the Linkset to route it down. For example the default route on Exchange A is 0.0.0/0 via STP-A linkset (The linkset from Exchange A to STP-A), we don’t specify the point code of STP-A, but just the name of the Linkset between them.

Back into the Lab

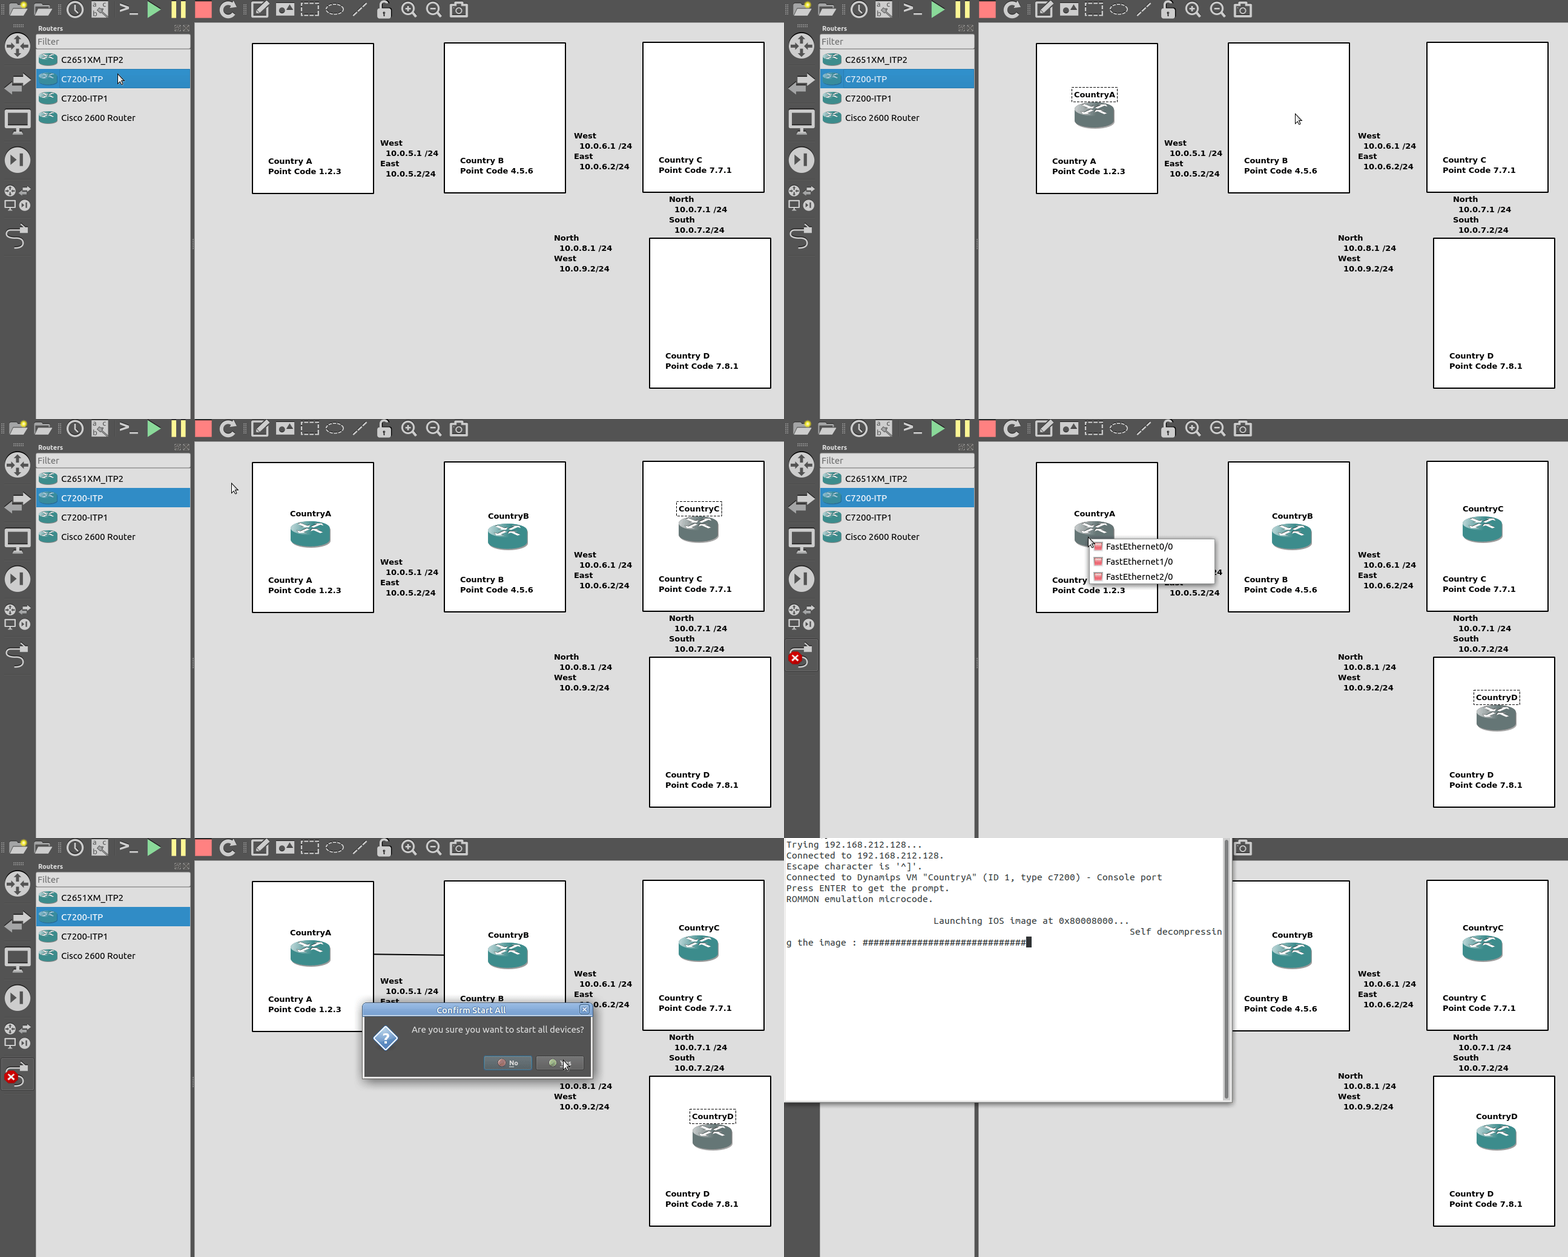
So back to the lab, where we left it was with linksets between each point code, so each Country could talk to it’s neighbor.

Let’s confirm this is the case before we go setting up routes, then together, we’ll get a route from Country A to Country C (and back).

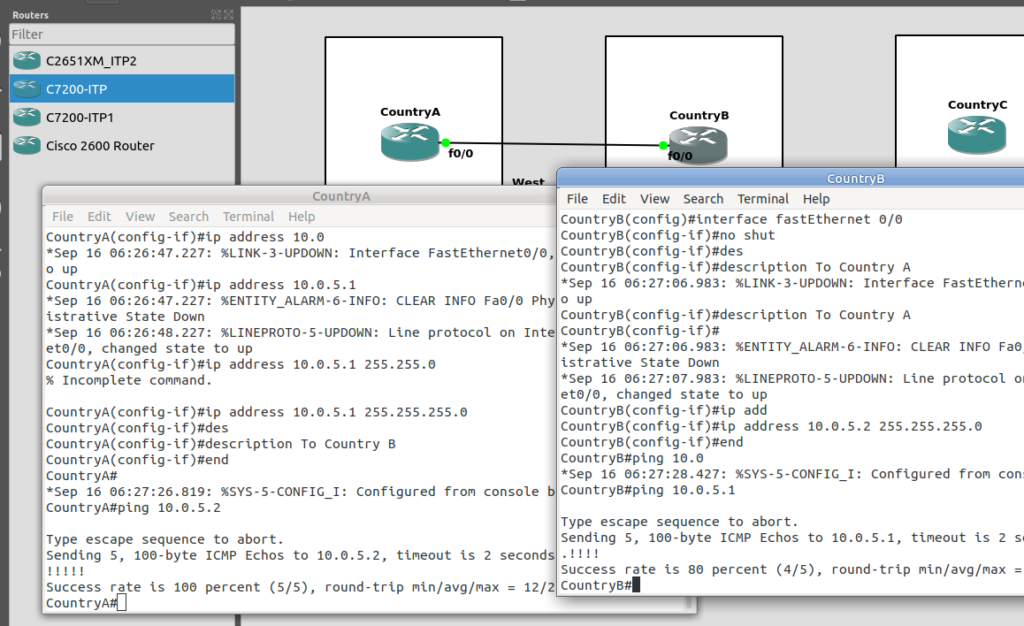
So let’s check the status of the link from Country B to its two neighbors – Country A and Country C. All going well it should look like this, and if it doesn’t, then stop by my last post and check you’ve got everything setup.

CountryB#show cs7 linkset 
lsn=ToCountryA          apc=1.2.3         state=avail     avail/links=1/1
  SLC  Interface                    Service   PeerState         Inhib
  00   10.0.5.1 1024 1024           avail     InService         -----

lsn=ToCountryC          apc=7.7.1         state=avail     avail/links=1/1
  SLC  Interface                    Service   PeerState         Inhib
  00   10.0.6.2 1025 1025           avail     InService         -----


So let’s add some routing so Country A can reach Country C via Country B. On Country A STP we’ll need to add a static route. For this example we’ll add a route to 7.7.1/14 (Just Country C).

That means Country A knows how to get to Country C. But with no return routing, Country C doesn’t know how to get to Country A. So let’s fix that.

We’ll add a static route to Country C to send everything via Country B.

CountryC#conf t
Enter configuration commands, one per line.  End with CNTL/Z.
CountryC(config)#cs7 route-table system
CountryC(config)#update route 0.0.0/0 linkset ToCountryB
*Jan 01 05:37:28.879: %CS7MTP3-5-DESTSTATUS: Destination 0.0.0 is accessible

So now from Country C, let’s see if we can ping Country A (Ok, it’s not a “real” ICMP ping, it’s a link state check message, but the result is essentially the same).

By running:

CountryC# ping cs7 1.2.3
*Jan 01 06:28:53.699: %CS7PING-6-RTT: Test Q.755 1.2.3: MTP Traffic test rtt 48/48/48
*Jan 01 06:28:53.699: %CS7PING-6-STAT: Test Q.755 1.2.3: MTP Traffic test 100% successful packets(1/1)
*Jan 01 06:28:53.699: %CS7PING-6-RATES: Test Q.755 1.2.3: Receive rate(pps:kbps) 1:0 Sent rate(pps:kbps) 1:0
*Jan 01 06:28:53.699: %CS7PING-6-TERM: Test Q.755 1.2.3: MTP Traffic test terminated.

We can confirm now that Country C can reach Country A, we can do the same from Country A to confirm we can reach Country B.

But what about Country D? The route we added on Country A won’t cover Country D, and to get to Country D, again we go through Country B.

This means we could group Country C and Country D into one route entry on Country A that matches anything starting with 7-X-X,

For this we’d add a route on Country A, and then remove the original route;

CountryA(config)# cs7 route-table system
CountryA(config-cs7-rt)#update route 7.0.0/3 linkset ToCountryB
CountryA(config-cs7-rt)#no update route 7.7.1/14 linkset ToCountryB

Of course, you may have already picked up, we’ll need to add a return route to Country D, so that it has a default route pointing all traffic to STP-B. Once we’ve done that from Country A we should be able to reach all the other countries:

CountryA#show cs7 route 
Dynamic Routes 0 of 1000

Routing table = system Destinations = 3 Routes = 3

Destination            Prio Linkset Name        Route
---------------------- ---- ------------------- -------        
4.5.6/14         acces   1  ToCountryB          avail          
7.0.0/3          acces   5  ToCountryB          avail          


CountryA#ping cs7 7.8.1
*Jan 01 07:28:19.503: %CS7PING-6-RTT: Test Q.755 7.8.1: MTP Traffic test rtt 84/84/84
*Jan 01 07:28:19.503: %CS7PING-6-STAT: Test Q.755 7.8.1: MTP Traffic test 100% successful packets(1/1)
*Jan 01 07:28:19.503: %CS7PING-6-RATES: Test Q.755 7.8.1: Receive rate(pps:kbps) 1:0  Sent rate(pps:kbps) 1:0 
*Jan 01 07:28:19.507: %CS7PING-6-TERM: Test Q.755 7.8.1: MTP Traffic test terminated.
CountryA#ping cs7 7.7.1
*Jan 01 07:28:26.839: %CS7PING-6-RTT: Test Q.755 7.7.1: MTP Traffic test rtt 60/60/60
*Jan 01 07:28:26.839: %CS7PING-6-STAT: Test Q.755 7.7.1: MTP Traffic test 100% successful packets(1/1)
*Jan 01 07:28:26.839: %CS7PING-6-RATES: Test Q.755 7.7.1: Receive rate(pps:kbps) 1:0  Sent rate(pps:kbps) 1:0 
*Jan 01 07:28:26.843: %CS7PING-6-TERM: Test Q.755 7.7.1: MTP Traffic test terminated.

So where to from here?

Well, we now have a a functional SS7 network made up of STPs, with routing between them, but if we go back to our SS7 network overview diagram from before, you’ll notice there’s something missing from our lab network…

So far our network is made up only of STPs, that’s like building a network only out of routers!

In our next lab, we’ll start adding some SSPs to actually generate some SS7 traffic on the network, rather than just OAM traffic.

Demystifying SS7 & Sigtran – Part 3 – SS7 Lab in GNS3

This is part of a series of posts looking into SS7 and Sigtran networks. We cover some basic theory and then get into the weeds with GNS3 based labs where we will build real SS7/Sigtran based networks and use them to carry traffic.

So we’ve made it through the first two parts of this series talking about how it all works, but now dear reader, we build an SS7 Lab!

At one point, and SS7 Signaling Transfer Point would be made up of at least 3 full size racks, and cost $5M USD.
We can run a dozen of them inside GNS3!


This post won’t cover usage of GNS3 itself, there’s plenty of good documentation on using GNS3 if you need to get acquainted with it before we start.

Cisco’s “IP Transfer Point” (ITP) software adds SS7 STP functionality to some models of Cisco Router, like the 2651XM and C7200 series hardware.

Luckily for us, these hardware platforms can be emulated in GNS3, so that’s how we’ll be setting up our instances of Cisco’s ITP product to use as STPs in our network.

For the rest of this post series, I’ll refer to Cisco’s IP Transfer Point as the “Cisco STP”.

Not open source you say! Osmocom have OsmoSTP, which we’ll introduce in a future post, and elaborate on why later…

From inside GNS3, we’ll create a new template as per the Gif below.

You will need a copy of the software image to load in. If you’ve got software entitlements you should be able to download it, the filename of the image I’m using for the 7200 series is c7200-itpk9-mz.124-15.SW.bin and if you go searching, you should find it.

Now we can start building networks with our Cisco STPs!

What we’re going to achieve

In this lab we’re going to introduce the basics of setting up STPs using Sigtran (SS7 over IP).

If you follow along, by the end of this post you should have two STPs talking Sigtran based SS7 to each other, and be able to see the SS7 packets in Wireshark.

As we touched on in the last post, there’s a lot of different flavours and ways to implement SS7 over IP. For this post, we’re going to use M2PA (MTP2 Peer Adaptation Layer) to carry the MTP2 signaling, while MTP3 and higher will look the same as if it were on a TDM link. In a future post we’ll better detail the options here, the strengths and weaknesses of each method of transporting SS7 over IP, but that’s future us’ problem.

IP Connectivity

As we don’t have any TDM links, we’re going to do everything on IP, this means we have to setup the IP layer, before we can add any SS7/Sigtran stuff on top, so we’re going to need to get basic IP connectivity going between our Cisco STPs.

So for this we’ll need to set an IP Address on an interface, unshut it, link the two STPs. Once we’ve confirmed that we’ve got IP connectivity running between the two, we can get started on the Sigtran / SS7 side of things.

Let’s face it, if you’re reading this, I’m going to bet that you are probably aware of how to configure a router interface.

I’ve put a simple template down in the background to make a little more sense, which I’ve attached here if you want to follow along with the same addressing, etc.

So we’ll configure all the routers in each country with an IP – we don’t need to configure IP routing. This means adjacent countries with a direct connection between them should be able to ping each other, but separated countries shouldn’t be able to.

So now we’ve got IP connectivity between two countries, let’s get Sigtran / SS7 setup!

First we’ll need to define the basics, from configure-terminal in each of the Cisco STPs. We’ll need to set the SS7 variant (We’ll use ITU variant as we’re simulating international links), the network-indicator (This is an International network, so we’ll use that) and the point code for this STP (From the background image).

CountryA(config)#cs7 variant itu 
CountryA(config)#cs7 network-indicator international 
CountryA(config)#cs7 point-code 1.2.3

Repeat this step on Country A and Country B.

Next we’ll define a local peer on the STP. This is an instance of the Sigtran stack along with the port we’ll be listening on. Our remote peer will need to know this value to bring up the connection, the number specified is the port, and the IP is the IP it will bind on.

CountryA(config)#cs7 local-peer 1024
CountryA(config-cs7-lp)#local-ip 10.0.5.1

If we had multiple layer 3 IP Interfaces connecting Country A & Country B, we could list all the IP Addresses here for SCTP Multihoming.

Lastly on Country A we’ll need to define our Linkset to connect to our peer.

CountryA(config)#cs7 linkset ToCountryB 4.5.6
CountryA(config-cs7-ls)#link 0 sctp 10.0.5.2 1024 1024

Where the first 1024 is the local-peer port we configured earlier, and the second 1024 is the remote peer port we’re about to configure on Country B.

If we stop at this point and sniff the traffic from Country A to Country B, we’ll see SCTP INITs from Country A to Country B, as it tries to bring up the SCTP connection for our SS7 traffic, and the SCTP connection gets rejected by Country B.

This is of course, because we’ve only configured Country A at this stage, so let’s fix this by configuring Country B.

On CountryB, again we’ll set the basic parameters, our local-peer settings and the Linkset to bring up,

CountryB(config)#cs7 variant itu 
CountryB(config)#cs7 network-indicator international 
CountryB(config)#cs7 point-code 4.5.6
CountryB(config)#cs7 local-peer 1024
CountryB(config-cs7-lp)#local-ip 10.0.5.2
CountryB(config-cs7-lp)#exit
CountryB(config)#cs7 linkset ToCountryA 1.2.3
CountryB(config-cs7-ls)#link 0 sctp 10.0.5.1 1024 1024

If you’re still sniffing the traffic between Country A and Country B, you should see our SS7 connection come up.

Wireshark trace of the connection coming up

The conneciton will come up layer-by-layer, firstly you’ll see the transport layer (SCTP) bring up an SCTP association, then MTP2 Peer Adaptation Layer (M2PA) will negotiate up to confirm both ends are working, then finally you’ll see MTP3 messaging.

If we open up an MTP3 packet you can see our Originating and Destination Point Codes.

Notice in Wireshark the Point Codes don’t show up as 1-2-3, but rather 2067? That’s because they’re formatted as Decimal rather than 14 bit, this handy converter will translate them for you, or you can just change your preference in Wireshark’s decoders to use the matching ITU POint Code Structure.

From the CLI on one of the two country STPs we can run some basic commands to view the status of all SS7 components and Linksets.

And there you have it! Basic SS7 connectivity!

There is so much more to learn, and so much more to do!
By bringing up the link we’ve barely scratched the surface here.

Some homework before the next post, link all the other countries shown together, with Country D having a link to Country C and Country B. That’s where we’ll start in the lab – Tip: You’ll find you’ll need to configure a new cs7 local-peer for each interface, as each has its own IP.

Demystifying SS7 & Sigtran (With Labs!) – Part 2 – Ingredients Needed

This is part of a series of posts looking into SS7 and Sigtran networks. We cover some basic theory and then get into the weeds with GNS3 based labs where we will build real SS7/Sigtran based networks and use them to carry traffic.

So one more step before we actually start bringing up SS7 / Sigtran networks, and that’s to get a bit of a closer look at what components make up SS7 networks.

Recap: What is SS7?

SS7 is the name given to the protocol stack used almost exclusively in the telecommunications space. SS7 isn’t just one protocol, instead it is a suite of protocols.
In the same way when someone talks about IP networking, they’re typically not just talking about the IP layer, but the whole stack from transport to application, when we talk about an SS7 network, we’re talking about the whole stack used to carry messages over SS7.

And what is SIGTRAN?

Sigtran is “Signaling Transport”. Historically SS7 was carried over TDM links (Like E1 lines).

As the internet took hold, the “Signaling Transport” working group was formed to put together the standards for carrying SS7 over IP, and the name stuck.

I’ve always thought if I were to become a Mexican Wrestler (which is quite unlikely), my stage name would be DSLAM, but SIGTRAN comes a close second.

Today when people talk about SIGTRAN, they mean “SS7 over IP”.

What is in an SS7 Network?

SS7 Networks only have 3 types of network elements:

  • Service Switching Points (SSP)
  • Service Transfer Points (STP)
  • Service Control Points (SCP)

Service Switching Points (SSP)

Service Switching Points (SSPs) are endpoints in the network.
They’re the users of the connectivity, they use it to create and send meaningful messages over the SS7 network, and receive and process messages over the SS7 network.

Like a PC or server are IP endpoints on an IP Network, which send and receive messages over the network, an SSP uses the SS7 network to send and receive messages.

In a PSTN context, your local telephone exchange is most likely an SS7 Service Switching Point (SSP) as it creates traffic on the SS7 network and receives traffic from it.

A call from a user on one exchange to a user on another exchange could go from the SSP in Exchange A, to the SSP in Exchange B, in the same way you could send data between two computers by connecting directly between them with an Ethernet crossover cable.

Messages between our two exchanges are addressed using Point Codes, which can be thought of a lot like IP Addresses, except shorter.

In the MTP3 header of each SS7 message is the Destination Point Code, and the Origin Point Code.

When Telephone Exchange A wants to send a message over SS7 to Telephone Exchange B, the MTP header would look like:

MTP3 Header:
Origin Point Code:      1.2.3
Destination Point Code: 4.5.6

Service Transfer Points (STP)

Linking each SSP to each other SSP has a pretty obvious problem as our network grows.

What happens if we’ve got hundreds of SSPs? If we want a full-mesh topology connecting every SSP to every other SSP directly, we’d have a rats nest of links!

A “full-mesh” approach for connecting SSPs does not work at scale, so STPs are introduced

So to keep things clean and scalable, we’ve got Signalling Transfer Points (STPs).

STPs can be thought of like Routers but in an SS7 network.

When our SSP generates an SS7 message, it’s typically handed to an STP which looks at the Destination Point Code, it’s own routing table and routes it off to where it needs to go.

STP acting as a central router to connect lots of SSPs

This means every SSP doesn’t require a connection to every other SSP. Instead by using STPs we can cut down on the complexity of our network.

When Telephone Exchange A wants to send a message over SS7 to Telephone Exchange B, the MTP header would look the same, but the routing table on Telephone Exchange A would be setup to send the requests out the link towards the STP.

MTP3 Header:
Origin Point Code:      1.2.3
Destination Point Code: 4.5.6

Linksets

Between SS7 Nodes we have Linksets. Think of Linksets as like LACP or Etherchannel, but for SS7.

You want to have multiple links on every connection, for sharing out the load or for redundancy, and a Linkset is a group of connections from one SS7 node to another, that are logically treated as one link.

Link between an SSP and STP with 3 linksets

Each of the links in a Linkset is identified by a number, and specified in in the MTP3 header’s “Signaling Link Selector” field, so we know what link each message used.

MTP3 Header:
Origin Point Code:       1.2.3
Destination Point Code:  4.5.6
Signaling Link Selector: 2

Service Control Point (SCP)

Somewhere between a Rolodex an relational database, is the Service Control Point (SCP).

For an exchange (SSP) to route a call to another exchange, it has to know the point code of the destination Exchange to send the call to.
When fixed line networks were first deployed this was fairly straight forward, each exchange had a list of telephone number prefixes and the point code that served each prefix, simple.

But then services like number porting came along when a number could be moved anywhere.
Then 1800/0800 numbers where a number had to be translated back to a standard phone number entered the picture.

To deal with this we need a database, somewhere an SSP can go to query some information in a database and get a response back.

This is where we use the Service Control Point (SCP).

Keep in mind that SS7 long predates APIs to easily lookup data from a service, so there was no RESTful option available in the 1980s.

When a caller on a local exchange calls a toll free (1800 or 0800 number depending on where you are) number, the exchange is setup with the Point Code of an SCP to query with the toll free number, and the SCP responds back with the local number to route the call to.

While SCPs are fading away in favor of technology like DNS/ENUM for Local Number Portability or Routing Databases, but they are still widely used in some networks.

Getting to know the Signalling Transfer Point (STP)

As we saw earlier, instead of a one-to-one connection between each SS7 device to every other SS7 device, Signaling Transfer Points (STP) are used, which act like routers for our SS7 traffic.

The STP has an internal routing table made up of the Point Codes it has connections to and some logic to know how to get to each of them.

Like a router, STPs don’t really create SS7 traffic, or consume traffic, they just receive SS7 messages and route them on towards their destination.

Ok, they do create some traffic for checking links are up, etc, but like a router, their main job is getting traffic where it needs to go.

When an STP receives an SS7 message, the STP looks at the MTP3 header. Specifically the Destination Point Code, and finds if it has a path to that Point Code. If it has a route, it forwards the SS7 message on to the next hop.

Like a router, an STP doesn’t really concern itself with anything higher than the MTP3 layer – As point codes are set in the MTP3 layer that’s the only layer the STP looks at and the upper layers aren’t really “any of its business”.

STPs don’t require a direct connection (Linkset) from the Originating Point Code straight to the Destination Point Code. Just like every IP router doesn’t need a direct connection to ever other network.
By setting up a routing table of Point Codes and Linksets as the “next-hop”, we can reach Destination Point Codes we don’t have a direct Linkset to by routing between STPs to reach the final Destination Point Code.

Let’s work through an example:

And let’s look at the routing table setup on STP-A:

STP A Routing Table:
1.2.3 - Directly attached (Telephone Exchange A)
1.2.4 - Directly attached (Telephone Exchange C)
1.2.5 - Directly attached (Telephone Exchange D)
4.5.1 - Directly attached (STP-B)
4.5.3 - Via STP-B
4.5.6 - Via STP-B

So what happens when Telephone Exchange A (Point Code 1.2.3) wants to send a message to Telephone Exchange E (Point Code 4.5.3)?
Firstly Telephone Exchange A puts it’s message on an MTP3 payload, and the MTP3 header will look something like this:

MTP3 Header:
Origin Point Code:       1.2.3
Destination Point Code:  4.5.3
Signaling Link Selector: 1

Telephone Exchange A sends the SS7 message to STP A, which looks at the MTP3 header’s Destination Point Code (4.5.3), and then in it’s routing table for a route to the destination point. We can see from our example routing table that STP A has a route to Destination Point Code 4.5.3 via STP-B, so sends it onto STP-B.

For STP-B it has a direct connection (linkset) to Telephone Exchange E (Point Code 4.5.3), so sends it straight on

Like IP, Point Codes have their own form of Variable-Length-Subnet-Routing which means each STP doesn’t need full routing info for every Destination Point Code, but instead can have routes based on part of the point code and a subnet mask.

But unlike IP, there is no BGP or OSPF on SS7 networks. Instead, all routes have to be manually specified.

For STP A to know it can get messages to destinations starting with 4.5.x via STP B, it needs to have this information manually added to it’s route table, and the same for the return routing.

Sigtran & SS7 Over IP

As the world moved towards IP enabled everything, TDM based Sigtran Networks became increasingly expensive to maintain and operate, so a IETF taskforce called SIGTRAN (Signaling Transport) was created to look at ways to move SS7 traffic to IP.

When moving SS7 onto IP, the first layer of SS7 (MTP1) was dropped, as it primarily concerned the physical side of the network. MTP2 didn’t really fit onto an IP model, so a two options were introduced for transport of the MTP2 data, M2PA (Message Transfer Part 2 User Peer-to-Peer Adaptation Layer) and M2UA (MTP2 User Adaptation Layer) were introduced, which rides on top of SCTP.
This means if you wanted an MTP2 layer over IP, you could use M2UA or M2TP.

SCTP is neither TCP or UDP. I’ve touched upon SCTP on this blog before, it’s as if you took the best bits of TCP without the issues like head of line blocking and added multi-homing of connections.

So if you thought all the layers above MTP2 are just transferred, unchanged on top of our M2PA layer, that’s one way of doing it, however it’s not the only way of doing it.

There are quite a few ways to map SS7 onto IP Networks, which we’ll start to look into it more detail, but to keep it simple, for the next few posts we’ll be assuming that everything above MTP2/M2PA remain unchanged.

In the next post, we’ll get some actual SS7 traffic flowing!

Demystifying SS7 & Sigtran Networks (With Labs!) – Part 1 – Intro

This is part of a series of posts looking into SS7 and Sigtran networks. We cover some basic theory and then get into the weeds with GNS3 based labs where we will build real SS7/Sigtran based networks and use them to carry traffic.

If you use a mobile phone, a VoIP system or a copper POTS line, there’s a high chance that somewhere in the background, SS7 based signaling is being used.

The signaling for GSM, UMTS and WCDMA mobile networks all rely on SS7 based signaling, and even today the backbone of most PSTN traffic relies SS7 networks. To many this is mysterious carrier tech, and as such doesn’t get much attention, but throughout this series of posts we’ll take a hands-on approach to putting together an SS7 network using GNS3 based labs and connect devices through SS7 and make some stuff happen.

Overview of SS7

Signaling System No. 7 (SS7/C7) is the name for a family of protocols originally designed for signaling between telephone switches. In plain English, this means it was used to setup and teardown large volumes of calls, between exchanges or carriers.

When carrier A and Carrier B want to send calls between each other, there’s a good chance they’re doing it over an SS7 Network.

But wait! SIP exists and is very popular, why doesn’t everyone just use SIP?
Good question, imaginary asker. The answer is that when SS7 came along, SIP was still almost 25 years away from being defined.
Yes. It’s pretty old.

SS7 isn’t one protocol, but a family of protocols that all work together – A “protocol stack”.
The SS7 specs define the lower layers and a choice of upper layer / application protocols that can be carried by them.

The layered architecture means that the application layer at the top can be changed, while the underlying layers are essentially the same.

This means while SS7’s original use was for setting up and tearing down phone calls, this is only one application for SS7 based networks. Today SS7 is used heavily in 2G/3G mobile networks for connectivity between core network elements in the circuit-switched domain, for international roaming between carriers and services like Local Number Portability and Toll Free numbers.

Here’s the layers of SS7 loosely mapped onto the OSI model (SS7 predates the OSI model as well):

OSI Model (Left) and SS7 Protocol Stack (Right)

We do have a few layers to play with here, and we’ll get into them all in depth as we go along, but a brief introduction to the underlying layers:

MTP 1 – Message Transfer Part 1

This is our physical layer. In this past this was commonly E1/T1 lines.

It’s responsible for getting our 1s and 0s from one place to another.

MTP 2 – Message Transfer Part 2

MTP2 is responsible for the data link layer, handling reliable transfer of data, in sequence.

MTP 3 – Message Transfer Part 3

The MTP3 header contains an Originating and a Destination Point Code.

These point codes can be thought of as like an IP Address; they’re used to address the source and destination of a message. A “Point Code” is the unique address of a SS7 Network element.

MTP3 header showing the Destination Point Code (DPC) and Origin Point Code (OPC) on a National Network, carrying ISUP traffic

Every message sent over an SS7 network will contain an Origin Point Code that identifies the sender, and a Destination Point Code that identifies the intended recipient.

This is where we’ll bash around at the start of this course, setting up Linksets to allow different devices talking to each other and addressing each other via Point Codes.

The MTP3 header also has a Service Indicator flag that indicates what the upper layer protocol it is carrying is, like the Protocol indicator in IPv4/IPv6 headers.

A Signaling Link Selector indicates which link it was transported over (did I mention we can join multiple links together?), and a Network Indicator for determining if this is signaling is at the National or International level.

TUP/MAP/SCCP/ISUP

These are the “higher-layer” protocols. Like FTP sits on top of TCP/IP, a SS7 network can transport these protocols from their source to their destination, as identified by the Origin Point Code (OPC), to the Destination Point Code (DPC), as specified in the MTP3 header.

We’ll touch on these protocols more as we go on. SCCP has it’s own addressing on top of the OPC/DPC (Like IP has IP Addressing, but TCP has port numbers on top to further differentiate).

Why learn SS7 today?

SS7 and SIGTRAN are still widely in use in the telco world, some of it directly, other parts derived / evolved from it.

So stick around, things are about to get interesting!