Our team recently shipped a new UPF which is a huge improvement on our old UPF, and I drew the short straw of doing all the interop testing for the IMS.
Initially I thought there was an issue with IP routing, as I’d never see the SIP register from the UE, but I would see the IMS APN coming up.
I could access the internet from the UE IPs just fine, but that’s going to public IPs, whereas the P-CSCF is in private address space, and hosted on the same box as the UPF.
I spent hours on this as my lab servers do routing on a stick, and I thought some hardware offload somewhere was trying to fast path my packets and send them back to the server without going via the router.
Then I dug a little deeper and found I could see the 3 way handhake between the UE an the P-CSCF, but no SIP packets.
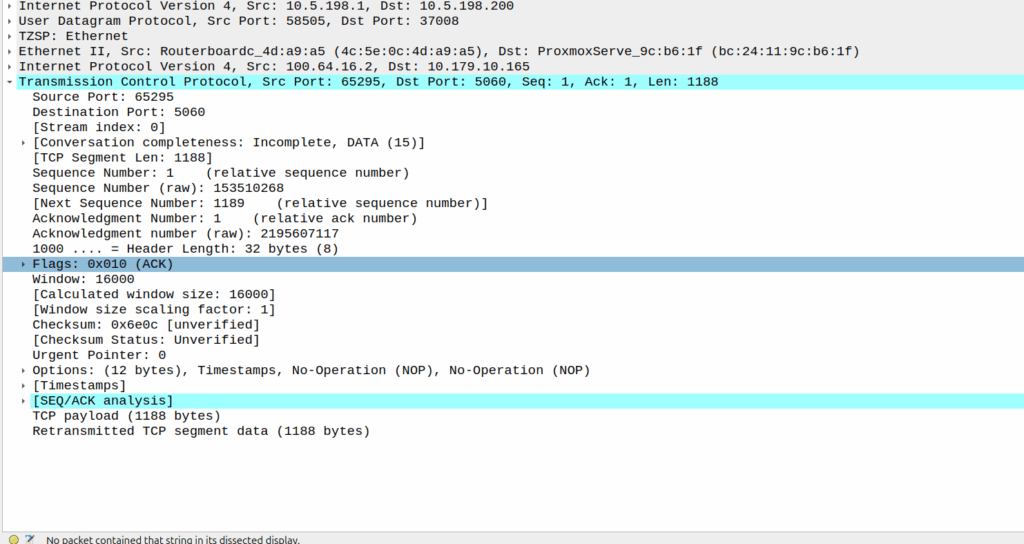
Successful 3 way handshake between the UE and the P-CSCF on TCP 5060
This was confusing, clearly we had at least intermittent two way comms – the 3 way TCP handshake confirmed that, but then why were packets not getting across?
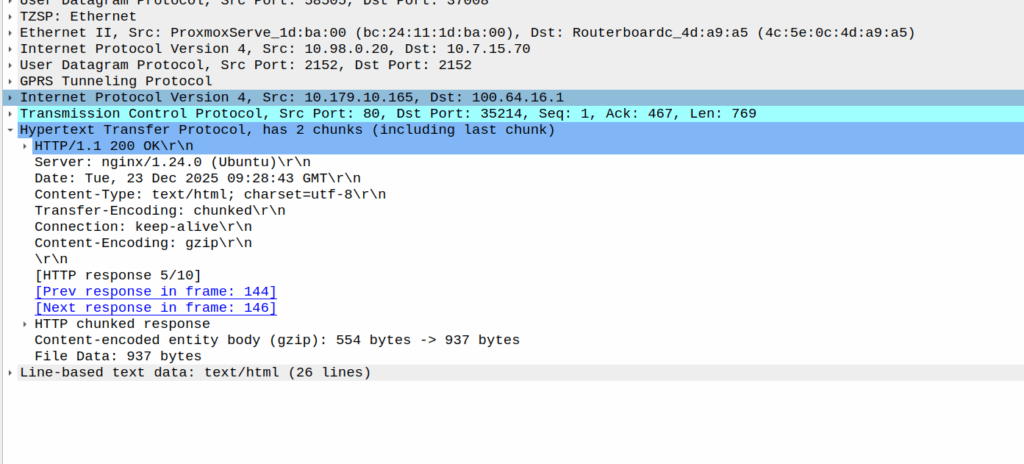
We have an XCAP server hosted on our P-CSCF instances, so I tried hitting that from the phone in case there was something weird about routing to the network segment that hosts the P-CSCF, but I could hit the XCAP server just fine, so now I was certain the UE IP pool could route to the P-CSCF and 3 way handshake for TCP was working and payload could be pushed.
Clearly we can route to the P-CSCF as that’s where this XCAP server is hosted
Then I dug into what happened after the 3 way handshake, and I found a TCP payload containing the start of the SIP REGISTER.
Hmm, we have a SIP Fragment here at least…
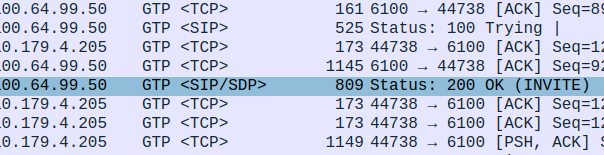
I traced it all the way through and lo, it’s hitting the P-CSCF:
And the fragment is recieved on the P-CSCF
Okay, but then what happens, because it’s only a fragment, not the complete re-assembled packet, so what’s going on?
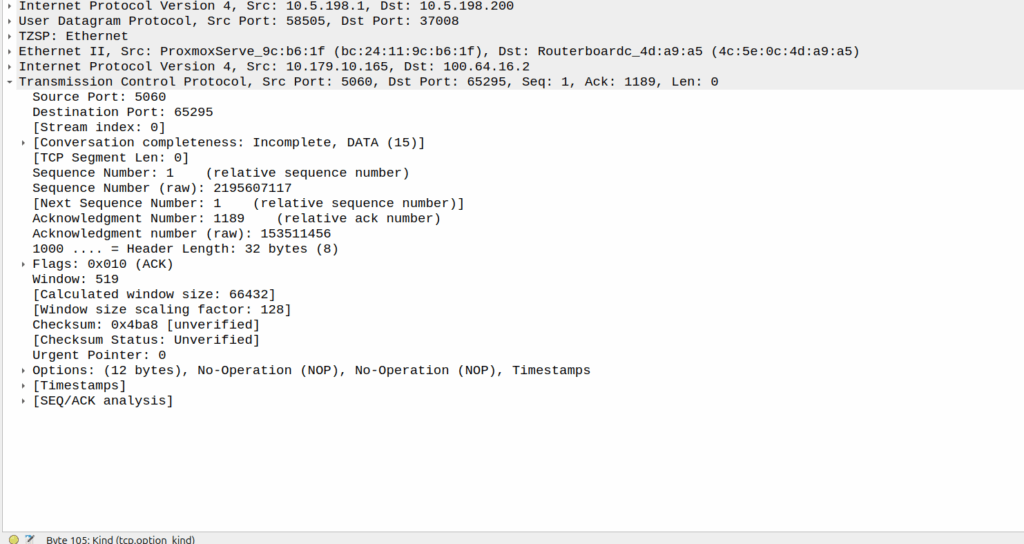
Well, the P-CSCF sends a TCP ACK back to the UE.
And the TCP fragment containing the first part of the REGISTER gets an ACK back from the P-CSCF
The ACK gets forwarded to the UPF:
And that TCP ack makes it to the P-CSCF
And then… Nothing? The UPF never encaps the TCP ACK back into GTP-U and never sends it onto base station.
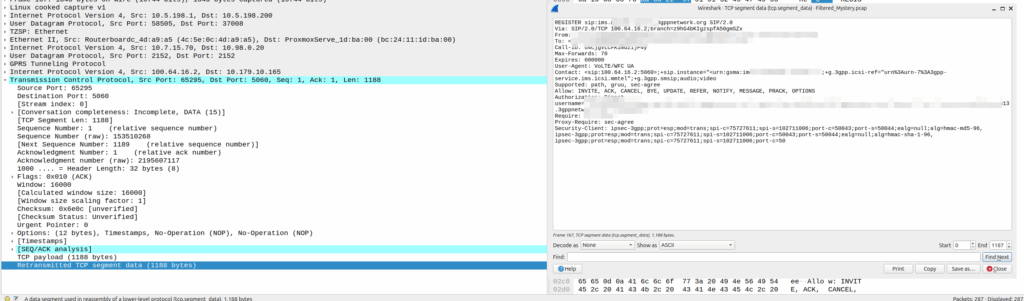
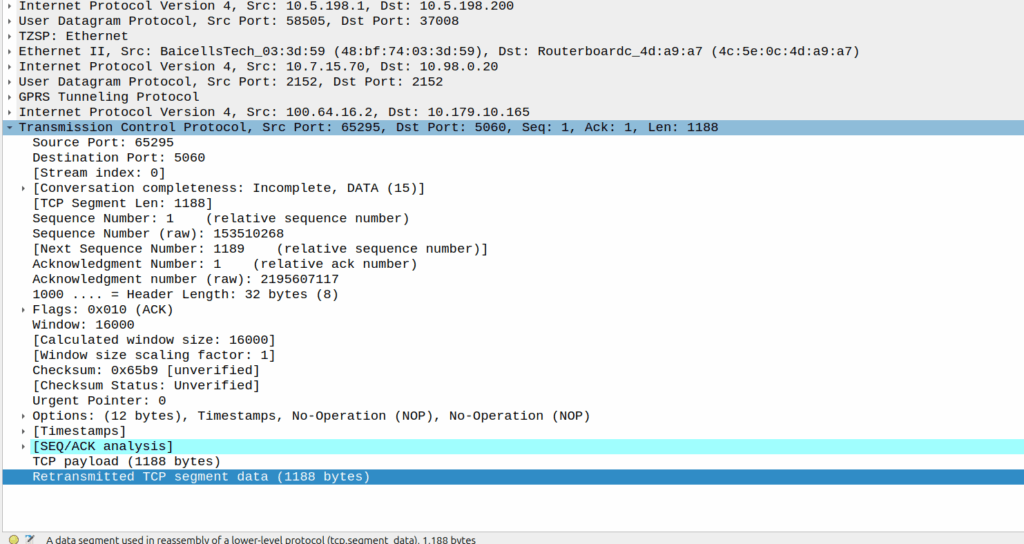
Eventually the UE re-sends the payload with the start of the REGISTER, but it does not get the ACK from the P-CSCF.
Retransmitted TCP segment containing the REGISTER from the UE
So naughty UPF right? Not forwarding that ACK for some reason?
I started digging, maybe the ACK was getting routed weirdly and landing on the UPF without going through the router?
Well not quite…
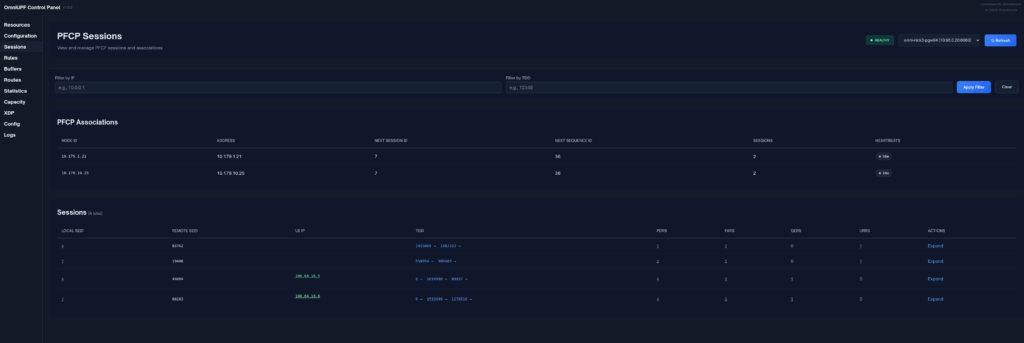
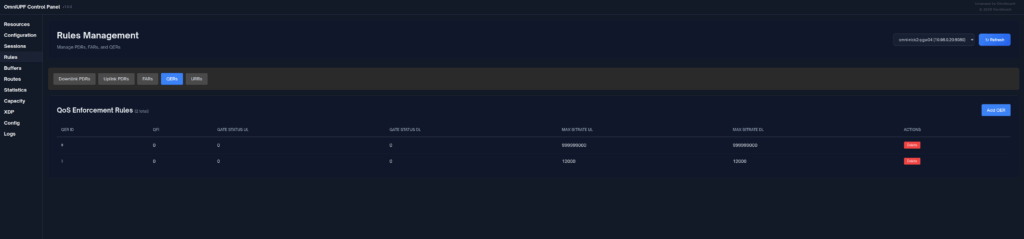
When I started digging into the QER rules being installed I noticed the MBR bitrate we had on the IMS APN in the HSS was tiny.
The UPF can only gate on traffic to the UE, so was gating the ACK traffic, as the QER had consumed all the bandwidth so the ACK never made it back.
Time wasted – About 4 hours, but I will not make this mistake again!
- name: Fetch the DataDB dump from remote cgrates to local machine fetch: src=/tmp/redis_dump_{{ inventory_hostname }}_{{ ts }}.rdb dest={{ backup_path }}/ flat=yes
Obviously you need to backup your .json config files, but to restore is just a matter of restoring the StorDB data with MySQL on the new machine, copying the Redis database into /var/lib/redis/dump.rdb on the new machine, and starting MySQL, Redis and CGrateS.
Recently we ran into an issue with certain devices while roaming not including an ICSCI field in the Contact header while registering onto the IMS, leading to MT call failures.
So what is ICSI and why were these calls failing?
The IMS standards are littered with novel ideas for smart telephony features that no one ever implimented, and presents a minefield of conditionals about features you never even knew existed.
Today’s dead feature is the “IMS Communication Service Identifier” (ICSI), no, it’s not a TV show about IMS Crime Scene Investigators (don’t steal my pitch), instead ICSI identifies IMS services by using “IMS Enablers” which allows multiple IMS applications to run on the phone.
It’s like a VLAN or a VRF but for IMS, one IMS stack but multiple sub-IMS stacks I guess.
Why would you want to do this you might ask? Well, the example from the Specs is if you were using OMA’s very short lived OMA Instant Messaging and Presence application, which uses SIP for transport, but needs the SIP messages routed to the OMA client application in the phone, rather than the standard IMS SIP client in the phone for making calls / texts.
Alternately, you could have a mobile PBX application for office workers, and with a different ICSI this could use a secondary dialler with a contacts list and presence for all your co-workers, these sorts of “sub” IMS clients and applications were possible with ICSI.
So how does it actually work? Well, it’s stupid simple, during register the phone indicates in the Contact header what ICSI applications that client supports.
When a call is made by the UE based on this value the iFCs can route to different Application Servers based on the values.
For mobile originated calls, the terminal in this scenario is kinda meant to work like a SIP Proxy, dispatching a SIP message to the correct application (in the terminal another IMS client that spoke to the main phone).
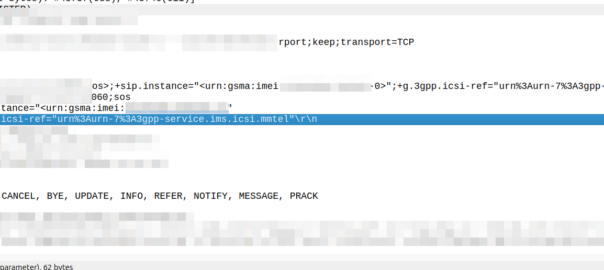
In reality though, there is only one ICSI service seen in 99.999% of IMS traffic and that’s the 3gpp-service.ims.icsi.mmtel ICSI, used by IMS clients to denote that they support IMS Multimedia Telephony, aka just normal IMS.
For reasons best know to VENDOR X (you know who you are) their phones include the 3gpp-service.ims.icsi.mmtel in the Contact header when registering on the home network, but while registering while roaming do not include this.
Our TAS ignores the lack of ICSI for mmtel in the contact on regular MT calls, but one of the other TAS vendors in the mix got grumpy because it was missing, and they didn’t have a contact for MMtel for the registered subscriber.
In the end we rewrote the headeron on our CSCFs before passing it to their TAS, which resolved the issue.
Who’s in the wrong? Well, the particular phone vendor who doesn’t include MMtel in the ICSI Contact, but that’s not going to change any time soon. So as the old saying goes, if the mountain won’t come to Mohammed… Mohammed will rewrite SIP headers.
Here’s a Kamailio question I posed to the mailing list the other day:
I’m working on a scenario with a Kamailio box with a private IP, with a public IP 1:1 NATed to it (but the VM does not see the public IP on the NICs).
When forwarding requests to some hosts I want to set the Via address to be the public IP, but when forwarding requests to other hosts I want to leave the Via address to the internal IP address.
If I set the Advertise parameter in the bind config, this sets the Via to the advertised IP, but I’m seeing that address used even when communicating with hosts on the private IP.
Of course if the IP was on the VM itself I could use $fs or force_send_socket, but that only works if I’ve got the public IP bound, which I can’t do.
Is there a simple way to set / override what IP gets baked into the Via header?
Where you’ve got multiple IPs on your box, you can include the advertise paramter to override the IP you show, for example if you have the IP 100.64.253.251 on your NIC, but you’ve NATed the traffic and instead want to show 1.2.3.4 you can set this in the general config:
But then every message Kamailio forwards, will contain the 1.2.3.4 address int he Via header. For my scenario, this didn’t work, as I wanted to only use the 1.2.3.4 IP when communicating with hosts outside of the RFC1918 address space (only conditionally use that address).
Because of this I couldn’t use the advertise option, but I found the set_advertised_address() function to use in my routing logic, where I set the advertised address just on the given routes I care about:
#General Config:
listen=tcp:100.64.253.251:5061


#My routing blocks that go to hosts outside RFC1918 address space:
                rtpengine_manage("media-address=1.2.3.4");
                set_advertised_address("1.2.3.4:5060");
                msg_apply_changes();
So now any packets by default will have a Via of 100.64.253.251 but when I want to I can set the Via to the 1.2.3.4 public IP (and I do the same in RTPengine).
So we’ve found this scenario that occurs on some Samsung UEs, in certain radio contions, where midway through an otherwise normal voice call, the UE sends “mystery” data (Not IP data), which in turn causes the UPF to send the error indication and drop the bearer, which in turn drops the call.
The call starts, like any normal call, SIP REGISTER, INVITE, etc.
The P-CSCF / PCRF / PGW set up the dedicated bearer for the voice traffic, and the RTP stream starts flowing over it.
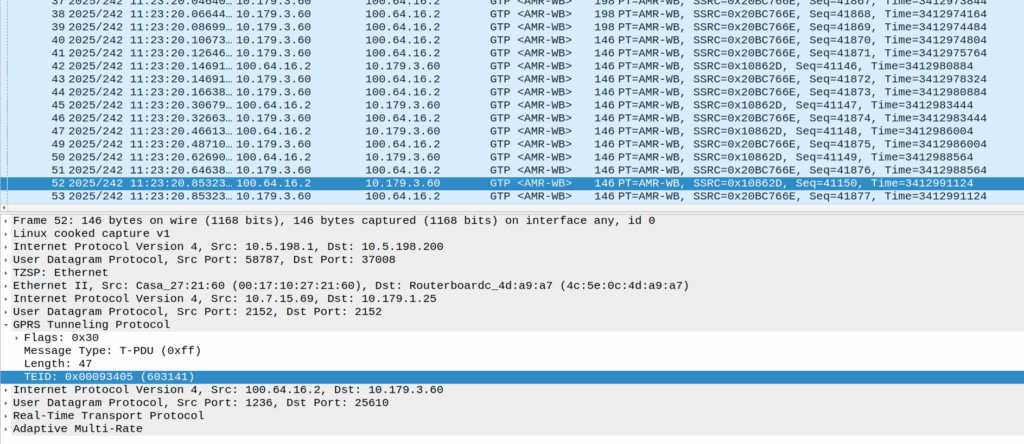
Then the UE sends these weird packets instead of the RTP stream:
These are GTP-U encapsulated data, with the TEID that matches the TEID used for the RTP stream, but there’s no IP data in them – they’re only 14 bytes long and sent by the UE.
Here’s some examples of what’s sent (each line is a packet):
An IPv4 header is 20 bytes long, and IPv6 header is 40, so this is too short for either of those protocols, but what else could it be?
There’s some commonality of course, starts d0 as the first octet, then d1, d2, d3, etc. So that’s something?
I thought perhaps it was a boundary issue, that the standard RTP packet was being split across multiple GTP-U payloads, but that doesn’t appear to be the case.
An Ethernet header is 14 bytes, but if we were to decode this as Ethernet there’s still nothing it’s transporting, and the destination MAC is changing sequentailly if that’s the case, which would be even weirder.
I also thought about RTP that for some reason has lost it’s IP/UDP header, as the sequentially counting byte at the start could be the RTP sequence number, but that’d be 19 bytes minimum and the sequence number is the 3rd and 4th byte, not the first.
Whatever they contain, we see this sent over and over for a few seconds, then bam, back to normal RTP stream flowing.
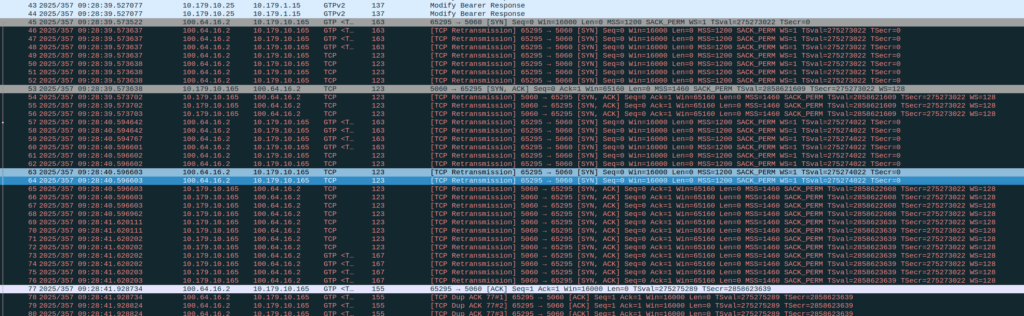
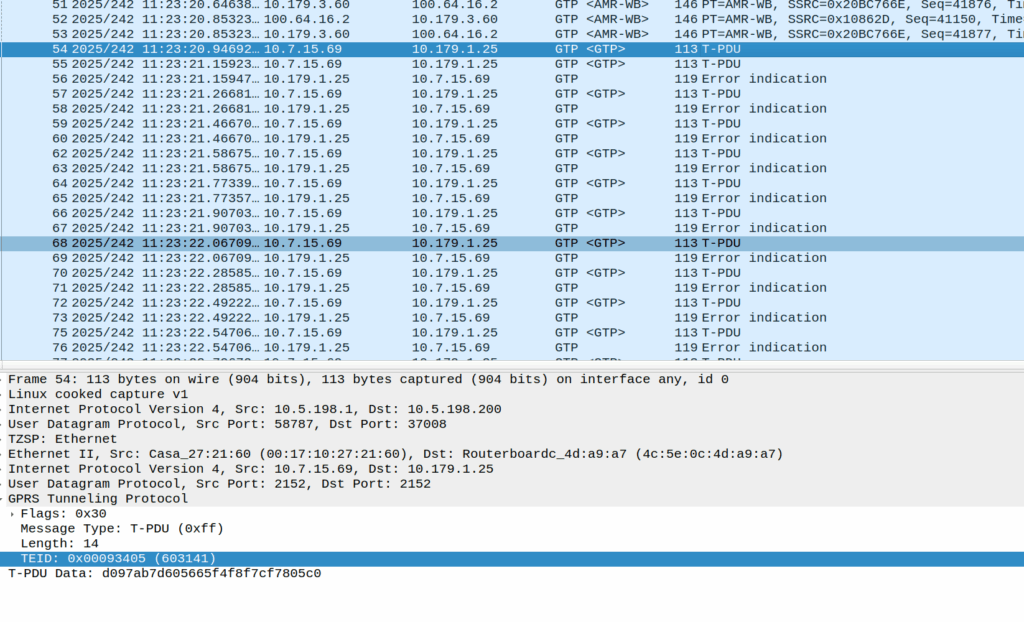
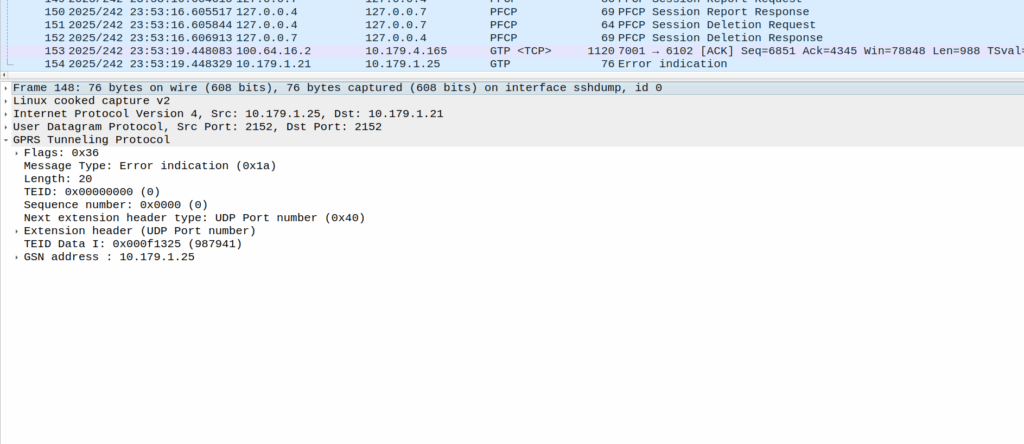
Or at least it should be, but the invalid packet causes the UPF to generate a GTP-U Error Indication.
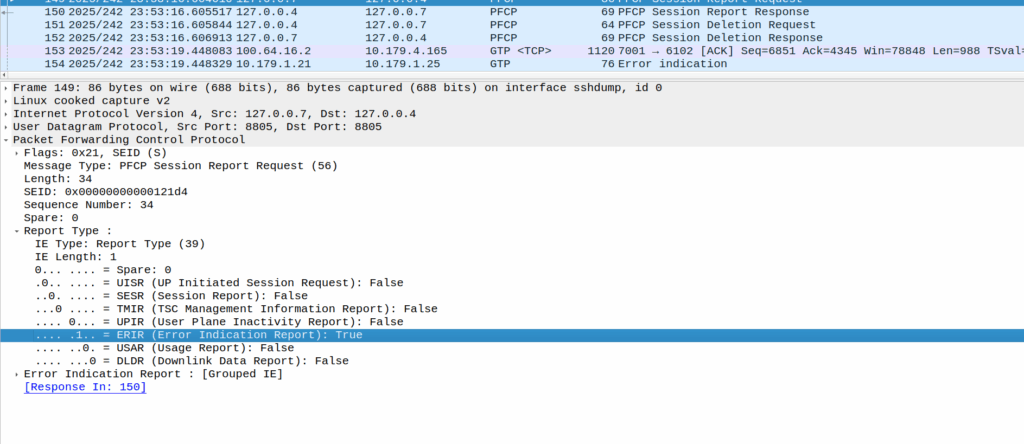
These Error Indication payloads eventually lead to the next PFCP Session Report Request having the Error Indication Report (ERIR) flag set to True.
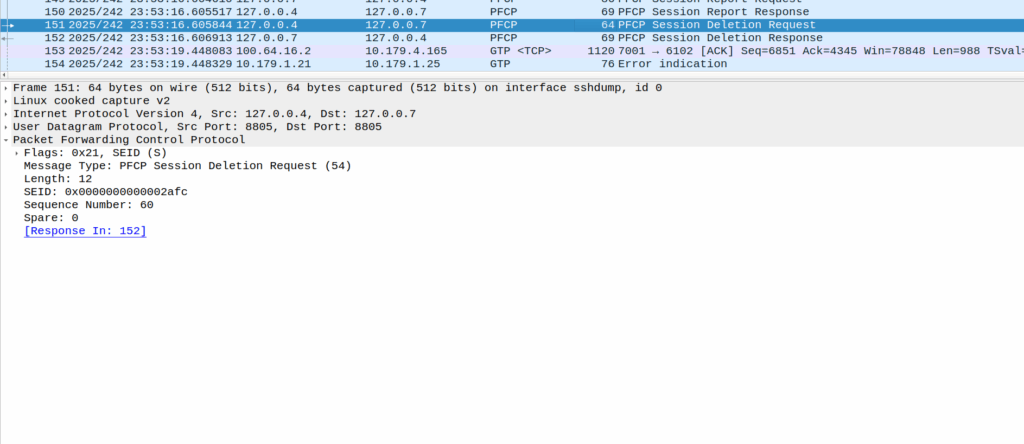
When the PGW-U gets this, it sends a Session Delete Request, which dutifully drops the bearer.
Meaning the session drops on the EPC side, and the RTP drops with it, eventually a BYE is sent from the phone due to RTP timeout.
The above screenshot shows a different cause of GTP-U Error Indication – At this point the bearer has been dropped on the EPC side and these are Error Indications to report it doesn’t know the TIED / bearer.
How to fix this?
Well, unlikely we’ll get a fix on the Samsung side, so we’ll need to not drop the bearer on the PGW-C if we get a lot of Error Indications, and hope for the best.
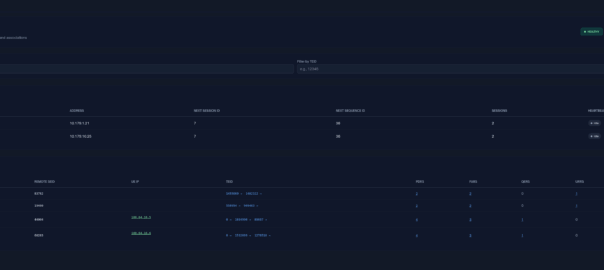
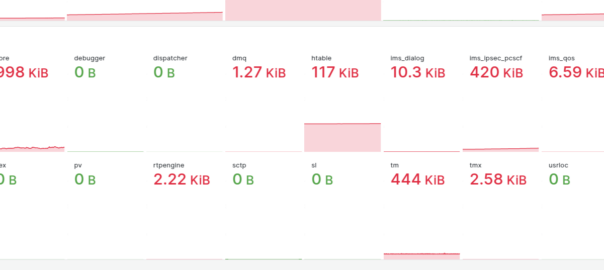
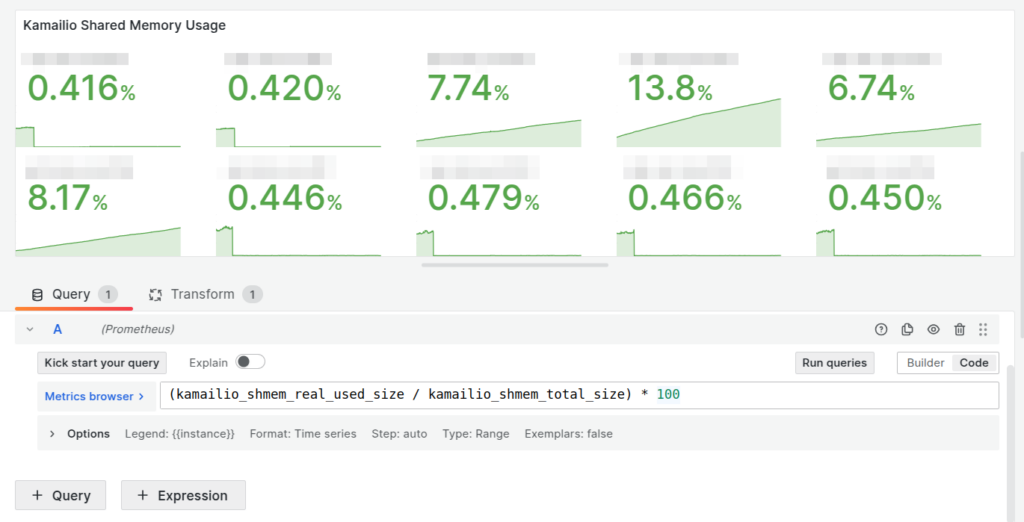
Our dashboards showed this slow memory leak, with the memory slowly ticking up on a certain group of machines, we knew there was a memory leak, but in which Kamailio module?
Shared memory usage per Kamailio instance
So we know there’s a memory leak on some boxes (different boxes run different modules) but which ones?
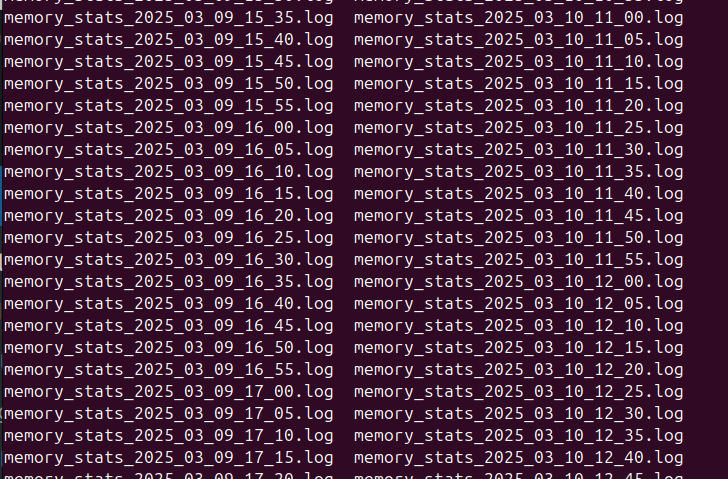
kamcmd will show you a breakdown of the shared memory usage per module, so I started with a little cronjob to dump the data every so often, with the idea I would diff the values and look for big increases.
Then the idea of processing the data from the files started to scare me.
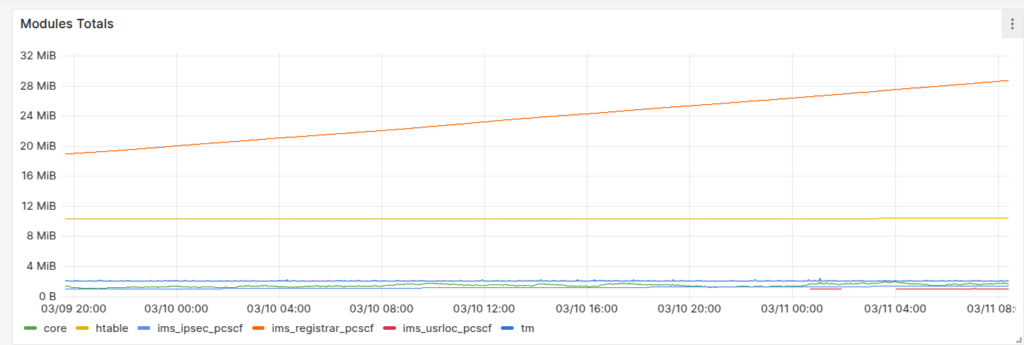
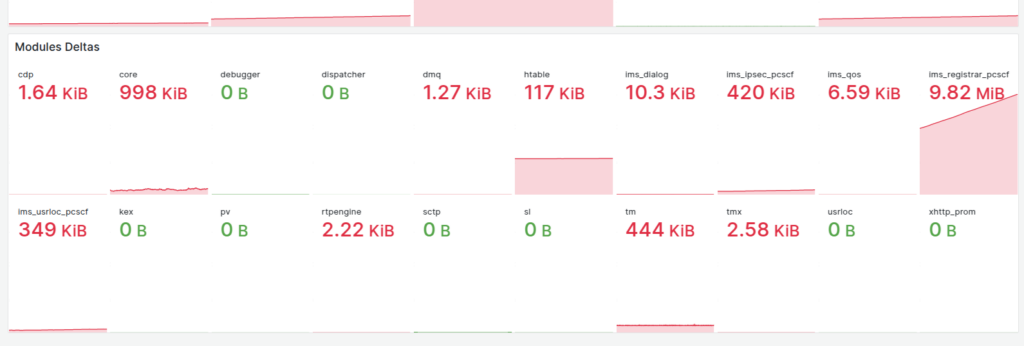
So in the end I went overboard and wrote a little script to get the memory usage of each module and export it via Prometheus, so I can track down what module is at fault.
If I were a better C programmer I’d have added this into the main Kamailio Prometheus module, but I’m terrible at C.
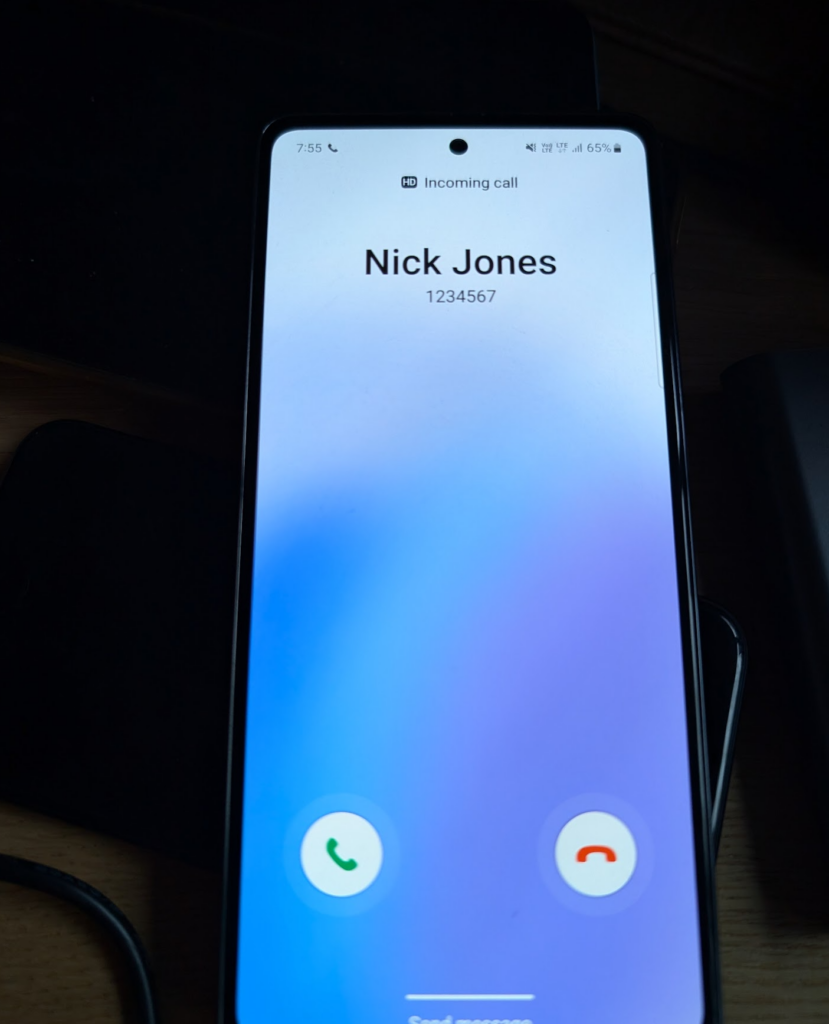
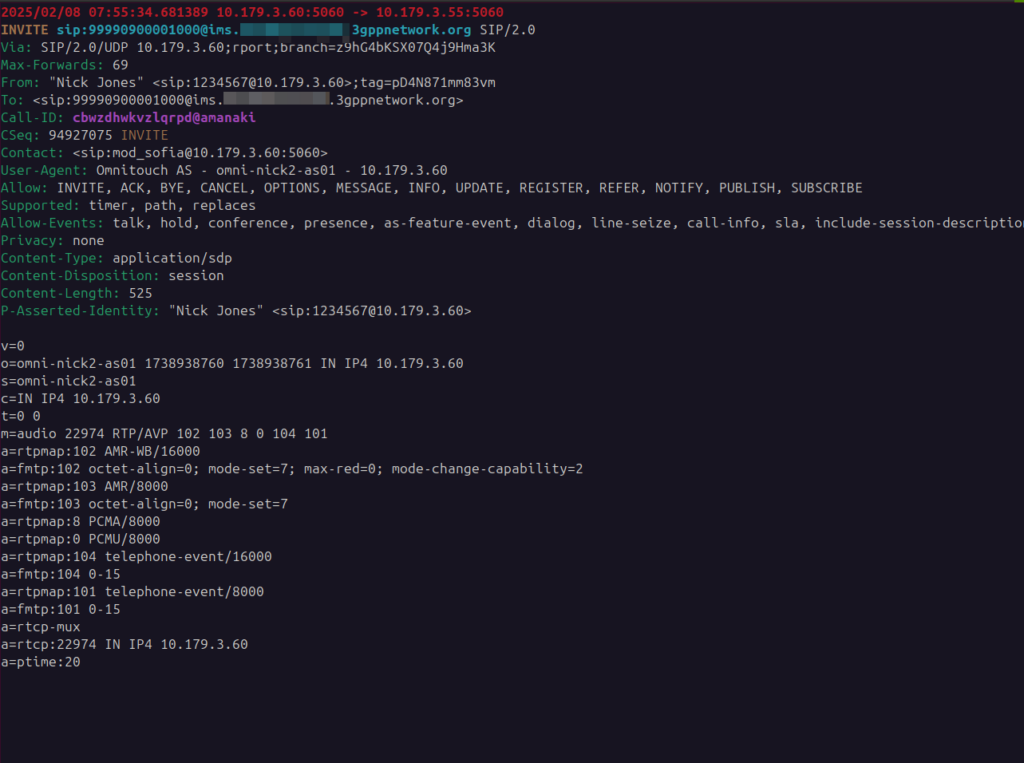
SIP has got a multitude of ways of showing Caller ID, PAI, R-PAI, From, even Contact, but the other day I got a tip (Thanks John!) that you can set a name as the Caller ID in the “Username field “display name” part of the P-Asserted-Identity for the leg from the TAS to the UE, and it’ll show up on the phone, and they’re right.
One thing that it doesn’t do is show the name in the call history, and if you go to “Add as Contact” it still makes you enter the name, clearly that’s not linked in, but it’s a kinda neat feature.
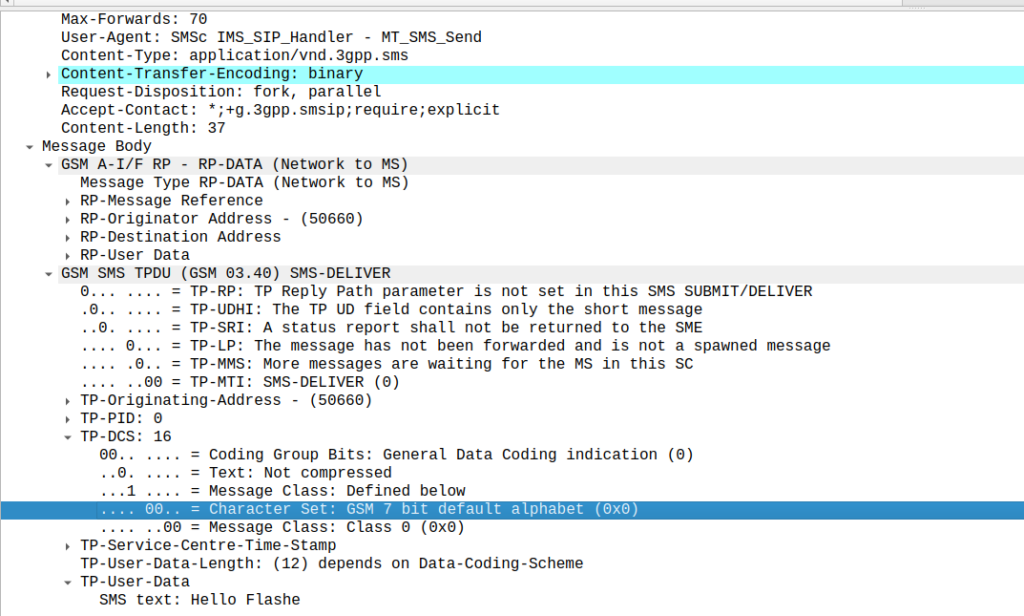
Stumbled across these the other day, while messing around with some values on our SMSc.
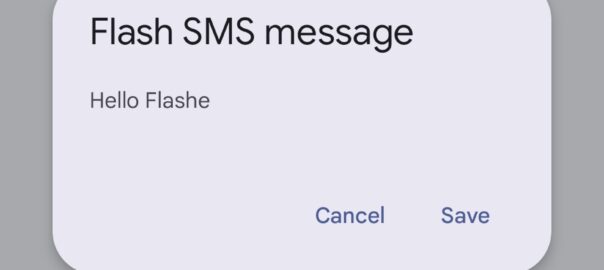
Setting the Data Coding Scheme to 16 with GSM7 encoding flags the SMS as “Flash message”, which means it pops up on the screen of the phone on top of whatever the user is doing.
While reading a quality telecom blog bam! There’s the flash SMS popping over whatever I was reading.
Oddly while there’s plenty of info online about Flash SMS, it does not appear in the 3GPP specifications for SMS.
Turns out they still work, move over RCS and A2P, it’s all about Flash messages!
There’s no real secret to this other than to set the Data Coding Scheme to 16, which is GSM7 with Flash class set. That’s it.
Obviously to take advantage of this you’d need to be a network operator, or have access to the network you wish to deliver to. Recently more A2P providers are filtering non vanilla SMS traffic to filter out stuff like SMS OTA message or SIM specific messages, so there’s a good chance this may not work through A2P providers.
I’ve been writing a fair bit recently about the “VoLTE Mess” – It’s something that’s been around for a long time, mostly impacting greenfield players rolling out LTE only, but now the big carriers are starting to feel it as they shut off their 2G and 3G networks, so I figured a brief history was in order to understand how we got here.
Note: I use the terms 4G or LTE interchangeably
The Introduction of LTE
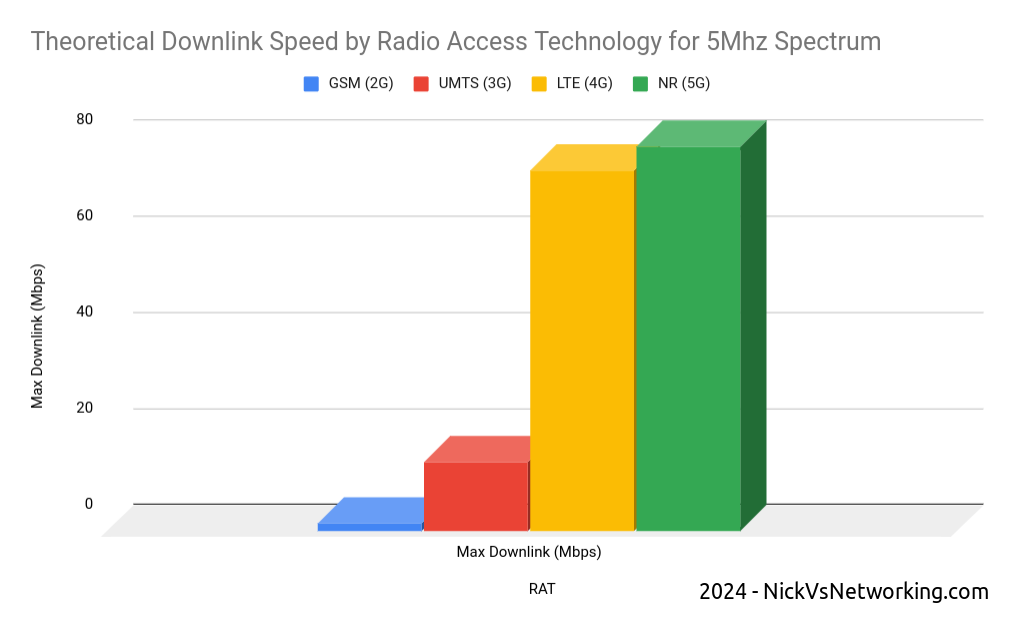
LTE (4G) is more “spectrally efficient” than the technologies that came before it. In simple terms, 1 “chunk” of spectrum will get you more speed (capacity) on LTE than the same size chunk of spectrum would on 2G or 3G.
So imagine it’s 2008 and you’re the CTO of a mobile network operator. Your network is congested thanks to carrying more data traffic than it was ever designed for (the first iPhone had launched the year before) and the network is struggling under the weight of all this new data traffic. You have two options here, to build more cell sites for more density (very expensive) or buy more spectrum (extremely expensive) – Both options see you going cap in hand to the finance team and asking for eye-wateringly large amounts of capital for either option.
But then the answer to your prayers arrives in the form of 3GPP’s Release 8 specification with the introduction of LTE. Now by taking some 2G or 3G spectrum, and by using it on 4G, you can get ~5x more capacity from the same spectrum. So just by changing spectrum you own from 2G or 3G to 4G, you’ve got 5x more capacity. Hallelujah!
So you go to Nortel and buy a packet core, and Alcatel and Siemens provide 4G RAN (eNodeBs) which you selectively deploy on the cell sites that are the most congested. The finance team and the board are happy and your marketing team runs amok with claims of 4G data speeds. You’ve dodged the crisis, phew.
This is the path that all established mobile operators took; throw LTE at the congested cell sites, to cheaply and easily free up capacity, and as the natural hardware replacement cycle kicked in, or cell sites reached capacity, swap out the hardware to kit that supports LTE in addition to the 2G and 3G tech.
Circuit Switched Fallback
But it’s hard to talk about the machinations of late 2000s telecom executives, without at least mentioning Hitler.
This video below from 15 years ago is pretty obscure and fairly technical, but the crux of it it is that Hitler is livid because LTE does not have a “CS Domain” aka circuit switched voice (the way 2G and 3G had handled voice calls).
It was optional to include support for voice calls in the LTE network (Voice over LTE) when you launched LTE services. So if you already had a 2G or 3G network (CS Network) you could just keep using 2G and 3G for your voice calls, while getting that sweet capacity relief.
So our hypothetical CTO, strapped for cash and data capacity, just didn’t bother to support VoLTE when they launched LTE – Doing so would have taken more time to launch, during which time the capacity problem would become worse, so “don’t worry about VoLTE for now” was the mantra.
All the operators who still had 2G and 3G networks, opted to just “Fallback” to using the 2G / 3G network for calling. This is called “Circuit Switched Fallback” aka CSFB.
Operators loved this as they got the capacity relief provided by shifting to 4G/LTE (more capacity in the network is always good) and could all rant about how their network was the fastest and had 4G first, this however was what could be described as a “Foot gun” – Something you can shoot yourself in the foot with in the future.
Operators eventually introduce VoLTE
Time ticked on an operators built out their 4G networks, and many in the past 10 years or so have launched VoLTE in their own networks.
For phones that support it, in areas with blanket 4G coverage, they can use VoLTE for all their calls.
But that’s the sticking point right there – If the phones support it.
But if the phones don’t support it, they’re roaming or making emergency calls, there is always been the safety blanket of 2G or 3G and Circuit Switched fallback to well, fall back to.
There’s no driver for operators who plan to (or are required to) operate a 2G or 3G network for the foreseeable future, to ensure a high level of VoLTE support in their devices.
For an operator today with 2G or 3G, Voice over LTE is still optional. Many operators still rely exclusively on Circuit Switched Fallback, and there are only a handful of countries that have turned off 2G and 3G and rely solely on VoLTE.
VoLTE Handset Support
For the past 16 years phone manufacturers have been making LTE capable phones.
But that does not mean they’ve been making phones that support Voice over LTE.
But it’s never been an issue up until this point, as there’s always been a circuit switched (2G/3G) network to fall back to, so the fact that these chips may not support VoLTE was not a big problem.
Many of the cheaper chipsets that power phones simply don’t support VoLTE – These chips do support LTE for data connections but rely on Circuit Switched Fallback for voice calls. This is in part due to the increased complexity, but also because some of the technologies for VoLTE (like AMR) required intellectual property deals to licence to use, so would add to the component cost to manufacture, and in the chips game, keeping down component cost is critical.
Even for chips that do support Voice over LTE, it’s “special”. Unlike calling in 2G or 3G that worked the same for every operator, phone manufacturers require a “Carrier Bundle” for each operator, containing that specific operators’ special flavor of VoLTE, that operator uses in their network.
This is because while VoLTE is standardized (Despite some claims to the contrary) a lot of “optional” bits have existed, and different operators built networks with subtle differences in the “flavor” of their Voice over LTE (IMS) stack they used. The OEMs (Phone / Chip manufacturers) had to handle these changes in the devices they made, for in order to sell their phones through that operator.
This means I can have a phone from vendor X that works with VoLTE on Network Y, but does not support VoLTE on Network Z.
Worse still, knowing which phones are supported is a bit of a guessing game.
Most operators sell phones directly to their customer base, so buying an Network Y branded phone from Vendor X, you know it’s going to support Network Y’s VoLTE settings, but if you change carriers, who knows if it’ll still support it?
When you’ve still got a Circuit Switched network it’s not the end of the world, you’ll just use CSFB and probably not realize it, until operators go to shut down 2G / 3G networks…
IMS Profile selection on an engineering mode MTK based Android handset
Navigating the Maze of VoLTE Compatibility
Here are some simple checklist you can ask your elderly family members if they ask if their phone is VoLTE compatible:
Does the underlying chipset the phone is based on support VoLTE? (you can find this out by disassembling the phone and checking the datasheets for the components from the OEMs after signing NDAs for each)
Does the underlying chipset require a “carrier bundle” of settings to have been loaded for this operator in order to support VoLTE (See Qualcomm MBM as an example)?
What version of this list am I currently on (generally set in the factory) and does it support this operator? (You can check by decapping the ICs and dumping their NVRAM and then running it through a decompiler)
Does my phones OS (Android / iOS) require a “carrier bundle” of it’s own to enable VoLTE? Is my operator in the version of the database on the phone? (See Android’s Carrier Database for example) (You can find the answer by rooting the phone and running some privileged commands to poke around the internal file system)
Does my operator / MNO support VoLTE – Does my plan / package support VoLTE? (You can easily find the answer by visiting the store and asking questions that don’t appear on the script)
If you managed to answer yes to all of the above, congratulations! You have conditional VoLTE support on your phone, although you probably don’t have a working phone anymore.
Wait, conditional VoLTE support?
That’s right folks, VoLTE will work in some scenarios with your operator!
If you plan on traveling, well your phone may support VoLTE at home, but does the phone have VoLTE roaming enabled? Many phones support VoLTE in the home network, but resort to CSFB when roaming.
If it does support VoLTE roaming, does the network you’re visiting support VoLTE roaming? Has the roaming agreement (IRA) between the operator you’re using while traveling and your home operator been updated to include VoLTE Roaming? These IRAs (AA.12 / AA.13 docs) also indicate if the network must turn off IPsec encryption for the VoLTE traffic when roaming, which is controlled by the phone anyway.
Phew, all this talk of VoLTE roaming while traveling scares me, I think I’ll stay home in the safety of the Australian bush with all these great friendly animals around a phone that supports VoLTE on my home network.
Ah – After spending some time in the Australian bush one of our many deadly animals bit me. Time to call for help! Wait, what about emergency calls over VoLTE? Again, many phones support VoLTE for normal calls, fall back to 2G or 3G for the emergency call, so if you have one of those phones (You’ll only find out if you try to make an emergency call and it fails) and try to make an emergency call in a country without 2G or 3G, you’d better find a payphone.
Sarcasm aside, there’s no dataset or compatibility matrix here – No simple way to see if your phone will work for VoLTE on a given operator, even if the underlying chip does support VoLTE.
Operators in Australia which recently shut down their 3G network, were mandated to block devices that didn’t support VoLTE for emergency calling. They did this using an Equipment Identity Register, and blocking devices based on the Type Allocation Code, but this scattergun approach just blocked non-carrier issued devices, regardless of it they supported VoLTE or VoLTE emergency calling.
Blame Game
So who’s to blame here?
There’s no one group to blame here, the industry has created a shitty cycle here:
Standards orgs for having too many “flavors” available
Operators deploying their own “Flavors” of VoLTE then mandating OEMs / Chip manufacturers comply with their “flavor”.
OEMs / Chip manufactures respond by adding “Carrier Bundles” to account for this per-operator customization
I’ve got some ideas on a way to unscramble this egg, and it’s going to take a push from the industry.
If you’re in the industry and keen to push for a fix, get in touch!
It’s time to get a long term solution to this problem, and we as an industry need to lead the change.
Oh boy this has been a pain in the backside with IMS / VoLTE devices using TCP and how they handle the underlying TCP sockets.
A mobile phone from manufacturer A, wants every SIP dialog to be in it’s own TCP session, while a phone from manufacturer B wants a unique TCP session per transaction, while manufacturer C thinks that every SIP message should reuse the same transaction.
So an MT call to manufacturer A, who wants every SIP dialog in it’s own transaction would look something like this:
PCSCF:44738 -> UE:5060; TCP SYN UE:5060 -> PCSCF:44738; TCP SYN/ACK PCSCF:44738 -> UE:5060; TCP ACK --- TCP connection is now open to UE from P-CSCF--- --- Start of new SIP Transaction 1 & Dialog --- PCSCF:44738 -> UE:5060; TCP PSH - SIP INVITE.... UE:5060 -> PCSCF:44738; TCP ACK
--- Start of SIP Transaction 2 --- PCSCF:44738 -> UE:5060; TCP PSH - SIP BYE.... UE:5060 -> PCSCF:44738; TCP ACK, PSH - SIP 200.... --- End of SIP Transaction 2 & SIP Dialog --- PCSCF:44738 -> UE:5060; TCP FIN UE:5060 -> PCSCF:44738; TCP ACK --- End of TCP Connection ---
Where UE:5060 – is the IP & port of the UE, as advertised in the Contact: header, while PCSCF:44738 is the PCSCF IP and a random TCP port used for this connection.
But for manufacturer B, who wants a unique TCP session per transaction, they want it to look like this:
PCSCF:44738 -> UE:5060; TCP SYN UE:5060 -> PCSCF:44738; TCP SYN/ACK PCSCF:44738 -> UE:5060; TCP ACK --- TCP connection is now open to UE from P-CSCF--- --- Start of new SIP Transaction 1 & Dialog --- PCSCF:44738 -> UE:5060; TCP PSH - SIP INVITE.... UE:5060 -> PCSCF:44738; TCP ACK
--- Start of TCP Session 2 ---- PCSCF:32627 -> UE:5060; TCP SYN UE:5060 -> PCSCF:32627; TCP SYN/ACK PCSCF:32627 -> UE:5060; TCP ACK --- Start of SIP Transaction 2 --- PCSCF:32627 -> UE:5060; TCP PSH - SIP BYE.... UE:5060 -> PCSCF:32627; TCP ACK, PSH - SIP 200.... --- End of SIP Transaction 2 & SIP Dialog --- PCSCF:32627 -> UE:5060; TCP FIN UE:5060 -> PCSCF:32627; TCP ACK --- End of TCP Connection 2 ---
And then manufacturer C wants just the one TCP session to be used for everything, so they open the TCP connection when they register, and that’s all we use for everything.
Is there any logic to this? Nope, seems to be tied to the underlying chipset (Qualcomm vs Mediatek vs Unisoc) and the SIP stack used (Qualcomm, MTK, Unisoc, Samsung, Apple).
We’ve profiled devices into one of 3 behaviors, and then we tag them based on user agent as to what “persona” they demand from the network.
I can’t believe I’m still talking about VoLTE / IMS handset support and it’s almost 2025…. For context IMS was “standardized” 17 years ago.
And bam, now when we run Kamailio we’ll get all the logic that rtpengine exposes when being called.
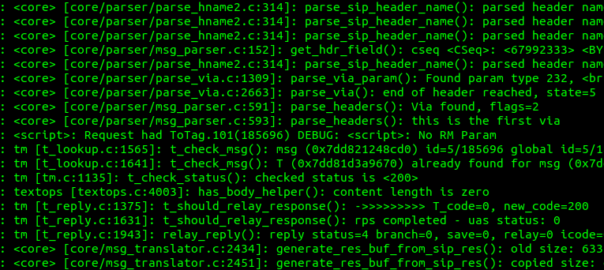
By setting cfgtrace we can enable a config trace as well, and as we step through our Kamailio config file for a SIP message, we can see what’s going on at every step.
So if you’re like me, you can use the debugger module, combined with reading through the source code, to prove every singletime that the issue is with my not understanding the function properly, and never the logic of the Kamailio module!
I generally do this with Python or via the Swagger UI for the Web UI, but here’s how we can create a fixed-line IMS subscriber in PyHSS, so we can register it with a softphone, without using EAP-AKA.
Firstly we create the AuC object for this password combo.
PyHSS is our open source Home Subscriber Server, it’s written in Python, has a variety of different backends, and is highly perforate (We benchmark to 10K transactions per second) and infinitely scaleable.
In this post I’ll cover the basics of setting up PyHSS in your enviroment and getting some Diameter peers connected.
For starters, we’ll need a database (We’ll use MySQL for this demo) and an account on that database for a MySQL user.
So let’s get that rolling (I’m using Ubuntu 24.04):
sudo apt update
sudo apt install mysql-server
Next we’ll create the MySQL user for PyHSS to use:
CREATE USER 'pyhss_user'@'%' IDENTIFIED BY 'pyhss_password';
GRANT ALL PRIVILEGES ON *.* TO 'pyhss_user'@'%' WITH GRANT OPTION;
FLUSH PRIVILEGES;
We’ll also need Redis as well (PyHSS uses Redis for inter-service communications and for caching), so go ahead an install that for your distro:
sudo apt install redis-server
So that’s our prerequisites sorted, let’s clone the PyHSS repo:
And install the requirements with pip from the PyHSS repo:
pip3 install -r requirements.txt
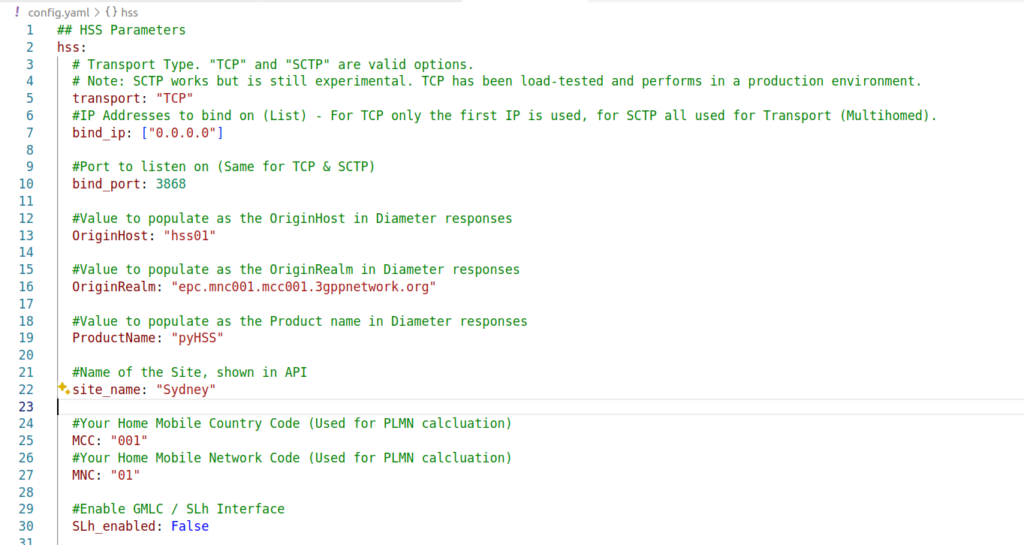
Next we’ll need to configure PyHSS, for that we update the config file (config.yaml) with the settings we want to use.
We’ll start by setting the bind_ip to a list of IPs you want to listen on, and your transport – We can use either TCP or SCTP.
For Diameter, we will set OriginHost and OriginRealm to match the Diameter hostname you want to use for this peer, and the Realm of your Diameter network.
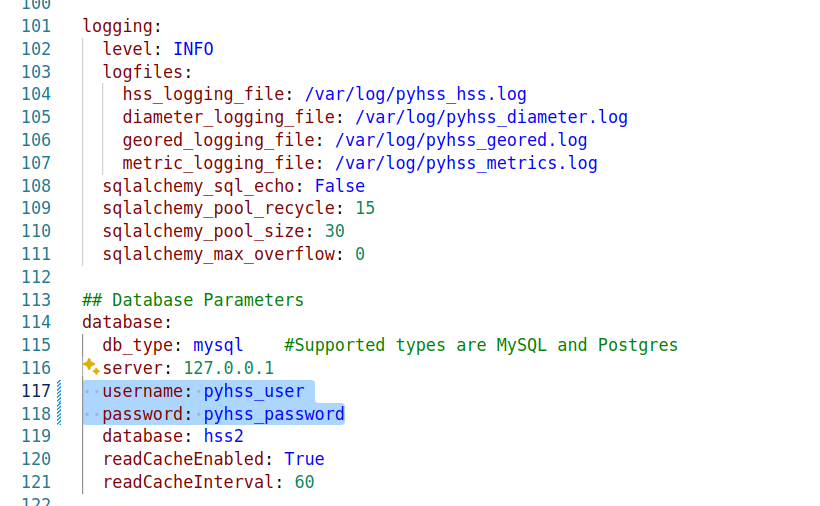
Lastly we’ll need to set the database parameters, updating the database: section to populate your credentials, setting your username and password and the database to match your SQL installation we setup at the start.
With that done, we can start PyHSS, which we do using systemctl.
Because there’s multiple microservices that make up PyHSS, there’s multiple systemctl files use to run PyHSS as a service, they’re all in the /systemd folder.
After we setup CgrateS the next thing we’d generally want to do would be to rate some traffic.
Of course, that could be realtime traffic, from Diameter, Radius, Kamailio, FreeSWITCH, Asterisk or whatever your case may be, but it could just as easily be CSV files, records from a database or a text file.
We’re going to be rating CDRs from simple CSV files with the date of the event, calling party, called party, and talk time, but of course your CDR exports will have a different format, and that’s to be expected – we tailor the Event Reader Service to match the format of the files we need.
The Event Reader Service, like everything inside CgrateS, is modular. ERS is a module we load that parses files using the rules we define, and creates Events that CgrateS can process and charge for, based on the rules we define.
But before I can tell you that story, I have to tell you this story…
Nick’s imaginary CSV factory
In the repo I’ve added a DummyCSV.csv, it’s (as you might have guessed) a CSV file.
This CSV file is like a million other CSV formats out there – We’ve got a CSV file with Start Time, End Time, Customer, Talk Time, Calling Party, Called Party, Animal (for reasons) and CallID to uniquely identify this CDR.
Protip: The Rainbow CSV VScode extension makes viewing/editing/querying CSV files in VScode much easier.
Call Start Time
Row 0
Call End Time
Row 1
Customer
Row 2
Talk Time
Row 3
Calling Party
Row 4
Called Party
Row 5
Animal
Row 6
CallID
Row 7
File Format
Next we need to feed this into CGrateS, and for that we’ll be using the Event Reporter Service.
JSON config files don’t make for riveting blog posts, but you’ve made it this far, so let’s power through.
ERS is setup in CGrateS’ JSON config file, where we’ll need to define one or more readers which are the the logic we define inside CGrateS to tell it what fields are what, where to find the files we need to import, and set all the parameters for the imports.
This means if we have a CSV file type we get from one of our suppliers with CDRs in it, we’d define a reader to parse that type of file. Likewise, if we’ve got a CSV of SMS traffic out of our SMSc, we’d need to define another reader to parse the CDRs in that format – Generally we’ll do a Reader for each file type we want to parse.
So let’s define a reader for this CSV spec we’ve just defined:
"ers": {
	"enabled": true,
	"readers": [
		{
			"id": "blog_example_csv_parser",
			"enabled": true,
			"run_delay":  "-1",
			"type": "*file_csv",
			"opts": {
				"csvFieldSeparator":",",
				"csvLazyQuotes": true,
				//csvLazyQuotes Counts the row length and if does not match this value declares an error
				//-1 means to look at the first row and use that as the row length
				"csvRowLength": -1
			},
			"source_path": "/var/spool/cgrates/blog_example_csv_parser/in",
			"processed_path": "/var/spool/cgrates/blog_example_csv_parser/out",
			"concurrent_requests": 1024,	//How many files to process at the same time
			"flags": [
				"*cdrs",
				"*log"
			],
			"tenant": "cgrates.org",
			"filters": [
				"*string:~*req.2:Nick", //Only process CDRs where Customer column == "Nick"
			],
			"fields":[]
}]}
This should hopefully be relatively simple (I’ve commented it as best I can).
The ID of the ERS object is just the name of this reader – you can name it anything you like, keeping in mind we can have multiple readers defined for different file formats we may want to read, and setting the ID just helps to differentiate them.
The run_delay of -1 means ERS will run as soon as a file is moved into the source_path directory, and the type is a CSV file – Note that’s moved not copied. We’ve got to move the file, not just copy it, as CGrateS waits for the inode notify.
In the opts section we set the specifics for the CSV we’re reading, field separator if how we’re separating the values in our CSV, and in our case, we’re using commas to delineate the fields, but if you were using a file using semicolons or another delineator, you’d adjust this.
Lastly we’ve got the paths, the source path is where we’ll need to move the files to get processed into, and the processed_path is where the processed files will end up.
For now I’ve set the flags to *log and *cdrs – By calling log we’ll make our lives a bit easier for debugging, and CDRs will send the event to the CDRs module to generate a rated CDR in CGrateS, which we could then use to bill a customer, a supplier, etc, and access via the API or exporting using Event Exporter Service.
Lastly under FilterS we’re able to define the filters that should define if we should process a row or not. You don’t know how much you need this feature until you need this feature. The filter rule I’ve included will only process lines where the Customer field in the CSV (row #2) is equal to “Nick”. You could use this to also filter only calls that have been answered, only calls to off-net, etc, etc – FilterS needs a blog post all on it’s own (and if you’re reading this in the future I may have already written one).
Alright, so far so good, we’ve just defined the metadata we need to do to read the file, but now how do we actually get down to parsing the lines in the file?
Well, that’s where the data in Fields: [] comes in.
If you’ve been following along the CgrateS in baby steps series, you’ll have rated a CDR using the API, that looked something like this:
ERS is going to use the same API to rate a CDR, calling more-or-less the same API, so we’re going to set the parameters that go into this from the CSV contents inside the fields:
			"fields":[

				//Type of Record (Voice)
				{"tag": "ToR", "path": "*cgreq.ToR", "type": "*constant", "value": "*voice"},

				//Category set to "call" to match RatingProfile_VoiceCalls from our RatingProfile
				{"tag": "Category", "path": "*cgreq.Category", "type": "*constant", "value": "call"},

				//RequestType is *rated as we won't be deducting from an account balance
				{"tag": "RequestType", "path": "*cgreq.RequestType", "type": "*constant", "value": "*rated"},

]
That’s the static values out of the way, next up we’ll define our values we pluck from the CSV. We can get the value of each row from “~*req.ColumnNumber” where ColumnNumber is the column number starting from 0.
				//Unique ID for this call - We get this from the CallID field in the CSV
				{"tag": "OriginID", "path": "*cgreq.OriginID", "type": "*variable","value":"~*req.7"},

				//Account is the Source of the call
				{"tag": "Account", "path": "*cgreq.Account", "type": "*variable", "value": "~*req.4"},

				//Destination is B Party Number - We use 'Called Party Number'
				{"tag": "Destination", "path": "*cgreq.Destination", "type": "*variable", "value": "~*req.5"},
				{"tag": "Subject", "path": "*cgreq.Subject", "type": "*variable", "value": "~*req.5"},

				//Call Setup Time (In this case, CGrateS can already process this as a datetime object)
				{"tag": "SetupTime", "path": "*cgreq.SetupTime", "type": "*variable", "value": "~*req.0"},

				//Usage in seconds - We use 'Call duration'
				{"tag": "Usage", "path": "*cgreq.Usage", "type": "*variable", "value": "~*req.3"},

				//We can include extra columns with extra data - Like this one:
				{"tag": "Animal", "path": "*cgreq.Animal", "type": "*variable", "value": "~*req.6"},
]
You’ll need to restart CGrateS after putting the config changes in, but your instance will probably fail to start as we’ll need to create the directories we specified CGrateS should monitor for incoming CSV files:
But before we can put this all into play, we’ll need to setup some rates. My previous posts have covered how to do this, so for that I’ve included a Python script to setup all the rates, which you can run once you’ve restarted CGrateS.
Alright, with that out of the way, we can test it out, move our Dummy.csv file to /var/spool/cgrates/blog_example_csv_parser/in and see what happens.
I run Ubuntu on my desktop and I mess with Kamailio a lot.
Recently I was doing some work with KEMI using Python, but installing the latest versions of Kamailio from the Debian Repos for Kamailio wasn’t working.
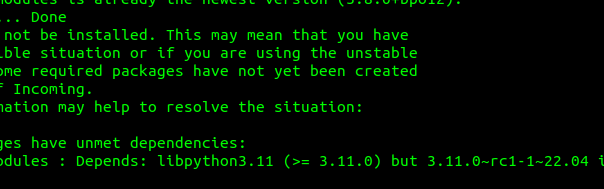
The following packages have unmet dependencies:
 kamailio-python3-modules : Depends: libpython3.11 (>= 3.11.0) but 3.11.0~rc1-1~22.04 is to be installed
Kamailio’s Python modules expect libpython3.11 or higher, but Ubuntu 22.04 repos only contain the release candidate – not the final version:
The docs describe AttributeS as a Key-Value-Store, but that’s probably selling it short – You can do some really cool stuff with AttributeS, and in this post, we’re going to learn about using AttributeS to transform stuff.
Note: Before we get started, I’d suggest copying this config file to use for testing.
Let’s look at a really basic example, where we add some data into AttributeS, match based on Account in CGrateS, and get back that data.
Well, for starters we’re calling the SetAttributeProfile endpoint, this is where we go to create / update Attribute Profiles, but in this case, because we’re hitting it for the first time with this ID, we’re creating a new entry called “ATTR_Nick_Key_Value_Example“, this will match any Contexts (more on them later) where the FilterIDs is a string, where the request Account, is equal to 1234.
Let’s run this against the CGrateS API and take a look at the result:
This tells us we matched the Attribute with the ID ATTR_Nick_Key_Value_Example, and inside Event we can see that ExampleKey was added with value ExampleValue.
Okay, you’re saying, well what was the point of that?
Well, what if as a key in the attributes, we had the password for the SIP account, which we passed to our SIP switch (Kamailio, FreeSWITCH or Asterisk for example), and used that to authenticate?
Now if the CGrateS Agent for your SIP Switch, includes the *attributes flag, and the call is coming from 1234, we’ll get back a key called “SIP_password” with the value “sosecretiputitonthewebsite”, which you can use to auth the SIP account.
We can also return multiple AttributeS, for example, we created two Attributes (ATTR_Nick_Password_Example and ATTR_Nick_Key_Value_Example) which match on the account 1234. This means we’ll get back the SIP Password from ATTR_Nick_Password_Example and the key:value we set in ATTR_Nick_Key_Value_Example:
The order can be controlled by the Weight flag in the attribute, and if you want to stop matching any other AttributeS rules after the current Attribute, you can set the Blocker=True flag when you create/update the Attribute.
Okay, I hear you saying, that’s all well and good, I can add arbitrary key/values to stuff. Here endeth the lesson right?
Well not quite, because we can add key/values, but we can also rewrite variables using AttributeS.
Let’s imagine we’ve got 3 phone numbers (DIDs) associated with an account inside CGrateS, for example’s sake let’s say we have 12340001, 12340002 and 12340003, and we want any calls from these numbers to be billed to a CGrateS account called “NickTest1234”.
Our SIP switch doesn’t need to know anything about “NickTest1234”, just the 3 DIDs it can use to call out from your SIP stack. But to do this, we’d need CGrateS to transform any events from these DIDs to replace the Account value inside CGrateS, with NickTest1234.
In the example code to go with this I’ve put together a simple for loop to add these – You can find the code on Github (link at the bottom).
So with these defined, let’s try and rate something, we’ll add a default Charger, and add an SMS balance, before simulating an SMS where the account is set to 12340003:
#Define default Charger
print(CGRateS_Obj.SendData({"method":"APIerSv1.SetChargerProfile","params":[{"Tenant":"cgrates.org","ID":"DEFAULT","FilterIDs":[],"AttributeIDs":["*none"],"Weight":0}]}))

#Add an SMS Balance
print(CGRateS_Obj.SendData({"method":"ApierV1.SetBalance","params":[{"Tenant":"cgrates.org","Account":"Nick_Test_123","BalanceType":"*sms","Categories":"*any","Balance":{"ID":"SMS_Balance_1","Value":"100","Weight":25}}],"id":13}))

import uuid
import datetime
now = datetime.datetime.now()
result = CGRateS_Obj.SendData({
    "method": "CDRsV2.ProcessExternalCDR",
    "params": [
        {
            "OriginID": str(uuid.uuid1()),
            "ToR": "*sms",
            "RequestType": "*pseudoprepaid",
            "AnswerTime": now.strftime("%Y-%m-%d %H:%M:%S"),
            "SetupTime": now.strftime("%Y-%m-%d %H:%M:%S"),
            "Tenant": "cgrates.org",
            #This is going to be transformed to Nick_Test_123 by Attributes
            "Account": "12340003",
            "Usage": "1",
        }
    ]
})
pprint.pprint(result)
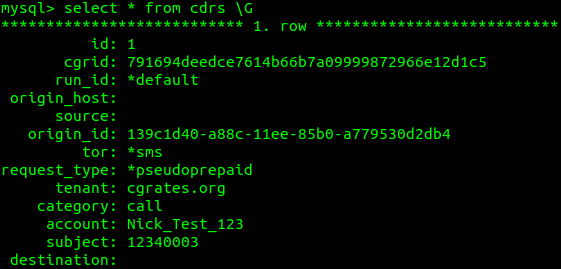
Right, so all going well, here’s what you should see in the CDRs table:
Bingo! Despite the fact the Account in the ProcessExternalCDR was set to 12340003, and had no mention of “NickTest1234”, CGrateS transformed it to NickTest1234.
How did that happen? Well, inside our cgrates.json file we have set the cdrs and chargers modules to have a link to Attributes, which means that when we call CDRs or Chargers modules via the API, these will in turn bounce the data through AttributesS for any transformations.
This means we don’t need to run AttributeSv1.ProcessEvent ourselves, when we call CDRsV2.ProcessExternalCDR, the CDRs module will call AttributeSv1.ProcessEvent for us.
We can actually see this happening, using ngrep, which as you work more with CGrateS, is a tool you’ll get very familiar with, let’s take a peek:
sudo ngrep -t -W byline port 2012 -d lo
Now if we run the CDRsV2.ProcessExternalCDR again, we’ll see the CDRs module has called Attributes for us:
Boom, there it is, same as we ran, but it’s being handled by CGrateS for us.
If you look carefully you’ll see the context in the API request is set to “*cdrs”, this means the CDRs module is calling Attributes.
When we define each of our Attributes, as we did earlier in the post, we can set what contexts they are valid in, for example we may want to apply the transformation when called by CDRs, but not other modules, you can restrict that when you define the Attribute by setting “Contexts”: [“*cdrs”].
Okay, so we’ve done some account replacement, what else can we do?
Well, let’s look at some other use cases,
Here in Australia we’ve got a few valid dialing formats, you could dial E.164 format (Numbers look like: +61212341234), 0NSN format (Numbers look like: 02 1234 1234) or NSN format (Numbers look like: 1234 1234 assuming you’re in the 03 area code yourself). If we want to define all our Destinations in E.164 format, we’ll need to to normalise the format using AttributeS, so the numbers always come as E.164.
And then under AttributeS we’ve defined a rule to replace anything matching the 0NSN regex, to strip the first digit and append a 61, to put it in E.164 format, and in SN format as the second entry.
And there you have it folks; our number format standardized.
We can combo / cascade AttributeS rules together, with the aid of the Weight and Blocker flags in the API.
Let’s imagine the 61212341234 number has been ported from Operator1 to Operator2, and the Destinations we’ve defined in CGrateS for this prefix are currently set to DST_Operator1. But because this number has been ported we should use DST_Operator2, so we charge the Operator2, as this number has been ported.
This means we don’t need to duplicate destination definitions to show this number has been ported, as this will be updated as the call gets rated, so we just assign the Attribute to each ported number.
So let’s match where the Subject of the call is 61212341234 (even though we’re going to input the Subject as 12341234), and rewrite the Destination attribute to DST_Operator2:
From the results we can see we matched two AttributeS rules, the first, ATTR_0NSN_to_E164_02_Area_Code reformatted the Subject of the call from 12341234 to 61212341234, then the updated Subject was passed through to ATTR_Ported_61212341234, which updated the Destination attribute to DST_Operator2.
If you’re having issues, make sure you have loaded the config file, are running the latest version, and if in doubt (and not on a production system), this script will clear all the data for you so you can rule out anything interfering.
Android, being open source, allows us to see how this logic works, and it’s important for operators to understand this logic, as it’s what dictates the behavior in many scenarios.
It’s important to note that I’m not covering Apple here, this information is not publicly available to share for iOS devices, so I won’t be sharing anything on this – Apple has their own ecosystem to handle emergency calling, if you’re from an operator and reading this, I’d suggest getting in touch with your Apple account manager to discuss it, they’re always great to work with.
The Android Open Source Project has an “emergency number database”. This database has each of the emergency phone numbers and the corresponding service, for each country.
This file can be read at packages/services/Telephony/ecc/input/eccdata.txt on a phone with engineering mode.
Let’s take a look what’s in mainline Android for Australia:
This one was a bit of a head scratcher for me, but I’m always glad to learn something new.
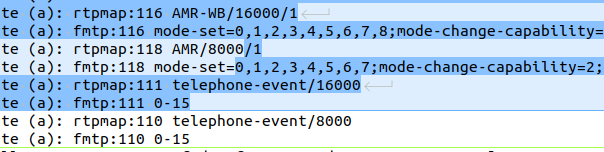
The handset made a VoLTE call, and it’s SDP offer shows it can support AMR and AMR-WB:
        Media Attribute (a): rtpmap:116 AMR-WB/16000/1
        Media Attribute (a): fmtp:116 mode-set=0,1,2,3,4,5,6,7,8;mode-change-capability=2;max-red=220
        Media Attribute (a): rtpmap:118 AMR/8000/1
        Media Attribute (a): fmtp:118 mode-set=0,1,2,3,4,5,6,7;mode-change-capability=2;max-red=220
        Media Attribute (a): rtpmap:111 telephone-event/16000
        Media Attribute (a): fmtp:111 0-15
Okay, that’s pretty normal, I can see we have the mode-set parameter defined, which indicates what modes the handset supports for each codec.
In our problem scenario, the Media Gateway that the call was sent to responded with this SDP answer:
        Media Description, name and address (m): audio 24504 RTP/AVP 118 110
        Media Attribute (a): rtpmap:118 AMR/8000
        Media Attribute (a): fmtp:118 mode-set=7
        Media Attribute (a): rtpmap:110 telephone-event/8000
        Media Attribute (a): fmtp:110 0-15
        Media Attribute (a): ptime:20
        Media Attribute (a): sendrecv
        [Generated Call-ID: FA163E564B37-f4d-98f56700-735d25-65357ee0-9c488]
But we got an error about not available codecs and the call drops, what gives?
Both sides support AMR (Only the phone supports AMR-WB), and the Media Gateway, as the answerer, supports mode-set 7, which is supported by the UE, so we should be good?
Well, not quite:
If mode-set is specified, it MUST be abided, and frames encoded with modes outside of the subset MUST NOT be sent in any RTP payload or used in codec mode requests. If not present, all codec modes are allowed for the payload type.
Okay, I get it, the answerer (media gateway) only supports mode 7, but the UE supports all the modes, so we should be fine right?
Well, no.
Section 8.3.1 in the RFC goes on to say in the Offer-Answer Model Considerations:
The parameter [mode-set] is bi-directional, i.e., the restricted set applies to media both to be received and sent by the declaring entity. If a mode set was supplied in the offer, the answerer SHALL return the mode-set unmodified or reject the payload type. However, the answerer is free to choose a mode-set in the answer only if no mode-set was supplied in the offer for a unicast two-peer session.
And there is our problem, and why the call is getting rejected.
The Media Gateway (the answerer in this scenario) is sending back the mode-set it supports (7) but as the UE / handset (offerer) included the mode-set, the Media Gateway should either respond with the same mode set (if it supported all the requested modes) or reject it.
Instead we’re seeing the Media Gateway repond with the mode set, which it supports, which it should not do: The Media Gateway should either return the same mode-set (unmodified / unchanged) or reject it.
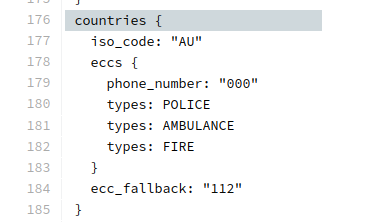
A lot of countries have a single point of contact for emergency services; in Europe you’d call 112 in an emergency, 000 in Australia or 911 in the US. Calling this number in the country will get you the emergency services.
This means a caller can order an ambulance for smoke inhalation, and the fire brigade, in one call.
But that’s not the case in every country; many countries don’t have one number for theemergency services, they’ve got multiple; a phone number for police, a different number for fire brigade and a different number for an ambulance.
For example, in Brazil if you need the police, you call 190, while a for example, uses 193 as the emergency number for the fire department, the police can be reached at 190 or 191 depending on if it’s road policing or general, and medical emergencies are covered by 192. Other countries have similar setups.
This is all well and good if you’re in Brazil, and you call 192 for an ambulance, the phone sends a SIP INVITE with a Request URI of sip:[email protected], because we can put a rule into our E-CSCF to say if the number is 192 to route it to the answer point for ambulances – But that’s not often the case on emergency calls.
In IMS, handsets generally detect the number dialed is on the Emergency Calling Code (ECC) list from the USIM Card.
The use of the ECC list means the phone knows this is an emergency call, and this is really important. For countries that use AML this can trigger sending of the AML SMS that process, and Emergency Calls should always be allowed to be made, even without credit, a valid SIM card, or even a SIM in the phone at all.
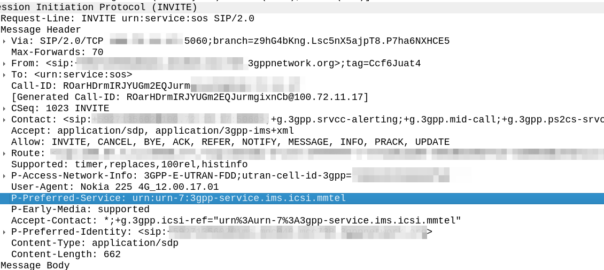
But this comes with a cost; when a user dials 911, the phones doesn’t (generally) send a call to sip:[email protected] like it would with any other dialled number, but rather the SIP INVITE is sent to urn:service:sos which will be routed to the PSAP by the E-CSCF. When a call comes through to these URNs they’re given top priority in the network
This is all well and good in a country where it doesn’t matter which emergency service you called, because all emergency calls route to a single PSAP, but in a country with multiple numbers, it’s really important when you call and ambulance, your call doesn’t get routed to animal control.
That means the phone has to look at what emergency number you’ve dialed, and map the URN it sends the call to to match what you’ve actually requested.
Recently we’ve been helping an operator in a country with a numbering plan like this, and we’ve been finding the limits of the standards here. So let’s start by looking at what the standards state:
IMS Emergency Calling is governed by TS 103.479 which in turn delegates to IETF RFC 5031, but for the calling number to URN translation, it’s pretty quiet.
Let’s look at what RFC 5031 allows for URNs:
urn:service:sos.ambulance
urn:service:sos.animal-control
urn:service:sos.fire
urn:service:sos.gas
urn:service:sos.marine
urn:service:sos.mountain
urn:service:sos.physician
urn:service:sos.poison
urn:service:sos.police
The USIM’s Emergency Calling Codes EF would be the perfect source of this data; for each emergency calling code defined, you’ve got a flag to indicate what it’s for, here’s what we’ve got available on the SIM Card:
Bit 1 Police
Bit 2 Ambulance
Bit 3 Fire Brigade
Bit 4 Marine Guard
Bit 5 Mountain Rescue
Bit 6 manually initiated eCall
Bit 7 automatically initiated eCall
Bit 8 is spare and set to “0”
So these could be mapped pretty easily you’d think, so if the call is made to an Emergency Calling Code flagged with Bit 4, the URN would go to urn:service:sos.mountain.
Alas from our research, we’ve found most OEMs send calls to the generic urn:service:sos, regardless of the dialled number and the ECC flags that are set on the SIM for that number.
One of the big chip vendors sends calls to an ECC flagged as Ambulance to urn:service:sos.fire, which is totally infuriating, and we’ve had to put a rule in our E-CSCF to handle this if the User Agent is set to one of their phones.
Is there room for improvement here? For sure! Emergency calling is super important, and time is of the essence, while animal control can probably transfer you to an ambulance, an emergency is by very nature time sensitive, and any time wasted can lead to worse outcomes.
While carrier bundles from the OEMs can handle this, the global ability to take any phone, from any country and call an emergency number is so important, that relying on a country-by-country approach here won’t suffice.
What could we do as an industry to address this?
Acknowledging that not all countries have a single point of contact for emergency service, introducing a simple mechanism in the UE SIP message to indicate what number (Emergency Calling Code) the user actually dialled would be invaluable here.
URNs are important, but knowing the dialed number when it comes to PSAP routing, is so important – This wouldn’t even need to be its own SIP header, it could just be thrown into the Contact header as another parameter.
Highly developed markets are often the first to embrace new tech (for us this means VoLTE and VoNR), but this means that these issues seen by less developed markets won’t appear until long after the standard has been set in stone, and often countries like this aren’t at the table of the standards bodies to discuss such requirements.
This easy, reasonable update to the standard, has the potential to save lives, and next time this comes up in a working group I’ll be advocating for a change.
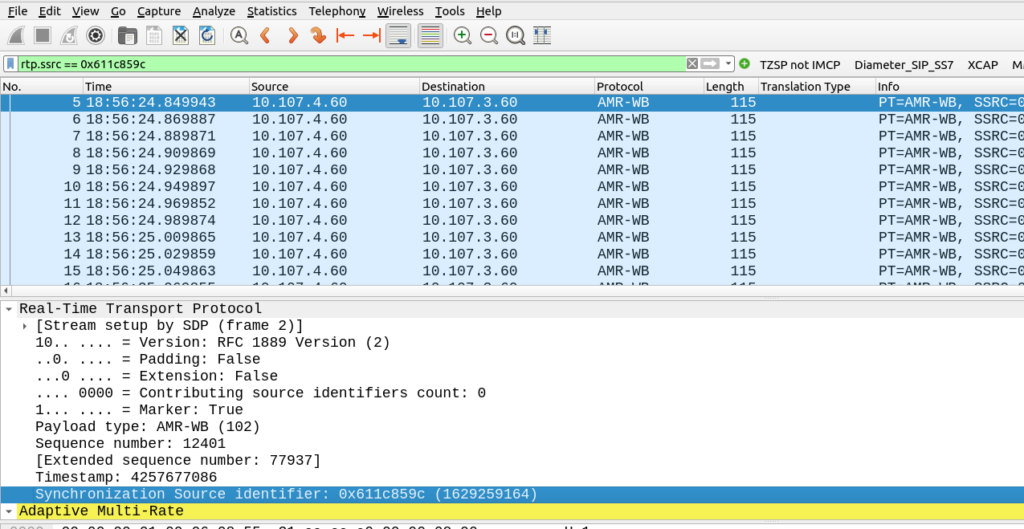
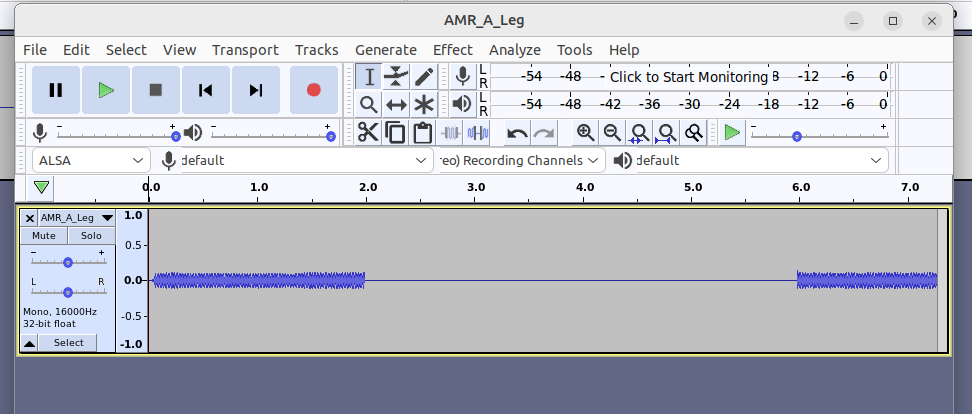
The other day I found myself banging my head on the table to diagnose an issue with Ringback tone on an SS7 link and the IMS.
On the IMS side, no RBT was heard, but I could see the Media Gateway was sending RTP packets to the TAS, and the TAS was sending it to the UE, but was there actual content in the RTP packets or was it just silence?
If this was PCM / G711 we’d be able to just playback in Wireshark, but alas we can’t do this for the AMR codec.
Filter the RTP stream out in Wireshark
Inside Wireshark I filtered each of the audio streams in one direction (one for the A-Party audio and one for the B-Party audio)
Then I needed to save each of the streams as a separate PCAP file (Not PCAPng).