I needed to have both legs of the B2BUA bridge call through FreeSWITCH using the same Call-ID (long story), and went down the rabbit hole of looking for how to do this.
A post from 15 years ago on the mailing list from Anthony Minessale said he added “sip_outgoing_call_id” variable for this, and I found the commit, but it doesn’t work – More digging shows this variable disappears somewhere in history.
But by looking at what it changed I found sip_invite_call_id does the same thing now, so if you want to make both legs use the same Call-ID here ya go:
If you work with FreeSWITCH there’s a good chance every time you do, you run fs_cli and attempt to read the firehose of data shown when making a call to make sense of what’s going on and why what you’re trying to do isn’t working.
That’s because we’ve edited the event_socket.conf.xml file, and fs_cli uses the event socket to connect to FreeSWITCH as well.
But there’s a simple fix,
Create a new file in /etc/fs_cli.conf and populate it with the info needed to connect to your ESL session you defined in event_socket.conf.xml, so if this is is your
[default]
; Put me in /etc/fs_cli.conf or ~/.fs_cli_conf
;overide any default options here
loglevel => 6
log-uuid => false


host     => 10.98.0.76
port     => 8021
password => mysupersecretpassword
debug    => 7
And that’s it, now you can run fs_cli and connect to the terminal once more!
We’re doing more and more network automation, and something that came up as valuable to us would be to have all the IPs in HOMER SIP Capture come up as the hostnames of the VM running the service.
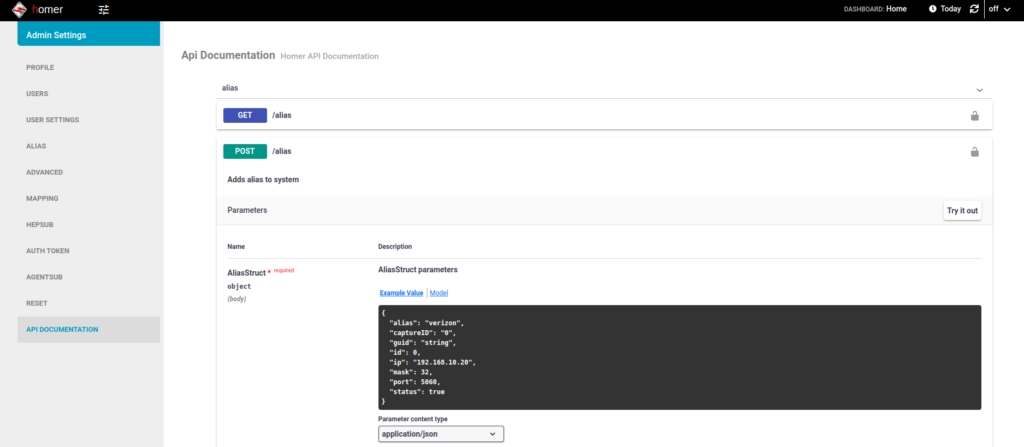
Luckily for us HOMER has an API for this ready to roll, and best of all, it’s Swagger based and easily documented (awesome!).
(Probably through my own failure to properly RTFM) I was struggling to work out the correct (current) way to Authenticate against the API service using a username and password.
Because the HOMER team are awesome however, the web UI for HOMER, is just an API client.
This means to look at how to log into the API, I just needed to fire up Wireshark, log into the Web UI via my browser and then flick through the packets for a real world example of how to do this.
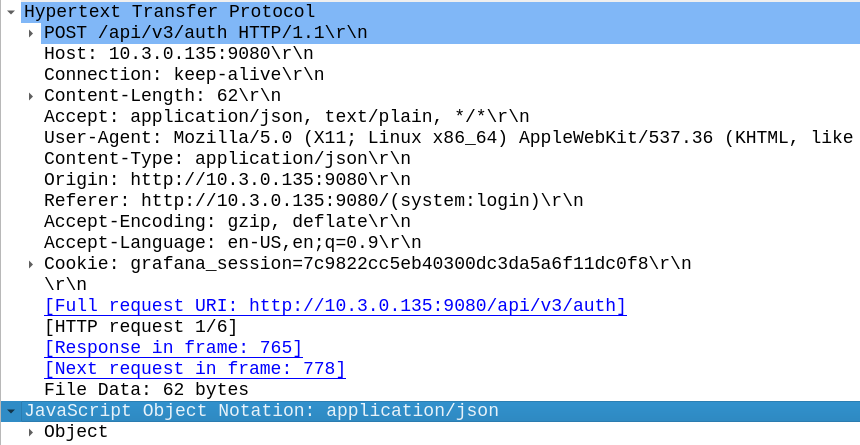
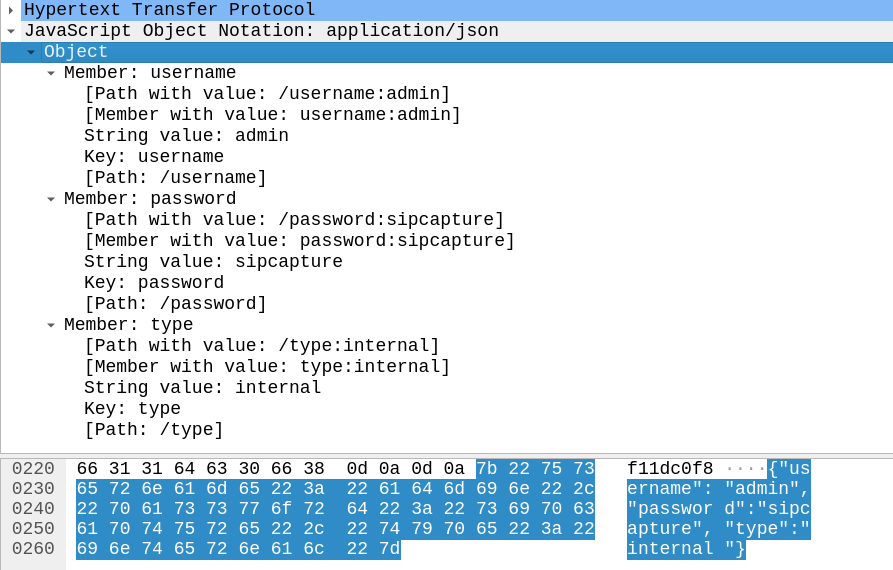
Homer Login JSON body as seen by Wireshark
In the Login action I could see the browser posts a JSON body with the username and password to /api/v3/auth
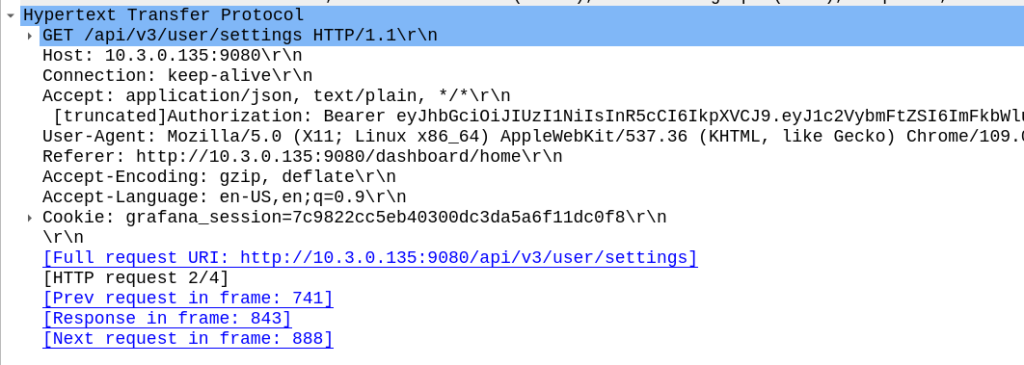
And in return the Homer API Server responds with a 201 Created an a auth token back:
Now in order to use the API we just need to include that token in our Authorization: header then we can hit all the API endpoints we want!
For me, the goal we were setting out to achieve was to setup the aliases from our automatically populated list of hosts. So using the info above I setup a simple Python script with Requests to achieve this:
import requests
s = requests.Session()

#Login and get Token
url = 'http://homer:9080/api/v3/auth'
json_data = {"username":"admin","password":"sipcapture"}
x = s.post(url, json = json_data)
print(x.content)
token = x.json()['token']
print("Token is: " + str(token))


#Add new Alias
alias_json = {
          "alias": "Blog Example",
          "captureID": "0",
          "id": 0,
          "ip": "1.2.3.4",
          "mask": 32,
          "port": 5060,
          "status": True
        }

x = s.post('http://homer:9080/api/v3/alias', json = alias_json, headers={'Authorization': 'Bearer ' + token})
print(x.status_code)
print(x.content)


#Print all Aliases
x = s.get('http://homer:9080/api/v3/alias', headers={'Authorization': 'Bearer ' + token})
print(x.json())
And bingo we’re done, a new alias defined.
We wrapped this up in a for loop for each of the hosts / subnets we use and hooked it into our build system and away we go!
With the Homer API the world is your oyster in terms of functionality, all the features of the Web UI are exposed on the API as the Web UI just uses the API (something I wish was more common!).
Using the Swagger based API docs you can see examples of how to achieve everything you need to, and if you ever get stuck, just fire up Wireshark and do it in the Homer WebUI for an example of how the bodies should look.
The Wiki on the Sangoma documentation page is really out of date and can’t be easily edited by the public, so here’s the skinny on how to setup a Sangoma transcoding card on a modern Debian system:
apt-get install libxml2* wget make gcc
wget https://ftp.sangoma.com/linux/transcoding/sng-tc-linux-1.3.11.x86_64.tgz
tar xzf sng-tc-linux-1.3.11.x86_64.tgz
cd sng-tc-linux-1.3.11.x86_64/
make
make install
cp lib/* /usr/local/lib/
ldconfig
At this point you should be able to check for the presence of the card with:
sngtc_tool -dev ens33 -list_modules
Where ens33 is the name of the NIC that the server that shares a broadcast domain with the transcoder.
Successfully discovering the Sangoma D150 transcoder
If instead you see something like this:
root@fs-131:/etc/sngtc#  sngtc_tool -dev ens33 -list_modules
Failed to detect and initialize modules with size 1
That means the server can’t find the transcoding device. If you’re using a D150 (The Ethernet enabled versions) then you’ve got to make sure that the NIC you specified is on the same VLAN / broadcast domain as the server, for testing you can try directly connecting it to the NIC.
I also found I had to restart the device a few times to get it to a “happy” state.
It’s worth pointing out that there are no LEDs lit when the system is powered on, only when you connect a NIC.
Next we’ll need to setup the sngtc_server so these resources can be accessed via FreeSWITCH or Asterisk.
Config is pretty simple if you’re using an all-in-one deployment, all you’ll need to change is the NIC in a file you create in /etc/sngtc/sngtc_server.conf.xml:
<configuration name="sngtc_server.conf" description="Sangoma Transcoding Manager Configuration">

        <settings>
                <!--
                By default the SOAP server uses a private local IP and port that will work for out of the box installations
                where the SOAP client (Asterisk/FreeSWITCH) and server (sngtc_server) run in the same box.
                However, if you want to distribute multiple clients across the network, you need to edit this values to
                listen on an IP and port that is reachable for those clients.
                <param name="bindaddr" value="0.0.0.0" />
                <param name="bindport" value="9000" />
                -->
        </settings>

        <vocallos>

                <!-- The name of the vocallo is the ethernet device name as displayed by ifconfig -->
                <vocallo name="ens33">
                        <!-- Starting UDP port for the vocallo -->
                        <param name="base_udp" value="5000"/>
                        <!-- Starting IP address octet to use for the vocallo modules -->
                        <param name="base_ip_octet" value="182"/>
                </vocallo>

        </vocallos>


</configuration>
With that set we can actually try starting the server,
Again, all going well you should see something like this in the log:
Well, there’s another concept I haven’t introduced yet, and that’s ChargerS, this is a concept / component we’ll dig into deeper for derived charging, but for now just know we need to add a ChargerS rule in order to get CDRs rated:
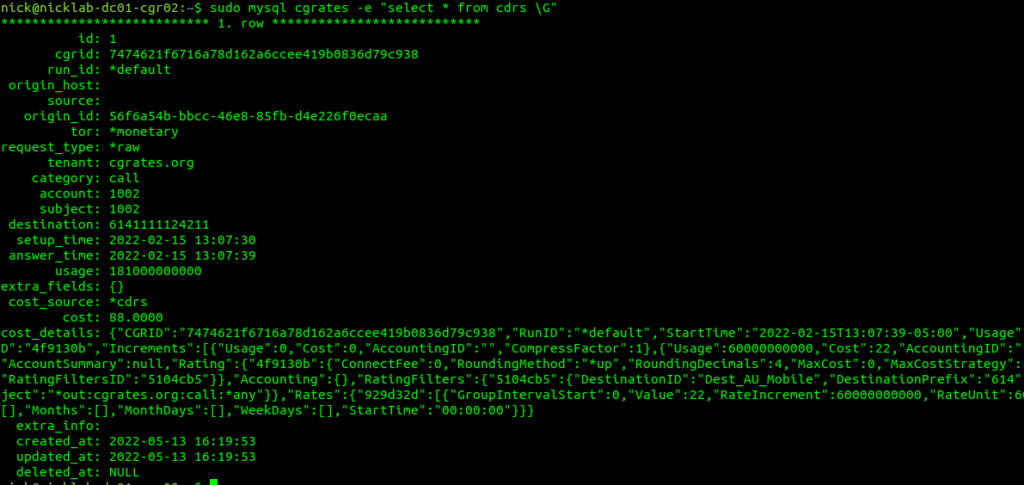
Well, if you’ve got CDR storage in StoreDB enabled (And you probably do if you’ve been following up until this point), then the answer is a MySQL table, and we can retrive the data with:
sudo mysql cgrates -e "select * from cdrs \G"
For those of you with a bit of MySQL experience under your belt, you’d be able to envisage using the SUM function to total a monthly bill for a customer from this.
Of course we can add CDRs via the API, and you probably already guessed this, but we can retrive CDRs via the API as well, filtering on the key criteria:
This would be useful for generating an invoice or populating recent calls for a customer portal.
Maybe creating rated CDRs and sticking them into a database is exactly what you’re looking to achieve in CGrateS – And if so, great, this is where you can stop – but for many use cases, there’s a want for an automated solution – For your platform to automatically integrate with CGrateS.
If you’ve got an Asterisk/FreeSWITCH/Kamailio or OpenSIPs based platform, then you can integrate CGrateS directly into your platform to add the CDRs automatically, as well as access features like prepaid credit control, concurrent call limits, etc, etc. The process is a little different on each of these platforms, but ultimately under the hood, all of these platforms have some middleware that generates the same API calls we just ran to create the CDR.
So far this tutorial has been heavy on teaching the API, because that’s what CGrateS ultimately is – An API service.
Our platforms like Asterisk and Kamailio with the CGrateS plugins are just CGrateS API clients, and so once we understand how to use and interact with the API it’s a breeze to plug in the module for your platform to generate the API calls to CGrateS required to integrate.
In our last post we talked about setting rates in CGrates and testing them out, but what’s the point in learning a charging system without services to charge?
This post focuses on intergrating FreeSWITCH and CGrates, other posts cover integrating Asterisk and CGrates, Kamailio and CGrates and Diameter and CGrates.
Future posts in this series will focus on the CGrates side, but this post will be a bit of a sidebar to get our FreeSWITCH environment connected to CGrates so we can put all our rating and charging logic into FreeSWITCH.
CGrates interacts with FreeSWITCH via the Event-Socket-Language in FreeSWITCH, which I’ve written about before, in essence when enabled, CGrates is able to make decisions regarding if a call should proceed or not, monitor currently up calls, and terminate calls when a subscriber has used their allocated balance.
Adding ESL Binding Support in FreeSWITCH
The configuration for CGrates is defined through the cgrates.json file in /etc/cgrates on your rating server.
By default, FreeSWITCH’s event socket only listens on localhost, as it is a pretty huge security flaw to open it to the world, but in order for our CGrates server to be able to access we’ll need to bind it to an IP Address assigned to the FreeSWITCH server so we can reach it from elsewhere on the network.
You may want to have CGrates installed on a different machine to your FreeSWITCH instance, or you may want to have multiple FreeSWITCH instances all getting credit control from CGrates.
Well, inside the cgrates.json config file, is where we populate the ESL connection details so CGrates can connect to FreeSWITCH.
Next we’ll need to tag the extensions we want to charge,
In order to do this we’ll need to set the type of the account (Ie. Prepaid, Postpaid, etc), and the flags to apply, which dictate which of the modules we’re going to use inside CGrateS.
FreeSWITCH won’t actually parse this info, it’s just passed to CGrateS.
And that’s pretty much it, when you restart FreeSWITCH and CGrates you should see in the CGrates log that it is connected to your FreeSWITCH instance, and when you make a call, FreeSWITCH will authorize it through CGrates.
We’ll get back into the nitty gritty about setting up CGrates in a future post, and cover setting up integration like this with other Platforms (Kamailio / Asterisk) and Protocols (Diameter & Radius) in future posts.
Sometimes FreeSWITCH XML dialplan is a bit cumbersome to do more complex stuff, particularly to do with interacting with APIs, etc. But we have the option of using scripts written in Python3 to achieve our outcomes and pass variables to/from the dialplan and perform actions as if we were in the dialplan.
For starters we’ll need to install the module and enable it, here’s the StackOverflow thread that got me looking at it where I share the setup steps.
Here is a very simple example I’ve put together to show how we interact with Python3 in FreeSWITCH:
We’ll create a script in /usr/share/freeswitch/scripts/ and call it “CallerName.py”
from freeswitch import *
import sys
def handler(session,args):

    #Get Variables from FreeSWITCH
    user_name = str(session.getVariable("user_name"))
    session.execute("log", "Call from Username: " + str(user_name))

    #Check if Username is equal to Nick
    if user_name == "Nick":
        session.execute("log", "Username is Nick!")
        #Convert the Username to Uppercase
        session.execute("set", "user_name=" + str(user_name).upper())
        #And return to the dialplan
        return
    else:
        #If no matches then log the error
        session.execute("log", "CRIT Username is not Nick - Hanging up the call")
        #And reject the call
        session.execute("hangup", "CALL_REJECTED")
Once we’ve created and saved the file, we’ll need to ensure it is owned by and executable by service user:
After adding this to the dialplan, we’ll need to run a “reloadxml” to reload the dialplan, and now when these actions are hit, the Python script we created will be called, and if the user_name variable is set to “nick” it will be changed to “NICK”, and if it it isn’t, the call will be hung up with a “CALL_REJECTED” response.
Obviously this is a very basic scenario, but I’m using it for things like ACLs from an API, and dynamic call routing, using the familiar and easy to work with Python interpreter.
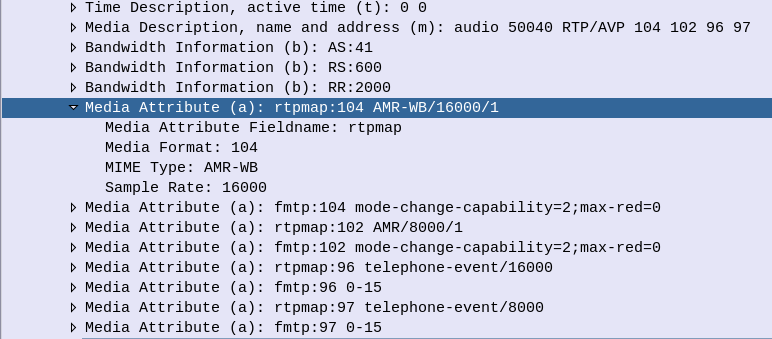
The hint to the cause of the error is above it – Codec comparison. If we look at the Audio Codec Compare lines, we can see the GSM codec we are trying to use, does not match the codecs configured in FreeSWITCH, hence getting the INCOMPATIBLE_DESTINATION error – None of the codecs offered match the codecs supported in FreeSWITCH.
So where do we go to fix this?
Well the SIP profile itself defines the codecs that are supported on this SIP profile,
FreeSWITCH SIP Profile (Sofia) codec settings
If you’re using a mostly default config, you’ll see this is set to a global variable, called $${global_codec_prefs}, so let’s take a look at vars.xml where this is defined:
FreeSWITCH default codec selection global variable
And there’s our problem, we need to add the GSM codec into that list to allow the calls,
So we change it to add the codecs we want to support, and reload the changes,
The Codec preferences I need for this IMS Application Server
After getting AMR support in FreeSWITCH I set about creating an IMS Application Server for VoLTE / IMS networks using FreeSWITCH.
So in IMS what is an Application Server? Well, the answer is almost anything that’s not a CSCF.
An Application Server could handle your Voicemail, recorded announcements, a Conference Factory, or help interconnect with other systems (without using a BGCF).
I’ll be using mine as a simple bridge between my SIP network and the IMS core I’ve got for VoLTE, with FreeSWITCH transcoding between AMR to PCMA.
Setting up FreeSWITCH
You’ll need to setup FreeSWITCH as per your needs, so that’s however you want to use it.
This post won’t cover setting up FreeSWITCH, there’s plenty of good resources out there for that.
The only difference is when you install FreeSWITCH, you will want to compile with AMR Support, so that you can interact with mobile phones using the AMR codec, which I’ve documented how to do here.
Setting up your IMS
In order to get calls from the IMS to the Application Server, we need a way of routing the calls to the Application Server.
There are two standards-compliant ways to achieve this,
But this is a blunt instrument, after all, it’ll only ever be used at the start of the call, what if we want to send it to an AS because a destination can’t be reached and we want to play back a recorded announcement?
Through fs_cli you can orignate calls from FreeSWITCH.
At the CLI you can use the originate command to start a call, this can be used for everything from scheduled wake up calls, outbound call centers, to war dialing.
For example, what I’m using:
originate sofia/external/[email protected]:5061 61399999995 XML default
originate is the command on the FS_CLI
sofia/external/[email protected]:5061 is the call URL, with the application (I’m using mod_sofia, so sofia), the Sofia Profile (in my case external) and the SIP URI, or, if you have gateways configured, the to URI and the gateway to use.
6139999995 is the Application
XML is the Dialplan to reference
default is the Context to use
But running this on the CLI is only so useful, we can use an ESL socket to use software to connect to FreeSWITCH’s API (Through the same mechanism fs_cli uses) in order to programmatically start calls.
But to do that first we need to expose the ESL API for inbound connections (Clients connecting to FreeSWITCH’s ESL API, which is different to FreeSWITCH connecting to an external ESL Server where FreeSWITCH is the client).
We’ll need to edit the event_socket.conf.xml file to define how this can be accessed:
Obviously you’ll need to secure this appropriately, good long password, and tight ACLs.
You may notice after applying these changes in the config, you’re no longer able to run fs_cli and access FreeSWITCH, this is because FreeSWITCH’s fs_cli tool connects to FreeSWITCH over ESL, and we’ve just changed tha parameters. You should still be able to connect by specifying the IP Address, port and the secret password we set:
This also means we can run fs_cli from other hosts if permitted through the ACLs (kinda handy for managing larger clusters of FreeSWITCH instances).
But now we can also connect a remote ESL client to it to run commands like our Originate command to setup calls, I’m using GreenSwitch with ESL in Python:
import gevent
import greenswitch
import sys
#import Fonedex_TelephonyAPI
#sys.path.append('../WebUI/Flask/')
import uuid

import logging
logging.basicConfig(level=logging.DEBUG)


esl_server_host = "10.0.1.16"
logging.debug("Originating call to " + str(destination) + " from " + str(source))
logging.debug("Routing the call to " + str(dialplan_entry))
fs = greenswitch.InboundESL(host=str(esl_server_host), port=8021, password='yoursecretpassword')
  try:
      fs.connect()
      logging.debug("Connected to ESL server at " + str(esl_server_host))
  except:
      raise SystemError("Failed to connect to ESL Server at " + str(esl_server_host))

r = fs.send('bgapi originate {origination_caller_id_number=' + str(source) + '}sofia/external/' + str(destination) + '@10.0.1.252:5061 default XML')
The mod_httapi in FreeSWITCH allows you to upload your call recordings to a HTTP server, in my case I’ve put together a Flask based Python server for a project I’m working on, which when the call ends, uploads to my web server. Presto!
Obviously you’ll need to replace the URL etc, but you can then just extract the POSTed file out and boom, you don’t need to store any recordings on each FreeSWITCH instance.
This is fantastic if you’re running multiple instances in a cluster or containerized, and want every FreeSWITCH instance to be dumb and with access to the same data as every other instance.
If you’re building IMS Networks, the AMR config is a must, but FreeSWITCH does not ship with AMR due to licencing constraints, but has all the hard work done, you just need to add the headers for AMR support and compile.
LibOpenCore has support for AMR which we build, and then with a few minor tweaks to copy the C++ header files over to the FreeSWITCH source directory, and enable support in modules.conf.
Then when building FreeSWITCH you’ve got the AMR Codec to enable you to manage IMS / VoLTE media streams from mobile devices.
Instead of copying and pasting a list of commands to do this, I’ve published a Dockerfile here you can use to build a Docker image, or on a straight Debian Buster machine if you’re working on VMs or Bare Metal if you run the commands from the Dockerfile on the VM / bare metal.
Most people think of SIP when it comes to FreeSWITCH, Asterisk and Kamailio, but all three support WebRTC.
FreeSWITCH makes WebRTC fairly easy to use and treats it much the same way as any SIP endpoint, in terms of registration and diaplan.
Setting up the SIP Profile
On the SIP profile we’ll need to activate WebRTC you’ll need to ensure a few lines of config are present:
    <!-- for sip over secure websocket support -->
    <!-- You need wss.pem in $${certs_dir} for wss or one will be created for you -->
    <param name="wss-binding" value=":7443"/>
Next you’ll need to restart FreeSWITCH and a self-signed certificate should get loaded,
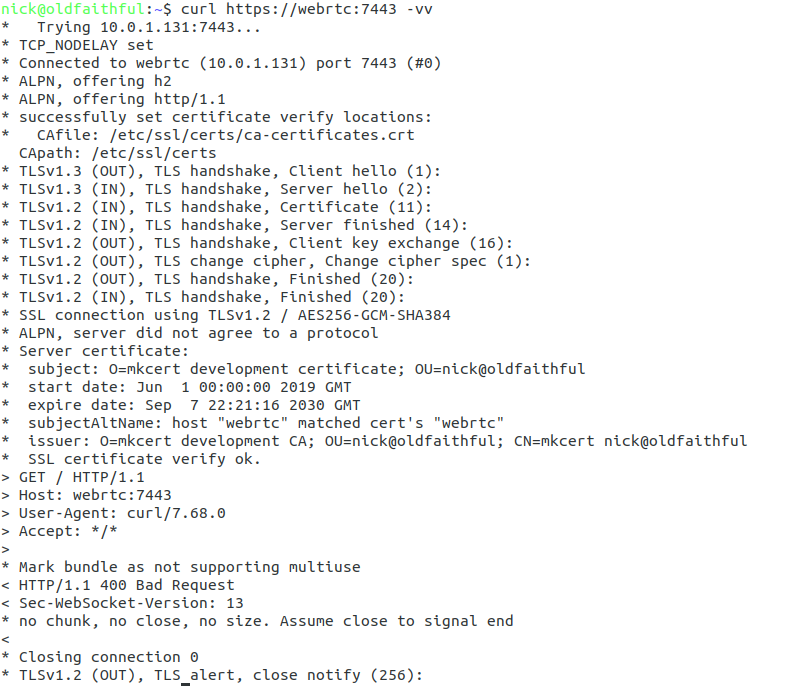
Once you’ve restarted FreeSWITCH will fail to detect any WebSocket certificate and generate a self signed certificate for you. This means that you can verify FreeSWITCH is listening as expected using Curl:
curl https://yourhostname:7443 -vvv
You should see an error regarding the connection failing due to an invalid certificate, if so, great! Let’s put in a valid certificate.
If not double check the firewall on your server allow traffic to port TCP 7443,
Loading your TLS Certificate
WebRTC & websocket are recent standards – this means a valid TLS certificate is mandatory. So to get this to work you’ll need a valid SSL certificate.
When we restarted FreeSWITCH after adding the wss-binding config a certificate was automatically generated in the $${certs_dir} of FreeSWITCH,
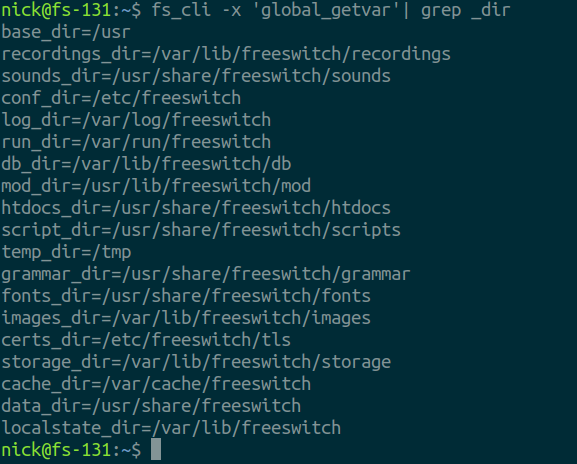
You can verify where the certs_dir is by echoing out the variable in FreeSWITCH:
fs_cli -x 'eval $${certs_dir}'
Unless you’ve changed it you’ll probably find your certs in /etc/freeswitch/tls/
The certificate and private key are stored in a single file, with the Certificate and the Private Key appended to the end,
In my case the certificate is called “webrtc.pem” and the private key file is “webrtc-key.pem”,
I’ll need to start by replacing the contents of the current certificate/ key file wss.pem with the certificate I’ve got webrtc.pem, and then appending the private key – webrtc-key.pem to the end of wss.pem,
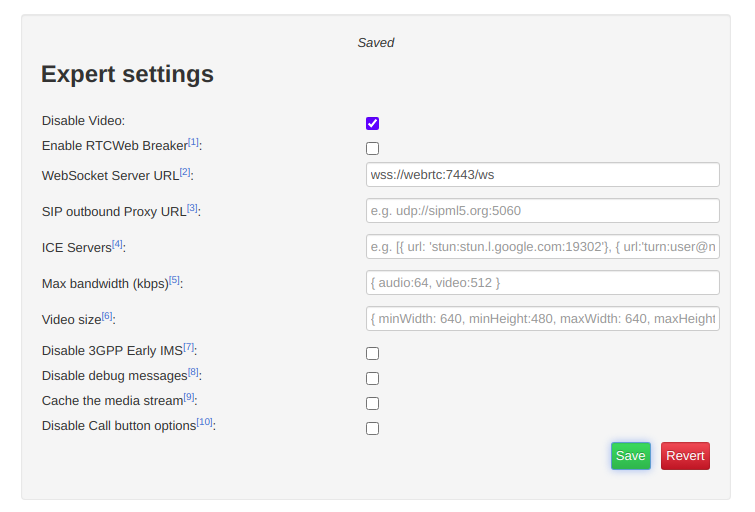
We’ll start by clicking the “Export Mode” button to set our wss:// URL;
Change the WebSocket Server URL to the URL of your FreeSWITCH instance (you must use a domain, not an IP Address)
If you’re running behind a NAT adding ICE servers is probably a good idea, although this will slow down connection times, you can use Google’s public STUN server by pasting in the below value:
[{ url: 'stun:stun.l.google.com:19302'}]
Finally we’ll save those settings and return back to the main tab,
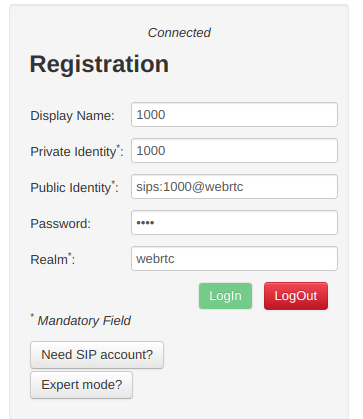
You’ll need to register with a username and password that’s valid on the FreeSWITCH box, in my case I’m using 1000 with the password 1000 (exists by default),
Replace webrtc with the domain name of your FreeSWITCH instance,
Finally you should be able to click Login and see Connected above,
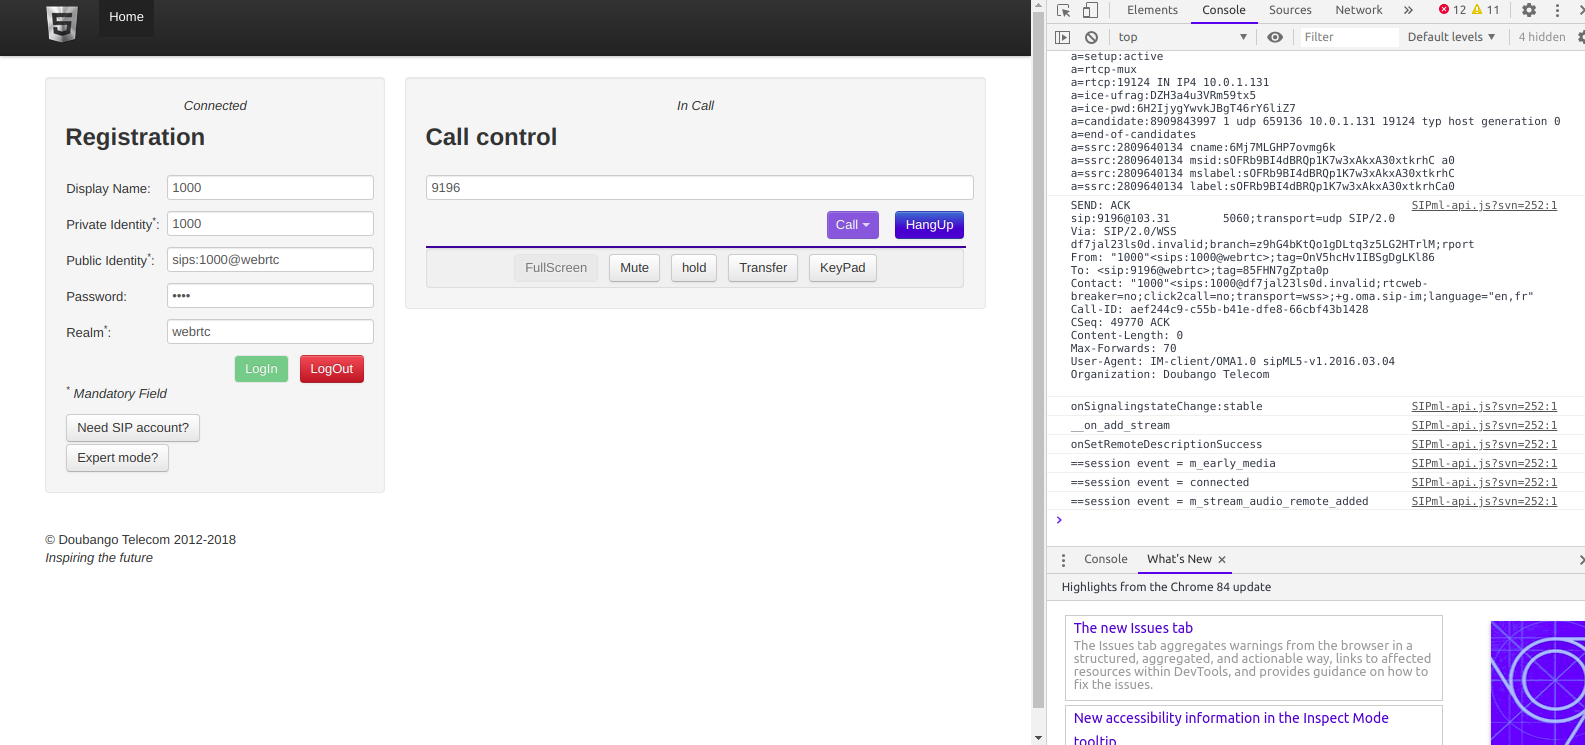
Then we can make calls to endpoints on FreeSWITCH using the dial box;
The Debug console in your browser will provide all the info you need to debug any issues, and you can trace WebSocket traffic using Sofia like any other SIP traffic.
Hopefully this was useful to you – I’ll cover more of WebRTC on Asterisk and also Kamailio in later posts!
Recently I’ve been working on a few projects with FreeSWITCH, and looking at options for programmatically generating dialplans, instead of static XML files.
Why not Static XML?
So let’s say I define a static XML dialplan.
It works great, but if I want to change the way a call routes I need to do it from the dialplan,
That’s not ideal if you’re using a distributed cluster of FreeSWITCH instances, or if you want to update on the fly.
Static XML means we have to define our dialplan when setting up the server, and would have to reconfigure the server to change it.
So what about mod_xml_curl?
When I’ve done this in the past I’ve relied on the mod_xml_curl module.
mod_xml_curl gets the XML dialplan using Curl from a web server, and so you setup a web server using Flask/PHP/etc, and dynamically generate the dialplan when the call comes in.
This sounds good, except you can’t update it on the fly.
mod_xml_curl means call routing decisions are made at the start of the call, and can’t be changed midway through the call.
So what’s ESL?
ESL is the Event Socket Library, essentially a call comes in, an ESL request is made to an external server.
For each step in the dialplan, an ESL request will be sent to the external server which tells it to do,
ESL allows us to use all FreeSWITCH’s fantastic modules, without being limited as to having to perform the call routing logic in FreeSWITCH.
So how do I use ESL?
You’ll need two create an ESL server,
Luckily there’s premade examples for popular languages;