Tag Archives: Asterisk

HOMER API in Python

We’re doing more and more network automation, and something that came up as valuable to us would be to have all the IPs in HOMER SIP Capture come up as the hostnames of the VM running the service.

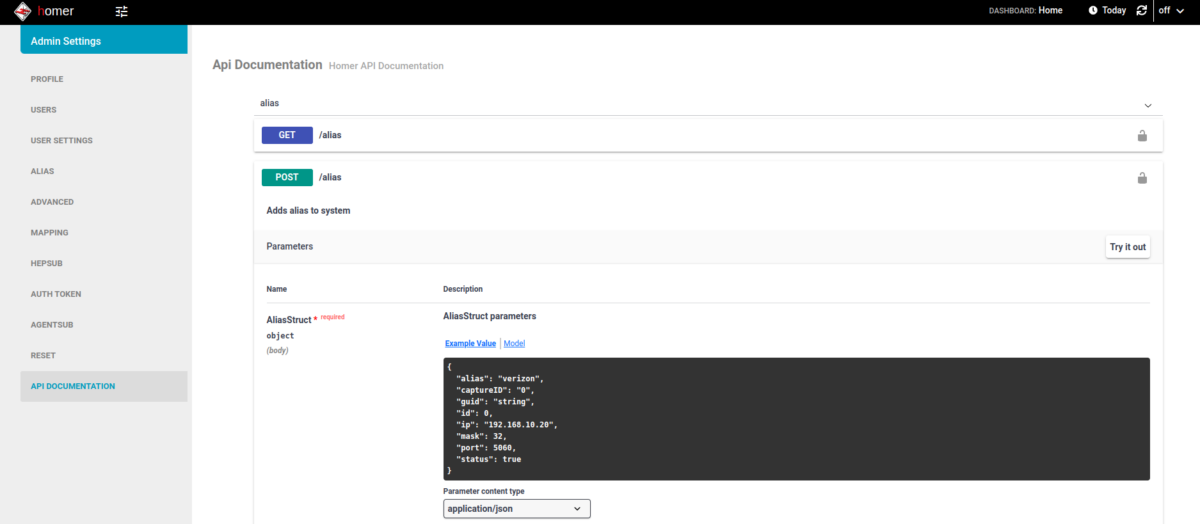
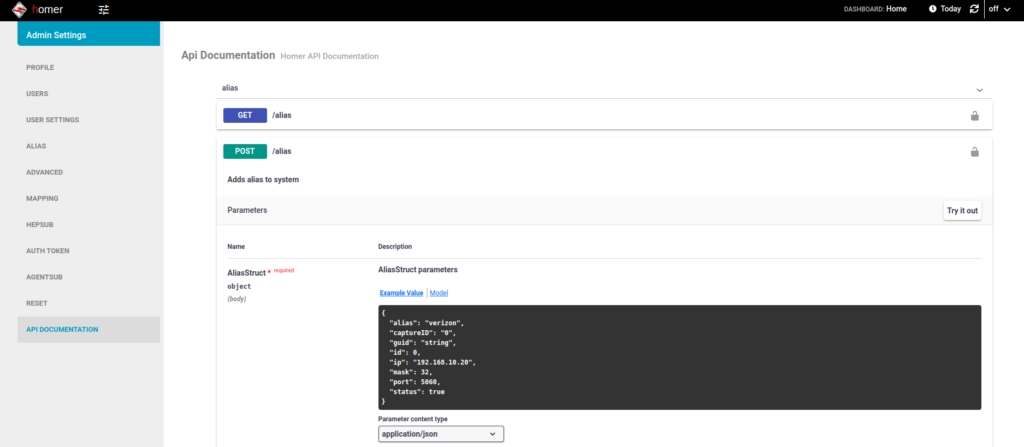
Luckily for us HOMER has an API for this ready to roll, and best of all, it’s Swagger based and easily documented (awesome!).

(Probably through my own failure to properly RTFM) I was struggling to work out the correct (current) way to Authenticate against the API service using a username and password.

Because the HOMER team are awesome however, the web UI for HOMER, is just an API client.

This means to look at how to log into the API, I just needed to fire up Wireshark, log into the Web UI via my browser and then flick through the packets for a real world example of how to do this.

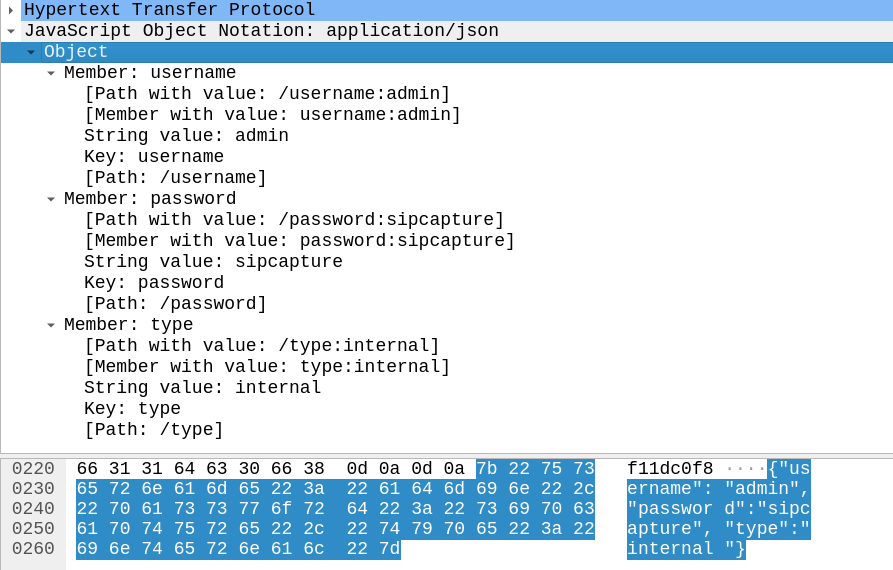
Homer Login JSON body as seen by Wireshark

In the Login action I could see the browser posts a JSON body with the username and password to /api/v3/auth

{"username":"admin","password":"sipcapture","type":"internal"}

And in return the Homer API Server responds with a 201 Created an a auth token back:

Now in order to use the API we just need to include that token in our Authorization: header then we can hit all the API endpoints we want!
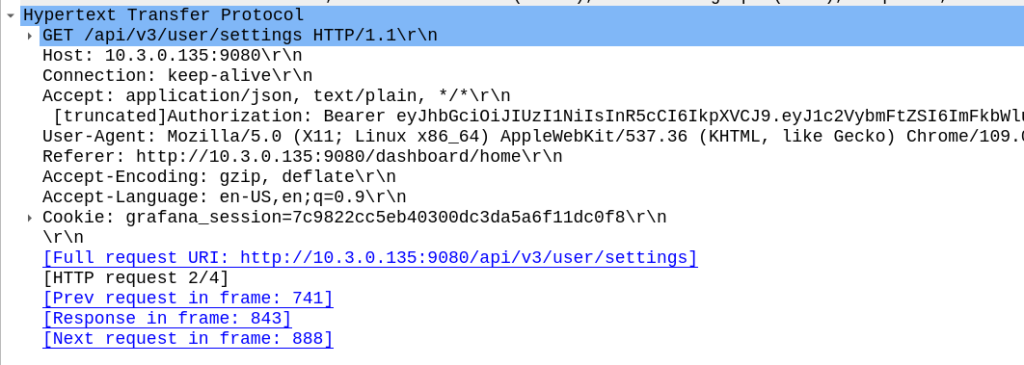
For me, the goal we were setting out to achieve was to setup the aliases from our automatically populated list of hosts. So using the info above I setup a simple Python script with Requests to achieve this:

import requests
s = requests.Session()

#Login and get Token
url = 'http://homer:9080/api/v3/auth'
json_data = {"username":"admin","password":"sipcapture"}
x = s.post(url, json = json_data)
print(x.content)
token = x.json()['token']
print("Token is: " + str(token))


#Add new Alias
alias_json = {
          "alias": "Blog Example",
          "captureID": "0",
          "id": 0,
          "ip": "1.2.3.4",
          "mask": 32,
          "port": 5060,
          "status": True
        }

x = s.post('http://homer:9080/api/v3/alias', json = alias_json, headers={'Authorization': 'Bearer ' + token})
print(x.status_code)
print(x.content)


#Print all Aliases
x = s.get('http://homer:9080/api/v3/alias', headers={'Authorization': 'Bearer ' + token})
print(x.json())

And bingo we’re done, a new alias defined.

We wrapped this up in a for loop for each of the hosts / subnets we use and hooked it into our build system and away we go!

With the Homer API the world is your oyster in terms of functionality, all the features of the Web UI are exposed on the API as the Web UI just uses the API (something I wish was more common!).

Using the Swagger based API docs you can see examples of how to achieve everything you need to, and if you ever get stuck, just fire up Wireshark and do it in the Homer WebUI for an example of how the bodies should look.

Thanks to the Homer team at QXIP for making such a great product!
Sangoma Transcoding Cards Setup

The Wiki on the Sangoma documentation page is really out of date and can’t be easily edited by the public, so here’s the skinny on how to setup a Sangoma transcoding card on a modern Debian system:

apt-get install libxml2* wget make gcc
wget https://ftp.sangoma.com/linux/transcoding/sng-tc-linux-1.3.11.x86_64.tgz
tar xzf sng-tc-linux-1.3.11.x86_64.tgz
cd sng-tc-linux-1.3.11.x86_64/
make
make install
cp lib/* /usr/local/lib/
ldconfig

At this point you should be able to check for the presence of the card with:

sngtc_tool -dev ens33 -list_modules

Where ens33 is the name of the NIC that the server that shares a broadcast domain with the transcoder.

Successfully discovering the Sangoma D150 transcoder

If instead you see something like this:

root@fs-131:/etc/sngtc#  sngtc_tool -dev ens33 -list_modules
Failed to detect and initialize modules with size 1

That means the server can’t find the transcoding device. If you’re using a D150 (The Ethernet enabled versions) then you’ve got to make sure that the NIC you specified is on the same VLAN / broadcast domain as the server, for testing you can try directly connecting it to the NIC.

I also found I had to restart the device a few times to get it to a “happy” state.

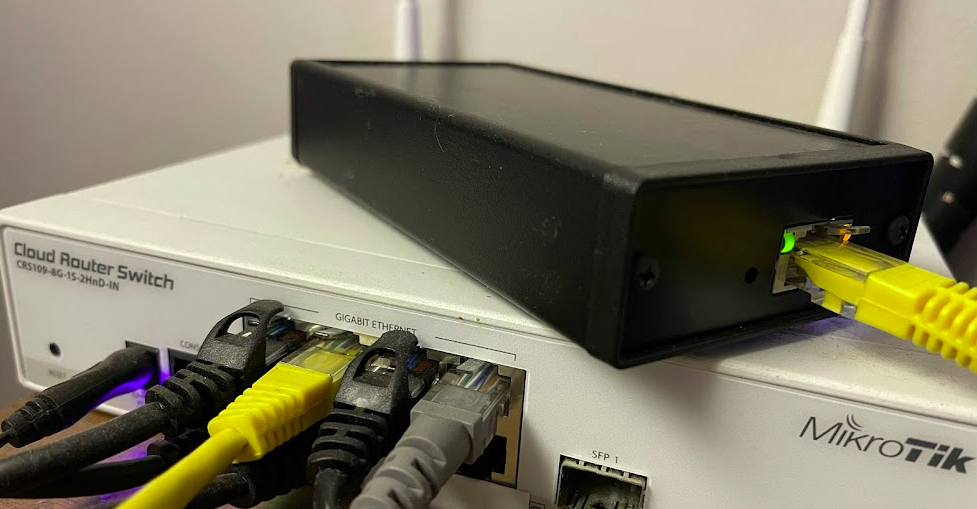
It’s worth pointing out that there are no LEDs lit when the system is powered on, only when you connect a NIC.

Next we’ll need to setup the sngtc_server so these resources can be accessed via FreeSWITCH or Asterisk.

Config is pretty simple if you’re using an all-in-one deployment, all you’ll need to change is the NIC in a file you create in /etc/sngtc/sngtc_server.conf.xml:

<configuration name="sngtc_server.conf" description="Sangoma Transcoding Manager Configuration">

        <settings>
                <!--
                By default the SOAP server uses a private local IP and port that will work for out of the box installations
                where the SOAP client (Asterisk/FreeSWITCH) and server (sngtc_server) run in the same box.
                However, if you want to distribute multiple clients across the network, you need to edit this values to
                listen on an IP and port that is reachable for those clients.
                <param name="bindaddr" value="0.0.0.0" />
                <param name="bindport" value="9000" />
                -->
        </settings>

        <vocallos>

                <!-- The name of the vocallo is the ethernet device name as displayed by ifconfig -->
                <vocallo name="ens33">
                        <!-- Starting UDP port for the vocallo -->
                        <param name="base_udp" value="5000"/>
                        <!-- Starting IP address octet to use for the vocallo modules -->
                        <param name="base_ip_octet" value="182"/>
                </vocallo>

        </vocallos>


</configuration>

With that set we can actually try starting the server,

Again, all going well you should see something like this in the log:

And then at the end you should see:

[SNGTC_INFO ] * 16:43:58: [00-0c-xx-yy-zz] RoundTripMs = 6 ulExtractTimeMs=0 ulCmdTimeoutMs 1000
[SNGTC_INFO ] * 16:43:58: 00-0c-xx-yy-zz: Reset Finished

[SNGTC_INFO ] * 16:43:58: 00-0c-xx-yy-zz: Setting cpu threshold Hi=90/Lo=80
[SNGTC_INFO ] * 16:43:58: Sangoma Transcoding Server Ready
[SNGTC_INFO ] * 16:43:58: Monitoring Sangoma Transcoding Modules

Once we know it’s starting up manually we can try and start the daemon.

sngtc_server_ctrl start

Should result in:

sngtc_server: Starting sngtc_server in safe mode ...
sngtc_server: Starting processes...
Starting sngtc_server...OK

And with that, we’re off and running and ready to configure this for use in FreeSWITCH or Asterisk.

Kamailio Bytes – Gotchas with Kamailio as an Asterisk Load Balancer

How do I make Kamailio work with Asterisk?

It’s a seemingly simple question, the answer to which is – however you want, sorry if that’s not a simple answer.

I’ve talked about the strengths and weaknesses of Kamailio and Asterisk in my post Kamailio vs Asterisk, so how about we use them to work together?

The State of Play

So before we go into the nitty gritty, let’s imagine we’ve got an Asterisk box with a call queue with Alice and Bob in it, set to ring those users if they’re not already on a call.

Each time a call comes in, Asterisk looks at who in the queue is not already on a call, and rings their phone.

Now let’s imagine we’re facing a scenario where the single Asterisk box we’ve got is struggling, and we want to add a second to share the load.

We do it, and now we’ve got two Asterisk boxes and a Kamailio load balancer to split the traffic between the two boxes.

Now each time a call comes in, Kamailio sends the SIP INVITE to one of the two Asterisk boxes, and when it does, that Asterisk box looks at who is in the queue and not already on a call, and then rings their phone.

Let’s imagine a scenario where a Alice & Bob are both on calls on Asterisk box A, and another call comes in this call is routed to Asterisk box B. Asterisk box B looks at who is in the queue and who is already on a call, the problem is Alice and Bob are on calls on Asterisk box A, so Asterisk box B doesn’t know they’re both on a call and tries to ring them.

We have a problem.

Scaling stateful apps is a real headache,

So have a good long hard think about how to handle these issues before going down this path!

Kamailio vs Asterisk

One of the most searched keywords that leads to this site is Kamailio vs Asterisk, so I thought I’d expand upon this a bit more as I’m a big fan of both, and it’s somewhat confusing.

(Almost everything in this post I talk about on Asterisk is roughly true for FreeSWITCH as well, although FS is generally more stable and scalable than Asterisk. )

Asterisk

Asterisk is a collection of PBX / softswitch components that you can configure and put together to create a large number of different products with the use of config files and modules.

Asterisk can read and write the RTP media stream, allowing it to offer services like Voicemail, B2B-UA, Conferencing, Playing back audio, call recording, etc.

It’s easy to learn and clear to understand how it handles “calls”.

Kamailio

Kamailio is a SIP proxy, from which you can modify SIP headers and then forward them on or process them and generate a response.

Kamailio is unable to do manipulate the RTP media stream. It can’t listen to, modify or add to the call audio, it only cares about SIP and not the media stream. This means it can’t playback an audio file, record a call or serve voicemail.

Kamailio has a bit of a steep learning curve, which I’ve tried to cover in my Kamailio 101 series, but even so, Kamailio doesn’t understand the concept of a “call”, it deals in Sessions, as in SIP, and everything you want to do, you have to write into Kamailio’s logic. Awesome power but a lot to take in.

Note – RTPengine is growing in capabilities and integrates beautifully into Kamailio, so for some applications you may be able to use RTPengine for media handling.

ScaleSpeedStabilityMedia FunctionsEase
AsteriskXX
KamailioXXX

Working Together

Asterisk has always had issues at scale. This is for a variety of reasons, but the most simplistic explanation is that Asterisk is fairly hefty software, and that each subscriber you add to the system consumes resources at a rate where once your system reaches a few hundred users you start to see issues with stability.

Kamailio works amazingly at scale, it’s architecture was designed with running at scale in mind, and it’s super lightweight footprint means the load on the box between handling 1,000 sessions and handling 100,000 sessions isn’t that much.

Because Asterisk has the feature set, and Kamailio has the scalability, so the the two can be used together really effectively. Let’s look at some examples of Asterisk and Kamailio working together:

Asterisk Clustering

You have a cluster of Asterisk based Voicemail servers, serving your softswitch environment. You can use a Kamailio instance to sit in front of them and route INVITEs evenly throughout the cluster of Asterisk instances.

You’d be using Asterisk’s VM functions (because Asterisk can do media functions) and Kamailio’s SIP routing functions.

Here’s an example of Kamailio Dispatcher acting in this function.

Application Server for SIP Softswitch

You have a Kamailio based Softswitch that routes SIP traffic from customers to carriers, customers want a hosted Conference Bridge. You offer this by routing any SIP INVITES to the address of the conference bridge to an Asterisk server that serves as the conference bridge.

You’d be using Kamialio to route the SIP traffic and using Asterisk’s ability to be aware of the media stream and join several sources to offer the conference bridge.

Which should I use?

It all depends on what you need to do.

If you need to do anything with the audio stream you probably need to use something like Asterisk, FreeSwitch, YaTE, etc, as Kamailio can’t do anything with the audio stream.*

If it’s just signalling, both would generally be able to work, Asterisk would be easier to setup but Kamailio would be more scaleable / stable.

Asterisk is amazingly quick and versatile when it comes to solving problems, I can whip something together with Asterisk that’ll fix an immediate need in a faction of the time I can do the same thing in Kamailio.

On the other hand I can fix a problem with Kamailio that’ll scale to hundreds of thousands of users without an issue, and be lightning fast and rock solid.

Summary

Kamailio only deals with SIP signalling. It’s very fast, very solid, but if you need to do anything with the media stream like mixing, muxing or transcoding (RTP / audio) itself, Kamailio can’t help you.*

Asterisk is able to deal with the media stream, and offer a variety of services through it’s rich module ecosystem, but the trade-off is less stability and more resource intensive.

If you do require Asterisk functionality it’s worth looking into FreeSWITCH, although slightly harder to learn it’s generally regarded as superior in a lot of ways to Asterisk.

I don’t write much about Asterisk these days – the rest of the internet has that pretty well covered, but I regularly post about Kamailio and other facets of SIP.

IBM Watson – Speech to Text (SST)

I’ve been using IBM’s Watson’s Speech to Text engine for transcribing call audio, some possible use cases are speech driven IVRs, Voicemail to Email transcription, or making Call Recordings text-searchable.

The last time I’d played with Speech Recognition on Voice Platforms was in 2012, and it’s amazing to see how far the technology has evolved with the help of AI.

IBM’s offering is a bit more flexible than the Google offering, and allows long transcription (>1 minutes) without uploading the files to external storage.

Sadly, Watson doesn’t have Australian language models out of the box (+1 point to Google which does), but you can add Custom Language Models & train it.

Input formats support PCM coded data, so you can pipe PCMA/PCMU (Aka G.711 µ-law 7 a-law) audio straight to it.

Getting Setup

The first thing you’re going to need are credentials.

For this you’ll need to sign into https://console.bluemix.net

Select “Speech to Text” and you can view / copy your API key from the Credentials header.

Once you’ve grabbed your API key we can start transcribing.

Basic Transcription

I’ve got an Asterisk instance that manages Voicemail, so let’s fire the messages to Watson and get it to transcribe the deposited messages:

curl -X POST -u "apikey:yourapikey" --header "Content-Type: audio/wav" --data-binary @msg0059.wav "https://stream.watsonplatform.net/speech-to-text/api/v1/recognize?model=en-US_NarrowbandModel"
“confidence”: 0.831,
“transcript”: “hi Nick this is Nick leaving Nick a test voice mail “

Common Transcription Options

speaker_labels=true

Speaker labels enable you to identify each speaker in a multi-party call.

This makes the transcription read more like a script with “Speaker 1: Hello other person” “Speaker 2: Hello there Speaker 1”, makes skimming through much easier.

timestamps=true

Timestamps timestamp each word based on the start of the audio file,

This reads poorly in CURL but when used with speaker_labels allows you to see the time and correlate it with a recording.

One useful use case is searching through a call recording transcript, and then jumping to that timestamp in the audio.

For example in a long conference call recording you might be interested in when people talked about “Item X”, you can search the call recording for “Item” “X” and find it’s at 1:23:45 and then jump to that point in the call recording audio file, saving yourself an hour and bit of listening to a conference call recording.

Audio formats (content types)

Unfortunately Watson, like GCP, only has support for MULAW (μ-law compounding) and not PCMA as used outside the US.

Luckily it has wide ranging WAV support, something GCP doesn’t, as well as FLAC, G.729, mpg, mp3, webm and ogg.

Speech Recognition Model

Watson has support for US and GB variants of speech recognition, wideband, narrowband and adaptive rate bitrates.

word_confidence=true

Per word confidence allows you to see a per word confidence breakdown, so you can mark unknown words in the final output with question marks or similar to denote if it’s not confident it has transcribed correctly.

Voice and mail Watson wasn’t sure of

max_alternatives

This allows you to specify on either a per-word basis or as a whole, the maximum number of alternatives Watson has for the conversation.

This is Neck a test voicemail