We’re doing more and more network automation, and something that came up as valuable to us would be to have all the IPs in HOMER SIP Capture come up as the hostnames of the VM running the service.
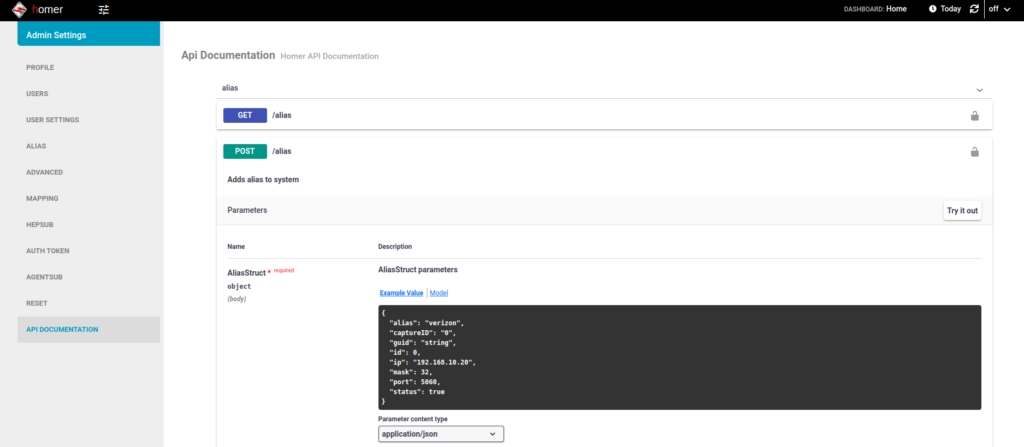
Luckily for us HOMER has an API for this ready to roll, and best of all, it’s Swagger based and easily documented (awesome!).
(Probably through my own failure to properly RTFM) I was struggling to work out the correct (current) way to Authenticate against the API service using a username and password.
Because the HOMER team are awesome however, the web UI for HOMER, is just an API client.
This means to look at how to log into the API, I just needed to fire up Wireshark, log into the Web UI via my browser and then flick through the packets for a real world example of how to do this.
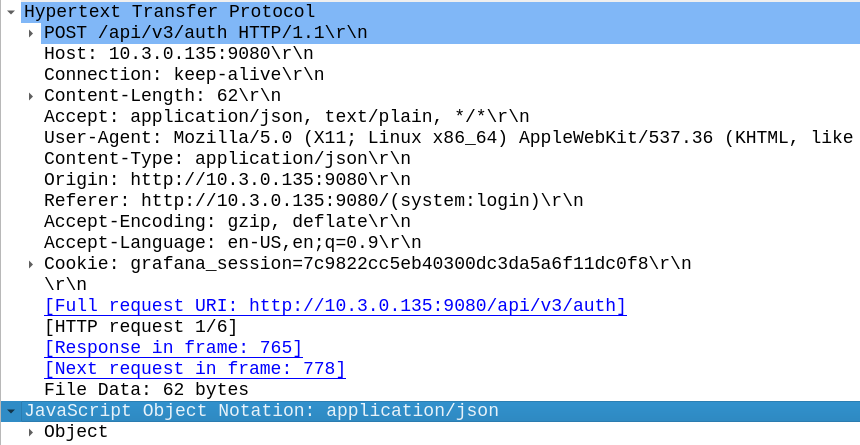
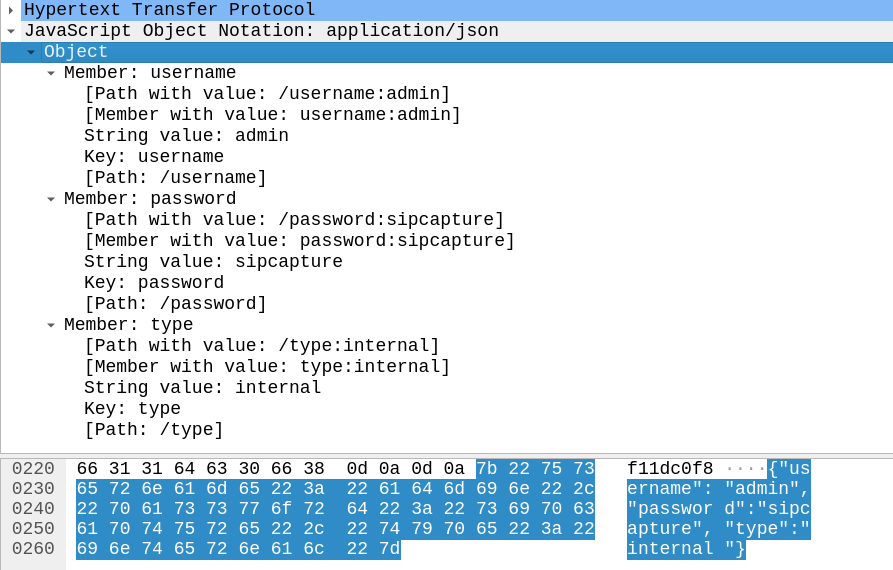
Homer Login JSON body as seen by Wireshark
In the Login action I could see the browser posts a JSON body with the username and password to /api/v3/auth
And in return the Homer API Server responds with a 201 Created an a auth token back:
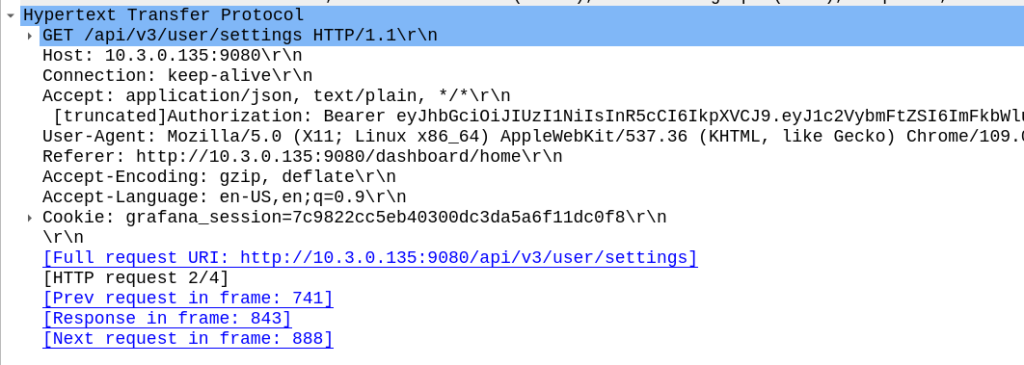
Now in order to use the API we just need to include that token in our Authorization: header then we can hit all the API endpoints we want!
For me, the goal we were setting out to achieve was to setup the aliases from our automatically populated list of hosts. So using the info above I setup a simple Python script with Requests to achieve this:
import requests
s = requests.Session()

#Login and get Token
url = 'http://homer:9080/api/v3/auth'
json_data = {"username":"admin","password":"sipcapture"}
x = s.post(url, json = json_data)
print(x.content)
token = x.json()['token']
print("Token is: " + str(token))


#Add new Alias
alias_json = {
          "alias": "Blog Example",
          "captureID": "0",
          "id": 0,
          "ip": "1.2.3.4",
          "mask": 32,
          "port": 5060,
          "status": True
        }

x = s.post('http://homer:9080/api/v3/alias', json = alias_json, headers={'Authorization': 'Bearer ' + token})
print(x.status_code)
print(x.content)


#Print all Aliases
x = s.get('http://homer:9080/api/v3/alias', headers={'Authorization': 'Bearer ' + token})
print(x.json())
And bingo we’re done, a new alias defined.
We wrapped this up in a for loop for each of the hosts / subnets we use and hooked it into our build system and away we go!
With the Homer API the world is your oyster in terms of functionality, all the features of the Web UI are exposed on the API as the Web UI just uses the API (something I wish was more common!).
Using the Swagger based API docs you can see examples of how to achieve everything you need to, and if you ever get stuck, just fire up Wireshark and do it in the Homer WebUI for an example of how the bodies should look.
The Wiki on the Sangoma documentation page is really out of date and can’t be easily edited by the public, so here’s the skinny on how to setup a Sangoma transcoding card on a modern Debian system:
apt-get install libxml2* wget make gcc
wget https://ftp.sangoma.com/linux/transcoding/sng-tc-linux-1.3.11.x86_64.tgz
tar xzf sng-tc-linux-1.3.11.x86_64.tgz
cd sng-tc-linux-1.3.11.x86_64/
make
make install
cp lib/* /usr/local/lib/
ldconfig
At this point you should be able to check for the presence of the card with:
sngtc_tool -dev ens33 -list_modules
Where ens33 is the name of the NIC that the server that shares a broadcast domain with the transcoder.
Successfully discovering the Sangoma D150 transcoder
If instead you see something like this:
root@fs-131:/etc/sngtc#  sngtc_tool -dev ens33 -list_modules
Failed to detect and initialize modules with size 1
That means the server can’t find the transcoding device. If you’re using a D150 (The Ethernet enabled versions) then you’ve got to make sure that the NIC you specified is on the same VLAN / broadcast domain as the server, for testing you can try directly connecting it to the NIC.
I also found I had to restart the device a few times to get it to a “happy” state.
It’s worth pointing out that there are no LEDs lit when the system is powered on, only when you connect a NIC.
Next we’ll need to setup the sngtc_server so these resources can be accessed via FreeSWITCH or Asterisk.
Config is pretty simple if you’re using an all-in-one deployment, all you’ll need to change is the NIC in a file you create in /etc/sngtc/sngtc_server.conf.xml:
<configuration name="sngtc_server.conf" description="Sangoma Transcoding Manager Configuration">

        <settings>
                <!--
                By default the SOAP server uses a private local IP and port that will work for out of the box installations
                where the SOAP client (Asterisk/FreeSWITCH) and server (sngtc_server) run in the same box.
                However, if you want to distribute multiple clients across the network, you need to edit this values to
                listen on an IP and port that is reachable for those clients.
                <param name="bindaddr" value="0.0.0.0" />
                <param name="bindport" value="9000" />
                -->
        </settings>

        <vocallos>

                <!-- The name of the vocallo is the ethernet device name as displayed by ifconfig -->
                <vocallo name="ens33">
                        <!-- Starting UDP port for the vocallo -->
                        <param name="base_udp" value="5000"/>
                        <!-- Starting IP address octet to use for the vocallo modules -->
                        <param name="base_ip_octet" value="182"/>
                </vocallo>

        </vocallos>


</configuration>
With that set we can actually try starting the server,
Again, all going well you should see something like this in the log:
Instead of going to all the effort of creating VMs (or running Ansible playbooks) we can use Docker and docker-compose to create a test environment with multiple Asterisk instances to dispatch traffic to from Kamailio.
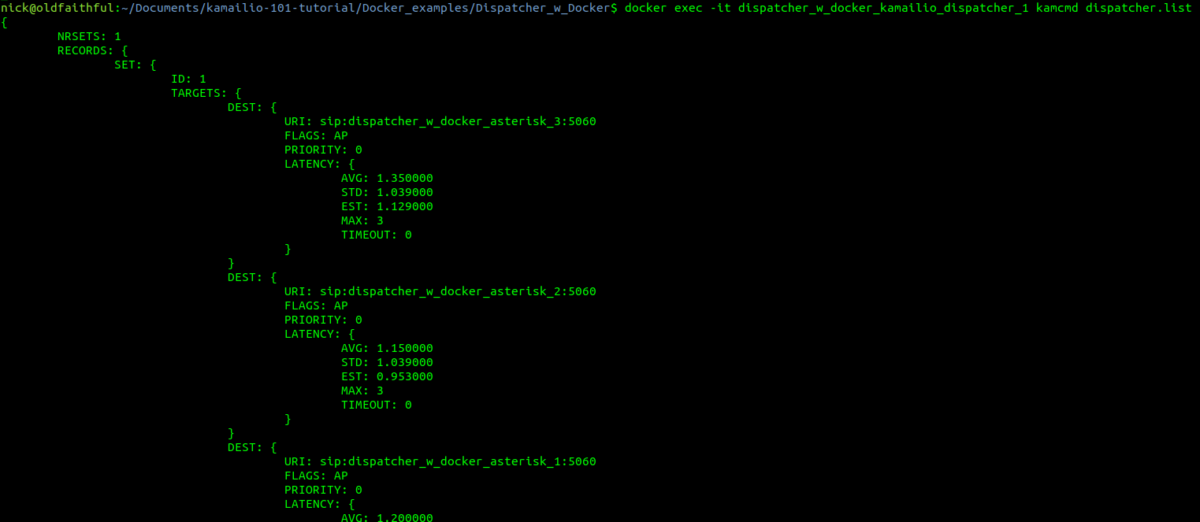
I covered the basics of using Kamailio with Docker in this post, which runs a single Kamailio instance inside Docker with a provided config file, but in this post we’ll use docker-compose to run multiple Asterisk instances and setup Kamailio to dispatch traffic to them.
I am a big Kubernetes fan, and yes, all this can be done in Kubernetes, and would be a better fit for a production environment, but for a development environment it’s probably overkill.
#Copy the config file onto the Filesystem of the Docker instance
COPY dispatcher.list /etc/kamailio/
COPY kamailio.cfg /etc/kamailio/
The Kamailio config we’re using is very similar to the Dispatcher example but with a few minor changes to the timers and setting it to use the Dispatcher data from a text file instead of a database. If you have a look at the contents of dispatcher.list you’ll see three entries; dispatcher_w_docker_asterisk_1, dispatcher_w_docker_asterisk_2 & dispatcher_w_docker_asterisk_3. These will be the hostnames of the 3 Asterisk instances we’ll create.
Next up we’ll take a look at the docker-compose file, which defines how our environment will be composed, and defines which containers will be run
The docker-compose file contains definitions about the Containers we want to run, for this example we’ll run several Asterisk instances and a single Kamailio instance.
The replicas: 6 parameter is ignored by standard docker-compose up command, but will be used if you’re using Docker swarm, otherwise we’ll manually set the number of replicas when we run the command.
So with that defined let’s define our Kamailio service;
It’s a seemingly simple question, the answer to which is – however you want, sorry if that’s not a simple answer.
I’ve talked about the strengths and weaknesses of Kamailio and Asterisk in my post Kamailio vs Asterisk, so how about we use them to work together?
The State of Play
So before we go into the nitty gritty, let’s imagine we’ve got an Asterisk box with a call queue with Alice and Bob in it, set to ring those users if they’re not already on a call.
Each time a call comes in, Asterisk looks at who in the queue is not already on a call, and rings their phone.
Now let’s imagine we’re facing a scenario where the single Asterisk box we’ve got is struggling, and we want to add a second to share the load.
We do it, and now we’ve got two Asterisk boxes and a Kamailio load balancer to split the traffic between the two boxes.
Now each time a call comes in, Kamailio sends the SIP INVITE to one of the two Asterisk boxes, and when it does, that Asterisk box looks at who is in the queue and not already on a call, and then rings their phone.
Let’s imagine a scenario where a Alice & Bob are both on calls on Asterisk box A, and another call comes in this call is routed to Asterisk box B. Asterisk box B looks at who is in the queue and who is already on a call, the problem is Alice and Bob are on calls on Asterisk box A, so Asterisk box B doesn’t know they’re both on a call and tries to ring them.
We have a problem.
Scaling stateful apps is a real headache,
So have a good long hard think about how to handle these issues before going down this path!
One of the most searched keywords that leads to this site is Kamailio vs Asterisk, so I thought I’d expand upon this a bit more as I’m a big fan of both, and it’s somewhat confusing.
(Almost everything in this post I talk about on Asterisk is roughly true for FreeSWITCH as well, although FS is generally more stable and scalable than Asterisk. )
Asterisk
Asterisk is a collection of PBX / softswitch components that you can configure and put together to create a large number of different products with the use of config files and modules.
Asterisk can read and write the RTP media stream, allowing it to offer services like Voicemail, B2B-UA, Conferencing, Playing back audio, call recording, etc.
It’s easy to learn and clear to understand how it handles “calls”.
Kamailio
Kamailio is a SIP proxy, from which you can modify SIP headers and then forward them on or process them and generate a response.
Kamailio is unable to do manipulate the RTP media stream. It can’t listen to, modify or add to the call audio, it only cares about SIP and not the media stream. This means it can’t playback an audio file, record a call or serve voicemail.
Kamailio has a bit of a steep learning curve, which I’ve tried to cover in my Kamailio 101 series, but even so, Kamailio doesn’t understand the concept of a “call”, it deals in Sessions, as in SIP, and everything you want to do, you have to write into Kamailio’s logic. Awesome power but a lot to take in.
Note – RTPengine is growing in capabilities and integrates beautifully into Kamailio, so for some applications you may be able to use RTPengine for media handling.
Scale
Speed
Stability
Media Functions
Ease
Asterisk
X
X
Kamailio
X
X
X
Working Together
Asterisk has always had issues at scale. This is for a variety of reasons, but the most simplistic explanation is that Asterisk is fairly hefty software, and that each subscriber you add to the system consumes resources at a rate where once your system reaches a few hundred users you start to see issues with stability.
Kamailio works amazingly at scale, it’s architecture was designed with running at scale in mind, and it’s super lightweight footprint means the load on the box between handling 1,000 sessions and handling 100,000 sessions isn’t that much.
Because Asterisk has the feature set, and Kamailio has the scalability, so the the two can be used together really effectively. Let’s look at some examples of Asterisk and Kamailio working together:
Asterisk Clustering
You have a cluster of Asterisk based Voicemail servers, serving your softswitch environment. You can use a Kamailio instance to sit in front of them and route INVITEs evenly throughout the cluster of Asterisk instances.
You’d be using Asterisk’s VM functions (because Asterisk can do media functions) and Kamailio’s SIP routing functions.
You have a Kamailio based Softswitch that routes SIP traffic from customers to carriers, customers want a hosted Conference Bridge. You offer this by routing any SIP INVITES to the address of the conference bridge to an Asterisk server that serves as the conference bridge.
You’d be using Kamialio to route the SIP traffic and using Asterisk’s ability to be aware of the media stream and join several sources to offer the conference bridge.
Which should I use?
It all depends on what you need to do.
If you need to do anything with the audio stream you probably need to use something like Asterisk, FreeSwitch, YaTE, etc, as Kamailio can’t do anything with the audio stream.*
If it’s just signalling, both would generally be able to work, Asterisk would be easier to setup but Kamailio would be more scaleable / stable.
Asterisk is amazingly quick and versatile when it comes to solving problems, I can whip something together with Asterisk that’ll fix an immediate need in a faction of the time I can do the same thing in Kamailio.
On the other hand I can fix a problem with Kamailio that’ll scale to hundreds of thousands of users without an issue, and be lightning fast and rock solid.
Summary
Kamailio only deals with SIP signalling. It’s very fast, very solid, but if you need to do anything with the media stream like mixing, muxing or transcoding (RTP / audio) itself, Kamailio can’t help you.*
Asterisk is able to deal with the media stream, and offer a variety of services through it’s rich module ecosystem, but the trade-off is less stability and more resource intensive.
If you do require Asterisk functionality it’s worth looking into FreeSWITCH, although slightly harder to learn it’s generally regarded as superior in a lot of ways to Asterisk.
I don’t write much about Asterisk these days – the rest of the internet has that pretty well covered, but I regularly post about Kamailio and other facets of SIP.
SIP was written to be fast and resonably lightweight.
Motorola StarTAC
At the time SIP was created in 1996, Motorola just had launched it’s first flip phone, the web was only 100,000 websites online and I was playing Pokémon.
Security wasn’t so much an afterthought, but rather not something everyone was as conscious of as they are today.
UDP is the protocol of choice for most SIP deployments, which opens it up for Message Amplification attacks.
As the world saw a few years back with DNS Amplification attacks (Good explanation of how Message Amplification works courtesy of Cloudflare), amplification attacks are enabled by DNS requests being smaller than DNS responses, and carrier networks that don’t verify the source of their traffic allowing someone to request a DNS lookup saying they’re from an IP that isn’t theirs, and that IP getting flooded.
SIP is vulnerable to this too, not exactly zero-day exploits, but something that hasn’t been looked at outside of the theoretical sphere, so I thought I’d roll up my sleeves and see how bad it can look.
For starters it’s worth remembering for a Message Amplification attack to work, it’s got to amplify. RF Engineering will teach you that amplification is the ratio of power in to power out, and it’s the same for Message Amplification, the size of the packet we send has to be smaller than the packet received, else we’re just using someone else to do our dirty work, but not amplifying.
Typical Response Sizes
These are small SIP messages I created in Python using sockets, they’re not the absolute smallest you could go, but they were as small as I could go and still get through the basic packet validation / sanity checks.
Some SIP Proxies drop traffic missing required headers while some don’t, I’ve included the required headers.
I’ve pointed the traffic at a Kamailio instance and measured the bytes sent vs bytes returned.
Method
Request Size (bytes)
Response Size (bytes)
Gain
OPTIONS
168
209
1.2x
REGISTER
380
411
1x
INVITE
197
377
1.9x
Content Length Mismatch
339
400 Missing Required Header in Request
300
Max Forwards Exceeded
213
So the best we can get is a packet 1.9 times the size of the packet we put in, which means SIP isn’t the best for Message Amplification attacks, but passable, so long as it keeps responding.
INVITE gets our best amplification and we can tune this to get the request smaller.
The Workhorse
Carrier grade SIP servers are pretty powerful machines, able to handle huge amounts of traffic, quite literally hundreds of millions a day, generally split across geographic areas and clustered, all on high quality low loss, low latency IP links.
If you have 20,000 subscribers sending a keep alive every 60 seconds, you’re at 72 million dialogs consisting of two packets each (144,000,000 SIP messages).
So after some stripping down I managed to get a valid INVITE that would be responded too with an auth challenge (407 Proxy Authentication Required) which was 125 bytes on the wire, while the response was 330, giving me a gain of 2.64 times what I put in. (I send 125 bytes, I get back 330)
The Setup
We’ve got 3 IPs we’re dealing with here,
Our victim is on 10.0.1.15. UDP port 5060 won’t even be open for this poor fellow, but he’ll get flooded.
Next is our attacker who’s machine is on 10.0.1.12, but claiming their source IP is 10.0.1.15 (the Victim’s IP)
From here our attacker will be sending SIP traffic to 10.0.1.110 (our “carrier” / SIP server), which will send it’s responses to the victim. I’ve spun up an Asterisk instance because it’s the voice eng version of sticky tape, I’d love to test this against something a Broadsoft platform, but licences are hard to come by.
I setup the Asterisk instance to be single threaded, on a box with just enough resources to run, to try this small scale.
I wrote a threaded Python script that will ramp up the number of messages exponentially, we’ll start by sending one message per second, then two messages per second, and so on.
And we’ll do this until something breaks.
The Results
In short – inconclusive at first, but kinda scary after that.
Asterisk died really quickly. “Exceptionally long queue length” popped up after the first second. Interestingly, the box eventually came good and actually replied to every one of our requests, and even sent a BYE. Cute.
So I modified the script to be a bit less aggressive, a random wait time between 0 and 1 seconds between loops for each thread.
Struggling under the load.
I got about 60 seconds in before Asterisk really stopped responding to traffic.
So I tweaked my script again, enabled multi threading on the “carrier” and tried again.
So here’s the best rate (packets per second) I could get after a lot of tweaking:
Packets per Second – Red = Sent, Green = Received
Peak Receive: 14,000 packets per second Peak Send: 20,000 packets per second
In terms of packet size – what we really care about, the results were actually pretty promising:
Click for full size
Peak receive rate of 67Mbps, for which we were putting in ~25Mbps.
So can SIP be used for message amplification attacks? Sure.
Is it particulary practical? Not really. There’s easier targets out there for the time being, so VoIP will be spared the worst of it.
But for a carrier weaponisation of carrier SIP server should be a real fear.
Protection for Carriers
Don’t use UDP for your SIP traffic.
It’s easier said than done, I know… But the reasoning for putting SIP on UDP was primarily speed and limited bandwidth, but with more and more fibre in the ground it’s no longer the case.
SIP over TCP (better yet use it as an excuse to move to TLS), will protect you from some of these attacks.
Flood protection is built into most SBCs these days, if your box is being used to hit a specific target, the source IP will be masquerading as the target. So blocking that and not responding is your best bet. Lots of SBCs still respond with a 4xx “Rate Limiting” response instead of just dropping the traffic, ideally you’d disable the nice “Rate liming” response and just drop the traffic.
Traffic modeling, GeoIP blocking and rate limiting per IP & destination port will also help, as well as monitoring.
Ultimately you can’t stop spoofed UDP traffic coming into your network, but you can stop UDP traffic leaving your network, and if everyone did that we wouldn’t be in this mess.
UDP spoofing is made possible by networks that don’t verify that the traffic that’s leaving their network is traffic that is sourced from your network.
Your core routers know what IPs are assigned to your network, and should be configured to drop traffic that’s leaving the network but not coming from those IPs.
IETF came up with this solution, and it’s built into all major router OSes: