Well CGrateS deducts for each incriment in the usage, and in my case, a usage of 107374182 meant CGrateS was trying to deduct from the balance 107 million times.
But as you can imagine, we don’t actually charge our customers per byte but rather we round up our incriments.
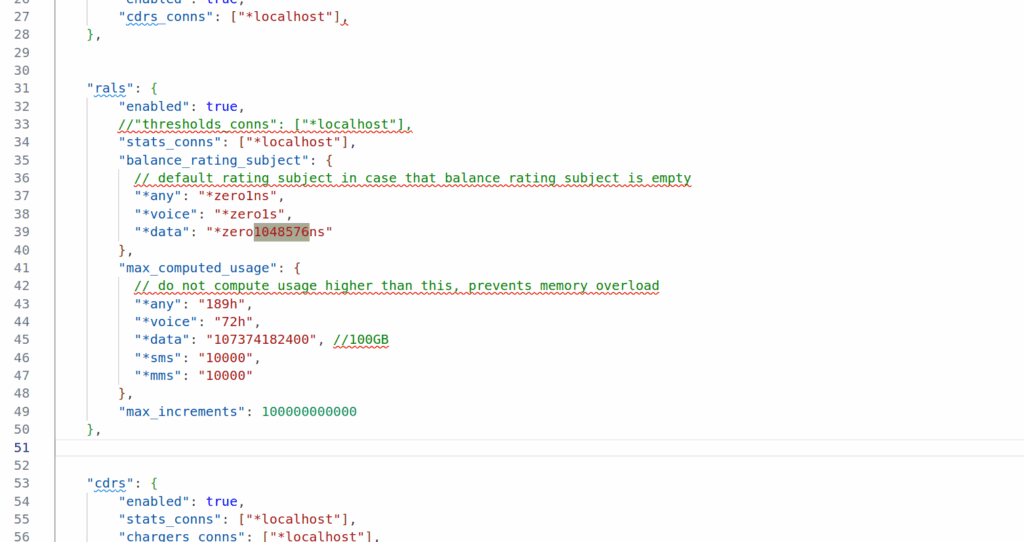
This is where the RatingSubject comes into play. RatingSubject sets what “blocks” of balance get calculated.
For example rather than calculating usage of 107,374,182 bytes, with CGrateS deducting from the balance 107 million times, we could set the value *zero1048576ns which means we’d calculate per Megabyte, so we’re only calculating 102 times 1 megabyte.
Likewise we could set the RatingSubject value to *zero1024ns to get it in Kilobytes.
What’s with the ns suffix? Well CGrateS (actually Go) treats units as duration, and the smallest unit is nanoseconds, but we can ignore the meaning in this context, as just 1 integer unit.
Well, there’s another concept I haven’t introduced yet, and that’s ChargerS, this is a concept / component we’ll dig into deeper for derived charging, but for now just know we need to add a ChargerS rule in order to get CDRs rated:
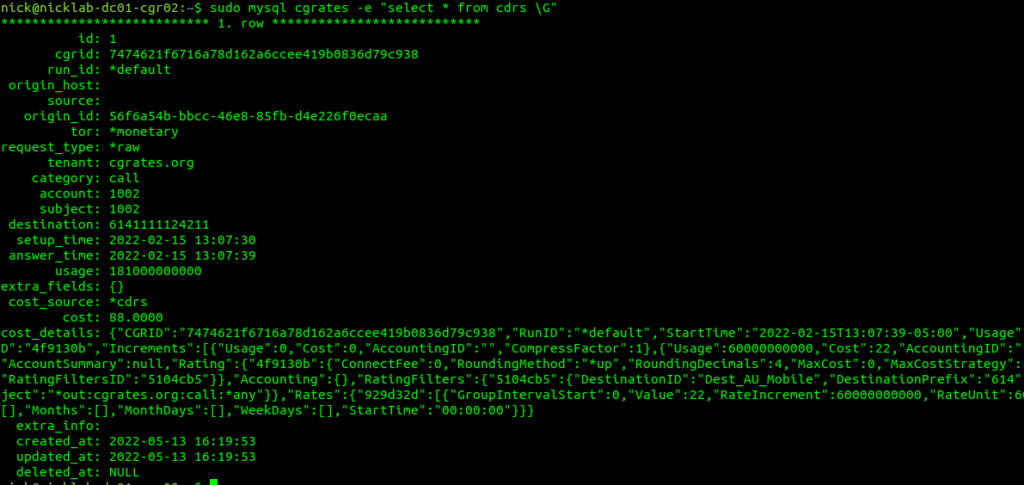
Well, if you’ve got CDR storage in StoreDB enabled (And you probably do if you’ve been following up until this point), then the answer is a MySQL table, and we can retrive the data with:
sudo mysql cgrates -e "select * from cdrs \G"
For those of you with a bit of MySQL experience under your belt, you’d be able to envisage using the SUM function to total a monthly bill for a customer from this.
Of course we can add CDRs via the API, and you probably already guessed this, but we can retrive CDRs via the API as well, filtering on the key criteria:
This would be useful for generating an invoice or populating recent calls for a customer portal.
Maybe creating rated CDRs and sticking them into a database is exactly what you’re looking to achieve in CGrateS – And if so, great, this is where you can stop – but for many use cases, there’s a want for an automated solution – For your platform to automatically integrate with CGrateS.
If you’ve got an Asterisk/FreeSWITCH/Kamailio or OpenSIPs based platform, then you can integrate CGrateS directly into your platform to add the CDRs automatically, as well as access features like prepaid credit control, concurrent call limits, etc, etc. The process is a little different on each of these platforms, but ultimately under the hood, all of these platforms have some middleware that generates the same API calls we just ran to create the CDR.
So far this tutorial has been heavy on teaching the API, because that’s what CGrateS ultimately is – An API service.
Our platforms like Asterisk and Kamailio with the CGrateS plugins are just CGrateS API clients, and so once we understand how to use and interact with the API it’s a breeze to plug in the module for your platform to generate the API calls to CGrateS required to integrate.
In our last post we introduced the CGrateS API and we used it to add Rates, Destinations and define DestinationRates.
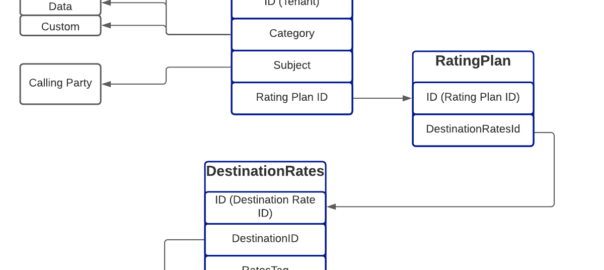
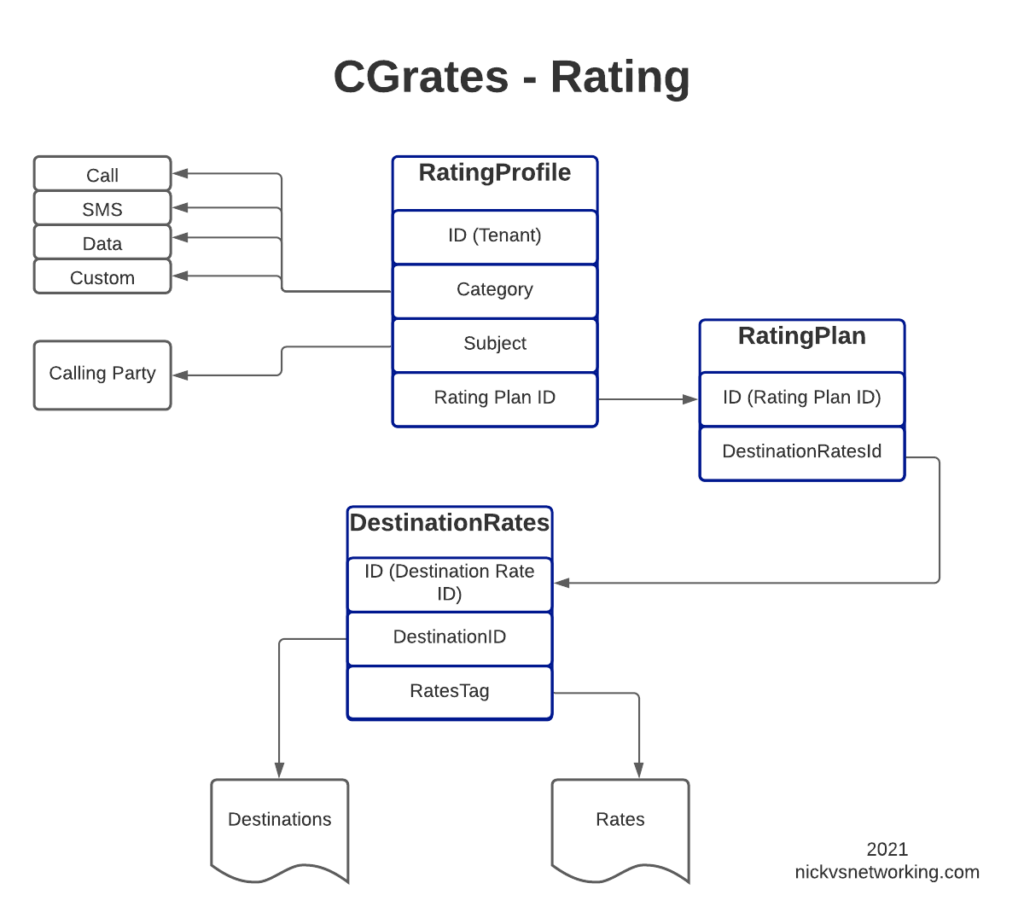
In this post, we’ll create the RatingPlan that references the DestinationRate we just defined, and the RatingProfile that references the RatingPlan, and then, as the cherry on top – We’ll rate some calls.
For anyone looking at the above diagram for the first time, you might be inclined to ask why what is the purpose of having all these layers?
This layered architecture allows all sorts of flexibility, that we wouldn’t otherwise have, for example, we can have multiple RatingPlans defined for the same Destinations, to allow us to have different Products defined, with different destinations and costs.
Likewise we can have multiple RatingProfiles assigned for the same destinations to allow us to generate multiple CDRs for each call, for example a CDR to bill the customer with and a CDR with our wholesale cost.
All this flexibility is enabled by the layered architecture.
Define RatingPlan
Picking up where we left off having just defined the DestinationRate, we’ll need to create a RatingPlan and link it to the DestinationRate, so let’s check on our DestinationRates:
From the output we can see we’ve got the DestinationRate defined, there’s a lot of info returned (I’ve left out most of it), but you can see the Destination, and the Rate associated with it is returned:
So after confirming that our DestinationRates are there, we’ll create a RatingPlan to reference it, for this we’ll use the APIerSv1.SetTPRatingPlan API call.
In our basic example, this really just glues the DestinationRate_AU object to RatingPlan_VoiceCalls.
It’s worth noting that you can use a RatingPlan to link to multiple DestinationRates, for example, we might want to have a different RatingPlan for each region / country, we can do that pretty easily too, in the below example I’ve referenced other Destination Rates (You’d go about defining the DestinationRates for these other destinations / rates the same way as we did in the last example).
One last step before we can test this all end-to-end, and that’s to link the RatingPlan we just defined with a RatingProfile.
StorDB & DataDB
Psych! Before we do that, I’m going to subject you to learning about backends for a while.
So far we’ve skirted around CGrateS architecture, but this is something we need to know for now.
To keep everything fast, a lot of data is cached in what is called a DataDB (if you’ve followed since part 1, then your DataDB is Redis, but there are other options).
To keep everything together, databases are used for storage, called StorDB (in our case we are using MySQL, but again, we can have other options) but calls to this database are minimal to keep the system fast.
If you’re an astute reader, you may have noticed many of our API calls have TP in method name, if the API call has TP in the name, it is storing it in the StoreDB, if it doesn’t, it means it’s storing it only in DataDB.
Why does this matter? Well, let’s look a little more closely and it will become clear:
ApierV1.SetRatingProfile will set the data only in DataDB (Redis), because it’s in the DataDB the change will take effect immediately.
ApierV1.SetTPRatingProfile will set the data only in StoreDB (MySQL), it will not take effect until it is copied from the database (StoreDB) to the cache (DataDB).
After we define the RatingPlan, we need to run this command prior to creating the RatingProfile, so it has something to reference, so we’ll do that by adding:
The last piece of the puzzle to define is the RatingProfile.
We define a few key things in the rating profile:
The Tenant – CGrateS is multitenant out of the box (in our case we’ve used tenant named “cgrates.org“, but you could have different tenants for different customers).
The Category – As we covered in the first post, CGrateS can bill voice calls, SMS, MMS & Data consumption, in this scenario we’re billing calls so we have the value set to *call, but we’ve got many other options. We can use Category to link what RatingPlan is used, for example we might want to offer a premium voice service with guaranteed CLI rates, using a different RatingPlan that charges more per call, or maybe we’re doing mobile and we want a different RatingPlan for use when Roaming, we can use Category to switch that.
The Subject – This is loosely the Source / Calling Party; in our case we’re using a wildcard value *any which will match any Subject
The RatingPlanActivations list the RatingPlanIds of the RatingPlans this RatingProfile uses
So let’s take a look at what we’d run to add this:
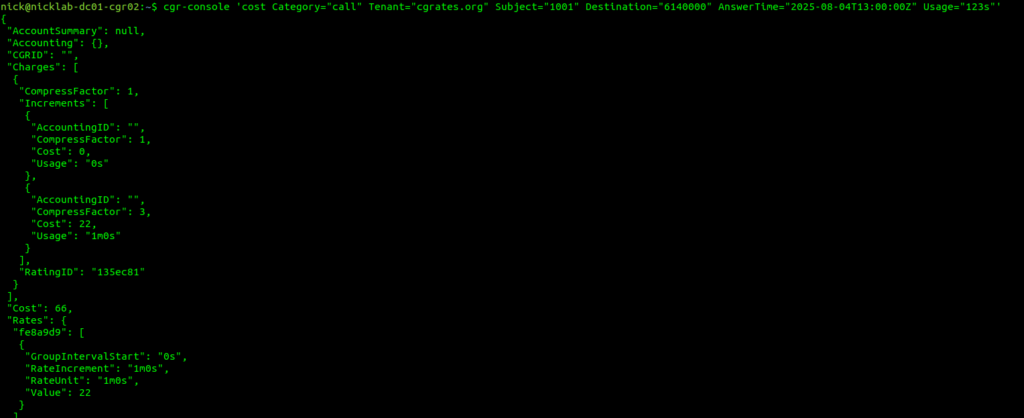
Okay, so at this point, all going well, we should have some data loaded, we’ve gone through all those steps to load this data, so now let’s simulate a call to a Mobile Number (22c per minute) for 123 seconds.
We cheated a fair bit, to show something that worked, but it’s not something you’d probably want to use in real life, loading static CSV files gets us off the ground, but in reality we don’t want to manage a system through CSV files.
Instead, we’d want to use an API.
Fair warning – There is some familiarity expected with JSON and RESTful APIs required, we’ll use Python3 for our examples, but you can use any programing language you’re comfortable with, or even CURL commands.
So we’re going to start by clearing out all the data we setup in CGrateS using the cgr-loader tool from those imported CSVs:
redis-cli flushall
sudo mysql -Nse 'show tables' cgrates | while read table; do sudo mysql -e "truncate table $table" cgrates; done
cgr-migrator -exec=*set_versions -stordb_passwd=CGRateS.org
sudo systemctl restart cgrates
So what have we just done? Well, we’ve just cleared all the data in CGrateS. We’re starting with a blank slate.
In this post, we’re going to define some Destinations, some Rates to charge and then some DestinationRates to link each Destination to a Rate.
But this time we’ll be doing this through the CGrateS API.
Introduction to the CGrateS API
CGrateS is all API driven – so let’s get acquainted with this API.
I’ve written a simple Python wrapper you can find here that will make talking to CGRateS a little easier, so let’s take it for a spin and get the Destinations that are loaded into our system:
import cgrateshttpapi
CGRateS_Obj = cgrateshttpapi.CGRateS('172.16.41.133', 2080) #Replace this IP with the IP Address of your CGrateS instance...

destinations = CGRateS_Obj.SendData({'method':'ApierV1.GetTPDestinationIDs','params':[{"TPid":"cgrates.org"}]})['result']

#Pretty print the result:
print("Destinations: ")
pprint.pprint(destinations)
All going well you’ll see something like this back:
Initializing with host 172.16.41.133 on port 2080
Sending Request with Body:
{'method': 'ApierV2.Ping', 'params': [{'Tenant': 'cgrates.org'}]}
Sending Request with Body:
{'method': 'ApierV2.GetTPDestinationIDs', 'params': [{"TPid":"cgrates.org"}]}
Destinations from CGRates: []
So what did we just do? Well, we sent a JSON formatted string to the CGRateS API at 172.16.41.133 on port 2080 – You’ll obviously need to change this to the IP of your CGrateS instance.
In the JSON body we sent we asked for all the Destinations using the ApierV1.GetTPDestinationIDs method, for the TPid ‘cgrates.org’,
And it looks like no destinations were sent back, so let’s change that!
Note: There’s API Version 1 and API Version 2, not all functions exist in both (at least not in the docs) so you have to use a mix.
Adding Destinations via the API
So now we’ve got our API setup, let’s see if we can add a destination!
To add a destination, we’ll need to go to the API guide and find the API call to add a destination – in our case the API call is ApierV2.SetTPDestination and will look like this:
So we’re creating a Destination named Dest_AU_Mobile and Prefix 614 will match this destination.
Note: I like to prefix all my Destinations with Dest_, all my rates with Rate_, etc, so it makes it easy when reading what’s going on what object is what, you may wish to do the same!
So we’ll use the Python code we had before to list the destinations, but this time, we’ll use the ApierV2.SetTPDestination API call to add a destination before listing them, let’s take a look:
If we post this to the CGR engine, we’ll create a rate, named Rate_AU_Mobile_Rate_1 that bills 22 cents per minute, charged every 60 seconds.
Let’s add a few rates:
CGRateS_Obj.SendData({"method":"ApierV1.SetTPRate","params":[{"ID":"Rate_AU_Mobile_Rate_1","TPid":"cgrates.org","RateSlots":[{"ConnectFee":0,"Rate":22,"RateUnit":"60s","RateIncrement":"60s","GroupIntervalStart":"0s"}]}],"id":1})
CGRateS_Obj.SendData({"method":"ApierV1.SetTPRate","params":[{"ID":"Rate_AU_Fixed_Rate_1","TPid":"cgrates.org","RateSlots":[{"ConnectFee":0,"Rate":14,"RateUnit":"60s","RateIncrement":"60s","GroupIntervalStart":"0s"}]}],"id":1})
CGRateS_Obj.SendData({"method":"ApierV1.SetTPRate","params":[{"ID":"Rate_AU_Toll_Free_Rate_1","TPid":"cgrates.org","RateSlots":[{"ConnectFee":25,"Rate":0,"RateUnit":"60s","RateIncrement":"60s","GroupIntervalStart":"0s"}]}],"id":1})

TPRateIds = CGRateS_Obj.SendData({"method":"ApierV1.GetTPRateIds","params":[{"TPid":"cgrates.org"}]})['result']
print(TPRateIds)
for TPRateId in TPRateIds:
    print("\tRate: " + str(TPRateId))
All going well, when you add the above, we’ll have added 3 new rates:
Rate Name
Cost
Rate_AU_Fixed_Rate_1
14c per minute charged every 60s
Rate_AU_Mobile_Rate_1
22c per minute charged every 60s
Rate_AU_Toll_Free_Rate_1
25c connection, untimed
Rates we just created
Linking Rates to Destinations
So now with Destinations defined, and Rates defined, it’s time to link these two together!
Destination Rates link our Destinations and Route rates, this decoupling means that we can have one Rate shared by multiple Destinations if we wanted, and makes things very flexible.
For this example, we’re going to map the Destinations to rates like this:
All going well, you’ll see the new DestinationRate we added.
Here’s a good chance to show how we can add multiple bits of data in one API call, we can tweak the ApierV1.SetTPDestinationRate method and include all the DestinationRates we need in one API call:
In our next post, we’ll keep working our way up this diagram, by creating RatingPlans and RatingProfiles to reference the DestinationRate we just created.
In our last post we talked about setting rates in CGrates and testing them out, but what’s the point in learning a charging system without services to charge?
This post focuses on intergrating FreeSWITCH and CGrates, other posts cover integrating Asterisk and CGrates, Kamailio and CGrates and Diameter and CGrates.
Future posts in this series will focus on the CGrates side, but this post will be a bit of a sidebar to get our FreeSWITCH environment connected to CGrates so we can put all our rating and charging logic into FreeSWITCH.
CGrates interacts with FreeSWITCH via the Event-Socket-Language in FreeSWITCH, which I’ve written about before, in essence when enabled, CGrates is able to make decisions regarding if a call should proceed or not, monitor currently up calls, and terminate calls when a subscriber has used their allocated balance.
Adding ESL Binding Support in FreeSWITCH
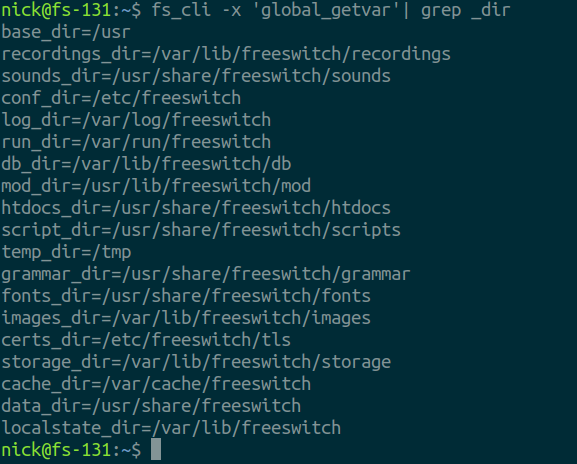
The configuration for CGrates is defined through the cgrates.json file in /etc/cgrates on your rating server.
By default, FreeSWITCH’s event socket only listens on localhost, as it is a pretty huge security flaw to open it to the world, but in order for our CGrates server to be able to access we’ll need to bind it to an IP Address assigned to the FreeSWITCH server so we can reach it from elsewhere on the network.
You may want to have CGrates installed on a different machine to your FreeSWITCH instance, or you may want to have multiple FreeSWITCH instances all getting credit control from CGrates.
Well, inside the cgrates.json config file, is where we populate the ESL connection details so CGrates can connect to FreeSWITCH.
Next we’ll need to tag the extensions we want to charge,
In order to do this we’ll need to set the type of the account (Ie. Prepaid, Postpaid, etc), and the flags to apply, which dictate which of the modules we’re going to use inside CGrateS.
FreeSWITCH won’t actually parse this info, it’s just passed to CGrateS.
And that’s pretty much it, when you restart FreeSWITCH and CGrates you should see in the CGrates log that it is connected to your FreeSWITCH instance, and when you make a call, FreeSWITCH will authorize it through CGrates.
We’ll get back into the nitty gritty about setting up CGrates in a future post, and cover setting up integration like this with other Platforms (Kamailio / Asterisk) and Protocols (Diameter & Radius) in future posts.
So you have a VoIP service and you want to rate the calls to charge your customers?
You’re running a mobile network and you need to meter data used by subscribers?
Need to do least-cost routing?
You want to offer prepaid mobile services?
Want to integrate with Asterisk, Kamailio, FreeSWITCH, Radius, Diameter, Packet Core, IMS, you name it!
Well friends, step right up, because today, we’re talking CGrates!
So before we get started, this isn’t going to be a 5 minute tutorial, I’ve a feeling this may end up a big multipart series like some of the others I’ve done. There is a learning curve here, and we’ll climb it together – but it is a climb.
Installation
Let’s start with a Debian based OS, installation is a doddle:
We’re going to use Redis for the DataDB and MariaDB as the StorDB (More on these concepts later), you should know that other backend options are available, but for keeping things simple we’ll just use these two.
Next we’ll get the database and config setup,
cd /usr/share/cgrates/storage/mysql/
./setup_cgr_db.sh root CGRateS.org localhost
cgr-migrator -exec=*set_versions -stordb_passwd=CGRateS.org
Lastly we’ll clone the config files from the GitHub repo:
In its simplest form, rating is taking a service being provided and calculating the cost for it.
The start of this series will focus on voice calls (With SMS, MMS, Data to come), where the callingparty (The person making the call) pays, so let’s imagine calling a Mobile number (Starting with 614) costs $0.22 per minute.
To perform rating we need to determine the Destination, the Rate to be applied, and the time to charge for.
For our example earlier, a call to a mobile (Any number starting with 614) should be charged at $0.22 per minute. So a 1 minute call will cost $0.22 and a 2 minute long call will cost $0.44, and so on.
We’ll also charge calls to fixed numbers (Prefix 612, 613, 617 and 617) at a flat $0.20 regardless of how long the call goes for.
So let’s start putting this whole thing together.
Introduction to RALs
RALs is the component in CGrates that takes care of Rating and Accounting Logic, and in this post, we’ll be looking at Rating.
The rates have hierarchical structure, which we’ll go into throughout this post. I took my notepad doodle of how everything fits together and digitized it below:
Destinations
Destinations are fairly simple, we’ll set them up in our Destinations.csv file, and it will look something like this:
Each entry has an ID (referred to higher up as the Destination ID), and a prefix.
Also notice that some Prefixes share an ID, for example 612, 613, 617 & 618 are under the Destination ID named “DST_AUS_Fixed”, so a call to any of those prefixes would match DST_AUS_Fixed.
Rates
Rates define the price we charge for a service and are defined by our Rates.csv file.
This is nice and clean, a 1 second call costs $0.25, a 60 second call costs $0.25, and a 61 second call costs $0.50, and so on.
This is the standard billing mechanism for residential services, but it does not pro-rata the call – For example a 1 second call is the same cost as a 59 second call ($0.25), and only if you tick over to 61 seconds does it get charged again (Total of $0.50).
Per Second Billing
If you’re doing a high volume of calls, paying for a 3 second long call where someone’s voicemail answers the call and was hung up, may seem a bit steep to pay the same for that as you would pay for 59 seconds of talk time.
Instead Per Second Billing is more common for high volume customers or carrier-interconnects.
This means the rate still be set at $0.25 per minute, but calculated per second.
So the cost of 60 seconds of call is $0.25, but the cost of 30 second call (half a minute) should cost half of that, so a 30 second call would cost $0.125.
How often we asses the charging is defined by the RateIncrement parameter in the Rate Table.
We could achieve the same outcome another way, by setting the RateIncriment to 1 second, and the dividing the rate per minute by 60, we would get the same outcome, but would be more messy and harder to maintain, but you could think of this as $0.25 per minute, or $0.004166667 per second ($0.25/60 seconds).
Flat Rate Billing
Another option that’s commonly used is to charge a flat rate for the call, so when the call is answered, you’re charged that rate, regardless of the length of the call.
Regardless if the call is for 1 second or 10 hours, the charge is the same.
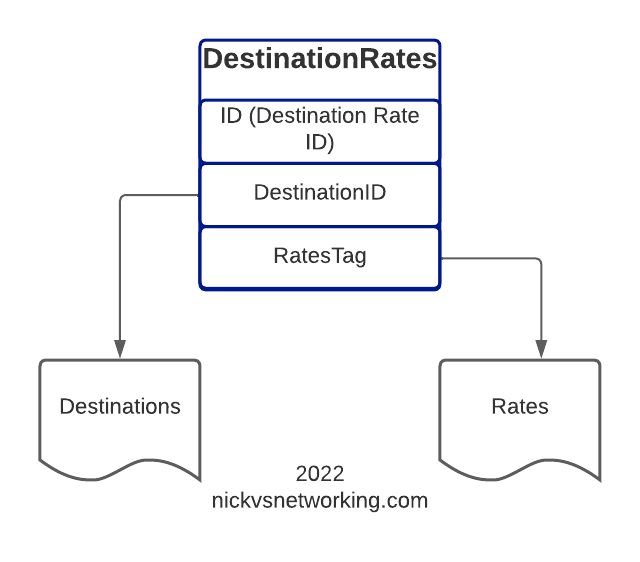
DestinationID – Refers to the DestinationID defined in the Destinations.csv file
RatesTag – Referes to the Rate ID we defined in Rates.csv
RoundingMethod – Defines if we round up or down
RoundingDecimals – Defines how many decimal places to consider before rounding
MaxCost – The maximum cost this can go up to
MaxCostStrategy – What to do if the Maximum Cost is reached – Either make the rest of the call Free or Disconnect the call
So for each entry we’ll define an ID, reference the Destination and the Rate to be applied, the other parts we’ll leave as boilerplate for now, and presto. We have linked our Destinations to Rates.
Rating Plans
We may want to offer different plans for different customers, with different rates.
DestinationRatesId (As defined in DestinationRates.csv)
TimingTag – References a time profile if used
Weight – Used to determine what precedence to use if multiple matches
So as you may imagine we need to link the DestinationRateIDs we just defined together into a Rating Plan, so that’s what I’ve done in the example above.
Rating Profiles
The last step in our chain is to link Customers / Subscribers to the profiles we’ve just defined.
How you allocate a customer to a particular Rating Plan is up to you, there’s numerous ways to approach it, but for this example we’re going to use one Rating Profile for all callers coming from the “cgrates.org” tenant:
Category is used to define the type of service we’re charging for, in this case it’s a call, but could also be an SMS, Data usage, or a custom definition.
Subject is typically the calling party, we could set this to be the Caller ID, but in this case I’ve used a wildcard “*any”
ActivationTime allows us to define a start time for the Rating Profile, for example if all our rates go up on the 1st of each month, we can update the Plans and add a new entry in the Rating Profile with the new Plans with the start time set
RatingPlanID sets the Rating Plan that is used as we defined in RatingPlans.csv
Loading the Rates into CGrates
At the start we’ll be dealing with CGrates through CSV files we import, this is just one way to interface with CGrates, there’s others we’ll cover in due time.
CGRates has a clever realtime architecture that we won’t go into in any great depth, but in order to load data in from a CSV file there’s a simple handy tool to run the process,
Obviously you’ll need to replace with the folder you cloned from GitHub.
Trying it Out
In order for CGrates to work with Kamailio, FreeSWITCH, Asterisk, Diameter, Radius, and a stack of custom options, for rating calls, it has to have common mechanisms for retrieving this data.
CGrates provides an API for rating calls, that’s used by these platforms, and there’s a tool we can use to emulate the signaling for call being charged, without needing to pickup the phone or integrate a platform into it.
The tenant will need to match those defined in the RatingProfiles.csv, the Subject is the Calling Party identity, in our case we’re using a wildcard match so it doesn’t matter really what it’s set to, the Destination is the destination of the call, AnswerTime is time of the call being answered (pretty self explanatory) and the usage defines how many seconds the call has progressed for.
The output is a JSON string, containing a stack of useful information for us, including the Cost of the call, but also the rates that go into the decision making process so we can see the logic that went into the price.
So have a play with setting up more Destinations, Rates, DestinationRates and RatingPlans, in these CSV files, and in our next post we’ll dig a little deeper… And throw away the CSVs all together!