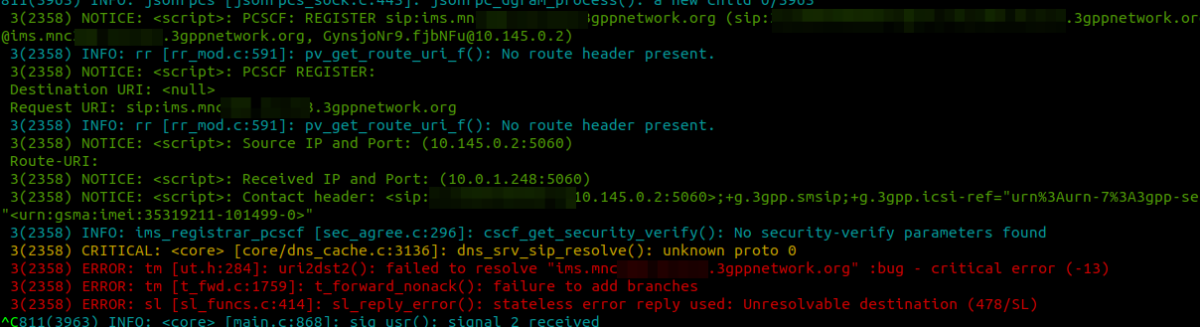
This was a rebuild, another P-CSCF was running fine and handling traffic with the same DNS server set.
I checked the netplan config and confirmed the DNS server was set correctly.
If I did an nslookup on the address that was failing to resolve – pointing it at the correct DNS server, the A & SRV records came back OK, and everything was fine.
Stranger still, after clearing the DNS Cache, and running a packet capture, I couldn’t see any DNS queries at all….
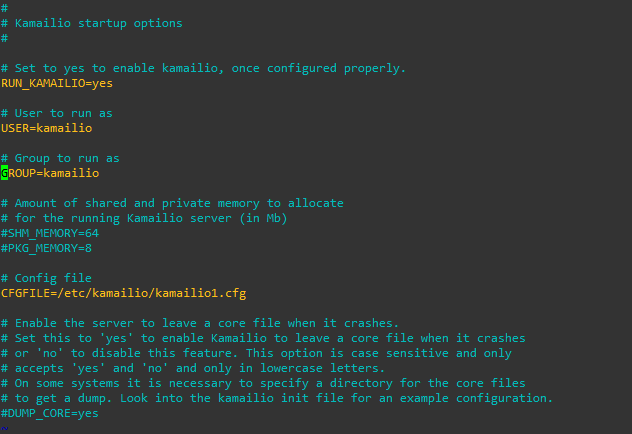
The problem? Kamailio uses resolv.conf by default on Ubuntu Server, and that was pointing to localhost.
After updating resolv.conf to point to the DNS server handling the IMS domains, I was good to go again.
Recently I’ve been doing some work with FreeSWITCH as an IMS Conference Factory, I’ve written a bit about it before in this post on using FreeSWITCH with the AMR codec.
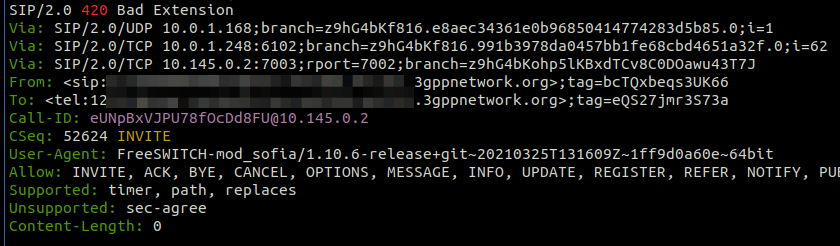
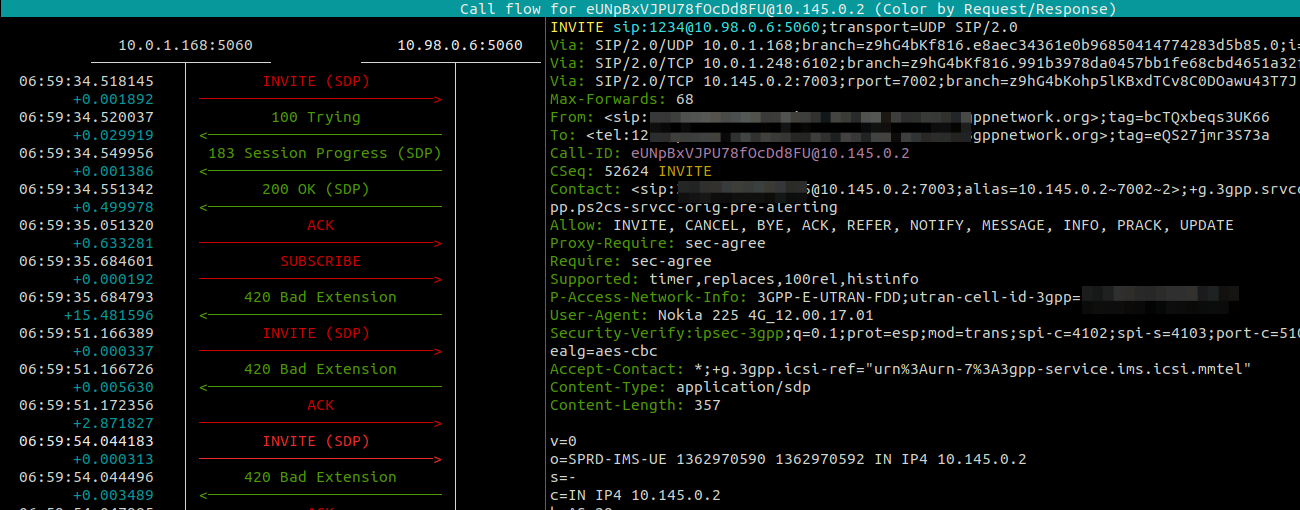
Pretty early on in my testing I faced a problem with subsequent in-dialog responses, like re-INVITEs used for holding the calls.
Every subsequent message, was getting a “420 Bad Extension” response from FreeSWITCH.
The ReINVITEThe 420 Bad Extension Response
So what didn’t it like and why was FreeSWITCH generating 420 Bad Extension Responses to these subsequent messages?
Well, the “Extensions” FreeSWITCH is referring to are not extensions in the Telephony sense – as in related to the Dialplan, like an Extension Number to identify a user, but rather the Extensions (as in expansions) to the SIP Protocol introduced for IMS.
The re-INVITE contains a Require header with sec-agree which is a SIP Extension introduced for IMS, which FreeSWITCH does not have support for, and the re-INVITE says is required to support the call (Not true in this case).
Using a Kamailio based S-CSCF means it is easy to strip these Headers before forwarding the requests onto the Application Server, which is what I’ve done, and bingo, no more errors!
So you have a VoIP service and you want to rate the calls to charge your customers?
You’re running a mobile network and you need to meter data used by subscribers?
Need to do least-cost routing?
You want to offer prepaid mobile services?
Want to integrate with Asterisk, Kamailio, FreeSWITCH, Radius, Diameter, Packet Core, IMS, you name it!
Well friends, step right up, because today, we’re talking CGrates!
So before we get started, this isn’t going to be a 5 minute tutorial, I’ve a feeling this may end up a big multipart series like some of the others I’ve done. There is a learning curve here, and we’ll climb it together – but it is a climb.
Installation
Let’s start with a Debian based OS, installation is a doddle:
We’re going to use Redis for the DataDB and MariaDB as the StorDB (More on these concepts later), you should know that other backend options are available, but for keeping things simple we’ll just use these two.
Next we’ll get the database and config setup,
cd /usr/share/cgrates/storage/mysql/
./setup_cgr_db.sh root CGRateS.org localhost
cgr-migrator -exec=*set_versions -stordb_passwd=CGRateS.org
Lastly we’ll clone the config files from the GitHub repo:
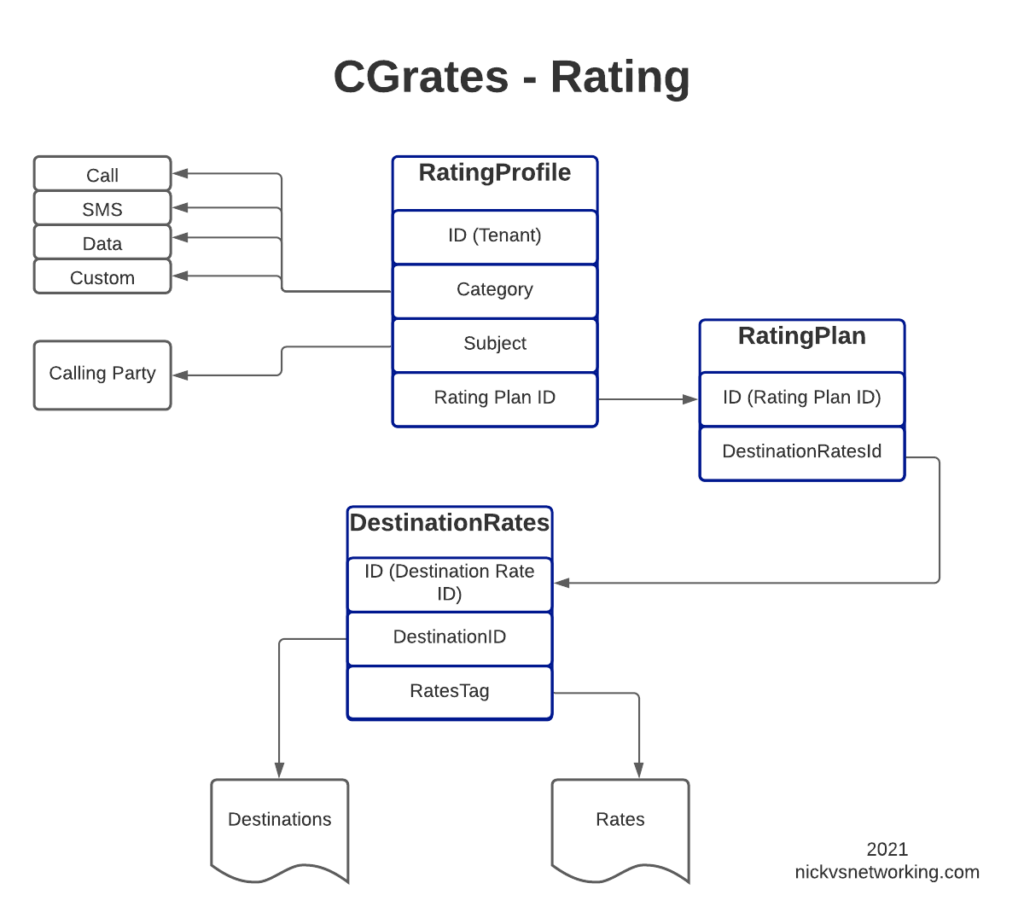
In its simplest form, rating is taking a service being provided and calculating the cost for it.
The start of this series will focus on voice calls (With SMS, MMS, Data to come), where the callingparty (The person making the call) pays, so let’s imagine calling a Mobile number (Starting with 614) costs $0.22 per minute.
To perform rating we need to determine the Destination, the Rate to be applied, and the time to charge for.
For our example earlier, a call to a mobile (Any number starting with 614) should be charged at $0.22 per minute. So a 1 minute call will cost $0.22 and a 2 minute long call will cost $0.44, and so on.
We’ll also charge calls to fixed numbers (Prefix 612, 613, 617 and 617) at a flat $0.20 regardless of how long the call goes for.
So let’s start putting this whole thing together.
Introduction to RALs
RALs is the component in CGrates that takes care of Rating and Accounting Logic, and in this post, we’ll be looking at Rating.
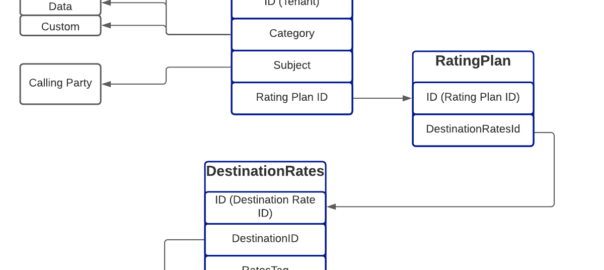
The rates have hierarchical structure, which we’ll go into throughout this post. I took my notepad doodle of how everything fits together and digitized it below:
Destinations
Destinations are fairly simple, we’ll set them up in our Destinations.csv file, and it will look something like this:
Each entry has an ID (referred to higher up as the Destination ID), and a prefix.
Also notice that some Prefixes share an ID, for example 612, 613, 617 & 618 are under the Destination ID named “DST_AUS_Fixed”, so a call to any of those prefixes would match DST_AUS_Fixed.
Rates
Rates define the price we charge for a service and are defined by our Rates.csv file.
This is nice and clean, a 1 second call costs $0.25, a 60 second call costs $0.25, and a 61 second call costs $0.50, and so on.
This is the standard billing mechanism for residential services, but it does not pro-rata the call – For example a 1 second call is the same cost as a 59 second call ($0.25), and only if you tick over to 61 seconds does it get charged again (Total of $0.50).
Per Second Billing
If you’re doing a high volume of calls, paying for a 3 second long call where someone’s voicemail answers the call and was hung up, may seem a bit steep to pay the same for that as you would pay for 59 seconds of talk time.
Instead Per Second Billing is more common for high volume customers or carrier-interconnects.
This means the rate still be set at $0.25 per minute, but calculated per second.
So the cost of 60 seconds of call is $0.25, but the cost of 30 second call (half a minute) should cost half of that, so a 30 second call would cost $0.125.
How often we asses the charging is defined by the RateIncrement parameter in the Rate Table.
We could achieve the same outcome another way, by setting the RateIncriment to 1 second, and the dividing the rate per minute by 60, we would get the same outcome, but would be more messy and harder to maintain, but you could think of this as $0.25 per minute, or $0.004166667 per second ($0.25/60 seconds).
Flat Rate Billing
Another option that’s commonly used is to charge a flat rate for the call, so when the call is answered, you’re charged that rate, regardless of the length of the call.
Regardless if the call is for 1 second or 10 hours, the charge is the same.
DestinationID – Refers to the DestinationID defined in the Destinations.csv file
RatesTag – Referes to the Rate ID we defined in Rates.csv
RoundingMethod – Defines if we round up or down
RoundingDecimals – Defines how many decimal places to consider before rounding
MaxCost – The maximum cost this can go up to
MaxCostStrategy – What to do if the Maximum Cost is reached – Either make the rest of the call Free or Disconnect the call
So for each entry we’ll define an ID, reference the Destination and the Rate to be applied, the other parts we’ll leave as boilerplate for now, and presto. We have linked our Destinations to Rates.
Rating Plans
We may want to offer different plans for different customers, with different rates.
DestinationRatesId (As defined in DestinationRates.csv)
TimingTag – References a time profile if used
Weight – Used to determine what precedence to use if multiple matches
So as you may imagine we need to link the DestinationRateIDs we just defined together into a Rating Plan, so that’s what I’ve done in the example above.
Rating Profiles
The last step in our chain is to link Customers / Subscribers to the profiles we’ve just defined.
How you allocate a customer to a particular Rating Plan is up to you, there’s numerous ways to approach it, but for this example we’re going to use one Rating Profile for all callers coming from the “cgrates.org” tenant:
Category is used to define the type of service we’re charging for, in this case it’s a call, but could also be an SMS, Data usage, or a custom definition.
Subject is typically the calling party, we could set this to be the Caller ID, but in this case I’ve used a wildcard “*any”
ActivationTime allows us to define a start time for the Rating Profile, for example if all our rates go up on the 1st of each month, we can update the Plans and add a new entry in the Rating Profile with the new Plans with the start time set
RatingPlanID sets the Rating Plan that is used as we defined in RatingPlans.csv
Loading the Rates into CGrates
At the start we’ll be dealing with CGrates through CSV files we import, this is just one way to interface with CGrates, there’s others we’ll cover in due time.
CGRates has a clever realtime architecture that we won’t go into in any great depth, but in order to load data in from a CSV file there’s a simple handy tool to run the process,
Obviously you’ll need to replace with the folder you cloned from GitHub.
Trying it Out
In order for CGrates to work with Kamailio, FreeSWITCH, Asterisk, Diameter, Radius, and a stack of custom options, for rating calls, it has to have common mechanisms for retrieving this data.
CGrates provides an API for rating calls, that’s used by these platforms, and there’s a tool we can use to emulate the signaling for call being charged, without needing to pickup the phone or integrate a platform into it.
The tenant will need to match those defined in the RatingProfiles.csv, the Subject is the Calling Party identity, in our case we’re using a wildcard match so it doesn’t matter really what it’s set to, the Destination is the destination of the call, AnswerTime is time of the call being answered (pretty self explanatory) and the usage defines how many seconds the call has progressed for.
The output is a JSON string, containing a stack of useful information for us, including the Cost of the call, but also the rates that go into the decision making process so we can see the logic that went into the price.
So have a play with setting up more Destinations, Rates, DestinationRates and RatingPlans, in these CSV files, and in our next post we’ll dig a little deeper… And throw away the CSVs all together!
In iOS 15, Apple added support for iPhones to support SMS over IMS networks – SMSoIP. Previously iPhone users have been relying on CSFB / SMSoNAS (Using the SGs interface) to send SMS on 4G networks.
Getting this working recently led me to some issues that took me longer than I’d like to admit to work out the root cause of…
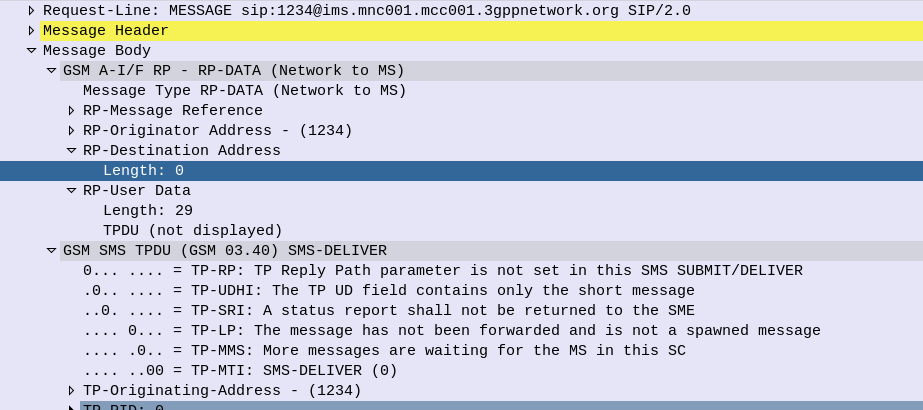
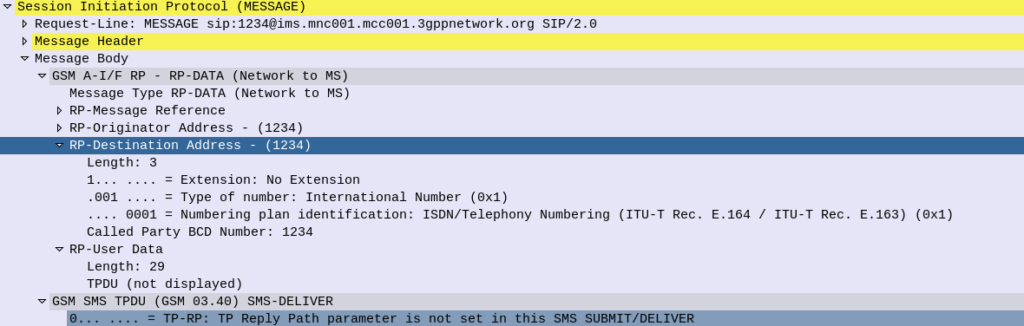
I was finding that when sending a Mobile Termianted SMS to an iPhone as a SIP MESSAGE, the iPhone would send back the 200 OK to confirm delivery, but it never showed up on the screen to the user.
The GSM A-I/F headers in an SMS PDU are used primarily for indicating the sender of an SMS (Some carriers are configured to get this from the SIP From header, but the SMS PDU is most common).
The RP-Destination Address is used to indicate the destination for the SMS, and on all the models of handset I’ve been testing with, this is set to the MSISDN of the Subscriber.
But some devices are really finicky about it’s contents. Case in point, Apple iPhones.
If you send a Mobile Terminated SMS to an iPhone, like the one below, the iPhone will accept and send back a 200 OK to this request.
The problem is it will never be displayed to the user… The message is marked as delivered, the phone has accepted it it just hasn’t shown it…
SMS reports as delivered by the iPhone (200 OK back) but never gets displayed to the user of the phone as the RP-Destination Address header is populated
The fix is simple enough, if you set the RP-Destination Address header to 0, the message will be displayed to the user, but still took me a shamefully long time to work out the problem.
RP-Destination Address set to 0 sent to the iPhone, this time it’ll get displayed to the user.
I’ve become a big fan of Redis, and recently I had a need to integrate it into Kamailio.
There are two modules for integrating Kamailio and Redis, each have different functionalities:
db_redis is used when you want to use Redis in lieu of MySQL, PostGres, etc, as the database backend, this would be useful for services like usrloc. Not all queries / function calls are supported, but can be used as a drop-in replacement for a lot of modules that need database connectivity.
ndb_redis exposes Redis functions from the Kamailio config file, in a much more generic way. That’s what we’ll be looking at today.
The setup of the module is nice and simple, we load the module and then define the connection to the Redis server:
With the above we’ve created a connection to the Redis server at 127.0.0.2, and it’s called MyRedisServer.
You can define multiple connections to multiple Redis servers, just give each one a different name to reference.
Now if we want to write some data to Redis (SET) we can do it from within the dialplan with:
redis_cmd("MyRedisServer", "SET foo bar", "r");
We can then get this data back with:
#Get value of key "foo" from Redis
redis_cmd("MyRedisServer", "GET foo", "r");
#Set avp "foo_value" to output from Redis
$avp(foo_value) = $redis(r=>value);
#Print out value of avp "foo_value" to syslog
xlog("Value of foo is:  $avp(foo_value))
At the same time, we can view this data in Redis directly by running:
nick@oldfaithful:~$ redis-cli GET foo
Likewise we can set the value of keys and the keys themselves from AVPs from within Kamailio:
#Set the Redis Key to be the Received IP, with the value set to the value of the AVP "youravp"
redis_cmd("MyRedisServer", "SET $ct $avp(youravp)", "r");
All of the Redis functions are exposed through this mechanism, not just get and set, for example we can set the TTL so a record deletes after a set period of time:
#Set key with value of the received IP to expire after 120 seconds
redis_cmd("MyRedisServer", "EXPIRE $ct 120", "r");
I recently used Redis for a distributed flooding prevention mechanism, where the Subscriber’s received IP is used as the key in Redis and the value set to the number of failed auth attempts that subscriber has had, by using Redis we’re able to use the same mechanism across different platforms and easily administer it.
After getting AMR support in FreeSWITCH I set about creating an IMS Application Server for VoLTE / IMS networks using FreeSWITCH.
So in IMS what is an Application Server? Well, the answer is almost anything that’s not a CSCF.
An Application Server could handle your Voicemail, recorded announcements, a Conference Factory, or help interconnect with other systems (without using a BGCF).
I’ll be using mine as a simple bridge between my SIP network and the IMS core I’ve got for VoLTE, with FreeSWITCH transcoding between AMR to PCMA.
Setting up FreeSWITCH
You’ll need to setup FreeSWITCH as per your needs, so that’s however you want to use it.
This post won’t cover setting up FreeSWITCH, there’s plenty of good resources out there for that.
The only difference is when you install FreeSWITCH, you will want to compile with AMR Support, so that you can interact with mobile phones using the AMR codec, which I’ve documented how to do here.
Setting up your IMS
In order to get calls from the IMS to the Application Server, we need a way of routing the calls to the Application Server.
There are two standards-compliant ways to achieve this,
But this is a blunt instrument, after all, it’ll only ever be used at the start of the call, what if we want to send it to an AS because a destination can’t be reached and we want to play back a recorded announcement?
This is part of a series of posts looking into SS7 and Sigtran networks. We cover some basic theory and then get into the weeds with GNS3 based labs where we will build real SS7/Sigtran based networks and use them to carry traffic.
So one more step before we actually start bringing up SS7 / Sigtran networks, and that’s to get a bit of a closer look at what components make up SS7 networks.
Recap: What is SS7?
SS7 is the name given to the protocol stack used almost exclusively in the telecommunications space. SS7 isn’t just one protocol, instead it is a suite of protocols. In the same way when someone talks about IP networking, they’re typically not just talking about the IP layer, but the whole stack from transport to application, when we talk about an SS7 network, we’re talking about the whole stack used to carry messages over SS7.
And what is SIGTRAN?
Sigtran is “Signaling Transport”. Historically SS7 was carried over TDM links (Like E1 lines).
As the internet took hold, the “Signaling Transport” working group was formed to put together the standards for carrying SS7 over IP, and the name stuck.
I’ve always thought if I were to become a Mexican Wrestler (which is quite unlikely), my stage name would be DSLAM, but SIGTRAN comes a close second.
Today when people talk about SIGTRAN, they mean “SS7 over IP”.
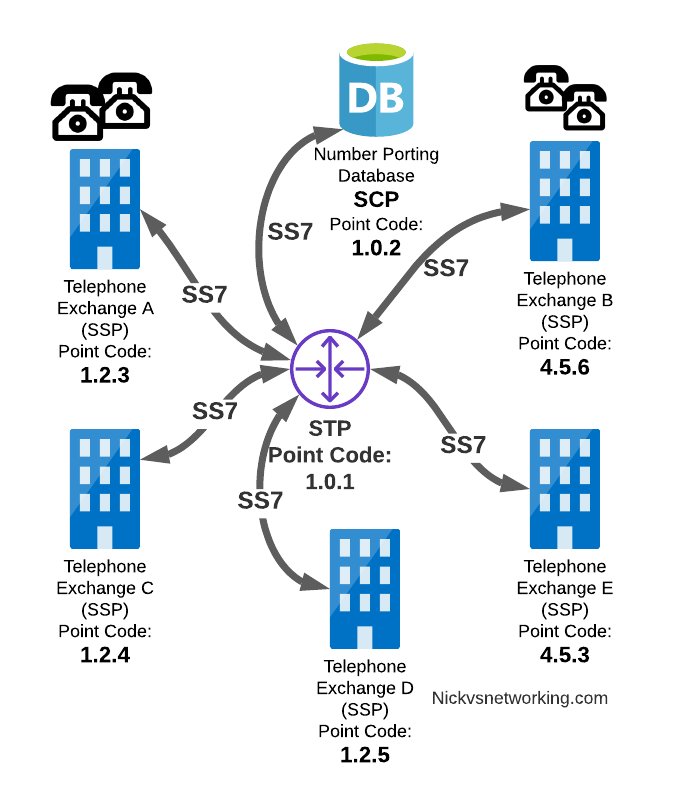
What is in an SS7 Network?
SS7 Networks only have 3 types of network elements:
Service Switching Points (SSP)
Service Transfer Points (STP)
Service Control Points (SCP)
Service Switching Points (SSP)
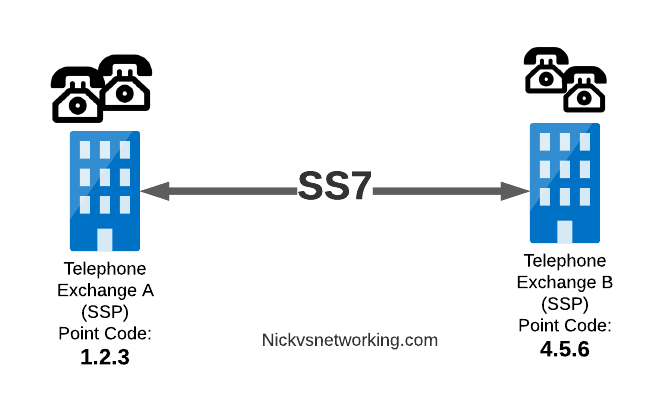
Service Switching Points (SSPs) are endpoints in the network. They’re the users of the connectivity, they use it to create and send meaningful messages over the SS7 network, and receive and process messages over the SS7 network.
Like a PC or server are IP endpoints on an IP Network, which send and receive messages over the network, an SSP uses the SS7 network to send and receive messages.
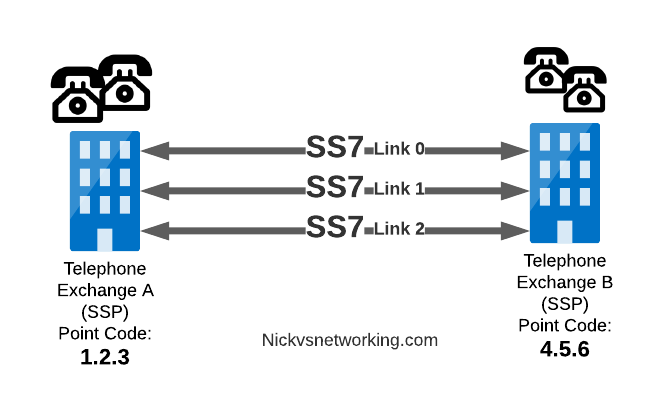
In a PSTN context, your local telephone exchange is most likely an SS7 Service Switching Point (SSP) as it creates traffic on the SS7 network and receives traffic from it.
A call from a user on one exchange to a user on another exchange could go from the SSP in Exchange A, to the SSP in Exchange B, in the same way you could send data between two computers by connecting directly between them with an Ethernet crossover cable.
Messages between our two exchanges are addressed using Point Codes, which can be thought of a lot like IP Addresses, except shorter.
In the MTP3 header of each SS7 message is the Destination Point Code, and the Origin Point Code.
When Telephone Exchange A wants to send a message over SS7 to Telephone Exchange B, the MTP header would look like:
MTP3 Header:
Origin Point Code:      1.2.3
Destination Point Code: 4.5.6
Service Transfer Points (STP)
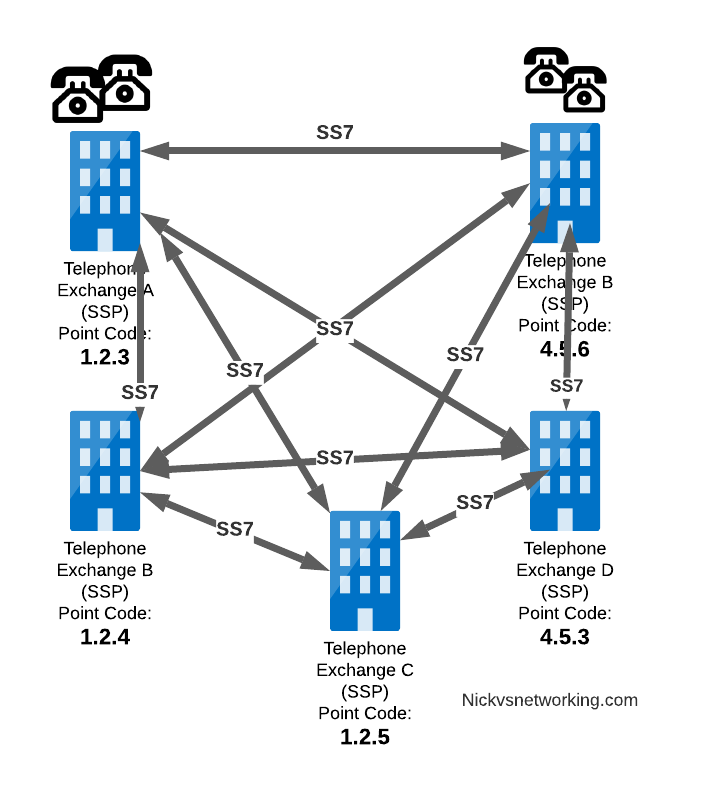
Linking each SSP to each other SSP has a pretty obvious problem as our network grows.
What happens if we’ve got hundreds of SSPs? If we want a full-mesh topology connecting every SSP to every other SSP directly, we’d have a rats nest of links!
A “full-mesh” approach for connecting SSPs does not work at scale, so STPs are introduced
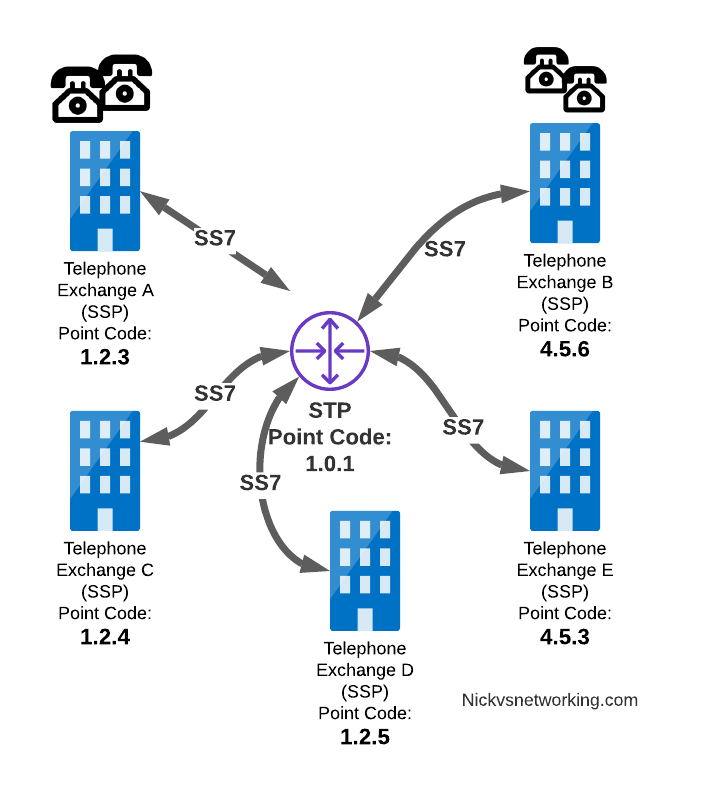
So to keep things clean and scalable, we’ve got Signalling Transfer Points (STPs).
STPs can be thought of like Routers but in an SS7 network.
When our SSP generates an SS7 message, it’s typically handed to an STP which looks at the Destination Point Code, it’s own routing table and routes it off to where it needs to go.
STP acting as a central router to connect lots of SSPs
This means every SSP doesn’t require a connection to every other SSP. Instead by using STPs we can cut down on the complexity of our network.
When Telephone Exchange A wants to send a message over SS7 to Telephone Exchange B, the MTP header would look the same, but the routing table on Telephone Exchange A would be setup to send the requests out the link towards the STP.
MTP3 Header:
Origin Point Code:      1.2.3
Destination Point Code: 4.5.6
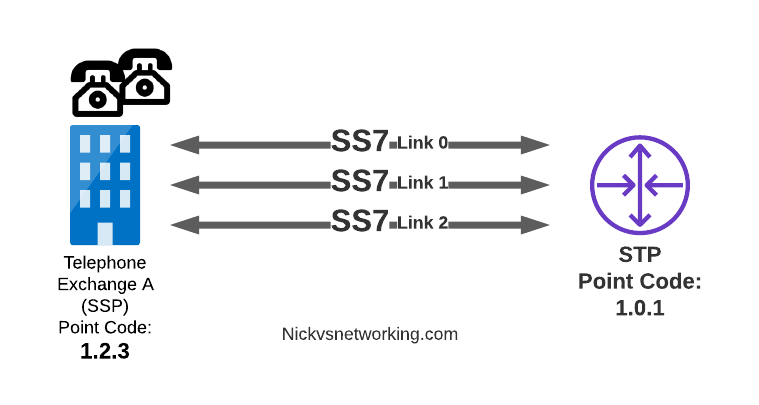
Linksets
Between SS7 Nodes we have Linksets. Think of Linksets as like LACP or Etherchannel, but for SS7.
You want to have multiple links on every connection, for sharing out the load or for redundancy, and a Linkset is a group of connections from one SS7 node to another, that are logically treated as one link.
Link between an SSP and STP with 3 linksets
Each of the links in a Linkset is identified by a number, and specified in in the MTP3 header’s “Signaling Link Selector” field, so we know what link each message used.
MTP3 Header:
Origin Point Code:       1.2.3
Destination Point Code:  4.5.6
Signaling Link Selector: 2
Service Control Point (SCP)
Somewhere between a Rolodex an relational database, is the Service Control Point (SCP).
For an exchange (SSP) to route a call to another exchange, it has to know the point code of the destination Exchange to send the call to. When fixed line networks were first deployed this was fairly straight forward, each exchange had a list of telephone number prefixes and the point code that served each prefix, simple.
But then services like number porting came along when a number could be moved anywhere. Then 1800/0800 numbers where a number had to be translated back to a standard phone number entered the picture.
To deal with this we need a database, somewhere an SSP can go to query some information in a database and get a response back.
This is where we use the Service Control Point (SCP).
Keep in mind that SS7 long predates APIs to easily lookup data from a service, so there was no RESTful option available in the 1980s.
When a caller on a local exchange calls a toll free (1800 or 0800 number depending on where you are) number, the exchange is setup with the Point Code of an SCP to query with the toll free number, and the SCP responds back with the local number to route the call to.
While SCPs are fading away in favor of technology like DNS/ENUM for Local Number Portability or Routing Databases, but they are still widely used in some networks.
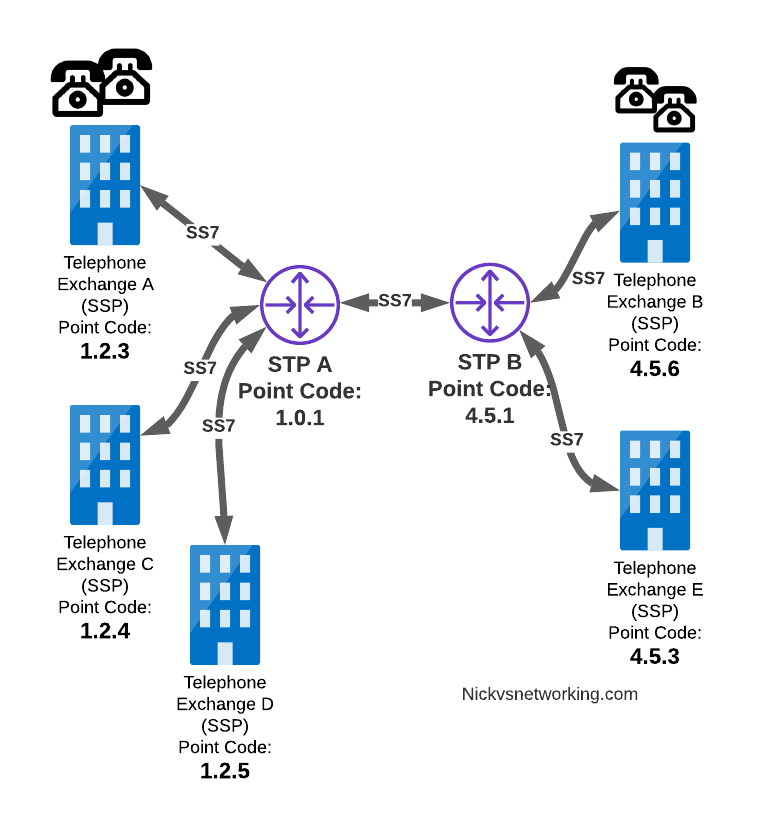
Getting to know the Signalling Transfer Point (STP)
As we saw earlier, instead of a one-to-one connection between each SS7 device to every other SS7 device, Signaling Transfer Points (STP) are used, which act like routers for our SS7 traffic.
The STP has an internal routing table made up of the Point Codes it has connections to and some logic to know how to get to each of them.
Like a router, STPs don’t really create SS7 traffic, or consume traffic, they just receive SS7 messages and route them on towards their destination.
Ok, they do create some traffic for checking links are up, etc, but like a router, their main job is getting traffic where it needs to go.
When an STP receives an SS7 message, the STP looks at the MTP3 header. Specifically the Destination Point Code, and finds if it has a path to that Point Code. If it has a route, it forwards the SS7 message on to the next hop.
Like a router, an STP doesn’t really concern itself with anything higher than the MTP3 layer – As point codes are set in the MTP3 layer that’s the only layer the STP looks at and the upper layers aren’t really “any of its business”.
STPs don’t require a direct connection (Linkset) from the Originating Point Code straight to the Destination Point Code. Just like every IP router doesn’t need a direct connection to ever other network. By setting up a routing table of Point Codes and Linksets as the “next-hop”, we can reach Destination Point Codes we don’t have a direct Linkset to by routing between STPs to reach the final Destination Point Code.
Let’s work through an example:
And let’s look at the routing table setup on STP-A:
STP A Routing Table:
1.2.3 - Directly attached (Telephone Exchange A)
1.2.4 - Directly attached (Telephone Exchange C)
1.2.5 - Directly attached (Telephone Exchange D)
4.5.1 - Directly attached (STP-B)
4.5.3 - Via STP-B
4.5.6 - Via STP-B
So what happens when Telephone Exchange A (Point Code 1.2.3) wants to send a message to Telephone Exchange E (Point Code 4.5.3)? Firstly Telephone Exchange A puts it’s message on an MTP3 payload, and the MTP3 header will look something like this:
MTP3 Header:
Origin Point Code:       1.2.3
Destination Point Code:  4.5.3
Signaling Link Selector: 1
Telephone Exchange A sends the SS7 message to STP A, which looks at the MTP3 header’s Destination Point Code (4.5.3), and then in it’s routing table for a route to the destination point. We can see from our example routing table that STP A has a route to Destination Point Code 4.5.3 via STP-B, so sends it onto STP-B.
For STP-B it has a direct connection (linkset) to Telephone Exchange E (Point Code 4.5.3), so sends it straight on
Like IP, Point Codes have their own form of Variable-Length-Subnet-Routing which means each STP doesn’t need full routing info for every Destination Point Code, but instead can have routes based on part of the point code and a subnet mask.
But unlike IP, there is no BGP or OSPF on SS7 networks. Instead, all routes have to be manually specified.
For STP A to know it can get messages to destinations starting with 4.5.x via STP B, it needs to have this information manually added to it’s route table, and the same for the return routing.
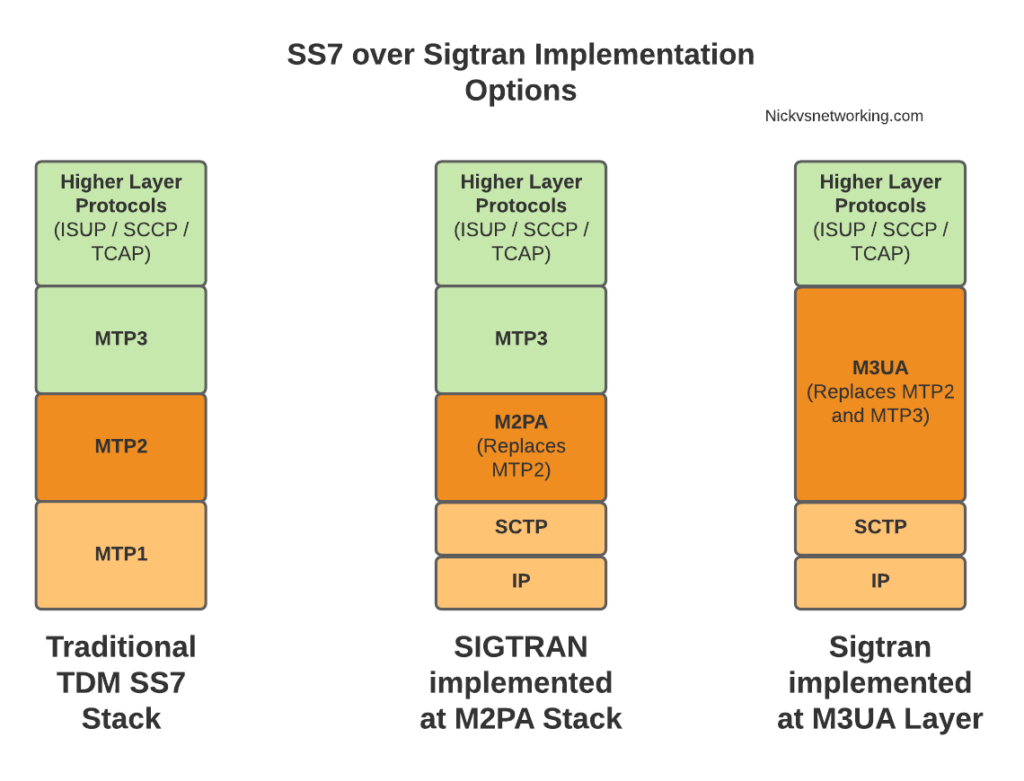
Sigtran & SS7 Over IP
As the world moved towards IP enabled everything, TDM based Sigtran Networks became increasingly expensive to maintain and operate, so a IETF taskforce called SIGTRAN (Signaling Transport) was created to look at ways to move SS7 traffic to IP.
When moving SS7 onto IP, the first layer of SS7 (MTP1) was dropped, as it primarily concerned the physical side of the network. MTP2 didn’t really fit onto an IP model, so a two options were introduced for transport of the MTP2 data, M2PA (Message Transfer Part 2 User Peer-to-Peer Adaptation Layer) and M2UA (MTP2 User Adaptation Layer) were introduced, which rides on top of SCTP. This means if you wanted an MTP2 layer over IP, you could use M2UA or M2TP.
SCTP is neither TCP or UDP. I’ve touched upon SCTP on this blog before, it’s as if you took the best bits of TCP without the issues like head of line blocking and added multi-homing of connections.
So if you thought all the layers above MTP2 are just transferred, unchanged on top of our M2PA layer, that’s one way of doing it, however it’s not the only way of doing it.
There are quite a few ways to map SS7 onto IP Networks, which we’ll start to look into it more detail, but to keep it simple, for the next few posts we’ll be assuming that everything above MTP2/M2PA remain unchanged.
In the next post, we’ll get some actual SS7 traffic flowing!
The SIP RFC allows for multiple SIP headers to have the same name,
For example, it’s very common to have lots of Via headers present in a request.
In Kamailio, we often may wish to add headers, view the contents of headers and perform an action or re-write headers (Disclaimer about not rewriting Vias as that goes beyond the purview of a SIP Proxy but whatever).
Let’s look at a use case where we have multiple instances of the X-NickTest: header, looking something like this:
INVITE sip:[email protected]:5061 SIP/2.0
X-NickTest: ENTRY ONE
X-NickTest: ENTRY TWO
X-NickTest: ENTRY THREE
...
Let’s look at how we’d access this inside Kamailio.
First, we could just use the psedovariable for header – $hdr()
xlog("Value of X-NickTest is: $hdr(X-NickTest)");
But this would just result in the first entry being printed out:
Value of X-NickTest is: ENTRY ONE
If we know how many instances there are of the header, we can access it by it’s id in the array, for example:
xlog("Value of first X-NickTest is: $hdr(X-NickTest)[0]");
xlog("Value of second X-NickTest is: $hdr(X-NickTest)[1]");
xlog("Value of third  X-NickTest is: $hdr(X-NickTest)[2]");
But we may not know how many to expect either, but we can find out using $hdrc(name) to get the number of headers returned.
xlog("X-NickTest has $hdrc(X-NickTest) entries");
You’re probably seeing where I’m going with this, the next logical step is to loop through them, which we can also do something like this:
$var(i) = 0;
while($var(i) < $hdrc(X-NickTest)) {
         xlog(X-NickTest entry [$var(i)] has value $hdrc(X-NickTest)[$var(i)]);
         $var(i) = $var(i) + 1;
}
Through fs_cli you can orignate calls from FreeSWITCH.
At the CLI you can use the originate command to start a call, this can be used for everything from scheduled wake up calls, outbound call centers, to war dialing.
For example, what I’m using:
originate sofia/external/[email protected]:5061 61399999995 XML default
originate is the command on the FS_CLI
sofia/external/[email protected]:5061 is the call URL, with the application (I’m using mod_sofia, so sofia), the Sofia Profile (in my case external) and the SIP URI, or, if you have gateways configured, the to URI and the gateway to use.
6139999995 is the Application
XML is the Dialplan to reference
default is the Context to use
But running this on the CLI is only so useful, we can use an ESL socket to use software to connect to FreeSWITCH’s API (Through the same mechanism fs_cli uses) in order to programmatically start calls.
But to do that first we need to expose the ESL API for inbound connections (Clients connecting to FreeSWITCH’s ESL API, which is different to FreeSWITCH connecting to an external ESL Server where FreeSWITCH is the client).
We’ll need to edit the event_socket.conf.xml file to define how this can be accessed:
Obviously you’ll need to secure this appropriately, good long password, and tight ACLs.
You may notice after applying these changes in the config, you’re no longer able to run fs_cli and access FreeSWITCH, this is because FreeSWITCH’s fs_cli tool connects to FreeSWITCH over ESL, and we’ve just changed tha parameters. You should still be able to connect by specifying the IP Address, port and the secret password we set:
This also means we can run fs_cli from other hosts if permitted through the ACLs (kinda handy for managing larger clusters of FreeSWITCH instances).
But now we can also connect a remote ESL client to it to run commands like our Originate command to setup calls, I’m using GreenSwitch with ESL in Python:
import gevent
import greenswitch
import sys
#import Fonedex_TelephonyAPI
#sys.path.append('../WebUI/Flask/')
import uuid

import logging
logging.basicConfig(level=logging.DEBUG)


esl_server_host = "10.0.1.16"
logging.debug("Originating call to " + str(destination) + " from " + str(source))
logging.debug("Routing the call to " + str(dialplan_entry))
fs = greenswitch.InboundESL(host=str(esl_server_host), port=8021, password='yoursecretpassword')
  try:
      fs.connect()
      logging.debug("Connected to ESL server at " + str(esl_server_host))
  except:
      raise SystemError("Failed to connect to ESL Server at " + str(esl_server_host))

r = fs.send('bgapi originate {origination_caller_id_number=' + str(source) + '}sofia/external/' + str(destination) + '@10.0.1.252:5061 default XML')
Recently I was working on a project that required Kamailio to constantly re-evaluate something, and generate a UAC request if the condition was met.
There’s a few use cases for this: For example you might want to get Kamailio to constantly check the number of SIP registrations and send an alert if they drop below a certain number. If a subscriber drops out in that their Registration just expires, there’s no SIP message that will come in to tell us, so we’d never be able to trigger something in the normal Kamailio request_route.
Of you might want to continually send a SIP MESSAGE to pop up on someone’s phone to drive them crazy. That’s what this example will focus on.
This is where the rtimer module comes in. You can define the check in a routing block, and then
The mod_httapi in FreeSWITCH allows you to upload your call recordings to a HTTP server, in my case I’ve put together a Flask based Python server for a project I’m working on, which when the call ends, uploads to my web server. Presto!
Obviously you’ll need to replace the URL etc, but you can then just extract the POSTed file out and boom, you don’t need to store any recordings on each FreeSWITCH instance.
This is fantastic if you’re running multiple instances in a cluster or containerized, and want every FreeSWITCH instance to be dumb and with access to the same data as every other instance.
It’s 2021, and everyone loves Containers; Docker & Kubernetes are changing how software is developed, deployed and scaled.
And yet so much of the Telco world still uses bare metal servers and dedicated hardware for processing.
So why not use Containers or VMs more for VoIP applications?
Disclaimer – When I’m talking VoIP about VoIP I mean the actual Voice over IP, that’s the Media Stream, RTP, the Audio, etc, not the Signaling (SIP). SIP is fine with Containers, it’s the media that has a bad time and that this post focuses on,
Virtualization Fundamentals
Once upon a time in Development land every application ran on it’s own server running in a DC / Central Office.
This was expensive to deploy (buying servers), operate (lots of power used) and maintain (lots of hardware to keep online).
Each server was actually sitting idle for a large part of the time, with the application running on it only using a some of the available resources some of the time.
One day Virtualization came and suddenly 10 physical servers could be virtualized into 10 VMs.
These VMs still need to run on servers but as each VM isn’t using 100% of it’s allocated resources all the time, instead of needing 10 servers to run it on you could run it on say 3 servers, and even do clever things like migrate VMs between servers if one were to fail.
VMs share the resources of the server it’s running on.
A server running VMs (Hypervisor) is able to run multiple VMs by splitting the resources between VMs.
If a VM A wants to run an operation at the same time a VM B & VM C, the operations can’t be run on each VM at the same time* so the hypervisor will queue up the requests and schedule them in, typically based on first-in-first out or based on a resource priority policy on the Hypervisor.
This is fine for a if VM A, B & C were all Web Servers. A request coming into each of them at the same time would see the VM the Hypervisor schedules the resources to respond to the request slightly faster, with the other VMs responding to the request when the hypervisor has scheduled the resources to the respective VM.
VoIP is an only child
VoIP has grown up on dedicated hardware. It’s an only child that does not know how to share, because it’s never had to.
Having to wait for resources to be scheduled by the Hypervisor to to VM in order for it to execute an operation is fine and almost unnoticeable for web servers, it can have some pretty big impacts on call quality.
If we’re running RTPproxy or RTPengine in order to relay media, scheduling delays can mean that the media stream ends up “bursty”.
RTP packets needing relaying are queued in the buffer on the VM and only relayed when the hypervisor is able to schedule resources, this means there can be a lot of packet-delay-variation (PDV) and increased latency for services running on VMs.
VMs and Containers both have this same fate, DPDK and SR-IOV assist in throughput, but they don’t stop interrupt headaches.
VMs that deprive other VMs on the same host of resources are known as “Noisy neighbors”.
The simple fix for all these problems? There isn’t one.
Each of these issues can be overcome, dedicating resources, to a specific VM or container, cleverly distributing load, but it is costly in terms of resources and time to tweak and implement, and some of these options undermine the value of virtualization or containerization.
As technology marches forward we have scenarios where Kubernetes can expose FPGA resources to pass them through to Pods, but right now, if you need to transcode more than ~100 calls efficiently, you’re going to need a hardware device.
And while it can be done by throwing more x86 / ARM compute resources at the problem, hardware still wins out as cheaper in most instances.
So far with most of our discussions about Kamailio we’ve talked about routing the initial SIP request (INVITE, REGISTER, SUBSCRIBE, etc), but SIP is not a one-message protocol, there’s a whole series of SIP messages that go into a SIP Dialog.
Sure the call may start with an INVITE, but there’s the 180 RINGING, the 200 OK and the ACK that go into getting the call actually established, and routing these in-dialog messages is just as important as routing the first INVITE.
When we’ve talked about SIP routing it’s all happened in the request_route {} block:
request_route {
        xlog("Received $rm to $ru - Forwarding");
        append_hf("X-Proxied: You betcha\r\n");
        #Forward to new IP
        forward("192.168.1.110");
}
In the example above we statelessly forward any initial requests to the IP 192.168.1.110.
We can add an onreply_route{} block to handle any replies from 192.168.1.110 back to the originator.
But why would we want to?
Some simple answers would be to do some kind of manipulation to the message – say to strip a Caller ID if CLIP is turned off, or to add a custom SIP header containing important information, etc.
onreply_route{
        xlog("Got a reply $rs");
        append_hf("X-Proxied: For the reply\r\n");
}
Let’s imagine a scenario where the destination our SIP proxy is relaying traffic to (192.168.1.110) starts responding with 404 error.
We could detect this in our onreply_route{} and do something about it.
onreply_route{
        xlog("Got a reply $rs");
        if($rs == 404) {
                #If remote destination returns 404
                xlog("Got a 404 for $rU");
                #Do something about it
        }
}
In the 404 example if we were using Dispatcher it’s got easily accessed logic to handle these scenarios a bit better than us writing it out here, but you get the idea.
There are a few other special routes like onreply_route{}, failure routes and event routes, etc.
Hopefully now you’ll have a better idea of how and when to use onreply_route{} in Kamailio.
It’s a seemingly simple question, the answer to which is – however you want, sorry if that’s not a simple answer.
I’ve talked about the strengths and weaknesses of Kamailio and Asterisk in my post Kamailio vs Asterisk, so how about we use them to work together?
The State of Play
So before we go into the nitty gritty, let’s imagine we’ve got an Asterisk box with a call queue with Alice and Bob in it, set to ring those users if they’re not already on a call.
Each time a call comes in, Asterisk looks at who in the queue is not already on a call, and rings their phone.
Now let’s imagine we’re facing a scenario where the single Asterisk box we’ve got is struggling, and we want to add a second to share the load.
We do it, and now we’ve got two Asterisk boxes and a Kamailio load balancer to split the traffic between the two boxes.
Now each time a call comes in, Kamailio sends the SIP INVITE to one of the two Asterisk boxes, and when it does, that Asterisk box looks at who is in the queue and not already on a call, and then rings their phone.
Let’s imagine a scenario where a Alice & Bob are both on calls on Asterisk box A, and another call comes in this call is routed to Asterisk box B. Asterisk box B looks at who is in the queue and who is already on a call, the problem is Alice and Bob are on calls on Asterisk box A, so Asterisk box B doesn’t know they’re both on a call and tries to ring them.
We have a problem.
Scaling stateful apps is a real headache,
So have a good long hard think about how to handle these issues before going down this path!
Recently I’ve been working on a few projects with FreeSWITCH, and looking at options for programmatically generating dialplans, instead of static XML files.
Why not Static XML?
So let’s say I define a static XML dialplan.
It works great, but if I want to change the way a call routes I need to do it from the dialplan,
That’s not ideal if you’re using a distributed cluster of FreeSWITCH instances, or if you want to update on the fly.
Static XML means we have to define our dialplan when setting up the server, and would have to reconfigure the server to change it.
So what about mod_xml_curl?
When I’ve done this in the past I’ve relied on the mod_xml_curl module.
mod_xml_curl gets the XML dialplan using Curl from a web server, and so you setup a web server using Flask/PHP/etc, and dynamically generate the dialplan when the call comes in.
This sounds good, except you can’t update it on the fly.
mod_xml_curl means call routing decisions are made at the start of the call, and can’t be changed midway through the call.
So what’s ESL?
ESL is the Event Socket Library, essentially a call comes in, an ESL request is made to an external server.
For each step in the dialplan, an ESL request will be sent to the external server which tells it to do,
ESL allows us to use all FreeSWITCH’s fantastic modules, without being limited as to having to perform the call routing logic in FreeSWITCH.
So how do I use ESL?
You’ll need two create an ESL server,
Luckily there’s premade examples for popular languages;
A lot of people think there’s a one-to-one relationship between a registration Address on Record, and a username.
That doesn’t have to be the case, there are some platforms that only allow a single registration for a single username, but the RFC itself allows multiple registrations for a single username.
REGISTER requests add, remove, and query bindings.
A REGISTER request can add a new binding between an address-of-record and one or more contact addresses.
Registration on behalf of a particular address-of-record can be performed by a suitably authorized third party.
A client can also remove previous bindings or query to determine which bindings are currently in place for an address-of-record.
Let’s say you’ve got a SIP phone on your desk at the office and at home.
What we could do is create a different username and password for home & work, and then setup some time based forward rules to ring the office from 9-5 and home outside of that.
You could register both with the same username and password, and then unplug the one at home before you leave to work, get to work, plug in your office phone, unplug it before you leave to go home, and when you get home plug back in your home phone, or if multi-device registration is supported, register both and have incoming calls ring on both.
Admittedly, platforms that support this are the exception, not the rule, but the RFC does allow it.
The other little known feature in SIP Registration is that you can query the SIP Registrar to get the list of Addresses on Record.
So there you go, factoids about SIP REGISTER method!
It’s probably pretty evident to most why you’d want to use TLS these days,
SIP Secure – aka sips has been around for a long time and is supported by most SIP endpoints now.
Kamailio supports TLS, and it’s setup is very straightforward.
I’ve got a private key and certificate file for the domain nickvsnetworking.com so I’ll use those to secure my Kamailio instance by using TLS.
I’ll start by copying both the certificate (in my case it’s cert.pem) and the private key (privkey.pem) into the Kamailio directory. (If you’ve already got the private key and certificate on your server for another application – say a web server, you can just reference that location so long as the permissions are in place for Kamailio to access)
Next up I’ll open my Kamailio config (kamailio.cfg), I’ll be working with an existing config and just adding the TLS capabilities, so I’ll add this like to the config:
!define WITH_TLS
That’s pretty much the end of the configuration in kamailio.cfg, if we have a look at what’s in place we can see that the TLS module loads it’s parameters from a separate file;
After restarting Kamailio subscribers can now contact us via TLS using sips.
You may wish to disable TCP & UDP transport in favor of only TLS.
A note about CAs…
If you’re planning on rolling out SIP over TLS (sips) to existing IP phones it’s worth looking at what Certificate Authorities (CAs) are recognised by the IP phones.
As TLS relies on a trust model where a CA acts kind of like a guarantor to the validity of the certificate, if the IP phone doesn’t recognise the CA, it may see the certificate as Invalid.
Some IP phones for example won’t recognize Let’s Encrypt certificates as valid, while others may not recognize any of the newer CAs.
I’ve been working for some time on open source mobile network cores, and one feature that has been a real struggle for a lot of people (Myself included) is getting VoLTE / IMS working.
Here’s some of the issues I’ve faced, and the lessons I learned along the way,
Sadly on most UEs / handsets, there’s no “Make VoLTE work now” switch, you’ve got a satisfy a bunch of dependencies in the OS before the baseband will start sending SIP anywhere.
Get the right Hardware
Your eNB must support additional bearers (dedicated bearers I’ve managed to get away without in my testing) so the device can setup an APN for the IMS traffic.
Sadly at the moment this rules our Software Defined eNodeBs, like srsENB.
ISIM – When you thought you understood USIMs – Guess again
According to the 3GPP IMS docs, an ISIM (IMS SIM) is not a requirement for IMS to work.
However in my testing I found Android didn’t have the option to enable VoLTE unless an ISIM was present the first time.
In a weird quirk I found once I’d inserted an ISIM and connected to the VoLTE network, I could put a USIM in the UE and also connect to the VoLTE network.
Obviously the parameters you can set on the USIM, such as Domain, IMPU, IMPI & AD, are kind of “guessed” but the AKAv1-MD5 algorithm does run.
Getting the APN Config Right
There’s a lot of things you’ll need to have correct on your UE before it’ll even start to think about sending SIP messaging.
I was using commercial UE (Samsung handsets) without engineering firmware so I had very limited info on what’s going on “under the hood”. There’s no “Make VoLTE do” tickbox, there’s VoLTE enable, but that won’t do anything by default.
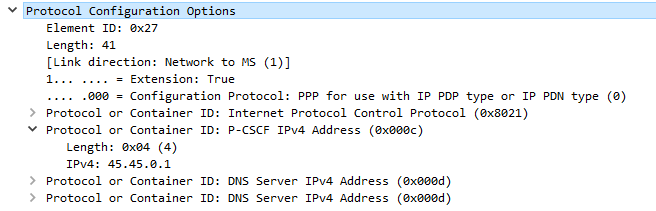
If your P-GW doesn’t know the IP of your P-CSCF, it’s not going to be able to respond to it in the Protocol Configuration Options (PCO) request sent by the UE with that nice new bearer for IMS we just setup.
There’s no way around Mutual Authentication
Coming from a voice background, and pretty much having RFC 3261 tattooed on my brain, when I finally got the SIP REGISTER request sent to the Proxy CSCF I knocked something up in Kamailio to send back a 200 OK, thinking that’d be the end of it.
For any other SIP endpoint this would have been fine, but IMS Clients, nope.
Reading the specs drove home the same lesson anyone attempting to setup their own LTE network quickly learns – Mutual authentication means both the network and the UE need to verify each other, while I (as the network) can say the UE is OK, the UE needs to check I’m on the level.
I saw my 401 response go back to the UE and then no response. Nada.
This led to my next lesson…
There’s no way around IPsec
According to the 3GPP docs, support for IPsec is optional, but I found this not to be the case on the handsets I’ve tested.
After sending back my 401 response the UE looks for the IPsec info in the 401 response, then tries to setup an IPsec SA and sends ESP packets back to the P-CSCF address.
Even with my valid AKAv1-MD5 auth, I found my UE wasn’t responding until I added IPsec support on the P-CSCF, hence why I couldn’t see the second REGISTER with the Authentication Info.
After setting up IPsec support, I finally saw the UE’s REGISTER with the AKAv1-MD5 authentication, and was able to send a 200 OK.