Recently I’ve been working on a few projects with FreeSWITCH, and looking at options for programmatically generating dialplans, instead of static XML files.
Why not Static XML?
So let’s say I define a static XML dialplan.
It works great, but if I want to change the way a call routes I need to do it from the dialplan,
That’s not ideal if you’re using a distributed cluster of FreeSWITCH instances, or if you want to update on the fly.
Static XML means we have to define our dialplan when setting up the server, and would have to reconfigure the server to change it.
So what about mod_xml_curl?
When I’ve done this in the past I’ve relied on the mod_xml_curl module.
mod_xml_curl gets the XML dialplan using Curl from a web server, and so you setup a web server using Flask/PHP/etc, and dynamically generate the dialplan when the call comes in.
This sounds good, except you can’t update it on the fly.
mod_xml_curl means call routing decisions are made at the start of the call, and can’t be changed midway through the call.
So what’s ESL?
ESL is the Event Socket Library, essentially a call comes in, an ESL request is made to an external server.
For each step in the dialplan, an ESL request will be sent to the external server which tells it to do,
ESL allows us to use all FreeSWITCH’s fantastic modules, without being limited as to having to perform the call routing logic in FreeSWITCH.
So how do I use ESL?
You’ll need two create an ESL server,
Luckily there’s premade examples for popular languages;
A lot of people think there’s a one-to-one relationship between a registration Address on Record, and a username.
That doesn’t have to be the case, there are some platforms that only allow a single registration for a single username, but the RFC itself allows multiple registrations for a single username.
REGISTER requests add, remove, and query bindings.
A REGISTER request can add a new binding between an address-of-record and one or more contact addresses.
Registration on behalf of a particular address-of-record can be performed by a suitably authorized third party.
A client can also remove previous bindings or query to determine which bindings are currently in place for an address-of-record.
Let’s say you’ve got a SIP phone on your desk at the office and at home.
What we could do is create a different username and password for home & work, and then setup some time based forward rules to ring the office from 9-5 and home outside of that.
You could register both with the same username and password, and then unplug the one at home before you leave to work, get to work, plug in your office phone, unplug it before you leave to go home, and when you get home plug back in your home phone, or if multi-device registration is supported, register both and have incoming calls ring on both.
Admittedly, platforms that support this are the exception, not the rule, but the RFC does allow it.
The other little known feature in SIP Registration is that you can query the SIP Registrar to get the list of Addresses on Record.
So there you go, factoids about SIP REGISTER method!
It’s probably pretty evident to most why you’d want to use TLS these days,
SIP Secure – aka sips has been around for a long time and is supported by most SIP endpoints now.
Kamailio supports TLS, and it’s setup is very straightforward.
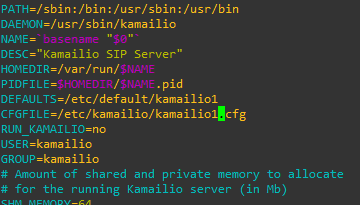
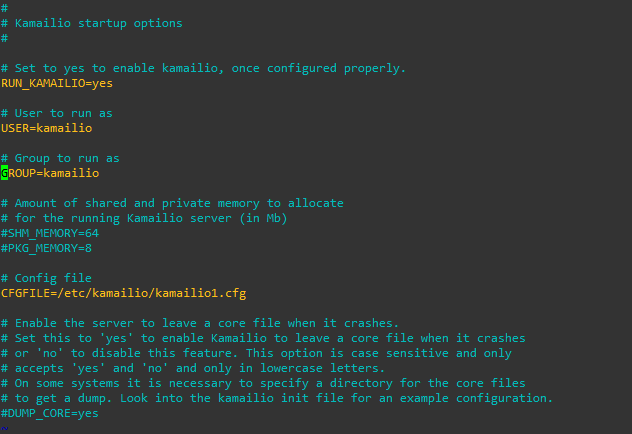
I’ve got a private key and certificate file for the domain nickvsnetworking.com so I’ll use those to secure my Kamailio instance by using TLS.
I’ll start by copying both the certificate (in my case it’s cert.pem) and the private key (privkey.pem) into the Kamailio directory. (If you’ve already got the private key and certificate on your server for another application – say a web server, you can just reference that location so long as the permissions are in place for Kamailio to access)
Next up I’ll open my Kamailio config (kamailio.cfg), I’ll be working with an existing config and just adding the TLS capabilities, so I’ll add this like to the config:
!define WITH_TLS
That’s pretty much the end of the configuration in kamailio.cfg, if we have a look at what’s in place we can see that the TLS module loads it’s parameters from a separate file;
After restarting Kamailio subscribers can now contact us via TLS using sips.
You may wish to disable TCP & UDP transport in favor of only TLS.
A note about CAs…
If you’re planning on rolling out SIP over TLS (sips) to existing IP phones it’s worth looking at what Certificate Authorities (CAs) are recognised by the IP phones.
As TLS relies on a trust model where a CA acts kind of like a guarantor to the validity of the certificate, if the IP phone doesn’t recognise the CA, it may see the certificate as Invalid.
Some IP phones for example won’t recognize Let’s Encrypt certificates as valid, while others may not recognize any of the newer CAs.
I’ve been working for some time on open source mobile network cores, and one feature that has been a real struggle for a lot of people (Myself included) is getting VoLTE / IMS working.
Here’s some of the issues I’ve faced, and the lessons I learned along the way,
Sadly on most UEs / handsets, there’s no “Make VoLTE work now” switch, you’ve got a satisfy a bunch of dependencies in the OS before the baseband will start sending SIP anywhere.
Get the right Hardware
Your eNB must support additional bearers (dedicated bearers I’ve managed to get away without in my testing) so the device can setup an APN for the IMS traffic.
Sadly at the moment this rules our Software Defined eNodeBs, like srsENB.
ISIM – When you thought you understood USIMs – Guess again
According to the 3GPP IMS docs, an ISIM (IMS SIM) is not a requirement for IMS to work.
However in my testing I found Android didn’t have the option to enable VoLTE unless an ISIM was present the first time.
In a weird quirk I found once I’d inserted an ISIM and connected to the VoLTE network, I could put a USIM in the UE and also connect to the VoLTE network.
Obviously the parameters you can set on the USIM, such as Domain, IMPU, IMPI & AD, are kind of “guessed” but the AKAv1-MD5 algorithm does run.
Getting the APN Config Right
There’s a lot of things you’ll need to have correct on your UE before it’ll even start to think about sending SIP messaging.
I was using commercial UE (Samsung handsets) without engineering firmware so I had very limited info on what’s going on “under the hood”. There’s no “Make VoLTE do” tickbox, there’s VoLTE enable, but that won’t do anything by default.
If your P-GW doesn’t know the IP of your P-CSCF, it’s not going to be able to respond to it in the Protocol Configuration Options (PCO) request sent by the UE with that nice new bearer for IMS we just setup.
There’s no way around Mutual Authentication
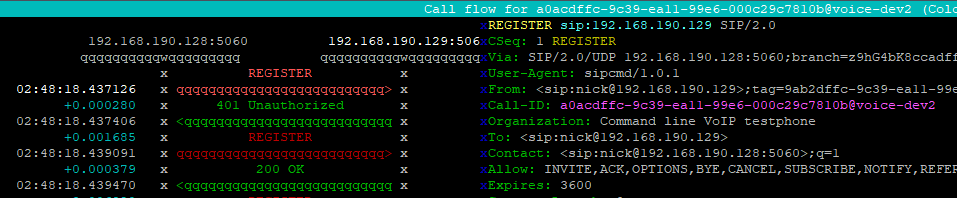
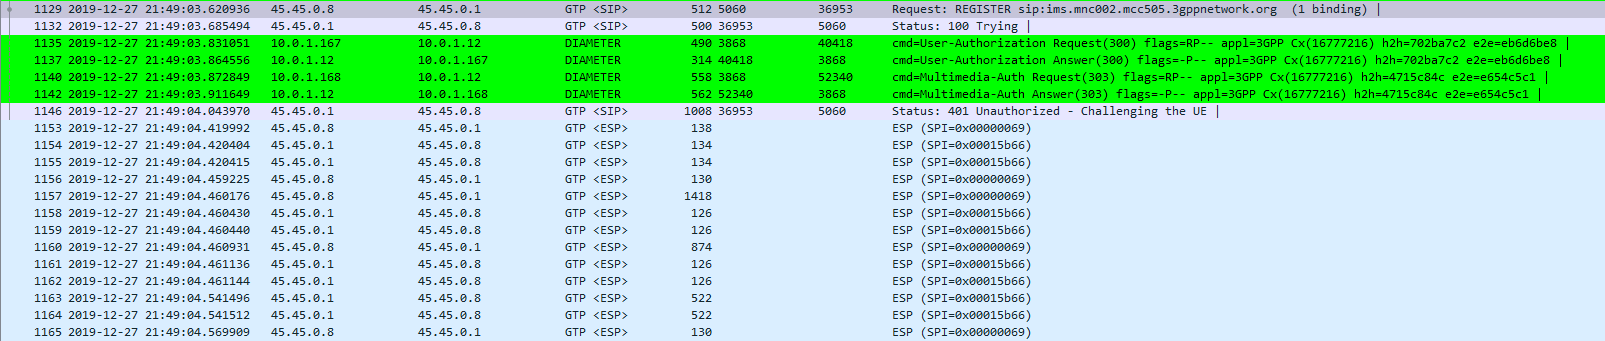
Coming from a voice background, and pretty much having RFC 3261 tattooed on my brain, when I finally got the SIP REGISTER request sent to the Proxy CSCF I knocked something up in Kamailio to send back a 200 OK, thinking that’d be the end of it.
For any other SIP endpoint this would have been fine, but IMS Clients, nope.
Reading the specs drove home the same lesson anyone attempting to setup their own LTE network quickly learns – Mutual authentication means both the network and the UE need to verify each other, while I (as the network) can say the UE is OK, the UE needs to check I’m on the level.
I saw my 401 response go back to the UE and then no response. Nada.
This led to my next lesson…
There’s no way around IPsec
According to the 3GPP docs, support for IPsec is optional, but I found this not to be the case on the handsets I’ve tested.
After sending back my 401 response the UE looks for the IPsec info in the 401 response, then tries to setup an IPsec SA and sends ESP packets back to the P-CSCF address.
Even with my valid AKAv1-MD5 auth, I found my UE wasn’t responding until I added IPsec support on the P-CSCF, hence why I couldn’t see the second REGISTER with the Authentication Info.
After setting up IPsec support, I finally saw the UE’s REGISTER with the AKAv1-MD5 authentication, and was able to send a 200 OK.
The Proxy-Call Session Control Function is the first network element a UE sends it’s SIP REGISTER message to, but how does it get there?
To begin with our UE connects as it would normally, getting a default bearer, an IP address and connectivity.
Overview
If the USIM has an ISIM application on it (or IMS is enabled on the UE using USIM for auth) and an IMS APN exists on the UE for IMS, the UE will set up another bearer in addition to the default bearer.
This bearer will carry our IMS traffic and allow QoS to be managed through the QCI values set on the bearer.
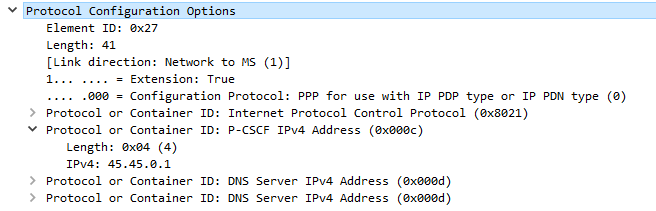
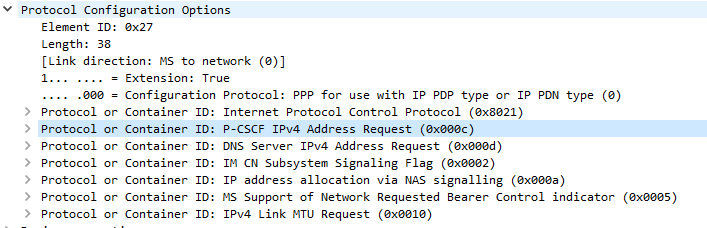
While setting up the bearer the UE requests certain parameters from the network in the Protocol Configuration Options element, including the P-CSCF address.
When setting up the bearer the network responds with this information, which if supported includes the P-CSCF IPv4 &/or IPv6 addresses.
The Message Exchange
We’ll start assuming the default bearer is in place & our UE is configured with the APN for IMS and supports IMS functionality.
The first step is to begin the establishment of an additional bearer for the IMS traffic.
This is kicked off through the Uplink NAS Transport, PDN Connectivity Request from the UE to the network. This includes the IMS APN information, and the UE’s NAS Payload includes the Protocol Configuration Options element (PCO), with a series of fields the UE requires responses from the network. including DNS Server, MTU, etc.
In the PCO the UE also includes the P-CSCF address request, so the network can tell the UE the IP of the P-CSCF to use.
If this is missing it’s because either your APN settings for IMS are not valid, or your device doesn’t have IMS support or isn’t enabling it.(that could be for a few reasons).
Protocol Configuration Options (Unpopulated) used to request information from the Network by the UE
The MME gets this information from the P-GW, and the network responds in the E-RAB Setup Request, Activate default EPS bearer Context Request and includes the Protocol Configuration Options again, this time the fields are populated with their respective values, including the P-CSCF Address;
Once the UE has this setup, the eNB confirms it’s setup the radio resources through the E-RAB Setup Response.
One the eNB has put the radio side of things in place, the UE confirms the bearer assignment has completed successfully through the Uplink NAS Transport, Activate default EPS Bearer Accept, denoting the bearer is now in place.
Now the UE has the IP address(s) of the P-CSCF and a bearer to send it over, the UE establishes a TCP socket with the address specified in the P-CSCF IPv4 or IPv6 address, to start communicating with the P-CSCF.
The SIP REGISTER request can now be sent and the REGISTRATION procedure can begin.
To be able to call sipcmd from anywhere, copy the binary to /usr/sbin/
cp sipcmd /usr/sbin/
Usage
Unlike SIPp, sipcmd has a much more simple syntax to allow you to follow basic call scenarios, like call a destination, wait a set time and then hangup, or answer an incoming call and send a DTMF digit and wait for the called party to hangup.
So let’s get the most basic thing we can set, SIP Registration and Authentication.
And there you have it, simple as that, we’ve made a test call, waited a set time and then hung up.
We can even combine this with monitoring / NMS systems like Nagios to run tests against the network continually.
For more advanced scenarios I’d recommend using SIPp, but for simple testing, particularly from a command line, sipcmd is a simple easy place to start.
People think SIP they think VoIP & phone calls, but SIP it’s the Phone Call Initiation Protocol it’s the Session Initiation Protocol – Sure VoIP guys like me love SIP, but it’s not just about VoIP.
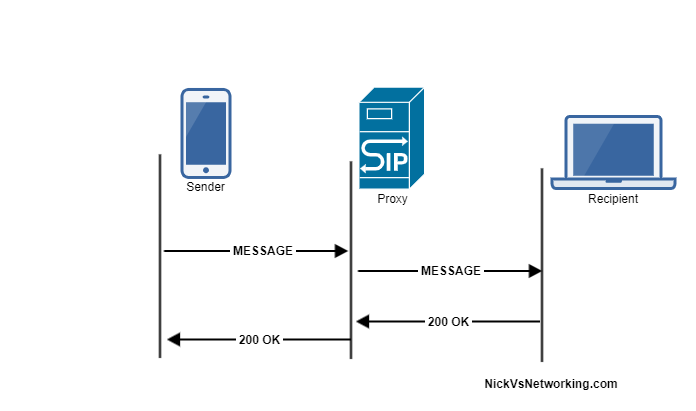
Have you sent an SMS on a modern mobile phone recently? Chances are you sent a SMS over SIP using SIP MESSAGE method.
So let’s look a bit at SIP SIMPLE, the catchily titled acronym translates to Session Initiation Protocol for Instant Messaging and Presence Leveraging Extensions (Admittedly less catchy in it’s full form).
There’s two way SIP SIMPLE can be used to implement Instant Messaging, Paging Mode with each message sent as a single transaction, and Session Mode where a session is setup between users and IMs exchanged with the same Call ID / transaction.
I’m going to cover the Paging Mode implementation because it’s simpler easier to understand.
Before we get too far this is another example of confusing terminology, let’s just clear this up; According to the RFC any SIP request is a SIP Message, like a SIP OPTIONS message, a SIP INVITE message. But the method of a SIP INVITE message is INVITE, the method of a SIP OPTIONS message is OPTIONS. There’s a SIP MESSAGE method, meaning you can send a SIP MESSAGE message using the MESSAGE method. Clear as mud? I’ll always refer to the SIP Method in Capitals, like MESSAGE, INVITE, UPDATE, etc.
The SIP MESSAGE method looks / acts very similar to a SIP INVITE, in that it’s got all the standard SIP headers, but also a Message Body, in which our message body lives (funny about that), typically we’ll send messages using the Content-Type: text/plain to denote we’re sending a plaintext message.
Example MESSAGE Message Flow
Like a SIP OPTIONS Method, the MESSAGE method is simply answered with a 200 OK (No Ack).
Let’s have a look at how the MESSAGE message looks:
I’ve talked about using the UAC module, but as promised, here’s how we can use the UAC module to send SIP REGISTER requests to another SIP server so we can register to another SIP proxy.
Let’s say we’re using Kamailio to talk to a SIP Trunk that requires us to register with them so they know where to send the calls. We’d need to use Kamailio UAC module to manage SIP Registration with our remote SIP Trunk.
But Kamailio’s a proxy, why are we sending requests from it? A proxy just handles messages, right? Proxies don’t originate messages, it’s true, and Kamailio can be a proxy, but with the UAC module we can use Kamailio as a Client instead of a server. Keep in mind Kamailio is what we tell it to be.
Getting Started
Before we can go spewing registrations out all over the internet we need to start by getting a few things in place;
First of which is configuring UAC module, which is something I covered off in my last post,
Once we’ve got that done we’ll need to tell the UAC module our IP Address for the from address for our Contact field, and the database URL of what we’ve setup.
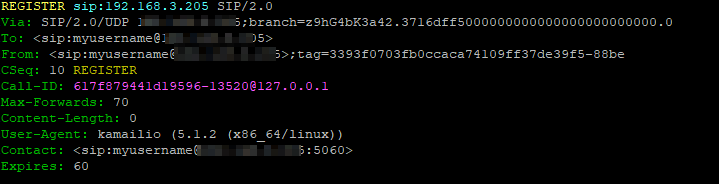
Once we’ve got a database connection in place and UAC module loaded, then we can configure an entry in the uacreg table in the database, in my example I’m going to be registering to an Asterisk box on 192.168.1.205, so I’ll insert that into my database:
mysql> INSERT INTO `uacreg` VALUES (NULL,'myusername','myusername','192.168.1.205','myusername','192.168.1.205','asterisk','myusername','mypassword','','sip:192.168.1.205:5060',60,0,0);
Note: If you’re using a later version of Kamailio (5.4+) then the DB schema changes and you may want something like this:
Having a look at the fields in our table makes it a bit clearer as to what we’ve got in place, setting flags to 0 will see Kamailio attempt registration. Make sure the auth_proxy is a SIP URI (Starts with sip:) and leave the auth_ha1 password empty as we haven’t calculated it.
After we’ve got our database connection in place, UAC module configured and database entries added, it’s time to put it into play, we’ll use Kamcmd to check it’s status:
kamcmd> uac.reg_reload
kamcmd> uac.reg_dump
Unfortunately from Kamcmd we’re not able to see registration status, but Sngrep will show us what’s going on:
From Sngrep we can see the REGISTRATION going out, the authentication challenge and the 200 OK at the end.
Make sure you’ve got your Realm correct, otherwise you may see an error like this:
RROR: {2 10 REGISTER [email protected]} uac [uac_reg.c:946]: uac_reg_tm_callback(): realms do not match. requested realm: [localhost]
Kamailio is a great SIP proxy, but sometimes you might want to see requests originate from Kamailio.
While this isn’t typical proxy behaviour, RFC definitions of a proxy and technical requirements are often two different things. The UAC module allows us to use Kamailio to act as a User Agent Client instead of just a UAS.
There’s one feature I won’t cover in this post, and that’s initiating and outbound SIP Registration using the UAC module, that will get a post of it’s own in the not to distant future.
You may already be sort of using Kamailio is a UAC, if you’re using Dispatcher and sending SIP Pings, then Kamailio is sending SIP OPTIONS messages to the dispatcher destinations. If you’re using the NAT module and sending Keepalives, then you’re also using Kamailio as a UAC. The only difference is the Dispatcher and NAT Helper modules do this for us, and we’re going to originate our own traffic.
There’s a bit of a catch here, when Kamailio receives a request it follows a set of logic and does something with that request. We’re going to remain constrained by this for our example, just to keep things simple.
So let’s work on an example, if a user on our network dials a call to an emergency services number, we’ll send a text message to my IP phone to let me know who’s dialed the emergency services number.
So to start with we’ll need to load the Kamailio UAC module, using LoadModule as we would with any other module:
loadmodule "uac.so"
If you’re working on the default config file that ships with Kamailio you’ll probably have to change how record routing is handled to support UAC,
modparam("rr", "append_fromtag", 1)
Now we should have UAC support added in Kamailio, I’m going to do a bare bones example of the routing logic below, but obviously if you wanted to put this into practice in real life you’d want to actually route the SIP INVITE to an emergency services destination.
First we’ll need to find if the request is an INVITE with the Request URI to an emergency services number, I’ve programmed this in with the Australian emergency services numbers:
if(is_method("INVITE") && ($rU == "000" or $tU == "112" or $tU == "116")){
#Matches any INVITEs with the Request URI to Address as 000, 112 or 116
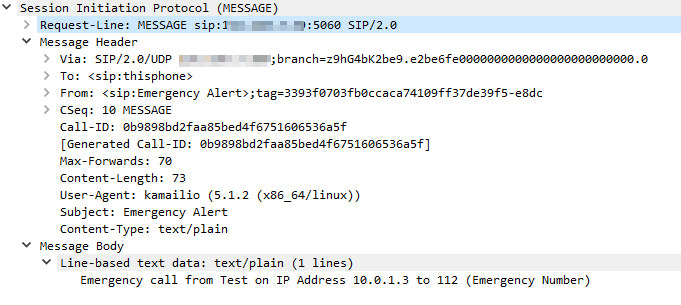
xlog("Emergency call from $fU to $rU (Emergency number) CSeq is $cs ");
}
Now calls to 000, 112 or 116 will see the alert apear in Xlog:
07:22:41 voice-dev3 /usr/sbin/kamailio[10765]: ERROR: : Emergency call from Test to 112 (Emergency number)
So next up we need to handle the sending a SIP MESSAGE request to my IP phone on the IP 10.0.1.5 – You’re probably thinking we could use the Registrar module to lookup my registered IP address, and you’re right, but to keep things simple I’m just hardcoding it in.
So to keep our routing neat we’ll send calls to the route route(“EmergencyNotify”); and so the demo works I’ll send back a 200 OK and exit – In real life you’d want to handle this request and forward it onto emergency services.
if(is_method("INVITE") && ($rU == "000" or $tU == "112" or $tU == "116")){
#Matches any INVITEs with the Request URI to Address as 000, 112 or 116
  xlog("Emergency call from $fU to $rU (Emergency number) CSeq is $cs ");
  route("EmergencyNotify");
  #You obviously would want this to route to an emergency services destination...
  sl_reply("200", "ok");
  exit;
}

if(is_method("INVITE")){
  #Matches everything else
  xlog("Just a regular call from $fU to $rU");
}
Obviously we need to now create a route called route[“EmergencyNotify”]{ } where we’ll put our UAC logic.
For the UAC module we need to craft the SIP Request we’re going to send; we’re going to be sending a SIP MESSAGE request,
So now we’ve sort of put it all together, when a call comes into an emergency destination, like 000, the route EmergencyNotify is called which sends a SIP MESSAGE request to my IP Phone to alert me.
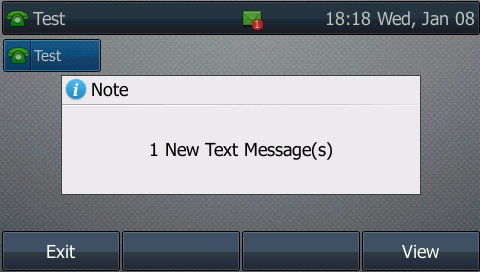
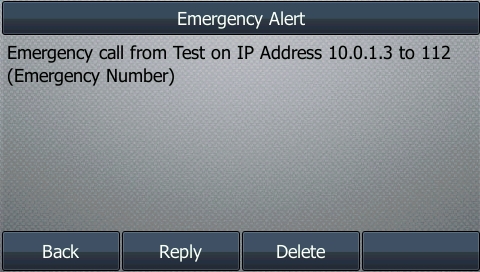
When a caller dials 000 I can see Kamailio sends a SIP MESSAGE to my IP Phone:
Let’s have a look at how this looks on my IP Phone:
For most Voice / Telco engineers IPsec is a VPN technology, maybe something used when backhauling over an untrusted link, etc, but voice over IP traffic is typically secured with TLS and SRTP.
IMS / Voice over LTE handles things a bit differently, it encapsulates the SIP & RTP traffic between the UE and the P-CSCF in IPsec Encapsulating Security Payload (ESP) payloads.
In this post we’ll take a look at how it works and what it looks like.
It’s worth noting that Kamailio recently added support for IPsec encapsulation on a P-CSCF, in the IMS IPSec-Register module. I’ll cover usage of this at a later date.
The Message Exchange
The exchange starts off looking like any other SIP Registration session, in this case using TCP for transport. The UE sends a REGISTER to the Proxy-CSCF which eventually forwards the request through to a Serving-CSCF.
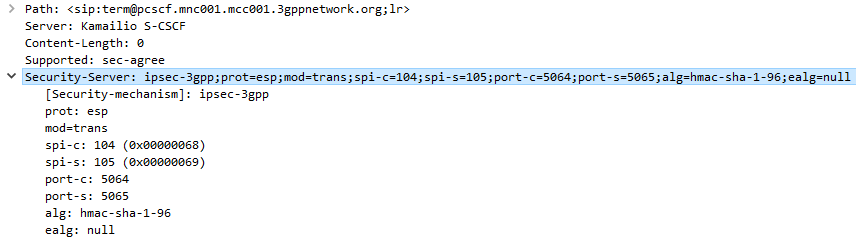
This is where we diverge from the standard SIP REGISTER message exchange. The Serving-CSCF generates a 401 Unauthorized response, containing an authentication challenge in the WWW-Authenticate header, and also a Ciphering Key & Integrity Key (ck= and ik=) also in the WWW-Authenticate header.
The Serving-CSCF sends the Proxy-CSCF the 401 response it created. The Proxy-CSCF assigns a SPI for the IPsec ESP to use, a server port and client port and indicates the used encryption algorithm (ealg) and algorithm to use (In this case HMAC-SHA-1-96.) and adds a new header to the 401 Unauthorized called Security–Server header to share this information with the UE.
The Proxy-CSCF also strips the Ciphering Key (ck=) and Integrity Key (ik=) headers from the SIP authentication challenge (WWW-Auth) and uses them as the ciphering and integrity keys for the IPsec connection.
Finally after setting up the IPsec server side of things, it forwards the 401 Unauthorized response onto the UE.
Upon receipt of the 401 response, the UE looks at the authentication challenge.
If the network is considered authenticated by the UE it generates a response to the Authentication Challenge, but it doesn’t deliver it over TCP. Using the information generated in the authentication challenge the UE encapsulates everything from the network layer (IPv4) up and sends it to the P-CSCF in an IPsec ESP.
Communication between the UE and the P-CSCF is now encapsulated in IPsec.
Wireshark trace of IPsec IMS Traffic between UE and P-CSCF
When learning to use Kamailio you might find yourself thinking about if you really want to learn to write a Kamailio configuration file, which is another weird scripting language to learn to achieve a task.
Enter KEMI – Kamailio Embedded Interface. KEMI allows you to abstract the routing logic to another programing language. In layman’s terms this means you can write your routing blocks, like request_route{}, reply_route{}, etc, in languages you already know – like Lua, JavaScript, Ruby – and my favorite – Python!
Why would you use KEMI?
Write in a language you already know;
You don’t need to learn how to do write complex routing logic in Kamailio’s native scripting language, you can instead do it in a language you’re already familiar with, writing your Routing Blocks in another programming language.
Change Routing on the Fly;
By writing the routing logic in KEMI allows you to change your routing blocks without having to restart Kamailio, something you can’t do with the “native” scripting language – This means you can change your routing live.
Note: This isn’t yet in place for all languages – Some still require a restart.
Leverage your prefered language’s libraries;
While Kamailio’s got a huge list of modules to interface with a vast number of different things, the ~200 Kamailio modules don’t compare with the thousands of premade libraries that exist for languages like Python, Ruby, JavaScript, etc.
Prerequisites
We’ll obviously need Kamailio installed, but we’ll also need the programming language we want to leverage setup (fairly obvious).
Configuring Kamailio to talk to KEMI
KEMI only takes care of the routing of SIP messages inside our routing blocks – So we’ve still got the Kamailio cfg file (kamailio.cfg) that we use to bind and setup the service as required, load the modules we want and configure them.
Essentially we need to load the app for the language we use, in this example we’ll use app_python3.so and use that as our Config Engine.
IPsec ESP can be used in 3 different ways on the Gm interface between the Ue and the P-CSCF:
Integrity Protection – To prevent tampering
Ciphering – To prevent inception / eavesdropping
Integrity Protection & Ciphering
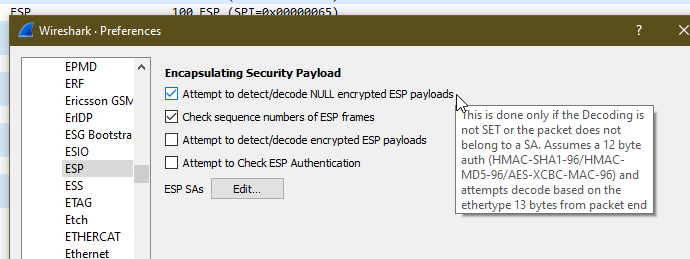
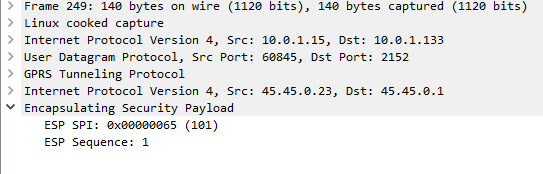
On Wireshark, you’ll see the ESP, but you won’t see the payload contents, just the fact it’s an Encapsulated Security Payload, it’s SPI and Sequence number.
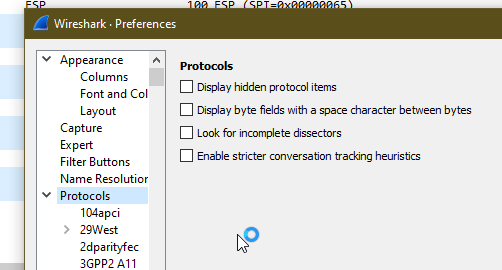
By default, Kamailio’s P-CSCF only acts in Integrity Protection mode, meaning the ESP payloads aren’t actually encrypted, with a few clicks we can get Wireshark to decode this data;
Just open up Wireshark Preferences, expand Protocols and jump to ESP
Now we can set the decoding preferences for our ESP payloads,
In our case we’ll tick the “Attempt to detect/decode NULL encrypted ESP payloads” box and close the box by clicking OK button.
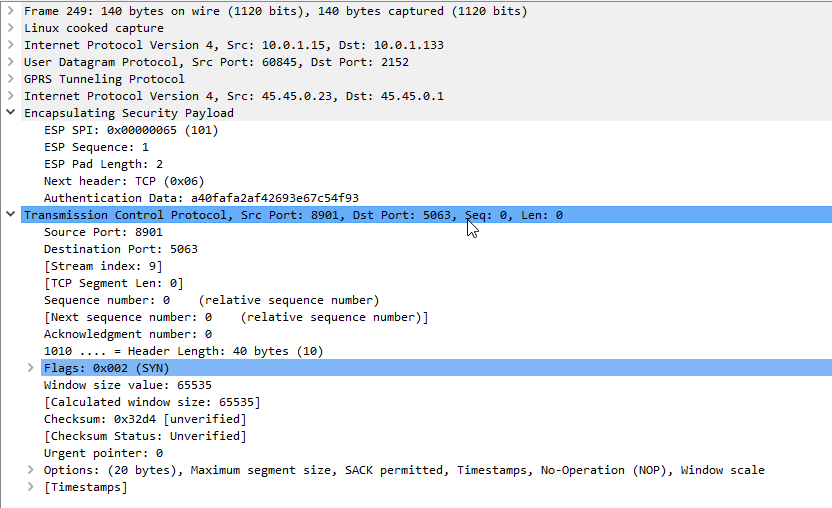
Now Wireshark will scan through all the frames again, anything that’s an ESP payload it will attempt to parse.
Now if we go back to the ESP payload with SQN 1 I showed a screenshot of earlier, we can see the contents are a TCP SYN.
Now we can see what’s going on inside this ESP data between the P-CSCF and the UE!
As a matter of interest if you can see the IK and CK values in the 401 response before they’re stripped you can decode encrypted ESP payloads from Wireshark, from the same Protocol -> ESP section you can load the Ciphering and Integrity keys used in that session to decrypt them.
On top of plain vanilla RFC3261, there’s a series of “Extension” methods added to SIP to expand it’s functionality, common extension methods are INFO, MESSAGE, NOTIFY, PRACK and UPDATE. Although now commonplace, of these is not defined in RFC3261 so is considered an “extension” to SIP.
It’s worth just pausing here to reiterate we’re not talking extensions like in a PBX context, like extra phones, we’re talking extensions like you’d add to a house, like extra functionality.
A SIP client can request functionality from a server (UAC to a UAS), if the server does not have support for that functionality, it can reject the session on those grounds and send back a response indicating it doesn’t know how to handle that extension, like a 420 Bad Extension – Bad SIP Protocol Extension used, not understood by the server. Response.
So clients can determine what functionality a server doesn’t support if it rejects the request, but there was no way to see what functionality the server does support, and what functionality the client requires.
If a UAC or UAS requires support for an extension – For example a Media Gateway has to understand PRACK, it can use the Require header to specify the request should be rejected if support for the listed extensions is not provided.
These headers are most commonly seen in SIP OPTIONS requests.
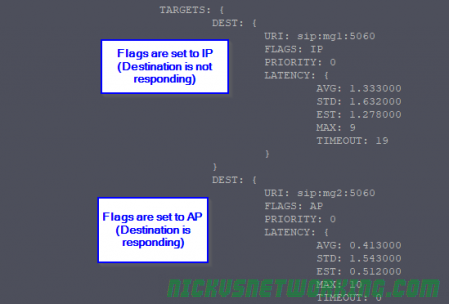
One question that’s not as obvious as it perhaps should be is the different states shown with kamcmd dispatcher.list command;
So what do the flags for state mean?
The first letter in the flag means is the current state, Active (A), Inactive (I) or Disabled (D).
The second letter in the flag means monitor status, Probing (P) meaning actively checked with SIP Options pings, or Not Set (X) denoting the device isn’t actively checked with SIP Options pings.
AP – Actively Probing – SIP OPTIONS are getting a response, routing to this destination is possible, and it’s “Up” for all intents and purposes.
IP – Inactively Probing – Destination is not meeting the threshold of SIP OPTIONS request responses it needs to be considered active. The destination is either down or not responding to all SIP OPTIONS pings. Often this is due to needing X number of positive responses before considering the destination as “Up”.
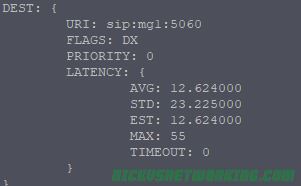
DX – Disabled & Not Probing – This device is disabled, no SIP OPTIONS are sent.
AX – Active & Not Probing– No SIP OPTIONS are sent to check state, but is is effectively “Up” even though the remote end may not be reachable.
In the third part of the Kamailio 101 series I briefly touched upon pseudovariables, but let’s look into what exactly they are and how we can manipulate them to change headers.
The term “pseudo-variable” is used for special tokens that can be given as parameters to different script functions and they will be replaced with a value before the execution of the function.
You’ve probably seen in any number of the previous Kamailio Bytes posts me use pseudovariables, often in xlog or in if statements, they’re generally short strings prefixed with a $ sign like $fU, $tU, $ua, etc.
When Kamailio gets a SIP message it explodes it into a pile of variables, getting the To URI and putting it into a psudovariable called $tU, etc.
We can update the value of say $tU and then forward the SIP message on, but the To URI will now use our updated value.
When it comes to rewriting caller ID, changing domains, manipulating specific headers etc, pseudovariables is where it mostly happens.
Kamailio allows us to read these variables and for most of them rewrite them – But there’s a catch. We can mess with the headers which could result in our traffic being considered invalid by the next SIP proxy / device in the chain, or we could mess with the routing headers like Route, Via, etc, and find that our responses never get where they need to go.
So be careful! Headers exist for a reason, some are informational for end users, others are functional so other SIP proxies and UACs can know what’s going on.
Rewriting SIP From Username Header (Caller ID)
When Kamailio’s SIP parser receives a SIP request/response it decodes the vast majority of the SIP headers into a variety of pseudovariables, we can then reference these variables we can then reference from our routing logic.
Let’s pause here and go back to the Stateless SIP Proxy Example, as we’ll build directly on that.
Follow the instructions in that post to get your stateless SIP proxy up and running, and we’ll make this simple change:
####### Routing Logic ########


/* Main SIP request routing logic
 * - processing of any incoming SIP request starts with this route
 * - note: this is the same as route { ... } */
request_route {

        xlog("Received $rm to $ru - Forwarding");
        $fU = "Nick Blog Example";   #Set From Username to this value
        #Forward to new IP
        forward("192.168.1.110");

}
Now when our traffic is proxied the From Username will show “Nick Blog Example” instead of what it previously showed.
On a PCM (G.711) RTP packet the payload is typically 160 bytes per packet.
But the total size of the frame on the wire is typically ~214 bytes, to carry a 160 byte payload that means 25% of the data being carried is headers.
This is fine for VoIP services operating over fixed lines, but when we’re talking about VoLTE / IMS and the traffic is being transferred over Radio Access Networks with limited bandwidth / resources, it’s important to minimize this as much as possible.
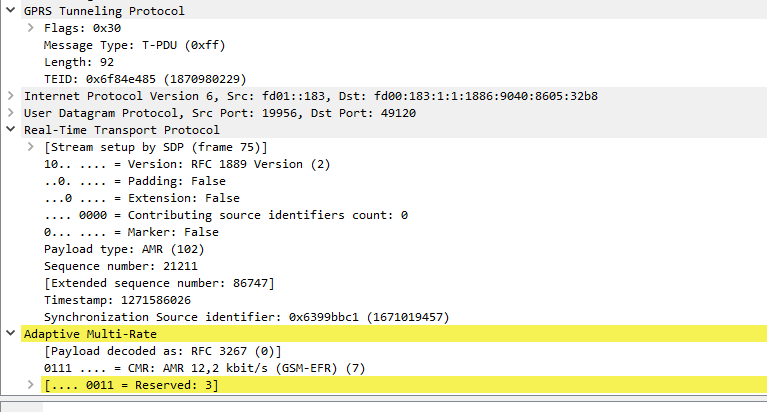
IMS uses the AMR codec, where the RTP payload for each packet is around 90 bytes, meaning up to two thirds of the packet on the wire (Or in this case the air / Uu interface) is headers.
Using ROHC the size of the headers are cut down to only 4-5 bytes, this is because the IPv4 headers, UDP headers and RTP headers are typically the same in each packet – with only the RTP Sequence number, RTP timestamp IPv4 & UDP checksum and changing between frames.
I modified the Kamailio config allow Transcoding, as I talked about in the post on setting up Transcoding in RTPengine with Kamailio.
Now I had a working Kamailio instance with RTPengine that was transcoding.
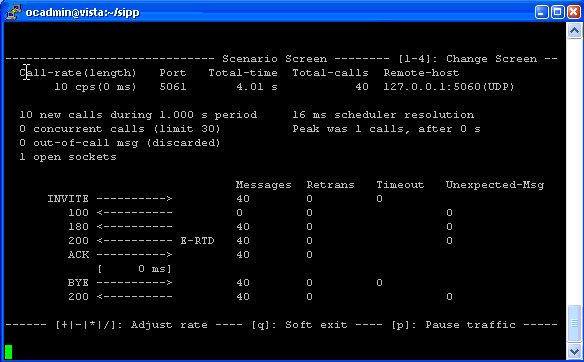
So the next step becomes testing the transcoding is working, for this I had two SIPp instances, one to make the calls and once to answer them.
Instance 1
Makes calls to the IP of the Kamailio / RTPengine instance, for this I modified the uac_pcap scenario to playback an RTP stream of a PCMA (G.711 a-law) call to the called party (stored in a pcap file), and made it call the Kamailio instance multiple times based on how many concurrent transcoding sessions I wanted:
We’ve talked about using a few different modules, like a SIP Registrar and Htable, that rely on data stored in Kamailio’s memory, the same is true for all the Stateful proxy discussion last week.
But what if you want to share this data between multiple Kamailio instances? This allows distributing workload and every server having the same information and therefore any server is able to process any request.
This allows memory data to be shared between multiple Kamailio instances (aka “Nodes”), so for example if you are storing data in Htable on one Kamailio box, all the other boxes/nodes in the DMQ pool will have the same HTable data.
Kamailio uses SIP to transfer DMQ messages between DMQ nodes, and DNS to discover DMQ nodes.
For this example we’ll share user location data (usrloc) between Kamailio instances, so we’ll create a very simple setup to store location data:
####### Routing Logic ########


/* Main SIP request routing logic
 * - processing of any incoming SIP request starts with this route
 * - note: this is the same as route { ... } */
request_route {

        #Enable record_routing so we see the BYE / Re-INVITE etc

        if(is_method("REGISTER")){

                save("location");
        }else{
                sl_reply("500", "Nope");
        }


}
Now if we register a SIP endpoint we should be able to view it using Kamcmd’s ul.dump call, as we talked about in the Kamailio SIP Registrar tutorial.
Next we’ll setup DMQ to allow this data to be shared to other nodes, so they also have the same userloc data available,
First we’ll begin by binding to an extra port for the DMQ messages to go to, to make it a bit clearer what is normal SIP and what’s DMQ,
So for this we’ll add a new line in the config to listen on port 5090:
/* uncomment and configure the following line if you want Kamailio to
 * bind on a specific interface/port/proto (default bind on all available) */
listen=udp:0.0.0.0:5060
listen=tcp:0.0.0.0:5060
listen=udp:0.0.0.0:5090
The server_address means we’re listening on any IP on port 5090. In production you may have an IP set here of a private NIC or something non public facing.
The notification address resolves to 2x A records, one is the IP of this Kamailio instance / node, the other is the IP of the other Kamailio instance / node, I’ve just done this in /etc/hosts
Finally we’ll add some routing logic to handle the DMQ messages coming in on port 5090:
####### Routing Logic ########


/* Main SIP request routing logic
 * - processing of any incoming SIP request starts with this route
 * - note: this is the same as route { ... } */
request_route {


        if (is_method("KDMQ") && $Rp == 5090)
        {
                dmq_handle_message();
        }

        #Enable record_routing so we see the BYE / Re-INVITE etc

        if(is_method("REGISTER")){

                save("location");
        }else{
                sl_reply("500", "Nope");
        }


}
We’ll put the same config on the other Kamailio instance and restart Kamailio on both.
We can now check the DMQ node status to confirm they’re talking to each other.
We talked a little about the Transaction module and using it for Transaction Stateful SIP Proxy, but it’s worth knowing a bit more about the Transaction Module and the powerful functions it offers.
So today I’ll cover some cool functionality TM offers!
Different Reply Routes
By calling the t_on_reply(); we can specify the reply route to be used for replies in this transaction.
route[RELAY]{

        #Use reply route "OurReplyRoute" for responses for this transaction
        t_on_reply("OurReplyRoute");

        #Relay (aka Forward) the request
        t_relay_to_udp("192.168.3.118", "5060");

}

onreply_route[OurReplyRoute] {
        #On replies from route[RELAY]

        #Check our AVP we set in the initial request
        xlog("for $rs response the value of AVP \"state_test_var\" is $avp(state_test_var) ");

        #Append a header so we can see this was proxied in the SIP capture
        append_hf("X-Proxied: For the reply\r\n");

}
Any responses from the route[RELAY] routing block will go to onreply_route[OurReplyRoute], the beauty of this is it allows you to have multiple reply routes each with their own logic. For example for a call leg to a carrier you may want to preserve CLI, but for a call leg to a customer you may wish to restrict it if that’s the option the user has selected, and you can make these changes / modifications in the reply messages.
Failure Routes
Failure routes allow the transaction module to know to try again if a call fails, for example if no response is received from the destination, send it to a different destination, like a backup.
route[RELAY]{

        #Use reply route "OurReplyRoute" for responses for this transaction
        t_on_reply("OurReplyRoute");
        t_on_failure("OurFailureRoute");
        #Relay (aka Forward) the request
        t_relay_to_udp("192.168.1.118", "5060");

}

failure_route[OurFailureRoute]{
        xlog("At failure route");
        t_reply("500", "Remote end never got back to us");
        exit;
}
We can build upon this, and try a different destination if the first one fails:
request_route {

        #Enable record_routing so we see the BYE / Re-INVITE etc
        record_route();

        #Handle Registrations in a dumb way so they don't messy our tests
        if(is_method("REGISTER")){
                sl_reply("200", "ok");
                exit;
        }


                 #Append a header so we can see this was proxied in the SIP capture
                append_hf("X-Proxied: You betcha\r\n");

        if(is_method("INVITE")){
                        #Createa  new AVP called "state_test_var" and set the value to "I remember"
                        $avp(state_test_var) = "I remember";
        }
                #Let syslog know we've set the value and check it
                xlog("for $rm the value of AVP \"state_test_var\" is $avp(state_test_var) ");

                #Send to route[RELAY] routing block
                rewritehostport("nonexistentdomain.com");
                route(RELAY);

}

route[RELAY]{

        #Use reply route "OurReplyRoute" for responses for this transaction
        t_on_reply("OurReplyRoute");
        t_on_failure("OurFailureRoute");
        #Relay (aka Forward) the request
        t_relay();
}

failure_route[OurFailureRoute]{
        xlog("At failure route");
        #t_reply("500", "Remote end never got back to us");

                rewritehostport("192.168.3.118");
                append_branch();
                t_relay();

}

onreply_route[OurReplyRoute] {
        #On replies from route[RELAY]

        #Check our AVP we set in the initial request
        xlog("for $rs response the value of AVP \"state_test_var\" is $avp(state_test_var) ");

        #Append a header so we can see this was proxied in the SIP capture
        append_hf("X-Proxied: For the reply\r\n");

}
One thing to keep in mind is that there’s lots of definitions of failure, for example if you are sending a call to a carrier and get a 404 response back, you probably want to relay that through to the end user, because that destination isn’t there.
But if you get back a 5xx series response you may consider that to be a failure and select the next carrier for example.
Different conditions / requirements have different definitions of “failures” and so there’s a lot to think about when implementing this, along with timeouts for no replies, TCP session management, etc.
Parallel Forking the Call to Multiple Destinations
Parallel Forking is a fancy way of saying ring multiple destinations at the same time.
/* Main SIP request routing logic
 * - processing of any incoming SIP request starts with this route
 * - note: this is the same as route { ... } */
request_route {

        #Enable record_routing so we see the BYE / Re-INVITE etc
        record_route();

        #Handle Registrations in a dumb way so they don't messy our tests
        if(is_method("REGISTER")){
                sl_reply("200", "ok");
                exit;
        }


                 #Append a header so we can see this was proxied in the SIP capture
                append_hf("X-Proxied: You betcha\r\n");

        if(is_method("INVITE")){
                        #Createa  new AVP called "state_test_var" and set the value to "I remember"
                        $avp(state_test_var) = "I remember";
        }
                #Let syslog know we've set the value and check it
                xlog("for $rm the value of AVP \"state_test_var\" is $avp(state_test_var) ");

                #Send to route[RELAY] routing block
                route(RELAY);

}

route[RELAY]{

        #Use reply route "OurReplyRoute" for responses for this transaction
        t_on_reply("OurReplyRoute");

        #Append branches for each destination we want to forward to
        append_branch("sip:[email protected]");
        append_branch("sip:[email protected]");
        append_branch("sip:[email protected]");

        t_on_failure("OurFailureRoute");
        #Relay (aka Forward) the request
        t_relay();
}

failure_route[OurFailureRoute]{
        xlog("At failure route");
        t_reply("500", "All those destinations failed us");

}

onreply_route[OurReplyRoute] {
        #On replies from route[RELAY]

        #Check our AVP we set in the initial request
        xlog("for $rs response the value of AVP \"state_test_var\" is $avp(state_test_var) ");

        #Append a header so we can see this was proxied in the SIP capture
        append_hf("X-Proxied: For the reply\r\n");

}
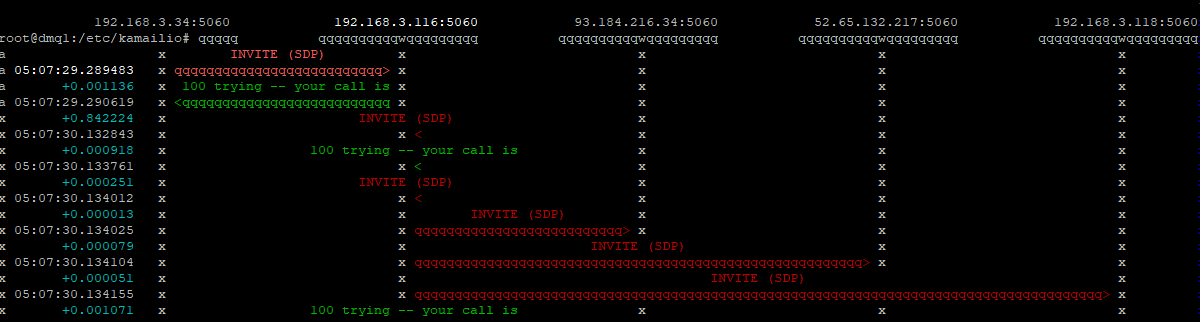
Bit of a mess but here we see the initial INVITE being branched to the 3 destinations at the same time (Parallel forking)
Serial Forking / Sequential Forking the calls to Multiple Destinations one after the Other
This could be used to try a series of weighted destinations and only try the next if the preceding one fails:
/* Main SIP request routing logic
 * - processing of any incoming SIP request starts with this route
 * - note: this is the same as route { ... } */
request_route {

        #Enable record_routing so we see the BYE / Re-INVITE etc
        record_route();


        #Send to route[RELAY] routing block
        route(RELAY);

}

route[RELAY]{

        #Use reply route "OurReplyRoute" for responses for this transaction
        t_on_reply("OurReplyRoute");

        append_branch("sip:[email protected]", "0.3");
        append_branch("sip:[email protected]", "0.2");
        append_branch("sip:[email protected]", "0.1");

        t_load_contacts();

        t_next_contacts();

        t_on_failure("OurFailureRoute");
        #Relay (aka Forward) the request
        t_relay();
        break;
}

failure_route[OurFailureRoute]{

        xlog("At failure route - Trying next destination");
        t_on_failure("OurFailureRoute");
        t_relay();


}

onreply_route[OurReplyRoute] {
        #On replies from route[RELAY]
        #Append a header so we can see this was proxied in the SIP capture
        append_hf("X-Proxied: For the reply\r\n");

}
Again this will try each destination, but one after the other based on the weight we added to each destination in the append_branch()
Here we see each destination being tried sequentially