Tag Archives: rtprelay

Virtualized Transcoding Dimensioning

A seemingly simple question is how many concurrent calls can a system handle.

Sadly the answer to that question is seldom simple and easy to say, even more so when we talk about transcoding.

Transcoding is the process of taking a media stream encoded in one codec (format) and transferring it to a different codec (hence trans-coding).

This can be a very resource intensive process, so there’s a large number of hardware based solutions (PCI cards / network devices) that use FGPAs and clever processor arrangements to handle the transcoding. These products are made by a multitude of different vendors but are generally called hardware transcoders.

Today we’ll talk a bit about software based transcoding, and how many concurrent calls you can transcode on common VM configurations.

These stats will translate fairly well to their dedicated hardware counterparts, but a VM provides us with a consistent hardware environment so makes it a bit easier.

For these tests I created the baseline VM to run in VMWare Workstation with the below settings:

We’ll be transcoding using RTPengine, which recently added transcoding capabilities, so I set that up as per my post on setting up RTPengine for Transcoding.

Next I setup some SIPp scenarios to simulate call loads, from G.711 a-law to G.711 u-law (the simplest of transcoding (well re-compounding)) and used glances to get the max CPU usage and logged the results.

PCMA to PCMU (Re-companding)

PCMA to PCMU

RTPengine fared significantly better than I expected, I stopped at 150 concurrent transcoding sessions as that’s when call quality was really starting to degrade, but I was still achieving MOS of 4.3+ up to 130 concurrent sessions.

For what I needed to do, running this in a virtualised environment allowed 150 transcoding sessions before the MOS started to drop and call quality was adversely affected. Either way I was pretty amazed at how efficiently RTPengine managed to handle this.

Transcoding from one codec to a different codec was a different matter, and I’ll post the results from that another day.

If you want to learn more about RTPengine have a read of my other posts on RTPengine, that cover Installing and configuring RTPengine, using RTPengine with Kamailio, transcoding with RTPengine and scaling with RTPengine over geographic areas.

NBNco Australia network map

Kamailio Bytes – Routing to geo local RTPengine Instances with Kamailio

I’m a big fan of RTPengine, and I’ve written a bit about it in the past.

Let’s say we’re building an Australia wide VoIP network. It’s a big country with a lot of nothing in the middle. We’ve got a POP in each of Australia’s capital cities, and two core softswitch clusters, one in Melbourne and one in Sydney.

These two cores will work fine, but a call from a customer in Perth, WA to another customer in Perth, WA would mean their RTP stream will need to go across your inter-caps to Sydney or Melbourne only to route back to Perth.

That’s 3,500Km each way, which is going to lead to higher latency, wasted bandwidth and decreased customer experience.

What if we could have an RTPengine instance in our Perth POP, handling RTP proxying for our Perth customers? Another in Brisbane, Canberra etc, all while keeping our complex expensive core signalling in just the two locations?

RTPengine to the rescue!

Preparing our RTPEngine Instances

In each of our POPs we’ll spin up a box with RTPengine,

We’d set it up in the way outlined in this post,

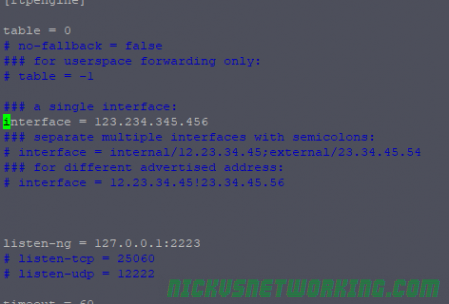
The only thing we’d do differently is set the listen-ng value to be 0.0.0.0:2223 and the interface to be the IP of the box.

By setting the listen-ng value to 0.0.0.0:2223 it’ll mean that RTPengine’s management port will be bound to any IP, so we can remotely manage it via it’s ng-control protocol, using the rtpengine Kamailio module.

Naturally you’d limit access to port 2223 only to allowed devices inside your network.

Adding Multiple RTP Engines to Kamailio Database

After adding database functionality to our Kamailio instance as we covered in this post, we’ll just need to add the follow lines to our config:

loadmodule "rtpengine.so"
modparam("rtpengine", "db_url", DBURL)
modparam("rtpengine", "table_name", "rtpengine")
modparam("rtpengine", "setid_avp", "$avp(setid)")

Next we’ll need to add the details of each of our RTP engine instances to MySQL, I’ve used a different setid for each of the RTPengines. I’ve chosen to use the first digit of the Zipcode for that state (WA’s Zipcodes / Postcodes are in the format 6xxx while NSW postcodes are look like 2xxx), we’ll use this later when we select which RTPengine instances to use.

I’ve also added localhost with setid of 0, we’ll use this as our fallback route if it’s not coming from Australia.

INSERT INTO `rtpengine` (`id`, `setid`, `url`, `weight`, `disabled`, `stamp`) VALUES (NULL, '6', 'udp:WA-POP.rtpengine.nickvsnetworking.com:2223', '1', '0', NOW());
INSERT INTO `rtpengine` (`id`, `setid`, `url`, `weight`, `disabled`, `stamp`) VALUES (NULL, '2', 'udp:NSW-POP.rtpengine.nickvsnetworking.com:2223', '1', '0', NOW());
INSERT INTO `rtpengine` (`id`, `setid`, `url`, `weight`, `disabled`, `stamp`) VALUES (NULL, '0', 'udp:localhost:2223', '1', '0', NOW());

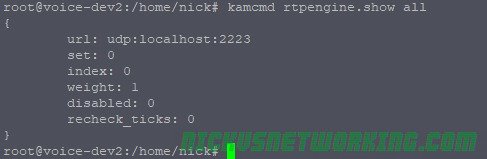
We’ll restart Kamailio, and check the status of the RTPengines we added:

#> kamcmd rtpengine.show all
{
        url: udp:NSW-POP.rtpengine.nickvsnetworking.com:2223
        set: 2
        index: 1
        weight: 1
        disabled: 0
        recheck_ticks: 0
}
{
        url: udp:WA-POP.rtpengine.nickvsnetworking.com:2223
        set: 6
        index: 3
        weight: 1
        disabled: 0
        recheck_ticks: 0
}
{
        url: udp:localhost:2223
        set: 6
        index: 3
        weight: 1
        disabled: 0
        recheck_ticks: 0
}

Bingo, we’re connected to three RTPengine instances,

Next up we’ll use the Geoip2 module to determine the source of the traffic and route to the correct, I’ve touched upon the Geoip2 module’s basic usage in the past, so if you’re not already familiar with it, read up on it’s usage and we’ll build upon that.

We’ll load GeoIP2 and run some checks in the initial request_route{} block to select the correct RTPengine instance:

        if(geoip2_match("$si", "src")){
                if($gip2(src=>cc)=="AU"){
                        $var(zip) =  $gip2(src=>zip);
                        $avp(setid) = $(var(zip){s.substr,0,1});
                        xlog("rtpengine setID is $avp(setid)");
                }else{
                        xlog("GeoIP not in Australia - Using default RTPengine instance");
                        set_rtpengine_set("0");
                }
        }else{
                xlog("No GeoIP Match - Using default RTPengine instance");
                set_rtpengine_set("0");
        }

In the above example if we have a match on source, and the Country code is Australia, the first digit of the ZIP / Postcode is extracted and assigned to the AVP “setid” so RTPengine knows which set ID to use.

In practice an INVITE from an IP in WA returns setID 6, and uses our RTPengine in WA, while one from NSW returns 2 and uses one in NSW. In production we’d need to setup rules for all the other states / territories, and generally have more than one RTPengine instance in each location (we can have multiple instances with the same setid).

Hopefully you’re starting to get an idea of the fun and relatively painless things you can achieve with RTPengine and Kamailio!

Transcoding with RTPengine and Kamailio

I’ve talked a bit in the past about using RTPengine to act as an RTP proxy / media proxy in conjunction with Kamailio.

Recently transcoding support was added to RTPengine, and although the Kamailio rtpengine module doesn’t yet recognise the commands when we put them in, they do work to transcode from one codec to another.

If you’ve setup your RTPengine installation as per this tutorial, and have it working with Kamailio to relay RTP, you can simply change the rtpengine_manage() to add transcoding support.

For example to allow only PCMU calls and transcode anything else we’d change the rtpengine_manage(); to:

rtpengine_manage("codec-mask-all codec-transcode-PCMU");

This will mask all the other codecs and transcode into PCMU, simple as that.

Beware software based transcoding is costly to resources, this works fine in small scale, but if you’re planning on transcoding more than 10 or so streams you’ll start to run into issues, and should look at hardware based transcoding.

Kamailio Bytes – Setting up rtpengine in Kamailio to relay RTP / Media

In an ideal world all media would go direct from one endpoint to another.

But it’s not an ideal world and relaying RTP / media streams is as much a necessary evil as transcoding and NAT in the real world.

The Setup

We’ll assume you’ve already got a rtpengine instance on your local machine running, if you don’t check out my previous post on installation & setup.

We’ll need to load the rtpengine module and set it’s parameters, luckily that’s two lines in our Kamailio file:

loadmodule "rtpengine.so"
...
modparam("rtpengine", "rtpengine_sock", "udp:localhost:2223")

Now we’ll restart Kamailio and use kamcmd to check the status of our rtpengine instance:

kamcmd rtpengine.show all

All going well you’ll see something like this showing your instance:

Putting it into Practice

If you’ve ever had experience with the other RTP proxies out there you’ll know you’ve had to offer, rewrite SDP and accept the streams in Kamailio.

Luckily rtpengine makes this a bit easier, we need to call rtpengine_manage(); when the initial INVITE is sent and when a response is received with SDP (Like a 200 OK).

So for calling on the INVITE I’ve done it in the route[relay] route which I’m using:

And for the reply I’ve simply put a conditional in the onreply_route[MANAGE_REPLY] for if it has SDP:

route[RELAY]{
   ...
   rtpengine_manage();
   ...
}
onreply_route[MANAGE_REPLY] {
        xdbg("incoming reply\n");
        if(status=~"[12][0-9][0-9]") {
                route(NATMANAGE);
        }
        rtpengine_manage();


}

And that’s it, now our calls will get RTP relayed through our Kamailio box.

Advanced Usage

There’s a bunch of more cool features you can use rtpengine for than just relay, for example:

  • IPv4 <-> IPv6 translation for Media
  • ICE Bridging
  • SRTP / Encrypted RTP to clear RTP bridging
  • Transcoding
  • Repacketization
  • Media Playback
  • Call Recording

I’ll cover some of these in future posts.

Here’s a copy of my running config on GitHub.

For more in-depth info on the workings of RTP check out my post RTP – More than you wanted to Know

RTPengine – Installation & Configuration (Debian 11 / Ubuntu 19.04 and below)

This post was originally published in September 2019.
It was updated December 2021 and updated for Debian 11
An updated version has been posted here for 20.04 and above.
If you’re reading this unless you are installing this on an old release, you probably want the post linked above…

Note before using

There’s a few RTP Proxies out there (rtpproxy/mediaproxy) but rtpengine from Sipwise has simplicity and flexibility that makes you wonder how you ever used the others.

Some of it’s more impressive features:

  • Bridge Encrypted (SRTP) & Plaintext RTP Sessions
  • ICE Bridge
  • Farmable loads (Can have a pool of RTPengine instances)
  • Recording of Media Streams (In a not stupid – accidentally-fill-up-the-disk way)
  • Transcoding
  • Media repacketization

Installation

This package isn’t in the default Ubuntu/Debian repos, so we’ll get it from the git repo:

git clone https://github.com/sipwise/rtpengine.git
cd rtpengine 

Next we’ll need to install some dependencies:

apt-get install debhelper default-libmysqlclient-dev gperf iptables-dev libavcodec-dev libavfilter-dev libavformat-dev libavutil-dev libbencode-perl libcrypt-openssl-rsa-perl libcrypt-rijndael-perl libhiredis-dev libio-multiplex-perl libio-socket-inet6-perl libjson-glib-dev libdigest-crc-perl libdigest-hmac-perl libnet-interface-perl libnet-interface-perl libssl-dev libsystemd-dev libxmlrpc-core-c3-dev libcurl4-openssl-dev libevent-dev libpcap0.8-dev markdown unzip nfs-common dkms libspandsp-dev libiptc-dev libmosquitto-dev python3-websockets

The dependency you’ll get stuck on will be the G.729 library, which we have to manually compile.

VER=1.0.4

curl https://codeload.github.com/BelledonneCommunications/bcg729/tar.gz/$VER >bcg729_$VER.orig.tar.gz

tar zxf bcg729_$VER.orig.tar.gz 

cd bcg729-$VER 

git clone https://github.com/ossobv/bcg729-deb.git debian 

dpkg-buildpackage -us -uc -sa -b -rfakeroot

cd ../

dpkg -i libbcg729-*.deb

Now let’s check the RTPengine dependencies again:

dpkg-checkbuilddeps

If you get an empty output you’re good to start building the packages:

dpkg-buildpackage  --no-sign

If that completed sucessfully in the directory above you should have a bunch of .deb files:

cd ../

dpkg -i ngcp-rtpengine-daemon_*.deb ngcp-rtpengine-iptables_*.deb ngcp-rtpengine-kernel-dkms_*.deb

Getting it Running

Now we’ve got RTPengine installed let’s setup the basics,

There’s an example config file we’ll copy and edit:

mv /etc/rtpengine/rtpengine.sample.conf /etc/rtpengine/rtpengine.conf

vi /etc/rtpengine/rtpengine.conf

We’ll uncomment the interface line and set the IP to the IP we’ll be listening on:

Once we’ve set this to our IP we can start the service:

/etc/init.d/ngcp-rtpengine-daemon start

All going well it’ll start and rtpengine will be running.

You can learn about all the startup parameters and what everything in the config means in the readme.

Want more RTP info?

If you want to integrate RTPengine with Kamailio take a look at my post on how to set up RTPengine with Kamailio.

For more in-depth info on the workings of RTP check out my post RTP – More than you wanted to Know