I’ve become a big fan of Redis, and recently I had a need to integrate it into Kamailio.
There are two modules for integrating Kamailio and Redis, each have different functionalities:
db_redis is used when you want to use Redis in lieu of MySQL, PostGres, etc, as the database backend, this would be useful for services like usrloc. Not all queries / function calls are supported, but can be used as a drop-in replacement for a lot of modules that need database connectivity.
ndb_redis exposes Redis functions from the Kamailio config file, in a much more generic way. That’s what we’ll be looking at today.
The setup of the module is nice and simple, we load the module and then define the connection to the Redis server:
With the above we’ve created a connection to the Redis server at 127.0.0.2, and it’s called MyRedisServer.
You can define multiple connections to multiple Redis servers, just give each one a different name to reference.
Now if we want to write some data to Redis (SET) we can do it from within the dialplan with:
redis_cmd("MyRedisServer", "SET foo bar", "r");
We can then get this data back with:
#Get value of key "foo" from Redis
redis_cmd("MyRedisServer", "GET foo", "r");
#Set avp "foo_value" to output from Redis
$avp(foo_value) = $redis(r=>value);
#Print out value of avp "foo_value" to syslog
xlog("Value of foo is:  $avp(foo_value))
At the same time, we can view this data in Redis directly by running:
nick@oldfaithful:~$ redis-cli GET foo
Likewise we can set the value of keys and the keys themselves from AVPs from within Kamailio:
#Set the Redis Key to be the Received IP, with the value set to the value of the AVP "youravp"
redis_cmd("MyRedisServer", "SET $ct $avp(youravp)", "r");
All of the Redis functions are exposed through this mechanism, not just get and set, for example we can set the TTL so a record deletes after a set period of time:
#Set key with value of the received IP to expire after 120 seconds
redis_cmd("MyRedisServer", "EXPIRE $ct 120", "r");
I recently used Redis for a distributed flooding prevention mechanism, where the Subscriber’s received IP is used as the key in Redis and the value set to the number of failed auth attempts that subscriber has had, by using Redis we’re able to use the same mechanism across different platforms and easily administer it.
After getting AMR support in FreeSWITCH I set about creating an IMS Application Server for VoLTE / IMS networks using FreeSWITCH.
So in IMS what is an Application Server? Well, the answer is almost anything that’s not a CSCF.
An Application Server could handle your Voicemail, recorded announcements, a Conference Factory, or help interconnect with other systems (without using a BGCF).
I’ll be using mine as a simple bridge between my SIP network and the IMS core I’ve got for VoLTE, with FreeSWITCH transcoding between AMR to PCMA.
Setting up FreeSWITCH
You’ll need to setup FreeSWITCH as per your needs, so that’s however you want to use it.
This post won’t cover setting up FreeSWITCH, there’s plenty of good resources out there for that.
The only difference is when you install FreeSWITCH, you will want to compile with AMR Support, so that you can interact with mobile phones using the AMR codec, which I’ve documented how to do here.
Setting up your IMS
In order to get calls from the IMS to the Application Server, we need a way of routing the calls to the Application Server.
There are two standards-compliant ways to achieve this,
But this is a blunt instrument, after all, it’ll only ever be used at the start of the call, what if we want to send it to an AS because a destination can’t be reached and we want to play back a recorded announcement?
The SIP RFC allows for multiple SIP headers to have the same name,
For example, it’s very common to have lots of Via headers present in a request.
In Kamailio, we often may wish to add headers, view the contents of headers and perform an action or re-write headers (Disclaimer about not rewriting Vias as that goes beyond the purview of a SIP Proxy but whatever).
Let’s look at a use case where we have multiple instances of the X-NickTest: header, looking something like this:
INVITE sip:[email protected]:5061 SIP/2.0
X-NickTest: ENTRY ONE
X-NickTest: ENTRY TWO
X-NickTest: ENTRY THREE
...
Let’s look at how we’d access this inside Kamailio.
First, we could just use the psedovariable for header – $hdr()
xlog("Value of X-NickTest is: $hdr(X-NickTest)");
But this would just result in the first entry being printed out:
Value of X-NickTest is: ENTRY ONE
If we know how many instances there are of the header, we can access it by it’s id in the array, for example:
xlog("Value of first X-NickTest is: $hdr(X-NickTest)[0]");
xlog("Value of second X-NickTest is: $hdr(X-NickTest)[1]");
xlog("Value of third  X-NickTest is: $hdr(X-NickTest)[2]");
But we may not know how many to expect either, but we can find out using $hdrc(name) to get the number of headers returned.
xlog("X-NickTest has $hdrc(X-NickTest) entries");
You’re probably seeing where I’m going with this, the next logical step is to loop through them, which we can also do something like this:
$var(i) = 0;
while($var(i) < $hdrc(X-NickTest)) {
         xlog(X-NickTest entry [$var(i)] has value $hdrc(X-NickTest)[$var(i)]);
         $var(i) = $var(i) + 1;
}
Recently I was working on a project that required Kamailio to constantly re-evaluate something, and generate a UAC request if the condition was met.
There’s a few use cases for this: For example you might want to get Kamailio to constantly check the number of SIP registrations and send an alert if they drop below a certain number. If a subscriber drops out in that their Registration just expires, there’s no SIP message that will come in to tell us, so we’d never be able to trigger something in the normal Kamailio request_route.
Of you might want to continually send a SIP MESSAGE to pop up on someone’s phone to drive them crazy. That’s what this example will focus on.
This is where the rtimer module comes in. You can define the check in a routing block, and then
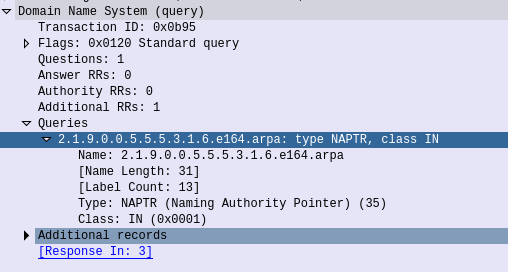
So once we’ve got an ENUM server configured and confirmed we can query it and get the results we want using Dig, we can configure Kamailio.
But before we get to the Kamailio side, a word on how Kamailio handles DNS, Kamailio doesn’t have the ability to set a DNS server, instead it uses the system DNS server details, This means your system will need to use the DNS server we want to query for ENUM for all DNS traffic, not just for Kamailio. This means you may need to setup Recursion to still be able to query DNS records for the outside world.
To add support to Kamailio, we’ll need to load the enum module (enum.so),
In terms of parameters, all we’ll set is the doman_suffix, which is, as it sounds, the domain suffix used in the DNS queries. If you’re using a different domain for your ENUM it’d need to be reflected here.
modparam("enum", "domain_suffix", "e164.arpa.")
Next up inside our minimalist dialplan we’ll just add enum_query(); to query the SIP URI,
if(is_method("INVITE")){
         enum_query();
         xlog("Ran ENUM query");
         xlog("To URI $tU");
         forward();
}
Obviously in production you’d want to add more sanity checks and error handling, but with this, sending a SIP INVITE to Kamailio with an E.164 number in the SIP URI user part, will lead to an ENUM query resolving this, and routing the traffic to it,
I’d been trying for some time to get Kamailio acting as a Diameter Routing Agent with mixed success, and eventually got it working, after a few changes to the codebase of the ims_diameter_server module.
It is rather unstable, in that if it fails to dispatch to a Diameter peer, the whole thing comes crumbling down, but incoming Diameter traffic is proxied off to another Diameter peer, and Kamailio even adds an extra AVP.
Having used Kamailio for so long I was really hoping I could work with Kamailio as a DRA as easily as I do for SIP traffic, but it seems the Diameter module still needs a lot more love before it’ll be stable enough and simple enough for everyone to use.
I created a branch containing the fixes I made to make it work, and with an example config for use, but use with caution. It’s a long way from being production-ready, but hopefully in time will evolve.
Instead of going to all the effort of creating VMs (or running Ansible playbooks) we can use Docker and docker-compose to create a test environment with multiple Asterisk instances to dispatch traffic to from Kamailio.
I covered the basics of using Kamailio with Docker in this post, which runs a single Kamailio instance inside Docker with a provided config file, but in this post we’ll use docker-compose to run multiple Asterisk instances and setup Kamailio to dispatch traffic to them.
I am a big Kubernetes fan, and yes, all this can be done in Kubernetes, and would be a better fit for a production environment, but for a development environment it’s probably overkill.
#Copy the config file onto the Filesystem of the Docker instance
COPY dispatcher.list /etc/kamailio/
COPY kamailio.cfg /etc/kamailio/
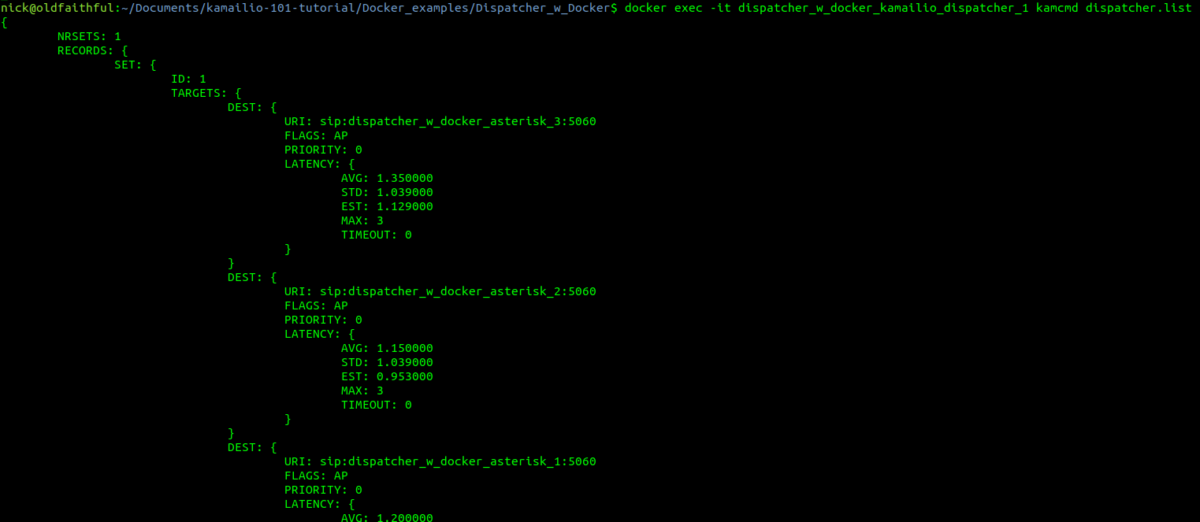
The Kamailio config we’re using is very similar to the Dispatcher example but with a few minor changes to the timers and setting it to use the Dispatcher data from a text file instead of a database. If you have a look at the contents of dispatcher.list you’ll see three entries; dispatcher_w_docker_asterisk_1, dispatcher_w_docker_asterisk_2 & dispatcher_w_docker_asterisk_3. These will be the hostnames of the 3 Asterisk instances we’ll create.
Next up we’ll take a look at the docker-compose file, which defines how our environment will be composed, and defines which containers will be run
The docker-compose file contains definitions about the Containers we want to run, for this example we’ll run several Asterisk instances and a single Kamailio instance.
The replicas: 6 parameter is ignored by standard docker-compose up command, but will be used if you’re using Docker swarm, otherwise we’ll manually set the number of replicas when we run the command.
So with that defined let’s define our Kamailio service;
So far with most of our discussions about Kamailio we’ve talked about routing the initial SIP request (INVITE, REGISTER, SUBSCRIBE, etc), but SIP is not a one-message protocol, there’s a whole series of SIP messages that go into a SIP Dialog.
Sure the call may start with an INVITE, but there’s the 180 RINGING, the 200 OK and the ACK that go into getting the call actually established, and routing these in-dialog messages is just as important as routing the first INVITE.
When we’ve talked about SIP routing it’s all happened in the request_route {} block:
request_route {
        xlog("Received $rm to $ru - Forwarding");
        append_hf("X-Proxied: You betcha\r\n");
        #Forward to new IP
        forward("192.168.1.110");
}
In the example above we statelessly forward any initial requests to the IP 192.168.1.110.
We can add an onreply_route{} block to handle any replies from 192.168.1.110 back to the originator.
But why would we want to?
Some simple answers would be to do some kind of manipulation to the message – say to strip a Caller ID if CLIP is turned off, or to add a custom SIP header containing important information, etc.
onreply_route{
        xlog("Got a reply $rs");
        append_hf("X-Proxied: For the reply\r\n");
}
Let’s imagine a scenario where the destination our SIP proxy is relaying traffic to (192.168.1.110) starts responding with 404 error.
We could detect this in our onreply_route{} and do something about it.
onreply_route{
        xlog("Got a reply $rs");
        if($rs == 404) {
                #If remote destination returns 404
                xlog("Got a 404 for $rU");
                #Do something about it
        }
}
In the 404 example if we were using Dispatcher it’s got easily accessed logic to handle these scenarios a bit better than us writing it out here, but you get the idea.
There are a few other special routes like onreply_route{}, failure routes and event routes, etc.
Hopefully now you’ll have a better idea of how and when to use onreply_route{} in Kamailio.
It’s a seemingly simple question, the answer to which is – however you want, sorry if that’s not a simple answer.
I’ve talked about the strengths and weaknesses of Kamailio and Asterisk in my post Kamailio vs Asterisk, so how about we use them to work together?
The State of Play
So before we go into the nitty gritty, let’s imagine we’ve got an Asterisk box with a call queue with Alice and Bob in it, set to ring those users if they’re not already on a call.
Each time a call comes in, Asterisk looks at who in the queue is not already on a call, and rings their phone.
Now let’s imagine we’re facing a scenario where the single Asterisk box we’ve got is struggling, and we want to add a second to share the load.
We do it, and now we’ve got two Asterisk boxes and a Kamailio load balancer to split the traffic between the two boxes.
Now each time a call comes in, Kamailio sends the SIP INVITE to one of the two Asterisk boxes, and when it does, that Asterisk box looks at who is in the queue and not already on a call, and then rings their phone.
Let’s imagine a scenario where a Alice & Bob are both on calls on Asterisk box A, and another call comes in this call is routed to Asterisk box B. Asterisk box B looks at who is in the queue and who is already on a call, the problem is Alice and Bob are on calls on Asterisk box A, so Asterisk box B doesn’t know they’re both on a call and tries to ring them.
We have a problem.
Scaling stateful apps is a real headache,
So have a good long hard think about how to handle these issues before going down this path!
Sometimes you need Kamailio to serve as a User Agent Client, we covered using UAC to send SIP REGISTER messages and respond with the authentication info, but if you find you’re getting 401 or 407 responses back when sending an INVITE, you’ll need to use the UAC module, specifically the uac_auth() to authenticate the INVITE,
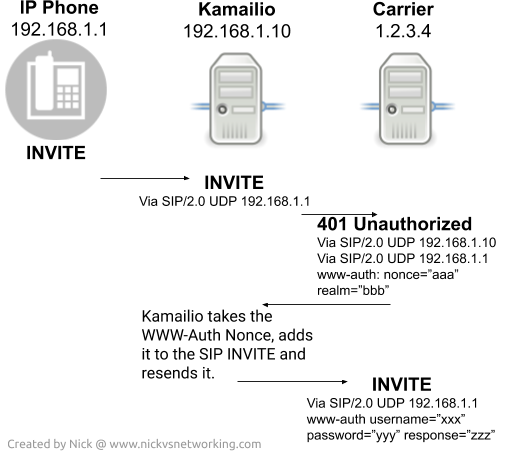
When Kamailio relays an INVITE to a destination, typically any replies / responses that are part of that dialog will go back to the originator using the Via headers.
This would be fine except if the originator doesn’t know the user name and password requested by the carrier, but Kamailio does,
Instead what we need Kamailio to do is if the response to the INVITE is a 401 Unauthorised Response, or a 407 Proxy Authentication required, intercept the request, generate the response to the authentication challenge, and send it to the carrier.
To do this we’ll need to use the UAC module in Kamailio and set some basic params:
Before we can call the t_relay() command, we need to specify a failure route, to be called if a negative response code comes back, we’ll use one called TRUNKAUTH and tell the transaction module that’s the one we’ll use by adding t_on_failure(“TRUNKAUTH”);
What we’ve done is specified to rewrite the destination URI to sip.nickvsnetworking.com, if the request type is an INVITE, it’ll load a failure route called TRUNKAUTH and proxy the request with the transaction module to sip.nickvsnetworking.com.
What we get is a 401 response back from our imaginary carrier, and included in it is a www-auth header for authentication.
To catch this we’ll create an on failure route named “TRUNKAUTH”
failure_route[TRUNKAUTH] {
    xlog("trunk auth");
    }
We’ll make sure the transaction hasn’t been cancelled, and if it has bail out (no point processing subsequent requests on a cancelled dialog).
failure_route[TRUNKAUTH] {
    xlog("trunk auth");
    if (t_is_canceled()) {
        exit;
    }
And determine if the response code is a 401 Unauthorised Response, or a 407 Proxy Authentication required (Authentication requests from our upstream carrier):
failure_route[TRUNKAUTH] {
    xlog("trunk auth");
    if (t_is_canceled()) {
        exit;
    }
	xlog("Checking status code");
    if(t_check_status("401|407")) {
	xlog("status code is valid auth challenge");
    }
}
Next we’ll define the username and password we want to call upon for this challenge, and generate an authentication response based on these values using the uac_auth() command,
failure_route[TRUNKAUTH] {
    xlog("trunk auth");
    if (t_is_canceled()) {
        exit;
    }
	xlog("Checking status code");
    if(t_check_status("401|407")) {
	xlog("status code is valid auth challenge");
        $avp(auser) = "test";
        $avp(apass) = "test";
        uac_auth();

    }
}
Then finally we’ll relay that back to the carrier with our www-auth header populated with the challenge response;
I wrote about using Ansible to automate Kamailio config management, Ansible is great at managing VMs or bare metal deployments, but for Containers using Docker to build and manage the deployments is where it’s at.
I’m going to assume you’ve got Docker in place, if not there’s heaps of info online about getting started with Docker.
The Dockerfile
The Kamailio team publish a Docker image for use, there’s no master branch at the moment, so you’ve got to specify the version; in this case kamailio:5.3.3-stretch.
Once we’ve got that we can start on the Dockerfile,
For this example I’m going to include
#Kamailio Test Stuff
FROM kamailio/kamailio:5.3.3-stretch

#Copy the config file onto the Filesystem of the Docker instance
COPY kamailio.cfg /etc/kamailio/

#Print out the current IP Address info
RUN ip add

#Expose port 5060 (SIP) for TCP and UDP
EXPOSE 5060
EXPOSE 5060/udp
Once the dockerfile is created we can build an image,
docker image build -t kamtest:0.1 .
And then run it,
docker run kamtest:0.1
Boom, now Kamailio is running, with the config file I pushed to it from my Dockerfile directory,
Now I can setup a Softphone on my local machine and point it to the IP of the Docker instance and away we go,
Where the real power here comes in is that I can run that docker run command another 10 times, and have another 10 Kamailio instannces running.
Tie this in with Kubernetes or a similar platform and you’ve got a way to scale and manage upgrades unlike anything you’d get on Bare Metal or VMs.
I had a few headaches getting the example P-CSCF example configs from the Kamailio team to run, recent improvements with the IPsec support and code evolution meant that the example config just didn’t run.
So, after finally working out the changes I needed to make to get Kamailio to function as a P-CSCF, I took the plunge and made my first pull request on the Kamailio project.
Today I thought I’d cover a simple use case – running an HTTP get from Kamailio and doing something with the output.
The http_client does what it sounds – Acts as an HTTP client to send HTTP GET and POST requests.
The use cases for this become clear quite quickly, you could use http_client to request credit from an accounting server via it’s API, get the latest rate to a destination from a supplier, pull weather data, etc, etc.
Let’s take a very simple example, we’ll load http_client by adding a loadmodule line:
...
loadmodule "http_client.so"
...
Next I’ve put together a very simple request_route block that requests a HTTP file from a web server and sends the response to a SIP client:
####### Routing Logic ########


/* Main SIP request routing logic
 * - processing of any incoming SIP request starts with this route
 * - note: this is the same as route { ... } */
request_route {

        xlog("Got request");
        http_client_query("https://nickvsnetworking.com/utils/curl.html", "", "$var(result)");
        xlog("Result is $var(result)");
        sl_reply("200", "Result from HTTP server was  $var(result)");
}
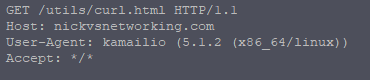
Using the http_client_query() function we’re able to query a HTTP server,
We’ll query the URL https://nickvsnetworking.com/utils/curl.html and store the output to a variable called result.
If you visit the URL you’ll just get a message that says “Hello there“, that’s what Kamailio will get when it runs the http_client function.
Next we print the result using an xlog() function so we can see the result in syslog,
Finally we send a stateless reply with the result code 200 and the body set to the result we got back from the server.
We can make this a bit more advanced, using HTTP Post we can send user variables and get back responses.
The http_client module is based on the ubiquitous cURL tool, that many users will already be familiar with.
It’s probably pretty evident to most why you’d want to use TLS these days,
SIP Secure – aka sips has been around for a long time and is supported by most SIP endpoints now.
Kamailio supports TLS, and it’s setup is very straightforward.
I’ve got a private key and certificate file for the domain nickvsnetworking.com so I’ll use those to secure my Kamailio instance by using TLS.
I’ll start by copying both the certificate (in my case it’s cert.pem) and the private key (privkey.pem) into the Kamailio directory. (If you’ve already got the private key and certificate on your server for another application – say a web server, you can just reference that location so long as the permissions are in place for Kamailio to access)
Next up I’ll open my Kamailio config (kamailio.cfg), I’ll be working with an existing config and just adding the TLS capabilities, so I’ll add this like to the config:
!define WITH_TLS
That’s pretty much the end of the configuration in kamailio.cfg, if we have a look at what’s in place we can see that the TLS module loads it’s parameters from a separate file;
After restarting Kamailio subscribers can now contact us via TLS using sips.
You may wish to disable TCP & UDP transport in favor of only TLS.
A note about CAs…
If you’re planning on rolling out SIP over TLS (sips) to existing IP phones it’s worth looking at what Certificate Authorities (CAs) are recognised by the IP phones.
As TLS relies on a trust model where a CA acts kind of like a guarantor to the validity of the certificate, if the IP phone doesn’t recognise the CA, it may see the certificate as Invalid.
Some IP phones for example won’t recognize Let’s Encrypt certificates as valid, while others may not recognize any of the newer CAs.
If you’re running a Debian system, the Kamailio team provide nightly development builds as Debian packages that can be installed on Debian or Ubuntu systems using the apt package manager.
Installing is a breeze, first we just add the GPG key for the repo:
Despite the fact it’s 2020 there’s still a lot of folks in the world manually configuring boxes,
Ansible is a topic I could talk all day about, but in essence it’s kind of an automation framework, tell Ansible what to do one and it can spin you up two boxes, or two thousand boxes and manage the config on them.
I talked about DMQ, the Distributed Message Queue in a Kamailio Bytes post some time ago, and so as an example I’ll share an example playbook to Install Kamailio the lazy way from the Repos, and load the DMQ config with the IP Address and DMQ Address pulled from variables based on the host itself.
There’s a huge number of posts on installing and the basics of Ansible online, if you’re not familiar with Ansible already I’d suggest starting by learning the basics and then rejoining us.
The Hosts
Depending on if your hosts are running on bare metal, VMWare VMs or cloud based, I’m going to assume you’re working with a Debian system.
I’ve already got 3 servers ready to go, they’ve got sequential IP Addresses so I’ve added the range to my /etc/ansible/hosts file:
I’ve created the group kamailio and put the IP Address range 10.0.1.193 to 10.0.1.195 in there.
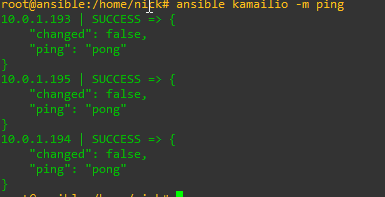
You will probably need to add the authentication info, such as passwords, private keys and privilege escalation details, but I’m going to assume you’ve already done that and you can run the ping module on each one:
ansible kamailio -m ping
Assuming that comes back OK and you can get into each one let’s move onto the Playbook.
The Playbook
There’s a few tasks we’ll get out of the way before we configure Kamailio,
The first of which is adding the Debian repo and the keys,
Next we’ll load a Kamailio config from a template that fills in our IP Address and Kamailio version, then we’ll install Kamailio,
Rather than talk you through each of the plays here’s a copy of my playbook:
---
- name: Configure Kamailio


  hosts: kamailio
  become: yes

  vars:
    kamailio_version: "53"
    debian_sources_dir: "/etc/apt/sources.list.d"

  tasks:


    - name: Add keys for Kamailio repo
      apt_key:
        url: http://deb.kamailio.org/kamailiodebkey.gpg
        state: present


    - name: Add repo to sources.list
      apt_repository:
        repo: deb http://deb.kamailio.org/kamailio{{kamailio_version}} {{hostvars[inventory_hostname]['ansible_lsb']['codename']}} main
                #The full list of Debian repos can be found at http://deb.kamailio.org/
                #The version is based off the versions listed there and the release is based on the codename of the Debian / Ubuntu release.
        state: present


    - name: Copy Config Template
                #Copies config from the template, fills in variables and uplaods to the server
      template:
        src: kamailio.cfg.j2
        dest: /etc/kamailio/kamailio.cfg
        owner: root
        group: root
        backup: yes
      register: config_changed

    - name: Install Kamailio
                #Updates cache (apt-get update) and then installs Kamailio
      apt:
        name: kamailio
        update_cache: yes
        state: present
      register: kamailio_installed_firstrun

    - name: Restart Kamailio if config changed
      service:
       name: kamailio
       state: restarted
      when: config_changed.changed

    - name: Start Kamailio if installed for the first time
      service:
       name: kamailio
       state: started
      when: kamailio_installed_firstrun.changed
Should be pretty straight forward to anyone who’s used Ansible before, but the real magic happens in the templatemodule. Let’s take a look;
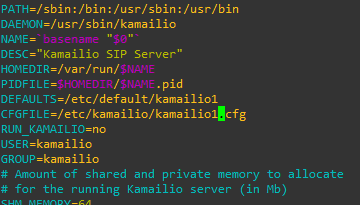
Kamailio config in Jinja2 template
Pusing out static config is one thing, but things like IP Addresses, FQDNs and SSL certs may differ from machine to machine, so instead of just pushing one config, I’ve created a config and added some variables in Jinja2 format to the config, that will be filled with the value on the target when pushed out.
In the templatemodule of the playbook you can see I’ve specified the file kamailio.cfg.j2 this is just a regular Kamailio config file but I’ve added some variables, let’s look at how that’s done.
On the machine 10.0.1.194 we want it to listen on 10.0.1.194, we could put list 0.0.0.0 but this can lead to security concerns, so instead let’s specify the IP in the Jinja config,
By putting ansible_default_ipv4.address in two sets of curly brackets, this tells Ansible to fill in thes values from the template with the Ansible IPv4 Address of the target machine.
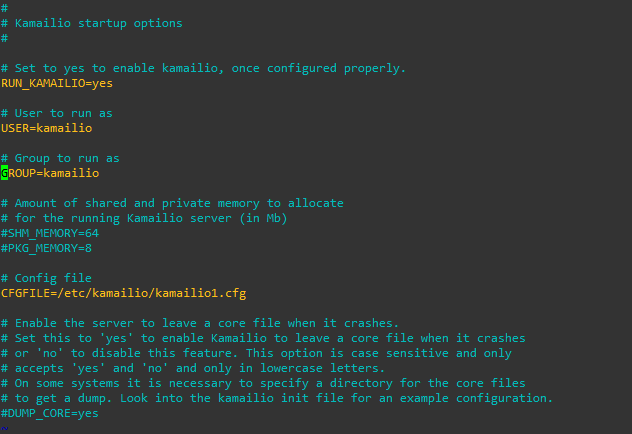
Let’s take a look on the 10.0.1.194’s actual kamailio.cfg file:
Let’s take another example,
To keep DMQ humming it makes sense to have different DMQ domains for different versions of Kamailio, so in the Kamailio config file template I’ve called the variable kamailio_versionin the DMQ address,
This means on a Kamailio 5.2 version this URL look like this on the boxes’ config:
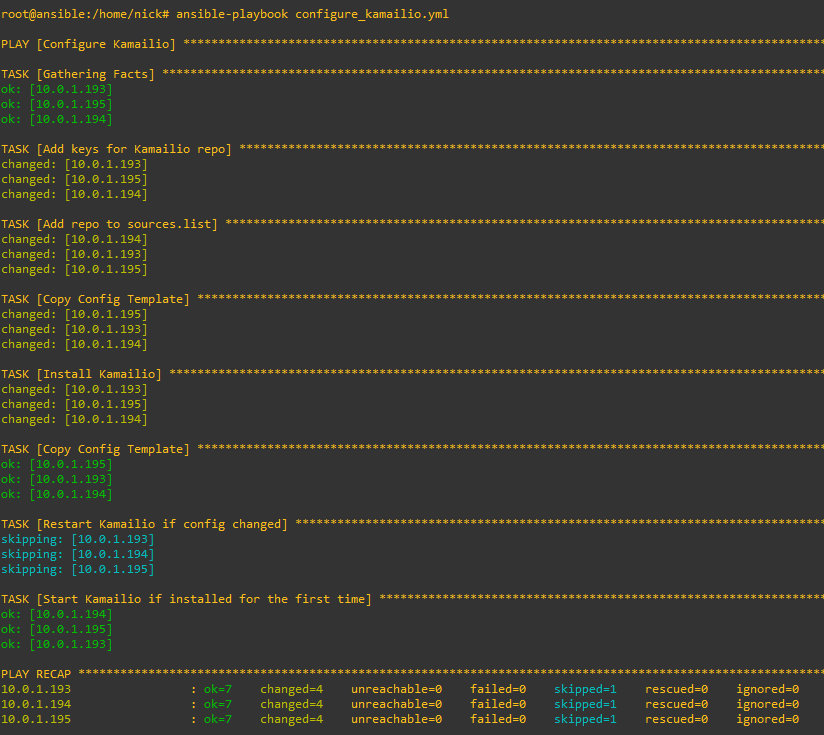
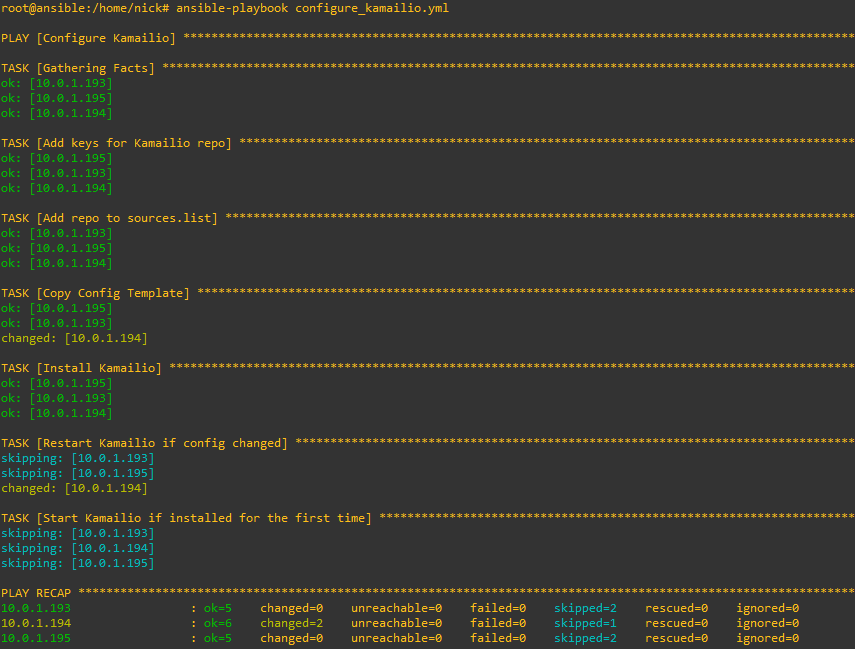
Running it is just a simple matter of calling ansible-playbook and pointing it at the playbook we created, here’s how it looks setting up the 3 hosts from their vanilla state:
The great thing about Kamailio is it’s omnipotent – This means it will detect if it needs to do each of the tasks specified in the playbook.
So if we run this again it won’t try and add the repo, GPG keys, install Kamailio and load the template, it’ll look and see each of those steps have already been done and skip each of them.
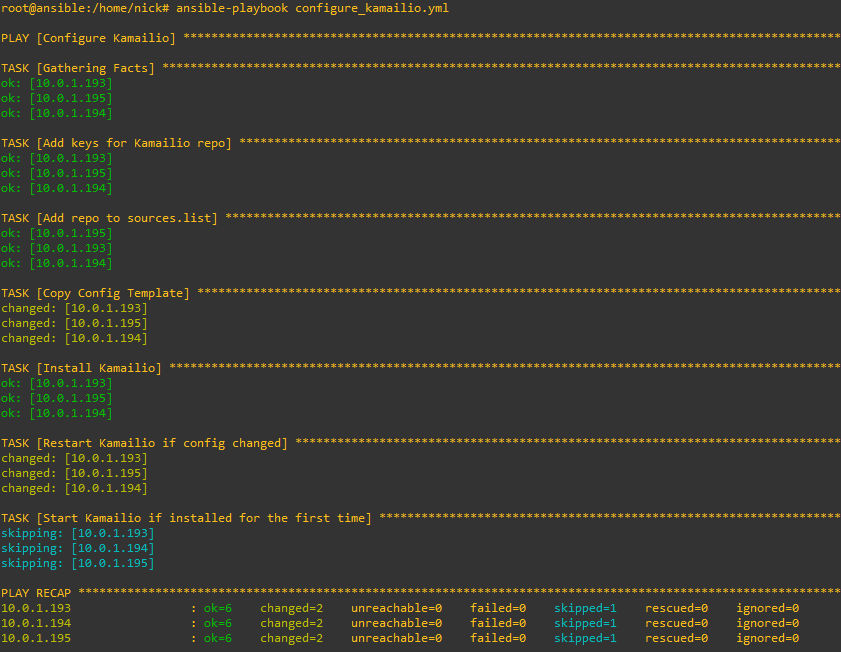
But what if someone makes some local changes on one of the boxes, let’s look at what happens:
Likewise now if we decide to change our config we only need to update the template file and Ansible will push it out to all our machines, I’ve added a comment into the Kamailio template, so let’s run it again and see the config pushed out to all the Kamailio instances and them restarting.
I’ve been working for some time on open source mobile network cores, and one feature that has been a real struggle for a lot of people (Myself included) is getting VoLTE / IMS working.
Here’s some of the issues I’ve faced, and the lessons I learned along the way,
Sadly on most UEs / handsets, there’s no “Make VoLTE work now” switch, you’ve got a satisfy a bunch of dependencies in the OS before the baseband will start sending SIP anywhere.
Get the right Hardware
Your eNB must support additional bearers (dedicated bearers I’ve managed to get away without in my testing) so the device can setup an APN for the IMS traffic.
Sadly at the moment this rules our Software Defined eNodeBs, like srsENB.
ISIM – When you thought you understood USIMs – Guess again
According to the 3GPP IMS docs, an ISIM (IMS SIM) is not a requirement for IMS to work.
However in my testing I found Android didn’t have the option to enable VoLTE unless an ISIM was present the first time.
In a weird quirk I found once I’d inserted an ISIM and connected to the VoLTE network, I could put a USIM in the UE and also connect to the VoLTE network.
Obviously the parameters you can set on the USIM, such as Domain, IMPU, IMPI & AD, are kind of “guessed” but the AKAv1-MD5 algorithm does run.
Getting the APN Config Right
There’s a lot of things you’ll need to have correct on your UE before it’ll even start to think about sending SIP messaging.
I was using commercial UE (Samsung handsets) without engineering firmware so I had very limited info on what’s going on “under the hood”. There’s no “Make VoLTE do” tickbox, there’s VoLTE enable, but that won’t do anything by default.
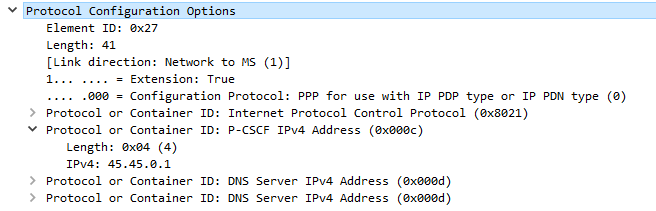
If your P-GW doesn’t know the IP of your P-CSCF, it’s not going to be able to respond to it in the Protocol Configuration Options (PCO) request sent by the UE with that nice new bearer for IMS we just setup.
There’s no way around Mutual Authentication
Coming from a voice background, and pretty much having RFC 3261 tattooed on my brain, when I finally got the SIP REGISTER request sent to the Proxy CSCF I knocked something up in Kamailio to send back a 200 OK, thinking that’d be the end of it.
For any other SIP endpoint this would have been fine, but IMS Clients, nope.
Reading the specs drove home the same lesson anyone attempting to setup their own LTE network quickly learns – Mutual authentication means both the network and the UE need to verify each other, while I (as the network) can say the UE is OK, the UE needs to check I’m on the level.
I saw my 401 response go back to the UE and then no response. Nada.
This led to my next lesson…
There’s no way around IPsec
According to the 3GPP docs, support for IPsec is optional, but I found this not to be the case on the handsets I’ve tested.
After sending back my 401 response the UE looks for the IPsec info in the 401 response, then tries to setup an IPsec SA and sends ESP packets back to the P-CSCF address.
Even with my valid AKAv1-MD5 auth, I found my UE wasn’t responding until I added IPsec support on the P-CSCF, hence why I couldn’t see the second REGISTER with the Authentication Info.
After setting up IPsec support, I finally saw the UE’s REGISTER with the AKAv1-MD5 authentication, and was able to send a 200 OK.
People think SIP they think VoIP & phone calls, but SIP it’s the Phone Call Initiation Protocol it’s the Session Initiation Protocol – Sure VoIP guys like me love SIP, but it’s not just about VoIP.
Have you sent an SMS on a modern mobile phone recently? Chances are you sent a SMS over SIP using SIP MESSAGE method.
So let’s look a bit at SIP SIMPLE, the catchily titled acronym translates to Session Initiation Protocol for Instant Messaging and Presence Leveraging Extensions (Admittedly less catchy in it’s full form).
There’s two way SIP SIMPLE can be used to implement Instant Messaging, Paging Mode with each message sent as a single transaction, and Session Mode where a session is setup between users and IMs exchanged with the same Call ID / transaction.
I’m going to cover the Paging Mode implementation because it’s simpler easier to understand.
Before we get too far this is another example of confusing terminology, let’s just clear this up; According to the RFC any SIP request is a SIP Message, like a SIP OPTIONS message, a SIP INVITE message. But the method of a SIP INVITE message is INVITE, the method of a SIP OPTIONS message is OPTIONS. There’s a SIP MESSAGE method, meaning you can send a SIP MESSAGE message using the MESSAGE method. Clear as mud? I’ll always refer to the SIP Method in Capitals, like MESSAGE, INVITE, UPDATE, etc.
The SIP MESSAGE method looks / acts very similar to a SIP INVITE, in that it’s got all the standard SIP headers, but also a Message Body, in which our message body lives (funny about that), typically we’ll send messages using the Content-Type: text/plain to denote we’re sending a plaintext message.
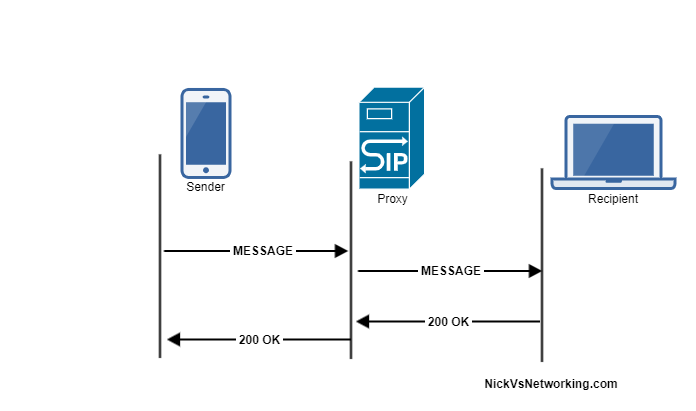
Example MESSAGE Message Flow
Like a SIP OPTIONS Method, the MESSAGE method is simply answered with a 200 OK (No Ack).
Let’s have a look at how the MESSAGE message looks: