One of my favorite things about Ansible and network automation as a whole is that I can do things in a repeatable manner, super quickly.
One of the worst things about network automation is I can uniformly break things super quickly.
Recently I was working on spinning up a core for a customer, who had some funky VPN stuff, which meant I’d needed to jump traffic through a jumphost (no biggie).
But I’d set ControlPath in my ansible.cfg file with %%h but that’s escaped as %h in the SSH config, except my ansible.cfg is not the same as an SSH config, so it passed it literally.
Protip: It’s just %h not %%h.
This meant it when Ansible created the socket, it didn’t fill with target hostname, so I had a single socket, which happened to be created on the first VM that we connected to (not consistent).
Then all the other commands for all the playbooks were run on a single VM that the socket was on, while Ansible reported it was running the roles and tasks across hosts it wasn’t, as everything was happening on one host.
This was, very confusing to debug.
If I sshed into box X, it’s hostname would show box Y, and it’d have the roles deployed from box Z.
I’ve no idea if anyone else will make the same stupid mistake as I did today, but I probably will, so I wrote this done.
We’ve got a web based front end in our CRM which triggers Ansible Playbooks for provisioning of customer services, this works really well, except I’d been facing a totally baffling issue of late.
Ansible Plays (Provisioning jobs) would have variables set that they inherited from other Ansible Plays, essentially if I set a variable in Play X and then ran Play Y, the variable would still be set.
I thought this was an issue with our database caching the play data showing the results from a previous play, that wasn’t the case.
Then I thought our API that triggers this might be passing extra variables in that it had cached, wasn’t the case.
In the end I ran the Ansible function call in it’s simplest possible form, with no API, no database, nothing but plain vanilla Ansible called from Python
    # Run the actual playbook
    r = ansible_runner.run(
        private_data_dir='/tmp/',
        playbook=playbook_path,
        extravars=extra_vars,
        inventory=inventory_path,
        event_handler=event_handler_obj.event_handler,
        quiet=False
    )
And I still I had the same issue of variables being inherited.
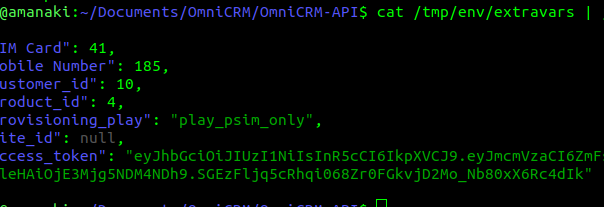
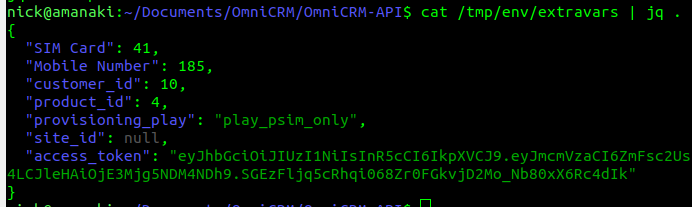
So what was the issue? Well the title gives it away, the private_data_dir parameter creates a folder in that directory, called env/extravars which a JSON file lives with all the vars from all the provisioning runs.
Removing the parameter from the Python function call resolved my issue, but did not give me back the half a day I spent debugging this…
I’ve written a playbook that provisions some server infrastructure, however one of the steps is to change the hostname.
A common headache when changing the hostname on a Linux machine is that if the hostname you set for the machine, isn’t in the machine’s /etc/hosts file, then when you run sudo su or su, it takes a really long time before it shows you the prompt as the machine struggles to do a DNS lookup for it’s own hostname and fails,
This becomes an even bigger problem when you’re using Ansible to setup these machines, Ansible times out when changing the hostname;
Simple fix, edit the /etc/ansible/ansible.cfg file and include
There’s always lots of talk of Network Function Virtualization (NFV) in the Telco space, but replacing custom hardware with computing resources is only going to get you so far, if every machine has to be configured manually.
Ansible is a topic I’ve written a little bit about in terms of network automation / orchestration.
I wanted to test limits of Open5gs EPC, which led me to creating a lot of Packet Gateways, so I thought I’d share a little Ansible Playbook I wrote for deploying P-GWs.
It dynamically sets the binding address and DHCP servers, and points to each PCRF in the defined pool.
You can obviously build upon this too, creating another playbook to deploy PCRFs, MMEs and S-GWs will allow you to reference the hosts in each group to populate the references.
logger:
    file: /var/log/open5gs/pgw.log

parameter:

pgw:
    freeDiameter: /etc/freeDiameter/pgw.conf
    gtpc:
      - addr: {{hostvars[inventory_hostname]['ansible_default_ipv4']['address']}}

    gtpu:
      - addr: {{hostvars[inventory_hostname]['ansible_default_ipv4']['address']}}

    ue_pool:
      - addr: 45.45.0.1/16
      - addr: cafe::1/64
    dns:
{% for dns in dns_servers %}
      - {{ dns }}
{% endfor %}
Diameter Config (pgw.conf.j2)
# This is a sample configuration file for freeDiameter daemon.

# Most of the options can be omitted, as they default to reasonable values.
# Only TLS-related options must be configured properly in usual setups.

# It is possible to use "include" keyword to import additional files
# e.g.: include "/etc/freeDiameter.d/*.conf"
# This is exactly equivalent as copy & paste the content of the included file(s)
# where the "include" keyword is found.


##############################################################
##  Peer identity and realm

# The Diameter Identity of this daemon.
# This must be a valid FQDN that resolves to the local host.
# Default: hostname's FQDN
#Identity = "aaa.koganei.freediameter.net";
Identity = "{{ inventory_hostname  }}.{{ diameter_realm }}";

# The Diameter Realm of this daemon.
# Default: the domain part of Identity (after the first dot).
#Realm = "koganei.freediameter.net";
Realm = "{{ diameter_realm }}";
##############################################################
##  Transport protocol configuration

# The port this peer is listening on for incoming connections (TCP and SCTP).
# Default: 3868. Use 0 to disable.
#Port = 3868;

# The port this peer is listening on for incoming TLS-protected connections (TCP and SCTP).
# See TLS_old_method for more information about TLS flavours.
# Note: we use TLS/SCTP instead of DTLS/SCTP at the moment. This will change in future version of freeDiameter.
# Default: 5868. Use 0 to disable.
#SecPort = 5868;

# Use RFC3588 method for TLS protection, where TLS is negociated after CER/CEA exchange is completed
# on the unsecure connection. The alternative is RFC6733 mechanism, where TLS protects also the
# CER/CEA exchange on a dedicated secure port.
# This parameter only affects outgoing connections.
# The setting can be also defined per-peer (see Peers configuration section).
# Default: use RFC6733 method with separate port for TLS.
#TLS_old_method;

# Disable use of TCP protocol (only listen and connect over SCTP)
# Default : TCP enabled
#No_TCP;

# Disable use of SCTP protocol (only listen and connect over TCP)
# Default : SCTP enabled
#No_SCTP;
# This option is ignored if freeDiameter is compiled with DISABLE_SCTP option.

# Prefer TCP instead of SCTP for establishing new connections.
# This setting may be overwritten per peer in peer configuration blocs.
# Default : SCTP is attempted first.
#Prefer_TCP;

# Default number of streams per SCTP associations.
# This setting may be overwritten per peer basis.
# Default : 30 streams
#SCTP_streams = 30;

##############################################################
##  Endpoint configuration

# Disable use of IP addresses (only IPv6)
# Default : IP enabled
#No_IP;

# Disable use of IPv6 addresses (only IP)
# Default : IPv6 enabled
#No_IPv6;

# Specify local addresses the server must bind to
# Default : listen on all addresses available.
#ListenOn = "202.249.37.5";
#ListenOn = "2001:200:903:2::202:1";
#ListenOn = "fe80::21c:5ff:fe98:7d62%eth0";
ListenOn = "{{hostvars[inventory_hostname]['ansible_default_ipv4']['address']}}";


##############################################################
##  Server configuration

# How many Diameter peers are allowed to be connecting at the same time ?
# This parameter limits the number of incoming connections from the time
# the connection is accepted until the first CER is received.
# Default: 5 unidentified clients in paralel.
#ThreadsPerServer = 5;

##############################################################
##  TLS Configuration

# TLS is managed by the GNUTLS library in the freeDiameter daemon.
# You may find more information about parameters and special behaviors
# in the relevant documentation.
# http://www.gnu.org/software/gnutls/manual/

# Credentials of the local peer
# The X509 certificate and private key file to use for the local peer.
# The files must contain PKCS-1 encoded RSA key, in PEM format.
# (These parameters are passed to gnutls_certificate_set_x509_key_file function)
# Default : NO DEFAULT
#TLS_Cred = "<x509 certif file.PEM>" , "<x509 private key file.PEM>";
#TLS_Cred = "/etc/ssl/certs/freeDiameter.pem", "/etc/ssl/private/freeDiameter.key";
TLS_Cred = "/etc/freeDiameter/pgw.cert.pem", "/etc/freeDiameter/pgw.key.pem";

# Certificate authority / trust anchors
# The file containing the list of trusted Certificate Authorities (PEM list)
# (This parameter is passed to gnutls_certificate_set_x509_trust_file function)
# The directive can appear several times to specify several files.
# Default : GNUTLS default behavior
#TLS_CA = "<file.PEM>";
TLS_CA = "/etc/freeDiameter/cacert.pem";

# Certificate Revocation List file
# The information about revoked certificates.
# The file contains a list of trusted CRLs in PEM format. They should have been verified before.
# (This parameter is passed to gnutls_certificate_set_x509_crl_file function)
# Note: openssl CRL format might have interoperability issue with GNUTLS format.
# Default : GNUTLS default behavior
#TLS_CRL = "<file.PEM>";

# GNU TLS Priority string
# This string allows to configure the behavior of GNUTLS key exchanges
# algorithms. See gnutls_priority_init function documentation for information.
# You should also refer to the Diameter required TLS support here:
#   http://tools.ietf.org/html/rfc6733#section-13.1
# Default : "NORMAL"
# Example: TLS_Prio = "NONE:+VERS-TLS1.1:+AES-128-CBC:+RSA:+SHA1:+COMP-NULL";
#TLS_Prio = "NORMAL";

# Diffie-Hellman parameters size
# Set the number of bits for generated DH parameters
# Valid value should be 768, 1024, 2048, 3072 or 4096.
# (This parameter is passed to gnutls_dh_params_generate2 function,
# it usually should match RSA key size)
# Default : 1024
#TLS_DH_Bits = 1024;

# Alternatively, you can specify a file to load the PKCS#3 encoded
# DH parameters directly from. This accelerates the daemon start
# but is slightly less secure. If this file is provided, the
# TLS_DH_Bits parameters has no effect.
# Default : no default.
#TLS_DH_File = "<file.PEM>";


##############################################################
##  Timers configuration

# The Tc timer of this peer.
# It is the delay before a new attempt is made to reconnect a disconnected peer.
# The value is expressed in seconds. The recommended value is 30 seconds.
# Default: 30
#TcTimer = 30;

# The Tw timer of this peer.
# It is the delay before a watchdog message is sent, as described in RFC 3539.
# The value is expressed in seconds. The default value is 30 seconds. Value must
# be greater or equal to 6 seconds. See details in the RFC.
# Default: 30
#TwTimer = 30;

##############################################################
##  Applications configuration

# Disable the relaying of Diameter messages?
# For messages not handled locally, the default behavior is to forward the
# message to another peer if any is available, according to the routing
# algorithms. In addition the "0xffffff" application is advertised in CER/CEA
# exchanges.
# Default: Relaying is enabled.
#NoRelay;

# Number of server threads that can handle incoming messages at the same time.
# Default: 4
#AppServThreads = 4;

# Other applications are configured by loaded extensions.

##############################################################
##  Extensions configuration

#  The freeDiameter framework merely provides support for
# Diameter Base Protocol. The specific application behaviors,
# as well as advanced functions, are provided
# by loadable extensions (plug-ins).
#  These extensions may in addition receive the name of a
# configuration file, the format of which is extension-specific.
#
# Format:
#LoadExtension = "/path/to/extension" [ : "/optional/configuration/file" ] ;
#
# Examples:
#LoadExtension = "extensions/sample.fdx";
#LoadExtension = "extensions/sample.fdx":"conf/sample.conf";

# Extensions are named as follow:
# dict_* for extensions that add content to the dictionary definitions.
# dbg_*  for extensions useful only to retrieve more information on the framework execution.
# acl_*  : Access control list, to control which peers are allowed to connect.
# rt_*   : routing extensions that impact how messages are forwarded to other peers.
# app_*  : applications, these extensions usually register callbacks to handle specific messages.
# test_* : dummy extensions that are useful only in testing environments.


# The dbg_msg_dump.fdx extension allows you to tweak the way freeDiameter displays some
# information about some events. This extension does not actually use a configuration file
# but receives directly a parameter in the string passed to the extension. Here are some examples:
## LoadExtension = "dbg_msg_dumps.fdx" : "0x1111"; # Removes all default hooks, very quiet even in case of errors.
## LoadExtension = "dbg_msg_dumps.fdx" : "0x2222"; # Display all events with few details.
## LoadExtension = "dbg_msg_dumps.fdx" : "0x0080"; # Dump complete information about sent and received messages.
# The four digits respectively control: connections, routing decisions, sent/received messages, errors.
# The values for each digit are:
#  0 - default - keep the default behavior
#  1 - quiet   - remove any specific log
#  2 - compact - display only a summary of the information
#  4 - full    - display the complete information on a single long line
#  8 - tree    - display the complete information in an easier to read format spanning several lines.

LoadExtension = "/usr/lib/x86_64-linux-gnu/freeDiameter/dbg_msg_dumps.fdx" : "0x8888";
LoadExtension = "/usr/lib/x86_64-linux-gnu/freeDiameter/dict_rfc5777.fdx";
LoadExtension = "/usr/lib/x86_64-linux-gnu/freeDiameter/dict_mip6i.fdx";
LoadExtension = "/usr/lib/x86_64-linux-gnu/freeDiameter/dict_nasreq.fdx";
LoadExtension = "/usr/lib/x86_64-linux-gnu/freeDiameter/dict_nas_mipv6.fdx";
LoadExtension = "/usr/lib/x86_64-linux-gnu/freeDiameter/dict_dcca.fdx";
LoadExtension = "/usr/lib/x86_64-linux-gnu/freeDiameter/dict_dcca_3gpp.fdx";


##############################################################
##  Peers configuration

#  The local server listens for incoming connections. By default,
# all unknown connecting peers are rejected. Extensions can override this behavior (e.g., acl_wl).
#
#  In addition to incoming connections, the local peer can
# be configured to establish and maintain connections to some
# Diameter nodes and allow connections from these nodes.
#  This is achieved with the ConnectPeer directive described below.
#
# Note that the configured Diameter Identity MUST match
# the information received inside CEA, or the connection will be aborted.
#
# Format:
#ConnectPeer = "diameterid" [ { parameter1; parameter2; ...} ] ;
# Parameters that can be specified in the peer's parameter list:
#  No_TCP; No_SCTP; No_IP; No_IPv6; Prefer_TCP; TLS_old_method;
#  No_TLS;       # assume transparent security instead of TLS. DTLS is not supported yet (will change in future versions).
#  Port = 5868;  # The port to connect to
#  TcTimer = 30;
#  TwTimer = 30;
#  ConnectTo = "202.249.37.5";
#  ConnectTo = "2001:200:903:2::202:1";
#  TLS_Prio = "NORMAL";
#  Realm = "realm.net"; # Reject the peer if it does not advertise this realm.
# Examples:
#ConnectPeer = "aaa.wide.ad.jp";
#ConnectPeer = "old.diameter.serv" { TcTimer = 60; TLS_old_method; No_SCTP; Port=3868; } ;
{% for pcrf in pcrf_hosts %}
ConnectPeer = "{{ pcrf }}" { ConnectTo = "{{ pcrf }}"; No_TLS; };
{% endfor %}


##############################################################
Despite the fact it’s 2020 there’s still a lot of folks in the world manually configuring boxes,
Ansible is a topic I could talk all day about, but in essence it’s kind of an automation framework, tell Ansible what to do one and it can spin you up two boxes, or two thousand boxes and manage the config on them.
I talked about DMQ, the Distributed Message Queue in a Kamailio Bytes post some time ago, and so as an example I’ll share an example playbook to Install Kamailio the lazy way from the Repos, and load the DMQ config with the IP Address and DMQ Address pulled from variables based on the host itself.
There’s a huge number of posts on installing and the basics of Ansible online, if you’re not familiar with Ansible already I’d suggest starting by learning the basics and then rejoining us.
The Hosts
Depending on if your hosts are running on bare metal, VMWare VMs or cloud based, I’m going to assume you’re working with a Debian system.
I’ve already got 3 servers ready to go, they’ve got sequential IP Addresses so I’ve added the range to my /etc/ansible/hosts file:
I’ve created the group kamailio and put the IP Address range 10.0.1.193 to 10.0.1.195 in there.
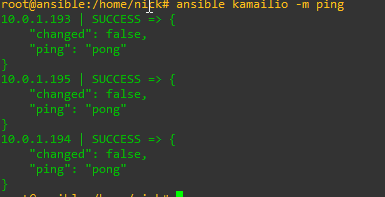
You will probably need to add the authentication info, such as passwords, private keys and privilege escalation details, but I’m going to assume you’ve already done that and you can run the ping module on each one:
ansible kamailio -m ping
Assuming that comes back OK and you can get into each one let’s move onto the Playbook.
The Playbook
There’s a few tasks we’ll get out of the way before we configure Kamailio,
The first of which is adding the Debian repo and the keys,
Next we’ll load a Kamailio config from a template that fills in our IP Address and Kamailio version, then we’ll install Kamailio,
Rather than talk you through each of the plays here’s a copy of my playbook:
---
- name: Configure Kamailio


  hosts: kamailio
  become: yes

  vars:
    kamailio_version: "53"
    debian_sources_dir: "/etc/apt/sources.list.d"

  tasks:


    - name: Add keys for Kamailio repo
      apt_key:
        url: http://deb.kamailio.org/kamailiodebkey.gpg
        state: present


    - name: Add repo to sources.list
      apt_repository:
        repo: deb http://deb.kamailio.org/kamailio{{kamailio_version}} {{hostvars[inventory_hostname]['ansible_lsb']['codename']}} main
                #The full list of Debian repos can be found at http://deb.kamailio.org/
                #The version is based off the versions listed there and the release is based on the codename of the Debian / Ubuntu release.
        state: present


    - name: Copy Config Template
                #Copies config from the template, fills in variables and uplaods to the server
      template:
        src: kamailio.cfg.j2
        dest: /etc/kamailio/kamailio.cfg
        owner: root
        group: root
        backup: yes
      register: config_changed

    - name: Install Kamailio
                #Updates cache (apt-get update) and then installs Kamailio
      apt:
        name: kamailio
        update_cache: yes
        state: present
      register: kamailio_installed_firstrun

    - name: Restart Kamailio if config changed
      service:
       name: kamailio
       state: restarted
      when: config_changed.changed

    - name: Start Kamailio if installed for the first time
      service:
       name: kamailio
       state: started
      when: kamailio_installed_firstrun.changed
Should be pretty straight forward to anyone who’s used Ansible before, but the real magic happens in the templatemodule. Let’s take a look;
Kamailio config in Jinja2 template
Pusing out static config is one thing, but things like IP Addresses, FQDNs and SSL certs may differ from machine to machine, so instead of just pushing one config, I’ve created a config and added some variables in Jinja2 format to the config, that will be filled with the value on the target when pushed out.
In the templatemodule of the playbook you can see I’ve specified the file kamailio.cfg.j2 this is just a regular Kamailio config file but I’ve added some variables, let’s look at how that’s done.
On the machine 10.0.1.194 we want it to listen on 10.0.1.194, we could put list 0.0.0.0 but this can lead to security concerns, so instead let’s specify the IP in the Jinja config,
By putting ansible_default_ipv4.address in two sets of curly brackets, this tells Ansible to fill in thes values from the template with the Ansible IPv4 Address of the target machine.
Let’s take a look on the 10.0.1.194’s actual kamailio.cfg file:
Let’s take another example,
To keep DMQ humming it makes sense to have different DMQ domains for different versions of Kamailio, so in the Kamailio config file template I’ve called the variable kamailio_versionin the DMQ address,
This means on a Kamailio 5.2 version this URL look like this on the boxes’ config:
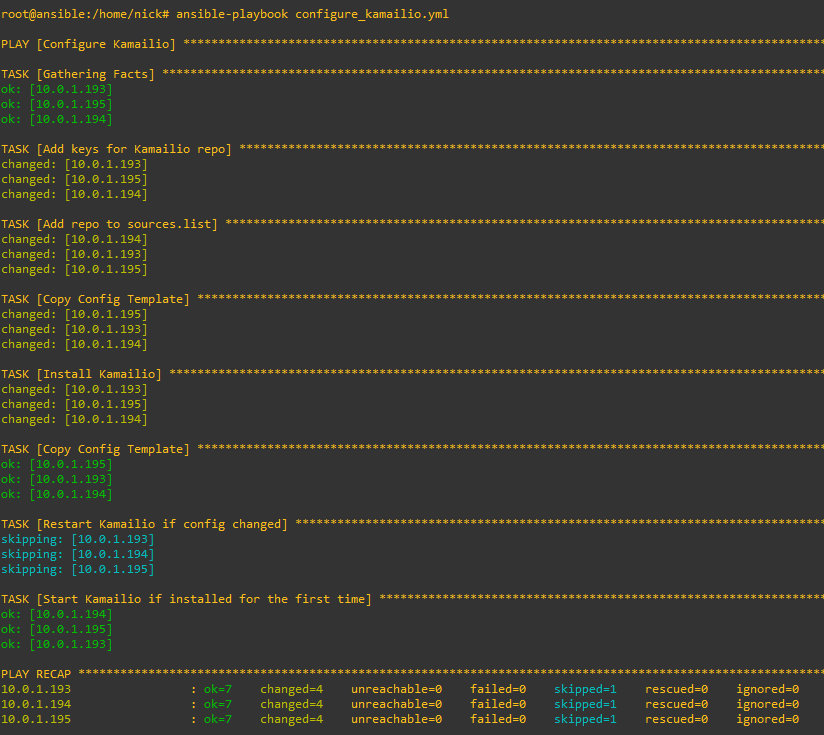
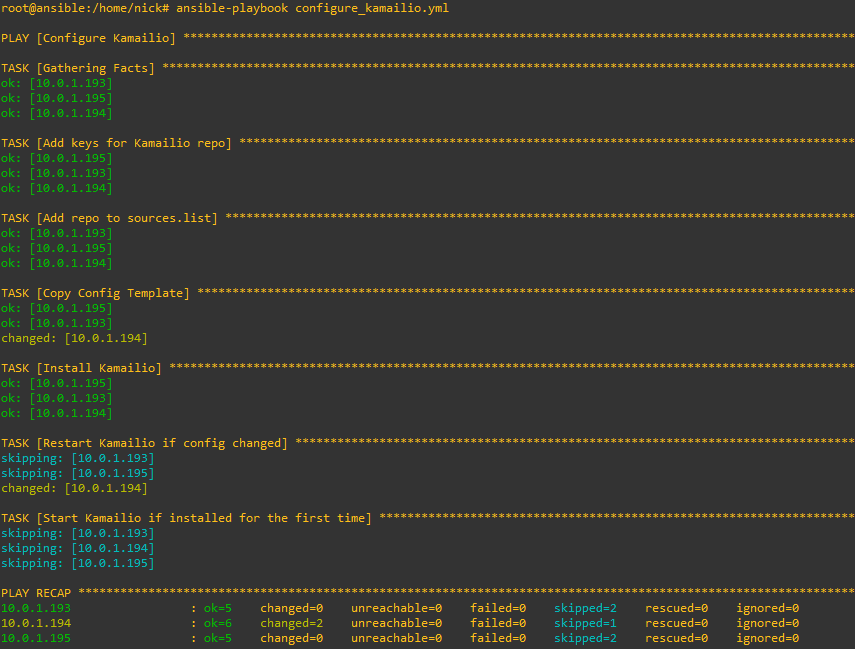
Running it is just a simple matter of calling ansible-playbook and pointing it at the playbook we created, here’s how it looks setting up the 3 hosts from their vanilla state:
The great thing about Kamailio is it’s omnipotent – This means it will detect if it needs to do each of the tasks specified in the playbook.
So if we run this again it won’t try and add the repo, GPG keys, install Kamailio and load the template, it’ll look and see each of those steps have already been done and skip each of them.
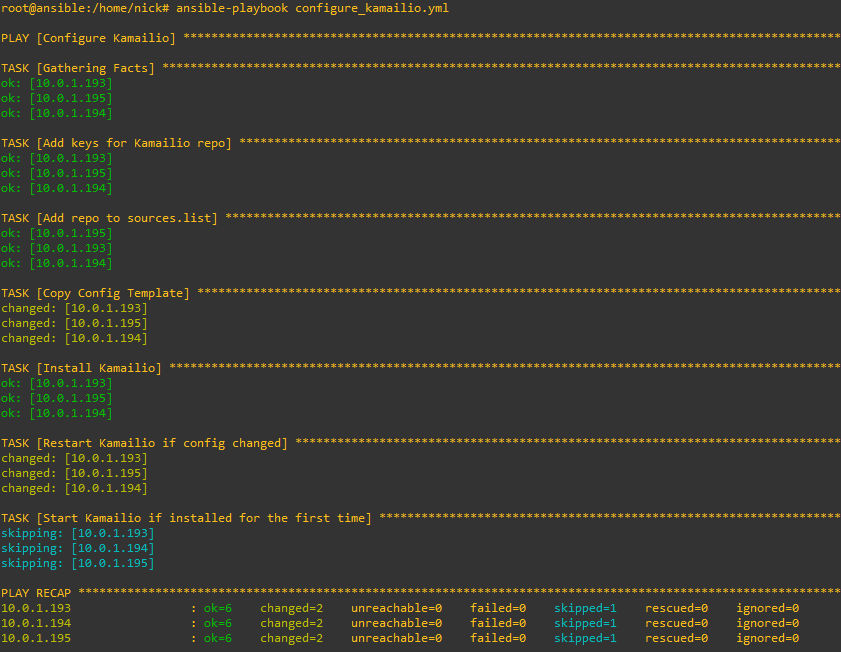
But what if someone makes some local changes on one of the boxes, let’s look at what happens:
Likewise now if we decide to change our config we only need to update the template file and Ansible will push it out to all our machines, I’ve added a comment into the Kamailio template, so let’s run it again and see the config pushed out to all the Kamailio instances and them restarting.