Category Archives: 5G SA

MTU in LTE & 5G Transmission Networks – Part 1

Every now and then when looking into a problem I have to really stop and think about how things work low down, that I haven’t thought about for a long time, and MTU is one of those things.

I faced with an LTE MTU issue recently I thought I’d go back and brush up on my MTU knowhow and do some experimenting.

Note: This is an IPv4 discussion, IPv6 does not support fragmentation.

The very, very basics

MTU is the Maximum Transmission Unit.

In practice this is the largest datagram the layer can handle, and more often than not, this is based on a physical layer constraint, in that different physical layers can only stuff so much into a frame.

“The Internet” from a consumer perspective typically has an MTU of 1500 bytes or perhaps a bit under depending on their carrier, such as 1472 bytes.
SANs in data centers typically use an MTU of around 9000 bytes,
Out of the box, most devices if you don’t specify, will use an MTU of 1500 bytes.

As a general rule, service providers typically try to offer an MTU as close to 1500 as possible.

Messages that are longer than the Maximum Transmission Unit need to be broken up in a process known as “Fragmenting”.
Fragmenting allows large frames to be split into smaller frames to make their way across hops with a lower MTU.

All about Fragmentation

So we can break up larger packets into smaller ones by Fragmenting them, so case closed on MTU right? Sadly not.

Fragmentation leads to reduced efficiency – Fragmenting frames takes up precious CPU cycles on the router performing it, and each time a frame is broken up, additional overhead is added by the device breaking it up, and by the receiver to reassemble it.

Fragmentation can happen multiple times across a path (Multi-Stage Fragmentation).
For example if a frame is sent with a length of 9000 bytes, and needs to traverse a hop with an MTU of 4000, it would need to be fragmented (broken up) into 3 frames (Frame 1 and Frame 2 would be ~4000 bytes long and frame 3 would be ~1000 bytes long).
If it then needs to traverse another hop with an MTU of 1500, then the 3 fragmented frame would each need to be further fragmented, with the first frame of ~4000 bytes being split up into 3 more fragmented frames.
Lost track of what just happened? Spare a thought for the routers having to to do the fragmentation and the recipient having to reassemble their packets.

Fragmented frames are reassembled by the end recipient, other devices along the transmission path don’t reassemble packets.

In the end it boils down to this trade off:
The larger the packet can be, the more user data we can stuff into each one as a percentage of the overall data. We want the percentage of user data for each packet to be as high as can be.
This means we want to use the largest MTU possible, without having to fragment packets.

Overhead eats into our MTU

A 1500 byte MTU that has to be encapsulated in IPsec, GTP or PPP, is no longer a 1500 byte MTU as far as the customer is concerned.

Any of these encapsulation techniques add overhead, which shrinks the MTU available to the end customer.

Keep in mind we’re going to be encapsulating our subscriber’s data in GTP before it’s transmitted across LTE/NR, and this means we’ll be adding:

  • 8 bytes for the GTP header
  • 8 bytes for the transport UDP header
  • 20 bytes for the transport IPv4 header
  • 14 bytes if our transport is using Ethernet

This means we’ve got 50 bytes of transmission / transport overhead. This will be important later on!

How do subscribers know what to use as MTU?

Typically when a subscriber buys a DSL service or HFC connection, they’ll either get a preconfigured router from their carrier, or they will be given a list of values to use that includes MTU.

LTE and 5G on the other hand tell us the value we should use.

Inside the Protocol Configuration Options in the NAS PDU, the UE requests the MTU and DNS server to be used, and is provided back from the network.

This MTU value is actually set on the MME, not the P-GW. As the MME doesn’t actually know the maximum MTU of the network, it’s up to the operator to configure this to be a value that represents the network.

Why this Matters for LTE & 5G Transmission

As we covered earlier, fragmentation is costly. If we’re fragmenting packets we are:

  • Wasting resources on our transmission network / core networks – as we fragment Subscriber packets it’s taking up compute resources and therefore limiting throughput
  • Wasting radio resources as additional overhead is introduced for fragmented packets, and additional RBs need to be scheduled to handle the fragmented packets

To test this I’ve setup a scenario in the lab, and we’ll look at the packet captures to see how the MTU is advertised, and see how big we can make our MTU on the subscriber side.

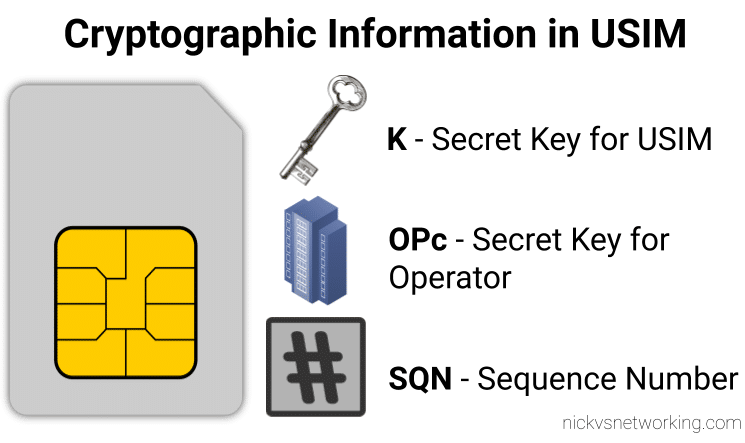
Information stored on USIM / SIM Card for LTE / EUTRAN / EPC - K key, OP/OPc key and SQN Sequence Number

Confidentiality Algorithms in 3GPP Networks: MILENAGE, XOR & Comp128

We’ve covered a fair bit on authentication in 3GPP networks, SIM cards, HSS / AuC, etc, but never actually looked at the Confidentiality Algorithms in use,

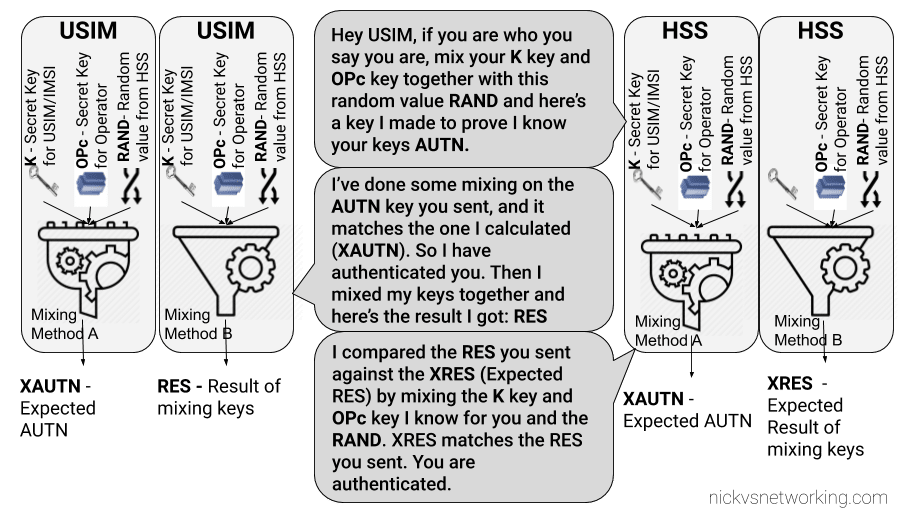
LTE USIM Authentication - Mutual Authentication of the Network and Subscriber

While we’ve already covered the inputs required by the authentication elements of the core network (The HSS in LTE/4G, the AuC in UMTS/3G and the AUSF in 5G) to generate an output, it’s worth noting that the Confidentiality Algorithms used in the process determines the output.

This means the Authentication Vector (Also known as an F1 and F1*) generated for a subscriber using Milenage Confidentiality Algorithms will generate a different output to that of Confidentiality Algorithms XOR or Comp128.

To put it another way – given the same input of K key, OPc Key (or OP key), SQN & RAND (Random) a run with Milenage (F1 and F1* algorithm) would yield totally different result (AUTN & XRES) to the same inputs run with a simple XOR.

Technically, as operators control the network element that generates the challenges, and the USIM that responds to them, it is an option for an operator to implement their own Confidentiality Algorithms (Beyond just Milenage or XOR) so long as it produced the same number of outputs. But rolling your own cryptographic anything is almost always a terrible idea.

So what are the differences between the Confidentiality Algorithms and which one to use?
Spoiler alert, the answer is Milenage.

Milenage

Milenage is based on AES (Originally called Rijndael) and is (compared to a lot of other crypto implimentations) fairly easy to understand,

AES is very well studied and understood and unlike Comp128 variants, is open for anyone to study/analyse/break, although AES is not without shortcomings, it’s problems are at this stage, fairly well understood and mitigated.

There are a few clean open source examples of Milenage implementations, such as this C example from FreeBSD.

XOR

It took me a while to find the specifications for the XOR algorithm – it turns out XOR is available as an alternate to Milenage available on some SIM cards for testing only, and the mechanism for XOR Confidentiality Algorithm is only employed in testing scenarios, not designed for production.

Instead of using AES under the hood like Milenage, it’s just plan old XOR of the keys.

Osmocom have an implementation of this in their CN code, you can find here.

Defined under 3GPP TS 34.108 8.1.2.1

Comp128

Comp128 was originally a closed source algorithm, with the maths behind it not publicly available to scrutinise. It is used in GSM A3 and A5 functions, akin to the F1 and F1* in later releases.

Due to its secretive nature it wasn’t able to be studied or analysed prior to deployment, with the idea that if you never said how your crypto worked no one would be able to break it. Spoiler alert; public weaknesses became exposed as far back as 1998, which led to Toll Fraud, SIM cloning and eventually the development of two additional variants, with the original Comp128 renamed Comp128-1, and Comp128-2 (stronger algorithm than the original addressing a few of its flaws) and Comp128-3 (Same as Comp128-2 but with a 64 bit long key generated).

Into the Future & 5G later releases

As options beyond just USIM authentication become available for authentication in 5G SA networks, additional algorithms can be used beyond EAP and AKA, but at the time of writing only TLS has been added. 5G adds SUCI and SUPI which provide a mechanism to keep the private identifier (IMSI) away from prying eyes (or antenna), which I’ve detailed in this post.

5G Subscriber Identifiers – SUCI & SUPI

The SUPI (Subscription Permanent Identifier) replaces the IMSI as the unique identifier for each Subscriber in 5G.

One of the issues with using IMSI in LTE/EUTRAN is there were a few occasions where the IMSI was sent over the clear – meaning the IMSIs of subscribers nearby could be revealed to anyone listening.

So what is a SUPI and what does it look like? Well, most likely it’ll look like an IMSI – 15 or 16 digits long, with the MCC/MNC as the prefix.

If you’re using a non-3GPP RAT it could be a RFC 4282 Network Access Identifier, but if it’s on a SIM card or in a Mobile Device, it’s probably exactly the same as the IMSI.

SUCI Subscription Concealed Identifier

Our SUPI is never sent over the air in the clear / plaintext, instead we rely on the SUCI (Subscription Concealed Identifier) for this, which replaces the GUTI/TMSI/IMSI for all plaintext transactions over the air.

Either the UE or the SIM generate the SUCI (if it’s done by the SIM it’s much slower), based on a set of parameters defined on the SIM.

The SUCI has to be generated by the UE or SIM in a way the Network can identify the SUPI behind the SUCI, but no one else can.

In LTE/EUTRAN this was done by the network randomly assigning a value (T-MSI / GUTI) and the network keeping track of which randomly assigned value mapped to which user, but initial attach and certain handovers revealed the real IMSI in the clear, so for 5G this isn’t an option.

So let’s take a look at how SUCI is calculated in a way that only the network can reveal the SUPI belonging to a SUCI.

The Crypto behind SUCI Calculation

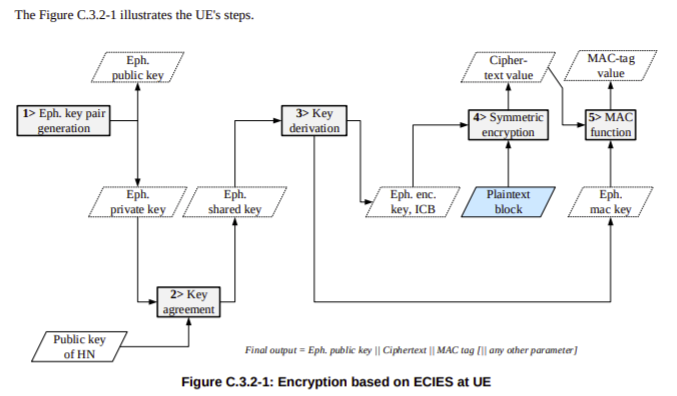
As we’ll see further down, SUCI is actually made up of several values concatenated together. The most complicated of these values is the Protection Scheme Output, the cryptographically generated part of the SUCI that can be used to determine the SUPI by the network.

Currently 3GPP defines 3 “Protection Scheme Profiles” for calculating the SUCI.

Protection Scheme Identifier 1 – null-scheme

Does nothing. Doesn’t conceal the SUPI at all. If this scheme is used then the Protection Scheme Output is going to just be the SUPI, for anyone to sniff off the air.

Protection Scheme Identifier 2 & 3 – ECIES scheme profile A & B

The other two Protection Scheme Identifiers both rely on Elliptic Curve Integrated Encryption Scheme (ECIES) for generation.

This is better known as Elliptic Curve Encryption Scheme, it’s primarily used for Cryptography. Crypto is crazy complex, and I’m a mere mathematical mortal, but there’s a great post on the Cloudflare blog on the topic that touches on Elliptic Curve Encryption.

So if both Profile A & Profile B rely on Elliptic Curve Integrated Encryption Scheme, then what’s the difference between the two?

Well dear reader, the answer is semantics! There’s lots of parameters and variables that go into generating a resulting value from a cryptographic function, and Profile A & Profile B are just different parameters being used to generate the results.

For crypto nerds you can find the specifics in C.3.4.1 Profile A and C.3.4.1 Profile B outlined in 3GPP TS 33.501.

For non crypto nerds we just need to know this;

When the SIM is generating the SUCI the UE just asks for an identity by executing the GET IDENTITY command ADF against the SIM and uses the response as the SUCI.

When the UE is generating the SUCI, the UE gets the SUCI_Calc_Info EF contents from the SIM and extracts the Home Network Public Key from it’s reply. It uses this Home Network Public Key and a freshly created ephemeral public/private key pair to generate a SUCI value to use.

Creating the SUCI

After generating a Protection Scheme Output, we’ll need to add some extra info into it to make it useful.

The first digit of the SUCI is the SUPI type, a value of 0 denotes the value contained in the Protection Scheme Output is an IMSI, while 1 is used for Network Access Indicator for Non 3GPP access.

Next up we have the Home Network Identifier, which in a mobile environment is our PLMN (MCC/MCC).

Then a Routing Indicator, 1-4 digits long, is used with the Home Network Identifier to route the Authentication traffic to the UDM that contains that subscriber’s information, ie you may have MVNOs with their own UDM. If the routing indicator of 10 is assigned to the MVNOs SIMs then the AMF can be set to route traffic with a routing indicator of 10 to the UDM of the VMNO.

The Protection Scheme we covered earlier, with the 3 types of protection scheme (Null & two relying on Elliptic Curve Integrated Encryption Scheme).

Home Network Public Key Identifier identifies which Public Key was used to generate the Protection Scheme Output.

Finally we have the Protection Scheme Output which we covered generating in the previous session.

Usage in Signaling

The SUPI is actually rarely used beyond the initial attach to the network.

After authenticating to the network using AKA and the SUCI, in 5GC, like in LTE/EUTRAN, a shorter GUTI is used which further protects the subscriber’s identity and changes frequently.

My first 5G Core: Open5Gs and UERANSIM

Note: As this space develops so quickly I’ve refreshed the original post from November 2021 in March 2021 with updated instructions.

While 5G SA devices are still in their early stages, and 5G RAN hardware / gNodeBs are hard to come by, so today we’ll cover using UERANSIM to simulate UEs and 5G RAN, to put test calls through our 5GC.

Bringing your 5G Core Online

We’ll use Open5Gs for all the 5GC components, and install on any recent Ubuntu distribution.

Installation is nice and easy;

$ sudo apt update 
$ sudo apt install software-properties-common 
$ sudo add-apt-repository ppa:open5gs/latest 
$ sudo apt update 
$ sudo apt install open5gs

The first point of contact we’ll need to talk about is the AMF,

The AMF – the Access and Mobility Function is reached by the gNodeB over the N2 interface. The AMF handles our 5G NAS messaging, which is the messaging used by the UEs / Devices to request data services, manage handovers between gNodeBs when moving around the network, and authenticate to the network.

By default the AMF binds to a loopback IP, which is fine if everything is running on the same box, but becomes an issue for real gNodeBs or if we’re running UERANSIM on a different machine.

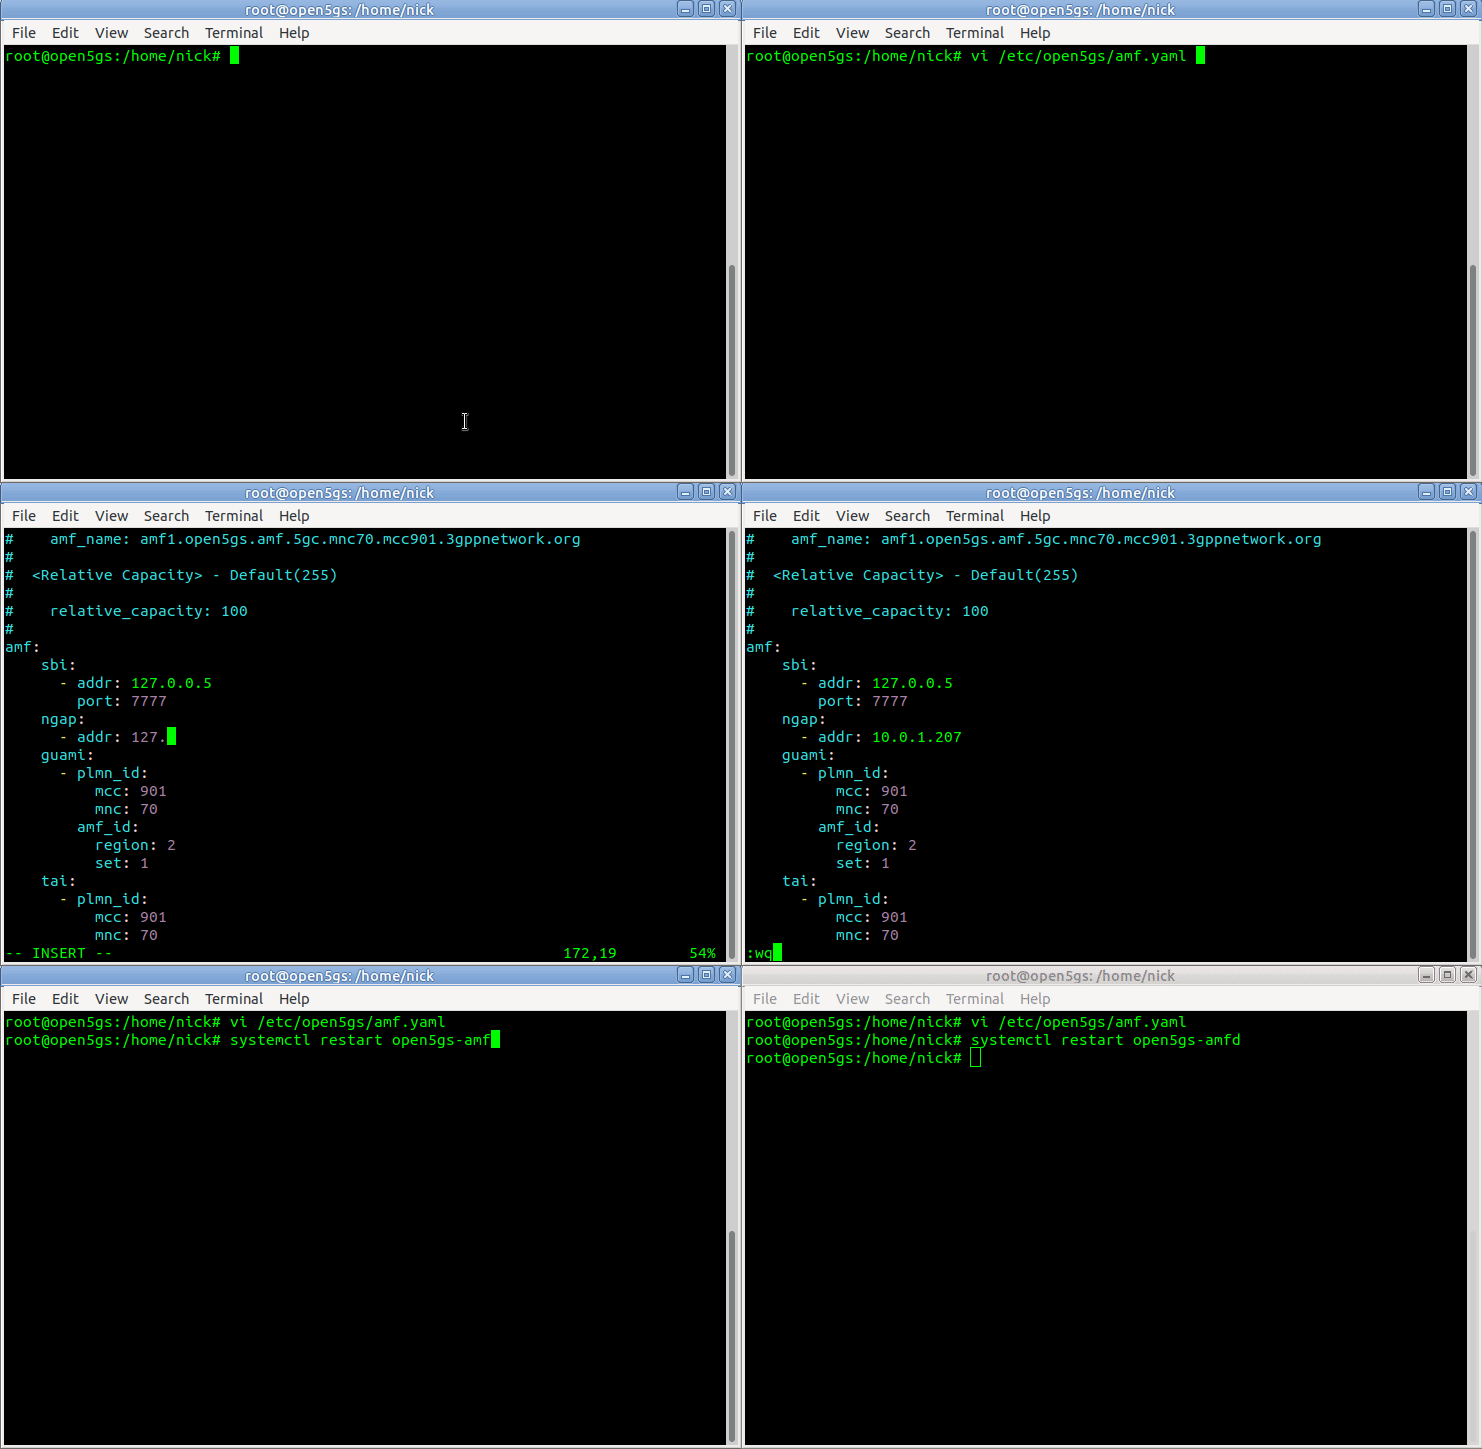
This means we’ll need to configure our AMF to bind to the IP of the machine it’s running on, by configuring the AMF in /etc/open5gs/amf.yaml, so we’ll change the ngap addr to bind the AMF to the machine’s IP, for me this is 10.0.1.207,

ngap:
  - addr: 10.0.1.207

In the amf.conf there’s a number of things we can change and configure; such as the PLMN and network name, the NRF parameters, however for now we’ll keep it simple and leave everything else as default.

To allow the changes to take effect, we’ll restart the Open5GS AMF service to make our changes take effect;

$ sudo systemcl restart open5gs-amfd

Setting up the Simulator

We’re using UERANSIM as our UE & RAN Simulator, so we’ll need to get it installed. I’m doing this on an Ubuntu system as we’re using Snaps.

$ sudo apt update 
$ sudo apt upgrade 
$ sudo apt install make g++ libsctp-dev lksctp-tools 
$ iproute2 sudo snap install cmake --classic

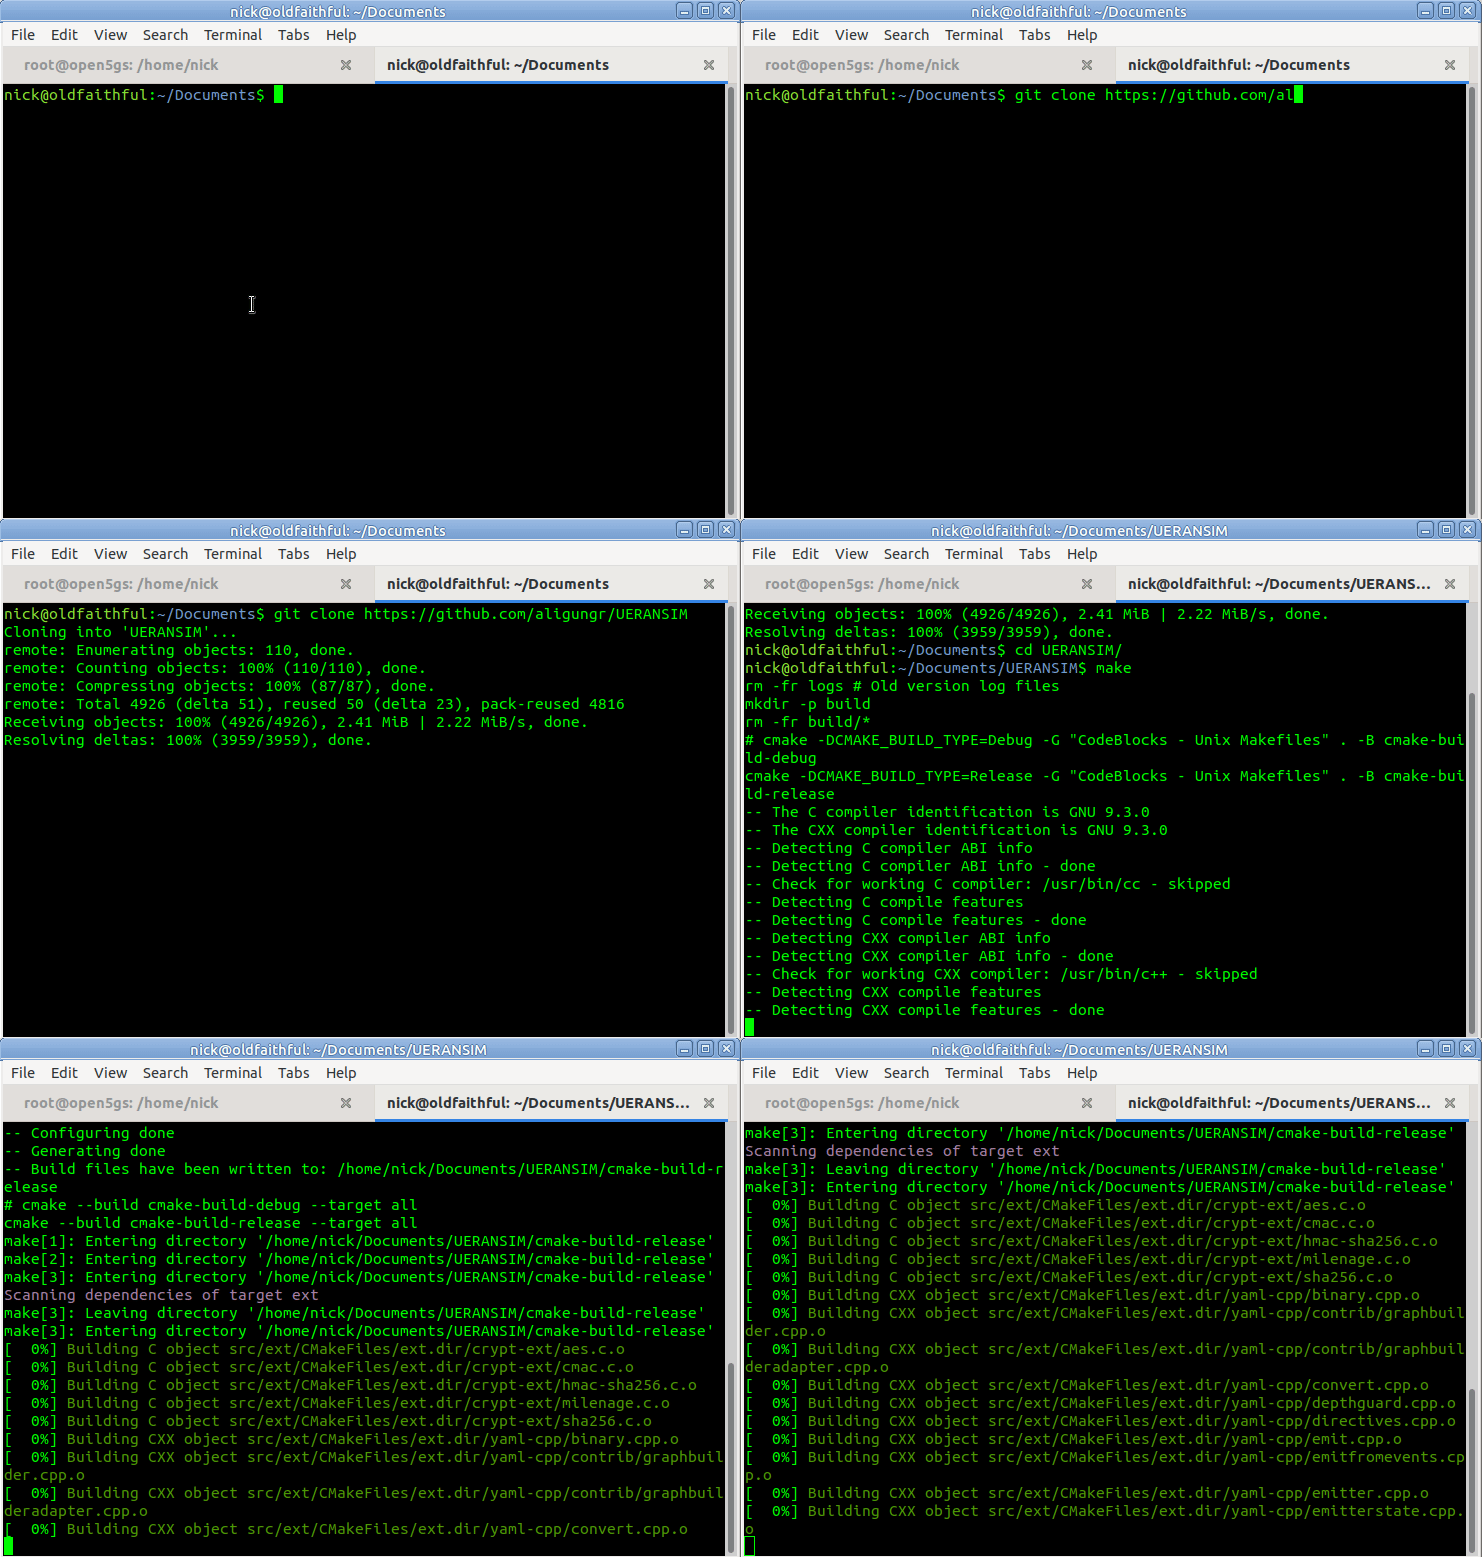
With all the prerequisites installed we’ll clone the Git repository and make everything from source;

We’ll clone the Github repository, move into it and make from source.

$ git clone https://github.com/aligungr/UERANSIM
$ cd UERANSIM
$ make

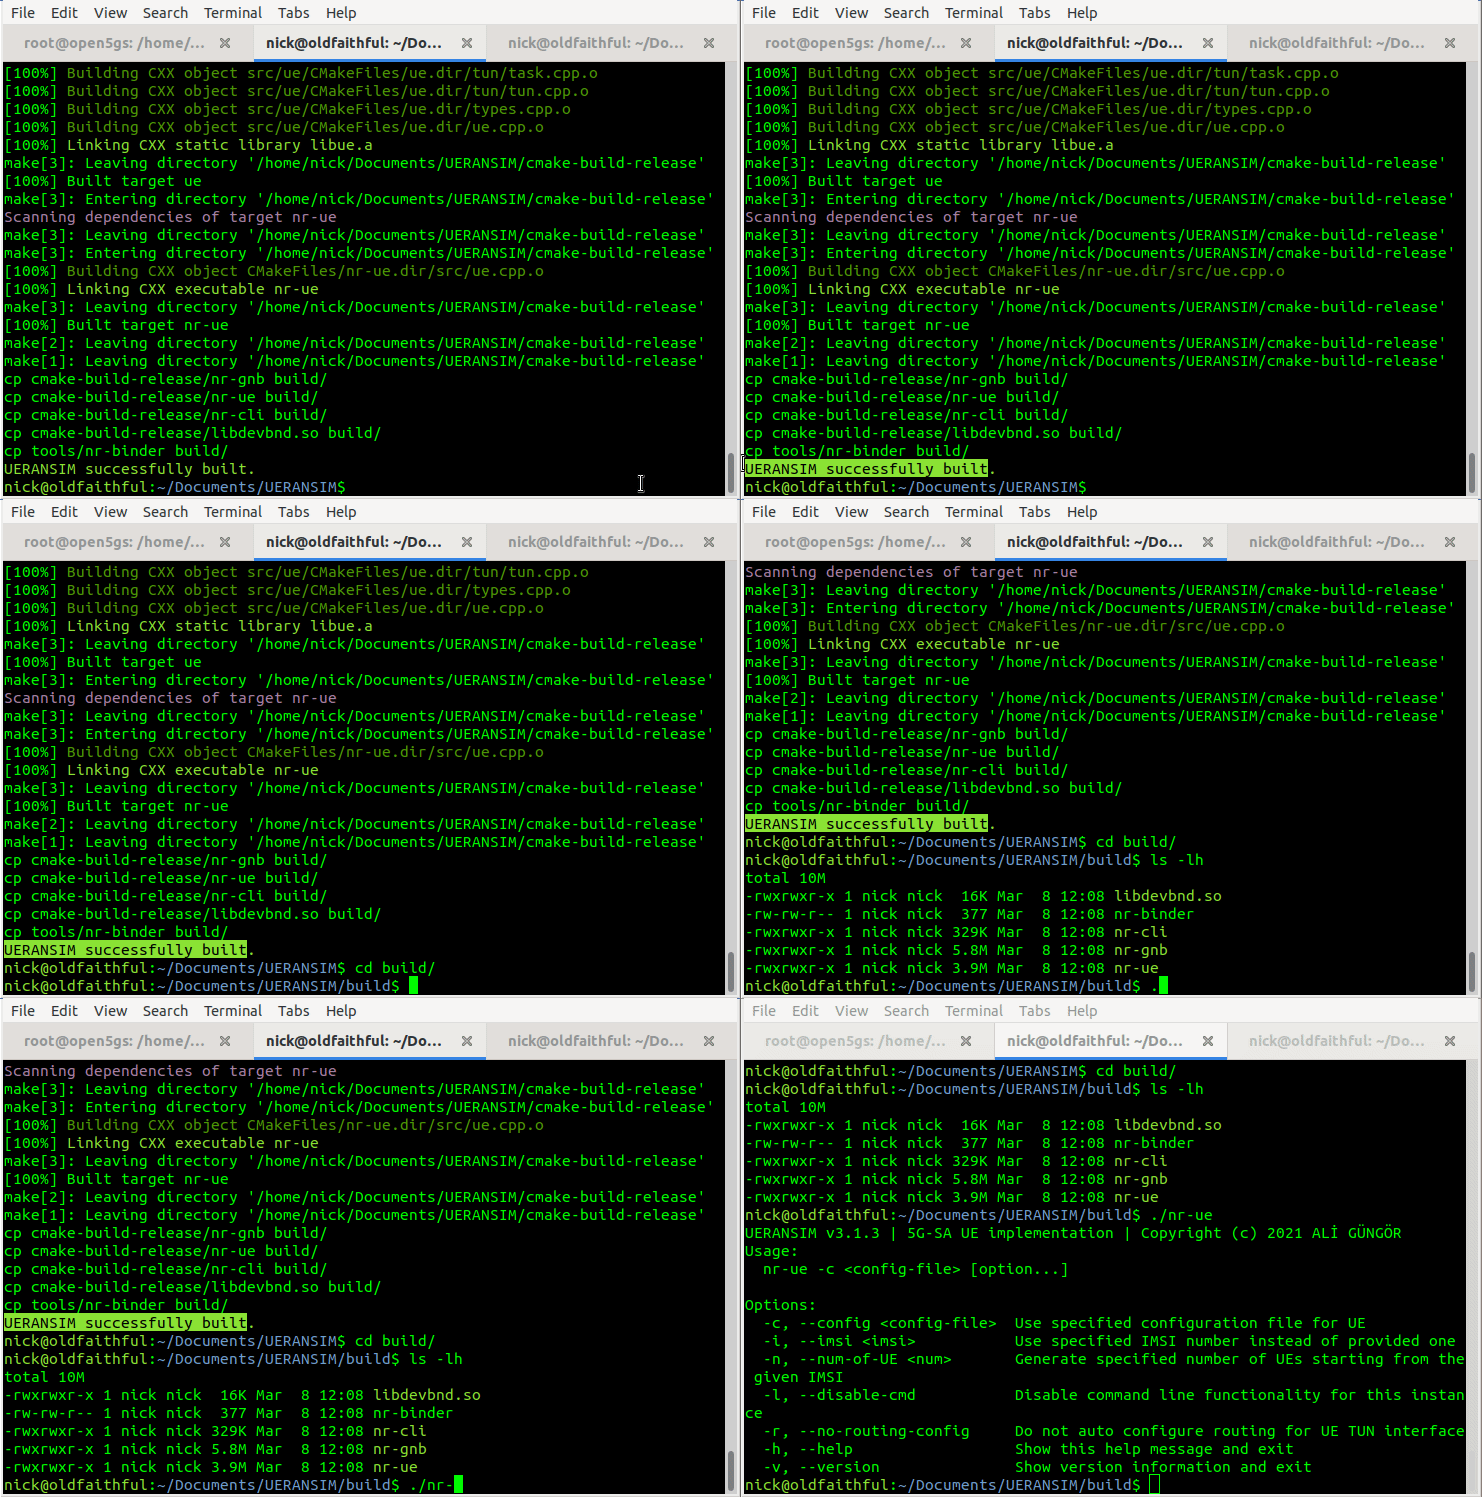
Now we wait for everything to compile,

XKCD – Compiling

Once we’ve got the software installed we’ll need to put together the basic settings.

You should see these files in the /build/ directory and they should be executable.

Running the Simulator (UERANSIM)

UERANSIM has two key parts, like any RAN,

The first is the gNodeB, that connects to our AMF and handles subscriber traffic over our (simulated) radio link,

The other is our subscribers themselves – the UEs.

Both are defined and setup through config files in the config/ directory,

Configuring & Starting the gNodeB

While we’re not actually going to bring anything “on air” in the RF sense, we’ll still need to configure and start our gNodeB.

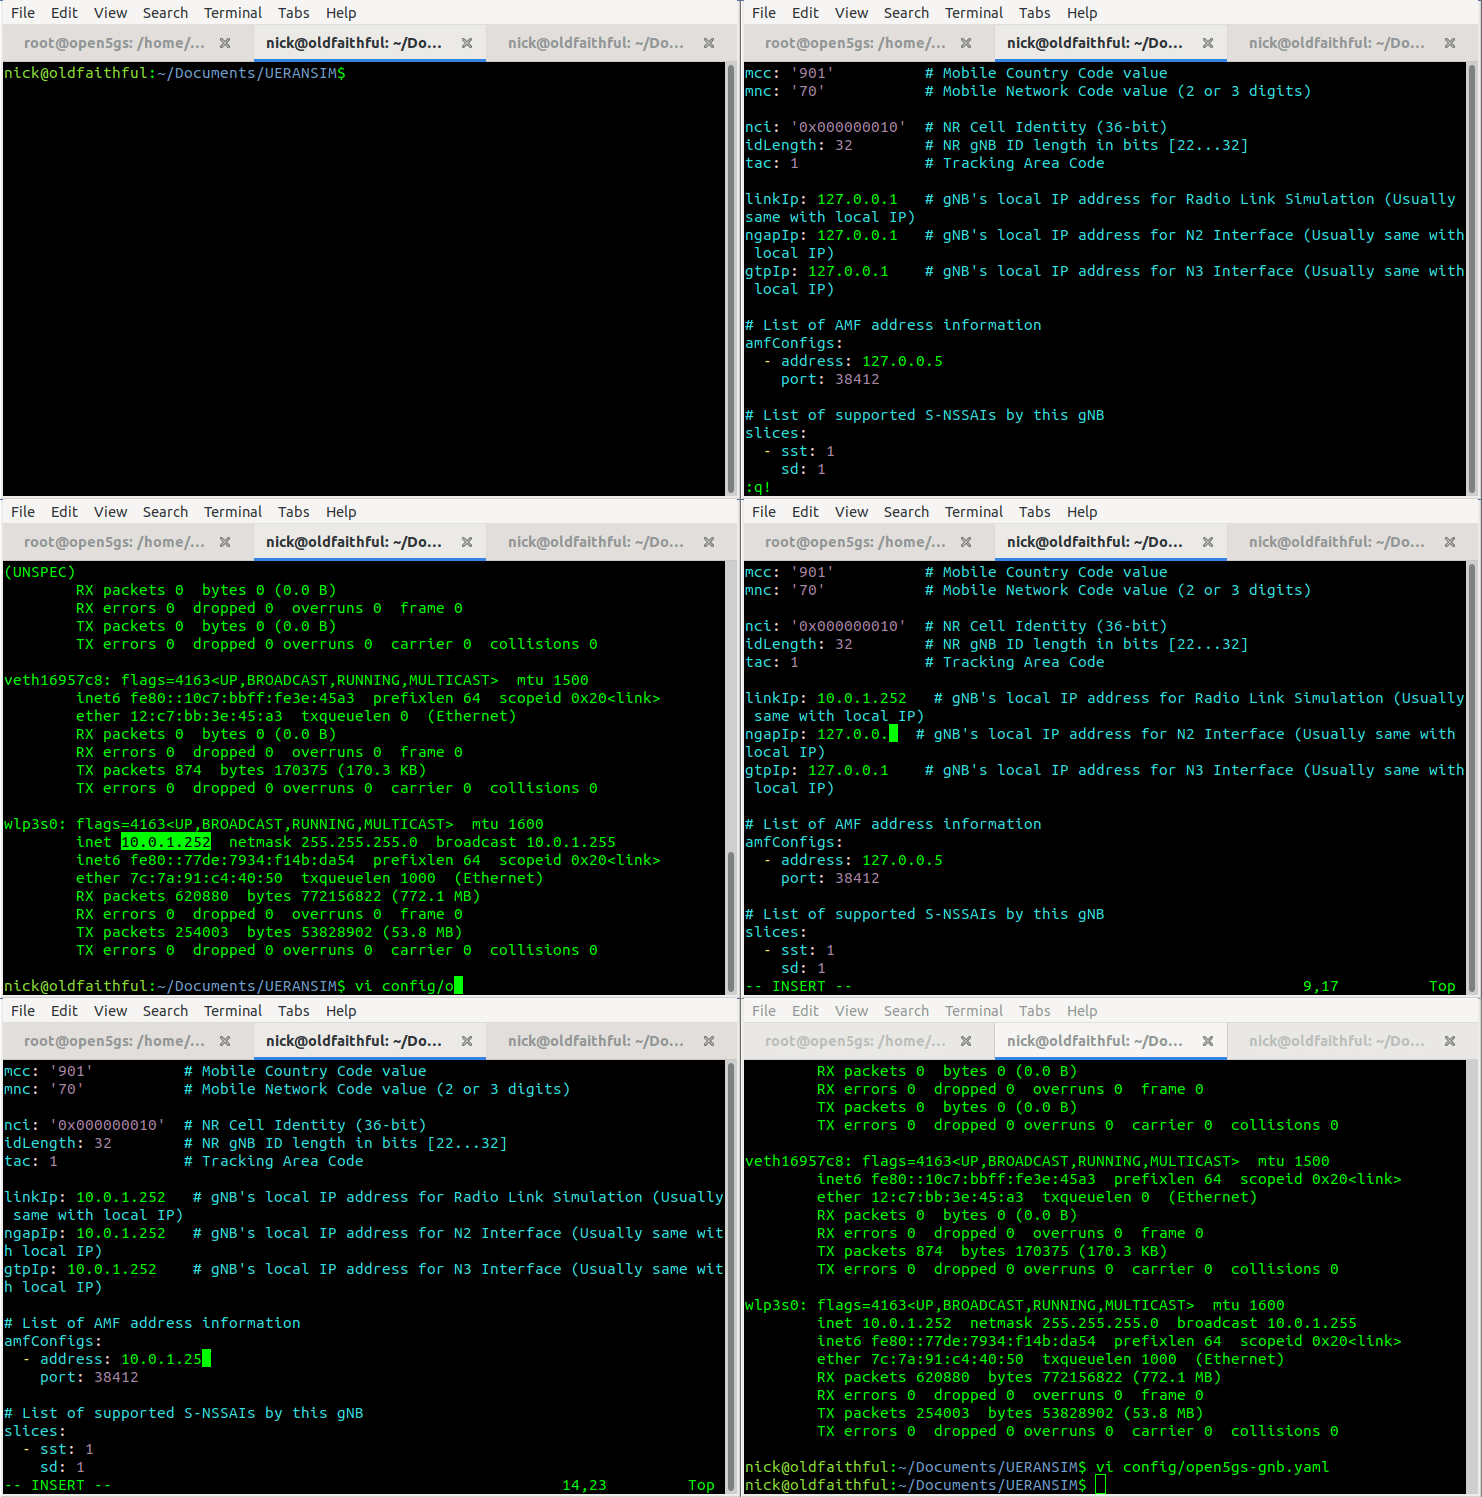
All the parameters for our gNodeB are set in the config/open5gs-gnb.yaml file,

Inside here we’ll need to set the the parameters of our simulated gNodeB, for us this means (unless you’ve changed the PLMN etc) just changing the Link IPs that the gNodeB binds to, and the IP of the AMFs (for me it’s 10.0.1.207) – you’ll need to substitute these IPs with your own of course.

Now we should be able to start the gNodeB service and see the connection, let’s take a look,

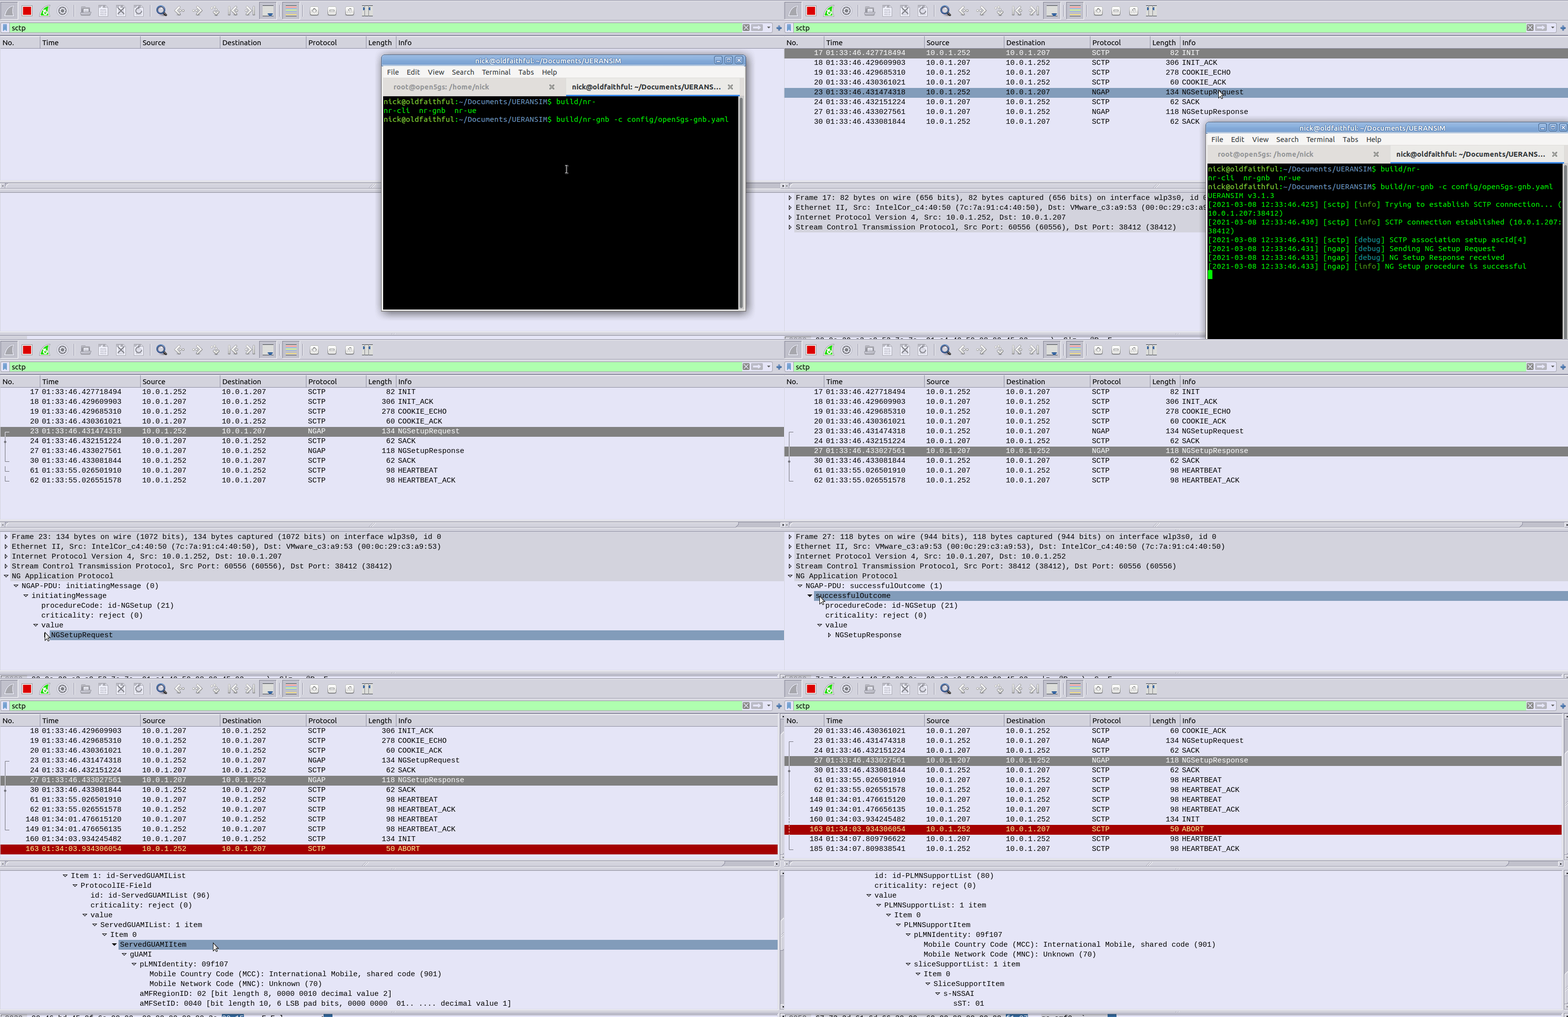
We’ll start the gNodeB service from the UERANSIM directory by running the nr-gnb service with the config file we just configured in config/open5gs-gnb.yaml

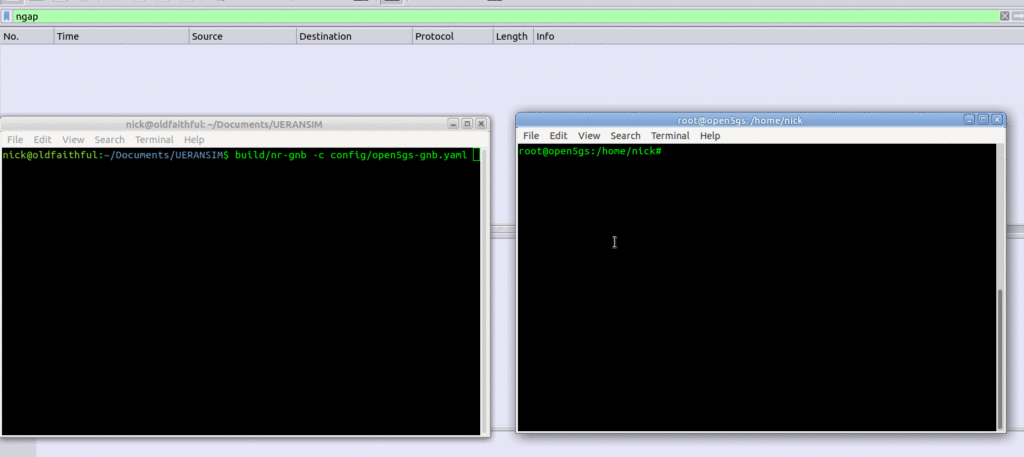
$ build/nr-gnb -c config/open5gs-gnb.yaml

All going well you’ll see something like:

[2021-03-08 12:33:46.433] [ngap] [info] NG Setup procedure is successful

And if you’re running Wireshark you should see the NG-AP (N2) traffic as well;

If we tail the logs on the Open5GS AMF we should also see the connection too:

Configuring the UE Simulator

So with our gNodeB “On the air” next up we’ll connect a simulated UE to our simulated gNodeB.

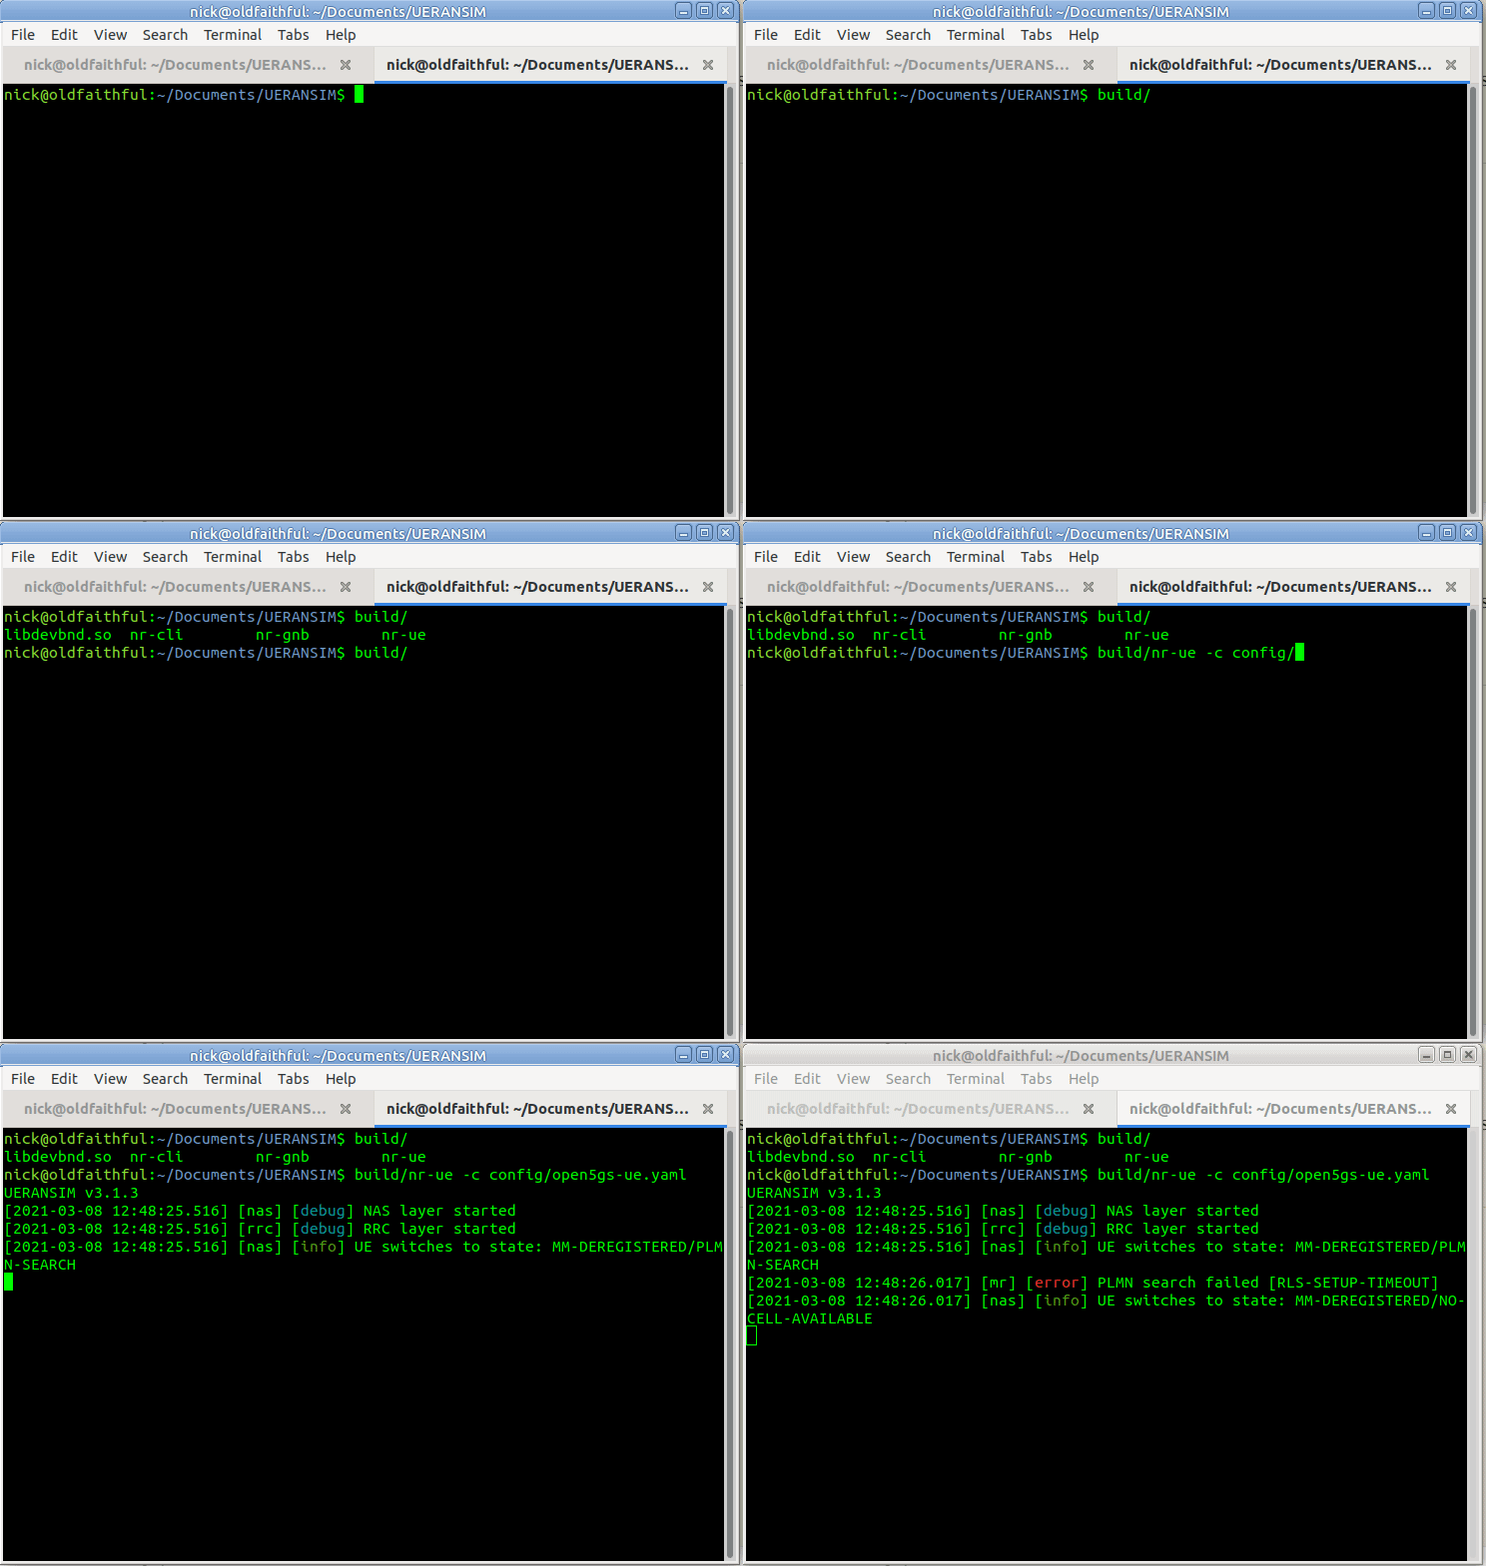
We’ll leave the nr-gnb service running and open up a new terminal to start the UE with:

$ build/nr-gnb -c config/open5gs-gnb.yaml

But if you run it now, you’ll just see errors regarding the PLMN search failing,

So why is this? We need to tell our UE the IP of the gNodeB (In reality the UE would scan the bands to find a gNB to serve it, but we’re simulating hre).

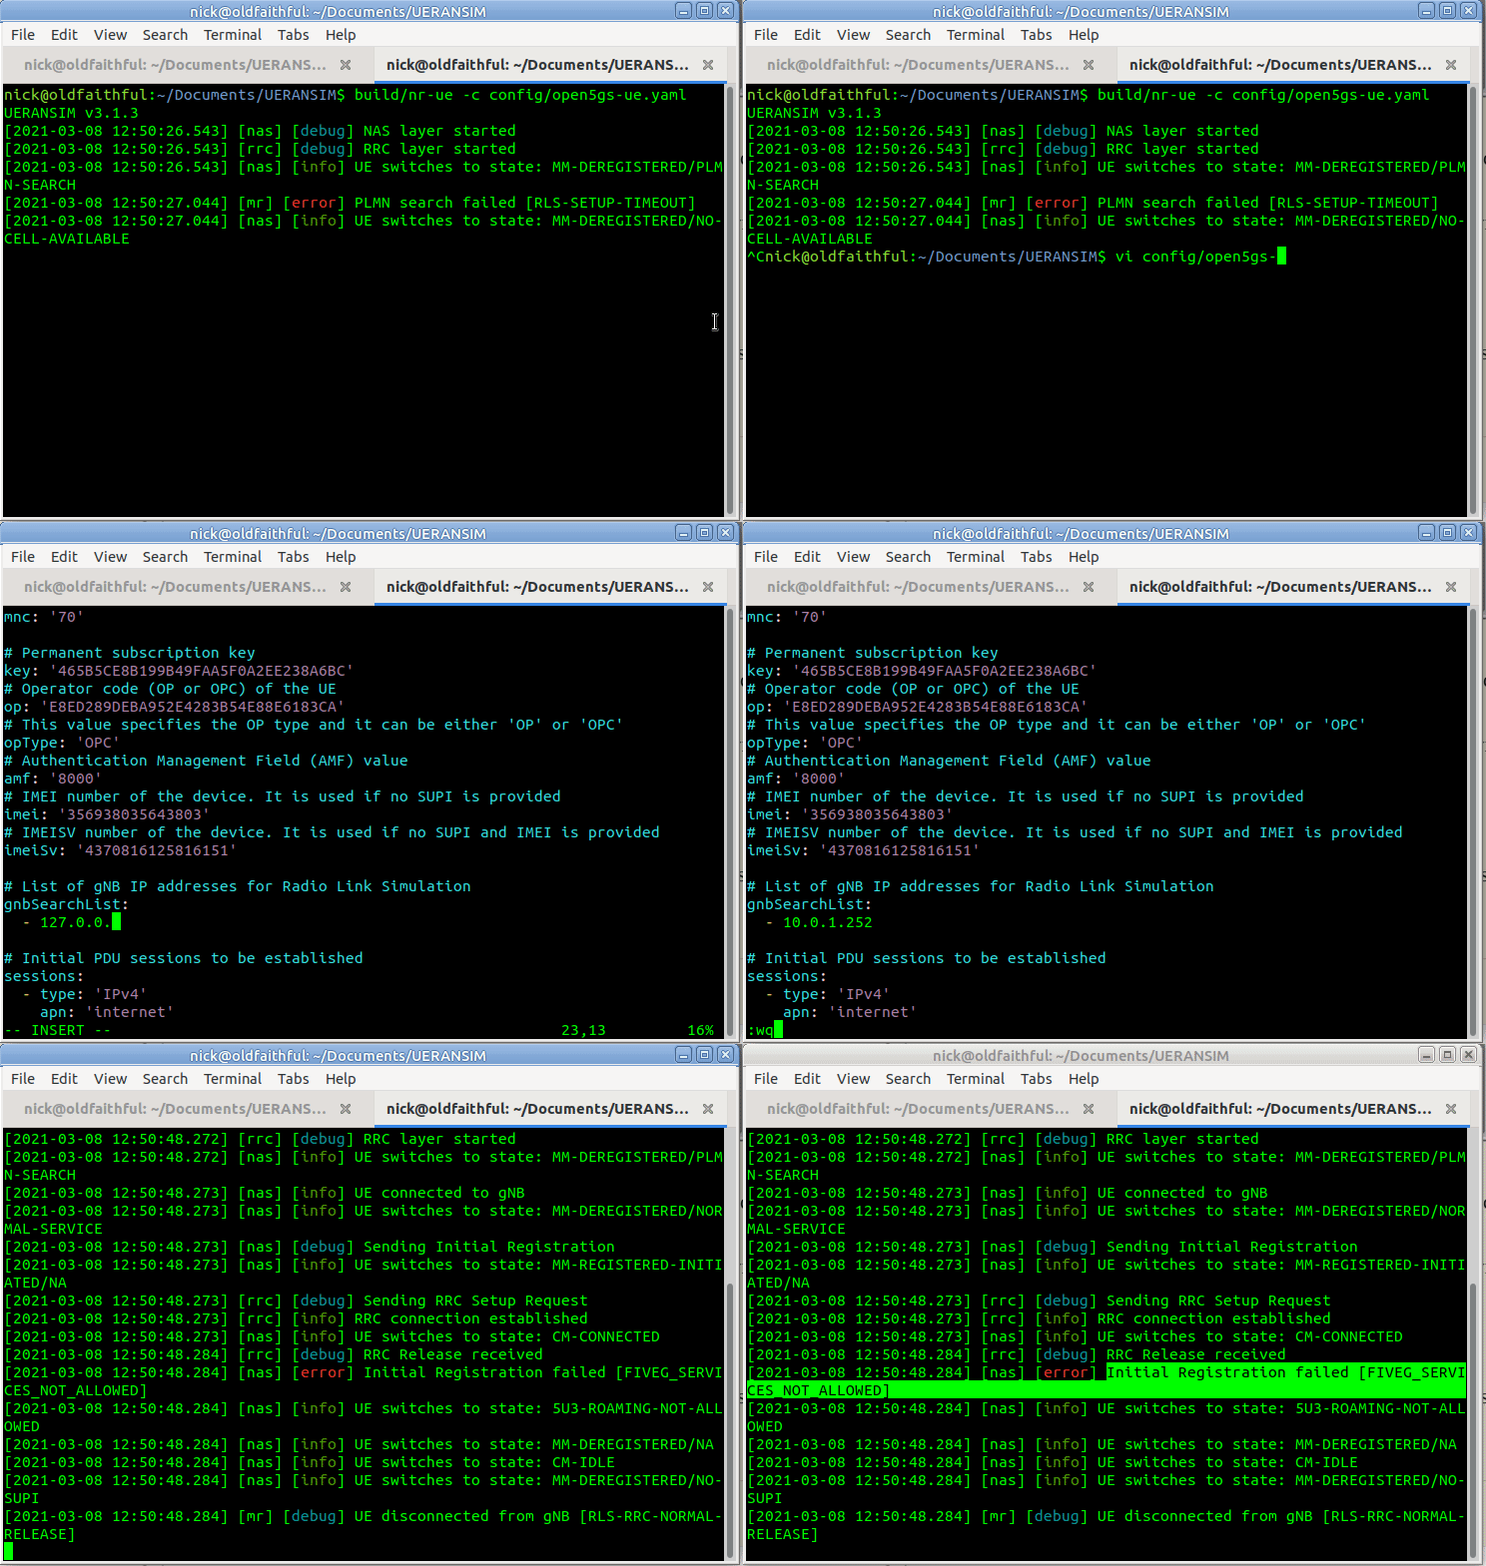
So let’s correct this by updating the config file to point to the IP of our gNodeB, and trying again,

So better but not working, we see the RRC was released with error “FIVEG_SERVICES_NOT_ALLOWED”, so why is this?

A quick look at the logs on Open5Gs provides the answer,

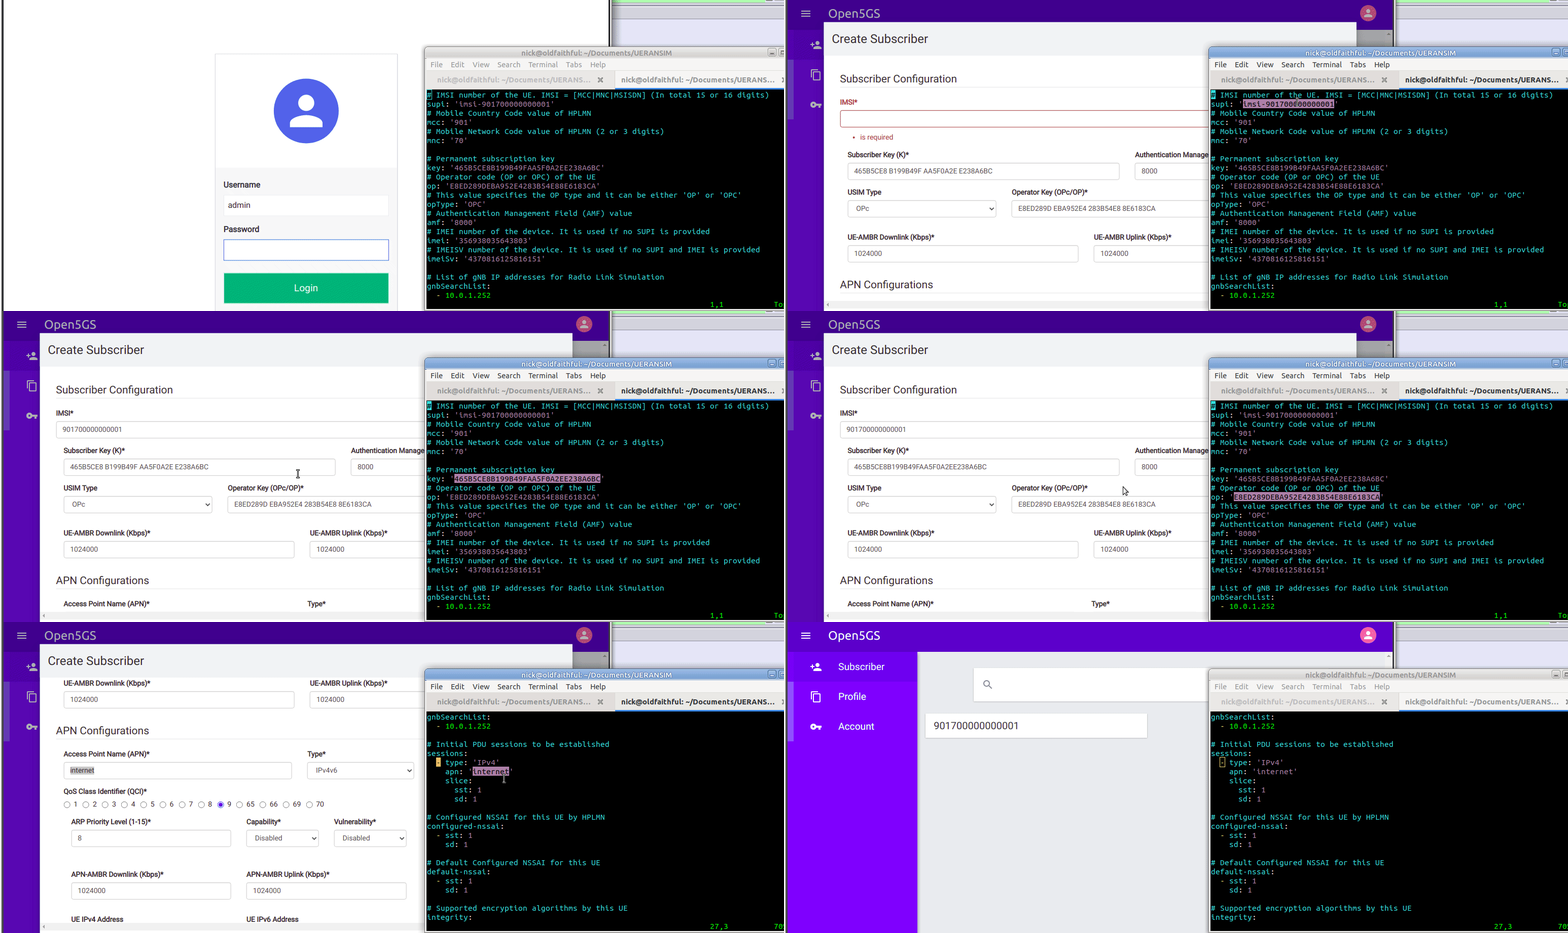
Of course, we haven’t configured the subscriber in Open5Gs’s UDM/UDR.

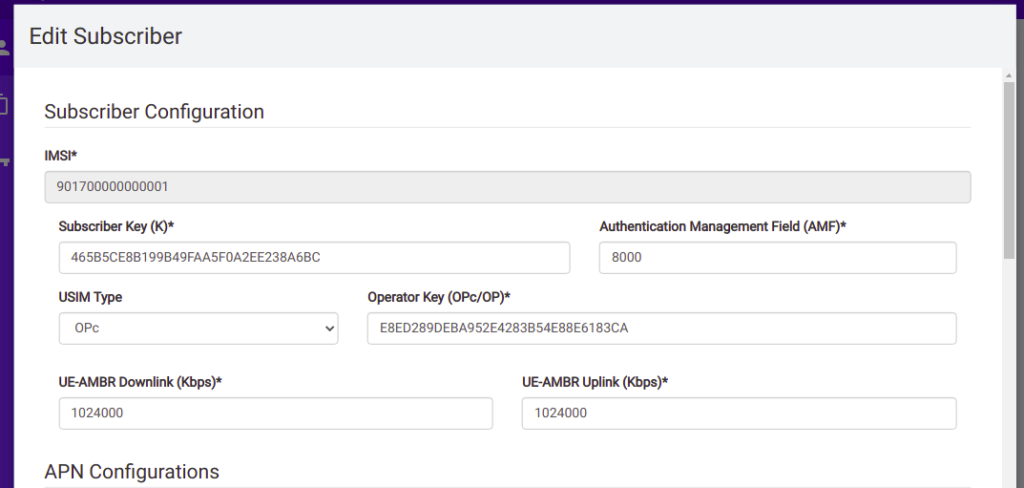
So we’ll browse to the web interface for Open5GS HSS/UDR and add a subscriber,

We’ll enter the IMSI, K key and OP key (make sure you’ve selected OPc and not OP), and save. You may notice the values match the defaults in the Open5GS Web UI, just without the spaces.

Running the UE Simulator

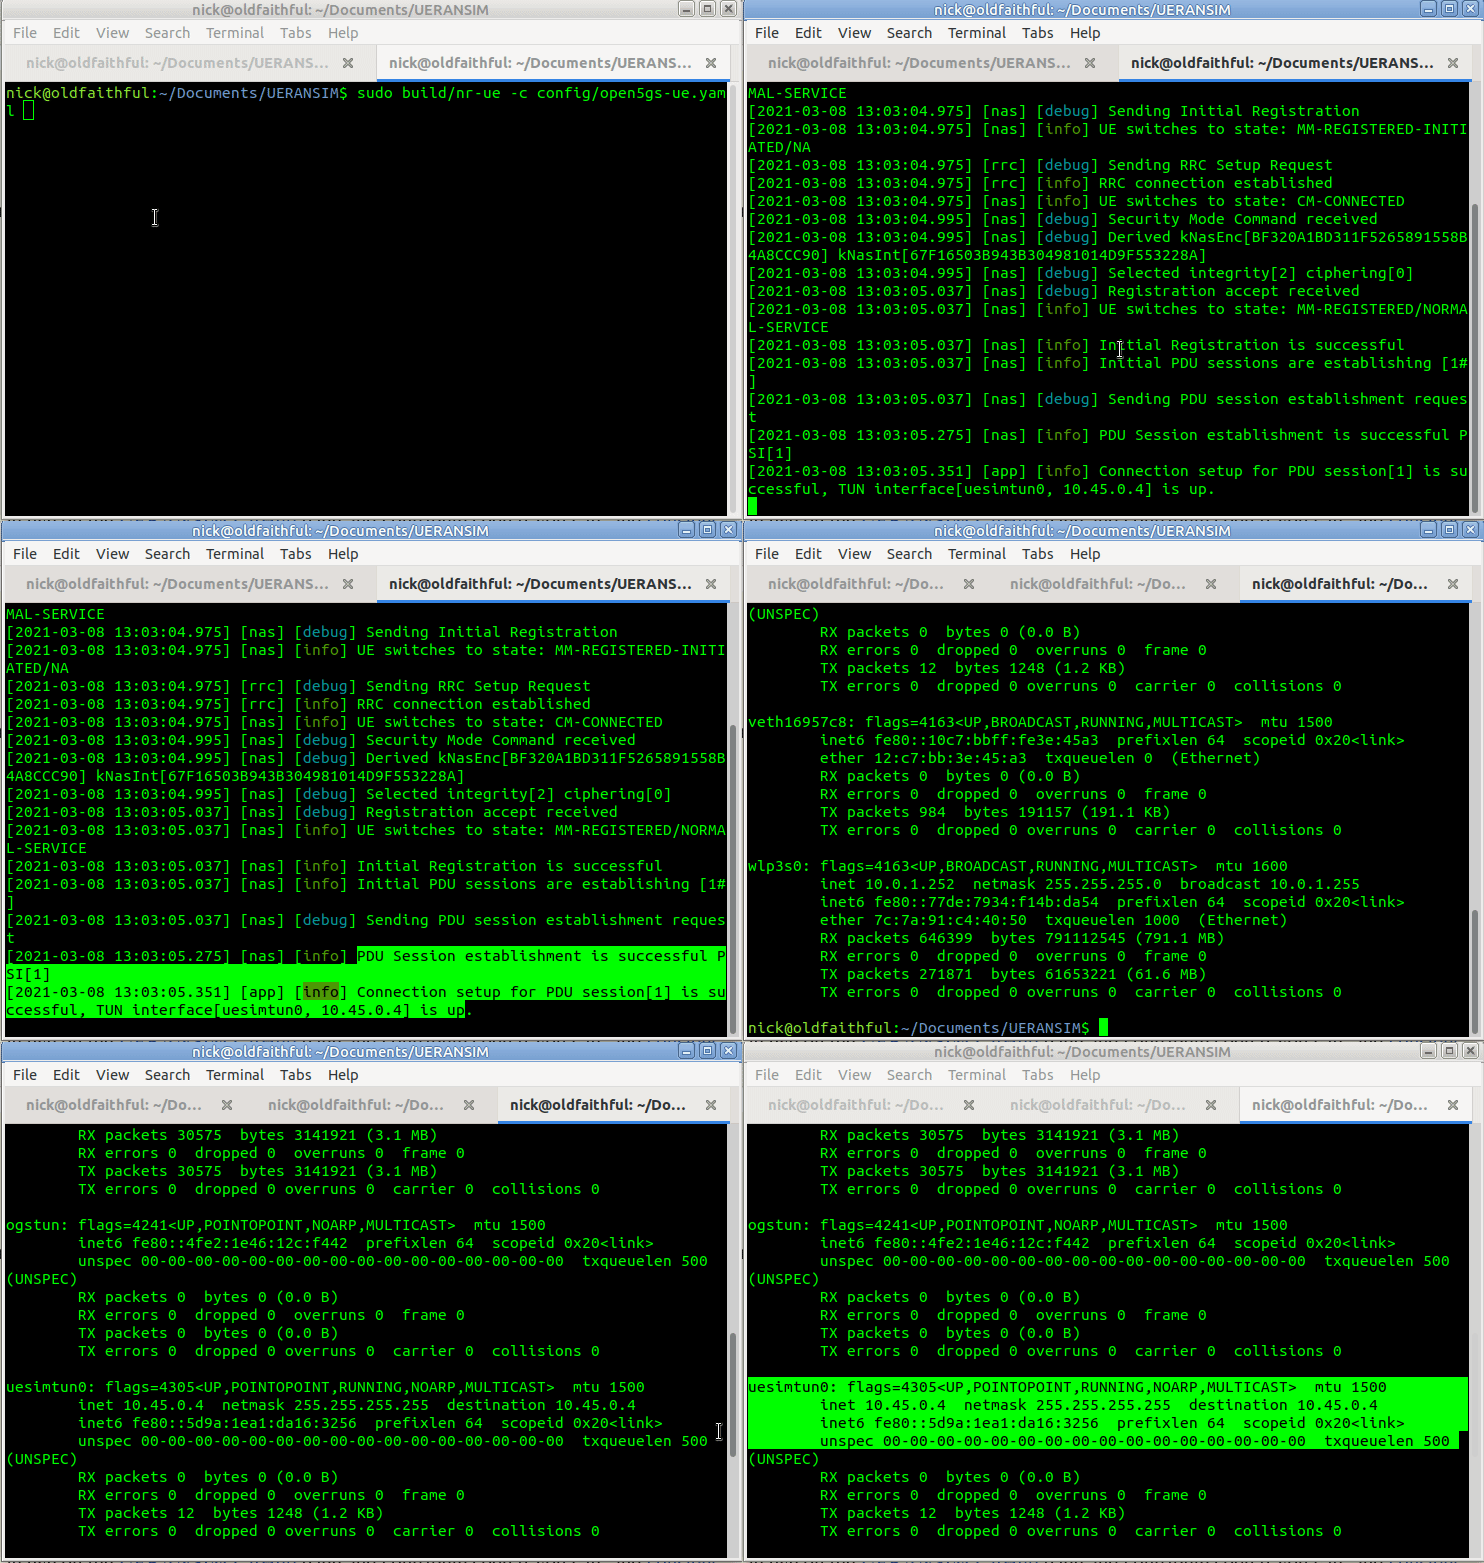
So now we’ve got all this configured we can run the UE simulator again, this time as Sudo, and we should get a very different ouput;

$ build/nr-gnb -c config/open5gs-gnb.yaml

Now when we run it we should see the session come up, and a new NIC is present on the machine, uesimtun0,

We can now run commands like Ping and Curl and by specifying our special uesimtun0 interface, and the traffic will be encapsulated in GTP and pop out the other end.

Supporting UERANSIM

More advanced functionality is in the works though, so keep an eye on the UERANSIM GitHub page and contribute code if you can, and consider supporting them on Patreon if you can’t, they’re doing great work.

Open5GS – NRF Setup

We covered NRFs last week, but I thought I’d cover actually configuring the NRF on Open5GS,

We’ll first off need to install the NRF,

$ sudo apt update 
$ sudo apt install software-properties-common 
$ sudo add-apt-repository ppa:open5gs/latest 
$ sudo apt update 
$ sudo apt install open5gs

Next up we’ll need to configure the NRF on the domain “nrf.5gc.mnc001.mcc001.3gppnetwork.org”, for this we’ll edit /etc/open5gs/nrf.conf and set the binding IP.

nrf:
  sbi:
    - addr:
       - 10.0.1.252
      port: 7777

Now for each Network Element we’re bringing online we’ll need to point it at our NRF’s address (or IP).

nrf:
  sbi:
    - addr:
       - nrf.5gc.mnc001.mcc001.3gppnetwork.org
      port: 7777

But there’s another very similar section inside the definition file, but this defines which IP the NRF client will listen on,

And that’s it,

From the log in /var/log/open5gs/nrf.log you see connections coming in,

5GC: The Network Function Repository Function

The Problem

Mobile networks are designed to be redundant and resilient, with N+1 for everything.

Every network element connects to multiple other network elements.

The idea being the network is architected so a failure of any one network element will not impact service.

To take an LTE/EPC example, your eNodeBs connect to multiple MMEs, which in turn connect to multiple HSSs, multiple S-GWs, multiple EIRs, etc.
The problem is when each eNodeB connects to 3 MMEs, and you want to add a 4th MME, you have to go and reconfigure all the eNodeBs to point to the new MME, and all the HSSs to accept that MME as a new Diameter Peer, for example.

The more redundant you make the network, the harder it becomes to change.

This led to development of network elements like Diameter Routing Agents (DRAs) and DNS SRV for service discovery, but ultimately adding and removing network elements in previous generations of mobile core, involved changing a lot of config on a lot of different boxes.

The Solution

The NRF – Network Repository Function serves as a central repository for Network Functions (NFs) on the network.

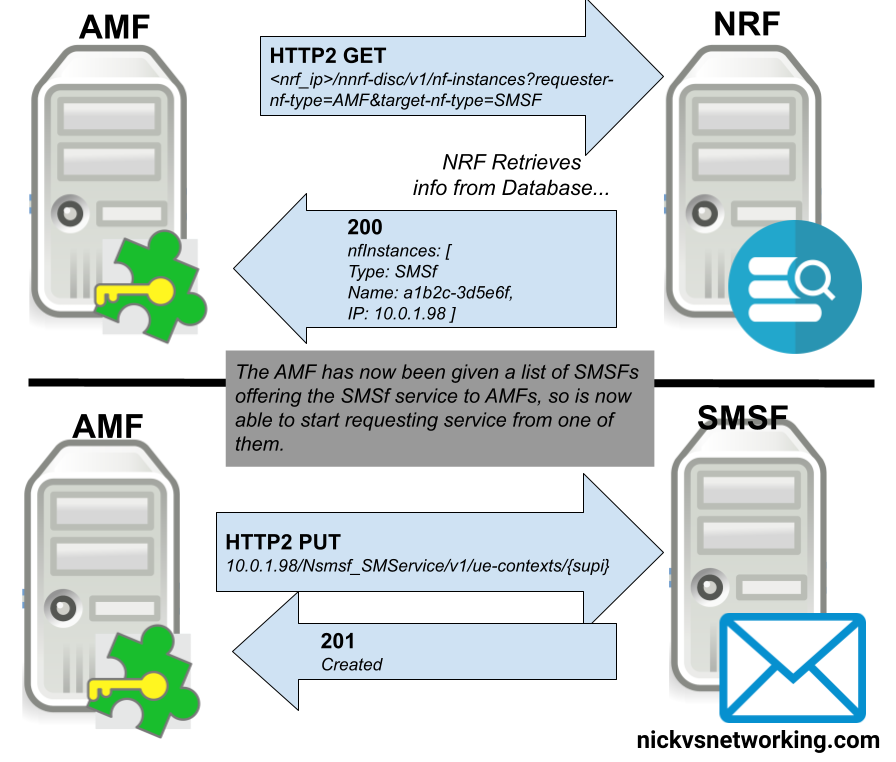
In practice this means when you bring a new Network Function / Network Element online, you only need to point it at the NRF, which will tell it about other Network Functions on the network, register the new Network Function and let every other interested Network Function know about the new guy.

Take for example adding a new AMF to the network, after bringing it online the only bit of information the AMF really needs to start placing itself in the network, is the details of the NRF, so it can find everything it needs to know.

Our new AMF will register itself to the NRF, advertising what Network Functions it can offer (ie AMF service), and it’ll in turn be able to learn about what Network Functions it can consume – for example our AMF would need to know about the UDMs it can query data from.

It is one of the really cool design patterns usually seen in modern software, that 3GPP have adopted as part of the 5GC.

In Practice

Let’s go into a bit more detail and look at how it looks.

The NRF uses HTTP and JSON to communicate (anything not using ASN.1 is a winner), and looks familiar to anyone used to dealing with RESTful APIs.

Let’s take a look at how an AMF looks when registering to a NRF,

NF Register – Providing the NRF a profile for each NF

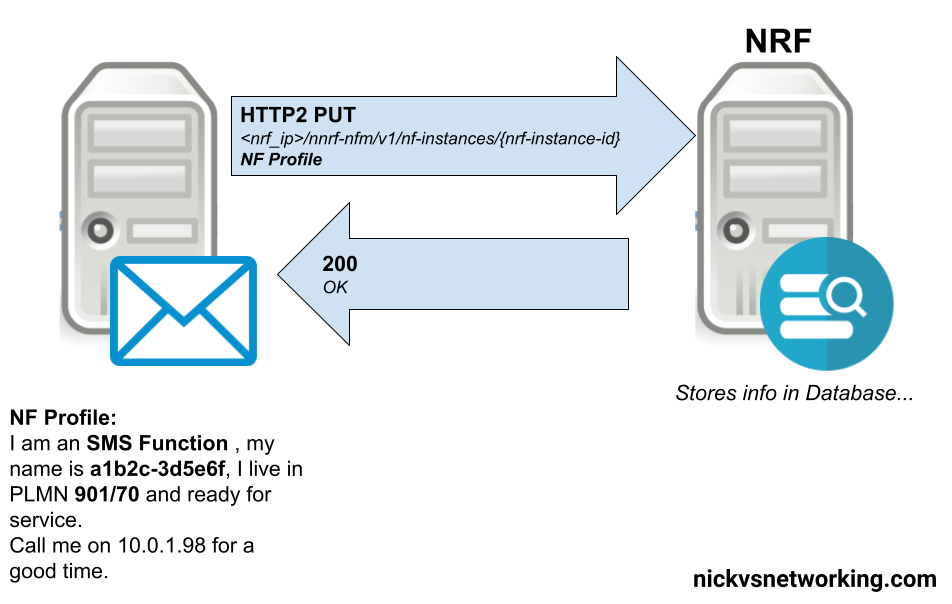
In order for the NRF to function it has to know about the presence of all the Network Functions on the network, and what they support. So when a new Network Function comes online, it’s got to introduce itself to the NRF.

It does this by providing a “Profile” containing information about the Network Functions it supports, IP Addresses, versions, etc.

Going back to our AMF example, the AMF sends a HTTP PUT request to our NRF, with a JSON payload describing the functions and capabilities of the AMF, so other Network Functions will be able to find it.

Let’s take a look at what’s in the JSON payload used for the NF Profile.

  • Each Network Function is identified by a UUID – nfInstanceId, in this example it’s value is “f2b2a934-1b06-41eb-8b8b-cb1a09f099af”
  • The nfType (Network Function type) is an AMF, and it’s IP Address is 10.0.1.7
  • The heartBeatTimer sets how often the network function (in this case AMF) sends messages to the NRF to indicate it’s still alive. This prevents a device registering to an NRF and then going offline, and the NRF not knowing.

The nfServices key contains an array of services and details of those services, in the below example the key feature is the serviceName which is namf-comm which means the Namf_Communication Service offered by the AMF.

The NRF files this info away for anyone who requests it (more on that later) and in response to this our NRF will indicate (hopefully) that it’s successfully created the entry in its internal database of Network Functions for our AMF, resulting in a HTTP 201 “Created” response back from the NRF to the AMF.

NRF StatusSubscribe – Subscribe & Notify

Simply telling the NRF about the presence of NFs is one thing, but it’s not much use if nothing is done with that data.

A Network Function can subscribe to the NRF to get updates when certain types of NFs enter/leave the network.

Subscribing is done by sending a HTTP POST with a JSON payload indicating which NFs we’re interested in.

Contents of a Subscription message to be notified of all AMFs joining the network

Whenever a Network Function registers on the NRF that related to the type that has been subscribed to, a HTTP POST is sent to each subscriber to let them know.

For example when a UDM registers to the network, our AMF gets a Notification with information about the UDM that’s just joined.

NRF Update – Updating NRF Profiles & Heartbeat

If our AMF wants to update its profile in the NRF – for example a new IP is added to our AMF, a HTTP PATCH request is sent with a JSON payload with the updated details, to the NRF.

The same mechanism is used as the Heartbeat / keepalive mechanism, to indicate the NRF is still there and working.

Summary

The NRF acts as a central repository used for discovery of neighboring network functions.

5GC for EPC Folks – Control Plane Signalling

As the standardisation for 5G-SA has been completed and the first roll outs are happening, I thought I’d cover the basic architecture of the 5G Core Network, for people with a background in EPC/SAE networks for 4G/LTE, covering the key differences, what’s the same and what’s new.

The AMFAuthentication & Mobility Function, serves much the same role as the MME in LTE/EPC/SAE networks.

Like the MME, the AMF only handles Control Plane traffic, and serves as the gatekeeper to the services on the network, connecting the RAN to the core, authenticating subscribers and starting data / PDN connections for the UEs.

While the MME connects to eNodeBs for RAN connectivity, the AMF connects to gNodeBs for RAN.

The Authentication Functions

In EPC the HSS had two functions; it was a database of all subscribers’ profile information and also the authentication centre for generating authentication vectors.

5GC splits this back into two network elements (Akin to the AuC and HLR in 2G/3G).

The UDM (Unified Data Management) provides the AMF with the subscriber profile information (allowed / barred services / networks, etc),

The AUSF (Authentication Server Function) provides the AMF with the authentication vectors for authenticating subscribers.

Like in UMTS/LTE USIMs are used to authenticate subscribers when connecting to the network, again using AKA (Authentication and Key Agreement) for mutual subscriber & network authentication.

Other authentication methods may be implemented, R16 defines 3 suporrted methods, 5G-AKA, EAP-AKA’, and EAP-TLS.

This opens the door for the 5GC to be used for non-mobile usage. There has been early talk of using the 5G architecture for fixed line connectivity as well as mobile, hence supporting a variety of authentication methods beyond classic AKA & USIMs. (For more info about Non-3GPP Access interworking look into the N3IWF)

The Mobility Functions

When a user connects to the network the AMF selects a SMF (Session Management Function) akin to a P-GW-C in EPC CUPS architecture and requests the SMF setup a connection for the UE.

This is similar to the S11 interface in EPC, however there is no S-GW used in 5GC, so would be more like if S11 were instead sent to the P-GW-C.

The SMF selects a UPF (Akin to the P-GW-C selecting a P-GW-U in EPC), which will handle this user’s traffic, as the UPF bridges external data networks (DNs) to the gNodeB serving the UE.

More info on how the UPF functions compared to it’s EPC counterparts can be found in this post.

Moving between cells / gNodeBs is handled in much the same way as done previously, with the path the UPF sends traffic to (N3 interface) updated to point to the IP of the new gNodeB.

Mobility between EPC & 5GC is covered in this post.

Connection Overview

When a UE attempts to connect to the network their signalling traffic (Using the N1 reference point between the UE and the AMF), is sent to the AMF.

an authentication challenge is issued as in previous generations.

Upon successful authentication the AMF signals the SMF to setup a session for the UE. The SMF selects a UPF to handle the user plane forwarding to the gNodeB serving the UE.

Key Differences

  • Functions handled by the MME in EPC now handled by AMF in 5GC
  • Functions of HSS now in two Network Functions – The UDM (Unified Data Management) and AUSF (Authentication Server Function)
  • Setting up data connections “flatter” (more info on the User Plane differences can be found here)
  • Non 3GPP access (Potentially used for fixed-line / non mobile networks)

See also: 5GC for EPC Folks – User Plane Traffic

5GC for EPC Folks – User Plane Traffic

As the standardisation for 5G-SA has been completed and the first roll outs are happening, I thought I’d cover the basic architecture of the 5G Core Network, for people with a background in EPC/SAE networks for 4G/LTE, covering the key differences, what’s the same and what’s new.

This posts focuses on the User Plane side of things, there’s a similar post I’ve written here on the Control Plane side of things.

UPF – User Plane Forwarding

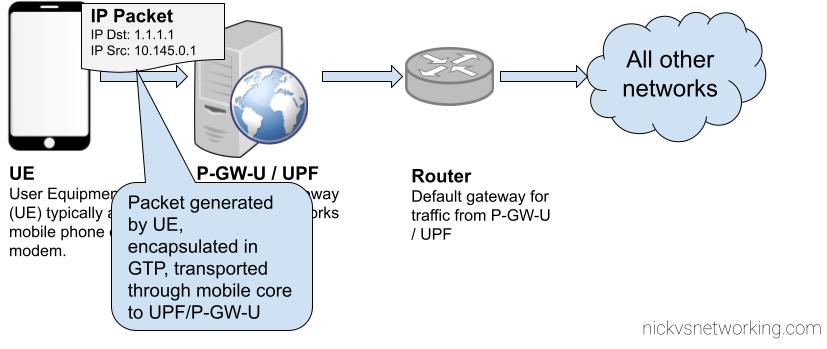
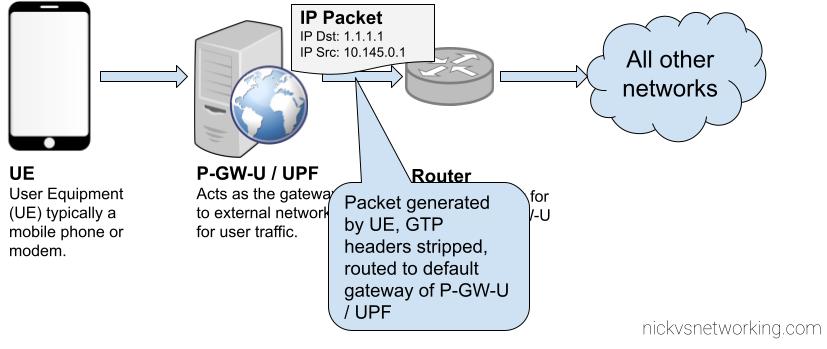
The UPF bridges the external networks (DNs) to the gNodeB serving the UE by encapsulating the traffic into GTP, which has been used in every network since GSM.

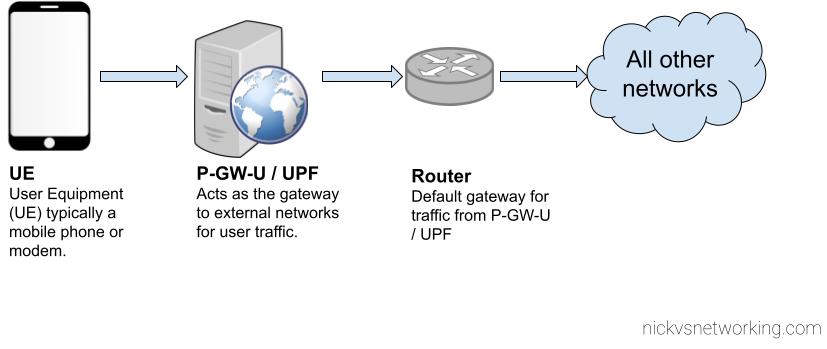
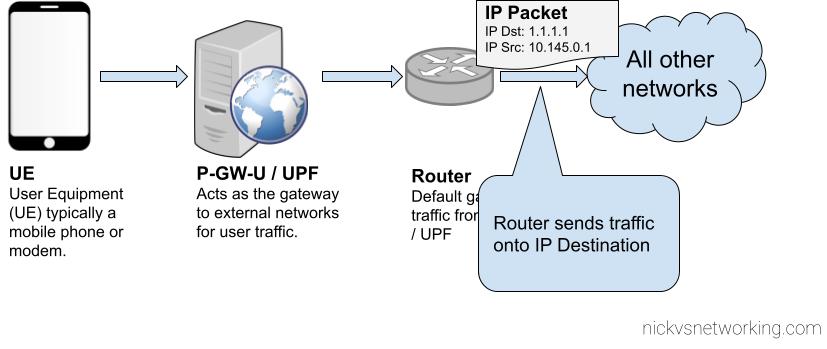
Like the P-GW the UPF takes traffic destined to/from external networks and passes it to/from subscribers.

In 5GC these external networks are now referred to as “DN” – Data Networks, instead of by the SGi reference point.
In EPC the Serving-Gateway’s intermediate function of routing traffic to the correct eNB is removed and instead this is all handled by the UPF, along with buffering packets for a subscriber in idle mode.

The idea behind this, is that by removing the S-GW removes extra hops / latency in the network, and allows users to be connected to the best UPF for their needs, typically one located close to the user.

However, there are often scenarios where an intermediate function is required – for example wanting to anchor a session to keep an IP Address allocated to one UPF associated with a user, while they move around the network. In this scenario a UPF can act as an “Session Anchor” (Akin to a P-GW), and pass through “Intermediate UPFs” (Like S-GWs).

Unlike the EPCs architecture, there is no limit to how many I-UPFs can be chained together between the Session Anchoring UPF and the gNB, and this chaining of UPFs allows for some funky routing options.

The UPF is dumb by design. The primary purpose is just to encapsulate traffic destined from external networks to subscribers into GTP-U packets and forward them onto the gNodeB serving that subscriber, and the same in reverse. Do one thing and do it well.

SMF – Session Management Function

So with dumb UPFs we need something smarter to tell them what to do.

Control of the UPFs is handled by the SMF – Session Management Function, which signals using PFCP down to the UPFs to tell them what to do in terms of setting up connections.

While GTP-U is used for handling user traffic, control plane traffic no longer uses GTPv2-C. Instead 5GC uses PFCP – Packet Forwarding Control Protocol. To get everyone warmed up to Control & User Plane separation 3GPP introduced as seen in CUPS into the EPC architecture in Release 14.

This means the interface between the SMF and UPF (the N4 interface) is more or less the same as the interface between a P-GW-C and a P-GW-U seen in CUPS.

When a subscriber connects to the network and has been authenticated, the AMF (For more info on the AMF see the sister post to this topic covering Control Plane traffic) requests the SMF to setup a connection for the subscriber.

Interworking with EPC

For deployments with an EPC and 5GC interworking between the two is of course required.

This is achieved first through the implementation of CUPS (Control & User Plane Separation) on the EPC, specifically splitting the P-GW into a P-GW-C for handing the Control Plane signalling (GTPv2c) and a P-GW-U for the User Plane traffic encapsulated into GTP.

The P-GW-C and P-GW-U communications using PFCP are essentially the same as the N4 interface (between the SMF and the UPF) so the P-GW-U is able to act as a UPF.

This means handovers between the two RATs / Cores is seamless as when moving from an LTE RAT and EPC to a 5G RAT and 5G Core, the same UPF/P-GW-U is used, and only the Control Plane signalling around it changes.

When moving from LTE to 5G RAT, the P-GW-C is replaced by the SMF,
When moving from 5G RAT to LTE, the SMF is replaced by the P-GW-C.
In both scenarios user plane traffic takes the same exit point to external Data Networks (SGi interface in EPC / N6 interface in 5GC).

Interfaces / Reference Points

N3 Interface

N3 interface connects the gNodeB user plane to the UPF, to transport GTP-U packets.

This is a User Plane interface, and only transports user plane traffic.

This is akin to the S1-UP interface in EPC.

N4 Interface

N4 interface connects the Session Management Function (SMF) control plane to the UPF, to setup, modify and delete UPF sessions.

It is a control plane interface, and does not transport User Plane traffic.

This interface relies on PFCP – Packet Forwarding Control Protocol.

This is akin to the SxB interface in EPC with CUPS.

N6 Interface

N6 interface connects the UPF to External Data Networks (DNs), taking packets destined for Subscribers and encapsulating them into GTP-U packets.

This is a User Plane interface, and only transports user plane traffic.

This is akin to the SGi interface in EPC.

N9 Interface

When Session Anchoring is used, and Intermediate-UPFs are used, the connection between these UPFs uses the N9 interface.

This is only used in certain scenarios – the preference is generally to avoid unnecessary hops, so Intermediate-UPF usage is to be avoided where possible.

As this is a User Plane interface, it only transports user plane traffic.

When used this would be akin to the S5 interface in EPC.

N11 Interface

SMFs need to be told when to setup / tear down connections, this information comes from the AMF via the N11 interface.

As this is a Control Plane interface, it only transports control plane traffic.

This is similar to the S11 interface between the MME and the S-GW in EPC, however it would be more like the S11 if the S11 terminated on the P-GW.

Meta: 5G on this Blog

I’ve tried to steer well clear of the fever-pitched hype over 5G recently (I mean, this year I wrote 22 posts about building GSM networks with Osmocom to avoid talking about 5G), but the time has come to start sharing more about 5G.

But before we do…

My promise to you:
No talk of Augmented Reality, Holographic Video calls, 5G connected cities, sales buzzwords.

Just info for nerds about real (actually standardized) 5G.

As always I’ll reference specs where possible.

Let’s get building!

Link to all 5G tagged posts.

CUPS – Control and User Plane Separation in LTE & NR with PFCP (Sx & N4)

3GPP release 14 introduced the concept of CUPS – Control & User Plane Separation, and the Sx interface, this allows the control plane (GTP-C) functionality and the user plane (GTP-U) functionality to be separated, and run in a distributed fashion, allowing the node a user’s GTP-U traffic flows through to be in a different location to where the Control / Signalling traffic (GTP-C) flows.

In practice that means for an LTE EPC this means we split our P-GW and S-GW into a minimum of two network elements each.

A P-GW is split and becomes a P-GW-C that handles the P-GW Control Plane traffic (GTPv2-C) and a P-GW-U speaking GTP-U for our User Plane traffic. But the split doesn’t need to stop there, one P-GW-C could control multiple P-GW-Us, routing the user plane traffic. Sames goes for S-GW being split into S-GW-C and S-GW-U,

This would mean we could have a P-GW-U located closer to a eNB / User to reduce latency, by allowing GTP-U traffic to break out on a node closer to the user.

It also means we can scale better too, if we need to handle more data traffic, but not necessarily more control plane traffic, we can just add more P-GW-U nodes to handle this.

To manage this a new protocol was defined – PFCP – the Packet Forwarding Control Protocol. For LTE this is refereed to as the Sx reference point, it’ also reused in 5G-SA as the N4 reference point.
When a GTP-C “Create Session Request” comes into a P-GW for example from an S-GW, a PFCP “Session Establishment Request” is sent by the P-GW-C to the P-GW-U with much the same information that was in the GTP-C request, to setup the session.

So why split the Control and User Plane traffic if you’re going to just relay the GTP-C traffic in a different format?

That was my first question – the answer is that keeping the GTP-C interface ensures backward compatibility with older MMEs, PCRFs, charging systems, and allows a staged roll out and bolting on extra capacity.

GTP-C disappears entirely in 5G Standalone architecture and is replaced with the N4 interface, which uses PFCP for the Control Plan and GTP-U again.

Here’s a capture from Open5Gs core showing GTPv2C and PFCP in play.