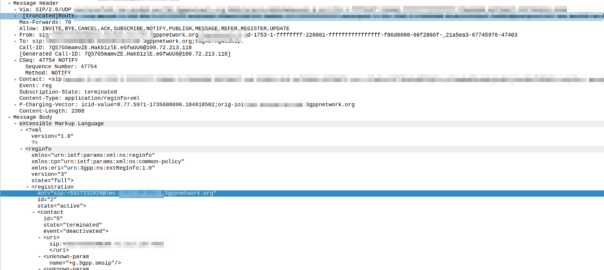
And bam, now when we run Kamailio we’ll get all the logic that rtpengine exposes when being called.
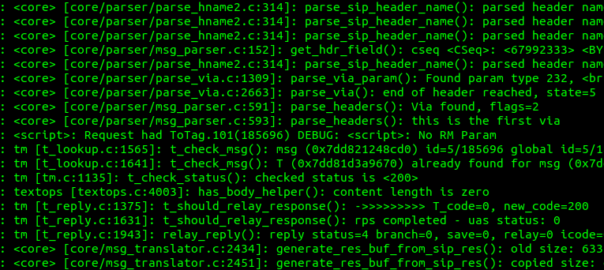
By setting cfgtrace we can enable a config trace as well, and as we step through our Kamailio config file for a SIP message, we can see what’s going on at every step.
So if you’re like me, you can use the debugger module, combined with reading through the source code, to prove every singletime that the issue is with my not understanding the function properly, and never the logic of the Kamailio module!
I run Ubuntu on my desktop and I mess with Kamailio a lot.
Recently I was doing some work with KEMI using Python, but installing the latest versions of Kamailio from the Debian Repos for Kamailio wasn’t working.
The following packages have unmet dependencies:
kamailio-python3-modules : Depends: libpython3.11 (>= 3.11.0) but 3.11.0~rc1-1~22.04 is to be installed
Kamailio’s Python modules expect libpython3.11 or higher, but Ubuntu 22.04 repos only contain the release candidate – not the final version:
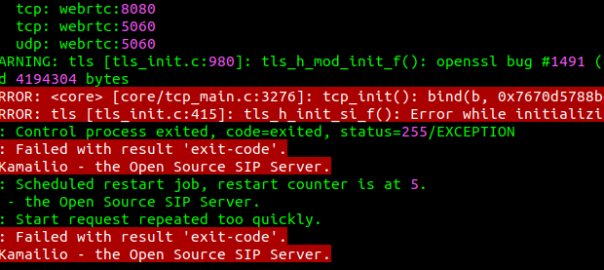
If you’re setting up Kamailio for support for WebSocket and need to bind to TCP port 80 or TCP port 443, you may run into the issue that permission is denied to bind to these ports when you try and start the service.
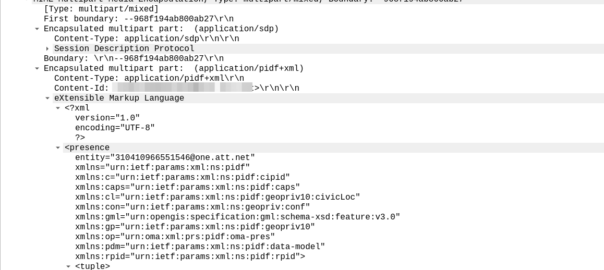
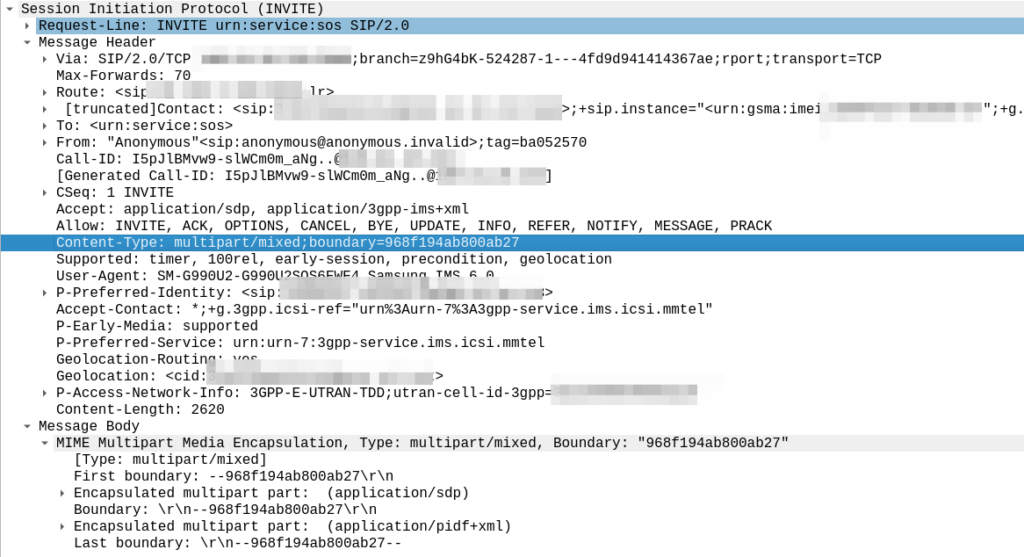
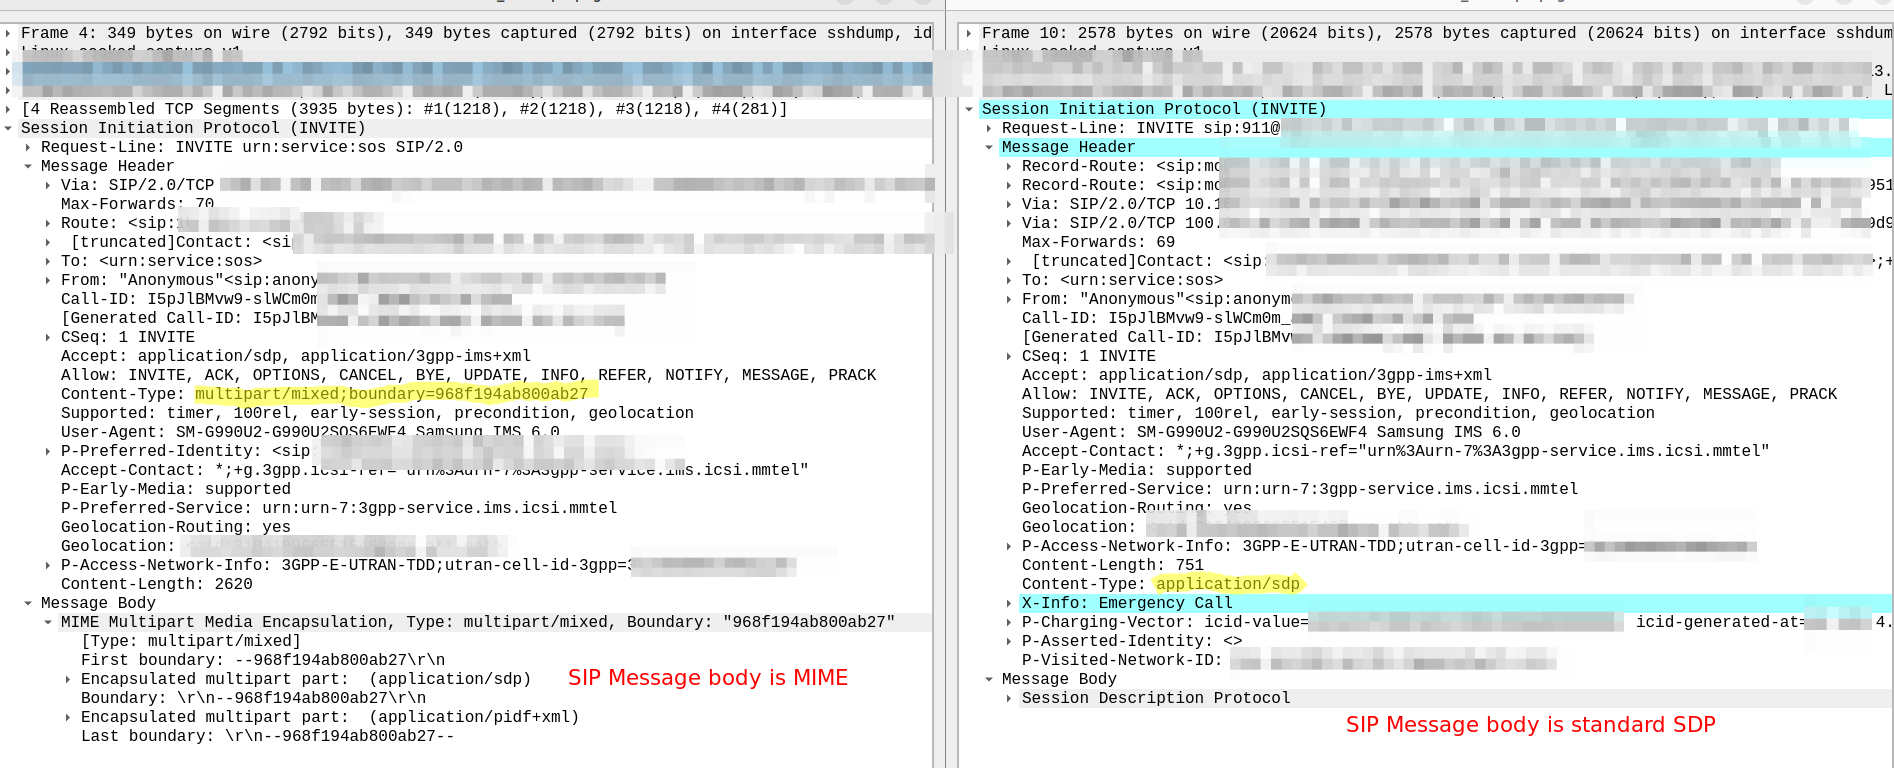
If you’re used to dealing with SIP, you’d expect to see:
Content-Type: application/sdp
This Content-Type multipart/mixed;boundary is totally valid in SIP, in fact RFC 5261 (Message Body Handling in the Session Initiation Protocol (SIP)) details the use of MIME in SIP, and the Geolocation extension uses this, as we see below from a 911 call example.
But while this extension is standardised, and having your SIP Body containing multipart MIME is legal, not everything supports this, including the FreeSWITCH bridge module, which just appends a new SDP body into the Mime Multipart
Okay, so how do we replace the MIME Multipart SIP body with a standard SDP?
#If the body is multipart then strip it and replace with a single part
if (has_body("multipart/mixed")) {
xlog("This has a multipart body");
if (filter_body("application/sdp")) {
remove_hf("Content-Type");
append_hf("Content-Type: application/sdp\r\n");
} else {
xlog("Body part application/sdp not found\n");
}
}
We’re doing more and more network automation, and something that came up as valuable to us would be to have all the IPs in HOMER SIP Capture come up as the hostnames of the VM running the service.
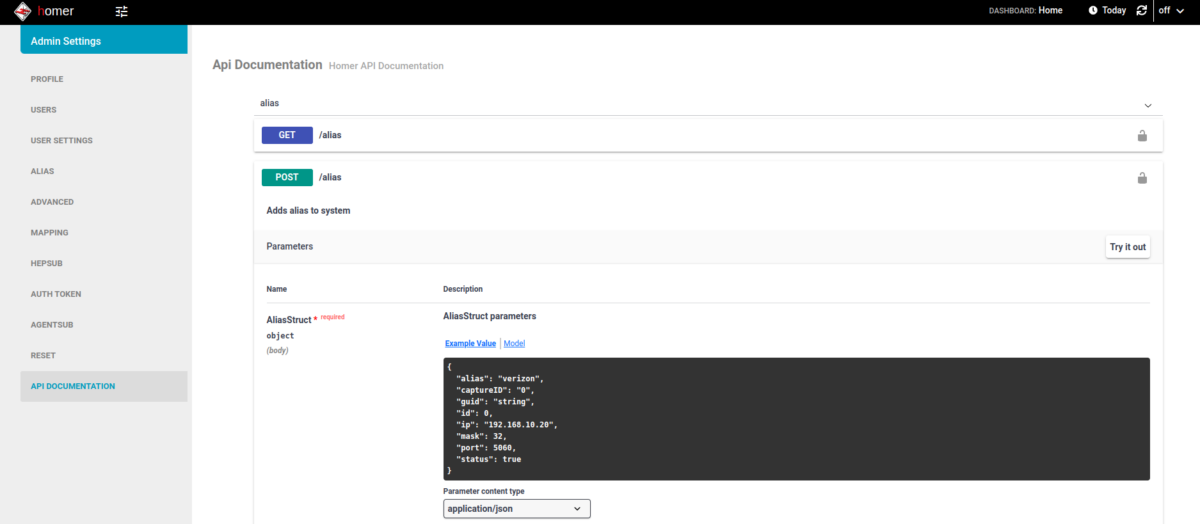
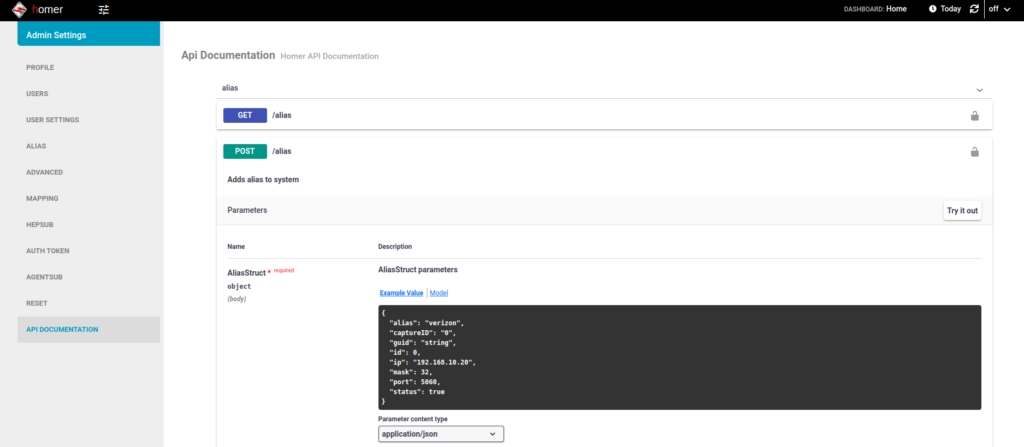
Luckily for us HOMER has an API for this ready to roll, and best of all, it’s Swagger based and easily documented (awesome!).
(Probably through my own failure to properly RTFM) I was struggling to work out the correct (current) way to Authenticate against the API service using a username and password.
Because the HOMER team are awesome however, the web UI for HOMER, is just an API client.
This means to look at how to log into the API, I just needed to fire up Wireshark, log into the Web UI via my browser and then flick through the packets for a real world example of how to do this.
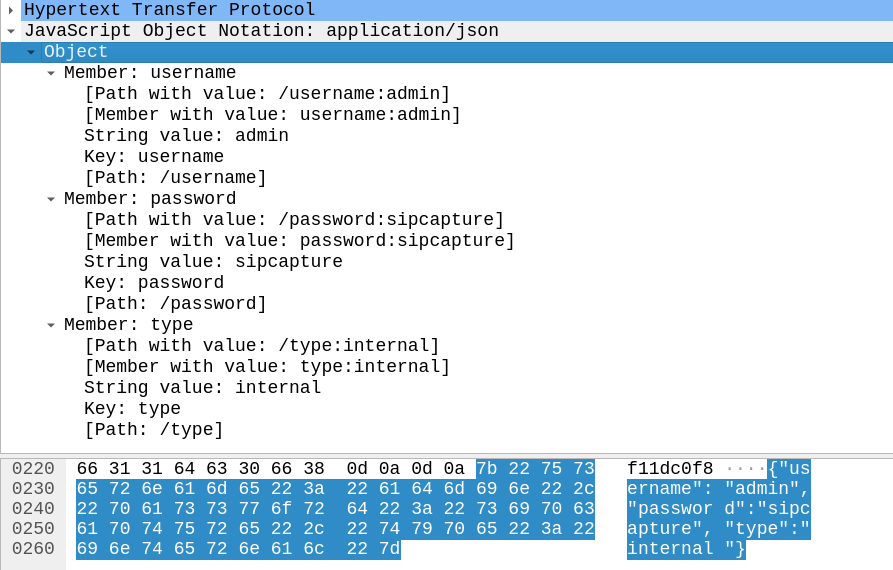
In the Login action I could see the browser posts a JSON body with the username and password to /api/v3/auth
And in return the Homer API Server responds with a 201 Created an a auth token back:
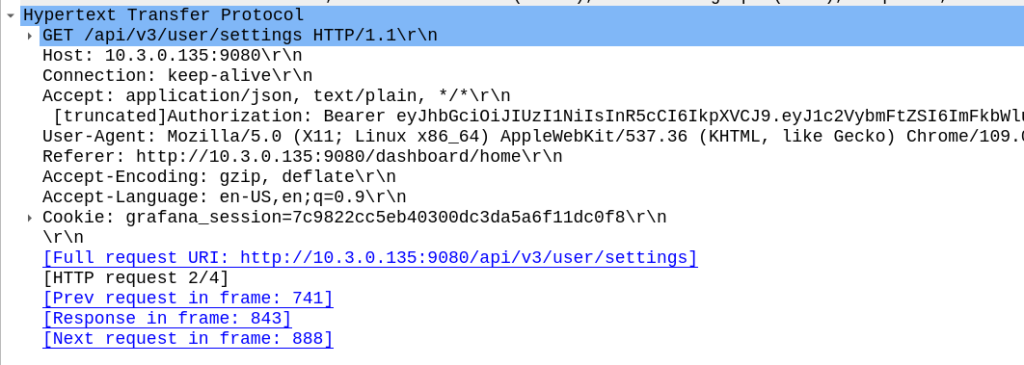
Now in order to use the API we just need to include that token in our Authorization: header then we can hit all the API endpoints we want!
For me, the goal we were setting out to achieve was to setup the aliases from our automatically populated list of hosts. So using the info above I setup a simple Python script with Requests to achieve this:
import requests
s = requests.Session()
#Login and get Token
url = 'http://homer:9080/api/v3/auth'
json_data = {"username":"admin","password":"sipcapture"}
x = s.post(url, json = json_data)
print(x.content)
token = x.json()['token']
print("Token is: " + str(token))
#Add new Alias
alias_json = {
"alias": "Blog Example",
"captureID": "0",
"id": 0,
"ip": "1.2.3.4",
"mask": 32,
"port": 5060,
"status": True
}
x = s.post('http://homer:9080/api/v3/alias', json = alias_json, headers={'Authorization': 'Bearer ' + token})
print(x.status_code)
print(x.content)
#Print all Aliases
x = s.get('http://homer:9080/api/v3/alias', headers={'Authorization': 'Bearer ' + token})
print(x.json())
And bingo we’re done, a new alias defined.
We wrapped this up in a for loop for each of the hosts / subnets we use and hooked it into our build system and away we go!
With the Homer API the world is your oyster in terms of functionality, all the features of the Web UI are exposed on the API as the Web UI just uses the API (something I wish was more common!).
Using the Swagger based API docs you can see examples of how to achieve everything you need to, and if you ever get stuck, just fire up Wireshark and do it in the Homer WebUI for an example of how the bodies should look.
One day recently I was messing with the XCAP server, trying to set the Call Forward timeout. In the process I triggered the UE to send a USSD request to the IMS.
Huh, I thought, “I wonder how hard it would be to build a USSD Gateway for our IMS?”, and this my friends, is the story of how I wasted a good chunk of my weekend trying (and failing) to add support for USSD.
You might be asking “Who still uses USSD?” – The use cases for USSD are pretty thin on the ground in this day and age, but I guess balance query, and uh…
But this is the story of what I tried before giving up and going outside…
Routing
First I’d need to get the USSD traffic towards the USSD Gateway, this means modifying iFCs. Skimming over the spec I can see the Recv-Info: header for USSD traffic should be set to “g.3gpp.ussd” so I knocked up an iFC to match that, and route the traffic to my dev USSD Gateway, and added it to the subscriber profile in PyHSS:
Easy peasy, now we have the USSD requests hitting our USSD Gateway.
The Response
I’ll admit that I didn’t jump straight to the TS doc from the start.
The first place I headed was Google to see if I could find any PCAPs of USSD over IMS/SIP.
And I did – Restcomm seems to have had a USSD product a few years back, and trawling around their stuff provided some reference PCAPs of USSD over SIP.
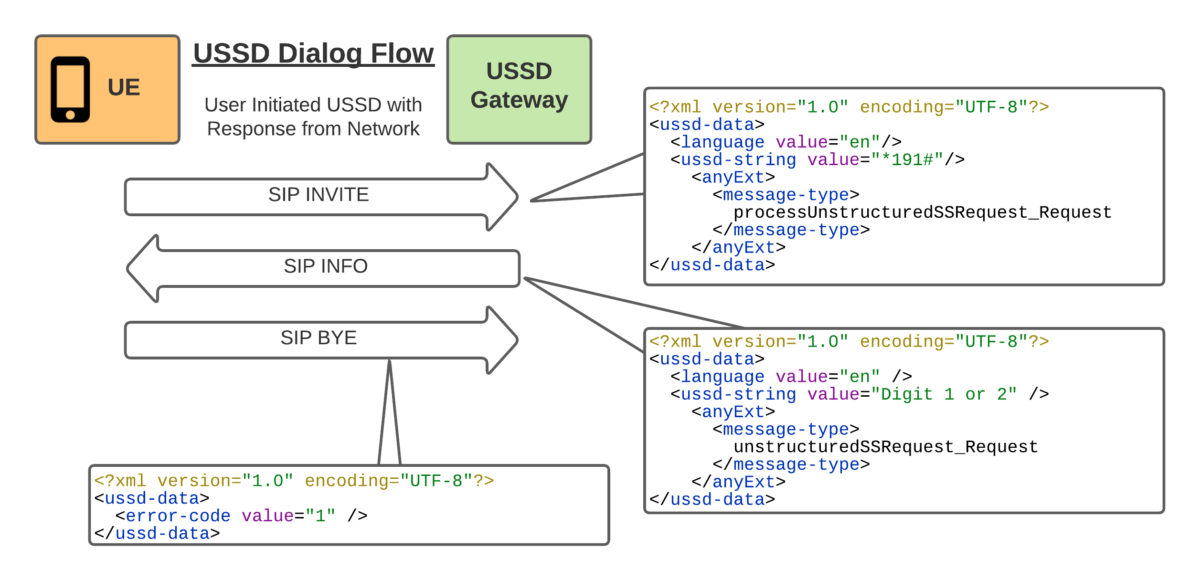
So the flow seemed pretty simple, SIP INVITE to set up the session, SIP INFO for in-dialog responses and a BYE at the end.
With all the USSD guts transferred as XML bodies, in a way that’s pretty easy to understand.
Being a Kamailio fan, that’s the first place I started, but quickly realised that SIP proxies, aren’t great at acting as the UAS.
So I needed to generate in-dialog SIP INFO messages, so I turned to the UAC module to generate the SIP INFO response.
My Kamailio code is super simple, but let’s have a look:
request_route {
xlog("Request $rm from $fU");
if(is_method("INVITE")){
xlog("USSD from $fU to $rU (Emergency number) CSeq is $cs ");
sl_reply("200", "OK Trying USSD Phase 1"); #Generate 200 OK
route("USSD_Response"); #Call USSD_Response route block
exit;
}
}
route["USSD_Response"]{
xlog("USSD_Response Route");
#Generate a new UAC Request
$uac_req(method)="INFO";
$uac_req(ruri)=$fu; #Copy From URI to Request URI
$uac_req(furi)=$tu; #Copy To URI to From URI
$uac_req(turi)=$fu; #Copy From URI to To URI
$uac_req(callid)=$ci; #Copy Call-ID
#Set Content Type to 3GPP USSD
$uac_req(hdrs)=$uac_req(hdrs) + "Content-Type: application/vnd.3gpp.ussd+xml\r\n";
#Set the USSD XML Response body
$uac_req(body)="<?xml version='1.0' encoding='UTF-8'?>
<ussd-data>
<language value=\"en\"/>
<ussd-string value=\"Bienvenido. Seleccione una opcion: 1 o 2.\"/>
</ussd-data>";
$uac_req(evroute)=1; #Set the event route to use on return replies
uac_req_send(); #Send it!
}
So the UAC module generates the 200 OK and sends it back.
“That was quick” I told myself, patting myself on the back before trying it out for the first time.
Huston, we have a problem – Although the Call-ID is the same, it’s not an in-dialog response as the tags aren’t present, this means our UE send back a 405 to the SIP INFO.
Right. Perhaps this is the time to read the Spec…
Okay, so the SIP INFO needs to be in dialog. Can we do that with the UAC module? Perhaps not…
But alas real life came back to rear its ugly head, and this adventure will have to continue another day…
Update: Thanks to a kindly provided PCAP I now know what I was doing wrong, and so we’ll soon have a follow up to this post named “Successes in cobbling together a USSD Gateway” just as soon as I have a weekend free.
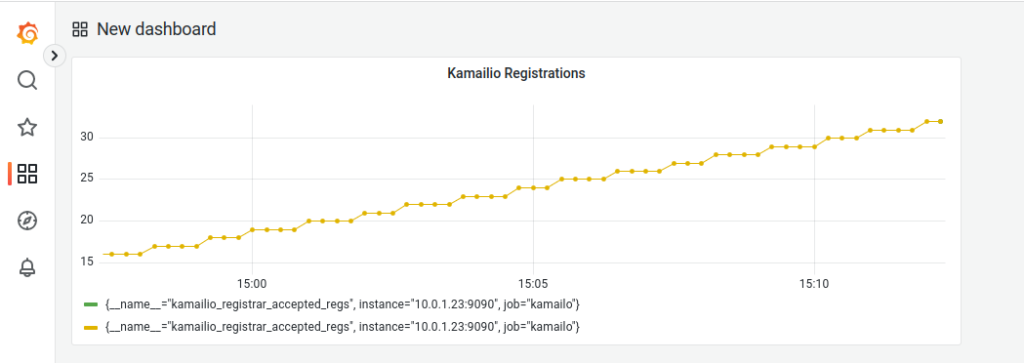
I recently fell in love with the Prometheus + Grafana combo, and I’m including it in as much of my workflow as possible, so today we’ll be integrating this with another favorite – Kamailio.
Why would we want to integrate Kamailio into Prometheus + Grafana? Observability, monitoring, alerting, cool dashboards to make it look like you’re doing complicated stuff, this duo have it all!
I’m going to assume some level of familiarity with Prometheus here, and at least a basic level of understanding of Kamailio (if you’ve never worked with Kamailio before, check out my Kamailio 101 Series, then jump back here).
So what will we achieve today?
We’ll start with the simple SIP Registrar in Kamailio from this post, and we’ll add on the xhttp_prom module, and use it to expose some stats on the rate of requests, and responses sent to those requests.
So to get started we’ll need to load some extra modules, xhttp_prom module requires xhttp (If you’d like to learn the basics of xhttp there’s also a Kamailio Bytes – xHTTP Module post covering the basics) so we’ll load both.
xHTTP also has some extra requirements to load, so in the top of our config we’ll explicitly specify what ports we want to bind to, and set two parameters that control how Kamailio handles HTTP requests (otherwise you’ll not get responses for HTTP GET requests).
Then where you load all your modules we’ll load xhttp and xhttp_prom, and set the basic parameters:
loadmodule "xhttp.so"
loadmodule "xhttp_prom.so"
# Define two counters and a gauge
modparam("xhttp_prom", "xhttp_prom_stats", "all")
By setting xhttp_prom module to expose all stats, this exposes all of Kamailio’s internal stats as counters to Prometheus – This means we don’t need to define all our own counters / histograms / gauges, instead we can use the built in ones from Kamailio. Of course we can define our own custom ones, but we’ll do that in our next post.
Lastly we’ll need to add an event route to handle HTTP requests to the /metrics URL:
Recently I’ve been working on open source Diameter Routing Agent implementations (See my posts on FreeDiameter).
With the hurdles to getting a DRA working with open source software covered, the next step was to get all my Diameter traffic routed via the DRAs, however I soon rediscovered a Kamailio limitation regarding support for Diameter Routing Agents.
You see, when Kamailio’s C Diameter Peer module makes a decision as to where to route a request, it looks for the active Diameter peers, and finds a peer with the suitable Vendor and Application IDs in the supported Applications for the Application needed.
Unfortunately, a DRA typically only advertises support for one application – Relay.
This means if you have everything connected via a DRA, Kamailio’s CDP module doesn’t see the Application / Vendor ID for the Diameter application on the DRA, and doesn’t route the traffic to the DRA.
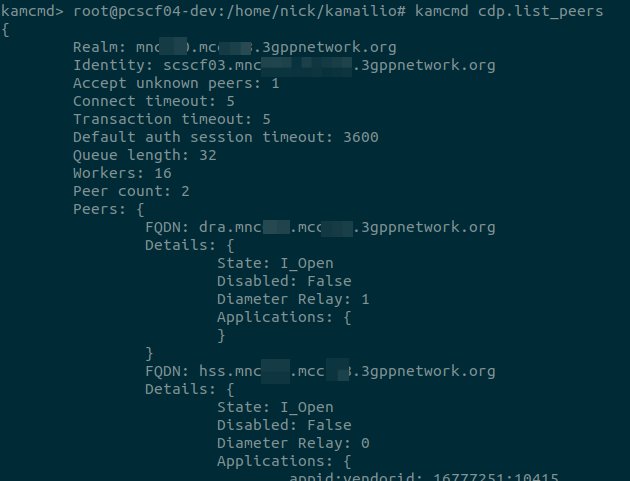
The fix for this was twofold, the first step was to add some logic into Kamailio to determine if the Relay application was advertised in the Capabilities Exchange Request / Answer of the Diameter Peer.
I added the logic to do this and exposed this so you can see if the peer supports Diameter relay when you run “cdp.list_peers”.
With that out of the way, next step was to update the routing logic to not just reject the candidate peer if the Application / Vendor ID for the required application was missing, but to evaluate if the peer supports Diameter Relay, and if it does, keep it in the game.
I added this functionality, and now I’m able to use CDP Peers in Kamailio to allow my P-CSCF, S-CSCF and I-CSCF to route their traffic via a Diameter Routing Agent.
Recently I had a strange issue I thought I’d share.
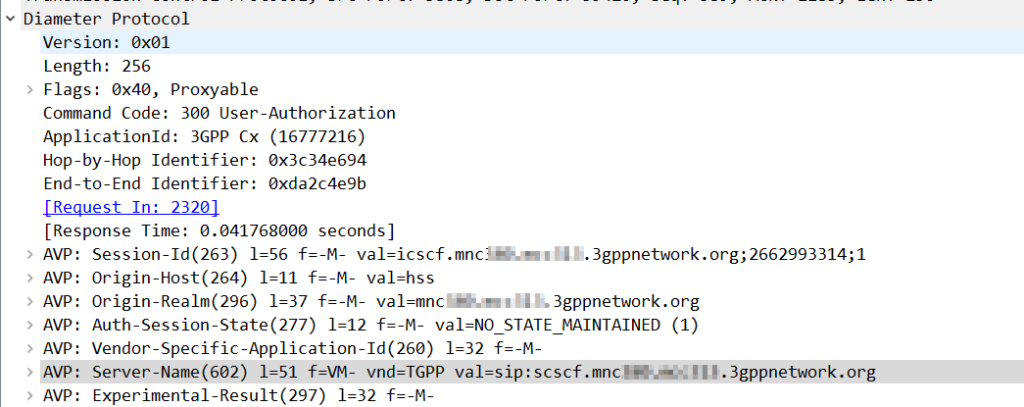
Using Kamailio as an Interrogating-CSCF, Kamailio was getting the S-CSCF details from the User-Authorization-Answer’s “Server-Name” (602) AVP.
The value was set to:
sip:scscf.mnc001.mcc001.3gppnetwork.org:5060
But the I-CSCF was only looking up A-Records for scscf.mnc001.mcc001.3gppnetwork.org, not using DNS-SRV.
The problem? The Server-Name I had configured as a full SIP URI in PyHSS including the port, meant that Kamailio only looks up the A-Record, and did not do a DNS-SRV lookup for the domain.
Dropping the port number saw all those delicious SRV records being queried.
Something to keep in mind if you use S-CSCF pooling with a Kamailio based I-CSCF, if you want to use SRV records for load balancing / traffic sharing, don’t include the port, and if instead you want it to go to the specified host found by an A-record, include the port.
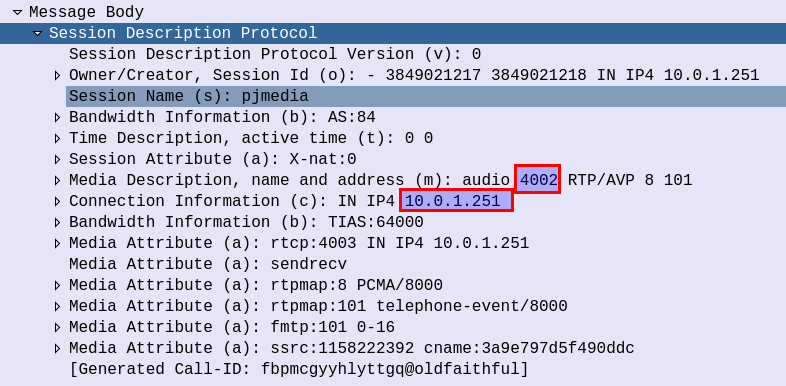
So the other day I needed to extract the IP and Port parameters from an SDP body – Not the whole line mind, but the values themselves.
As with so many things in Kamailio, there’s a lot of ways to achieve an outcome, but here’s how I approached this problem.
Using the SDPops module we can get a particular line in the SDP, for example, we can get the media line with:
#Get SDP line starting with m= and put it into AVP $avp(mline)
sdp_get_line_startswith("$avp(mline)", "m=")
#Print value of $avp(mline)
xlog("m-line: $avp(mline)\n");
This gets us the line, but now we need to extract the data, in the example from the screenshot the M line has the value:
m=audio 4002 RTP/AVP 8 101
But we only want the port from the M line.
This is where I’ve used the Kamailio Dialplan module and regex to extract the port from this line.
With a fairly simple regex pattern, we can get a group match for the Port from the m= line.
So I took this regular expression, and put it into the Kamailio Dialplan database with dialplan ID 400 for this example:
INSERT INTO `dialplan` VALUES (4,400,10,1,'m=audio (\\d*)',0,'m=audio (\\d*)','\\1','SDP M Port Stripper');
Now using Dialplan ID 400 we can translate an inputted m= SDP line, and get back the port used, so let’s put that into practice:
if(sdp_get_line_startswith("$avp(mline)", "m=")) {
xlog("m-line: $avp(mline)\n");
xlog("raw: $avp(mline)");
xlog("Extracting Port from Media Line");
dp_translate("400", "$avp(mline)/$avp(m_port_b_leg)");
xlog("Translated m_port_b_leg is: $avp(m_port_b_leg)");
}
Now we have an AVP called $avp(m_port_b_leg) which contains the RTP Port from the SDP.
Now we’ve got a few other values we might want to get, such as the IP the RTP is to go to, etc, we can extract this in the same way, with Dialplans and store them as AVPs:
#Print current SDP Values and store as Vars
if(sdp_get_line_startswith("$avp(mline)", "m=")) {
xlog("m-line: $avp(mline)\n");
xlog("raw: $avp(mline)");
xlog("Extracting Port from Media Line");
dp_translate("400", "$avp(mline)/$avp(m_port_b_leg)");
xlog("Translated m_port_b_leg is: $avp(m_port_b_leg)");
}
if(sdp_get_line_startswith("$avp(oline)", "o=")) {
xlog("o-line: $avp(oline)\n");
dp_translate("401", "$avp(oline)/$avp(o_line_port_1)");
xlog("O Line Port 1: $avp(o_line_port_1)");
dp_translate("402", "$avp(oline)/$avp(o_line_port_2)");
xlog("O Line Port 2: $avp(o_line_port_2)");
dp_translate("403", "$avp(oline)/$avp(o_ip_b_leg)");
xlog("O IP: $avp(o_ip_b_leg)");
}
And all the Regex you’ll need:
INSERT INTO `dialplan` VALUES
(4,400,10,1,'m=audio (\\d*)',0,'m=audio (\\d*)','\\1','SDP M Port Stripper'),
(5,401,10,1,'o=[^ ]* (\\d*) (\\d*) IN IP4 (\\d*.d*.\\d*.\\d*)',0,'o=[^ ]* (\\d*) (\\d*) IN IP4 (\\d*.d*.\\d*.\\d*)','\\1','O Port 1'),
(6,402,10,1,'o=[^ ]* (\\d*) (\\d*) IN IP4 (\\d*.d*.\\d*.\\d*)',0,'o=[^ ]* (\\d*) (\\d*) IN IP4 (\\d*.d*.\\d*.\\d*)','\\2','O Port 2'),
(7,403,10,1,'o=[^ ]* (\\d*) (\\d*) IN IP4 (\\d*.d*.\\d*.\\d*)',0,'o=[^ ]* (\\d*) (\\d*) IN IP4 (\\d*[.]\\d*[.]\\d*[.]\\d*)','\\3','O IP');
This was a rebuild, another P-CSCF was running fine and handling traffic with the same DNS server set.
I checked the netplan config and confirmed the DNS server was set correctly.
If I did an nslookup on the address that was failing to resolve – pointing it at the correct DNS server, the A & SRV records came back OK, and everything was fine.
Stranger still, after clearing the DNS Cache, and running a packet capture, I couldn’t see any DNS queries at all….
The problem? Kamailio uses resolv.conf by default on Ubuntu Server, and that was pointing to localhost.
After updating resolv.conf to point to the DNS server handling the IMS domains, I was good to go again.
Recently I’ve been doing some work with FreeSWITCH as an IMS Conference Factory, I’ve written a bit about it before in this post on using FreeSWITCH with the AMR codec.
Pretty early on in my testing I faced a problem with subsequent in-dialog responses, like re-INVITEs used for holding the calls.
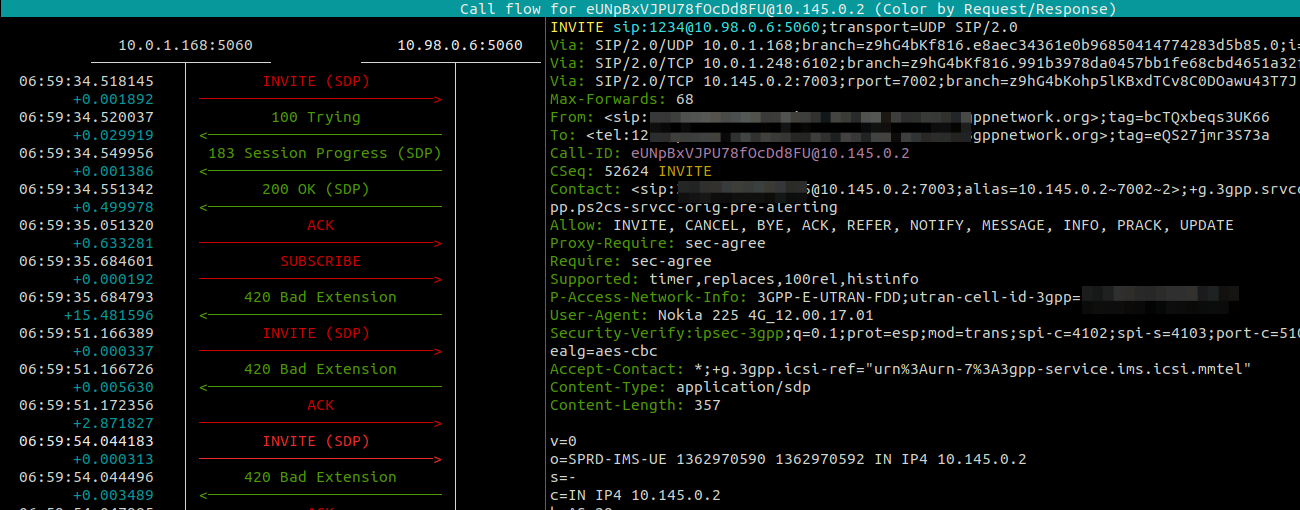
Every subsequent message, was getting a “420 Bad Extension” response from FreeSWITCH.
So what didn’t it like and why was FreeSWITCH generating 420 Bad Extension Responses to these subsequent messages?
Well, the “Extensions” FreeSWITCH is referring to are not extensions in the Telephony sense – as in related to the Dialplan, like an Extension Number to identify a user, but rather the Extensions (as in expansions) to the SIP Protocol introduced for IMS.
The re-INVITE contains a Require header with sec-agree which is a SIP Extension introduced for IMS, which FreeSWITCH does not have support for, and the re-INVITE says is required to support the call (Not true in this case).
Using a Kamailio based S-CSCF means it is easy to strip these Headers before forwarding the requests onto the Application Server, which is what I’ve done, and bingo, no more errors!
In iOS 15, Apple added support for iPhones to support SMS over IMS networks – SMSoIP. Previously iPhone users have been relying on CSFB / SMSoNAS (Using the SGs interface) to send SMS on 4G networks.
Getting this working recently led me to some issues that took me longer than I’d like to admit to work out the root cause of…
I was finding that when sending a Mobile Termianted SMS to an iPhone as a SIP MESSAGE, the iPhone would send back the 200 OK to confirm delivery, but it never showed up on the screen to the user.
The GSM A-I/F headers in an SMS PDU are used primarily for indicating the sender of an SMS (Some carriers are configured to get this from the SIP From header, but the SMS PDU is most common).
The RP-Destination Address is used to indicate the destination for the SMS, and on all the models of handset I’ve been testing with, this is set to the MSISDN of the Subscriber.
But some devices are really finicky about it’s contents. Case in point, Apple iPhones.
If you send a Mobile Terminated SMS to an iPhone, like the one below, the iPhone will accept and send back a 200 OK to this request.
The problem is it will never be displayed to the user… The message is marked as delivered, the phone has accepted it it just hasn’t shown it…
SMS reports as delivered by the iPhone (200 OK back) but never gets displayed to the user of the phone as the RP-Destination Address header is populated
The fix is simple enough, if you set the RP-Destination Address header to 0, the message will be displayed to the user, but still took me a shamefully long time to work out the problem.
RP-Destination Address set to 0 sent to the iPhone, this time it’ll get displayed to the user.
I’ve become a big fan of Redis, and recently I had a need to integrate it into Kamailio.
There are two modules for integrating Kamailio and Redis, each have different functionalities:
db_redis is used when you want to use Redis in lieu of MySQL, PostGres, etc, as the database backend, this would be useful for services like usrloc. Not all queries / function calls are supported, but can be used as a drop-in replacement for a lot of modules that need database connectivity.
ndb_redis exposes Redis functions from the Kamailio config file, in a much more generic way. That’s what we’ll be looking at today.
The setup of the module is nice and simple, we load the module and then define the connection to the Redis server:
With the above we’ve created a connection to the Redis server at 127.0.0.2, and it’s called MyRedisServer.
You can define multiple connections to multiple Redis servers, just give each one a different name to reference.
Now if we want to write some data to Redis (SET) we can do it from within the dialplan with:
redis_cmd("MyRedisServer", "SET foo bar", "r");
We can then get this data back with:
#Get value of key "foo" from Redis
redis_cmd("MyRedisServer", "GET foo", "r");
#Set avp "foo_value" to output from Redis
$avp(foo_value) = $redis(r=>value);
#Print out value of avp "foo_value" to syslog
xlog("Value of foo is: $avp(foo_value))
At the same time, we can view this data in Redis directly by running:
nick@oldfaithful:~$ redis-cli GET foo
Likewise we can set the value of keys and the keys themselves from AVPs from within Kamailio:
#Set the Redis Key to be the Received IP, with the value set to the value of the AVP "youravp"
redis_cmd("MyRedisServer", "SET $ct $avp(youravp)", "r");
All of the Redis functions are exposed through this mechanism, not just get and set, for example we can set the TTL so a record deletes after a set period of time:
#Set key with value of the received IP to expire after 120 seconds
redis_cmd("MyRedisServer", "EXPIRE $ct 120", "r");
I recently used Redis for a distributed flooding prevention mechanism, where the Subscriber’s received IP is used as the key in Redis and the value set to the number of failed auth attempts that subscriber has had, by using Redis we’re able to use the same mechanism across different platforms and easily administer it.
After getting AMR support in FreeSWITCH I set about creating an IMS Application Server for VoLTE / IMS networks using FreeSWITCH.
So in IMS what is an Application Server? Well, the answer is almost anything that’s not a CSCF.
An Application Server could handle your Voicemail, recorded announcements, a Conference Factory, or help interconnect with other systems (without using a BGCF).
I’ll be using mine as a simple bridge between my SIP network and the IMS core I’ve got for VoLTE, with FreeSWITCH transcoding between AMR to PCMA.
Setting up FreeSWITCH
You’ll need to setup FreeSWITCH as per your needs, so that’s however you want to use it.
This post won’t cover setting up FreeSWITCH, there’s plenty of good resources out there for that.
The only difference is when you install FreeSWITCH, you will want to compile with AMR Support, so that you can interact with mobile phones using the AMR codec, which I’ve documented how to do here.
Setting up your IMS
In order to get calls from the IMS to the Application Server, we need a way of routing the calls to the Application Server.
There are two standards-compliant ways to achieve this,
But this is a blunt instrument, after all, it’ll only ever be used at the start of the call, what if we want to send it to an AS because a destination can’t be reached and we want to play back a recorded announcement?
The SIP RFC allows for multiple SIP headers to have the same name,
For example, it’s very common to have lots of Via headers present in a request.
In Kamailio, we often may wish to add headers, view the contents of headers and perform an action or re-write headers (Disclaimer about not rewriting Vias as that goes beyond the purview of a SIP Proxy but whatever).
Let’s look at a use case where we have multiple instances of the X-NickTest: header, looking something like this:
INVITE sip:[email protected]:5061 SIP/2.0
X-NickTest: ENTRY ONE
X-NickTest: ENTRY TWO
X-NickTest: ENTRY THREE
...
Let’s look at how we’d access this inside Kamailio.
First, we could just use the psedovariable for header – $hdr()
xlog("Value of X-NickTest is: $hdr(X-NickTest)");
But this would just result in the first entry being printed out:
Value of X-NickTest is: ENTRY ONE
If we know how many instances there are of the header, we can access it by it’s id in the array, for example:
xlog("Value of first X-NickTest is: $hdr(X-NickTest)[0]");
xlog("Value of second X-NickTest is: $hdr(X-NickTest)[1]");
xlog("Value of third X-NickTest is: $hdr(X-NickTest)[2]");
But we may not know how many to expect either, but we can find out using $hdrc(name) to get the number of headers returned.
xlog("X-NickTest has $hdrc(X-NickTest) entries");
You’re probably seeing where I’m going with this, the next logical step is to loop through them, which we can also do something like this:
$var(i) = 0;
while($var(i) < $hdrc(X-NickTest)) {
xlog(X-NickTest entry [$var(i)] has value $hdrc(X-NickTest)[$var(i)]);
$var(i) = $var(i) + 1;
}
Recently I was working on a project that required Kamailio to constantly re-evaluate something, and generate a UAC request if the condition was met.
There’s a few use cases for this: For example you might want to get Kamailio to constantly check the number of SIP registrations and send an alert if they drop below a certain number. If a subscriber drops out in that their Registration just expires, there’s no SIP message that will come in to tell us, so we’d never be able to trigger something in the normal Kamailio request_route.
Of you might want to continually send a SIP MESSAGE to pop up on someone’s phone to drive them crazy. That’s what this example will focus on.
This is where the rtimer module comes in. You can define the check in a routing block, and then