Having rated CDRs in CGrateS is great, but in reality, you probably want to get them into a billing system, CSV file, S3 bucket, CRM, invoice, Grafana, SQL table, etc, etc.
The Event Exporter Service (EES (previously called CDRe)) handles exporting CDRs from CGrateS.
Like everything in CGrateS, it’s highly configurable, and, again, like everything in CGrateS, supports every combination of services you can think of, plus a stack you haven’t thought of.
CDRs can be exported one of two ways, in real time, as the CDR is generated (online), or after the fact, exporting from the database containing the CDRs (offline).
Exporting in realtime (online) is a great option if you don’t want (or need) to store the CDRs in CGrateS; if you’re just using CGrateS to rate calls and spit them into a seperate system, this is a fantastic option, as it allows your CGrateS instances to remain light and not get clogged up with lots of old CDRs – That said, of course you can export the CDRs in realtime and still store them in CGrateS, that’s also a totally valid approach as well.
The more traditional approach is offline CDR export, where periodically or when an event is triggered, you scrape up a pile of CDRs and send them to your external systems.
For both options, we’ll need to define at least one exporter in our cgrates.json config file. For this example we’ll define a HTTP POST that we will trigger for realtime (online) CDR exporting, and a CSV file we dump to periodically when called from the API.
So first things first, we enable the EES module in the config:
"ees": {
		"enabled": true,
		"exporters": [
		]
	}
We’ll start with defining one exporter, named CSVExporter, that will output files to a folder named “testCSV” in the /tmp/ directory, but you can plonk these files wherever you like:
"ees": {
		"enabled": true,
		"synchronous": true,
		"exporters": [
			{
				"id": "CSVExporter",
				"type": "*file_csv",
				"export_path": "/tmp/testCSV",
				"flags": ["*log"],
				"attempts": 1,
				"synchronous": true,
				"field_separator": ",",
			},
		]
	}
We’ve got a lot of different types of export available to us, but type *file_csv is the easiest, so that’s where we’ll start.
Setting synchronous to true will mean we’ll only run one export job at a time, but it also means we’ll get back the result via the API, which will allow us to keep track of the ID of the last record we updated, so we don’t export the same record multiple times, more on this later.
Flags allows us to, if we wanted, bounce the event through AttributeS, for example, by adding *attributes to the flags, but in this case, it’s just logging to syslog.
Of course, just enabling ees won’t actually send calls to it, we’ll need to add “ees_conns“: [“*localhost”], to “apiers”: and “cdrs” so they know to bounce the events through it:
	"apiers": {
		"enabled": true,
                ...
		"ees_conns": ["*localhost"],
	},

	"cdrs": {
		"enabled": true,
		...
		"ees_conns": ["*localhost"],
	},
Okay, enough talk, let’s get exporting some CDRs!
If you’ve already got CDRs on your system from our previous tutorial, fantastic, but if not, let’s get up and running with a quick and dirty script to define some destinations, a charger, an account balance and then use some of the balance to generate a CDR:
import cgrateshttpapi
import pprint
import uuid
import datetime
now = datetime.datetime.now()
CGRateS_Obj = cgrateshttpapi.CGRateS('localhost', 2080)
#Define Destinations
CGRateS_Obj.SendData({'method':'ApierV2.SetTPDestination','params':[{"TPid":'cgrates.org',"ID":"Dest_AU_Mobile","Prefixes":["614"]}]})
#Load TariffPlan we just defined from StorDB to DataDB
CGRateS_Obj.SendData({"method":"APIerSv1.LoadTariffPlanFromStorDb","params":[{"TPid":'cgrates.org',"DryRun":False,"Validate":True,"APIOpts":None,"Caching":None}],"id":0})
#Define default Charger
print(CGRateS_Obj.SendData({"method": "APIerSv1.SetChargerProfile","params": [{"Tenant": "cgrates.org","ID": "DEFAULT",'FilterIDs': [],'AttributeIDs' : ['*none'],'Weight': 0,}]}))
account = "Nick_Test_123"
#Add a balance to the account with type *sms with 100 sms events
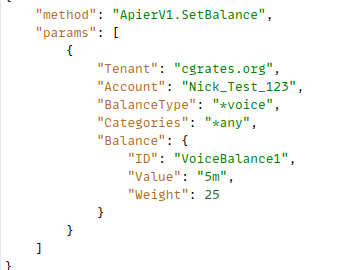
pprint.pprint(CGRateS_Obj.SendData({"method": "ApierV1.SetBalance","params": [{"Tenant": "cgrates.org","Account": account,"BalanceType": "*sms","DestinationIDs": 'Dest_NZ_Mobile;Dest_AU_Mobile',"Categories": "*any","Balance": {"ID": "100_SMS_Bundle_AU_NZ_Mobile","Value": 100,"Weight": 25}}]}))
#Process CDR Event for a single SMS
pprint.pprint(CGRateS_Obj.SendData({"method": "CDRsV2.ProcessExternalCDR","params": [{"OriginID": str(uuid.uuid1()),"ToR": "*sms","RequestType": "*pseudoprepaid","AnswerTime": now.strftime("%Y-%m-%d %H:%M:%S"),"SetupTime": now.strftime("%Y-%m-%d %H:%M:%S"),"Tenant": "cgrates.org","Account": account,"Destination" : "61412345678","Usage": "1",}]}))
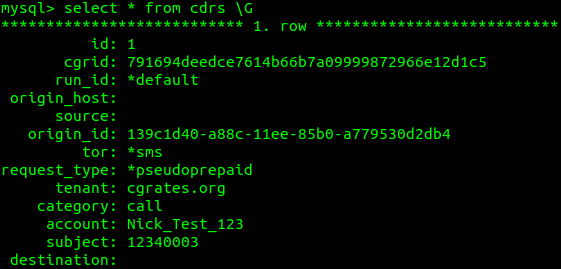
Right, with that out of the way, we should now have something in our CDRs table, a quick SQL query confirms this is the case:

Bingo, there we go.
So let’s try an offline export via the API:
result = CGRateS_Obj.SendData({
	"method": "APIerSv1.ExportCDRs",
	"params": [
		{
			"ExporterIDs": [
				"CSVExporter"
			],
			"Verbose": True,
			"Accounts": [account
			]
		}
	]
})
pprint.pprint(result)
So, as you may have guessed, we’ve called the ExportCDRs API endpoint, we’ve specified which ExporterIDs we want to reference (these link back to the objects in the config, and the one we have defined currently is named CSVExporter).
Setting Verbose: True means that CGrateS gives us back a lot of info from the API call, here’s what we get back:
{"error": None,
 "id": None,
 "result": {"CSVExporter": {"ExportPath": "/tmp/testCSV/CSVExporter_21e9bc2.csv",
                            "FirstEventATime": "2024-01-02T18: 09: 29+11: 00",
                            "FirstExpOrderID": 14,
                            "LastEventATime": "2024-01-02T18: 40: 53+11: 00",
                            "LastExpOrderID": 25,
                            "NegativeExports": [],
                            "NumberOfEvents": 12,
                            "PositiveExports": ["f45dd29",
                                                ...
                                                "6163255"
            ],
                            "TimeNow": "2024-01-02T18: 40: 53.791517662+11: 00",
                            "TotalCost": 0,
                            "TotalSMSUsage": 12
        }
    }
}
Now that looks pretty positive, we got 12 events of SMS usage exported, which we can see in the file /tmp/testCSV/CSVExporter_21e9bc2.csv – and if we cat out the file, yeap, there’s all the CDRs.
But it’s a bit of a mess, there’s a lot of fields in there, so let’s adjust what goes into the CSV.
Let’s start by filtering what goes into the exporter, to only give us SMS events, of course you could adjust the filters here to target exporting only the records you want, based on anything you can define with Filters (and there’s a lot you can define with filters).
	"ees": {
		"enabled": true,
		"exporters": [
			{
				"id": "CSVExporter",
				"type": "*file_csv",
				"export_path": "/tmp/testCSV",
				"flags": ["*log"],
				"attempts": 1,
				"filters": ["*string:~*req.ToR:*sms"],
				"synchronous": true,
				"field_separator": ",",
				...
Now we’re only exporting SMS records, so let’s clean up the output of the CSV to just give us the data we want, which is the CDR ID, time, account, destination and usage.
	"ees": {
		"enabled": true,
		"exporters": [
			{
				"id": "CSVExporter",
				"type": "*file_csv",
				"export_path": "/tmp/testCSV",
				"flags": ["*log"],
				"attempts": 1,
				"filters": ["*string:~*req.ToR:*sms"],
				"synchronous": true,
				"field_separator": ",",
				"fields":[
					//Headers
					{"tag": "CGRID", "path": "*hdr.CGRID", "type": "*constant", "value": "CGRID"},
					{"tag": "AnswerTime", "path": "*hdr.AnswerTime", "type": "*constant", "value": "AnswerTime"},
					{"tag": "Account", "path": "*hdr.Account", "type": "*constant", "value": "Account"},
					{"tag": "Destination", "path": "*hdr.Destination", "type": "*constant", "value": "Destination"},
					{"tag": "Usage", "path": "*hdr.Usage", "type": "*constant", "value": "Usage"},
					//Values
					{"tag": "CGRID", "path": "*exp.CGRID", "type": "*variable", "value": "~*req.CGRID"},
					{"tag": "AnswerTime", "path": "*exp.AnswerTime", "type": "*variable", "value": "~*req.AnswerTime{*time_string:2006-01-02T15:04:05Z}"},
					{"tag": "Account", "path": "*exp.Account", "type": "*variable", "value": "~*req.Account"},
					{"tag": "Destination", "path": "*exp.Destination", "type": "*variable", "value": "~*req.Destination"},
					{"tag": "Usage", "path": "*exp.Usage", "type": "*variable", "value": "~*req.Usage"},

				],
			},
...
Now after a restart of CGrateS, our exports look like this:
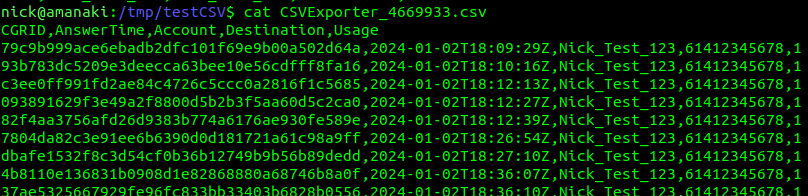
Stunning, truly beautiful, look at that output!
Right, well you may at this point have noticed a problem if you’ve run this more than once. The problem is that is every time we run this, we get all the CDRs since the beginning of time.
Now there’s a few ways we can handle this, if we only want CDRs generated in the past day for example, we can filter that as an input on the ExportCDRs API call, using the multitude of filters available to us as documented in the API docs.
But where filtering by date/time falls down, is that if an offline CDR of a call on Monday, only got ingested on Tuesday, it would be missed by the export.
But, setting Verbose: True on the ExportCDRs API call gives us a handy trick, we’ve been told what the highest ID in the CDRs table we just exported in the response from the API in LastExpOrderID field.
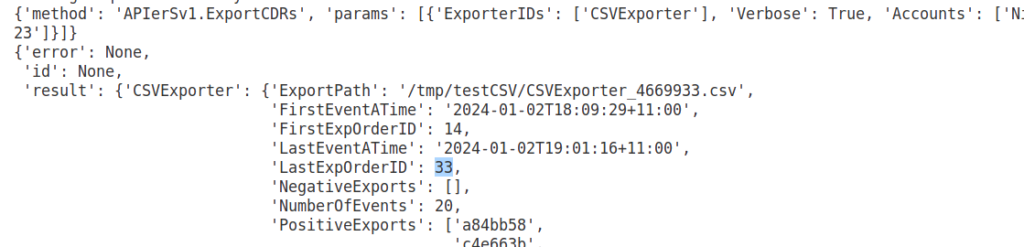
If we jump over to the SQL database we use for StorDB, we can see that 33 is the ID of the highest CDR in the system.
So let’s try something, let’s run the exporter again, but this time let’s get all the CDRs where the ID is higher than 33:
#Process CDR Event for a single SMS
pprint.pprint(CGRateS_Obj.SendData({"method": "CDRsV2.ProcessExternalCDR","params": [{"OriginID": str(uuid.uuid1()),"ToR": "*sms","RequestType": "*pseudoprepaid","AnswerTime": now.strftime("%Y-%m-%d %H:%M:%S"),"SetupTime": now.strftime("%Y-%m-%d %H:%M:%S"),"Tenant": "cgrates.org","Account": account,"Destination" : "61412345678","Usage": "1",}]}))

#Trigger export where the OrderID is above 33
result = CGRateS_Obj.SendData({"method":"APIerSv1.ExportCDRs","params":[
    {"ExporterIDs": ["CSVExporter"],
     "Verbose" : True,
     "ExtraArgs" : {
        "OrderIDStart" : int(33),
     },
     "Accounts" : [account]}
]})
pprint.pprint(result)
Boom, now if we have a look at the output we can see the export covered two records, and the last ID was 35.
{'method': 'APIerSv1.ExportCDRs', 'params': [{'ExporterIDs': ['CSVExporter'], 'Verbose': True, 'ExtraArgs': {'OrderIDStart': 33}, 'run_id': 'carrier_interconnect', 'Accounts': ['Nick_Test_123']}]}
{'error': None,
 'id': None,
 'result': {'CSVExporter': {'ExportPath': '/tmp/testCSV/CSVExporter_c444cd9.csv',
                            'FirstEventATime': '2024-01-02T19:19:59+11:00',
                            'FirstExpOrderID': 34,
                            'LastEventATime': '2024-01-02T19:20:08+11:00',
                            'LastExpOrderID': 35,
                            'NegativeExports': [],
                            'NumberOfEvents': 2,
                            'PositiveExports': ['034aba2', '22e4fa7'],
                            'TimeNow': '2024-01-02T19:20:08.355664133+11:00',
                            'TotalCost': 0,
                            'TotalSMSUsage': 2}}}
So as long as we keep track of the LastExpOrderID value, and feed that as in input every time we run ExportCDRs, we can ensure we never miss a CDR, and never get the same CDR twice.