We recently added support in PyHSS for fixed line SIP subscribers to attach to the IMS.
Traditional telecom operators are finding their fixed line network to be a bit of a money pit, something they’re required to keep operating to meet regulatory obligations, but the switches are sitting idle 99% of the time. As such we’re seeing more and more operators move fixed line subs onto their IMS.
This new feature means we can use PyHSS to serve as the brains for a fixed network, as well as for mobile, but there’s one catch – How we authenticate subscribers changes.
Most banks of line cards in a legacy telecom switches, or IP Phones, don’t have SIM slots to allow us to authenticate, so instead we’re forced to fallback to what they do support.
Unfortunately for the most part, what is supported by these IP phones or telecom switches is SIP MD5 Digest Authentication.
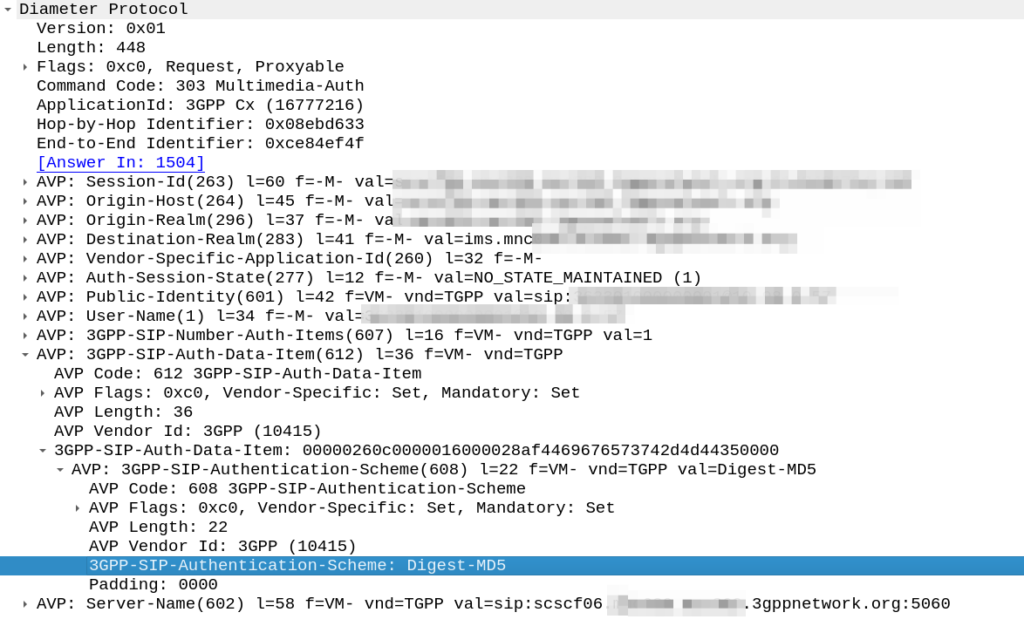
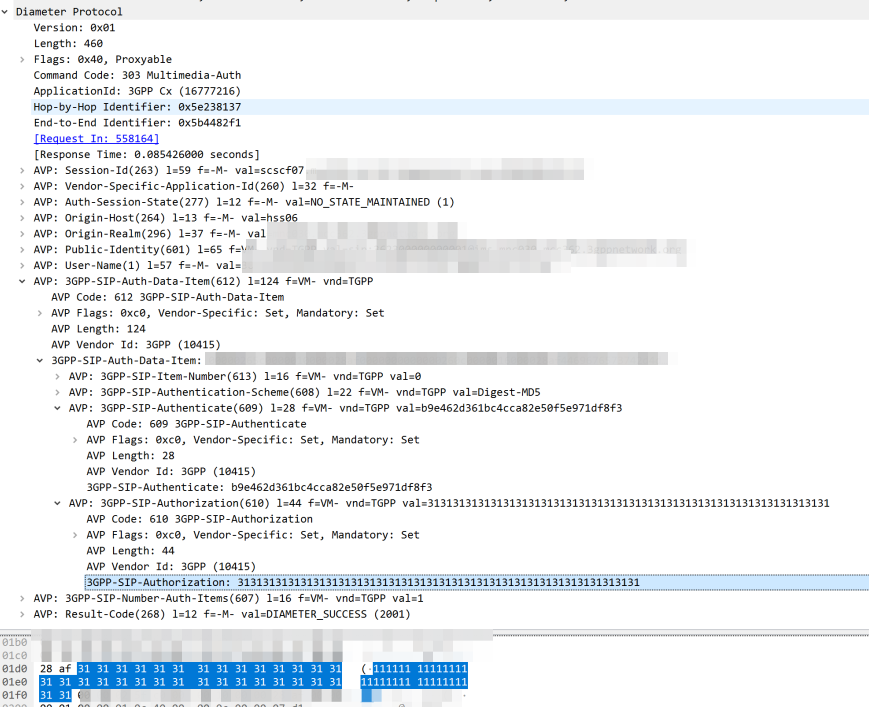
The Nonce is generated by the HSS and put into the Multimedia-Authentication-Answer, along with the subscriber’s password and sent in the clear to the S-CSCF.
The HSS then generates the the Multimedia-Auth Answer, it generates a nonce (in the 3GPP-SIP-Authenticate / 609 AVP) and sends the Subscriber’s password in the 3GPP-SIP-Authorization (610) AVP in response back to the S-CSCF.
I would have thought a better option would be for the HSS to generate the Nonce and Digest, and then the S-CSCF to just send the Nonce to the Sub and compare the returned Digest from the Sub against the expected Digest from the HSS, but it would limit flexibility (realm adaptation, etc) I guess.
The UE/UA (I guess it’s a UA in this context as it’s not a mobile) then generates its own Digest from the Nonce and sends it back to the S-CSCF via the P-CSCF.
The S-CSCF compares the received Digest response against the one it generated, and if the two match, the sub is authenticated and allowed to attach onto the network.
In the past I had my iFCs setup to look for the P-Access-Network-Info header to know if the call was coming from the IMS, but it wasn’t foolproof – Fixed line IMS subs didn’t have this header.
We’re doing more and more network automation, and something that came up as valuable to us would be to have all the IPs in HOMER SIP Capture come up as the hostnames of the VM running the service.
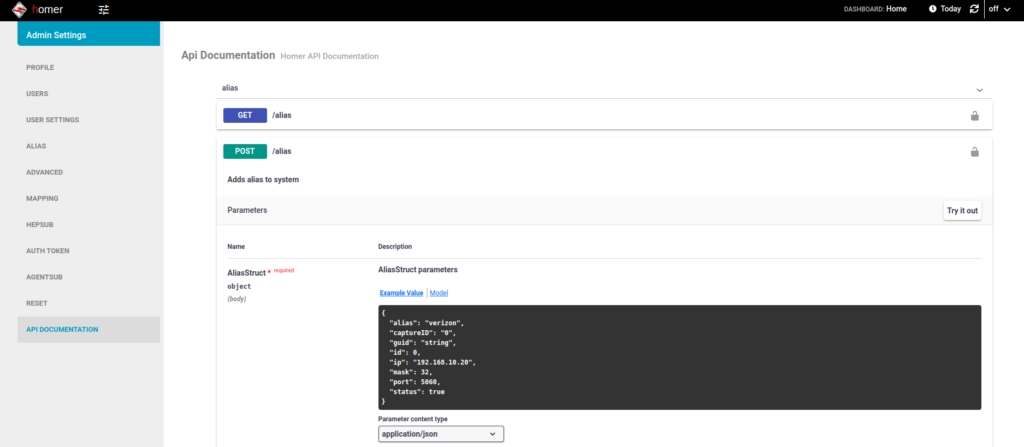
Luckily for us HOMER has an API for this ready to roll, and best of all, it’s Swagger based and easily documented (awesome!).
(Probably through my own failure to properly RTFM) I was struggling to work out the correct (current) way to Authenticate against the API service using a username and password.
Because the HOMER team are awesome however, the web UI for HOMER, is just an API client.
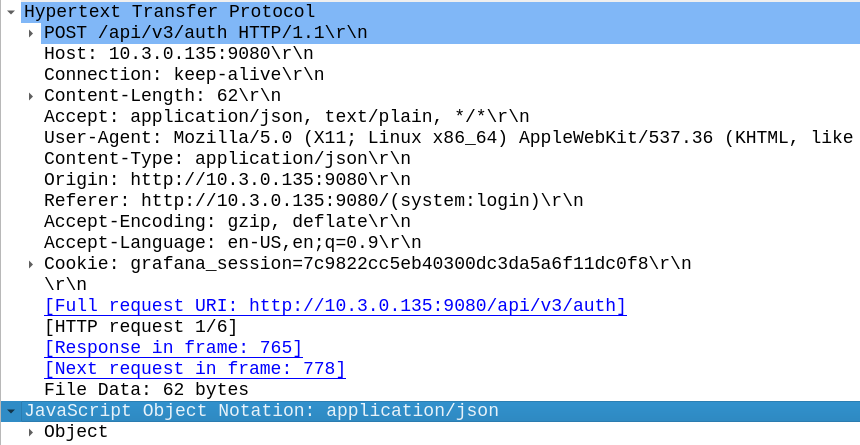
This means to look at how to log into the API, I just needed to fire up Wireshark, log into the Web UI via my browser and then flick through the packets for a real world example of how to do this.
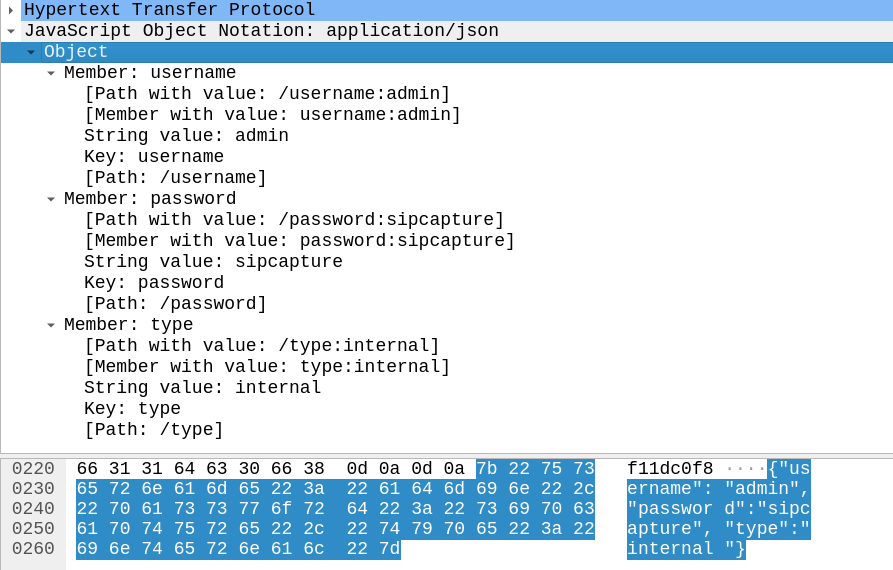
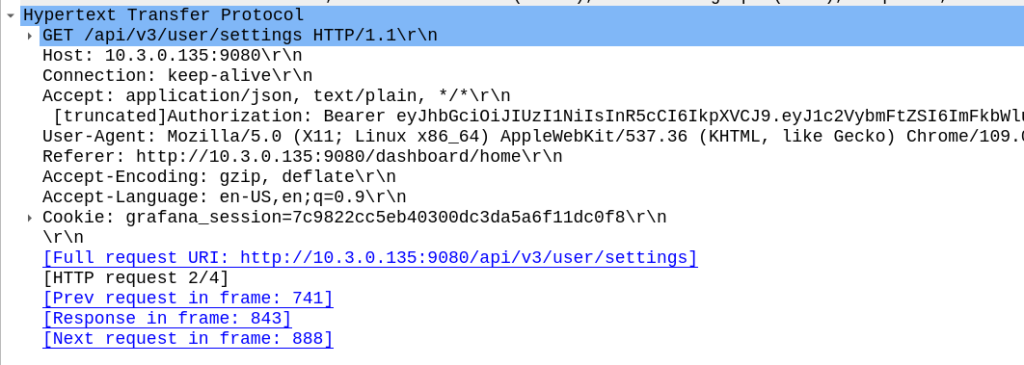
Homer Login JSON body as seen by Wireshark
In the Login action I could see the browser posts a JSON body with the username and password to /api/v3/auth
And in return the Homer API Server responds with a 201 Created an a auth token back:
Now in order to use the API we just need to include that token in our Authorization: header then we can hit all the API endpoints we want!
For me, the goal we were setting out to achieve was to setup the aliases from our automatically populated list of hosts. So using the info above I setup a simple Python script with Requests to achieve this:
import requests
s = requests.Session()

#Login and get Token
url = 'http://homer:9080/api/v3/auth'
json_data = {"username":"admin","password":"sipcapture"}
x = s.post(url, json = json_data)
print(x.content)
token = x.json()['token']
print("Token is: " + str(token))


#Add new Alias
alias_json = {
          "alias": "Blog Example",
          "captureID": "0",
          "id": 0,
          "ip": "1.2.3.4",
          "mask": 32,
          "port": 5060,
          "status": True
        }

x = s.post('http://homer:9080/api/v3/alias', json = alias_json, headers={'Authorization': 'Bearer ' + token})
print(x.status_code)
print(x.content)


#Print all Aliases
x = s.get('http://homer:9080/api/v3/alias', headers={'Authorization': 'Bearer ' + token})
print(x.json())
And bingo we’re done, a new alias defined.
We wrapped this up in a for loop for each of the hosts / subnets we use and hooked it into our build system and away we go!
With the Homer API the world is your oyster in terms of functionality, all the features of the Web UI are exposed on the API as the Web UI just uses the API (something I wish was more common!).
Using the Swagger based API docs you can see examples of how to achieve everything you need to, and if you ever get stuck, just fire up Wireshark and do it in the Homer WebUI for an example of how the bodies should look.
One day recently I was messing with the XCAP server, trying to set the Call Forward timeout. In the process I triggered the UE to send a USSD request to the IMS.
Huh, I thought, “I wonder how hard it would be to build a USSD Gateway for our IMS?”, and this my friends, is the story of how I wasted a good chunk of my weekend trying (and failing) to add support for USSD.
You might be asking “Who still uses USSD?” – The use cases for USSD are pretty thin on the ground in this day and age, but I guess balance query, and uh…
But this is the story of what I tried before giving up and going outside…
Routing
First I’d need to get the USSD traffic towards the USSD Gateway, this means modifying iFCs. Skimming over the spec I can see the Recv-Info: header for USSD traffic should be set to “g.3gpp.ussd” so I knocked up an iFC to match that, and route the traffic to my dev USSD Gateway, and added it to the subscriber profile in PyHSS:
Easy peasy, now we have the USSD requests hitting our USSD Gateway.
The Response
I’ll admit that I didn’t jump straight to the TS doc from the start.
The first place I headed was Google to see if I could find any PCAPs of USSD over IMS/SIP.
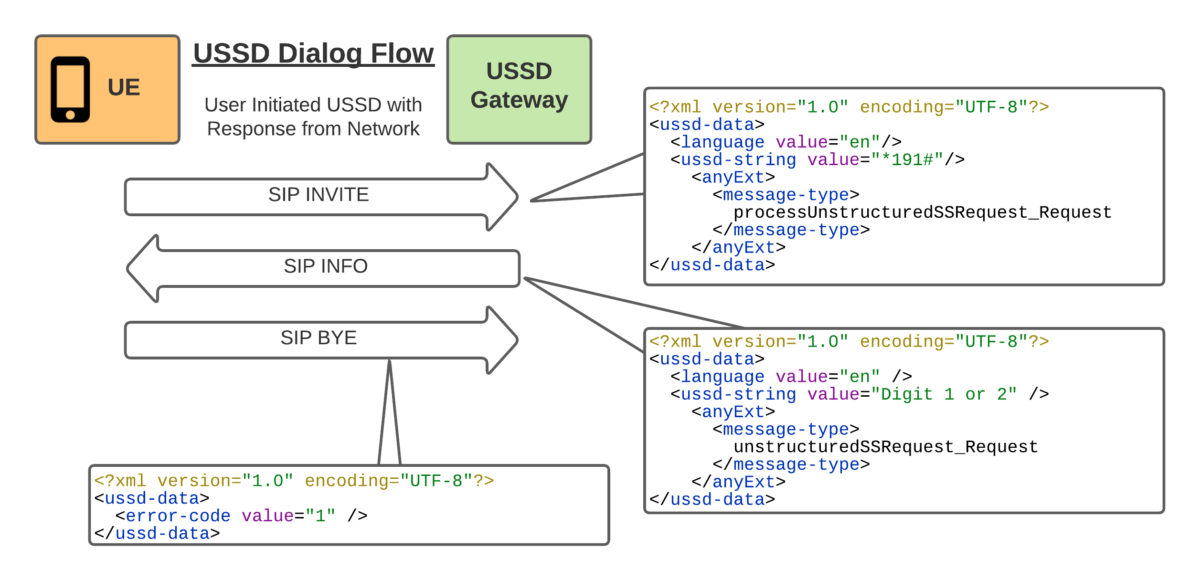
And I did – Restcomm seems to have had a USSD product a few years back, and trawling around their stuff provided some reference PCAPs of USSD over SIP.
So the flow seemed pretty simple, SIP INVITE to set up the session, SIP INFO for in-dialog responses and a BYE at the end.
With all the USSD guts transferred as XML bodies, in a way that’s pretty easy to understand.
Being a Kamailio fan, that’s the first place I started, but quickly realised that SIP proxies, aren’t great at acting as the UAS.
So I needed to generate in-dialog SIP INFO messages, so I turned to the UAC module to generate the SIP INFO response.
My Kamailio code is super simple, but let’s have a look:
request_route {

        xlog("Request $rm from $fU");

        if(is_method("INVITE")){
                xlog("USSD from $fU to $rU (Emergency number) CSeq is $cs ");
                sl_reply("200", "OK Trying USSD Phase 1");      #Generate 200 OK
                route("USSD_Response"); #Call USSD_Response route block
                exit;
        }
}

route["USSD_Response"]{
        xlog("USSD_Response Route");
        #Generate a new UAC Request
        $uac_req(method)="INFO";
        $uac_req(ruri)=$fu;     #Copy From URI to Request URI
        $uac_req(furi)=$tu;     #Copy To URI to From URI
        $uac_req(turi)=$fu;     #Copy From URI to To URI
        $uac_req(callid)=$ci;   #Copy Call-ID
                                #Set Content Type to 3GPP USSD
        $uac_req(hdrs)=$uac_req(hdrs) + "Content-Type: application/vnd.3gpp.ussd+xml\r\n";
                                #Set the USSD XML Response body
        $uac_req(body)="<?xml version='1.0' encoding='UTF-8'?>
        <ussd-data>
                <language value=\"en\"/>
                <ussd-string value=\"Bienvenido. Seleccione una opcion: 1 o 2.\"/>
        </ussd-data>";
        $uac_req(evroute)=1;    #Set the event route to use on return replies
        uac_req_send();         #Send it!
}
So the UAC module generates the 200 OK and sends it back.
“That was quick” I told myself, patting myself on the back before trying it out for the first time.
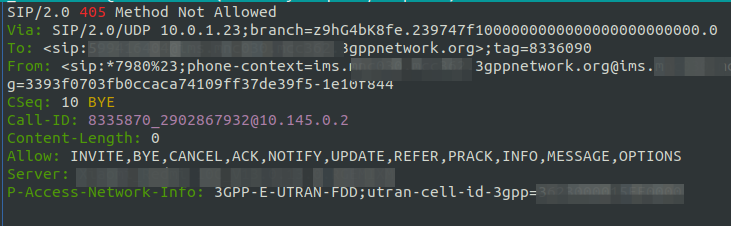
Huston, we have a problem – Although the Call-ID is the same, it’s not an in-dialog response as the tags aren’t present, this means our UE send back a 405 to the SIP INFO.
Right. Perhaps this is the time to read the Spec…
Okay, so the SIP INFO needs to be in dialog. Can we do that with the UAC module? Perhaps not…
But alas real life came back to rear its ugly head, and this adventure will have to continue another day…
Update: Thanks to a kindly provided PCAP I now know what I was doing wrong, and so we’ll soon have a follow up to this post named “Successes in cobbling together a USSD Gateway” just as soon as I have a weekend free.
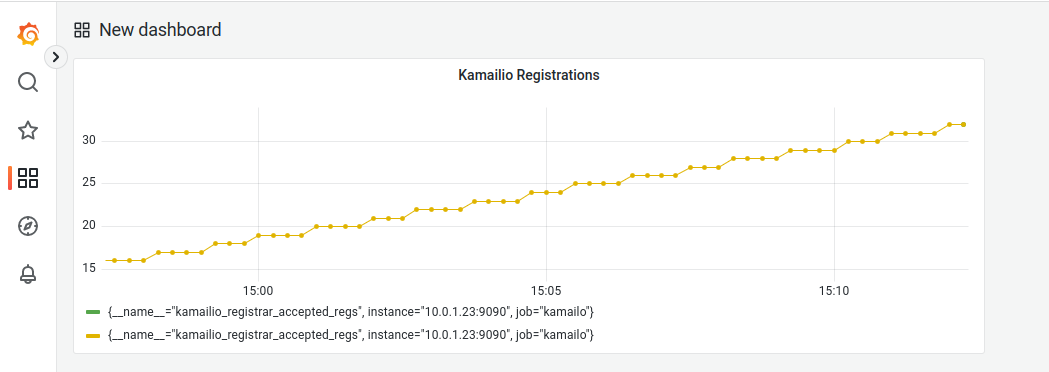
I recently fell in love with the Prometheus + Grafana combo, and I’m including it in as much of my workflow as possible, so today we’ll be integrating this with another favorite – Kamailio.
Why would we want to integrate Kamailio into Prometheus + Grafana? Observability, monitoring, alerting, cool dashboards to make it look like you’re doing complicated stuff, this duo have it all!
I’m going to assume some level of familiarity with Prometheus here, and at least a basic level of understanding of Kamailio (if you’ve never worked with Kamailio before, check out my Kamailio 101 Series, then jump back here).
So what will we achieve today?
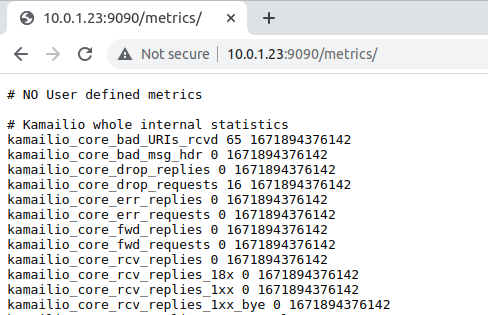
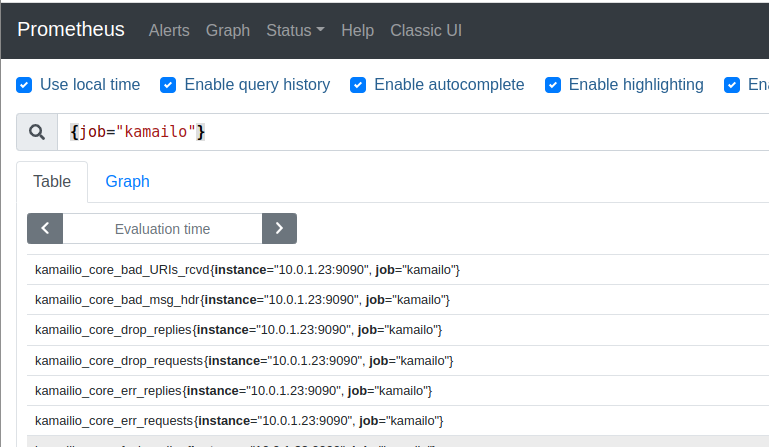
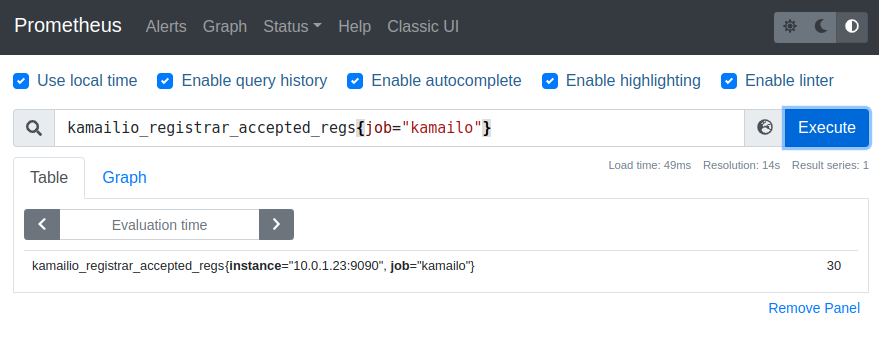
We’ll start with the simple SIP Registrar in Kamailio from this post, and we’ll add on the xhttp_prom module, and use it to expose some stats on the rate of requests, and responses sent to those requests.
So to get started we’ll need to load some extra modules, xhttp_prom module requires xhttp (If you’d like to learn the basics of xhttp there’s also a Kamailio Bytes – xHTTP Module post covering the basics) so we’ll load both.
xHTTP also has some extra requirements to load, so in the top of our config we’ll explicitly specify what ports we want to bind to, and set two parameters that control how Kamailio handles HTTP requests (otherwise you’ll not get responses for HTTP GET requests).
Then where you load all your modules we’ll load xhttp and xhttp_prom, and set the basic parameters:
loadmodule "xhttp.so"
loadmodule "xhttp_prom.so"

# Define two counters and a gauge
modparam("xhttp_prom", "xhttp_prom_stats", "all")
By setting xhttp_prom module to expose all stats, this exposes all of Kamailio’s internal stats as counters to Prometheus – This means we don’t need to define all our own counters / histograms / gauges, instead we can use the built in ones from Kamailio. Of course we can define our own custom ones, but we’ll do that in our next post.
Lastly we’ll need to add an event route to handle HTTP requests to the /metrics URL:
Well, there’s another concept I haven’t introduced yet, and that’s ChargerS, this is a concept / component we’ll dig into deeper for derived charging, but for now just know we need to add a ChargerS rule in order to get CDRs rated:
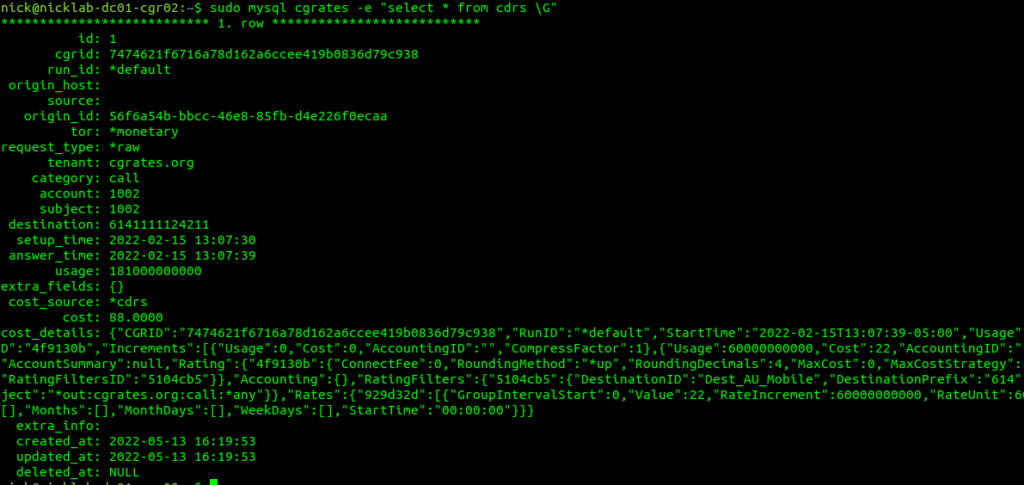
Well, if you’ve got CDR storage in StoreDB enabled (And you probably do if you’ve been following up until this point), then the answer is a MySQL table, and we can retrive the data with:
sudo mysql cgrates -e "select * from cdrs \G"
For those of you with a bit of MySQL experience under your belt, you’d be able to envisage using the SUM function to total a monthly bill for a customer from this.
Of course we can add CDRs via the API, and you probably already guessed this, but we can retrive CDRs via the API as well, filtering on the key criteria:
This would be useful for generating an invoice or populating recent calls for a customer portal.
Maybe creating rated CDRs and sticking them into a database is exactly what you’re looking to achieve in CGrateS – And if so, great, this is where you can stop – but for many use cases, there’s a want for an automated solution – For your platform to automatically integrate with CGrateS.
If you’ve got an Asterisk/FreeSWITCH/Kamailio or OpenSIPs based platform, then you can integrate CGrateS directly into your platform to add the CDRs automatically, as well as access features like prepaid credit control, concurrent call limits, etc, etc. The process is a little different on each of these platforms, but ultimately under the hood, all of these platforms have some middleware that generates the same API calls we just ran to create the CDR.
So far this tutorial has been heavy on teaching the API, because that’s what CGrateS ultimately is – An API service.
Our platforms like Asterisk and Kamailio with the CGrateS plugins are just CGrateS API clients, and so once we understand how to use and interact with the API it’s a breeze to plug in the module for your platform to generate the API calls to CGrateS required to integrate.
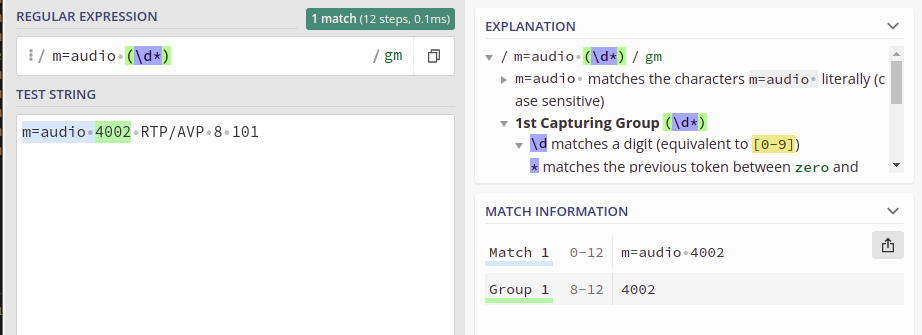
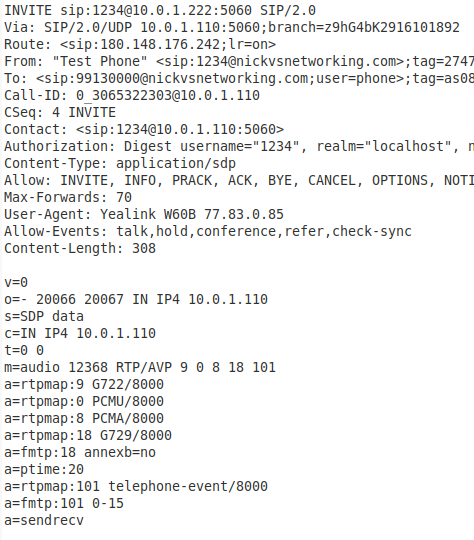
So the other day I needed to extract the IP and Port parameters from an SDP body – Not the whole line mind, but the values themselves.
As with so many things in Kamailio, there’s a lot of ways to achieve an outcome, but here’s how I approached this problem.
Using the SDPops module we can get a particular line in the SDP, for example, we can get the media line with:
#Get SDP line starting with m= and put it into AVP $avp(mline)
sdp_get_line_startswith("$avp(mline)", "m=")
#Print value of $avp(mline)
xlog("m-line: $avp(mline)\n");
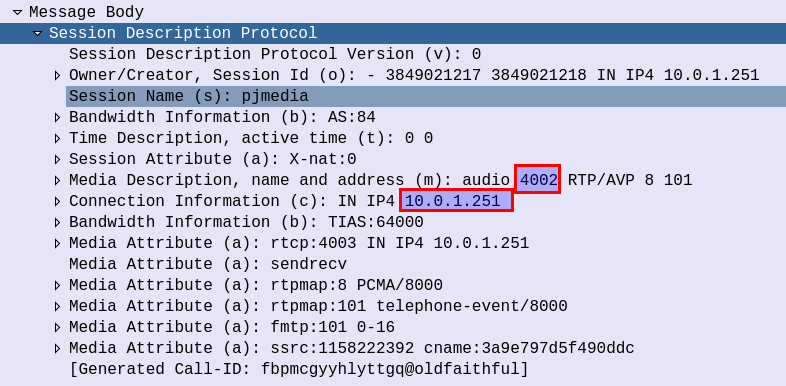
This gets us the line, but now we need to extract the data, in the example from the screenshot the M line has the value:
m=audio 4002 RTP/AVP 8 101
But we only want the port from the M line.
This is where I’ve used the Kamailio Dialplan module and regex to extract the port from this line.
With a fairly simple regex pattern, we can get a group match for the Port from the m= line.
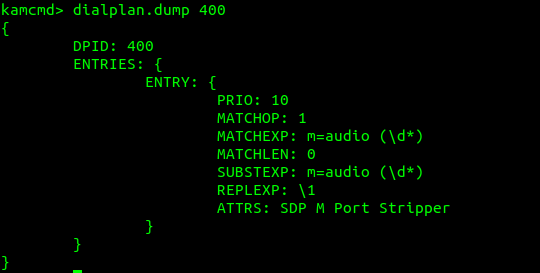
So I took this regular expression, and put it into the Kamailio Dialplan database with dialplan ID 400 for this example:
INSERT INTO `dialplan` VALUES (4,400,10,1,'m=audio (\\d*)',0,'m=audio (\\d*)','\\1','SDP M Port Stripper');
Now using Dialplan ID 400 we can translate an inputted m= SDP line, and get back the port used, so let’s put that into practice:
        if(sdp_get_line_startswith("$avp(mline)", "m=")) {
            xlog("m-line: $avp(mline)\n");
            xlog("raw: $avp(mline)");
            xlog("Extracting Port from Media Line");
            dp_translate("400", "$avp(mline)/$avp(m_port_b_leg)");
            xlog("Translated m_port_b_leg is: $avp(m_port_b_leg)");
        }
Now we have an AVP called $avp(m_port_b_leg) which contains the RTP Port from the SDP.
Now we’ve got a few other values we might want to get, such as the IP the RTP is to go to, etc, we can extract this in the same way, with Dialplans and store them as AVPs:
        #Print current SDP Values and store as Vars
        if(sdp_get_line_startswith("$avp(mline)", "m=")) {
            xlog("m-line: $avp(mline)\n");
            xlog("raw: $avp(mline)");
            xlog("Extracting Port from Media Line");
            dp_translate("400", "$avp(mline)/$avp(m_port_b_leg)");
            xlog("Translated m_port_b_leg is: $avp(m_port_b_leg)");
        }

        if(sdp_get_line_startswith("$avp(oline)", "o=")) {
            xlog("o-line: $avp(oline)\n");
            dp_translate("401", "$avp(oline)/$avp(o_line_port_1)");
            xlog("O Line Port 1: $avp(o_line_port_1)");
            dp_translate("402", "$avp(oline)/$avp(o_line_port_2)");
            xlog("O Line Port 2: $avp(o_line_port_2)");
            dp_translate("403", "$avp(oline)/$avp(o_ip_b_leg)");
            xlog("O IP: $avp(o_ip_b_leg)");
        }
And all the Regex you’ll need:
INSERT INTO `dialplan` VALUES
(4,400,10,1,'m=audio (\\d*)',0,'m=audio (\\d*)','\\1','SDP M Port Stripper'),
(5,401,10,1,'o=[^ ]* (\\d*) (\\d*) IN IP4 (\\d*.d*.\\d*.\\d*)',0,'o=[^ ]* (\\d*) (\\d*) IN IP4 (\\d*.d*.\\d*.\\d*)','\\1','O Port 1'),
(6,402,10,1,'o=[^ ]* (\\d*) (\\d*) IN IP4 (\\d*.d*.\\d*.\\d*)',0,'o=[^ ]* (\\d*) (\\d*) IN IP4 (\\d*.d*.\\d*.\\d*)','\\2','O Port 2'),
(7,403,10,1,'o=[^ ]* (\\d*) (\\d*) IN IP4 (\\d*.d*.\\d*.\\d*)',0,'o=[^ ]* (\\d*) (\\d*) IN IP4 (\\d*[.]\\d*[.]\\d*[.]\\d*)','\\3','O IP');
The hint to the cause of the error is above it – Codec comparison. If we look at the Audio Codec Compare lines, we can see the GSM codec we are trying to use, does not match the codecs configured in FreeSWITCH, hence getting the INCOMPATIBLE_DESTINATION error – None of the codecs offered match the codecs supported in FreeSWITCH.
So where do we go to fix this?
Well the SIP profile itself defines the codecs that are supported on this SIP profile,
FreeSWITCH SIP Profile (Sofia) codec settings
If you’re using a mostly default config, you’ll see this is set to a global variable, called $${global_codec_prefs}, so let’s take a look at vars.xml where this is defined:
FreeSWITCH default codec selection global variable
And there’s our problem, we need to add the GSM codec into that list to allow the calls,
So we change it to add the codecs we want to support, and reload the changes,
The Codec preferences I need for this IMS Application Server
Recently I’ve been doing some work with FreeSWITCH as an IMS Conference Factory, I’ve written a bit about it before in this post on using FreeSWITCH with the AMR codec.
Pretty early on in my testing I faced a problem with subsequent in-dialog responses, like re-INVITEs used for holding the calls.
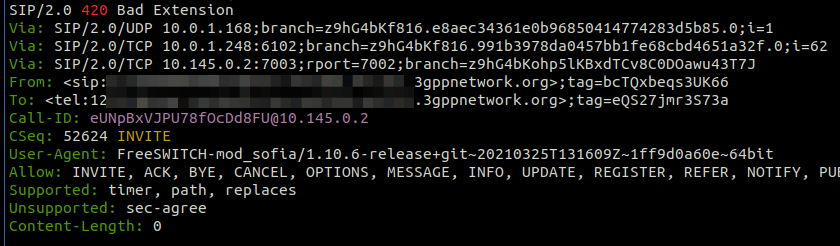
Every subsequent message, was getting a “420 Bad Extension” response from FreeSWITCH.
The ReINVITEThe 420 Bad Extension Response
So what didn’t it like and why was FreeSWITCH generating 420 Bad Extension Responses to these subsequent messages?
Well, the “Extensions” FreeSWITCH is referring to are not extensions in the Telephony sense – as in related to the Dialplan, like an Extension Number to identify a user, but rather the Extensions (as in expansions) to the SIP Protocol introduced for IMS.
The re-INVITE contains a Require header with sec-agree which is a SIP Extension introduced for IMS, which FreeSWITCH does not have support for, and the re-INVITE says is required to support the call (Not true in this case).
Using a Kamailio based S-CSCF means it is easy to strip these Headers before forwarding the requests onto the Application Server, which is what I’ve done, and bingo, no more errors!
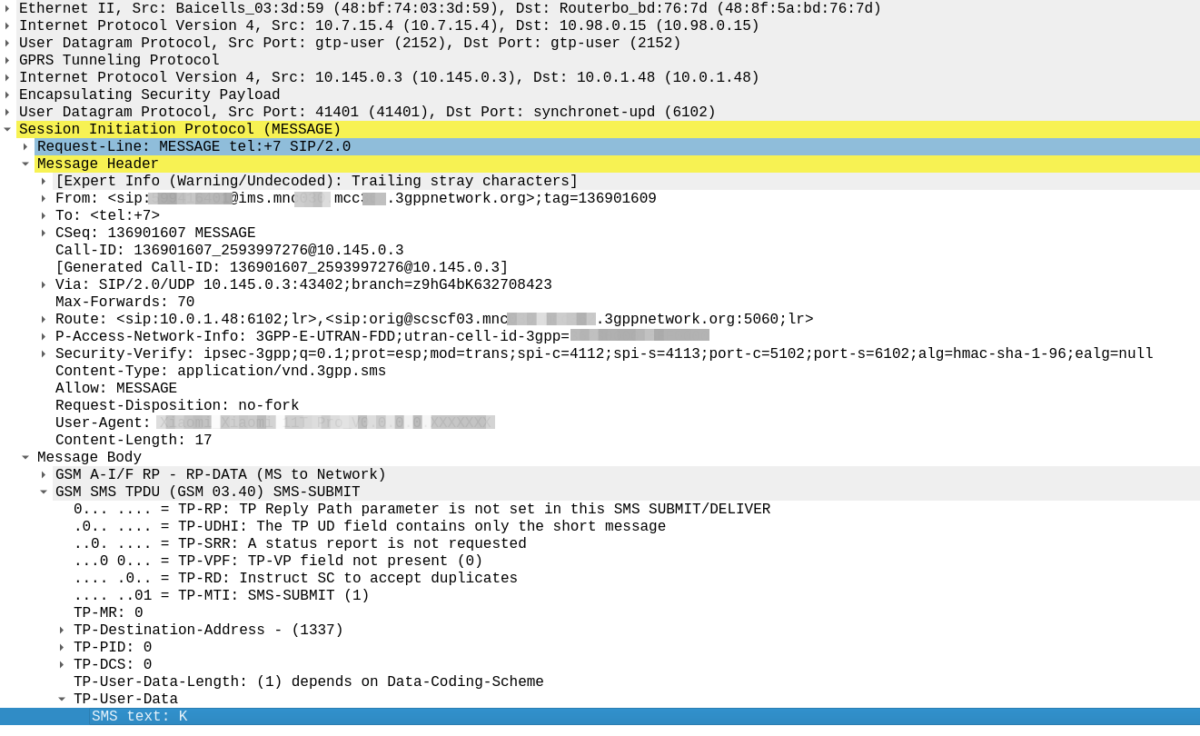
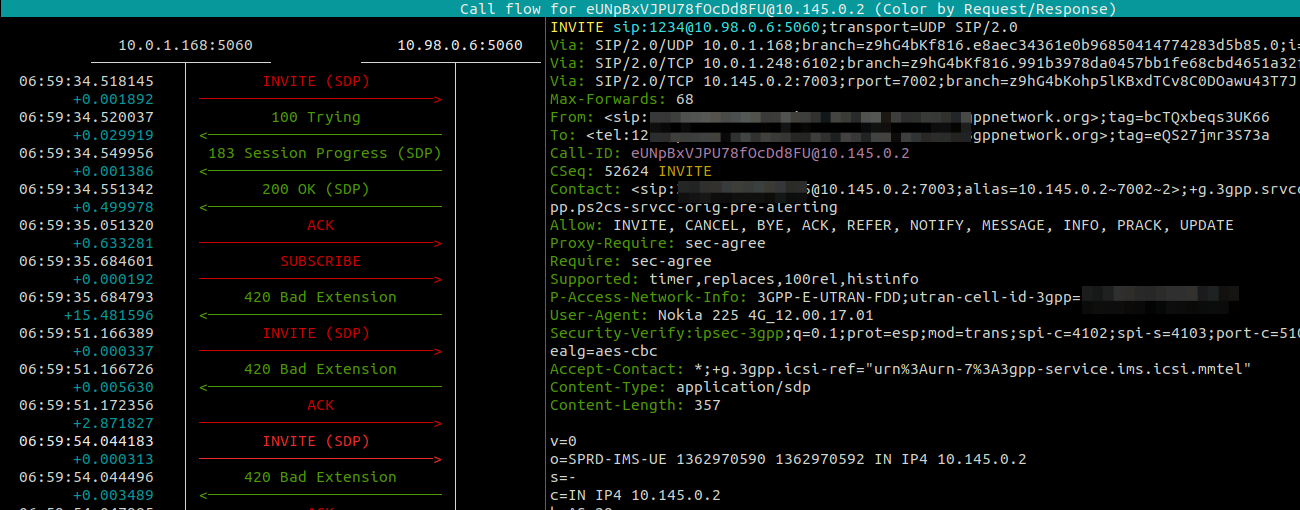
In iOS 15, Apple added support for iPhones to support SMS over IMS networks – SMSoIP. Previously iPhone users have been relying on CSFB / SMSoNAS (Using the SGs interface) to send SMS on 4G networks.
Getting this working recently led me to some issues that took me longer than I’d like to admit to work out the root cause of…
I was finding that when sending a Mobile Termianted SMS to an iPhone as a SIP MESSAGE, the iPhone would send back the 200 OK to confirm delivery, but it never showed up on the screen to the user.
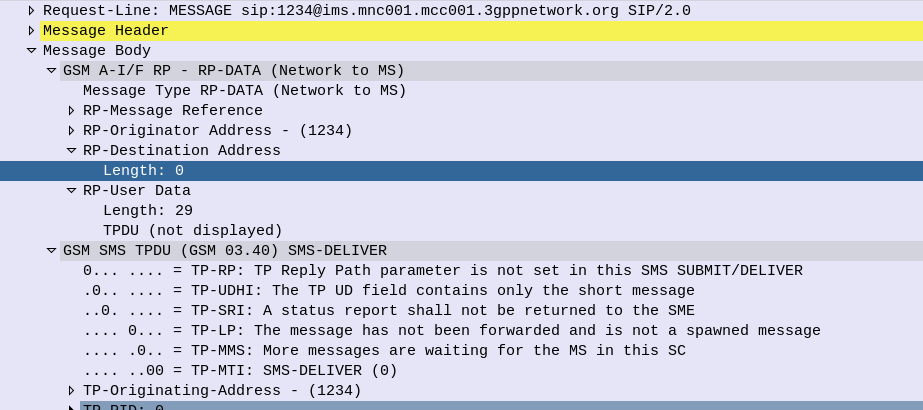
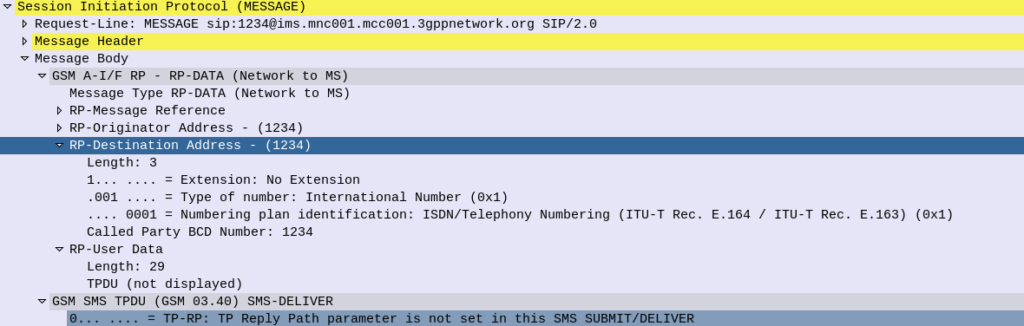
The GSM A-I/F headers in an SMS PDU are used primarily for indicating the sender of an SMS (Some carriers are configured to get this from the SIP From header, but the SMS PDU is most common).
The RP-Destination Address is used to indicate the destination for the SMS, and on all the models of handset I’ve been testing with, this is set to the MSISDN of the Subscriber.
But some devices are really finicky about it’s contents. Case in point, Apple iPhones.
If you send a Mobile Terminated SMS to an iPhone, like the one below, the iPhone will accept and send back a 200 OK to this request.
The problem is it will never be displayed to the user… The message is marked as delivered, the phone has accepted it it just hasn’t shown it…
SMS reports as delivered by the iPhone (200 OK back) but never gets displayed to the user of the phone as the RP-Destination Address header is populated
The fix is simple enough, if you set the RP-Destination Address header to 0, the message will be displayed to the user, but still took me a shamefully long time to work out the problem.
RP-Destination Address set to 0 sent to the iPhone, this time it’ll get displayed to the user.
The SIP RFC allows for multiple SIP headers to have the same name,
For example, it’s very common to have lots of Via headers present in a request.
In Kamailio, we often may wish to add headers, view the contents of headers and perform an action or re-write headers (Disclaimer about not rewriting Vias as that goes beyond the purview of a SIP Proxy but whatever).
Let’s look at a use case where we have multiple instances of the X-NickTest: header, looking something like this:
INVITE sip:[email protected]:5061 SIP/2.0
X-NickTest: ENTRY ONE
X-NickTest: ENTRY TWO
X-NickTest: ENTRY THREE
...
Let’s look at how we’d access this inside Kamailio.
First, we could just use the psedovariable for header – $hdr()
xlog("Value of X-NickTest is: $hdr(X-NickTest)");
But this would just result in the first entry being printed out:
Value of X-NickTest is: ENTRY ONE
If we know how many instances there are of the header, we can access it by it’s id in the array, for example:
xlog("Value of first X-NickTest is: $hdr(X-NickTest)[0]");
xlog("Value of second X-NickTest is: $hdr(X-NickTest)[1]");
xlog("Value of third  X-NickTest is: $hdr(X-NickTest)[2]");
But we may not know how many to expect either, but we can find out using $hdrc(name) to get the number of headers returned.
xlog("X-NickTest has $hdrc(X-NickTest) entries");
You’re probably seeing where I’m going with this, the next logical step is to loop through them, which we can also do something like this:
$var(i) = 0;
while($var(i) < $hdrc(X-NickTest)) {
         xlog(X-NickTest entry [$var(i)] has value $hdrc(X-NickTest)[$var(i)]);
         $var(i) = $var(i) + 1;
}
Through fs_cli you can orignate calls from FreeSWITCH.
At the CLI you can use the originate command to start a call, this can be used for everything from scheduled wake up calls, outbound call centers, to war dialing.
For example, what I’m using:
originate sofia/external/[email protected]:5061 61399999995 XML default
originate is the command on the FS_CLI
sofia/external/[email protected]:5061 is the call URL, with the application (I’m using mod_sofia, so sofia), the Sofia Profile (in my case external) and the SIP URI, or, if you have gateways configured, the to URI and the gateway to use.
6139999995 is the Application
XML is the Dialplan to reference
default is the Context to use
But running this on the CLI is only so useful, we can use an ESL socket to use software to connect to FreeSWITCH’s API (Through the same mechanism fs_cli uses) in order to programmatically start calls.
But to do that first we need to expose the ESL API for inbound connections (Clients connecting to FreeSWITCH’s ESL API, which is different to FreeSWITCH connecting to an external ESL Server where FreeSWITCH is the client).
We’ll need to edit the event_socket.conf.xml file to define how this can be accessed:
Obviously you’ll need to secure this appropriately, good long password, and tight ACLs.
You may notice after applying these changes in the config, you’re no longer able to run fs_cli and access FreeSWITCH, this is because FreeSWITCH’s fs_cli tool connects to FreeSWITCH over ESL, and we’ve just changed tha parameters. You should still be able to connect by specifying the IP Address, port and the secret password we set:
This also means we can run fs_cli from other hosts if permitted through the ACLs (kinda handy for managing larger clusters of FreeSWITCH instances).
But now we can also connect a remote ESL client to it to run commands like our Originate command to setup calls, I’m using GreenSwitch with ESL in Python:
import gevent
import greenswitch
import sys
#import Fonedex_TelephonyAPI
#sys.path.append('../WebUI/Flask/')
import uuid

import logging
logging.basicConfig(level=logging.DEBUG)


esl_server_host = "10.0.1.16"
logging.debug("Originating call to " + str(destination) + " from " + str(source))
logging.debug("Routing the call to " + str(dialplan_entry))
fs = greenswitch.InboundESL(host=str(esl_server_host), port=8021, password='yoursecretpassword')
  try:
      fs.connect()
      logging.debug("Connected to ESL server at " + str(esl_server_host))
  except:
      raise SystemError("Failed to connect to ESL Server at " + str(esl_server_host))

r = fs.send('bgapi originate {origination_caller_id_number=' + str(source) + '}sofia/external/' + str(destination) + '@10.0.1.252:5061 default XML')
It’s 2021, and everyone loves Containers; Docker & Kubernetes are changing how software is developed, deployed and scaled.
And yet so much of the Telco world still uses bare metal servers and dedicated hardware for processing.
So why not use Containers or VMs more for VoIP applications?
Disclaimer – When I’m talking VoIP about VoIP I mean the actual Voice over IP, that’s the Media Stream, RTP, the Audio, etc, not the Signaling (SIP). SIP is fine with Containers, it’s the media that has a bad time and that this post focuses on,
Virtualization Fundamentals
Once upon a time in Development land every application ran on it’s own server running in a DC / Central Office.
This was expensive to deploy (buying servers), operate (lots of power used) and maintain (lots of hardware to keep online).
Each server was actually sitting idle for a large part of the time, with the application running on it only using a some of the available resources some of the time.
One day Virtualization came and suddenly 10 physical servers could be virtualized into 10 VMs.
These VMs still need to run on servers but as each VM isn’t using 100% of it’s allocated resources all the time, instead of needing 10 servers to run it on you could run it on say 3 servers, and even do clever things like migrate VMs between servers if one were to fail.
VMs share the resources of the server it’s running on.
A server running VMs (Hypervisor) is able to run multiple VMs by splitting the resources between VMs.
If a VM A wants to run an operation at the same time a VM B & VM C, the operations can’t be run on each VM at the same time* so the hypervisor will queue up the requests and schedule them in, typically based on first-in-first out or based on a resource priority policy on the Hypervisor.
This is fine for a if VM A, B & C were all Web Servers. A request coming into each of them at the same time would see the VM the Hypervisor schedules the resources to respond to the request slightly faster, with the other VMs responding to the request when the hypervisor has scheduled the resources to the respective VM.
VoIP is an only child
VoIP has grown up on dedicated hardware. It’s an only child that does not know how to share, because it’s never had to.
Having to wait for resources to be scheduled by the Hypervisor to to VM in order for it to execute an operation is fine and almost unnoticeable for web servers, it can have some pretty big impacts on call quality.
If we’re running RTPproxy or RTPengine in order to relay media, scheduling delays can mean that the media stream ends up “bursty”.
RTP packets needing relaying are queued in the buffer on the VM and only relayed when the hypervisor is able to schedule resources, this means there can be a lot of packet-delay-variation (PDV) and increased latency for services running on VMs.
VMs and Containers both have this same fate, DPDK and SR-IOV assist in throughput, but they don’t stop interrupt headaches.
VMs that deprive other VMs on the same host of resources are known as “Noisy neighbors”.
The simple fix for all these problems? There isn’t one.
Each of these issues can be overcome, dedicating resources, to a specific VM or container, cleverly distributing load, but it is costly in terms of resources and time to tweak and implement, and some of these options undermine the value of virtualization or containerization.
As technology marches forward we have scenarios where Kubernetes can expose FPGA resources to pass them through to Pods, but right now, if you need to transcode more than ~100 calls efficiently, you’re going to need a hardware device.
And while it can be done by throwing more x86 / ARM compute resources at the problem, hardware still wins out as cheaper in most instances.
So far with most of our discussions about Kamailio we’ve talked about routing the initial SIP request (INVITE, REGISTER, SUBSCRIBE, etc), but SIP is not a one-message protocol, there’s a whole series of SIP messages that go into a SIP Dialog.
Sure the call may start with an INVITE, but there’s the 180 RINGING, the 200 OK and the ACK that go into getting the call actually established, and routing these in-dialog messages is just as important as routing the first INVITE.
When we’ve talked about SIP routing it’s all happened in the request_route {} block:
request_route {
        xlog("Received $rm to $ru - Forwarding");
        append_hf("X-Proxied: You betcha\r\n");
        #Forward to new IP
        forward("192.168.1.110");
}
In the example above we statelessly forward any initial requests to the IP 192.168.1.110.
We can add an onreply_route{} block to handle any replies from 192.168.1.110 back to the originator.
But why would we want to?
Some simple answers would be to do some kind of manipulation to the message – say to strip a Caller ID if CLIP is turned off, or to add a custom SIP header containing important information, etc.
onreply_route{
        xlog("Got a reply $rs");
        append_hf("X-Proxied: For the reply\r\n");
}
Let’s imagine a scenario where the destination our SIP proxy is relaying traffic to (192.168.1.110) starts responding with 404 error.
We could detect this in our onreply_route{} and do something about it.
onreply_route{
        xlog("Got a reply $rs");
        if($rs == 404) {
                #If remote destination returns 404
                xlog("Got a 404 for $rU");
                #Do something about it
        }
}
In the 404 example if we were using Dispatcher it’s got easily accessed logic to handle these scenarios a bit better than us writing it out here, but you get the idea.
There are a few other special routes like onreply_route{}, failure routes and event routes, etc.
Hopefully now you’ll have a better idea of how and when to use onreply_route{} in Kamailio.
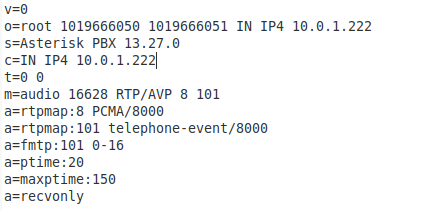
I had a discussion with a friend the other day about if hold is signified with a=sendonly or a=recvonly, which led me to revisiting the RFC to confirm, so here’s an overview of how “Call Hold” works in SIP.
By the Book
According to RFC 6337 a user can hold calls by sending a new SDP offer in an established session (Re-INVITE on active call), with an SDP payload of a=sendonly for each media stream the user want’s to hold.
The SIP Switch / PBX / UAS replies with an updated SDP where each media stream’s SDP contains a=recvonly.
So it’s both, depending on which leg you’re looking at.
In Common Practice
When a UAC puts a call in hold, it does so by sending a SIP re-INVITE, updating the SDP to include the attribute line “sendonly”
See the bottom line of the SDP is a=sendonly ? That’s denoting the call is to be put on hold,
If the call hold was sucesful the UAS sends back a 200 Ok, with the SDP attribute set to recvonly
The a=recvonly denotes the call has been held.
To retrieve the call another SIP re-invite is sent by the UAC, this time setting the media attribute back to sendrecv
If sucesful a 200 OK is sent by the UAS with the a=sendrecv also set.
Recently I’ve been working on a few projects with FreeSWITCH, and looking at options for programmatically generating dialplans, instead of static XML files.
Why not Static XML?
So let’s say I define a static XML dialplan.
It works great, but if I want to change the way a call routes I need to do it from the dialplan,
That’s not ideal if you’re using a distributed cluster of FreeSWITCH instances, or if you want to update on the fly.
Static XML means we have to define our dialplan when setting up the server, and would have to reconfigure the server to change it.
So what about mod_xml_curl?
When I’ve done this in the past I’ve relied on the mod_xml_curl module.
mod_xml_curl gets the XML dialplan using Curl from a web server, and so you setup a web server using Flask/PHP/etc, and dynamically generate the dialplan when the call comes in.
This sounds good, except you can’t update it on the fly.
mod_xml_curl means call routing decisions are made at the start of the call, and can’t be changed midway through the call.
So what’s ESL?
ESL is the Event Socket Library, essentially a call comes in, an ESL request is made to an external server.
For each step in the dialplan, an ESL request will be sent to the external server which tells it to do,
ESL allows us to use all FreeSWITCH’s fantastic modules, without being limited as to having to perform the call routing logic in FreeSWITCH.
So how do I use ESL?
You’ll need two create an ESL server,
Luckily there’s premade examples for popular languages;
These posts focus on the use of Diameter and SIP in an IMS / VoLTE context, however these practices can be equally applied to other networks.
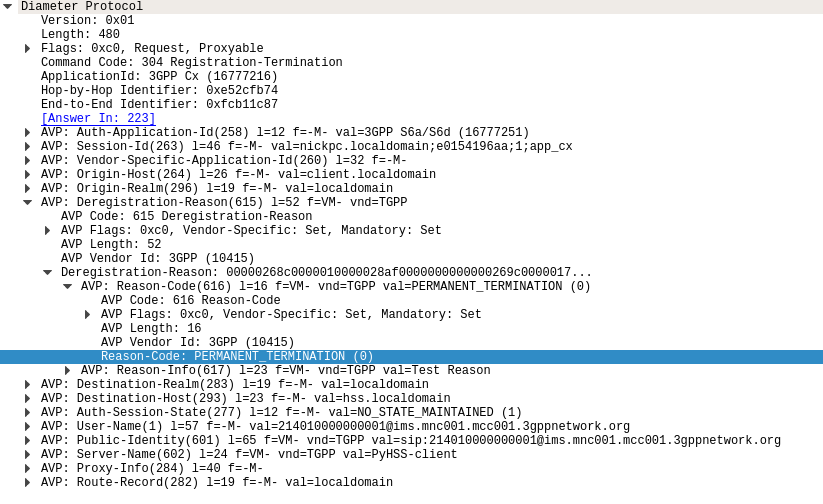
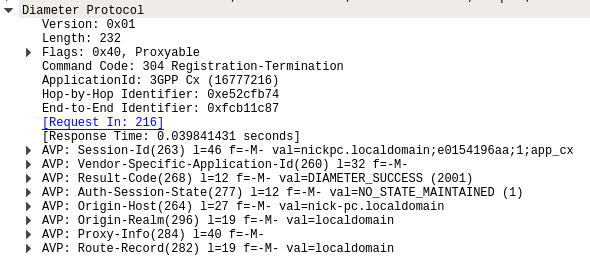
The Registration-Termination Request / Answer allow a Diameter Client (S-CSCF) to indicate to the HSS (Diameter Server) that it is no longer serving that user and the registration has been terminated.
Basics:
The RFC’s definition is actually pretty succinct as to the function of the Server-Assignment Request/Answer:
The Registration-Termination-Request is sent by a Diameter Multimedia server to a Diameter Multimedia client in order to request the de-registration of a user.
Reference: TS 29.229
The Registration-Termination-Request commands are sent by a S-CSCF to indicate to the Diameter server that it is no longer serving a specific subscriber, and therefore this subscriber is now unregistered.
There are a variety of reasons for this, such as PERMANENT_TERMINATION, NEW_SIP_SERVER_ASSIGNED and SIP_SERVER_CHANGE.
The Diameter Server (HSS) will typically send the Diameter Client (S-CSCF) a Registration-Termination-Answer in response to indicate it has updated it’s internal database and will no longer consider the user to be registered at that S-CSCF.
Packet Capture
I’ve included a packet capture of these Diameter Commands from my lab network which you can find below.
These posts focus on the use of Diameter and SIP in an IMS / VoLTE context, however these practices can be equally applied to other networks.
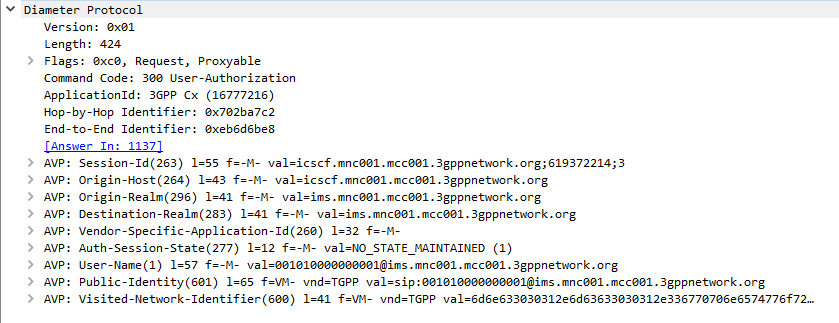
The Diameter User-Authorization-Request and User-Authorization-Answer commands are used as the first line of authorization of a user and to determine which Serving-CSCF to forward a request to.
Basics
When a SIP Proxy (I-CSCF) receives an incoming SIP REGISTER request, it sends a User-Authorization-Request to a Diameter server to confirm if the user exists on the network, and which S-CSCF to forward the request to.
When the Diameter server receives the User-Authorization-Request it looks at the User-Name (1) AVP to determine if the Domain / Realm is served by the Diameter server and the User specified exists.
Assuming the user & domain are valid, the Diameter server sends back a User-Authorization-Answer, containing a Server-Capabilities (603) AVP with the Server-Name of the S-CSCF the user will be served by.
I always find looking at the packets puts everything in context, so here’s a packet capture of both the User-Authorization-Request and the User-Authorization-Answer.
Wireshark display of User-Authorization-Request packet
Wireshark display of User-Authorization-Answer packet
First Registration
If this is the first time this Username / Domain combination (Referred to in the RFC as an AOR – Address of Record) is seen by the Diameter server in the User-Authorization-Request it will allocate a S-CSCF address for the subscriber to use from it’s pool / internal logic.
The Diameter server will store the S-CSCF it allocated to that Username / Domain combination (AoR) for subsequent requests to ensure they’re routed to the same S-CSCF.
The Diameter server indicates this is the first time it’s seen it by adding the DIAMETER_FIRST_REGISTRATION (2001) AVP to the User-Authorization-Answer.
Subsequent Registration
If the Diameter server receives another User-Authorization-Request for the same Username / Domain (AoR) it has served before, the Diameter server returns the same S-CSCF address as it did in the first User-Authorization-Answer.
It indicates this is a subsequent registration in much the same way the first registration is indicated, by adding an DIAMETER_SUBSEQUENT_REGISTRATION (2002) AVP to the User-Authorization-Answer.
User-Authorization-Type (623) AVP
An optional User-Authorization-Type (623) AVP is available to indicate the reason for the User-Authorization-Request. The possible values / reasons are:
Creating / Updating / Renewing a SIP Registration (REGISTRATION (0))
Establishing Server Capabilities & Registering (CAPABILITIES (2))
Terminating a SIP Registration (DEREGISTRATION (1))
If the User-Authorization-Type is set to DEREGISTRATION (1) then the Diameter server returns the S-CSCF address in the User-Authorization-Answer and then removes the S-SCSF address it had associated with the AoR from it’s own records.