These posts focus on the use of Diameter and SIP in an IMS / VoLTE context, however these practices can be equally applied to other networks.
The Registration-Termination Request / Answer allow a Diameter Client (S-CSCF) to indicate to the HSS (Diameter Server) that it is no longer serving that user and the registration has been terminated.
Basics:
The RFC’s definition is actually pretty succinct as to the function of the Server-Assignment Request/Answer:
The Registration-Termination-Request is sent by a Diameter Multimedia server to a Diameter Multimedia client in order to request the de-registration of a user.
Reference: TS 29.229
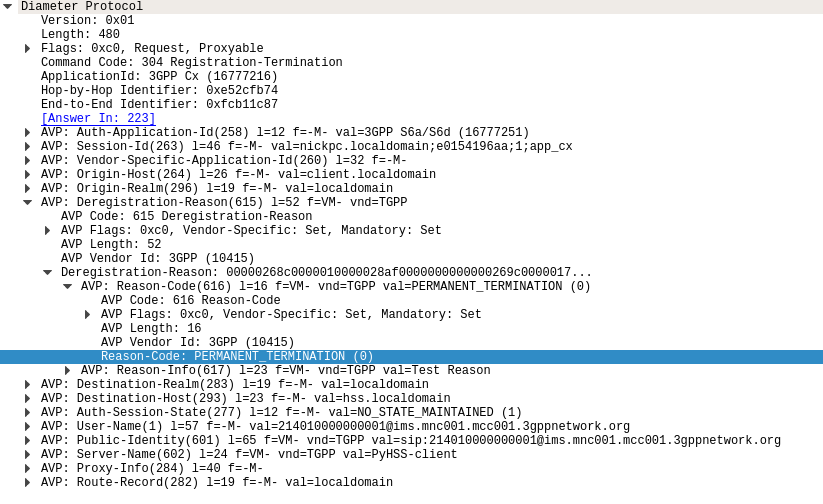
The Registration-Termination-Request commands are sent by a S-CSCF to indicate to the Diameter server that it is no longer serving a specific subscriber, and therefore this subscriber is now unregistered.
There are a variety of reasons for this, such as PERMANENT_TERMINATION, NEW_SIP_SERVER_ASSIGNED and SIP_SERVER_CHANGE.
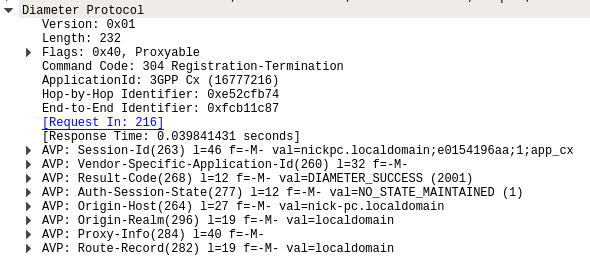
The Diameter Server (HSS) will typically send the Diameter Client (S-CSCF) a Registration-Termination-Answer in response to indicate it has updated it’s internal database and will no longer consider the user to be registered at that S-CSCF.
Packet Capture
I’ve included a packet capture of these Diameter Commands from my lab network which you can find below.
These posts focus on the use of Diameter and SIP in an IMS / VoLTE context, however these practices can be equally applied to other networks.
The Diameter User-Authorization-Request and User-Authorization-Answer commands are used as the first line of authorization of a user and to determine which Serving-CSCF to forward a request to.
Basics
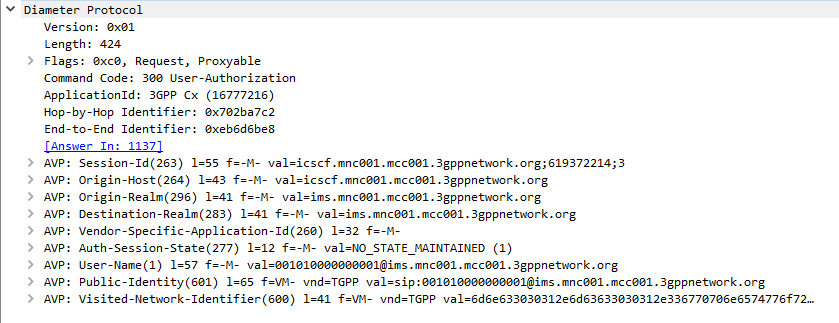
When a SIP Proxy (I-CSCF) receives an incoming SIP REGISTER request, it sends a User-Authorization-Request to a Diameter server to confirm if the user exists on the network, and which S-CSCF to forward the request to.
When the Diameter server receives the User-Authorization-Request it looks at the User-Name (1) AVP to determine if the Domain / Realm is served by the Diameter server and the User specified exists.
Assuming the user & domain are valid, the Diameter server sends back a User-Authorization-Answer, containing a Server-Capabilities (603) AVP with the Server-Name of the S-CSCF the user will be served by.
I always find looking at the packets puts everything in context, so here’s a packet capture of both the User-Authorization-Request and the User-Authorization-Answer.
Wireshark display of User-Authorization-Request packet
Wireshark display of User-Authorization-Answer packet
First Registration
If this is the first time this Username / Domain combination (Referred to in the RFC as an AOR – Address of Record) is seen by the Diameter server in the User-Authorization-Request it will allocate a S-CSCF address for the subscriber to use from it’s pool / internal logic.
The Diameter server will store the S-CSCF it allocated to that Username / Domain combination (AoR) for subsequent requests to ensure they’re routed to the same S-CSCF.
The Diameter server indicates this is the first time it’s seen it by adding the DIAMETER_FIRST_REGISTRATION (2001) AVP to the User-Authorization-Answer.
Subsequent Registration
If the Diameter server receives another User-Authorization-Request for the same Username / Domain (AoR) it has served before, the Diameter server returns the same S-CSCF address as it did in the first User-Authorization-Answer.
It indicates this is a subsequent registration in much the same way the first registration is indicated, by adding an DIAMETER_SUBSEQUENT_REGISTRATION (2002) AVP to the User-Authorization-Answer.
User-Authorization-Type (623) AVP
An optional User-Authorization-Type (623) AVP is available to indicate the reason for the User-Authorization-Request. The possible values / reasons are:
Creating / Updating / Renewing a SIP Registration (REGISTRATION (0))
Establishing Server Capabilities & Registering (CAPABILITIES (2))
Terminating a SIP Registration (DEREGISTRATION (1))
If the User-Authorization-Type is set to DEREGISTRATION (1) then the Diameter server returns the S-CSCF address in the User-Authorization-Answer and then removes the S-SCSF address it had associated with the AoR from it’s own records.
These posts focus on the use of Diameter and SIP in an IMS / VoLTE context, however these practices can be equally applied to other networks.
The Server-Assignment-Request/Answer commands are used so a SIP Server can indicate to a Diameter server that it is serving a subscriber and pull the profile information of the subscriber.
Basics:
The RFC’s definition is actually pretty succinct as to the function of the Server-Assignment Request/Answer:
The main functions of the Diameter SAR command are to inform the Diameter server of the URI of the SIP server allocated to the user, and to store or clear it from the Diameter server.
Additionally, the Diameter client can request to download the user profile or part of it.
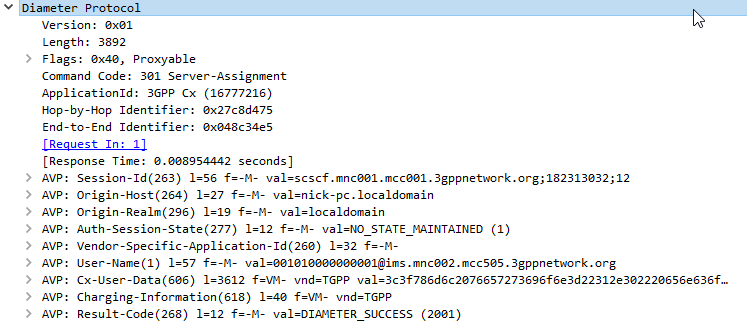
The Server-Assignment-Request/Answer commands are sent by a S-CSCF to indicate to the Diameter server that it is now serving a specific subscriber, (This information can then be queried using the Location-Info-Request commands) and get the subscriber’s profile, which contains the details and identities of the subscriber.
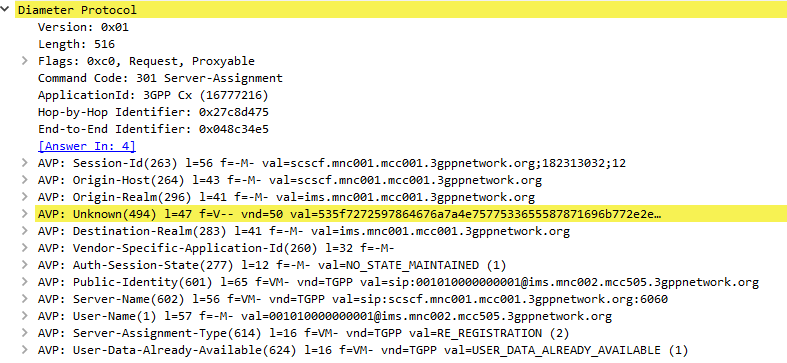
Typically upon completion of a successful SIP REGISTER dialog (Multimedia-Authentication Request), the SIP Server (S-CSCF) sends the Diameter server a Server-Assignment-Request containing the SIP Username / Domain (referred to as an Address on Record (SIP-AOR) in the RFC) and the SIP Server (S-CSCF)’s SIP-Server-URI.
The Diameter server looks at the SIP-AOR and ensures there are not currently any active SIP-Server-URIs associated with that AoR. If there are not any currently active it then stores the SIP-AOR and the SIP-Server-URI of the SIP Server (S-CSCF) serving that user & sends back a Server-Assignment-Answer.
For most request the Subscriber’s profile is also transfered to the S-SCSF in the Server-Assignment-Answer command.
SIP-Server-Assignment-Type AVP
The same Server-Assignment-Request command can be used to register, re-register, remove registration bindings and pull the user profile, through the information in the SIP-Server-Assignment-Type AVP (375),
Common values are:
NO_ASSIGNMENT (0) – Used to pull just the user profile
The Cx-User-Data profile contains the subscriber’s profile from the Diameter server in an XML formatted dataset, that is contained as part of the Server-Assignment-Answer in the Cx-User-Data AVP (606).
The profile his tells the S-CSCF what services are offered to the subscriber, such as the allowed SIP Methods (ie INVITE, MESSAGE, etc), and how to handle calls to the user when the user is not registered (ie send calls to voicemail if the user is not there).
There’s a lot to cover on the user profile which we’ll touch on in a later post.
These posts focus on the use of Diameter and SIP in an IMS / VoLTE context, however these practices can be equally applied to other networks.
The Location-Information-Request/Answer commands are used so a SIP Server query a Diameter to find which P-CSCF a Subscriber is being served by
Basics:
The RFC’s definition is actually pretty succinct as to the function of the Server-Assignment Request/Answer:
The Location-Info-Request is sent by a Diameter Multimedia client to a Diameter Multimedia server in order to request name of the server that is currently serving the user.Reference: 29.229-
The Location-Info-Request is sent by a Diameter Multimedia client to a Diameter Multimedia server in order to request name of the server that is currently serving the user.
Reference: TS 29.229
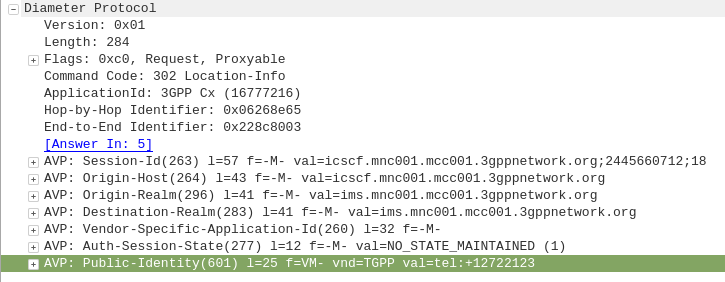
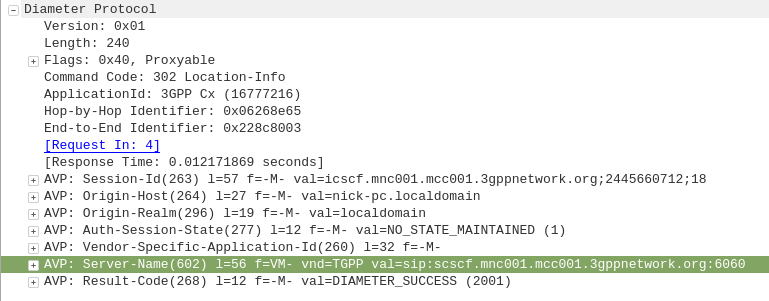
The Location-Info-Request commands is sent by an I-CSCF to the HSS to find out from the Diameter server the FQDN of the S-CSCF serving that user.
The Public-Identity AVP (601) contains the Public Identity of the user being sought.
Here you can see the I-CSCF querying the HSS via Diameter to find the S-CSCF for public identity 12722123
The Diameter server sends back the Location-Info-Response containing the Server-Name AVP (602) with the FQDN of the S-CSCF.
Packet Capture
I’ve included a packet capture of these Diameter Commands from my lab network which you can find below.
So we’ve got a functional network, but let’s dive deeper into what we can do to connect it with other networks and how things work in “the real world”.
Media Handling – OsmoMGW
The Audio/Voice (media stream) data on a call between subscribers does not go directly between the subscribers and instead needs to be proxed relayed. The reason for this is because there’s no direct link from one BTS to another BTS (even if they are served by the same BSC) and as our subscribers can move from cell to cell while on a call – which may mean moving from one BSC to another depending on where they’re heading – we need to have a single point for the audio to remain.
To handle this a Media Gateway is used, a single point for call audio to be “anchored” – meaning regardless of which BTS/BSC is serving the subscribers on either end of the call, the media will be sent by both parties to a single destination (The Media Gateway), and that destination will send the audio to the other party.
The Media gateway relays / proxies the Media Stream – the RTP packets containing the call audio. OsmoMSC provides the SDP payload containing the codecs and RTP details for the session via MGCP (Media Gateway Control Protocol) to the OsmoMGW which relays the audio.
In terms of running osmo-mgw we installed it earlier,
The only parameter you really need to change is the rtp bind-ip,
On the MGW you can also limit and restrict the codecs supported and also allow or disallow transcoding.
MNCC-SAP & Call Routing
In it’s default mode, the OsmoMSC will look at the destination a call is being sent to, and if the destination is a subscriber on the network (in it’s VLR), will route the call to that subscriber
This on-net only mode is great but it puts our network on an island – cut off from the outside world.
Calls between MSCs, to the PSTN and users everywhere else are not possible in this scenario.
3GPP defined “MNCC-SAP” (Mobile Network Call Control – Service Access Point) a protocol for handling calls to/from destinations outside of the local MSC.
When in MNCC-SAP mode all calls (even on-net calls between subscribers on the same MSC) are routed to the external MNCC-SAP, and left up to it to determine how to route the call.
Configuring Osmo-MSC to talk MNCC
As we just covered by default Osmo-MSC only switches calls internally between subscribers, so we’ll need to turn off this behaviour and isntead reconfigure it to talk MNCC-SAP.
To do this we’ll telnet / VTY into Osmo-MSC;
root@gsm-bts:/etc/osmocom# telnet localhost 4254
Welcome to the OsmoMSC VTY interface
OsmoMSC - Osmocom Circuit-Switched Core Network implementation
OsmoMSC> enable
OsmoMSC# configure terminal
OsmoMSC(config)# msc
OsmoMSC(config-msc)# mncc external /tmp/msc_mncc
OsmoMSC(config-msc)# end
OsmoMSC# cop run st
Configuration saved to /etc/osmocom/osmo-msc.cfg
After making this change we have to restart OsmoMSC;
systemctl restart osmo-msc
Now OsmoMSC will not switch calls locally, but instead when a mobile originated call comes to the MSC, it will signal to the external MNCC via the file sock at /tmp/msc_mncc,
MNCC-SAP sounds great but platform X only speaks SIP
Enter the Osmo-SIP-Connector, which takes the MNCC-SAP messages and converts them to SIP.
From here you can tie the call control functions of the MNC into any SIP software such as Kamailio, FreeSwitch, Asterisk, etc, to handle call routing, number translation, application services like voicemail and conferencing, etc, etc.
On my to-do list is to make a call between one subscriber on GSM and one on VoLTE, I’ll cover that in a subsequent post.
So anywho, let’s get Osmo-SIP-Connector setup, I’m running it on the same box as the MSC on 10.0.1.201, My softphone client is running on 10.0.1.252
root@gsm-bts:/etc/osmocom# apt-get install osmo-sip-connector
root@gsm-bts:/etc/osmocom# telnet localhost 4256
Welcome to the OsmoSIPcon VTY interface
OsmoSIPcon> enable
OsmoSIPcon# configure t
OsmoSIPcon(config)# mncc
OsmoSIPcon(config-mncc)# socket-path /tmp/msc_mncc
OsmoSIPcon(config-mncc)# exit
OsmoSIPcon(config)# sip
OsmoSIPcon(config-sip)# local 10.0.1.201 5060
OsmoSIPcon(config-sip)# remote 10.0.1.252 5060
OsmoSIPcon(config-sip)# end
OsmoSIPcon# cop run st
Configuration saved to /etc/osmocom/osmo-sip-connector.cfg
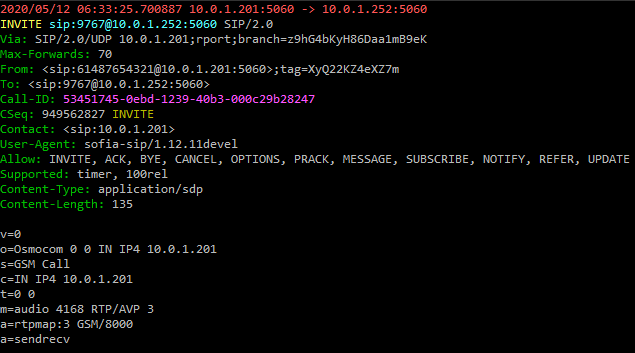
Now any Mobile Originated calls will result in a SIP INVITE being sent to 10.0.1.252 port 5060 (using UDP).
Any SIP INVITES where the request URI is a valid MSISDN @ 10.0.1.201 from 10.0.1.252 will be routed to the correct subscriber for that MSISDN.
A small note – The GSM codec is (unsurprisingly) used as the codec for GSM calls by default.
Some handsets support different codecs, but many off-the-shelf IP phones don’t include GSM support, so you may find you’re required to transcode between codecs if there is no support for the other codecs.
So now we’re able to define our call routing logic in something that speaks SIP and connect calls between multiple MSCs, VoLTE / IMS networks and fixed networks, all based on what we do with the SIP.
Local Call, Local Switch
If two subscribers on the same BSC call each other, the RTP / call audio will route to the MGW where it’s anchored.
This makes sense from a mobility standpoint, but adds load to the MGW and relies on a quality A interface connection, which may be an issue depending on what backhaul options you have.
Local Call, Local Switch is a 3GPP spec to allow the RTP / call audio to act as the RTP proxy instead of the MGW.
I wrote about using Ansible to automate Kamailio config management, Ansible is great at managing VMs or bare metal deployments, but for Containers using Docker to build and manage the deployments is where it’s at.
I’m going to assume you’ve got Docker in place, if not there’s heaps of info online about getting started with Docker.
The Dockerfile
The Kamailio team publish a Docker image for use, there’s no master branch at the moment, so you’ve got to specify the version; in this case kamailio:5.3.3-stretch.
Once we’ve got that we can start on the Dockerfile,
For this example I’m going to include
#Kamailio Test Stuff
FROM kamailio/kamailio:5.3.3-stretch

#Copy the config file onto the Filesystem of the Docker instance
COPY kamailio.cfg /etc/kamailio/

#Print out the current IP Address info
RUN ip add

#Expose port 5060 (SIP) for TCP and UDP
EXPOSE 5060
EXPOSE 5060/udp
Once the dockerfile is created we can build an image,
docker image build -t kamtest:0.1 .
And then run it,
docker run kamtest:0.1
Boom, now Kamailio is running, with the config file I pushed to it from my Dockerfile directory,
Now I can setup a Softphone on my local machine and point it to the IP of the Docker instance and away we go,
Where the real power here comes in is that I can run that docker run command another 10 times, and have another 10 Kamailio instannces running.
Tie this in with Kubernetes or a similar platform and you’ve got a way to scale and manage upgrades unlike anything you’d get on Bare Metal or VMs.
I had a few headaches getting the example P-CSCF example configs from the Kamailio team to run, recent improvements with the IPsec support and code evolution meant that the example config just didn’t run.
So, after finally working out the changes I needed to make to get Kamailio to function as a P-CSCF, I took the plunge and made my first pull request on the Kamailio project.
A lot of people think there’s a one-to-one relationship between a registration Address on Record, and a username.
That doesn’t have to be the case, there are some platforms that only allow a single registration for a single username, but the RFC itself allows multiple registrations for a single username.
REGISTER requests add, remove, and query bindings.
A REGISTER request can add a new binding between an address-of-record and one or more contact addresses.
Registration on behalf of a particular address-of-record can be performed by a suitably authorized third party.
A client can also remove previous bindings or query to determine which bindings are currently in place for an address-of-record.
Let’s say you’ve got a SIP phone on your desk at the office and at home.
What we could do is create a different username and password for home & work, and then setup some time based forward rules to ring the office from 9-5 and home outside of that.
You could register both with the same username and password, and then unplug the one at home before you leave to work, get to work, plug in your office phone, unplug it before you leave to go home, and when you get home plug back in your home phone, or if multi-device registration is supported, register both and have incoming calls ring on both.
Admittedly, platforms that support this are the exception, not the rule, but the RFC does allow it.
The other little known feature in SIP Registration is that you can query the SIP Registrar to get the list of Addresses on Record.
So there you go, factoids about SIP REGISTER method!
Today I thought I’d cover a simple use case – running an HTTP get from Kamailio and doing something with the output.
The http_client does what it sounds – Acts as an HTTP client to send HTTP GET and POST requests.
The use cases for this become clear quite quickly, you could use http_client to request credit from an accounting server via it’s API, get the latest rate to a destination from a supplier, pull weather data, etc, etc.
Let’s take a very simple example, we’ll load http_client by adding a loadmodule line:
...
loadmodule "http_client.so"
...
Next I’ve put together a very simple request_route block that requests a HTTP file from a web server and sends the response to a SIP client:
####### Routing Logic ########
/* Main SIP request routing logic
* - processing of any incoming SIP request starts with this route
* - note: this is the same as route { ... } */
request_route {
xlog("Got request");
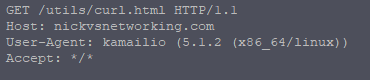
http_client_query("https://nickvsnetworking.com/utils/curl.html", "", "$var(result)");
xlog("Result is $var(result)");
sl_reply("200", "Result from HTTP server was $var(result)");
}
Using the http_client_query() function we’re able to query a HTTP server,
We’ll query the URL https://nickvsnetworking.com/utils/curl.html and store the output to a variable called result.
If you visit the URL you’ll just get a message that says “Hello there“, that’s what Kamailio will get when it runs the http_client function.
Next we print the result using an xlog() function so we can see the result in syslog,
Finally we send a stateless reply with the result code 200 and the body set to the result we got back from the server.
We can make this a bit more advanced, using HTTP Post we can send user variables and get back responses.
The http_client module is based on the ubiquitous cURL tool, that many users will already be familiar with.
It’s probably pretty evident to most why you’d want to use TLS these days,
SIP Secure – aka sips has been around for a long time and is supported by most SIP endpoints now.
Kamailio supports TLS, and it’s setup is very straightforward.
I’ve got a private key and certificate file for the domain nickvsnetworking.com so I’ll use those to secure my Kamailio instance by using TLS.
I’ll start by copying both the certificate (in my case it’s cert.pem) and the private key (privkey.pem) into the Kamailio directory. (If you’ve already got the private key and certificate on your server for another application – say a web server, you can just reference that location so long as the permissions are in place for Kamailio to access)
Next up I’ll open my Kamailio config (kamailio.cfg), I’ll be working with an existing config and just adding the TLS capabilities, so I’ll add this like to the config:
!define WITH_TLS
That’s pretty much the end of the configuration in kamailio.cfg, if we have a look at what’s in place we can see that the TLS module loads it’s parameters from a separate file;
After restarting Kamailio subscribers can now contact us via TLS using sips.
You may wish to disable TCP & UDP transport in favor of only TLS.
A note about CAs…
If you’re planning on rolling out SIP over TLS (sips) to existing IP phones it’s worth looking at what Certificate Authorities (CAs) are recognised by the IP phones.
As TLS relies on a trust model where a CA acts kind of like a guarantor to the validity of the certificate, if the IP phone doesn’t recognise the CA, it may see the certificate as Invalid.
Some IP phones for example won’t recognize Let’s Encrypt certificates as valid, while others may not recognize any of the newer CAs.
If you’re running a Debian system, the Kamailio team provide nightly development builds as Debian packages that can be installed on Debian or Ubuntu systems using the apt package manager.
Installing is a breeze, first we just add the GPG key for the repo:
Despite the fact it’s 2020 there’s still a lot of folks in the world manually configuring boxes,
Ansible is a topic I could talk all day about, but in essence it’s kind of an automation framework, tell Ansible what to do one and it can spin you up two boxes, or two thousand boxes and manage the config on them.
I talked about DMQ, the Distributed Message Queue in a Kamailio Bytes post some time ago, and so as an example I’ll share an example playbook to Install Kamailio the lazy way from the Repos, and load the DMQ config with the IP Address and DMQ Address pulled from variables based on the host itself.
There’s a huge number of posts on installing and the basics of Ansible online, if you’re not familiar with Ansible already I’d suggest starting by learning the basics and then rejoining us.
The Hosts
Depending on if your hosts are running on bare metal, VMWare VMs or cloud based, I’m going to assume you’re working with a Debian system.
I’ve already got 3 servers ready to go, they’ve got sequential IP Addresses so I’ve added the range to my /etc/ansible/hosts file:
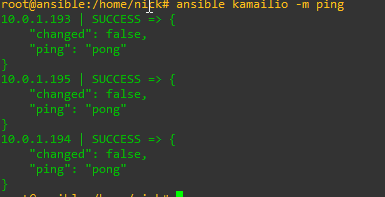
I’ve created the group kamailio and put the IP Address range 10.0.1.193 to 10.0.1.195 in there.
You will probably need to add the authentication info, such as passwords, private keys and privilege escalation details, but I’m going to assume you’ve already done that and you can run the ping module on each one:
ansible kamailio -m ping
Assuming that comes back OK and you can get into each one let’s move onto the Playbook.
The Playbook
There’s a few tasks we’ll get out of the way before we configure Kamailio,
The first of which is adding the Debian repo and the keys,
Next we’ll load a Kamailio config from a template that fills in our IP Address and Kamailio version, then we’ll install Kamailio,
Rather than talk you through each of the plays here’s a copy of my playbook:
---
- name: Configure Kamailio


  hosts: kamailio
  become: yes

  vars:
    kamailio_version: "53"
    debian_sources_dir: "/etc/apt/sources.list.d"

  tasks:


    - name: Add keys for Kamailio repo
      apt_key:
        url: http://deb.kamailio.org/kamailiodebkey.gpg
        state: present


    - name: Add repo to sources.list
      apt_repository:
        repo: deb http://deb.kamailio.org/kamailio{{kamailio_version}} {{hostvars[inventory_hostname]['ansible_lsb']['codename']}} main
                #The full list of Debian repos can be found at http://deb.kamailio.org/
                #The version is based off the versions listed there and the release is based on the codename of the Debian / Ubuntu release.
        state: present


    - name: Copy Config Template
                #Copies config from the template, fills in variables and uplaods to the server
      template:
        src: kamailio.cfg.j2
        dest: /etc/kamailio/kamailio.cfg
        owner: root
        group: root
        backup: yes
      register: config_changed

    - name: Install Kamailio
                #Updates cache (apt-get update) and then installs Kamailio
      apt:
        name: kamailio
        update_cache: yes
        state: present
      register: kamailio_installed_firstrun

    - name: Restart Kamailio if config changed
      service:
       name: kamailio
       state: restarted
      when: config_changed.changed

    - name: Start Kamailio if installed for the first time
      service:
       name: kamailio
       state: started
      when: kamailio_installed_firstrun.changed
Should be pretty straight forward to anyone who’s used Ansible before, but the real magic happens in the templatemodule. Let’s take a look;
Kamailio config in Jinja2 template
Pusing out static config is one thing, but things like IP Addresses, FQDNs and SSL certs may differ from machine to machine, so instead of just pushing one config, I’ve created a config and added some variables in Jinja2 format to the config, that will be filled with the value on the target when pushed out.
In the templatemodule of the playbook you can see I’ve specified the file kamailio.cfg.j2 this is just a regular Kamailio config file but I’ve added some variables, let’s look at how that’s done.
On the machine 10.0.1.194 we want it to listen on 10.0.1.194, we could put list 0.0.0.0 but this can lead to security concerns, so instead let’s specify the IP in the Jinja config,
By putting ansible_default_ipv4.address in two sets of curly brackets, this tells Ansible to fill in thes values from the template with the Ansible IPv4 Address of the target machine.
Let’s take a look on the 10.0.1.194’s actual kamailio.cfg file:
Let’s take another example,
To keep DMQ humming it makes sense to have different DMQ domains for different versions of Kamailio, so in the Kamailio config file template I’ve called the variable kamailio_versionin the DMQ address,
This means on a Kamailio 5.2 version this URL look like this on the boxes’ config:
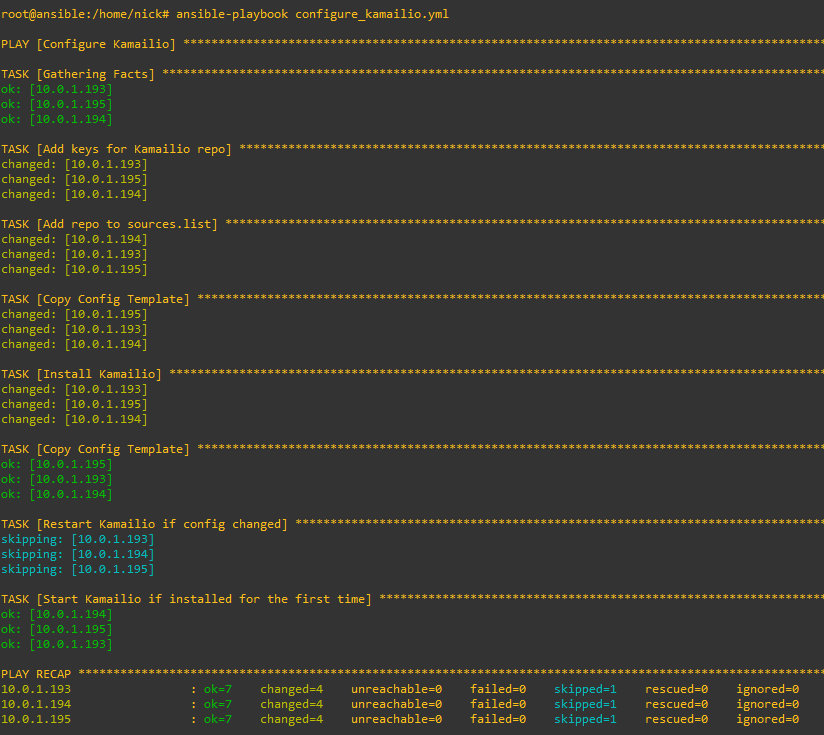
Running it is just a simple matter of calling ansible-playbook and pointing it at the playbook we created, here’s how it looks setting up the 3 hosts from their vanilla state:
The great thing about Kamailio is it’s omnipotent – This means it will detect if it needs to do each of the tasks specified in the playbook.
So if we run this again it won’t try and add the repo, GPG keys, install Kamailio and load the template, it’ll look and see each of those steps have already been done and skip each of them.
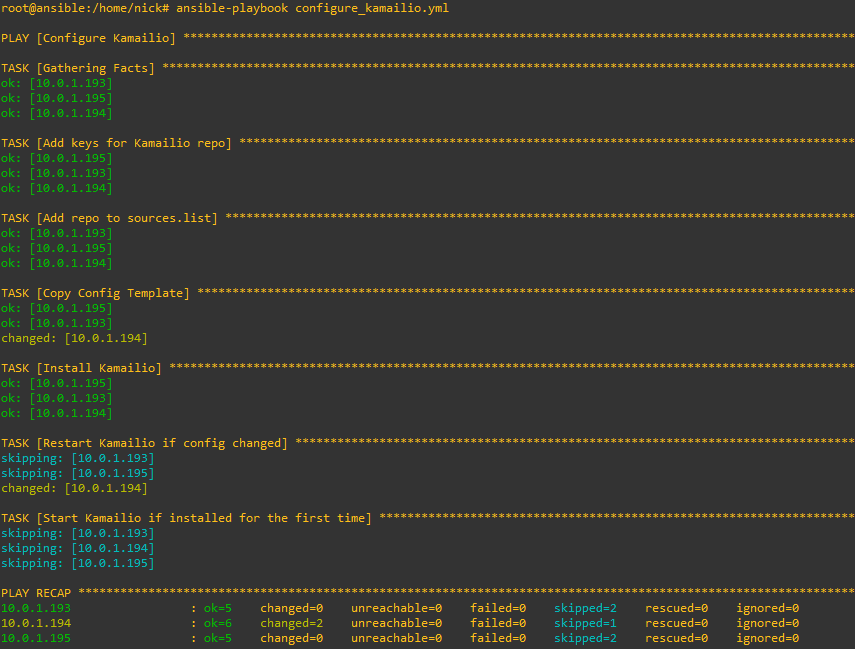
But what if someone makes some local changes on one of the boxes, let’s look at what happens:
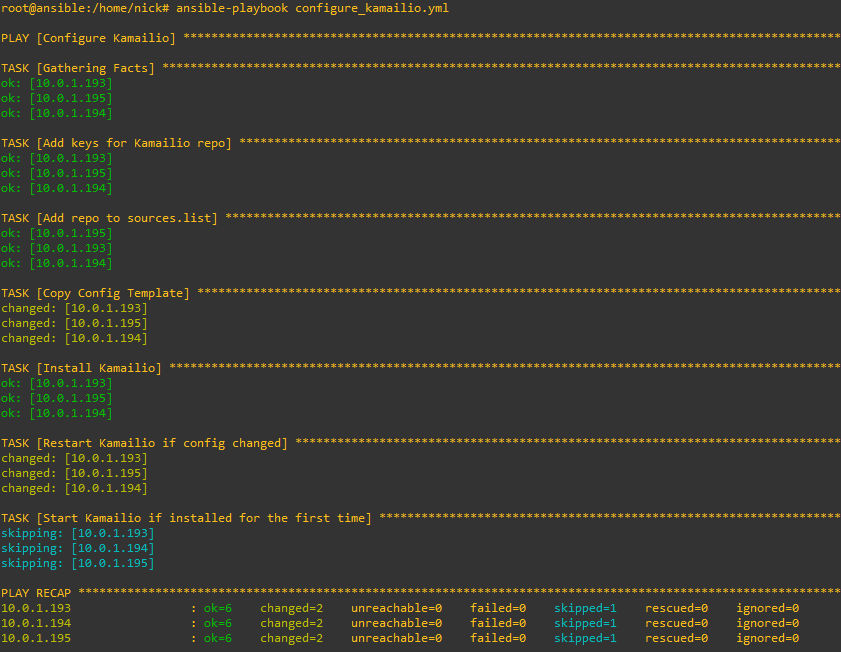
Likewise now if we decide to change our config we only need to update the template file and Ansible will push it out to all our machines, I’ve added a comment into the Kamailio template, so let’s run it again and see the config pushed out to all the Kamailio instances and them restarting.
I’ve been working for some time on open source mobile network cores, and one feature that has been a real struggle for a lot of people (Myself included) is getting VoLTE / IMS working.
Here’s some of the issues I’ve faced, and the lessons I learned along the way,
Sadly on most UEs / handsets, there’s no “Make VoLTE work now” switch, you’ve got a satisfy a bunch of dependencies in the OS before the baseband will start sending SIP anywhere.
Get the right Hardware
Your eNB must support additional bearers (dedicated bearers I’ve managed to get away without in my testing) so the device can setup an APN for the IMS traffic.
Sadly at the moment this rules our Software Defined eNodeBs, like srsENB.
ISIM – When you thought you understood USIMs – Guess again
According to the 3GPP IMS docs, an ISIM (IMS SIM) is not a requirement for IMS to work.
However in my testing I found Android didn’t have the option to enable VoLTE unless an ISIM was present the first time.
In a weird quirk I found once I’d inserted an ISIM and connected to the VoLTE network, I could put a USIM in the UE and also connect to the VoLTE network.
Obviously the parameters you can set on the USIM, such as Domain, IMPU, IMPI & AD, are kind of “guessed” but the AKAv1-MD5 algorithm does run.
Getting the APN Config Right
There’s a lot of things you’ll need to have correct on your UE before it’ll even start to think about sending SIP messaging.
I was using commercial UE (Samsung handsets) without engineering firmware so I had very limited info on what’s going on “under the hood”. There’s no “Make VoLTE do” tickbox, there’s VoLTE enable, but that won’t do anything by default.
If your P-GW doesn’t know the IP of your P-CSCF, it’s not going to be able to respond to it in the Protocol Configuration Options (PCO) request sent by the UE with that nice new bearer for IMS we just setup.
There’s no way around Mutual Authentication
Coming from a voice background, and pretty much having RFC 3261 tattooed on my brain, when I finally got the SIP REGISTER request sent to the Proxy CSCF I knocked something up in Kamailio to send back a 200 OK, thinking that’d be the end of it.
For any other SIP endpoint this would have been fine, but IMS Clients, nope.
Reading the specs drove home the same lesson anyone attempting to setup their own LTE network quickly learns – Mutual authentication means both the network and the UE need to verify each other, while I (as the network) can say the UE is OK, the UE needs to check I’m on the level.
I saw my 401 response go back to the UE and then no response. Nada.
This led to my next lesson…
There’s no way around IPsec
According to the 3GPP docs, support for IPsec is optional, but I found this not to be the case on the handsets I’ve tested.
After sending back my 401 response the UE looks for the IPsec info in the 401 response, then tries to setup an IPsec SA and sends ESP packets back to the P-CSCF address.
Even with my valid AKAv1-MD5 auth, I found my UE wasn’t responding until I added IPsec support on the P-CSCF, hence why I couldn’t see the second REGISTER with the Authentication Info.
After setting up IPsec support, I finally saw the UE’s REGISTER with the AKAv1-MD5 authentication, and was able to send a 200 OK.
The Proxy-Call Session Control Function is the first network element a UE sends it’s SIP REGISTER message to, but how does it get there?
To begin with our UE connects as it would normally, getting a default bearer, an IP address and connectivity.
Overview
If the USIM has an ISIM application on it (or IMS is enabled on the UE using USIM for auth) and an IMS APN exists on the UE for IMS, the UE will set up another bearer in addition to the default bearer.
This bearer will carry our IMS traffic and allow QoS to be managed through the QCI values set on the bearer.
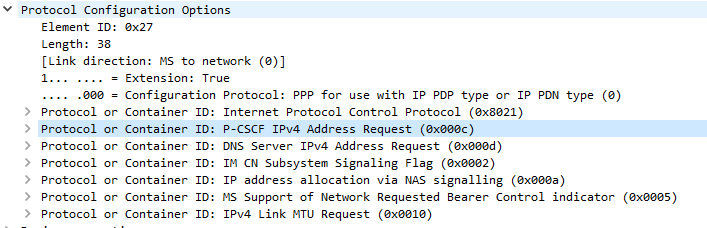
While setting up the bearer the UE requests certain parameters from the network in the Protocol Configuration Options element, including the P-CSCF address.
When setting up the bearer the network responds with this information, which if supported includes the P-CSCF IPv4 &/or IPv6 addresses.
The Message Exchange
We’ll start assuming the default bearer is in place & our UE is configured with the APN for IMS and supports IMS functionality.
The first step is to begin the establishment of an additional bearer for the IMS traffic.
This is kicked off through the Uplink NAS Transport, PDN Connectivity Request from the UE to the network. This includes the IMS APN information, and the UE’s NAS Payload includes the Protocol Configuration Options element (PCO), with a series of fields the UE requires responses from the network. including DNS Server, MTU, etc.
In the PCO the UE also includes the P-CSCF address request, so the network can tell the UE the IP of the P-CSCF to use.
If this is missing it’s because either your APN settings for IMS are not valid, or your device doesn’t have IMS support or isn’t enabling it.(that could be for a few reasons).
Protocol Configuration Options (Unpopulated) used to request information from the Network by the UE
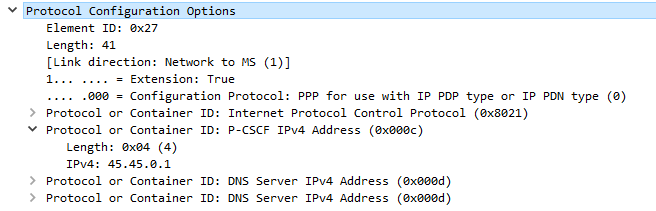
The MME gets this information from the P-GW, and the network responds in the E-RAB Setup Request, Activate default EPS bearer Context Request and includes the Protocol Configuration Options again, this time the fields are populated with their respective values, including the P-CSCF Address;
Once the UE has this setup, the eNB confirms it’s setup the radio resources through the E-RAB Setup Response.
One the eNB has put the radio side of things in place, the UE confirms the bearer assignment has completed successfully through the Uplink NAS Transport, Activate default EPS Bearer Accept, denoting the bearer is now in place.
Now the UE has the IP address(s) of the P-CSCF and a bearer to send it over, the UE establishes a TCP socket with the address specified in the P-CSCF IPv4 or IPv6 address, to start communicating with the P-CSCF.
The SIP REGISTER request can now be sent and the REGISTRATION procedure can begin.
To be able to call sipcmd from anywhere, copy the binary to /usr/sbin/
cp sipcmd /usr/sbin/
Usage
Unlike SIPp, sipcmd has a much more simple syntax to allow you to follow basic call scenarios, like call a destination, wait a set time and then hangup, or answer an incoming call and send a DTMF digit and wait for the called party to hangup.
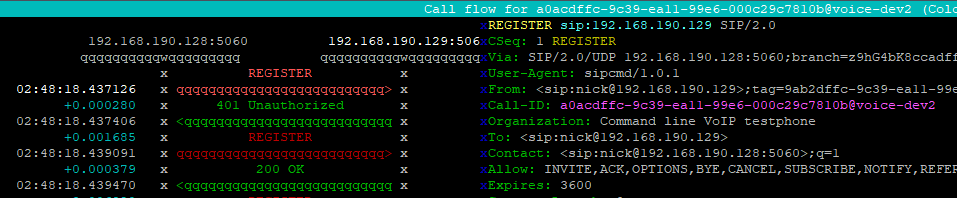
So let’s get the most basic thing we can set, SIP Registration and Authentication.
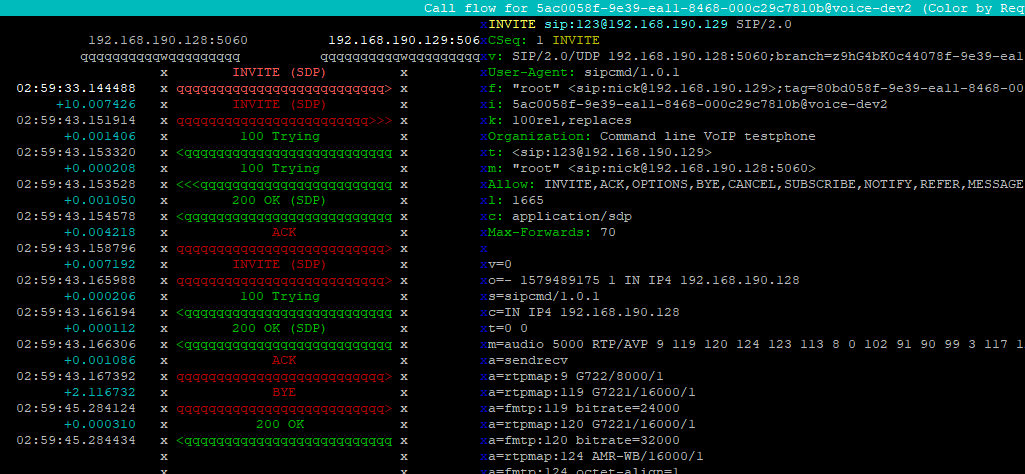
And there you have it, simple as that, we’ve made a test call, waited a set time and then hung up.
We can even combine this with monitoring / NMS systems like Nagios to run tests against the network continually.
For more advanced scenarios I’d recommend using SIPp, but for simple testing, particularly from a command line, sipcmd is a simple easy place to start.
People think SIP they think VoIP & phone calls, but SIP it’s the Phone Call Initiation Protocol it’s the Session Initiation Protocol – Sure VoIP guys like me love SIP, but it’s not just about VoIP.
Have you sent an SMS on a modern mobile phone recently? Chances are you sent a SMS over SIP using SIP MESSAGE method.
So let’s look a bit at SIP SIMPLE, the catchily titled acronym translates to Session Initiation Protocol for Instant Messaging and Presence Leveraging Extensions (Admittedly less catchy in it’s full form).
There’s two way SIP SIMPLE can be used to implement Instant Messaging, Paging Mode with each message sent as a single transaction, and Session Mode where a session is setup between users and IMs exchanged with the same Call ID / transaction.
I’m going to cover the Paging Mode implementation because it’s simpler easier to understand.
Before we get too far this is another example of confusing terminology, let’s just clear this up; According to the RFC any SIP request is a SIP Message, like a SIP OPTIONS message, a SIP INVITE message. But the method of a SIP INVITE message is INVITE, the method of a SIP OPTIONS message is OPTIONS. There’s a SIP MESSAGE method, meaning you can send a SIP MESSAGE message using the MESSAGE method. Clear as mud? I’ll always refer to the SIP Method in Capitals, like MESSAGE, INVITE, UPDATE, etc.
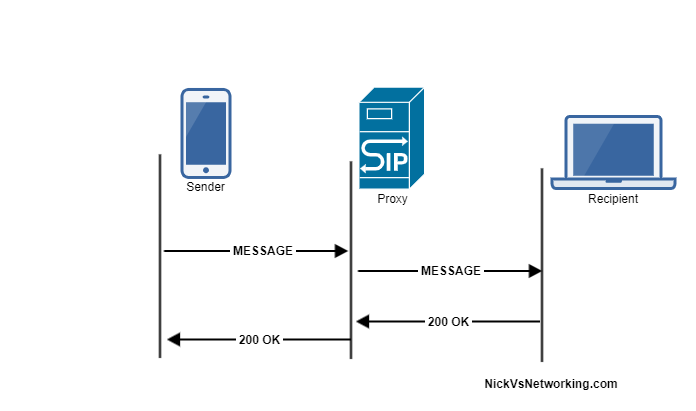
The SIP MESSAGE method looks / acts very similar to a SIP INVITE, in that it’s got all the standard SIP headers, but also a Message Body, in which our message body lives (funny about that), typically we’ll send messages using the Content-Type: text/plain to denote we’re sending a plaintext message.
Example MESSAGE Message Flow
Like a SIP OPTIONS Method, the MESSAGE method is simply answered with a 200 OK (No Ack).
Let’s have a look at how the MESSAGE message looks:
In my last post I talked about using KEMI in Kamailio and how you can integrate in a different programming language to handle your SIP request handling in a language you already know – Like Python!
Before we get too excited there’s some boilerplate we’ve got to add to our Python script, we need to create a class called kamailio and populate the class by defining some functions, we’ll define an __init__ to handle loading of the class, define a child_init for handling child processes, define ksr_request_route to handle the initial requests. We’ll also need to define a mod_init – outside of the Kamailio class to initialize the class.
import sys
import Router.Logger as Logger
import KSR as KSR

import requests

# global function to instantiate a kamailio class object
# -- executed when kamailio app_python module is initialized
def mod_init():
    KSR.info("===== from Python mod init\n");
    return kamailio();


# -- {start defining kamailio class}
class kamailio:
    def __init__(self):
        KSR.info('===== kamailio.__init__\n');


    # executed when kamailio child processes are initialized
    def child_init(self, rank):
        KSR.info('===== kamailio.child_init(%d)\n' % rank);
        return 0;


    # SIP request routing
    # -- equivalent of request_route{}
    def ksr_request_route(self, msg):
        KSR.info("===== request - from kamailio python script\n");
        KSR.dbg("method " + KSR.pv.get("$rm") + " r-uri " + KSR.pv.get("$ru"))
Most of these should be pretty self explanatory for anyone who’s done a bit more in-depth Python programming, but it’s no big deal if you don’t understand all this, the only part you need to understand is the ksr_request_route function.
ksr_request_route: translates to our request_route{} in the Kamailio native scripting language, all requests that come in will start off in this part.
Python Kamailio Routing
So let’s start to build upon this, so we’ll blindly accept all SIP registrations;
Here you’ll see we’ve added an if statement, as if we were doing any other If statement in Python, in this case we’re asking if the KSR.is_method(“REGISTER”), and if it is, we’ll send back a 200 OK response.
Let’s pause and talk about KSR
All the Kamailio bits we’ll use in Python will have the KSR. prefix, so let’s take a quick break here to talk about KSR. The KSR. functions are the KEMI functions we’ve exposed to Python.
Without them, we’re just writing Python, and we’d have to do all the functions provided by Kamailio nativeley in Python, which would be crazy.
So we leverage the Kamailio modules you know and love from Python using Python’s logic / programming syntax, as well as opening up the ability to pull in other libraries from Python.
Let’s look at how we might send a stateless reply,
There’s a module function to send a stateless reply;
KSR.sl.send_reply(200, "OK")
The vast majority of functions are abstracted as module functions, like the example above, but not all of them.
So every function doesn’t need to be wrapped up as a module, there’s also a way to call any function that you’d call from the native scripting language, wrapped up, kind of like an Exec command:
KSR.x.modf("sl_send_reply", "200", "OK");
So thanks to this we can call any Kamailio function from Python, even if it’s not explicitly in the KEMI abstraction.
Python Kamailio Routing (Continued)
So earlier we managed REGISTER requests and sent back a 200 OK response.
What about forwarding a SIP Request to another proxy? Let’s follow on with an elif statement to test if the method is an INVITE and statelessly forward it.
        elif KSR.is_method("INVITE"):
                #Lookup our public IP address
                try:
                    ip = requests.get('https://api.ipify.org').text
                except:
                    ip = "Failed to resolve"

                #Add that as a header
                KSR.hdr.append("X-KEMI: I came from KEMI at " + str(ip) + "\r\n");

                #Set host IP to 10.1.1.1
                KSR.sethost("10.1.1.1");

                #Forward the request on
                KSR.forward()
Now an incoming SIP invite will be proxied / forwarded to 10.1.1.1, all from Python.
But so far we’ve only done things in KEMI / Python that we could do in our native Kamailio scripting language, so let’s use some Python in our Python!
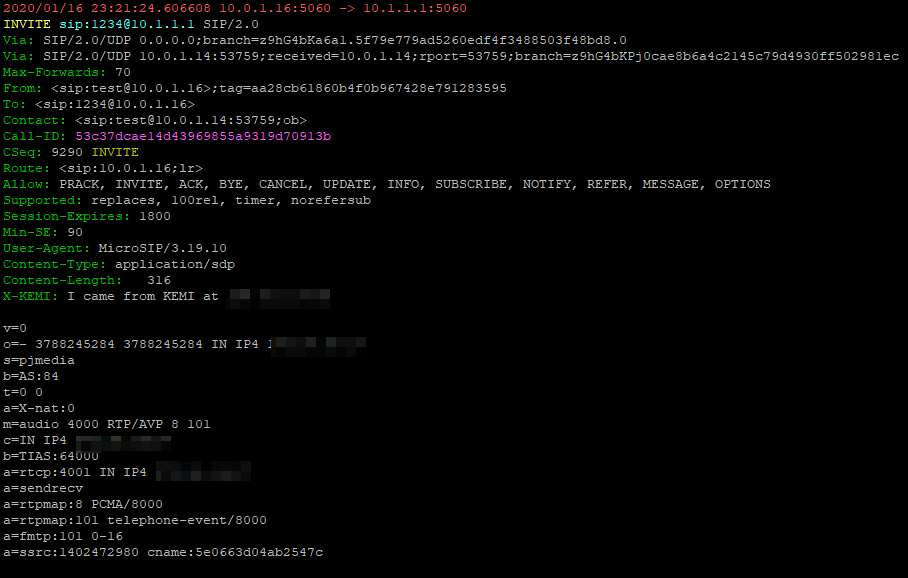
I utterly love the Python Requests library, so let’s use that to look up our public IP address and add it as a header to our forwarded SIP INVITE;
        elif KSR.is_method("INVITE"):
                #Lookup our public IP address
                try:
                    ip = requests.get('https://api.ipify.org').text
                except:
                    ip = "Failed to resolve"

                #Add that as a header
                KSR.hdr.append("X-KEMI: I came from KEMI at " + str(ip) + "\r\n");

                #Set host IP to 10.1.1.1
                KSR.sethost("10.1.1.1");

                #Forward the request on
                KSR.forward()
Bottom header is the X-KEMI custom header we included with our public IP
So let’s wrap this up a bit and handle any other request that’s not an INVITE or a REGISTER, with a 500 error code.
    # SIP request routing
    # -- equivalent of request_route{}
    def ksr_request_route(self, msg):

        KSR.dbg("method " + KSR.pv.get("$rm") + " r-uri " + KSR.pv.get("$ru"))


        if KSR.is_method("REGISTER"):
            KSR.sl.send_reply(200, "OK")

        elif KSR.is_method("INVITE"):
                #Lookup our public IP address
                try:
                    ip = requests.get('https://api.ipify.org').text
                except:
                    ip = "Failed to resolve"

                #Add that as a header
                KSR.hdr.append("X-KEMI: I came from KEMI at " + str(ip) + "\r\n");

                #Set host IP to 10.1.1.1
                KSR.sethost("10.1.1.1");

                #Forward the request on
                KSR.forward()
        else:
               KSR.sl.send_reply(500, "Got no idea...")
I’ve talked about using the UAC module, but as promised, here’s how we can use the UAC module to send SIP REGISTER requests to another SIP server so we can register to another SIP proxy.
Let’s say we’re using Kamailio to talk to a SIP Trunk that requires us to register with them so they know where to send the calls. We’d need to use Kamailio UAC module to manage SIP Registration with our remote SIP Trunk.
But Kamailio’s a proxy, why are we sending requests from it? A proxy just handles messages, right? Proxies don’t originate messages, it’s true, and Kamailio can be a proxy, but with the UAC module we can use Kamailio as a Client instead of a server. Keep in mind Kamailio is what we tell it to be.
Getting Started
Before we can go spewing registrations out all over the internet we need to start by getting a few things in place;
First of which is configuring UAC module, which is something I covered off in my last post,
Once we’ve got that done we’ll need to tell the UAC module our IP Address for the from address for our Contact field, and the database URL of what we’ve setup.
Once we’ve got a database connection in place and UAC module loaded, then we can configure an entry in the uacreg table in the database, in my example I’m going to be registering to an Asterisk box on 192.168.1.205, so I’ll insert that into my database:
mysql> INSERT INTO `uacreg` VALUES (NULL,'myusername','myusername','192.168.1.205','myusername','192.168.1.205','asterisk','myusername','mypassword','','sip:192.168.1.205:5060',60,0,0);
Note: If you’re using a later version of Kamailio (5.4+) then the DB schema changes and you may want something like this:
Having a look at the fields in our table makes it a bit clearer as to what we’ve got in place, setting flags to 0 will see Kamailio attempt registration. Make sure the auth_proxy is a SIP URI (Starts with sip:) and leave the auth_ha1 password empty as we haven’t calculated it.
After we’ve got our database connection in place, UAC module configured and database entries added, it’s time to put it into play, we’ll use Kamcmd to check it’s status:
kamcmd> uac.reg_reload
kamcmd> uac.reg_dump
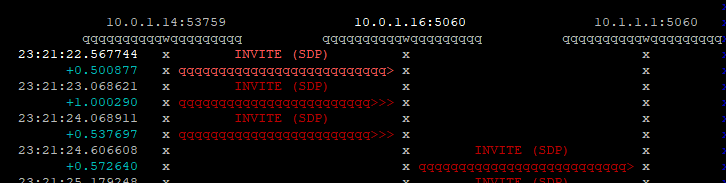
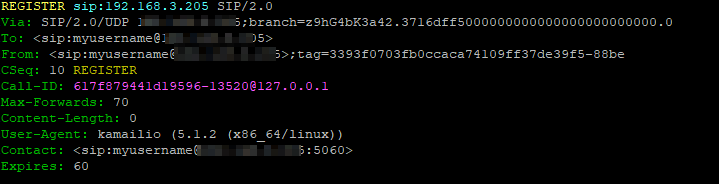
Unfortunately from Kamcmd we’re not able to see registration status, but Sngrep will show us what’s going on:
From Sngrep we can see the REGISTRATION going out, the authentication challenge and the 200 OK at the end.
Make sure you’ve got your Realm correct, otherwise you may see an error like this:
RROR: {2 10 REGISTER [email protected]} uac [uac_reg.c:946]: uac_reg_tm_callback(): realms do not match. requested realm: [localhost]