We’ve talked a bit in the Kamailio Bytes series about different modules we can use, but I thought it’d be useful to talk about setting up a SIP Proxy using Kamailio, and what’s involved in routing a message from Host A to Host B.
When we talk about proxying for the most part we’re talking about forwarding, let’s look at the steps involved:
Our Kamailio instance receives a SIP request (for simplicity we’ll assume an INVITE).
Kamailio looks at it’s routing logic to lookup where to forward the request to. You could find out where to send the request to from a lot of different sources, you could consult the Dialplan Module or Dispatcher Module, perform an SQL lookup, consult UsrLoc table to find a AoR, etc.
Add it’s own Via header (more on that later)
Forward the Request (aka Proxy it) to the destination selected
Let’s take a look at a very simple way we can do this with two lines in Kamailio to forward any requests to 192.168.1.110:
####### Routing Logic ########


/* Main SIP request routing logic
 * - processing of any incoming SIP request starts with this route
 * - note: this is the same as route { ... } */
request_route {

        xlog("Received $rm to $ru - Forwarding");

        #Forard to new IP
        forward("192.168.1.110");

}
After we restart Kamailio and send a call (INVITE) to it let’s see how it handles it:
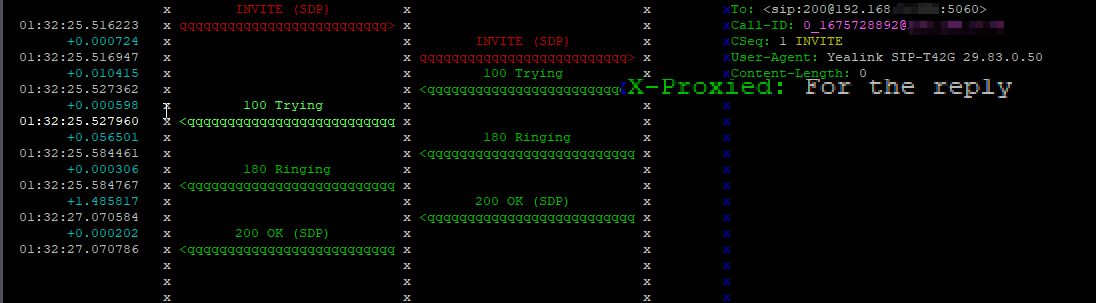
Let’s make a small modification, we’ll add a header called “X-Proxied” to the request before we forward it.
####### Routing Logic ########


/* Main SIP request routing logic
 * - processing of any incoming SIP request starts with this route
 * - note: this is the same as route { ... } */
request_route {

        xlog("Received $rm to $ru - Forwarding");

        append_hf("X-Proxied: You betcha\r\n");
        #Forard to new IP
        forward("192.168.1.110");

}
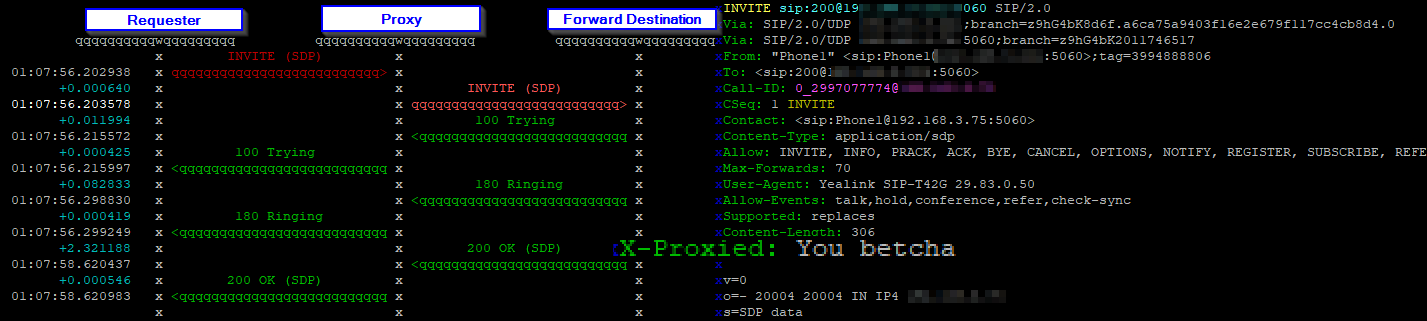
On the wire the packets still come from the requester, to the Proxy (Kamailio) before being forwarded to the forward destination (192.168.1.110):
We’ve now got a basic proxy that takes all requests to the proxy address and forwards it to an IP Address.
If you’re very perceptive you might have picked up the fact that the in-dialog responses, like the 100 Trying, the 180 Ringing and the 200 Ok also all went through the proxy, but if you look at syslog you’ll only see the initial request.
/usr/sbin/kamailio: Received INVITE to sip:[email protected]:5060 - Forwarding
So why didn’t we hit that xlog() route and generate a log entry for the replies?
But before we can talk too much about managing replies, let’s talk about Via…
It’s all about the Via
Before we can answer that question let’s take a look at Via headers.
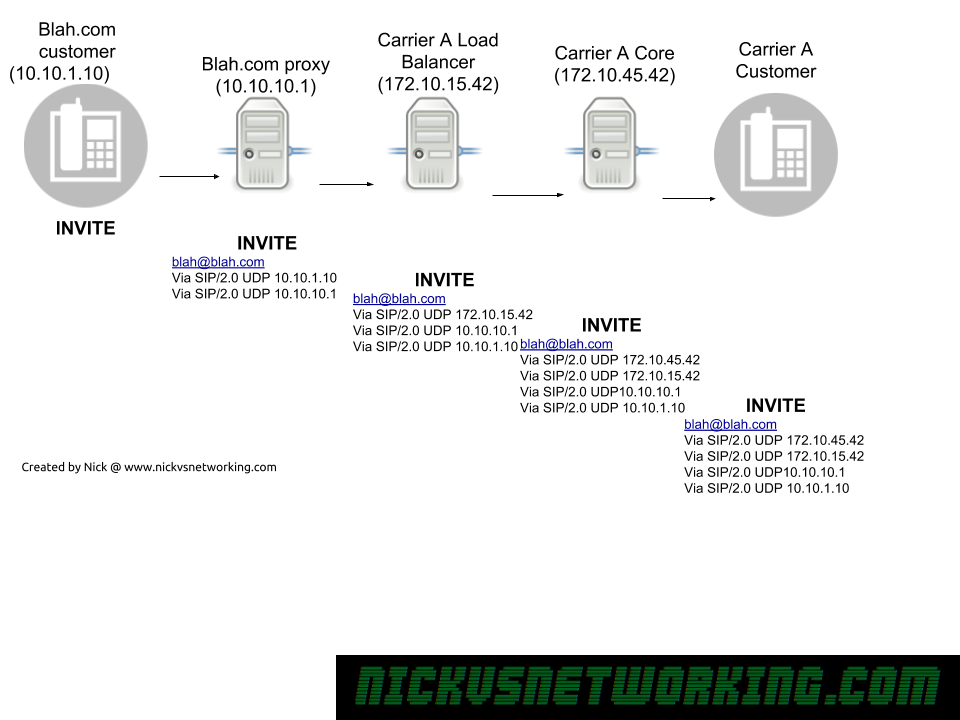
The SIP Via header is added by a proxy when it forwards a SIP message onto another destination,
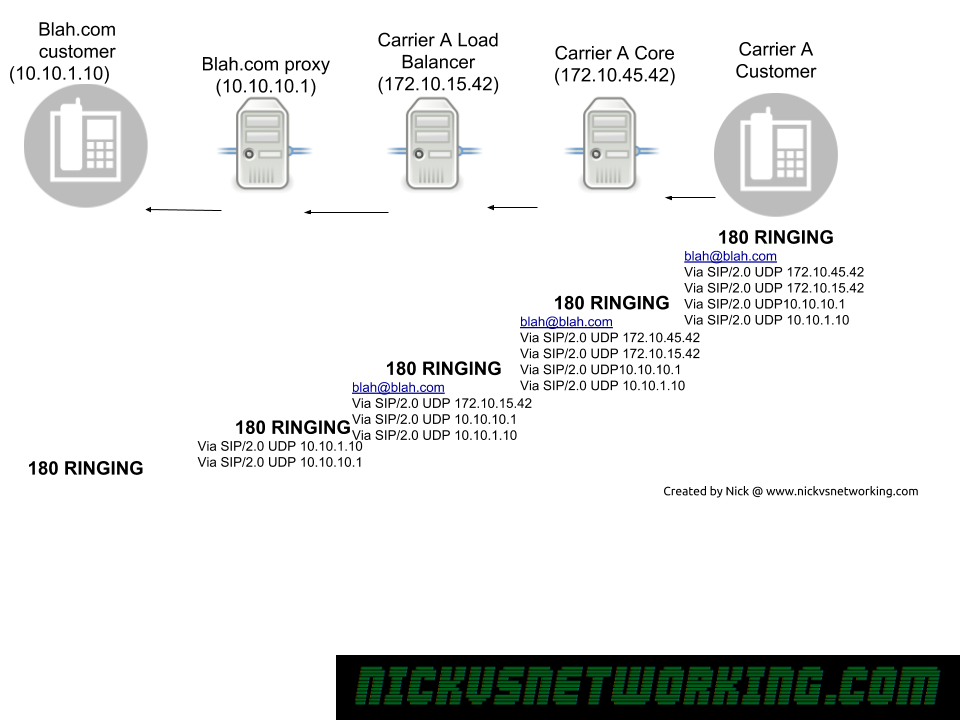
When a response is sent the reverse is done, each SIP proxy removes their details from the Via header and forwards to the next Via header along.
SIP Via headers in action
As we can see in the example above, each proxy adds it’s own address as a Via header, before it uses it’s internal logic to work out where to forward it to, and then forward on the INVITE.
Now because all our routing information is stored in Via headers when we need to route a Response back, each proxy doesn’t need to consult it’s internal logic to work out where to route to, but can instead just strip it’s own address out of the Via header, and then forward it to the next Via header IP Address down in the list.
Via headers are also used to detect looping, a proxy can check when it receives a SIP message if it’s own IP address is already in a Via header, if it is, there’s a loop there.
Managing Responses in Kamailio
By default Kamailio manages responses by looking at the Via header, if the top Via header is its own IP address, it strips it’s own Via header and forwards it onto the next destination in the Via header.
We can add our own logic into this by adding a new route called onreply_route{}
onreply_route{
        xlog("Got a reply $rs");
        append_hf("X-Proxied: For the reply\r\n");
}
Now we’ll create a log entry with the response code in syslog for each response we receive, and we’ll add a header on the replies too:
Recap
A simple proxy to forward INVITEs is easy to implement in Kamailio, the real tricky question is what’s the logic involved to make the decision,
Now we’ll put both together to create something functional you could use in your own deployments. (You’d often find it’s faster to use HTable to store and retrieve data like this, but that’s a conversation for another day)
The Project
We’ll build a SIP honeypot using Kamailio. It’ll listen on a Public IP address for SIP connections from people scanning the internet with malicious intent and log their IPs, so our real SIP softswitches know to ignore them.
We’ll use GeoIP2 to lookup the location of the IP and then store that data into a MySQL database.
Lastly we’ll create a routing block we can use on another Kamailio instance to verify if that the IP address of the received SIP message is not in our blacklist by searching the MySQL database for the source IP.
The Database
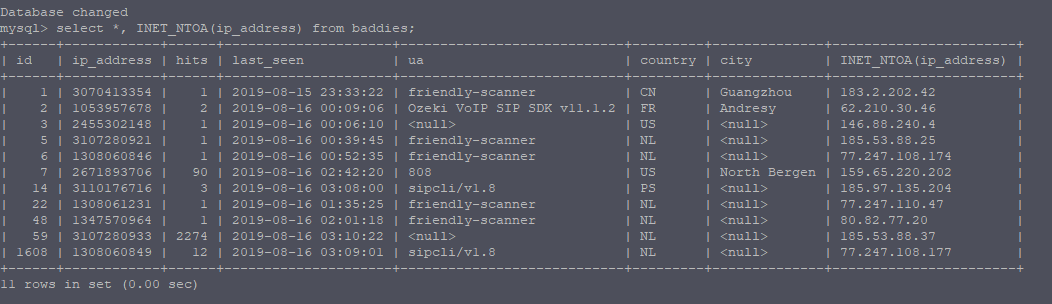
In this example I’m going to create a database called “blacklist” with one table called “baddies”, in MySQL I’ll run:
CREATE database blacklist;
CREATE TABLE `baddies` (
	`id` INT NOT NULL AUTO_INCREMENT PRIMARY KEY,
	`ip_address` INT unsigned UNIQUE,
	`hits` INT,
	`last_seen` DATETIME,
	`ua` TEXT,
	`country` TEXT,
	`city` TEXT
);
I’ll setup a MySQL user to INSERT/UPDATE/SELECT data from the MySQL database.
For storing IP addresses in the database we’ll store them as unsigned integers, and then use the INET_ATON('127.0.0.1') MySQL command to encode them from dotted-decimal format, and the INET_NTOA('2130706433') to put them back into dotted decimal.
Modparams
Now we’ll need to configure Kamailio, I’ll continue on from where we left off in the last post on GeoIP2 as we’ll use that to put Geographic data about the IP before adding the MySQL and SQLOps modules:
# ----- SQL params -----
loadmodule "db_mysql.so"
loadmodule "sqlops.so"

#Create a new MySQL database connection called blacklist_db
modparam("sqlops","sqlcon","blacklist_db=>mysql://root:yourpassword@localhost/blacklist")

#Set timeouts for MySQL Connections
modparam("db_mysql", "ping_interval", 60)
modparam("db_mysql", "auto_reconnect", 1)
modparam("db_mysql", "timeout_interval", 2)
After loading db_mysql and sqlops we create a new object / connection called blacklist_db with our MySQL Database parameters.
Now after a restart we’ll be connected to our MySQL database.
Honeypot Routing Logic
Now we’ll create a route to log the traffic:
####### Routing Logic ########


/* Main SIP request routing logic
 * - processing of any incoming SIP request starts with this route
 * - note: this is the same as route { ... } */
request_route {

        route(AddToBlacklist);
        sl_reply('200', 'Sure thing boss!');

}
route[AddToBlacklist]{
        xlog("Packet received from IP $si");
        sql_xquery("blacklist_db", "insert into baddies (ip_address, hits, last_seen, ua, country, city) values (2130706433, 10, NOW(), 'testua2', 'Australia', 'Hobart');");
}
Now for each SIP message received a new record will be inserted into the database:
 root@ip-172-31-8-156:/etc/kamailio# mysql -u root -p blacklist -e "select * from baddies;"
 Enter password:
 +----+------------+------+---------------------+---------+-----------+--------+
 | id | ip_address | hits | last_seen           | ua      | country   | city   |
 +----+------------+------+---------------------+---------+-----------+--------+
 |  1 | 2130706433 |   10 | 2019-08-13 02:52:57 | testua2 | Australia | Hobart |
 |  2 | 2130706433 |   10 | 2019-08-13 02:53:01 | testua2 | Australia | Hobart |
 |  3 | 2130706433 |   10 | 2019-08-13 02:53:05 | testua2 | Australia | Hobart |
 +----+------------+------+---------------------+---------+-----------+--------+
This is great but we’re not actually putting the call variables in here, and we’ve got a lot of duplicates, let’s modify our sql_xquery() to include the call variables:
Now we’re setting the IP Address value to the Source IP psedovariable ($si) and formatting it using the INET_ATON function in MySQL, setting the last_seen to the current timestamp and setting the user agent to the User Agent psedovariable ($ua).
Let’s restart Kamailio, truncate the data that’s currently in the DB, send some SIP traffic to it and then check the contents:
mysql -u root -p blacklist -e "select *, INET_NTOA(ip_address) from baddies;"
Here you can see we’re starting to get somewhere, the IP, UA and last_seen values are all now correct.
We’re getting multiple entries from the same IP though, instead we just want to increment the hits counter and set the last_seen to the current time, for that we’ll just update the SQL query to set the time to be NOW() and if that IP is already in the database to update the last_seen value and incriment the hits counter:
route[AddToBlacklist]{
        xlog("Packet received from IP $si");
        geoip2_match("$si", "src"))
        sql_xquery("blacklist_db", "insert into baddies (ip_address, hits, last_seen, ua, country, city) values (INET_ATON('$si'), 1, NOW(), '$ua', '$gip2(src=>cc)', '$gip2(src=>city)') ON DUPLICATE KEY UPDATE last_seen = NOW(), hits = hits + 1;", "r_sql");

}
The only issue with this is if GeoIP2 doesn’t have a match, no record will be added in the database, so we’ll add a handler for that:
route[AddToBlacklist]{
        xlog("Packet received from IP $si");
        if(geoip2_match("$si", "src")){
                sql_xquery("blacklist_db", "insert into baddies (ip_address, hits, last_seen, ua, country, city) values (INET_ATON('$si'), 1, NOW(), '$ua', '$gip2(src=>cc)', '$gip2(src=>city)') ON DUPLICATE KEY UPDATE last_seen = NOW(), hits = hits + 1;", "r_sql");
        }else{          ##If no match in GeoIP2 leave Country & City fields blank
                sql_xquery("blacklist_db", "insert into baddies (ip_address, hits, last_seen, ua, country, city) values (INET_ATON('$si'), 1, NOW(), '$ua', '', '') ON DUPLICATE KEY UPDATE last_seen = NOW(), hits = hits + 1;", "r_sql");
        }
}
Now let’s check our database again and see how the data looks:
mysql -u root -p blacklist -e "select *, INET_NTOA(ip_address) from baddies;"
Perfect! Now we’re inserting data into our blacklist from our honeypot. Now we’ll configure a new routing block we can use on another Kamailio instance to see if an IP is in the blacklist.
I left this running on my AWS box for a few hours, and lots of dodgy UAs dropped in to say hello, one of which was very insistent on making calls to Poland…
Querying the Data
Now we’ve got a blacklist it’s only useful if we block the traffic from our malicous actors who we’ve profiled in the database.
You could feed this into BGP to null route the traffic, or hook this into your firewall’s API, but we’re going to do this in Kamailio, so we’ll create a new routing block we can use on a different Kamailio instance – Like a production one – to see if the IP it just received traffic from is in the blacklist.
We’ve already spoken about querying databases in the SQLops Kamailio bytes, but this routing block will query the blacklist database, and if the sender is in the database, one or more records will be returned, so we know they’re bad and will drop their traffic:
route[CheckBlacklist]{

        xlog("Checking blacklist for ip $si");

        #Define a variable containing the SQL query we'll run
        $var(sql) = "select INET_NTOA(ip_address) as ip_address from baddies;";

        #Log the SQL query we're going to run to syslog for easy debugging
        xlog("Query to run is $var(sql)");

        #Query blacklist_db running the query stored in $var(sql) and store the result of the query to result_sql
        sql_query("blacklist_db", "$var(sql)", "result_sql");

        #If more than 0 records were returned from the database, drop the traffic
        if($dbr(result_sql=>rows)>0){
                xlog("This guy is bad news. Dropping traffic from $si");
                exit;
        }else{
                xlog("No criminal record for $si - Allowing to progress");
        }


}
This Honeypot use case just put those elements together.
In reality a far better implementation of this would use HTable to store this data, but hopefully this gives you a better understanding of how to actually work with data.
Final Note
I wrote this post about a week ago, and left the config running on an AWS box. I was getting hits to it within the hour, and in the past week I’ve had 172 IPs come and say hello, and some like the FriendlyScanner instance at 159.65.220.215 has sent over 93,000 requests:
RTPengine has an API / control protocol, which is what Kamailio / OpenSER uses to interact with RTPengine, called the ng Control Protocol.
Connection is based on Bencode encoded data and communicates via a UDP socket.
I wrote a simple Python script to pull active calls from RTPengine, code below:
#Quick Python library for interfacing with Sipwise's fantastic rtpengine - https://github.com/sipwise/rtpengine
#Bencode library from https://pypi.org/project/bencode.py/ (Had to download files from webpage (PIP was out of date))

import bencode
import socket
import sys
import random
import string

sock = socket.socket(socket.AF_INET, socket.SOCK_DGRAM)
server_address = ('188.0.169.13', 2224)     #Your server address

cookie = "0_2393_6"
data = bencode.encode({'command': 'list'})

message = str(cookie) + " " + str(data)
print(message)


sent = sock.sendto(message, server_address)

print('waiting to receive')
data, server = sock.recvfrom(4096)
print('received "%s"' % data)
data = data.split(" ", 1)       #Only split on first space
print("Cookie is: " + str(data[0]))
print("Data is: " + str(bencode.decode(data[1])))
print("There are " + str(len(bencode.decode(data[1])['calls'])) + " calls up on RTPengine at " + str(server_address[0]))
for calls in bencode.decode(data[1])['calls']:
    print(calls)
    cookie = "1_2393_6"
    data = bencode.encode({'command': 'query', 'call-id': str(calls)})
    message = str(cookie).encode('utf-8') + " ".encode('utf-8') + str(data).encode('utf-8')
    sent = sock.sendto(message, server_address)
    print('\n\nwaiting to receive')
    data, server = sock.recvfrom(8192)

    data = data.split(" ", 1)       #Only split on first space
    bencoded_data = bencode.decode(data[1])

    for keys in bencoded_data:
        print(keys)
        print("\t" + str(bencoded_data[keys]))

sock.close()
We’ve touched a tiny bit on basic database functionality in Kamailio, using MySQL to store User Data for authentication, ACLs or Dispatcher entries.
But with all those we were using Databases to load the config / dynamic data for a module.
We’ll build upon that, to connect to a Database that we can INSERT, UPDATE and SELECT data from within the dialplan.
For today’s example we’ll lookup the To address from a SIP INVITE and send back
Heads Up
There’s a lot of different use cases for reading and writing data from a database, but Kamailio also has a lot of native modules that handle this better, for example:
You might want to store a record of each INVITE and BYE you recieve for accounting, a better option is to use the Accounting Module in Kamailio.
You might want to authenticate user’s based on ACLs stored in a database, a better option would be to use Permissions Module.
User authentication info is best handled by Auth DB module.
The Dialplan module handles number translation really well and is lightning quick.
Just keep this in mind before jumping in that a lot of use cases have already been covered by a Kamailio module.
The Architecture
For today’s example we’ll be using MySQL as the database backend (db_mysl), but the db_mysql module simply connects us to a database, a bit like ODBC.
The real MVP is the SQLops module, that does all the heavy lifting by running the queries and managing the responses.
The majority of this config would work fine for other database backends, like PostGres, MongoDB, Oracle, etc.
I’ll demonstrate this same setup using different database backends in future posts.
MySQL Database
Before we get too excited we’ll need to setup a database to query. I’ll create a database called dyamic_routing with a table called routing storing source / destinations.
CREATE DATABASE phonebook;
USE  phonebook;
CREATE TABLE contacts (
     id INT NOT NULL AUTO_INCREMENT PRIMARY KEY,
     source TEXT,
     name TEXT
 );
INSERT INTO contacts VALUES (1, '200', 'Nick Deskphone');
I’ll setup a MySQL user to INSERT/UPDATE/SELECT data from the MySQL database the normal way.
Modparam
The module parameters for connecting to a database backend are fairly straight forward, but we’ll go into a bit of depth here to drive home the point.
# ----- SQL params -----
loadmodule "db_mysql.so"
loadmodule "sqlops.so"

#Create a new MySQL database connection called contacts_db
modparam("sqlops","sqlcon","contacts_db=>mysql://root:youshouldntrealluseroot@localhost/phonebook")

#Set timeouts for MySQL Connections
modparam("db_mysql", "ping_interval", 60)
modparam("db_mysql", "auto_reconnect", 1)
modparam("db_mysql", "timeout_interval", 2)
First off we load the two modules we need for this, db_mysql and sqlops. This is fairly self explanatory, if we were using db_postgres, db_mongodb or even db_text we’d load them instead of db_mysql.
The sqlops “sqlcon” modparam is where we define our MySQL database connection.
In this case we create a new database connection object called contacts_db– We can have connections to multiple databases, hence requiring a name.
The MySQL URL is fairly straightforward, database type, username, password, host and database:
mysql://root:password@localhost/phonebook
In production obviously you shouldn’t use root as the user account to log into the database, and lock it down to only the source IP of your Kamailio instance and with only the permissions it needs. (If it’s just selecting data there’s no need for GRANT…)
Basic Query
Now we’ve created a database connection it’s time to start using it.
request_route {
        if(method=="INVITE"){
                xlog("New request to $tU");

                #Query database object called "contacts_db", run the below query and store the output to a variable called result_sql
                sql_query("contacts_db", "select * from contacts;", "result_sql");

                #output number of rows in database returned
                xlog("number of rows in table is $dbr(result_sql=>rows)\n");
}
}
If the method is an INVITE we’ll query the database object called “contacts_db” to run the query select * from contacts;
We’ll then output the number of rows in the table to xlog.
The query actually happens in the sql_query() command, which takes the name of the database object ( contacts_db ), the query itself ( select * from contacts; ) and stores it into a variable called result_sql.
Finally xlog references the variable we stored our result in (result_sql) using the $dbr() handler to output the number of rows in the table.
If you save this and send an INVITE to any destination and watch the syslog you should see something along the lines of this:
/usr/sbin/kamailio[7815]: ERROR: : New request to 200
/usr/sbin/kamailio[7815]: ERROR: <script>: number of rows in table is 1
This means we’ve got a connection to the database and we can run queries.
Accessing the Output
Now we’ve got the data back from the database and stored it in result_sql we probably want to do something with the outputted data.
By wrapping the result_sql variable in the $dbr() tags we can access it’s jucy insides, let’s take a look:
                #output number of columns
                xlog("Result has $dbr(result_sql=>cols) Columns");
                #output number of rows
                xlog("Result has $dbr(result_sql=>rows) rows");
                #output contents of row 0, column 2
                xlog("Contents of row 0 col 2 is $dbr(result_sql=>[0,2]) ");
                #output name of column 2
                xlog("name of column 2 is $dbr(result_sql=>colname[2]) ");
If we add this after our last xlog line, restart Kamailio and view syslog it should look something like this:
/usr/sbin/kamailio[8249]: ERROR: <script>: New request to 200
/usr/sbin/kamailio[8249]: ERROR: <script>: number of rows in table is 1
/usr/sbin/kamailio[8249]: ERROR: <script>: Result has 3 Columns
/usr/sbin/kamailio[8249]: ERROR: <script>: Result has 1 rows
/usr/sbin/kamailio[8249]: ERROR: <script>: Contents of row 0 column 2 is Nick Deskphone
Now we can see the data in the result we’ll start to refine this down a bit, we’ll begin by limiting the SQL query to search for the called number.
For this we’ll update the sql_query(); function to:
sql_query("contacts_db", "select * from contacts where source = $tU;", "result_sql");
This will include the the To URI Username pseudo variable in our query, so will only return results if the number we dial has one or more matching “source” entries in the database.
If we dial 200 the query that’s actually run against the database will look like this:
select * from contacts where source = '200';
Now once we save and try again our traffic will look the same, except it’ll only return data if we dial 200, if we dial 201 the SQL server won’t have any matching results to return:
/usr/sbin/kamailio[9069]: ERROR: : New request from 2029
/usr/sbin/kamailio[9069]: ERROR: number of rows in table is 0
/usr/sbin/kamailio[9069]: ERROR: Result has 0 Columns
So that’s all well and good but we haven’t really got the data easily yet, while we’re outputting the contents of row 0 col 2 to syslog, it’s not going to handle multiple results being returned, or 0 results being returned, so we need a better way to handle this.
We’ll use a for loop to loop through all the results returned and output the second column of each (the “name” field in the database).
                #Loop through results
                #Create variable i to use as the counter
                $var(i) = 0;
                #While the contents of row i, position 2, is not null:
                while ($dbr(result_sql=>[$var(i),2]) != $null) {
                        #Output row i, position 2 (name)
                        xlog("name is $dbr(result_sql=>[$var(i),2])");
                        #increment i by 1
                        $var(i) = $var(i) + 1;
                }
So while the contents of row i, position 2, is not null, we’ll output the contents and increment i to get the next row in the database until there are none left.
Now we can give our code a bit of a clean up:
request_route {
        if(method=="INVITE"){
                xlog("New request from $tU");

                #Query database object called "contacts_db", run the below query and store the output to a variable called result_sql
                sql_query("contacts_db", "select * from contacts where source = $tU;", "result_sql");

                #Loop through results
                #Create variable i to use as the counter
                $var(i) = 0;
                #While the contents of row i, position 2, is not null:
                while ($dbr(result_sql=>[$var(i),2]) != $null) {
                        #Output row i, position 2 (name)
                        xlog("name $dbr(result_sql=>[$var(i),2])");
                        #increment i by 1
                        $var(i) = $var(i) + 1;
                }


        }
        if(method=="REGISTER"){ sl_reply('200', 'OK'); }
}
I’ve removed many of our xlog entries we put in for debugging and also added a handler to handle REGISTER requests to keep my IP phone happy.
Now if we make a call to number 200:
/usr/sbin/kamailio[9686]: ERROR: New request from 200
/usr/sbin/kamailio[9686]: ERROR: name Nick Deskphone
And for comparison a call to 201 (no matching database entry):
/usr/sbin/kamailio[9686]: ERROR: New request from 200
Using the Resulting Output
Now we’ve got access to the data from the database let’s do something with it.
Inside our loop we’ll send a reply to the SIP requester, with a 410 “Gone” response with the body containing the data returned from the database:
                        #Loop through results
                        #Create variable i to use as the counter
                        $var(i) = 0;
                        #While the contents of row i, position 2, is not null:
                        while ($dbr(result_sql=>[$var(i),2]) != $null) {
                                #Output row i, position 2 (name)
                                xlog("name $dbr(result_sql=>[$var(i),2])");
                                $var(name) = $dbr(result_sql=>[$var(i),2]);
                                #increment i by 1
                                $var(i) = $var(i) + 1;

                                #Reply with a 410 (User Gone) response with the name returned from the database
                                sl_reply("410", "Sorry $var(name) has gone home");
                                exit;
                        }
Now calls to 200 will get the message “Sorry Nick desk phone has gone home”.
Lastly we probably want to only loop through the output if there’s more than one row returned from the database, so we’ll put the looping code in an if statement that evaluates if the number of returned rows from the database is 1 or more, and if not just send a 404 response:
                #if one or more results are returned from the database
                if($dbr(result_sql=>rows)>0){

                        #Loop through results
                        #Create variable i to use as the counter
                        $var(i) = 0;
                        #While the contents of row i, position 2, is not null:
                        while ($dbr(result_sql=>[$var(i),2]) != $null) {
                                #Output row i, position 2 (name)
                                xlog("name $dbr(result_sql=>[$var(i),2])");
                                $var(name) = $dbr(result_sql=>[$var(i),2]);
                                #increment i by 1
                                $var(i) = $var(i) + 1;

                                #Reply with a 410 (User Gone) response with the name returned from the database
                                sl_reply("410", "Sorry $var(name) has gone home");
                                exit;
                        }
                }else{
                        #if 0 results are returned from database
                        sl_reply("404", "Never heard of them");
                }
INSERT, DELETE, UPDATE, etc
Although we only covered SELECT, queries that don’t return data like an INSERT, UPDATE, DELETE etc, can all be run the same way but we just don’t need to worry about managing the returned data.
For example we could delete a record using:
sql_query("contacts_db", "delete * from contacts where source = $tU;");
We don’t even need to store the output unless we need to.
Summary
Hopefully you’ve now got an idea how to query data from a database and view / manipulated the returned data.
Generally Kamailio functions as a SIP router, receiving SIP messages and then responding with SIP.
Sometimes we may have a use case where we need to interact with Kamailio but with a request that isn’t a SIP message.
You’ve got a motion activated IP Camera, and you want to send an alert to a SIP phone if it detects motion.
The problem? The IP camera doesn’t speak SIP. but it can send an HTTP request if it detects motion.
Enter xHTTP!
We’ll get Kamailio to listen for HTTP requests and send an instant message using method “MESSAGE” to a SIP phone to let someone know there’s been motion.
Use Case
The sending of the message is fairly straight forward, we’ll use the UAC module to perform a uac_req_send() and put it in it’s own routing block called “SEND_MESSAGE”, which we’ll add after the request_route{} block:
Now when we call the route ROUTE(SEND_MESSAGE); the SIP phone at 10.0.1.5 will get a message that pops up on the screen.
So the next step is getting something other than a SIP request to call our SEND_MESSAGE route.
For this we’ll use the xHTTP module, a barebones HTTP server for Kamailio.
It’s requirements are pretty easy, sl_reply needs to be loaded before xHTTP, and you may need to add tcp_accept_no_cl=yes to your core settings (aka Global Parameters at the top).
The two lines we’ll need to load and configure the module are equally as easy:
The url_match modparam just means that any HTTP request has to start with /sip/ in the URL.
Finally we’ll define an event route to handle any xHTTP requests after our request_route{} block:
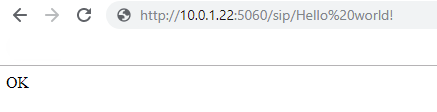
event_route[xhttp:request] {
        xlog("Recieved HTTP request with request $hu");                         #Write to log the URL of http request.
        xhttp_reply("200", "OK", "text/html", "<html><body>OK</body></html>");  #Send HTTP response
}
Now if we restart Kamailio, and open a browser pointed to the IP of your Kamailio server, port 5060 /sip/Hello World you should get a response of “OK” in the browser:
Perfect, we now have an HTTP server in Kamailio, and we can read the HTTP request URL into a variable.
Next up we can call the route(SEND_MESSAGE) and our SIP phone will get a message
event_route[xhttp:request] {
        xlog("Recieved HTTP request with request $hu");                         #Write to log the URL of http request.
        xhttp_reply("200", "OK", "text/html", "<html><body>OK</body></html>");  #Send HTTP response
        route(SEND_MESSAGE);
}
Presto! When we call that URL (http://your-kamailio-ip:5060/sip/whatever) a SIP SIMPLE MESSAGE is sent.
But why stop there, let’s make this a bit prettier, we’ll set the message to equal the part of the HTTP request after the /sip/ so we can send custom data, replace the %20 with underscores and send it:
route[SEND_MESSAGE]{
        $uac_req(method)="MESSAGE";
        $uac_req(ruri)="sip:192.168.3.227:5060";
        $uac_req(furi)="sip:nickvsnetworking.com";
        $uac_req(turi)="sip:thisphone";
        $uac_req(callid)=$(mb{s.md5});
        $uac_req(hdrs)="Subject: Test\r\n";
        $uac_req(hdrs)=$uac_req(hdrs) + "Content-Type: text/plain\r\n";
        $uac_req(body)=$var(message);
        uac_req_send();

}

event_route[xhttp:request] {
        xlog("Recieved HTTP request with request $hu");                         #Write to log the URL of http request.
        $var(message) = $hu;                                                    #Set variable $var(message) to equal the URL of http request.
        $var(message) = $(var(message){s.substr,5,0});                          #Cut off first 5 chars to exclude the /sip/ prefix from the HTTP request
        $var(message) = $(var(message){s.replace,%20,_});                       #Replace %20 of space in HTTP request with Underscore _ for spaces
        xlog("var message is $var(message)");                                   #Write to log the http request minus the /sip/ prefix
        xhttp_reply("200", "OK", "text/html", "<html><body>OK</body></html>");  #Send HTTP response
        route(SEND_MESSAGE);                                                    #Call the SEND_OPTIONS route (See above)
}
We’ll also set our core settings / gloabal parameters to listen on TCP port 80 as well as UDP port 5060 so we don’t need to specify the port in the browser:
Hopefully by now you can see some of the cool things you can do with the HTTP module. Kamailio is so much more than just a SIP router / proxy, and these external modules being able to interface with it give you so many options.
Want to offer webhooks to customers to control their calls? xHTTP can do that!
Want to play a message to all users on calls announcing to them lunch is ready? RTPengine and xHTTP can do that too!
If you’re planning on using this in production you probably want to automate the pulling of this data on a regular basis and keep it in a different directory.
I’ve made a very simple example Kamailio config that shows off some of the features of GeoIP2’s logic and what can be shown, so let’s look at the basics of the module:
if(geoip2_match("$si", "src")){
                xlog("Packet received from IP $si");
                xlog("Country is: $gip2(src=>cc)\n");
}
If we put this at the top of our request_route block every time we recieve a new request we can see the country from which the packet came from.
Let’s take a look at the output of syslog (with my IP removed):
#> tail -f /var/log/syslog
ERROR: <script>: Packet received from IP 203.###.###.###
ERROR: <script>: Country is: AU
ERROR: <script>: City is:  Melbourne
ERROR: <script>: ZIP is:  3004
ERROR: <script>: Regc is:  VIC
ERROR: <script>: Regn is:  Victoria
ERROR: <script>: Metro Code is:  <null>
We can add a bunch more smarts to this and get back a bunch more variables, including city, ZIP code, Lat & Long (Approx), timezone, etc.
        if(geoip2_match("$si", "src")){
                xlog("Packet received from IP $si");
                xlog("Country is: $gip2(src=>cc)\n");
                xlog("City is:  $gip2(src=>city)");
                xlog("ZIP is:  $gip2(src=>zip)");
                xlog("Regc is:  $gip2(src=>regc)");
                xlog("Regn is:  $gip2(src=>regn)");
                xlog("Metro Code is:  $gip2(src=>metro)");

                if($gip2(src=>cc)=="AU"){
                        xlog("Traffic is from Australia");
                }
        }else{
                xlog("No GeoIP Match for  $si");
        }
#> tail -f /var/log/syslog
ERROR: <script>: Packet received from IP ###.###.###.###
ERROR: <script>: Country is: AU
ERROR: <script>: City is:  Melbourne
ERROR: <script>: ZIP is:  3004
ERROR: <script>: Regc is:  VIC
ERROR: <script>: Regn is:  Victoria
ERROR: <script>: Metro Code is:  <null>
Using GeoIP2 you could use different rate limits for domestic users vs overseas users, guess the dialling rules based on the location of the caller and generate alerts if accounts are used outside their standard areas.
We’ll touch upon this again in our next post on RTPengine where we’ll use an RTPengine closes to the area in which the traffic originates.
I’m a big fan of RTPengine, and I’ve written a bit about it in the past.
Let’s say we’re building an Australia wide VoIP network. It’s a big country with a lot of nothing in the middle. We’ve got a POP in each of Australia’s capital cities, and two core softswitch clusters, one in Melbourne and one in Sydney.
These two cores will work fine, but a call from a customer in Perth, WA to another customer in Perth, WA would mean their RTP stream will need to go across your inter-caps to Sydney or Melbourne only to route back to Perth.
That’s 3,500Km each way, which is going to lead to higher latency, wasted bandwidth and decreased customer experience.
What if we could have an RTPengine instance in our Perth POP, handling RTP proxying for our Perth customers? Another in Brisbane, Canberra etc, all while keeping our complex expensive core signalling in just the two locations?
RTPengine to the rescue!
Preparing our RTPEngine Instances
In each of our POPs we’ll spin up a box with RTPengine,
The only thing we’d do differently is set the listen-ng value to be 0.0.0.0:2223 and the interface to be the IP of the box.
By setting the listen-ng value to 0.0.0.0:2223 it’ll mean that RTPengine’s management port will be bound to any IP, so we can remotely manage it via it’s ng-control protocol, using the rtpengine Kamailio module.
Naturally you’d limit access to port 2223 only to allowed devices inside your network.
Next we’ll need to add the details of each of our RTP engine instances to MySQL, I’ve used a different setid for each of the RTPengines. I’ve chosen to use the first digit of the Zipcode for that state (WA’s Zipcodes / Postcodes are in the format 6xxx while NSW postcodes are look like 2xxx), we’ll use this later when we select which RTPengine instances to use.
I’ve also added localhost with setid of 0, we’ll use this as our fallback route if it’s not coming from Australia.
Bingo, we’re connected to three RTPengine instances,
Next up we’ll use the Geoip2 module to determine the source of the traffic and route to the correct, I’ve touched upon the Geoip2 module’s basic usage in the past, so if you’re not already familiar with it, read up on it’s usage and we’ll build upon that.
We’ll load GeoIP2 and run some checks in the initial request_route{} block to select the correct RTPengine instance:
        if(geoip2_match("$si", "src")){
                if($gip2(src=>cc)=="AU"){
                        $var(zip) =  $gip2(src=>zip);
                        $avp(setid) = $(var(zip){s.substr,0,1});
                        xlog("rtpengine setID is $avp(setid)");
                }else{
                        xlog("GeoIP not in Australia - Using default RTPengine instance");
                        set_rtpengine_set("0");
                }
        }else{
                xlog("No GeoIP Match - Using default RTPengine instance");
                set_rtpengine_set("0");
        }
In the above example if we have a match on source, and the Country code is Australia, the first digit of the ZIP / Postcode is extracted and assigned to the AVP “setid” so RTPengine knows which set ID to use.
In practice an INVITE from an IP in WA returns setID 6, and uses our RTPengine in WA, while one from NSW returns 2 and uses one in NSW. In production we’d need to setup rules for all the other states / territories, and generally have more than one RTPengine instance in each location (we can have multiple instances with the same setid).
Hopefully you’re starting to get an idea of the fun and relatively painless things you can achieve with RTPengine and Kamailio!
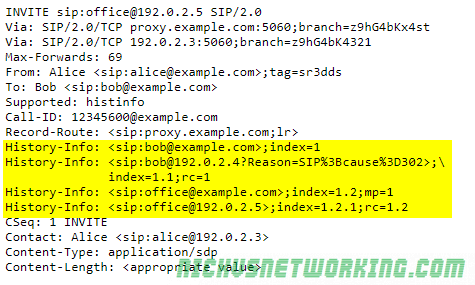
The History Info extension defined in RFC7044 sets a way for an INVITE to include where the session (call) has been before that.
For example a call may be made to a desk phone, which is forwarded (302) to a home phone. The History Info extension would add a History Info header to the INVITE to the home phone, denoting the call had come to it via the desk phone.
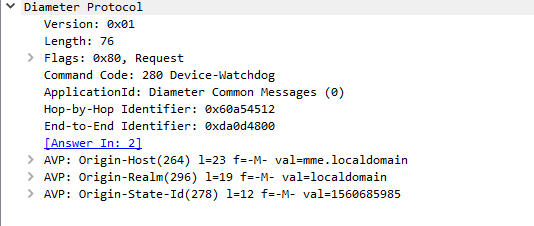
Each Diameter packet has at a the following headers:
Version
This 1 byte field is always (as of 2019) 0x01 (1)
Length
3 bytes containing the total length of the Diameter packet and all it’s contained AVPs.
This allows the receiver to know when the packet has ended, by reading the length and it’s received bytes so far it can know when that packet ends.
Flags
Flags allow particular parameters to be set, defining some possible options for how the packet is to be handled by setting one of the 8 bits in the flags byte, for example Request Set, Proxyable, Error, Potentially Re-transmitted Message,
Command Code
Each Diameter packet has a 3 byte command code, that defines the method of the request,
The IETF have defined the basic command codes in the Diameter Base Protocol RFC, but many vendors have defined their own command codes, and users are free to create and define their own, and even register them for public use.
To allow vendors to define their own command codes, each command code is also accompanied by the Application ID, for example the command code 257 in the base Diameter protocol translates to Capabilities Exchange Request, used to specify the capabilities of each Diameter peer, but 257 is only a Capabilities Exchange Request if the Application ID is set to 0 (Diameter Base Protocol).
If we start developing our own applications, we would start with getting an Application ID, and then could define our own command codes. So 257 with Application ID 0 is Capabilities Exchange Request, but command code 257 with Application ID 1234 could be a totally different request.
Hop-By-Hop Identifier
The Hop By Hop identifier is a unique identifier that helps stateful Diameter proxies route messages to and fro. A Diameter proxy would record the source address and Hop-by-Hop Identifier of a received packet, replace the Hop by Hop Identifier with a new one it assigns and record that with the original Hop by Hop Identifier, original source and new Hop by Hop Identifier.
End-to-End Identifier
Unlike the Hop-by-Hop identifier the End to End Identifier does not change, and must not be modified, it’s used to detect duplicates of messages along with the Origin-Host AVP.
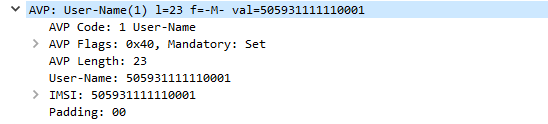
AVPs
The real power of Diameter comes from AVPs, the base protocol defines how to structure a Diameter packet, but can’t convey any specific data or requests, we put these inside our Attribute Value Pairs.
Let’s take a look at a simple Diameter request, it’s got all the boilerplate headers we talked about, and contains an AVP with the username.
Here we can see we’ve got an AVP with AVP Code 1, containing a username
Let’s break this down a bit more.
AVP Codes are very similar to the Diameter Command Codes/ApplicationIDs we just talked about.
Combined with an AVP Vendor ID they define the information type of the AVP, some examples would be Username, Session-ID, Destination Realm, Authentication-Info, Result Code, etc.
AVP Flags are again like the Diameter Flags, and are made up a series of bits, denoting if a parameter is set or not, at this stage only the first two bits are used, the first is Vendor Specific which defines if the AVP Code is specific to an AVP Vendor ID, and the second is Mandatory which specifies the receiver must be able to interpret this AVP or reject the entire Diameter request.
AVP Length defines the length of the AVP, like the Diameter length field this is used to delineate the end of one AVP.
AVP Vendor ID
If the AVP Vendor Specific flag is set this optional field specifies the vendor ID of the AVP Code used.
AVP Data
The payload containing the actual AVP data, this could be a username, in this example, a session ID, a domain, or any other value the vendor defines.
AVP Padding
AVPs have to fit on a multiple of a 32 bit boundary, so padding bits are added to the end of a packet if required to total the next 32 bit boundary.
3GPP selected Diameter protocol to take care of Authentication, Authorization, and Accounting (AAA).
It’s typically used to authenticate users on a network, authorize them to use services they’re allowed to use and account for how much of the services they used.
In a EPC scenario the Authentication function takes the form verifying the subscriber is valid and knows the K & OP/OPc keys for their specific IMSI.
The Authorization function checks to find out which features, APNs, QCI values and services the subscriber is allowed to use.
The Accounting function records session usage of a subscriber, for example how many sessional units of talk time, Mb of data transferred, etc.
Diameter Packets are pretty simple in structure, there’s the packet itself, containing the basic information in the headers you’d expect, and then a series of one or more Attribute Value Pairs or “AVPs”.
These AVPs are exactly as they sound, there’s an attribute name, for example username, and a value, for example, “Nick”.
This could just as easily be for ordering food; we could send a Diameter packet with an imaginary command code for Food Order Request, containing a series of AVPs containing what we want. The AVPs could belike Food: Hawian Pizza, Food: Garlic Bread, Drink: Milkshake, Address: MyHouse. The Diameter server could then verify we’re allowed to order this food (Authorization) and charge us for the food (Accounting), and send back a Food Order Response containing a series of AVPs such as Delivery Time: 30 minutes, Price: $30.00, etc.
Diameter packets generally take the form of a request – response, for example a Capabilities Exchange Request contains a series of AVPs denoting the features supported by the requester, which is sent to a Diameter peer. The Diameter peer then sends back a Capabilities Exchange Response, containing a series of AVPs denoting the features that it supports.
Diameter is designed to be extensible, allowing vendors to define their own type of AVP and Diameter requests/responses and 3GPP have defined their own types of messages (Diameter Command Codes) and types of data to be transferred (AVP Codes).
LTE/EPC relies on Diameter and the 3GPP/ETSI defined AVP / Diameter Packet requests/responses to form the S6a Interface between an MME and a HSS, the Gx Interface between the PCEF and the PCRF, Cx Interface between the HSS and the CSCF, and many more interfaces used for Authentication in 3GPP networks.
NAT is still common in Voice networks, and while we’re all awaiting the full scale adoption of IPv6, it’s still going to be a thing for some time.
I thought I’d dive into some of the NAT “solutions” that are currently in use.
Old RFC 3489 Definitions
These were the first NAT implementations used, and are still often used today.
Full cone NAT
A request from a private address is mapped to a public address and a publicly available port.
Traffic can be sent from any external device to this public address / port combination, and will be sent the internal device.
This is often statically setup, where you’d log into your router and put a NAT rule saying “Traffic on Port 5060 I want forwarded to my desk phone on 192.168.1.2” for example, and is sometimes just called a “Port forward”.
This can work fine if you’ve just got one unchanging internal address, but starts to have issues with multiple devices or dynamically assigned IPs.
Restricted Cone NAT
A request from a private address is mapped to a public address.
Traffic sent to this public address from an allowed IP will be routed to the internal device, regardless of port used.
Port Restricted Cone
Like restricted cone but only a single port may be used, traffic sent to any other port will not be routed to the internal device.
Symmetric NAT
Each request to an external destination gets a unique Public IP / Port combination to be used only by that destination, and each new request with a different source port on the internal side, or different destination on the external side, sets up a new NAT path.
RFC 5389 NAT Definitions
Endpoint Independent Mapping
Each request to an external destination gets the same public IP address / Port combination used for the outbound traffic.
Return traffic from the external destination is routed based on the source address, to the internal IP of the originating user.
It’s possible to have multiple internal devices communicating with multiple external destinations, using the same public IP address / port combination for each of them.
The source IP address of the traffic back from the external destination is used to map the path back to the internal IP.
This is efficient (doesn’t need to keep using outbound ports on the public IP) but means that it’ll only work to the requested external destination’s IP.
If you register to a SIP server on one IP, and media comes in on another, an Endpoint Independent Mapping NAT will see you with one-way audio.
Address Dependant Mapping
Each request to an external destination gets a unique public IP address / port combination used for outbound traffic.
It is reused for packets sent to the same destination, regardless of which destination port is used.
Address and Port Dependant Mapping
Same as Address Dependant Mapping but a new mapping is created for each destination and port.
You’ll often see numbers listed in different formats, which often leads to confusion.
Australian SIP networks may format numbers in either 0NDC-SN or E.164 format, leading some confusion. There’s no “correct” way, ACMA format in 0-NDC-SN, while most Australian tier 1 carriers store the records in E.164 format.
There’s no clear standard, so it’s always best to ask.
Let’s say my number is in Melbourne and is 9123 4567,
This could be expressed in Subscriber Number (SN) format:
9123 4567
The problem is a caller from Perth calling that number wouldn’t get through to me, there’s a good chance they’d get a totally unrelated business.
To stop this we can add the National Destination Code (NDC), for Victoria / Tasmania this is 3, however when dialling domestically a 0 is prefixed.
The leading 0 is a carry over from the days of step-by-step based switching, which had technical and physical design constraints that dictated the dialling plan we see today, which I’ll do a post about another day.
So to put it in 0-NDC-S format we’d list
03 9123 4567
But an international caller wouldn’t be able to reach this from their home country, they’d need to add the Country Code (CC) which for Australia is 61, so they’d dial the CC-NDC-SN
Sometimes this is listed with the plus symbol in front of it, like
+61 3 9123 4567
Each country has it’s own international dialling prefix, and the plus symbol is to be replaced by the international dialling prefix used in the calling country. In Australia, we replace the + with 0011, but it’s different from country to country.
I’ve talked a bit in the past about using RTPengine to act as an RTP proxy / media proxy in conjunction with Kamailio.
Recently transcoding support was added to RTPengine, and although the Kamailio rtpengine module doesn’t yet recognise the commands when we put them in, they do work to transcode from one codec to another.
This will mask all the other codecs and transcode into PCMU, simple as that.
Beware software based transcoding is costly to resources, this works fine in small scale, but if you’re planning on transcoding more than 10 or so streams you’ll start to run into issues, and should look at hardware based transcoding.
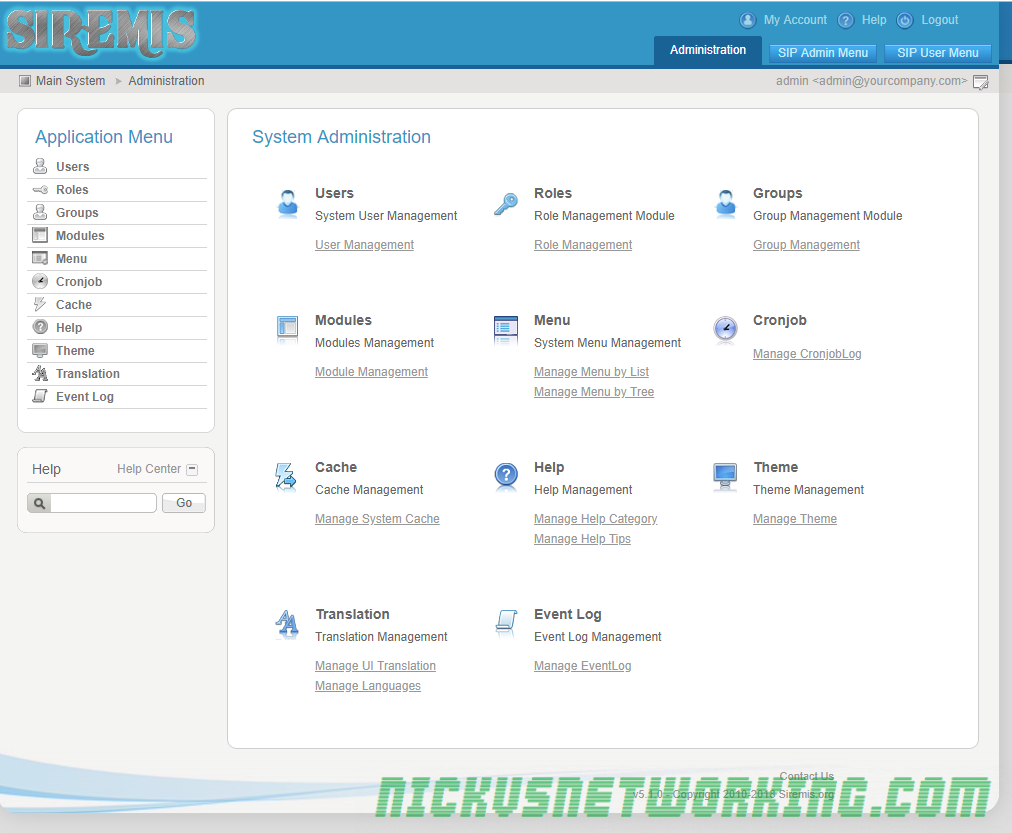
Siremis is a web interface for Kamailio, created by the team at Asipto, who contribute huge amounts to the Kamailio project.
Siremis won’t create your Kamailio configuration file for you, but allows you to easily drive the dynamic functions like dialplan, subscribers, dispatcher, permissions, etc, from a web interface.
Siremis essentially interfaces with the Kamailio database, kamcmd and kamctl to look after your running Kamailio instance.
Installation
I’ll be installing on Ubuntu 18.04, but for most major distributions the process will be the same. We’re using PHP7 and Apache2, which are pretty much universal available on other distros.
First we need to install all the packages we require:
Next we’ll download Siremis from the Git repo, and put it into a folder, which I’ve named the same as my Kamailio version.
cd /var/www/html/
git clone https://github.com/asipto/siremis kamailio-5.1.2
Now we’ll move into the directory we’ve created (called kamailio-5.1.2) and build the apache2 config needed:
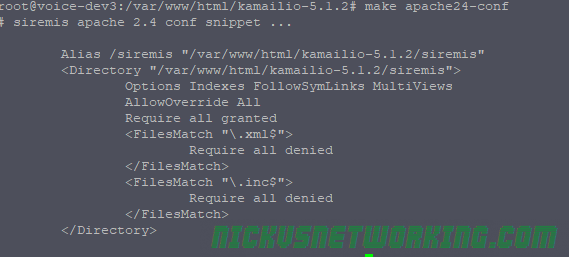
cd kamailio-5.1.2/
make apache24-conf
This then gives us a config except we can put into our Apache virtual host config file:
We can now copy and paste this into the end of an existing or new Apache virtual host file.
If this is a fresh install you can just pipe the output of this into the config file directly:
make apache24-conf >> /etc/apache2/sites-available/000-default.conf
service apache2 restart
Now if you browse to http://yourserverip/siremis you should be redirected to http://yourserverip/siremis/install and have a few errors, that’s OK, it means our Apache config is working.
Next we’ll set the permissions, create the folders and .htaccess. The Siremis team have also created make files to take care of this too, so we can just run them to set everything up:
make prepare24
make chown
With that done we can try browsing to our server again ( http://yourserverip/siremis ) and you should hit the installation wizard:
Now we’ll need to setup our database, so we can read and write from it.
We’ll create new MySQL users for Kamailio and Seremis:
mysql> GRANT ALL PRIVILEGES ON siremis.* TO siremis@localhost IDENTIFIED BY 'siremisrw';

mysql> CREATE USER 'kamailio'@'localhost' IDENTIFIED BY 'my5yhtY7zPJzV8vu';

mysql> GRANT ALL PRIVILEGES ON * . * TO 'kamailio'@'localhost';

mysql>  FLUSH PRIVILEGES;
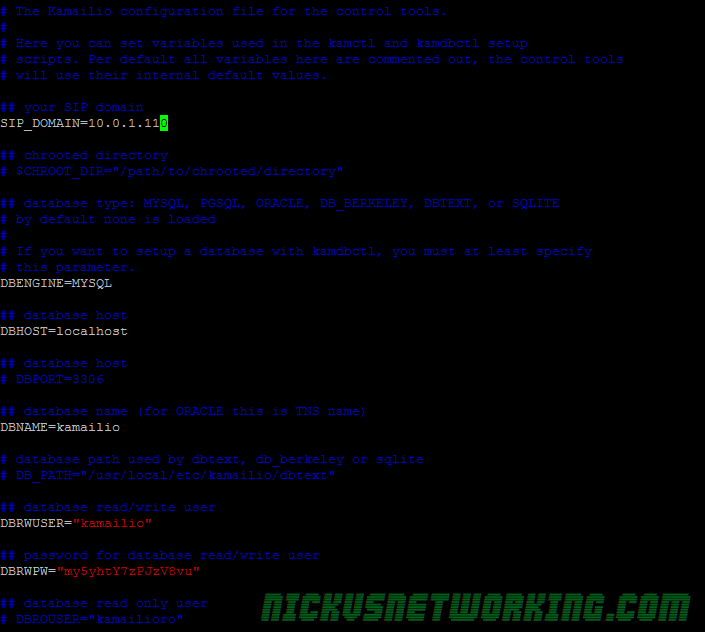
Next up we’ll need to configure kamctlrc so it knows the database details, we covered this the Security in Practice tutorial.
We’ll edit /etc/kamalio/kamctlrc and add our database information:
Once that’s done we can create the database and tables using kamdbctl the database tool:
kamdbctl create
I’ve selected to install the optional tables for completeness.
Once this is done we can go back to the web page and complete the installation wizard:
We’ll need to fill the password for the Siremis DB we created and for the Kamailio DB, and ensure all the boxes are ticked.
Next, Next, Next your way through until you hit the login page, login with admin/admin and you’re away!
Troubleshooting
If you have issues during the installation you can re-run the installation web wizard by removing the install.lock file in /var/www/html/kamailio-5.1.2/siremis
You can also try dropping the Siremis database and getting the installer to create it again for you:
HTable is Kamailio’s implimentation of Hash Tables a database-like data structure that runs in memory and is very quick.
It’s uses only become apparent when you’ve become exposed to it.
Let’s take an example of protecting against multiple failed registration attempts.
We could create a SQL database called registration attempts, and each time one failed log the time and attempted username.
Then we could set it so before we respond to traffic we query the database, find out how many rows there are that match the username being attempted and if it’s more than a threshold we set we send back a rate limit response.
The problem is that’s fairly resource intensive, the SQL data is read and written from disks and is slow to do both.
Enter HTable, which achieves the same thing with an in-memory database, that’s lightning fast.
Basic Setup
We’ll need to load htable and create an htable called Table1 to store data in:
$sht(MessageCount=>test) is the logical link to the Htable called MessageCount with a key named test. We’re making that equal itself + 1.
We’re then outputting the content of $sht(MessageCount=>test) to xlog too so we can see it’s value in Syslog.
Now each time a new dialog is started the MessageCount htable key “test” will be incremented.
We can confirm this in Syslog:
ERROR: : MessageCount is 1
ERROR: : MessageCount is 2
We can also check this in kamcmd too:
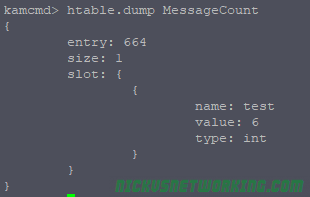
htable.dump MessageCount
Here we can see in MessageCount there is one key named “test” with a value of 6, and it’s an integer. (You can also store Strings in HTable).
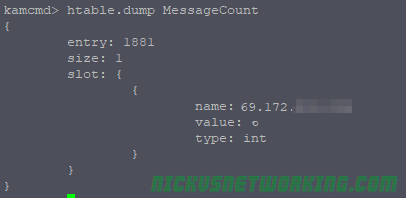
So that’s all well and pointless, but let’s do make it a bit more useful, report on how many SIP transactions we get per IP. Instead of storing our values with the name key “test” we’ll name it based on the Source IP of the message, which lives in Psedovariable $si for Source IP Address.
I’m calling the boilerplate AUTH block, and I’ve added some logic to increment the AuthCount for each failed auth attempt, and reset it to $null if authentication is successful, thus resetting the counter for that IP Address.
Now we’ve done that we need to actually stop the traffic if it’s failed too many times. I’ve added the below check into REQINIT block, which I call at the start of processing:
if($sht(AuthCount=>$si) > 5){
        xlog("$si is back again, rate limiting them...");
        sl_send_reply("429", "Rate limiting");
        exit;
}
Now if AuthCount is more than 5, it’ll respond with a Rate Limiting response.
Because in our modparam() setup for AuthCount we set an expiry, after 360 seconds (10 minutes), after 10 minutes all will be forgiven and our blocked UA can register again.
Advanced Usage / Notes
So now we’ve got Kamailio doing rate limiting, it’s probably worth mentioning the Pike module, which can also be used.
You’ll notice if you reboot Kamailio all the htable values are lost, that’s because the hashes are stored in memory, so aren’t persistent.
You have a few options for making this data persistent,
By using DMQ you can Sync data between Kamailio instances including htable values.
kamcmd can view, modify & manipulate htable values.
As we’ve seen before we can dump the contents of an htable using:
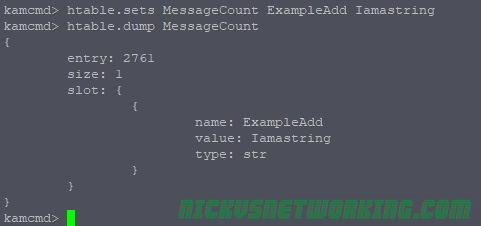
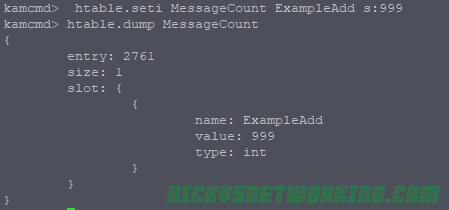
kamcmd htable.dump MessageCount
We can also add new entries & modify existing ones:
kamcmd htable.seti MessageCount ExampleAdd s:999
htable.seti is for setting integer values, we can also use htable.sets to set string values:
htable.sets MessageCount ExampleAdd Iamastring
We can also delete values from here too, which can be super useful for unblocking destinations manually:
htable.delete MessageCount ExampleAdd
As always code from this example is on GitHub. (Please don’t use it in production without modification, Authentication is only called on Register, and it’s just built upon the previous tutorials).
There are a number of ways to feed Homer data, in this case we’re going to use Kamailio, which has a HEP module, so when we feed Kamailio SIP data it’ll use the HEP module to encapsulate it and send it to the database for parsing on the WebUI.
We won’t actually do any SIP routing with Kamailio, we’ll just use it to parse copies of SIP messages sent to it, encapsulate them into HEP and send them to the DB.
We’ll be doing this on the same box that we’re running the HomerUI on, if we weren’t we’d need to adjust the database parameters in Kamailio so it pushes the data to the correct MySQL database.
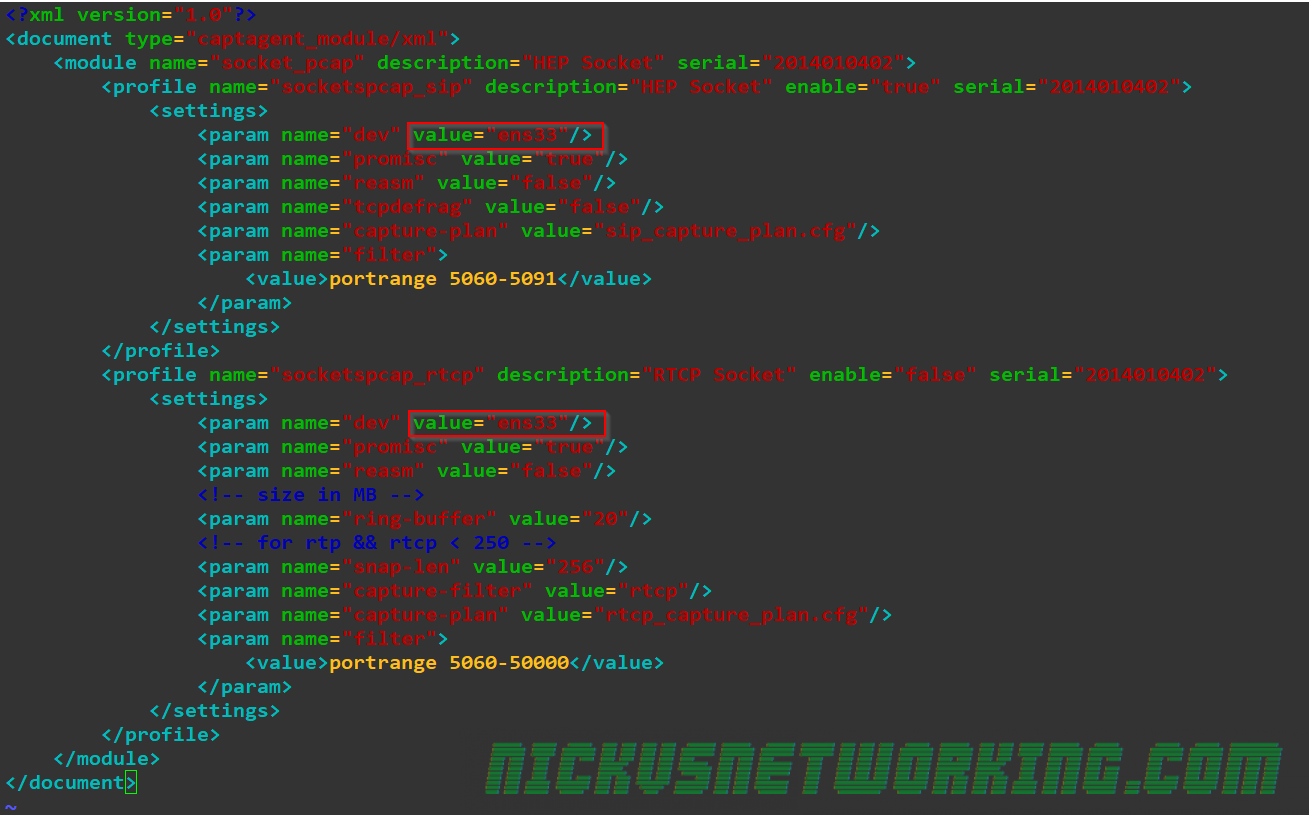
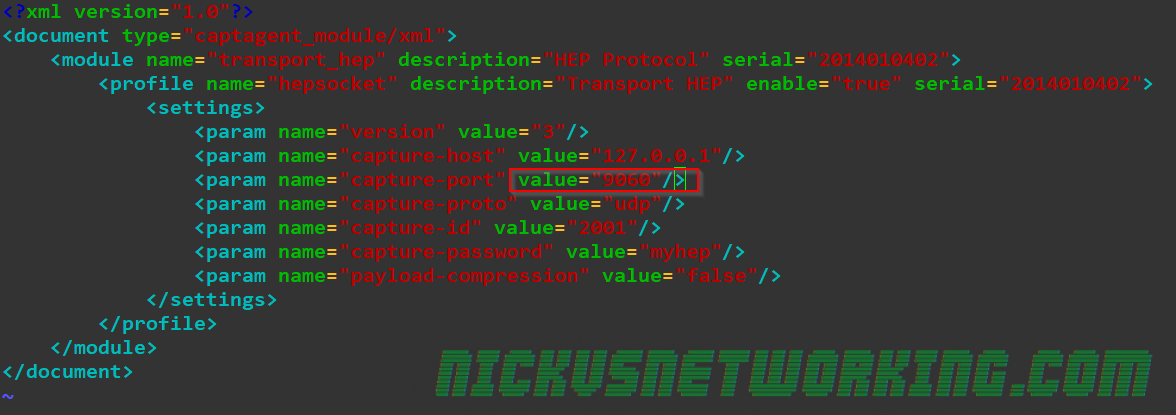
Next we’ll need to configure captagent to capture data and feed it to Kamailio. There’s two things we’ll need to change from the default, the first is the interface we capture on (By default it’s eth0, but Ubuntu uses eth33 as the first network interface ID) and the second is the HEP destination we send our data to (By default it’s on 9061 but our Kamailio instance is listening on 9060).
We’ll start by editing captagent’s socket_pcap.xml file to change the interface we capture on:
vi /etc/captagent/socket_pcap.xml
HOMER Captagent Interface Setup
Next we’ll edit the port that we send HEP data on
vi /etc/captagent/transport_hep.xml
Set HEP Port for Transport
And finally we’ll restart captagent
/etc/init.d/captagent
Now if we send SIP traffic to this box it’ll be fed into HOMER.
In most use cases you’d use a port mirror so you may need to define the network interface that’s the destination of the port mirror in socket_pcap.xml
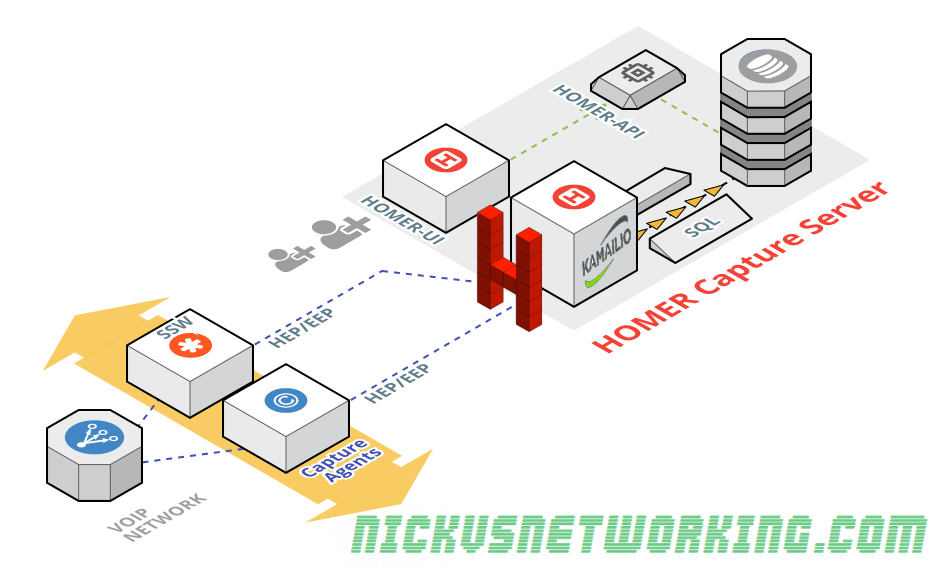
HOMER is a popular open source SIP / RTP debug / recording tool.
It’s architecture is pretty straight forward, we have a series of Capture Agents feeding data into a central HOMER Capture Server, which runs a database (today we’re using MySQL), a Homer-UI (Running on Apache), a Homer-API (Also running on Apache) and a HEP processor, which takes the HEP encoded data from the Capture Agents and runs on Kamailio. (That’s right, I’m back rambling about Kamailio)
So this will get the web interface and DB backend of HOMER setup,
For HOMER to actually work you’ll need to feed it data, in the next tutorial we’ll cover configuring a capture agent to feed the HEP processor (Kamailio) which we’ll also setup, but for now we’ll just setup the web user interface for HOMER, API and Database.