Siremis is a web interface for Kamailio, created by the team at Asipto, who contribute huge amounts to the Kamailio project.
Siremis won’t create your Kamailio configuration file for you, but allows you to easily drive the dynamic functions like dialplan, subscribers, dispatcher, permissions, etc, from a web interface.
Siremis essentially interfaces with the Kamailio database, kamcmd and kamctl to look after your running Kamailio instance.
Installation
I’ll be installing on Ubuntu 18.04, but for most major distributions the process will be the same. We’re using PHP7 and Apache2, which are pretty much universal available on other distros.
First we need to install all the packages we require:
apt-get update

apt-get upgrade

apt-get install kamailio* mysql-server apache2 php php-mysql php-gd php-curl php-xml libapache2-mod-php php-pear php-xmlrpc make
Enable apache2 rewrite & restart Apache
a2enmod rewrite
service apache2 reload
Next we’ll download Siremis from the Git repo, and put it into a folder, which I’ve named the same as my Kamailio version.
cd /var/www/html/
git clone https://github.com/asipto/siremis kamailio-5.1.2
Now we’ll move into the directory we’ve created (called kamailio-5.1.2) and build the apache2 config needed:
cd kamailio-5.1.2/
make apache24-conf
This then gives us a config except we can put into our Apache virtual host config file:
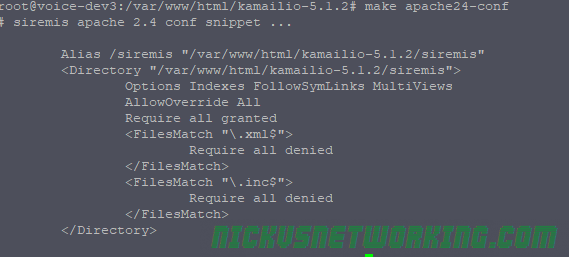
We can now copy and paste this into the end of an existing or new Apache virtual host file.
If this is a fresh install you can just pipe the output of this into the config file directly:
make apache24-conf >> /etc/apache2/sites-available/000-default.conf
service apache2 restart
Now if you browse to http://yourserverip/siremis you should be redirected to http://yourserverip/siremis/install and have a few errors, that’s OK, it means our Apache config is working.
Next we’ll set the permissions, create the folders and .htaccess. The Siremis team have also created make files to take care of this too, so we can just run them to set everything up:
make prepare24
make chown
With that done we can try browsing to our server again ( http://yourserverip/siremis ) and you should hit the installation wizard:

Now we’ll need to setup our database, so we can read and write from it.
We’ll create new MySQL users for Kamailio and Seremis:
mysql> GRANT ALL PRIVILEGES ON siremis.* TO siremis@localhost IDENTIFIED BY 'siremisrw';

mysql> CREATE USER 'kamailio'@'localhost' IDENTIFIED BY 'my5yhtY7zPJzV8vu';

mysql> GRANT ALL PRIVILEGES ON * . * TO 'kamailio'@'localhost';

mysql>  FLUSH PRIVILEGES;
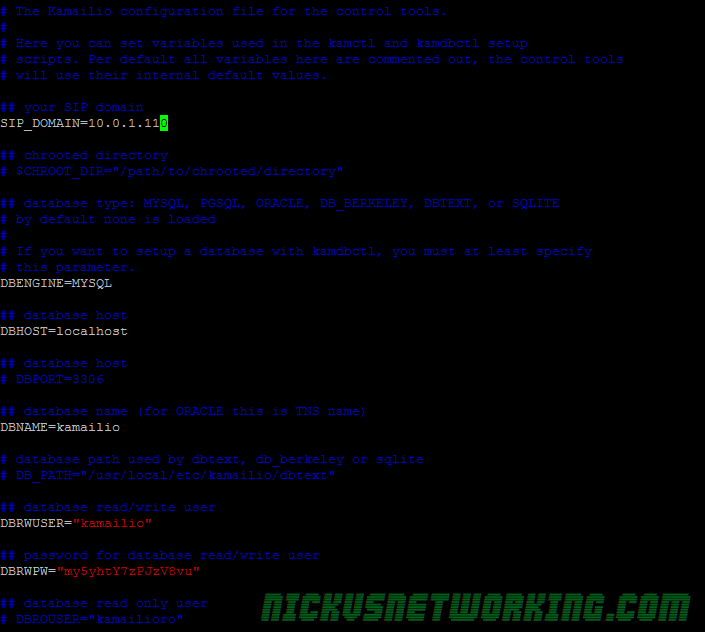
Next up we’ll need to configure kamctlrc so it knows the database details, we covered this the Security in Practice tutorial.
We’ll edit /etc/kamalio/kamctlrc and add our database information:
Once that’s done we can create the database and tables using kamdbctl the database tool:
kamdbctl create
I’ve selected to install the optional tables for completeness.
Once this is done we can go back to the web page and complete the installation wizard:

We’ll need to fill the password for the Siremis DB we created and for the Kamailio DB, and ensure all the boxes are ticked.
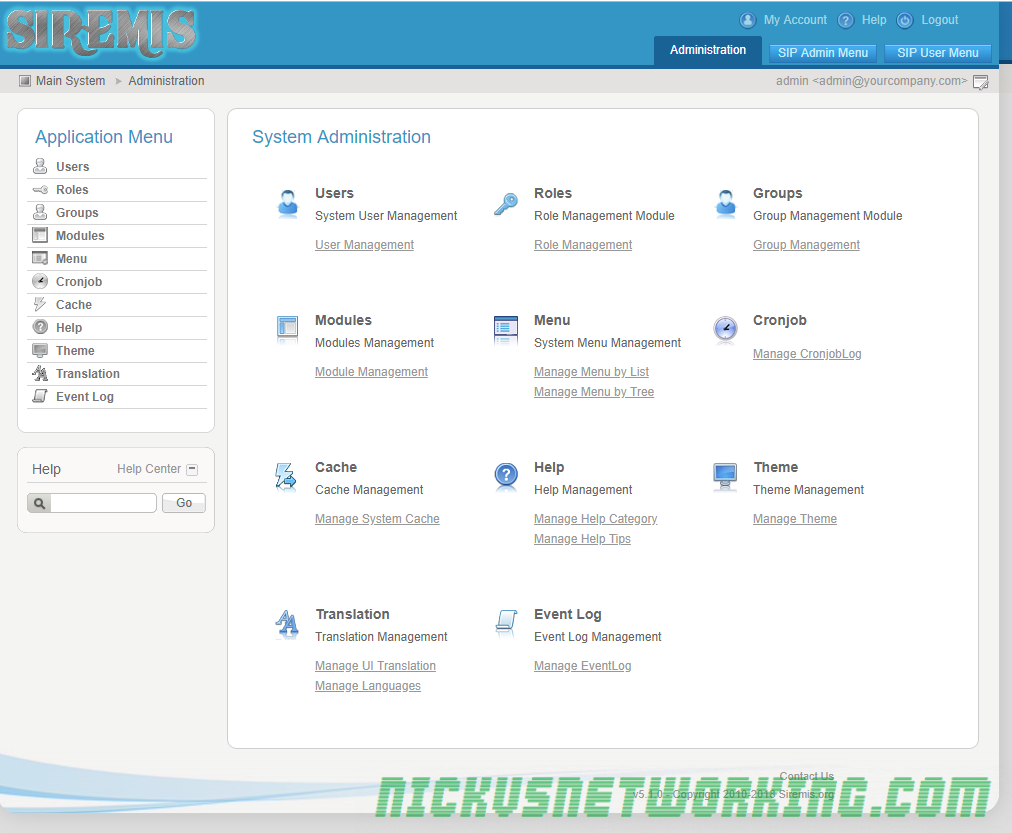
Next, Next, Next your way through until you hit the login page, login with admin/admin and you’re away!
Troubleshooting
If you have issues during the installation you can re-run the installation web wizard by removing the install.lock file in /var/www/html/kamailio-5.1.2/siremis
You can also try dropping the Siremis database and getting the installer to create it again for you:
mysql> drop database siremis;