Category Archives: VoIP

RTPengine – Installation & Configuration (Debian 11 / Ubuntu 19.04 and below)

This post was originally published in September 2019.
It was updated December 2021 and updated for Debian 11
An updated version has been posted here for 20.04 and above.
If you’re reading this unless you are installing this on an old release, you probably want the post linked above…

Note before using

There’s a few RTP Proxies out there (rtpproxy/mediaproxy) but rtpengine from Sipwise has simplicity and flexibility that makes you wonder how you ever used the others.

Some of it’s more impressive features:

  • Bridge Encrypted (SRTP) & Plaintext RTP Sessions
  • ICE Bridge
  • Farmable loads (Can have a pool of RTPengine instances)
  • Recording of Media Streams (In a not stupid – accidentally-fill-up-the-disk way)
  • Transcoding
  • Media repacketization

Installation

This package isn’t in the default Ubuntu/Debian repos, so we’ll get it from the git repo:

git clone https://github.com/sipwise/rtpengine.git
cd rtpengine 

Next we’ll need to install some dependencies:

apt-get install debhelper default-libmysqlclient-dev gperf iptables-dev libavcodec-dev libavfilter-dev libavformat-dev libavutil-dev libbencode-perl libcrypt-openssl-rsa-perl libcrypt-rijndael-perl libhiredis-dev libio-multiplex-perl libio-socket-inet6-perl libjson-glib-dev libdigest-crc-perl libdigest-hmac-perl libnet-interface-perl libnet-interface-perl libssl-dev libsystemd-dev libxmlrpc-core-c3-dev libcurl4-openssl-dev libevent-dev libpcap0.8-dev markdown unzip nfs-common dkms libspandsp-dev libiptc-dev libmosquitto-dev python3-websockets

The dependency you’ll get stuck on will be the G.729 library, which we have to manually compile.

VER=1.0.4

curl https://codeload.github.com/BelledonneCommunications/bcg729/tar.gz/$VER >bcg729_$VER.orig.tar.gz

tar zxf bcg729_$VER.orig.tar.gz 

cd bcg729-$VER 

git clone https://github.com/ossobv/bcg729-deb.git debian 

dpkg-buildpackage -us -uc -sa -b -rfakeroot

cd ../

dpkg -i libbcg729-*.deb

Now let’s check the RTPengine dependencies again:

dpkg-checkbuilddeps

If you get an empty output you’re good to start building the packages:

dpkg-buildpackage  --no-sign

If that completed sucessfully in the directory above you should have a bunch of .deb files:

cd ../

dpkg -i ngcp-rtpengine-daemon_*.deb ngcp-rtpengine-iptables_*.deb ngcp-rtpengine-kernel-dkms_*.deb

Getting it Running

Now we’ve got RTPengine installed let’s setup the basics,

There’s an example config file we’ll copy and edit:

mv /etc/rtpengine/rtpengine.sample.conf /etc/rtpengine/rtpengine.conf

vi /etc/rtpengine/rtpengine.conf

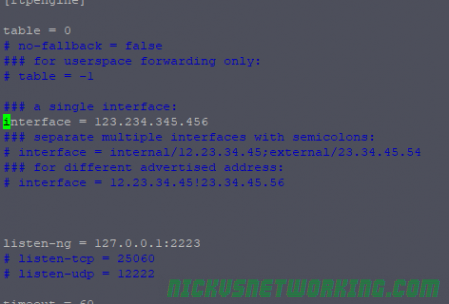
We’ll uncomment the interface line and set the IP to the IP we’ll be listening on:

Once we’ve set this to our IP we can start the service:

/etc/init.d/ngcp-rtpengine-daemon start

All going well it’ll start and rtpengine will be running.

You can learn about all the startup parameters and what everything in the config means in the readme.

Want more RTP info?

If you want to integrate RTPengine with Kamailio take a look at my post on how to set up RTPengine with Kamailio.

For more in-depth info on the workings of RTP check out my post RTP – More than you wanted to Know

Why z9hG4bK?

Every SIP branch value starts with z9hG4bK, why?

Branch IDs were introduced in RFC 3261, to help keep differentiate all the different transactions a device or proxy might be involved in.

The answer isn’t that exciting. IETF picked the 7 character long prefix as a magic cookie so older SIP servers (RFC 2543 compliant only) wouldn’t pick up the value due to it’s length.


The branch ID inserted by an element compliant with this specification MUST always begin with the characters “z9hG4bK”. These 7 characters are used as a magic cookie (7 is deemed sufficient to ensure that an older RFC 2543 implementation would not pick such a value), so that servers receiving the request can determine that the branch ID was constructed in the fashion described by this specification (that is, globally unique).

SIP: Session Initiation Protocol – RFC 3261

As to why z9hG4bK, instead of any other random 7 letter string, I haven’t been able to find an answer, but it’s as good as any random 7 letter string I guess.

SIP Via Header

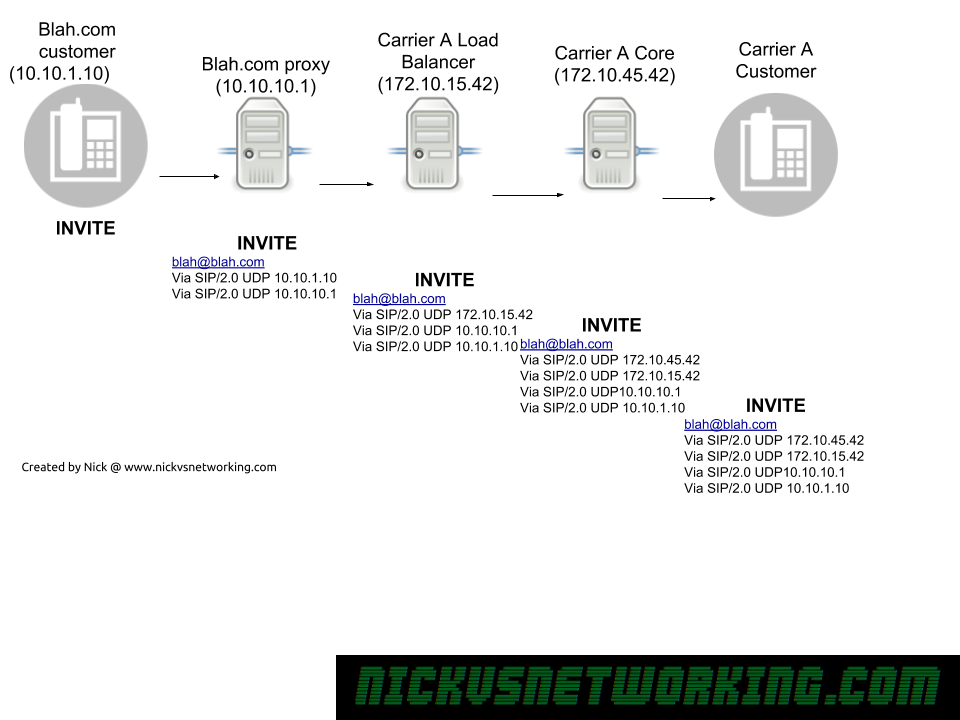
The SIP Via header is added by a proxy when it forwards a SIP message onto another destination,

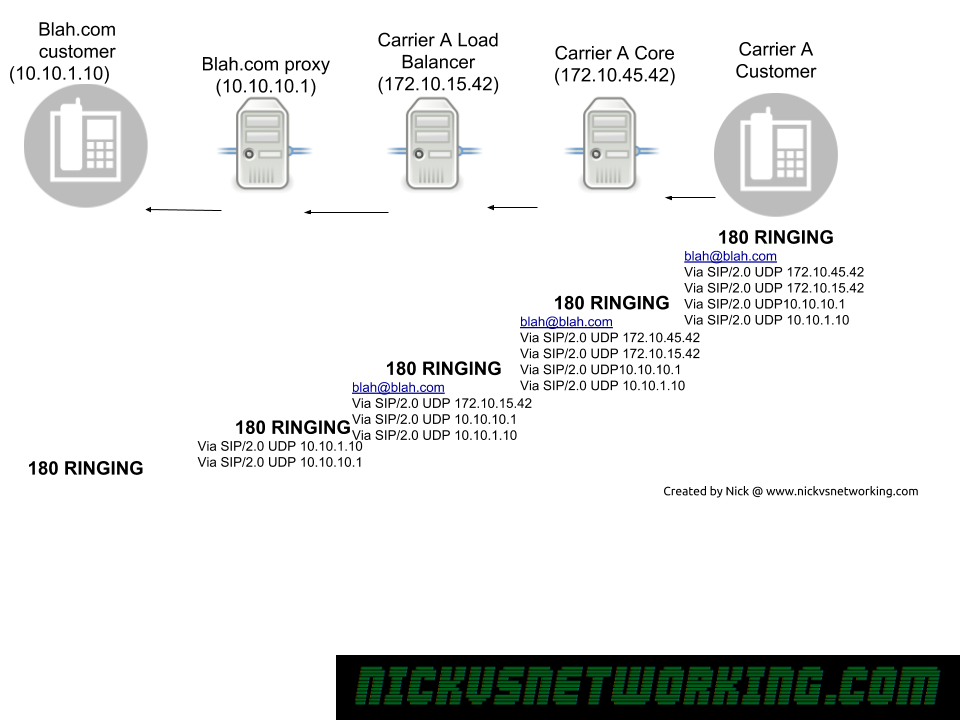
When a response is sent the reverse is done, each SIP proxy removes their details from the Via header and forwards to the next Via header along.

SIP Via headers in action

As we can see in the example above, each proxy adds it’s own address as a Via header, before it uses it’s internal logic to work out where to forward it to, and then forward on the INVITE.

Now because all our routing information is stored in Via headers when we need to route a Response back, each proxy doesn’t need to consult it’s internal logic to work out where to route to, but can instead just strip it’s own address out of the Via header, and then forward it to the next Via header IP Address down in the list.

SIP Via headers in action

Via headers are also used to detect looping, a proxy can check when it receives a SIP message if it’s own IP address is already in a Via header, if it is, there’s a loop there.

Kamailio Bytes – MySQL Database Backend for Module Config

Many Kamailio modules require, or have additional functionality, when you’re using a database backend.

There’s a few options, but for this tutorial we’ll use a MySQL database backend.

To begin with we’ll install MySQL & Kamailio,

apt-get install kamailio* mysql-server

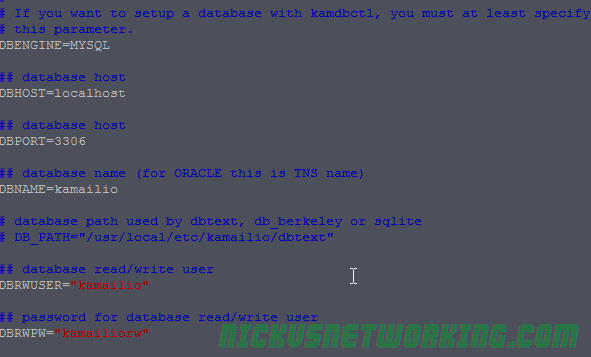
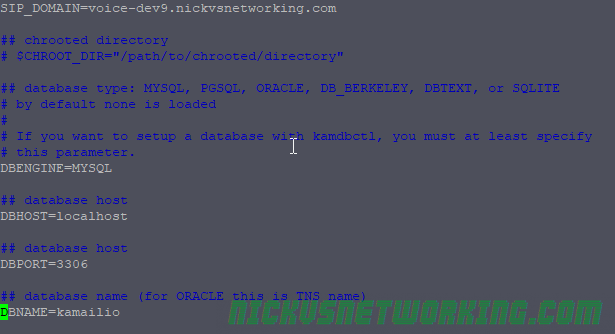
Next we’ll want to configure the file called kamctlrc in which we’ll add our database information so command line tools like kamcmd and kamctl can read and write from the database Kamailio is using.

vi /etc/kamailio/kamctlrc

We’ll need to set a few values, the SIP_DOMAIN, DBENGINE, DBHOST, DBNAME and DBPORT.

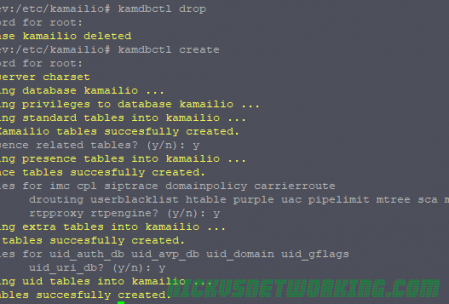
Next we’ll use the kamdbctl tool to create the database and tables required for Kamailio’s database driven modules.

kamdbctl create

Assuming you haven’t set a root password for MySQL you can just hit enter to leave it blank.

Next we’ll define a variable (AVP) in our Kamailio config file containing our database information. This means we only have to define it once and for each module we load we can just call this variable instead of defining our MySQL database information over and over again in the config.
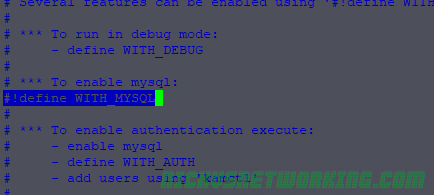
In the default config we’ll define WITH_MYSQL to use MySQL database config:

#!define WITH_MYSQL

That’ll automatically put the DBURL line into play:

And we’re done, now we can call different modules that have database functionality and start using it, some examples:

modparam("usrloc", "db_url", DBURL)
...
modparam("auth_db", "db_url", DBURL)
...
modparam("permissions", "db_url", DBURL)

Implementation varies from module to module but you’ll have created the database tables and should be good to go implementing modules with database functionality.


DTMF over IP – SIP INFO, Inband & RTP Events

DTMF (Dual Tone Modulated Frequency) aka touch tone, was initially designed to be a faster method of dialling since make-and-break dial pulses were slow and a more efficient method for user input was required switching was becoming digital.

By using two tones DTMF tones, switching equipment could be easily identify the input without complex circuitry, and because it uses two tones the chances of someone accidentally generating the two-tone pair was slim. MF had been used for tandem / trunk signalling inside the network with great success, so DTMF was a standout choice.

SIP was never explicitly designed as a telephony protocol, and as such, it’s support for DTMF wasn’t baked in from the start.

Over time organisations started using DTMF so users could interact with IVRs, Auto Attendants, enter PIN codes and interact with services using their telephone, ideas that wen’t beyond the call setup function originally imagined for DTMF.

Your standard subscriber loop POTS line doesn’t have any out of band signalling for the DTMF, but the carrier switch passes through the audio end to end, and the DTMF tones are carried in that audio, so it’s not a problem.

So when SIP rolled along as the defacto standard for Voice calls over IP, it didn’t have a method for signalling that a DTMF digit had been placed.

Never to fear, neither does a POTS line, so everything will be fine and the tones will just be carried in the media stream like they do on a POTS line.

This was called in-band DTMF. In-band because the DTMF tones are carried in the audio stream like they would if you were to playback those tones on a tape recorder or harmonised whistling.

However along came G.729 and other compressed codecs and suddenly these two tones were lost in compression, so the VoIP world needed a new way to transport DTMF information.

RFC2833 came to fix this problem in 2000, introducing a special RTP packet called an “RTP Event” that denoted a DTMF key-press, which evolved into RFC4733, carrying the DTMF as an RTP event.

Here’s a post I did on RFC2833 DTMF.

For some reason this method of DTMF signalling is still referred to as RFC2833, despite the fact that most implementations are of RFC4733.

But the next problem facing SIP implementers was SIP Proxies had no awareness of the DTMF events, because by definition, a SIP proxy only works with the SIP (signalling) part of the call, not the RTP (media).

So for a device to know when a DTMF keypress happened it’d have to be listening in to the RTP media stream to pickup the RTP events.

The solution that’s considered best practices today actually predates the other two standards. RFC2976 describes using SIP INFO messages to carry payloads. (Link to post on the topic)

In the case of using SIP INFO for payloads, the DTMF info is put into this payload, so this is often used now to carry DTMF info as well as ISUP messaging.

Seems like backwards step, but Proxies can be aware of DTMF messaging and interoperability is in theory enhanced.

The disadvantage is there’s now 3 possible implimentations, DTMF Inband, DTMF in RTP Events, and DTMF in SIP INFO.

Some endpoints use more than one method, some even use all 3. The idea being that it’ll “just work” and won’t need configuring. So when a user presses a digit it plays the tone (in-band), sends an RTP event (RFC4733/2833) and sends a SIP INFO message containing the pressed digit (RFC2976) all at once.

This can cause huge headaches if the switch it’s talking to can recognise more than one type of DTMF signalling it gets multiple inputs, causing jumping through IVRs and menus.

If only we had one universal standard…

See also:

RFC2976 / RFC6086 – SIP INFO

RFC2833 – RTP Events

RTP – More than you wanted to Know

RFC2976 / RFC6086 – SIP INFO

SIP INFO was designed to carry session related information during a session.

SIP was designed to setup and tear down sessions, with little thought given to what happens after the setup, but before the teardown.

SIP INFO (RFC2976) was designed to fill this gap. (Obsoleted by RFC6086)

It’s predominantly used now to carry DTMF info during a call.

The message body in this case contains the signal (DTMF digit 3) and the Duration (180ms).

The SIP Info standard doesn’t actually stipulate how the message body should be structured, but the above shows a defacto standard that’s now common, although not set in stone.

See also:

DTMF over IP – SIP INFO, Inband & RTP Events

RFC2833 – RTP Events

RFC2833 – RTP Events

RFC2833 was designed to carry DTMF signalling, other tone signals and telephony events in RTP packets.

This was later superseded by RFC4733, but everyone still referrers to this protocol as RFC2833, so I will too.

RFC2833 a special RTP payload designed to carry DTMF signalling information, so it operates on the same source / destination ports as the RTP signal and you’ll see it mixed in there when viewing packet captures.

It uses RTP’s Synchronisation Source Identifiers to identify the stream, and uses the next RTP sequence numbers, so it relies on RTP to sort pretty much everything.

The RTP Event itself, contains an Event ID header (called “event” in the spec), End of Event flag, Reserved flag, Volume header and Event Duration header.

Event ID (event)

The Event header contains the event that is being conveyed. For DTMF this would be the numeral 8 (8) for DTMF Eight.

DTMF named events

End of Event

The End of Event (Referred to as E in the RFC) flag is set to 1 if the transmitted packet is the end of an RTP event.

This allows for a key press to span over multiple packets, with the end of the key-press (key release) denoted by this flag.

Reserved Flag

The reserved flag (R) is reserved for future use, and will just be set to 0.

Volume

This is only used for DTMF digits and denotes the volume of the tone in dB from 0 to -36 dBm0.

Event Duration

The event duration tag. When a DTMF keypress is split over multiple RTP Event packets, the first will start at 0 and then this will count up by the time incremented in the timestamp.

Analysing in Wireshark

By using the display filter “rtpevent” you can see all the RTP events for you call.

Each DTMF event will contain multiple packets, with the total number depending on how long the keypress is and packetization timers.

When they key is pressed by the user, an RTP event with a duration of 0 and the Event ID of the DTMF digit is sent.

For as long as the digit is held, subsequent packets with a totalled event duration will keep being sent,

Finally when the key is released an RTP Event with the “End of Event” header set to True will be sent to mark the end of the RTP Event.

See also:

DTMF over IP – SIP INFO, Inband & RTP Events

RFC2976 / RFC6086 – SIP INFO


Reverse MD5 on SIP Auth

MD5 isn’t a particularly well regarded hashing function these days, but it’s still pretty ubiquitous.

SIP authentication, for the most part, still uses MD5 in the form of Message Digest Authentication,

If we were to take the password password and hash it using an online tool to generate MD5 Hashes we’d get “482c811da5d5b4bc6d497ffa98491e38”


If we hash password again with MD5 we’d get the same output – “482c811da5d5b4bc6d497ffa98491e38”,


The catch with this is if you put “5f4dcc3b5aa765d61d8327deb882cf99” into a search engine, Google immediately tells you it’s plain text value. That’s because the MD5 of password is always 5f4dcc3b5aa765d61d8327deb882cf99, hashing the same input phase “password” always results in the same output MD5 hash aka “response”.

By using Message Digest Authentication we introduce a “nonce” value and mix it (“salt”) with the SIP realm, username, password and request URI, to ensure that the response is different every time.

Let’s look at this example REGISTER flow:

We can see a REGISTER message has been sent by Bob to the SIP Server.

REGISTER sips:ss2.biloxi.example.com SIP/2.0    
Via: SIP/2.0/TLS client.biloxi.example.com:5061;branch=z9hG4bKnashds7
Max-Forwards: 70
From: Bob <sips:[email protected]>;tag=a73kszlfl
To: Bob <sips:[email protected]>
Call-ID: [email protected]
CSeq: 1 REGISTER
Contact: <sips:[email protected]>
Content-Length: 0

The SIP Server has sent back a 401 Unauthorised message, but includes the WWW-Authenticate header field, from this, we can grab a Realm value, and a Nonce, which we’ll use to generate our response that we’ll send back.

 SIP/2.0 401 Unauthorized    
Via: SIP/2.0/TLS client.biloxi.example.com:5061;branch=z9hG4bKnashds7 ;received=192.0.2.201
From: Bob <sips:[email protected]>;tag=a73kszlfl
To: Bob <sips:[email protected]>;tag=1410948204
Call-ID: [email protected]
CSeq: 1 REGISTER
WWW-Authenticate: Digest realm="atlanta.example.com", qop="auth",nonce="ea9c8e88df84f1cec4341ae6cbe5a359", opaque="", stale=FALSE, algorithm=MD5
Content-Length: 0

The formula for generating the response looks rather complex but really isn’t that bad.

HA1=MD5(username:realm:password)
HA2=MD5(method:digestURI)
response=MD5(HA1:nonce:HA2)

Let’s say in this case Bob’s password is “bobspassword”, let’s generate a response back to the server.

We know the username which is bob, the realm which is atlanta.example.com, digest URI is sips:biloxi.example.com, method is REGISTER and the password which is bobspassword. This seems like a lot to go through but all of these values, with the exception of the password, we just get from the 401 headers above.

So let’s generate the first part called HA1 using the formula HA1=MD5(username:realm:password), so let’s substitute this with our real values:
HA1 = MD5(bob:atlanta.example.com:bobspassword)
So if we drop bob:atlanta.example.com:bobspassword into our MD5 hasher and we get our HA1 hash and it it looks like 2da91700e1ef4f38df91500c8729d35f, so HA1 = 2da91700e1ef4f38df91500c8729d35f

Now onto the second part, we know the Method is REGISTER, and our digestURI is sips:biloxi.example.com
HA2=MD5(method:digestURI)
HA2=MD5(REGISTER:sips:biloxi.example.com)
Again, drop REGISTER:sips:biloxi.example.com into our MD5 hasher, and grab the output – 8f2d44a2696b3b3ed781d2f44375b3df
This means HA2 = 8f2d44a2696b3b3ed781d2f44375b3df

Finally we join HA1, the nonce and HA2 in one string and hash it:
Response = MD5(2da91700e1ef4f38df91500c8729d35f:ea9c8e88df84f1cec4341ae6cbe5a359:8f2d44a2696b3b3ed781d2f44375b3df)

Which gives us our final response of “bc2f51f99c2add3e9dfce04d43df0c6a”, so let’s see what happens when Bob sends this to the SIP Server.

REGISTER sips:ss2.biloxi.example.com SIP/2.0 
Via: SIP/2.0/TLS client.biloxi.example.com:5061;branch=z9hG4bKnashd92
Max-Forwards: 70
From: Bob <sips:[email protected]>;tag=ja743ks76zlflH
To: Bob <sips:[email protected]>
Call-ID: [email protected]
CSeq: 2 REGISTER
Contact: <sips:[email protected]>
Authorization: Digest username="bob", realm="atlanta.example.com", nonce="ea9c8e88df84f1cec4341ae6cbe5a359", opaque="", uri="sips:ss2.biloxi.example.com", response="bc2f51f99c2add3e9dfce04d43df0c6a"
Content-Length: 0
SIP/2.0 200 OK
Via: SIP/2.0/TLS client.biloxi.example.com:5061;branch=z9hG4bKnashd92;received=192.0.2.201
From: Bob <sips:[email protected]>;tag=ja743ks76zlflH
To: Bob <sips:[email protected]>;tag=37GkEhwl6
Call-ID: [email protected]
CSeq: 2 REGISTER
Contact: <sips:[email protected]>;expires=3600
Content-Length: 0

There you have it, a 200 OK response and Bob is registered on biloxi.example.com.

Update 2021: Jason Murley has contributed a much more robust version of the code below, which is way better than what I’d made!

You can find his code here.

I’ve written a little tool in Python to generate the correct response based on the nonce and values associated with it:

import hashlib

nonce = 'ea9c8e88df84f1cec4341ae6cbe5a359'
realm = 'sips:biloxi.example.com'
password = 'bobspassword'
username    =   str("bob")
requesturi  =   str(s"ips:biloxi.example.com")
print("username: " + username)
print("nonce: " + nonce)
print("realm: " + realm)
print("password: " + password)
print("\n")

HA1str = username + ":" + realm + ":" + password
HA1enc = (hashlib.md5(HA1str.encode()).hexdigest())
print ("HA1 String: " + HA1str)
print ("HA1 Encrypted: " + HA1enc)
HA2str = "REGISTER:" + requesturi
HA2enc = (hashlib.md5(HA2str.encode()).hexdigest())

print ("HA2 String: " + HA2str)
print ("HA2 Encrypted: " + HA2enc)

responsestr = HA1enc + ":" + nonce + ":" + HA2enc
print("Response String: " + responsestr)
responseenc = str((hashlib.md5(responsestr.encode()).hexdigest()))
print("Response Encrypted" + responseenc)