So now we’ve made a functional bare-bones PBX using Kamailio, and we’ve touched upon a few of the key functions Kamailio can do, but let’s go over them again to recap.
Future Kamailio posts I’ll be talking about using specific modules and using Kamailio for specific use cases, such as load balancing traffic between carriers and monitoring their up/down status, scaling Asterisk by front ending it with Kamailio, adding/rewriting/removing headers with Kamailio and stateful vs stateless operation, so stick around, but here’s an overview of what we’ve learned.
Routing blocks make code cleaner and allow reuse of the same blocks, you can call a route to do a function without having to write out what to do every time.
In the below example we go from the default “request_route” block, where all new messages start, and jump to the block named “RESPOND_501”.
request_route {
        route(RESPOND_501);    #Jump to the RESPOND_501 block
}

route[RESPOND_501]{
        sl_reply("501", "Not Implemented");   #Send 501 reply
}
From RESPOND_501 we send a stateless reply to whoever sent us the message.
We introduced xlog to write data to the log, and then viewed that data in Syslog.
Building upon having saved the location of registered endpoints we looked up the locations we had Address on Record entries for and forwarded the traffic to them, to allow to make calls between registered UAs.
Quickly we saw issues with this though, if the UA we wanted to reach wasn’t registered, if we hung up before the called party answered, and a host of other scenarios,
We addressed the user not registered scenario and then talked briefly about the routing blocks that come with Kamailio and how they’ll be our savoir.
We put back the default routing blocks that come with Kamailio after highlighting the difficulties with trying to do everything yourself.
We talked about how route(RELAY); will better handle message relaying than tm_relay(); alone, and using route(WITHINDLG); to manage within dialog requests & branching.
Using a database back-end (MySQL) we setup our UAs to be authenticated when registering and before making calls, and listed our Carrier’s IPs so we’d only accept inbound calls from our carrier, not random folks online.
We used kamctl to add users and manage address groups.
route(REQINIT); was used to manage traffic validation.
auth_challenge(“$fd”, “0”); was used to authenticate UAs
and (allow_source_address(“200”)) was used to authenticate carriers.
So by now we’ve secured our box and we’re able to route calls between registered endpoints.
Next up we’ll need to add some external connectivity, meaning we can reach destinations that aren’t directly registered on our Kamailio instance.
We’ve signed up with imaginary carrier at “imaginarycarrier.com” so we can make / receive calls from the PSTN using them as a trunk. They’ll be authenticating us based on our Source IP which we’ve let them know.
At the moment, when we receive an INVITE where the destination isn’t registered, we respond with a 404:
sl_reply("404", "User not Registered"); #If looking up location fails reply with 404
But now we’ve got a carrier we can send calls to if the destination isn’t on our PBX, so we won’t need to reply 404 anymore for calls from our users.
So let’s only give the 404 reply to calls in from our carrier (inbound calls), and instead of giving a 404 response to callers from within our organisation, let’s send the calls to the carrier to make an outbound call.
This means calls to any destination that isn’t registered on Kamailio will go to the Carrier.
But we’ll need to still respond with the 404 response if a carrier sends us a call to a destination that isn’t registered, like an inbound call to a user who isn’t registered.
route[ONNETINVITE]{
if(!lookup("location")){ #Try looking up location
#If looking up location fails then:
if(allow_source_address("200")){ #Check if the request has come from a carrier
sl_reply("404", "User not Registered"); #If if it is from a carrier to a destination we don't have registered reply with 404
exit; #And exit
}else{ #If it's not from a carrier
route(TOCARRIER); #Route the call out to the carrier (to make an external call)
}
}
route(RELAY); #Relay traffic to endpoint
exit(); #Exit
}
Next we’ll need to create our TOCARRIER route,
route[TOCARRIER]{ #Route to send calls to a carrier at 192.168.200.130
rewritehost("imaginarycarrier.com"); #Rewrite host to be the carrier's IP
route(RELAY); #Route relay
}
So let’s put this together and try and make an outbound call.
Call Flow
Outbound call to Carrier
First we see our UA make the call leg to Kamailio
UA to Kamailio: SIP: INVITE sip:61299999999@kamailio SIP/2.0
Kamailio asks the UA to authenticate itself and send that again, the UA does:
It’s not in address group 200, as the from address isn’t one of our Carrier’s IPs, so it ends up at
route(TOCARRIER);
The route block itself rewrites the host part of the request to be the Carrier’s IP, and then forwards it on to the carrier.
route[TOCARRIER]{ #Route to send calls to a carrier at 192.168.200.130
rewritehost("imaginarycarrier.com"); #Rewrite host to be the carrier's IP
route(RELAY); #Route relay
}
So now the INVITE has been forwarded to imaginarycarrier.com, and because we called route(RELAY); it’ll handle all the in dialog requests.
Inbound call from Carrier
So now we know how an outbound call flows, let’s look at inbound calls from the carrier.
Carrier to Kamailio: INVITE sip:61312341234@kamailio SIP/2.0
Kamailio responds with a provisional response of 100 Trying
Kamailio to Carrier: SIP: SIP/2.0 100 trying -- your call is important to us
Now Kamailio checks to see the method type – It’s INVITE, and if the source address is in Address Group 200 (As we defined in Part 8), it is, so it calls the route(ONNETINVITE) block.
if(method=="INVITE"){
if(allow_source_address("200")){ #If from a Carrier IP
route(ONNETINVITE); #Call INVITE handling bloc
Once we get to the ONNETINVITE block Kamailio tries to lookup the location, to see if there’s a device registered with a username that matches 61312341234, using:
lookup("location")
There is, so the route(relay) is called, which forwards the INVITE to the IP it has an Address on Record for for 61312341234.
The carrier sends the INVITE to Kamailio, Kamailio calls lookup location, which fails to return a location as 61299999999 isn’t registered.
Next we check to see if the call is from a carrier by checking if the source address of the INVITE is equal to address group 200.
if(allow_source_address("200")){ #Check if the request has come from a carrier
sl_reply("404", "User not Registered"); #If if it is from a carrier to a destination we don't have registered reply with 404
exit;
As the source address is in address group 200, the carrier gets the 404 “User not Registered” reply, as we see in the packet capture:
Kamailio > Carrier: SIP: SIP/2.0 404 User not Registered
In our last post we went over all the theory, now let’s get started implementing these security features.
Kamailio’s core is a basis to start from, but many common needs are covered by special modules that we need to load to handle certain scenarios.
In order to authenticate traffic, we’ll need to have a source of authentication info (auth_db module) and authorization (permissions module). For this we’ll be using MySQL (although you could use text files, PostGres, etc) to store both sets of data, and using phpMyAdmin to make everything a bit more accessible.
We’ll build upon our last tutorial but we’ll install MySQL and phpMyAdmin:
apt-get install mysql-server phpmyadmin
After following along the install prompts we’ll setup our database connection.
Each of the two modules we’ll be using (auth_db and permissions) require a database source. In each we could specify our database info but instead we’ll create a new variable and fill it with our database info so we only need to update it in one place.
Let’s setup a new MySQL user for our Kamailio instance (in production you’d only grant privileges on the DB we’re going to use):
mysql> CREATE USER 'kamailio'@'localhost' IDENTIFIED BY 'my5yhtY7zPJzV8vu';
mysql> GRANT ALL PRIVILEGES ON * . * TO 'kamailio'@'localhost';
mysql> FLUSH PRIVILEGES;
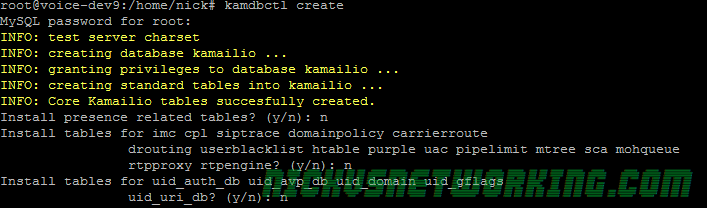
We’ll now use the kamdbctl tool, bundled with Kamailio to create the database tables for us:
kamdbctl create
You’ll be asked for the root password for MySQL and if you want some optional tables (we don’t just yet) and presto, all the tables are now created!
Using kamdbctl
We can now login with phpMyAdmin and see the tables we just added:
Adding Database Connectivity to Kamailio
The example config is designed to be nice and modular, so by simply un-commenting the WITH_MYSQL variable and setting the DBURL variable we’ll have set our MySQL database up for the modules we need.
We’ll change:
# *** To enable mysql:
# - define WITH_MYSQL
#
To:
# *** To enable mysql:
#!define WITH_MYSQL
#
So now we’ve defined an variabled named WITH_MYSQL
You’ll see later in the config there’s conditional (if statement) that looks at if WITH_MYSQL has been defined:
# *** Value defines - IDs used later in config
#!ifdef WITH_MYSQL
# - database URL - used to connect to database server by modules such
# as: auth_db, acc, usrloc, a.s.o.
#!ifndef DBURL
#!define DBURL "mysql://kamailio:my5yhtY7zPJzV8vu@localhost/kamailio"
#!endif
#!endif
We’ll change the !define DBURL to include the password in the Database connection string,
It breaks up like this:
mysql:// is the database type (you could use text:// for text based DB or pgsql:// for Postgres)
First part is the username:password@host/table
In this case, our username is kamailio, our password is the one we created (my5yhtY7zPJzV8vu), our host is localhost and our table is kamailio
Adding IP Authentication & Challenge / Response Auth
Like we defined the #!define WITH_MYSQL we’ll define two other blocks to add Authentication:
# *** To enable authentication execute:
# - enable mysql
# - define WITH_AUTH
# - add users using 'kamctl'
#
# *** To enable IP authentication execute:
# - enable mysql
# - enable authentication
# - define WITH_IPAUTH
We’ll change to:
# *** To enable authentication execute:
# - enable mysql
#!define WITH_AUTH
# - add users using 'kamctl'
#
# *** To enable IP authentication execute:
# - enable mysql
# - enable authentication
#!define WITH_IPAUTH
Adding Users & IP Addresses
Now we’ve gone and added these blocks to the code we’ll go about adding some users and IP addresses, to do this we’ll use the kamctl tool.
kamctl is another tool (like kamcmd) used to modify / change the Kamailio config, it’s a shell wrapper for managing Kamailio database among other things.
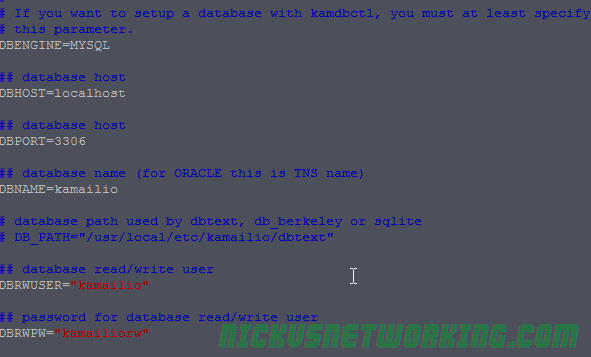
We do need to setup a few things to get the kamctl working, and to do that we’ve got to edit the kamctlrtc file in the /etc/kamailio directory, to include the details of the database we just setup.
Edit the file to define our database details
Adding Users
Now we can get to work adding some users from the command line:
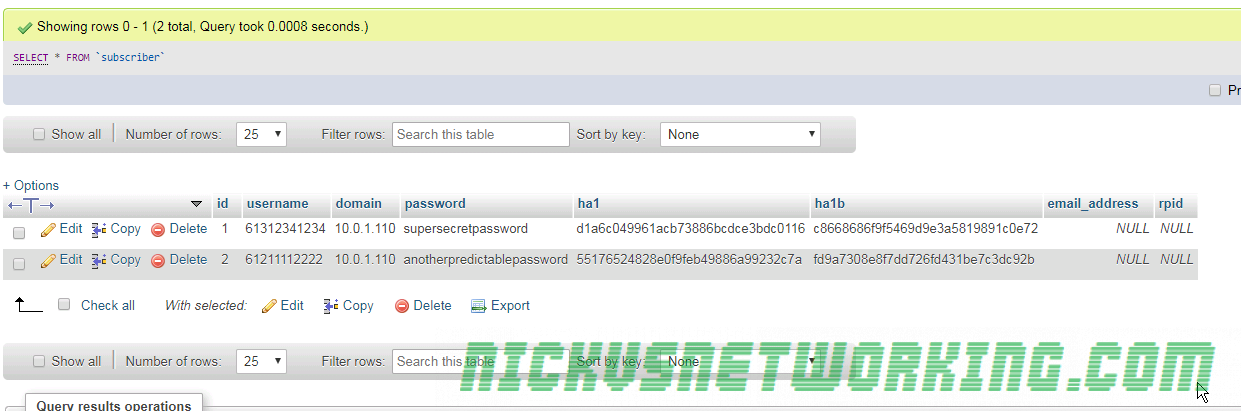
kamctl add 61312341234 supersecretpassword
Here we can see adding a user with the username 61312341234 and the password supersecretpassword. These will makeup the username and password we’ll have on our SIP endpoints. (We’ll make them match the phone numbers of our trunks to make the routing easier down the track)
We’ll add another user so we can make calls between users when we’re testing later too, we’ll add them using kamctl add USERNAME PASSWORD again.
Now if we have a look in the subscriber table in phpMyAdmin we can see the users we created:
Adding Carrier IPs
Next we’ll add the IP Address our carrier is going to send us calls from, so we can allow them call our users.
Kamailio’s permissions module relies on address groups – This means we could have address group (we’ll just use the number 200), which we decide is for our carriers, and add all our carrier’s IP addresses in here, without needing to put each of them into the config.
We could create another address group 300 and put the subnets of our offices in there and only allow REGISTER messages from IPs in those groups.
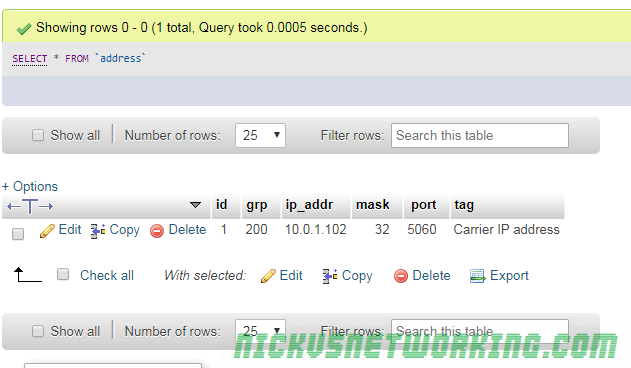
We’ll go through how to use the groups later on, but for now we’ll just add a new IP address to group 200, with a /32 subnet mask, on port 5060 with the name “Carrier IP address” so we know what it is.
kamctl address add 200 10.0.1.102 32 5060 "Carrier IP address"
Now if we have a look in the permissions table in Kamailio you’ll see the info we just added.
By now you’ve probably caught on to the fact kamctl is just a command line tool to add data to the database, but it’s useful none the less.
The final step is to reload the permissions address table – This is done when we restart but it’s good to know you can update it without a restart.
kamctl address reload
Adding authentication / authorization to REGISTER messages
Now let’s actually put this all into practice, the first thing we’ll do is call the REQINIT route to make sure our traffic if (reasonably) clean and take care of the basics.
request_route {
route(REQINIT); #Call REQINIT (Request Initial) route to filter out the worst of the bad traffic and take care of the basics.
Next we’ll setup how we handle REGISTER traffic, adding an auth challenge and only saving the location if the UA successfully responds to the challenge.
if(method=="REGISTER"){ # authenticate requests
if (!auth_check("$fd", "subscriber", "1")) { #If credentials don't match what we have in Subscriber table
auth_challenge("$fd", "0"); #Send an Auth Challenge
exit; #Stop processing
}
save("location"); #Save the location as an AoR
exit; #Stop processing
}
This may all seem a bit backward, but this is an example from the Kamailio devs we’re using, so it shows “the right way” of doing this, let’s break it down.
We know our if(method==”REGISTER”) means we’ll only do this check for REGISTER messages.
The auth_check checks to see if the presented credentials in our auth header are correct. For the first INVITE we don’t have an auth header so it’s not correct, and if we have an invalid password it’s also not correct. You’ll notice it’s prefixed with a if(!auth_check) meaning this if conditional block is only called if it fails the authentication check, and if we do fail the authentication check we issue an auth_challenge to generate a 401 response with an authentication header and send it back to the UA. Then we exit (stop processing).
As the above had an exit we know we’ll only hit blocks below if our credentials are correct, otherwise we’d just get the auth_challenge and exit from the auth_check block.
So as we know these credentials are correct we’ll save the location as an address on record using the save(“location”) function and exit.
So that’s our REGISTER block now handling & requiring authentication, now after restarting Kamailio we can register SIP devices with the username and password we setup, but if we get the username or password wrong, we’ll get rejected.
We can add extra users using the kamctl add command we touched on earlier.
Authorising / Authenticating INVITE messages
INVITE messages are used to setup sessions (calls), so it’s important we secure this too. At this point we’re authenticating to REGISTER, but not create a call (INVITE).
First let’s add a simple check to see if the INVITE has come from the IP of one of the carriers we defined earlier.
For this we’ll use the allow_source_address() command to see if the source address matches what we defined earlier using kamctl address add to address group 200 in the MySQL database.
if(method=="INVITE"){
if(allow_source_address("200")){ #If from a Carrier IP
if(!lookup("location")){ #Try looking up location
sl_reply("404", "User not Registered"); #If looking up location fails reply with 404
exit; #And exit
}
t_relay(); #Relay traffic to endpoint
exit(); #Exit
}else{
sl_reply("403", "Nope. Don't know who you are");
}
}
So we’ve got a simple if for if the source address is in group 200.
Presto, this works for calls from carriers coming in to registered endpoints! We can get inbound calls.
Small catch is our users can’t dial each other any more, as their IP isn’t in address group 200, they just get the 403 “Don’t know who you are” response.
Now we could go and add the subnet where our users are located, but then there’d be no point in using passwords at all. But before we do this let’s create a new routing module, called INVITE to keep everything pretty.
At the very bottom of our config we’ll add
route[ONNETINVITE]{
if(!lookup("location")){ #Try looking up location
sl_reply("404", "User not Registered"); #If looking up location fails reply with 404
exit; #And exit
}
t_relay(); #Relay traffic to endpoint
exit(); #Exit
}
And then we’ll remove most of the code in our if(method==”INVITE”){ block and replace it with this:
if(method=="INVITE"){
if(allow_source_address("200")){ #If from a Carrier IP
route(ONNETINVITE); #Call INVITE handling bloc
}else{
sl_reply("403", "Nope. Don't know who you are");
}
}
Now we’ve made it so we just call ROUTE(INVITE);when we have an INVITE we’ve authenticated. This will save us a lot of extra code when we add our checks to see if the call is from a user we recognize, instead of running through the lookup(“location”) code and relying, we’ll just call route(ONNETINVITE); when we’re happy we know who they are and off we go.
if(method=="INVITE"){
if(allow_source_address("200")){ #If from a Carrier IP
route(ONNETINVITE); #Call INVITE handling bloc
}else{
if (!auth_check("$fd", "subscriber", "1")) { #If credentials don't match what we have in Subscriber table
auth_challenge("$fd", "0"); #Send an Auth Challenge
exit; #Stop processing
}
route(ONNETINVITE); #Call invite handling block
}
}
You may recognize the !auth_check blocks as the same code we used for authenticating REGISTER messages, we’re using it again as it’s the same auth mechanism.
If we pass it we call the route(ONNETINVITE);
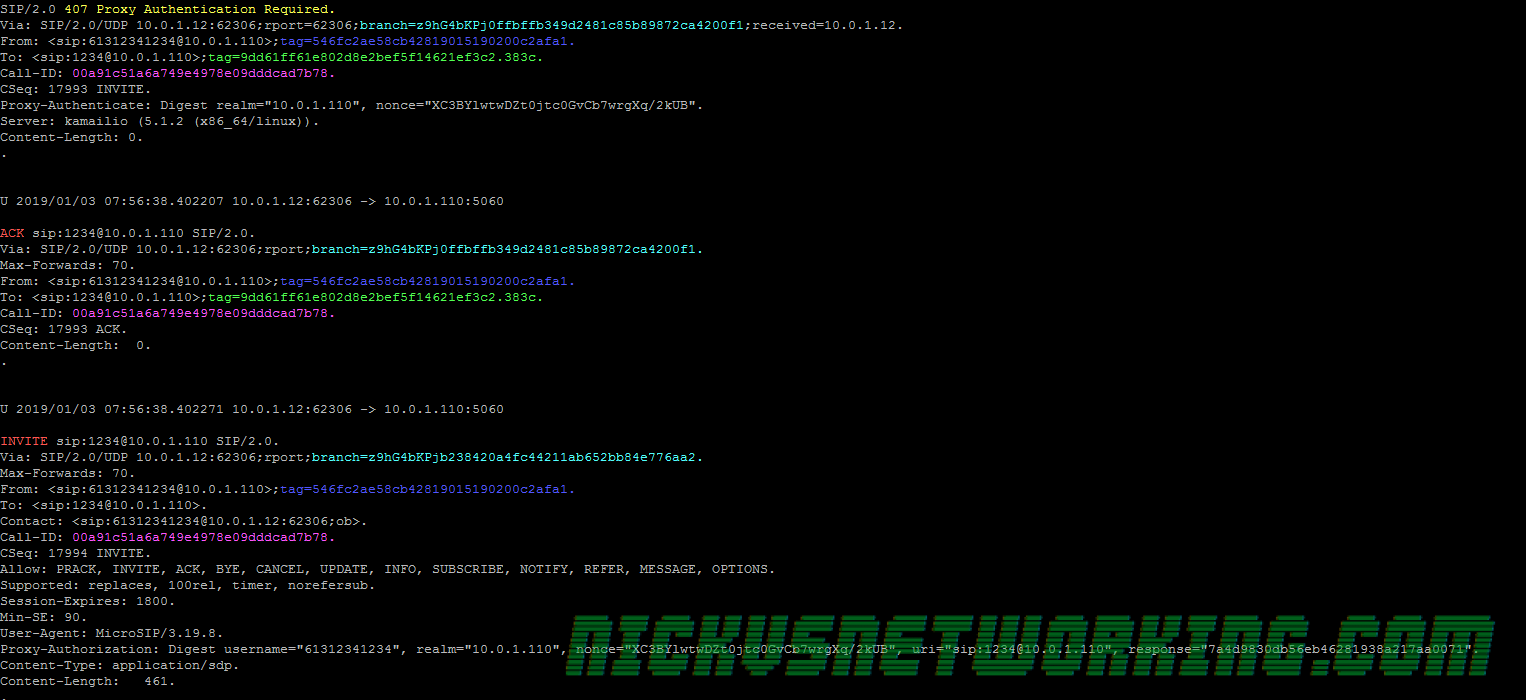
If we look at the packet captures we can see our INVITE gets a 407 “Proxy Authentication required” response back from Kamailio.
And the UA then resends the INVITE with an authentication header with correct username and password and we’re on our way!
And that’s it! Phew.
In production we’d want to handle other types of messages that we’d also want to authenticate, we’ll talk about that further down the line, but keep in mind every feature you add what the security ramifications might be.
Next up we’ll use our new found sense of security to add the ability to call numbers off-net (on the PSTN) via a SIP provider!
Before we get too much further, we’ll take a breather and talk about security. We saw in the last tutorial how we’ve got to have a way to handle every scenario, like how to handle a CANCEL to an INVITE, and security is the same.
You are responsible for the code you write being secure.
In this series we’ll ultimately end up with a basic PBX with the ability to make and receive calls between registered users and via trunks from a carrier.
Soon we’ll add the ability to call numbers not registered on our system (trunks) to our system, but now is a good time to talk about securing your system, as the threat of toll fraud is very real, as well as calls from random devices waking you up in the middle of the night.
VoIP security is a big topic, there’s a whole lot of wrong ways to do things, so think before you do.
Authentication, Authorisation and Accounting
Most telephony platforms employ some form of AAA, it’s a good minimum starting point for our system to ensure we Authenticate traffic, to make sure it is who it claims to be, we Authorise traffic to make sure it’s allowed to traverse this part of the network and use theses resources, and finally we’ll Account for resources used, for example recording CDRs and cost for the services used.
Authentication
Authentication in this example we’ll using the Challenge / Response based authentication for traffic from users (Such as REGISTER and INVITE messages), as shown in this example.
When we get an INVITE or a REGISTER from a user, we’ll check their username / password matches what we’ve got on record.
We’ll use IP Address authorisation for inbound traffic from carriers (so we can make sure that we’ll only allow calls from carriers, not just any IP on the internet sending INVITES).
This means when we get an INVITE from a Carrier to send us an inbound call, we’ll make sure it’s from the Carrier’s IP address before we start our user’s phones ringing.
So it’s important we filter everything, and make sure the traffic is valid.
SQL injection is a fun example, but more common examples could include not checking the Max Forwards header and looping packets out and back in infinitely (imagine no spanning tree and plugging a switch into itself) and not responding to known bad user agents like sipcli and sipvicious.
Luckily again the Kamailio team have covered this before, Kamailio comes with a module for handling a lot of the common threats.
With the boilerplate routes we talked about in the last tutorial all you have to do is add route(REQINIT); at the start of your routing block and you’ll get:
Dodgy UA filtering (You may want to add your own)
Basics of Flood Prevention (if you want it)
max_forward checking (for handling routing loops)
OPTIONS response handling
Sanity checking
In the next post we’ll go about putting these things into practice.
In the last tutorial we saw some issues, calls hung up before they were answered (CANCEL), we also would have run into issues with timeouts, issues if the remote end was registered but no longer responding, behind a NAT etc.
We saw a real example of what I touched on on the opener to this series, that you have to deal with everything, and it’s a daunting task.
Kamailio allows you to deal with all these problems yourself, writing your own routing blocks, but it also comes with a bunch of useful routing blocks in the example config, that we can re-use so we don’t need to specify how to manage every little thing ourselves – unless we want to.
So lets add some of these useful routing blocks,
We’ll add this at the start of our request_route{ block
request_route {
if (is_method("CANCEL")) {
if (t_check_trans()) {
route(RELAY);
}
exit;
}
if (!is_method("ACK")) {
if(t_precheck_trans()) {
t_check_trans();
exit;
}
t_check_trans();
}
# handle requests within SIP dialogs
route(WITHINDLG);
So now our config looks like this:
request_route {
if (is_method("CANCEL")) {
if (t_check_trans()) {
route(RELAY);
}
exit;
}
if (!is_method("ACK")) {
if(t_precheck_trans()) {
t_check_trans();
exit;
}
t_check_trans();
}
# handle requests within SIP dialogs
route(WITHINDLG);
if(method=="INVITE"){
if(!lookup("location")){
sl_reply("404", "User not Registered");
exit;
}
lookup("location");
t_relay();
exit();
}
        if(method=="REGISTER"){
                save("location");
                exit;
        }
xlog("No idea how to respond to method $rm");
sl_reply("501", "Not Implemented");
}
As you can see we’ve added an if statement to match if the method is CANCEL or ACK, and referenced some routing blocks:
route(RELAY)
route(WITHINDLG);
We’ve also added some code to manage ACKs, but we’ll go through that on our lesson on Statefulness, for now just roll with it.
You’ll probably notice if you try and use this config that it won’t work, that’s because we’re referencing these two routing blocks without actually having defined them.
To keep us moving I’ve added all the routing blocks that come with the default Kamailio config, and added in our code to the link below;
To recap, we added the boilerplate routes that come with Kamailio and referenced them in our code to better handle in dialog responses.
This is because handling all these possible scenarios, like NAT, cancel, no response, REINVITE, UPDATE, etc, etc, would take us ages to cover, and require a pretty good understanding of Kamailio and of SIP in practice.
So use the example I’ve linked above and tune in next time, where we’ll talk about adding security and authentication to our system before we connect it to the outside world.
So now we’ve got Kamailio handling REGISTER traffic, and we know what IPs endpoints are on, so let’s join this together and let’s route a call between two endpoints via our Proxy!
We’ll work on the config we were working on in the previous tutorial:
/* Main SIP request routing logic
 * - processing of any incoming SIP request starts with this route
 * - note: this is the same as route { ... } */
request_route {
        if(method=="INVITE"){
                sl_reply("480", "Temporarily Unavailable");
                exit;
        }
        if(method=="REGISTER"){
                save("location");
                exit;
        }
        sl_reply("501", "Not Implemented");
}
Let’s change how we handle the INVITE messages in our if(method==”INVITE”) block so instead of responding with a 480 Unavailable response, let’s lookup the location we saved if it was a REGISTER and forward the INVITE to the IP we’ve got.
Let’s break down each of the new functions we’ve introduced:
lookup(“location”);
In the last post we introduced save(“location”); which saves an Address on Record for the URI. lookup(“location”); looks up the IP address of the URI we’re after in the Address on Record table we wrote to with our save(“location”); call and automatically sets it as the destination IP of where we’re going to send the message.
When a user registered via a SIP REGISTER request, we saved their details, now we’re looking them up.
You could even replace the lookup(“location”) call with say a SQL lookup on an address book, and save the output to the IP the INVITE will be forwarded to, but lookup(“location”); does this it all in one function.
t_relay();
t_relay is transactional relay function. By transactional it means Kamailio remembers this session next time it’s referenced, we’ll touch upon transaction aware / stateful SIP proxies later, but for now what you need to know is it forwards the INVITE we just received to the address we got from our lookup(“location”).
exit();
Exit bails out so we won’t keep processing after that, it doesn’t just bail out of our current conditional but stops processing this request further. Without it we’d still go on and send the 501 Not Implemented reply.
The Setup
I’ve setup two phones – One using the username 106 and the other using 108, I’ve pointed both to the IP of our Kamailio instance and they’ve registered. Keep in mind if you’ve restarted Kamailio it’ll lose it’s location table, as it’s stored in memory, so you’ll have to force the phones to register again.
You can check you’ve got devices registered by using kamcmd ul.dump at the command line to confirm you’ve got entries for both. I have so I’ll try dialling 108 from 106:
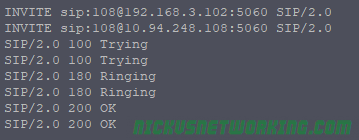
Here we can see the INVITE coming in, the lookup(“location”) doing it’s magic and forwarding the messages to the IP of 108.
The 100 Trying, 180 Ringing and 200 OK messages all go through on their own as they’re part of an existing dialog which we’ll touch on why later in the series,
So we’re done here right? Well, not quite…
What if a call is made to an endpoint that isn’t registered? Or if they send a CANCEL before the call is answered?
Let’s take a look at what happens if we try this:
The INVITE is received by Kamailio, a 100 TRYING response is sent back, but Kamailio isn’t really doing anything, after about 10 seconds I try and end the call from my softphone (CANCEL) and I get a 501 response back as we haven’t defined how to handle CANCEL messages, so there’s no way to end the call, and we’re stuck…
When things don’t go to plan…
As I said in the Introduction to Kamailio post, the power in Kamailio is the ability to define how every part functions, but to quote Spiderman – With great power comes great responsibility, and Peter Parker didn’t have the 269 pages of RFC3261 to grapple with…
We know the above example works fine when there’s a device registered on the other end and if they answer, but if they don’t? As we’ve seen, we’ve got to cater for every scenario.
Handling no registered user
Instead of just lookup(“location”) to lookup location we can put it in an if statement with some code to be run if it fails.
We’ll use the the if(!lookup(“location”)){ } call to create a new conditional for if lookup location fails, and inside it we can reply with a 404 and exit.
The if(!){} block can be used to try and run a command, and if it fails, it’ll run what’s between the {}.
In our scenario we try and lookup the location, if that fails, for example because we don’t have an Address on Record for that destination, it executes what’s between the {} in this case we use sl_reply to send a 404 error back and then exit:
So now if an INVITE is received to a destination we can’t find via a lookup(“location”); we respond with a 404 and exit.
Handling CANCEL (Calls terminated before answered)
So now we’ve specified how we’ll handle calling a device that isn’t registered, next we have to specify how we deal with CANCEL messages, so if the calling party hangs up (cancels) the call before it’s answered by the called party, it stops ringing the called party.
This means our SIP server has to get the CANCEL message from the caller who’s given up, respond with it with a 200 OK to the caller, before forwarding that CANCEL onto the next hop (the user we were trying to call).
By this point you’re probably dreading your work ahead of you as you try and understand how to handle every scenario, every eventuality and all the weird gotchas like CANCEL.
If only there was someone else that had done this before…
“Homer the Vigilante” Season 5 / Episode 11
Luckily the Kamailio team have got pretty great examples in thekamailio.cfg file that ships by default (that one we ruthlessly gutted to keep it simple in the second tutorial) and now is a good time to re-introduce some of these routing blocks, that are reused in most Kamailio instances.
The boilerplate that gets you up and running faster and means you don’t have to worry about quite as many possible scenarios or read about how to handle CANCELS ad nauseam.
In the next tutorial we’ll talk about these routing blocks, and add them to our code to manage scenarios like CANCEL, timeouts to the remote destination, and how you can use these blocks to speed things up and keep everything RFC compliant.
As we talked about in the post onSIP Registrars, SIP Registrars take the REGISTER requests from SIP endpoints and store their contact details in the form of an Address on Record (AoR). This AoR contains the URI and the endpoints’ current IP it just sent the REGISTER message from.
The primary use of this is it allow us to know how to reach people. It’s kind of like an address book for mapping current IP against a SIP URI, as IP Addresses of SIP endpoints may change often.
So our Kamailio instance is going to receive an REGISTER message, store the Contact as an address on record, and respond 200 OK. Let’s build upon the config we started with in the last tutorial:
/* Main SIP request routing logic
 * - processing of any incoming SIP request starts with this route
 * - note: this is the same as route { ... } */
request_route {
        if(method=="INVITE"){
                sl_reply("480", "Temporarily Unavailable");
                exit;
        }
        sl_reply("501", "Not Implemented");
}
So let’s add an if statement to manage REGISTER messages, and save their location:
/* Main SIP request routing logic
 * - processing of any incoming SIP request starts with this route
 * - note: this is the same as route { ... } */
request_route {
        if(method=="INVITE"){
                sl_reply("480", "Temporarily Unavailable");
                exit;
        }
        if(method=="REGISTER"){
                save("location");
                exit;
        }
        sl_reply("501", "Not Implemented");
}
So we’ve added an IF statement to find if the SIP method is a REGISTER message, and if it is, we’ll call the save(“location”); function.
The save() function saves the Contact address we just received to a database (in this case one in memory) in the form of a SIP URI and current Contact location, these two bits of info combined are known as an address on record (AoR) and the save function, if successful, responds with a 200 OK automatically.
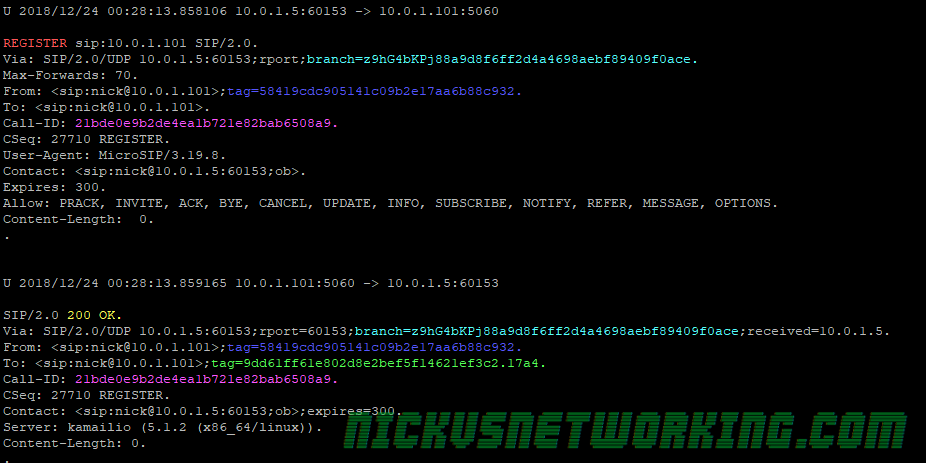
I’ve pointed a SIP endpoint at it again, we revive the REGISTER, respond with 200 OK,
As you can see REGISTER sent to us, 200 OK responded.
So that’s it – Our SIP endpoint is happy and by calling the save(“location”) we’ve called the built in function to store the Contact as an Address on Record and respond with 200 OK.
So how do we access this information and what can we do with it?
Kamailio comes with two tools for accessing Kamailio while it’s running. In this example we’ll use kamcmd to check what’s registered on our system. After we’ve seen a device register, from command line we’ll run:
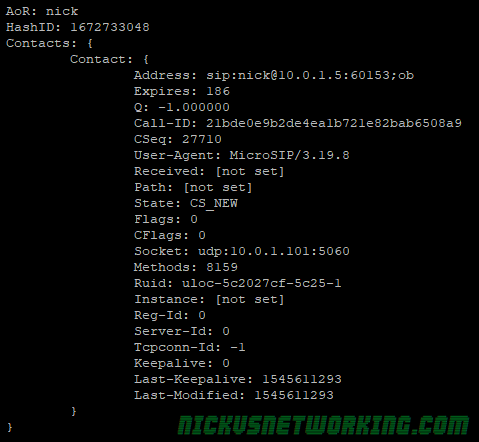
kamcmd ul.dump
This calls kamcmd the Kamailio command line tool, and calls the ul.dump function. ul is short for userloc – The module for user location management, and dump outputs all the contents of the userloc table.
Here we can see the info we’ve stored from the URI of the user (sip:[email protected]:60153) who sent a REGISTER at the Unix timestamp in “Last-Modified”.
So now we’ve created a SIP registrar, in the next tutorial we’ll use this information to route SIP INVITE messages to a registered endpoint, looking up it’s IP and get a call happening!
In production you’d generally not have a SIP registrar like this open to accept any registrations, you’d authenticate SIP endpoints using the REGISTER -> 401 Unauthorised -> REGISTER -> 200 OK process outlined here. To do this using the usrloc module we’d need to introduce the concept of a stateful proxy, as we need to remember what the challenge we sent them was to compare it with what we’re expecting, but we’ll touch upon this later in the series.
I know when I look back on code I’ve written in the past I cringe a little. As you go along you learn more efficient ways to do things, so before we hop to far into Kamailio we’re going to talk about how we’ll write our kamailio.cfg file.
General Rules
Some rules of thumb to get you started with writing Kamailio configs:
All lines that do things (instructions) have to end with a semicolon
Comments start with # if single line or /* blah */ for multi-line
Changes to the config only take effect when you restart Kamailio
Now we’ve got that out of the way let’s continue on from our last tutorial and start routing requests!
(We’ll skip all the config above the request_route{} block that configures the modules and their setup, it’s all very important, but we’ll touch upon that in a later tutorial I promise)
As I touched upon in the Introduction post, you define what Kamailio is and does in terms of routing SIP requests, so let’s jump straight in and get started on the blocks that take care of this.
The request_route{} Block
The request_route{} block is where all our incoming SIP requests start off. Replies / responses are handled a bit differently (more on that later), but essentially every new SIP request / message / dialog starts off here.
We can create new blocks other than request_route{} to help keep our code clean, in the same way we might define functions while programming.
Let’s take a look:
request_route {
        route(RESPOND_501);    #Jump to the RESPOND_501 block
}

route[RESPOND_501]{
        sl_reply("501", "Not Implemented");   #Send 501 reply
}
We can see in the above example, any SIP Request coming in will enter our request_route{},
In our request_route{} block we only have one instruction, which is route().
The route() command allows us to then specify another block of the config file / code to continue on from. Think of it kind of like calling a function or god forbid – a GoTo. So in this example the call comes in and then routed off to a new routing block called route[RESPOND_501],
This allows us to reuse bits of code multiple times and generally keep everything a lot cleaner.
It’s worth noting that unless you tell it to, routing to another block won’t stop Kamailio from continuing to execute it’s way through the code, it’ll do what it’s told in the other routing block and then finish what it started.
Let’s look at an example:
request_route {
        xlog("Hello, I am in the request_route");
        route(RESPOND_501);    #Jump to the RESPOND_501 block
        xlog("Back in request_route");
}

route[RESPOND_501]{
        xlog("Now I am in the respond 501 route");
        sl_reply("501", "Not Implemented");   #Send 501 reply
}
If we’re to run this code and send a SIP Request to it, we’d see each of these xlog entries in your syslog,
As the message firsts hits the xlog(“Hello, I am in the request_route”);, then is routed off to route[RESPOND_501]
In route[RESPOND_501] we’ll see the xlog(Now I am in the respond 501 route”); – Kamailio has now executed the route[RESPOND_501] block and resumes from where it was in request_route{}
When we get back to request_route we get the final xlog(“Back in request_route”);.
We can stop routing in a specific block using the exit; command which stops processing that request once hit. For example:
request_route {
        xlog("Hello, I am in the request_route");
        route(RESPOND_501);    #Jump to the RESPOND_501 block
        xlog("Back in request_route");
}

route[RESPOND_501]{
        xlog(Now I am in the respond 501 route");
        sl_reply("501", "Not Implemented");   #Send 501 reply
        exit;
}
Because of the exit we added in the route[RESPOND_501] Kamailio stops executing at that point, so we don’t continue passing through the config file and this time we won’t get the final xlog(“Back in request_route”); call.
Boilerplate Routes
Kamailio’s example config by default comes with a lot of preconfigured routes that can be reused over and over again, so you don’t have to create everything from scratch if you don’t want to. We’ll talk about using these in an upcoming tutorial, but for now just keep in mind there’s pre-written routing blocks for things like managing NAT, sanity checking traffic, etc.
Basic Message Routing
Let’s take a very basic use case, and write some code in the request_route{} block.
We’ll set it up so if we receive an INVITE request, we’re going to respond with a 480 Temporarily Unavailable message, and for everything else, we’ll respond with 501 “Not Implemented”.
/* Main SIP request routing logic
 * - processing of any incoming SIP request starts with this route
 * - note: this is the same as route { ... } */
request_route {
        if(method=="INVITE"){
                sl_reply("480", "Temporarily Unavailable");
                exit;
        }
        sl_reply("501", "Not Implemented");
}
So let’s break this down,
First we have a an if statement – If the method of the SIP message is an INVITE request, then execute the code inside the curly brackets.
Inside the curly brackets we’ll respond with 480 Temporarily Unavailable, using sl_reply() (You may remember from the last post that sl_reply sends a reply back to the sender of the message with the response code and text specified) and then exit, meaning we won’t continue executing what’s next in the config.
Finally outside of our if statement (so catching any SIP requests who’s method isn’t INVITE) we’ll respond with 501 “Not Implemented”.
This tutorial will use Kamailio on Ubuntu 18.04, installed from the default repos using apt-get, but these concepts will apply to any version 4.x Kamailio instance, though some of your directories & file names may differ.
After setting up our Ubuntu box we’ll update our repos and install Kamailio
apt-get update
apt-get install kamailio*
Now we’ve installed Kamailio with all the extra modules and plugins.
In production you’d only install what you need, but this would mean our development environment won’t be complaining about not having modules, so we’re installing the lot.
So now Kamailio is installed we can get to work making it do something.
Kamailio is driven by a text based config file that defines the routing rules and how we’ll handle SIP messages.
You need to specify how to handle the different types of SIP messages (aka SIP methods / requests), in a way the other devices communicating with it will understand and that generally follows the standards.
But for our example, we’ll create a really basic config that replies to any SIP message sent to it, saying it doesn’t know how to handle that message.
We’ll open kamailio.cfg – the text file that contains all our routing info, and get to work.
vi /etc/kamailio/kamailio.cfg
You’ll see the config starts by defining what modules to load, and the config for each of these modules. For us, the defaults will work for now, let’s get to the juicy bits. Keep moving down the config file until you hit this section:
/* Main SIP request routing logic
 * - processing of any incoming SIP request starts with this route
 * - note: this is the same as route { ... } */
request_route {
The request_route section is what handles the initial SIP message that comes through.
We’ll remove all the text after request_route { leaving us with a blank canvas in terms of how we handle messages. We’ll then put in a single line to log to syslog when we get a SIP message:
/* Main SIP request routing logic
 * - processing of any incoming SIP request starts with this route
 * - note: this is the same as route { ... } */
request_route {
        xlog("I got a message");
}
If we were to stop here and restart Kamailio, when a SIP message comes into our SIP server, we’d just write an entry to syslog saying “I got a message” each time we get a SIP message, but Kamailio won’t respond to the received SIP message, it’ll just enter a log entry each time it gets a SIP message. So let’s respond to any SIP message we get with a 501 “Not Implemented” message.
/* Main SIP request routing logic
 * - processing of any incoming SIP request starts with this route
 * - note: this is the same as route { ... } */
request_route {
        xlog("I got a message");
        sl_reply("501", "Not Implemented");
}
So let’s break down the two functions we just used.
xlog(“”);
xlog is your friend. Put simply xlog prints whatever you put inside the parenthesis to syslog. You can use it to check to see if your messages are getting to the part of the config you want, check what pseudovariables are doing and many other things, but I’m getting ahead of myself. For now you just need to know xlog is like NoOp() in Asterisk, print() in Python, etc.
sl_reply();
sl_reply is stateless reply. It takes two parameters, the SIP Response Code and the text to go with it, when called it sends the SIP response code and text back to the requester. In this case we’re using SIP Response Code 501, which translates to Not Implemented, meaning the server does not support the functionality required to fulfill the request aka:
Essentially what a 501 response translates to
Putting it into Play
Now let’s restart Kamailio to make our config live, point a SIP endpoint at it and see what happens!
First we’ll restart Kamailio:
/etc/init.d/kamailio restart
All going well you’ll restart Kamailio and be good to go:
After restarting via init.d you should see [ok] if it restarted sucesfully
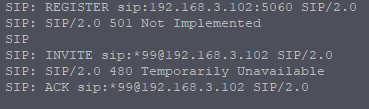
Now let’s fire some traffic at it and see what happens. I’m using tcpdump to capture traffic on port 5060, and I’ve setup a SIP endpoint that’s going to try and register to our IP to see what we get:
Presto – REGISTER message received and 501 response
So this is exciting, we now have a SIP server that can do nothing except let people know it can do nothing.
Let’s dig a bit deeper into the fundamentals and then we’ll have a good foundation to start building from, and get to work on stitching everything together to create something useful.
Kamailio (formerly OpenSER) is an open source SIP server, but Kamailio is a bit difficult to grasp what “it is“, but once you understand it’s all very logical.
Over this series I’ll attempt to explain what Kamailio is (and isn’t), and through a series of examples, show you how to use Kamailio to build cool stuff.
I’ll try and make it accessible for people with a background / understanding of VoIP, specifically with an understanding of SIP.
There’s a lot of meticulous documentation out there on specific Kamailio modules, but not much I could find that gives an overview of how the platform works, so over this series of Tutorials, I’ll attempt to cover the basics of using Kamailio to solve problems, as together we build a basic PBX with Kamailio, touching upon some of the common modules and core concepts of Kamailio.
So what is Kamailio ?
Kamailio is a SIP Server.
It’s a bit confusing at the start, because Kamailio isn’t like FreeSWITCH, Asterisk, YATE, an SBC, a PBX or any of other telephony platforms you may have encountered before, because out of the box, Kamailio doesn’t really do anything.
You’ve got to tell Kamailio how to do everything.
Let’s take a SIP INVITE message, used to start a call (aka session) that we might send to a PBX with the domain name biloxi.example.com and a SIP endpoint registered as ‘101’:
If we sent this message to a generic PBX, the PBX would have the logic to know that it has an extension 101 and the PBX would ring extension 101.
Our generic PBX looks at the Request URI in the INVITE message it received and has the logic predefined to know that 101 is a device it has registered and that we want to connect to that device, so sends the call to the matching device.
If we sent the same INVITE to an Asterisk box, Asterisk would take a look at our SIP INVITE message, and see if there’s an entry in the dialplan under the current context for 101. Asterisk doesn’t assume if you have a user registered on SIP/101 and receive a SIP INVITE to 101 that you want to get to SIP/101, it’d need to be told this through the dialplan.
Kamailio takes this example even further.
If we want to dial 101 on Kamailio and have it ring the device registered on 101, you have to tell Kamailio what to do when it receives an INVITE message in the first place, lookup if that destination is in our AOR (we’ll get to that) table, and then forward the INVITE to the destination if it exists, and forward the provisional responses (1xx) and finally the final response (200 OK) from the remote end back to the originator. Plus we’ve got to think about how we handle a scenario where the destination doesn’t exist, or isn’t registered, of if the destination returns a 4xx response to the INVITE, how we handle provisional responses and CANCEL messages and finally the BYE message (if we’re record routing).
Phew. This seems like a lot to handle.
It all seems pretty daunting at first, calling from one SIP Endpoint to another seems like a pretty rudimentary thing in a telephony product, but by putting how the system thinks, routes and manipulates messages up to you, we open the doors to all the possibilities.
What if you want something to sit in front of your servers and only allow certain SIP User Agents? Or load balance between several soft-switches? Or route least-cost between connected carriers and seamlessly failover if one is lost? Rate limit dodgy traffic before it hits your environment? Manage hundreds of thousands of registrations?
Kamailio can do all of that.
Kamailio can do anything you can think of (to do with signaling).
And that’s the awesome part of Kamailio. It is, what you define it to be.