Recently I’ve been doing some work with FreeSWITCH as an IMS Conference Factory, I’ve written a bit about it before in this post on using FreeSWITCH with the AMR codec.
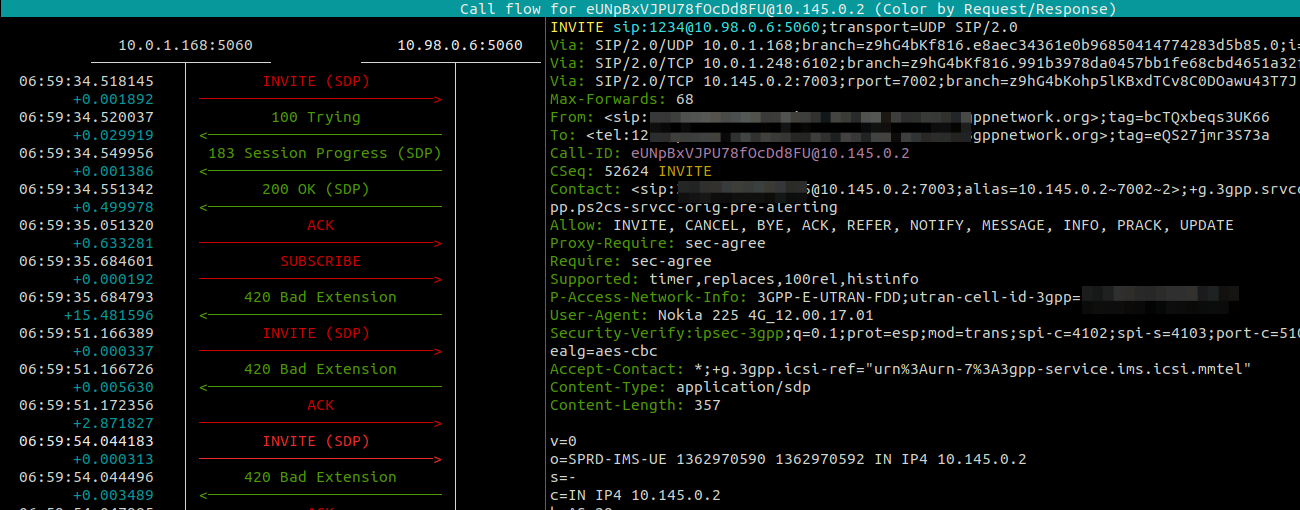
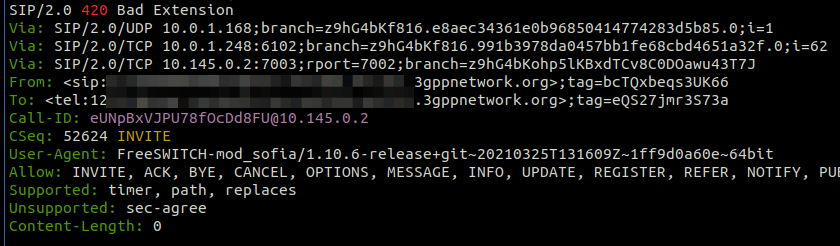
Pretty early on in my testing I faced a problem with subsequent in-dialog responses, like re-INVITEs used for holding the calls.
Every subsequent message, was getting a “420 Bad Extension” response from FreeSWITCH.
The ReINVITEThe 420 Bad Extension Response
So what didn’t it like and why was FreeSWITCH generating 420 Bad Extension Responses to these subsequent messages?
Well, the “Extensions” FreeSWITCH is referring to are not extensions in the Telephony sense – as in related to the Dialplan, like an Extension Number to identify a user, but rather the Extensions (as in expansions) to the SIP Protocol introduced for IMS.
The re-INVITE contains a Require header with sec-agree which is a SIP Extension introduced for IMS, which FreeSWITCH does not have support for, and the re-INVITE says is required to support the call (Not true in this case).
Using a Kamailio based S-CSCF means it is easy to strip these Headers before forwarding the requests onto the Application Server, which is what I’ve done, and bingo, no more errors!
So you have a VoIP service and you want to rate the calls to charge your customers?
You’re running a mobile network and you need to meter data used by subscribers?
Need to do least-cost routing?
You want to offer prepaid mobile services?
Want to integrate with Asterisk, Kamailio, FreeSWITCH, Radius, Diameter, Packet Core, IMS, you name it!
Well friends, step right up, because today, we’re talking CGrates!
So before we get started, this isn’t going to be a 5 minute tutorial, I’ve a feeling this may end up a big multipart series like some of the others I’ve done. There is a learning curve here, and we’ll climb it together – but it is a climb.
Installation
Let’s start with a Debian based OS, installation is a doddle:
We’re going to use Redis for the DataDB and MariaDB as the StorDB (More on these concepts later), you should know that other backend options are available, but for keeping things simple we’ll just use these two.
Next we’ll get the database and config setup,
cd /usr/share/cgrates/storage/mysql/
./setup_cgr_db.sh root CGRateS.org localhost
cgr-migrator -exec=*set_versions -stordb_passwd=CGRateS.org
Lastly we’ll clone the config files from the GitHub repo:
In its simplest form, rating is taking a service being provided and calculating the cost for it.
The start of this series will focus on voice calls (With SMS, MMS, Data to come), where the callingparty (The person making the call) pays, so let’s imagine calling a Mobile number (Starting with 614) costs $0.22 per minute.
To perform rating we need to determine the Destination, the Rate to be applied, and the time to charge for.
For our example earlier, a call to a mobile (Any number starting with 614) should be charged at $0.22 per minute. So a 1 minute call will cost $0.22 and a 2 minute long call will cost $0.44, and so on.
We’ll also charge calls to fixed numbers (Prefix 612, 613, 617 and 617) at a flat $0.20 regardless of how long the call goes for.
So let’s start putting this whole thing together.
Introduction to RALs
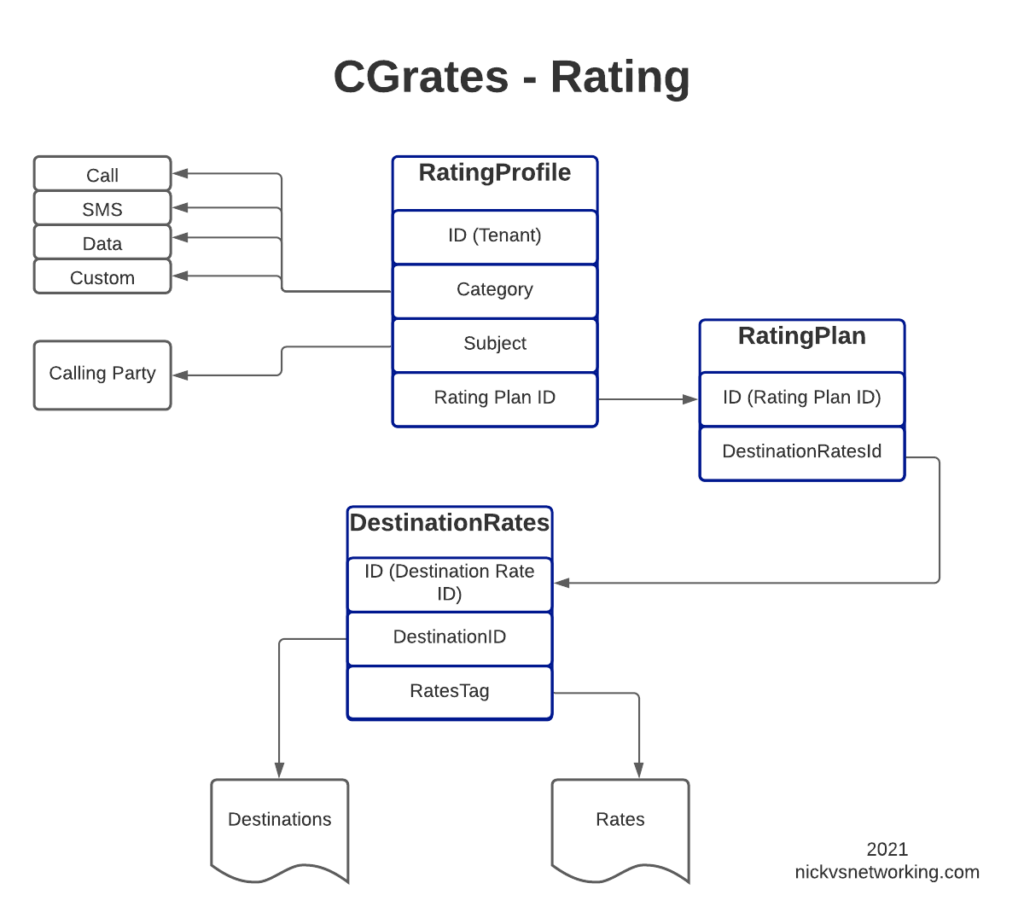
RALs is the component in CGrates that takes care of Rating and Accounting Logic, and in this post, we’ll be looking at Rating.
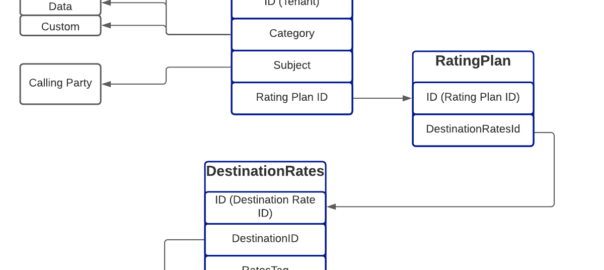
The rates have hierarchical structure, which we’ll go into throughout this post. I took my notepad doodle of how everything fits together and digitized it below:
Destinations
Destinations are fairly simple, we’ll set them up in our Destinations.csv file, and it will look something like this:
Each entry has an ID (referred to higher up as the Destination ID), and a prefix.
Also notice that some Prefixes share an ID, for example 612, 613, 617 & 618 are under the Destination ID named “DST_AUS_Fixed”, so a call to any of those prefixes would match DST_AUS_Fixed.
Rates
Rates define the price we charge for a service and are defined by our Rates.csv file.
This is nice and clean, a 1 second call costs $0.25, a 60 second call costs $0.25, and a 61 second call costs $0.50, and so on.
This is the standard billing mechanism for residential services, but it does not pro-rata the call – For example a 1 second call is the same cost as a 59 second call ($0.25), and only if you tick over to 61 seconds does it get charged again (Total of $0.50).
Per Second Billing
If you’re doing a high volume of calls, paying for a 3 second long call where someone’s voicemail answers the call and was hung up, may seem a bit steep to pay the same for that as you would pay for 59 seconds of talk time.
Instead Per Second Billing is more common for high volume customers or carrier-interconnects.
This means the rate still be set at $0.25 per minute, but calculated per second.
So the cost of 60 seconds of call is $0.25, but the cost of 30 second call (half a minute) should cost half of that, so a 30 second call would cost $0.125.
How often we asses the charging is defined by the RateIncrement parameter in the Rate Table.
We could achieve the same outcome another way, by setting the RateIncriment to 1 second, and the dividing the rate per minute by 60, we would get the same outcome, but would be more messy and harder to maintain, but you could think of this as $0.25 per minute, or $0.004166667 per second ($0.25/60 seconds).
Flat Rate Billing
Another option that’s commonly used is to charge a flat rate for the call, so when the call is answered, you’re charged that rate, regardless of the length of the call.
Regardless if the call is for 1 second or 10 hours, the charge is the same.
DestinationID – Refers to the DestinationID defined in the Destinations.csv file
RatesTag – Referes to the Rate ID we defined in Rates.csv
RoundingMethod – Defines if we round up or down
RoundingDecimals – Defines how many decimal places to consider before rounding
MaxCost – The maximum cost this can go up to
MaxCostStrategy – What to do if the Maximum Cost is reached – Either make the rest of the call Free or Disconnect the call
So for each entry we’ll define an ID, reference the Destination and the Rate to be applied, the other parts we’ll leave as boilerplate for now, and presto. We have linked our Destinations to Rates.
Rating Plans
We may want to offer different plans for different customers, with different rates.
DestinationRatesId (As defined in DestinationRates.csv)
TimingTag – References a time profile if used
Weight – Used to determine what precedence to use if multiple matches
So as you may imagine we need to link the DestinationRateIDs we just defined together into a Rating Plan, so that’s what I’ve done in the example above.
Rating Profiles
The last step in our chain is to link Customers / Subscribers to the profiles we’ve just defined.
How you allocate a customer to a particular Rating Plan is up to you, there’s numerous ways to approach it, but for this example we’re going to use one Rating Profile for all callers coming from the “cgrates.org” tenant:
Category is used to define the type of service we’re charging for, in this case it’s a call, but could also be an SMS, Data usage, or a custom definition.
Subject is typically the calling party, we could set this to be the Caller ID, but in this case I’ve used a wildcard “*any”
ActivationTime allows us to define a start time for the Rating Profile, for example if all our rates go up on the 1st of each month, we can update the Plans and add a new entry in the Rating Profile with the new Plans with the start time set
RatingPlanID sets the Rating Plan that is used as we defined in RatingPlans.csv
Loading the Rates into CGrates
At the start we’ll be dealing with CGrates through CSV files we import, this is just one way to interface with CGrates, there’s others we’ll cover in due time.
CGRates has a clever realtime architecture that we won’t go into in any great depth, but in order to load data in from a CSV file there’s a simple handy tool to run the process,
Obviously you’ll need to replace with the folder you cloned from GitHub.
Trying it Out
In order for CGrates to work with Kamailio, FreeSWITCH, Asterisk, Diameter, Radius, and a stack of custom options, for rating calls, it has to have common mechanisms for retrieving this data.
CGrates provides an API for rating calls, that’s used by these platforms, and there’s a tool we can use to emulate the signaling for call being charged, without needing to pickup the phone or integrate a platform into it.
The tenant will need to match those defined in the RatingProfiles.csv, the Subject is the Calling Party identity, in our case we’re using a wildcard match so it doesn’t matter really what it’s set to, the Destination is the destination of the call, AnswerTime is time of the call being answered (pretty self explanatory) and the usage defines how many seconds the call has progressed for.
The output is a JSON string, containing a stack of useful information for us, including the Cost of the call, but also the rates that go into the decision making process so we can see the logic that went into the price.
So have a play with setting up more Destinations, Rates, DestinationRates and RatingPlans, in these CSV files, and in our next post we’ll dig a little deeper… And throw away the CSVs all together!
In iOS 15, Apple added support for iPhones to support SMS over IMS networks – SMSoIP. Previously iPhone users have been relying on CSFB / SMSoNAS (Using the SGs interface) to send SMS on 4G networks.
Getting this working recently led me to some issues that took me longer than I’d like to admit to work out the root cause of…
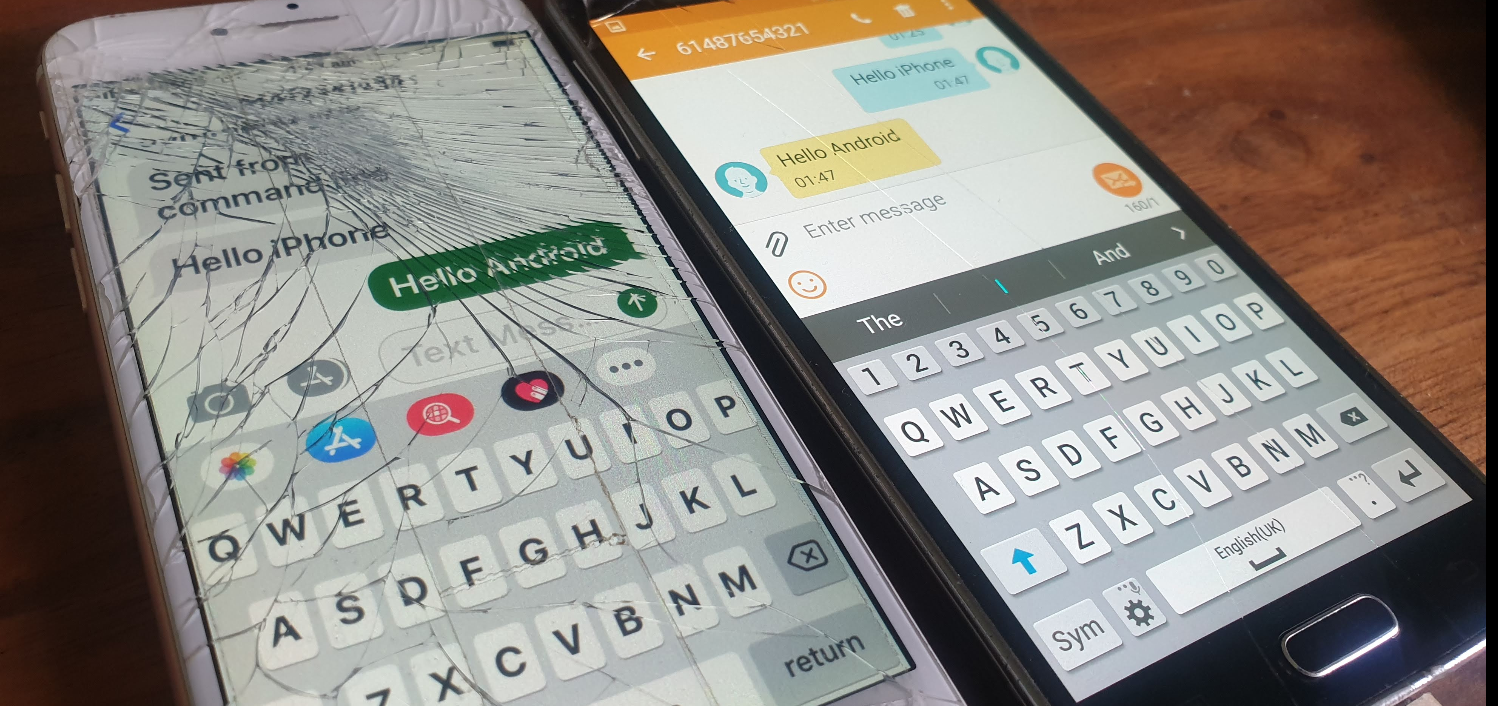
I was finding that when sending a Mobile Termianted SMS to an iPhone as a SIP MESSAGE, the iPhone would send back the 200 OK to confirm delivery, but it never showed up on the screen to the user.
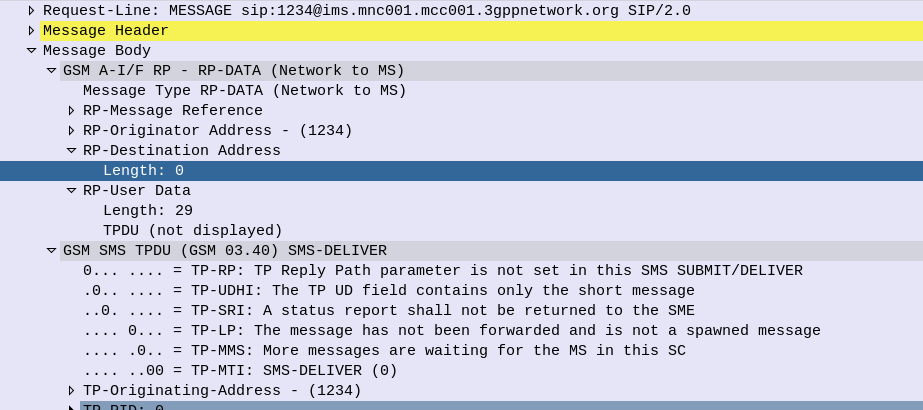
The GSM A-I/F headers in an SMS PDU are used primarily for indicating the sender of an SMS (Some carriers are configured to get this from the SIP From header, but the SMS PDU is most common).
The RP-Destination Address is used to indicate the destination for the SMS, and on all the models of handset I’ve been testing with, this is set to the MSISDN of the Subscriber.
But some devices are really finicky about it’s contents. Case in point, Apple iPhones.
If you send a Mobile Terminated SMS to an iPhone, like the one below, the iPhone will accept and send back a 200 OK to this request.
The problem is it will never be displayed to the user… The message is marked as delivered, the phone has accepted it it just hasn’t shown it…
SMS reports as delivered by the iPhone (200 OK back) but never gets displayed to the user of the phone as the RP-Destination Address header is populated
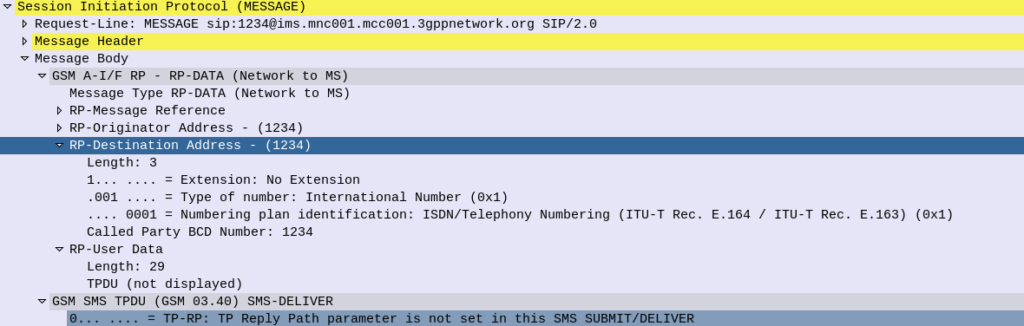
The fix is simple enough, if you set the RP-Destination Address header to 0, the message will be displayed to the user, but still took me a shamefully long time to work out the problem.
RP-Destination Address set to 0 sent to the iPhone, this time it’ll get displayed to the user.
After getting AMR support in FreeSWITCH I set about creating an IMS Application Server for VoLTE / IMS networks using FreeSWITCH.
So in IMS what is an Application Server? Well, the answer is almost anything that’s not a CSCF.
An Application Server could handle your Voicemail, recorded announcements, a Conference Factory, or help interconnect with other systems (without using a BGCF).
I’ll be using mine as a simple bridge between my SIP network and the IMS core I’ve got for VoLTE, with FreeSWITCH transcoding between AMR to PCMA.
Setting up FreeSWITCH
You’ll need to setup FreeSWITCH as per your needs, so that’s however you want to use it.
This post won’t cover setting up FreeSWITCH, there’s plenty of good resources out there for that.
The only difference is when you install FreeSWITCH, you will want to compile with AMR Support, so that you can interact with mobile phones using the AMR codec, which I’ve documented how to do here.
Setting up your IMS
In order to get calls from the IMS to the Application Server, we need a way of routing the calls to the Application Server.
There are two standards-compliant ways to achieve this,
But this is a blunt instrument, after all, it’ll only ever be used at the start of the call, what if we want to send it to an AS because a destination can’t be reached and we want to play back a recorded announcement?
To support Dedicated Bearers we first have to have a way of profiling the traffic, to classify the traffic as being the type we want to provide the Dedicated Bearer for.
The first step involves a request from an Application Function (AF) to the PCRF via the Rx interface.
The most common type of AF would be a P-CSCF. When a VoLTE call gets setup the P-CSCF requests that a dedicated bearer be setup for the IP Address and Ports involved in the VoLTE call, to ensure users get the best possible call quality.
But Application Functions aren’t limited to just VoLTE – You could also embed an Application Function into the server for an online game to enable a dedicated bearer for users playing that game, or a sports streaming app that detects when a user starts streaming sports and creates a dedicated bearer for that user to send the traffic down.
The request to setup a dedicated bearer comes in the form of a Diameter request message from the AF, using the Rx reference point, typically from the P-CSCF to the PCRF in the network in an “AA-Request”.
Of main interest in the AA-Request is the Media Component AVP, that contains all the details needed to identify the traffic flow.
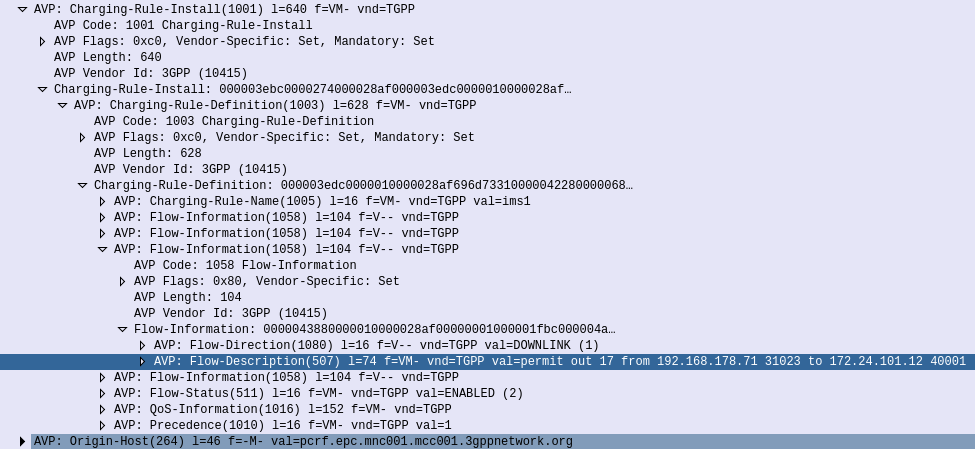
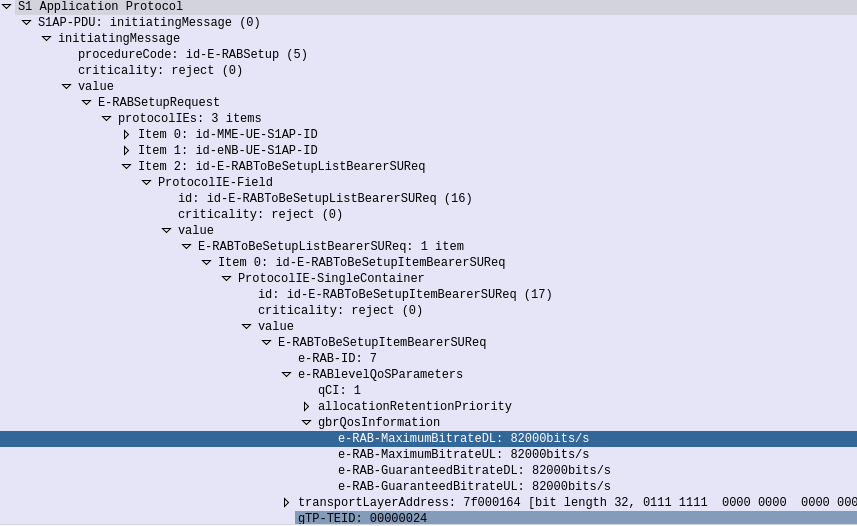
Now our PCRF is in charge of policy, and know which P-GW is serving the required subscriber. So the PCRF takes this information and sends a Gx Re-Auth Request to the PCEF in the P-GW serving the subscriber, with a Charging Rule the PCEF in the P-GW needs to install, to profile and apply QoS to the bearer.
Charging Rule Definition’s Flow-Information AVPs showing the information needed to profile the traffic
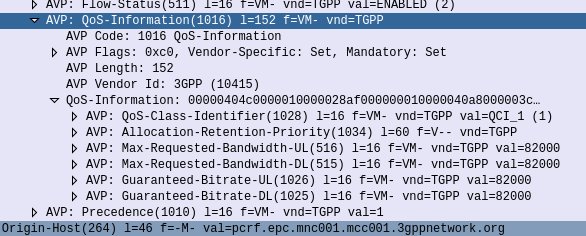
The QoS Description AVP defines which QoS parameters (QCI / ARP / Guaranteed & Maximum Bandwidth) should be applied to the traffic that matches the rules we just defined.
QoS Information AVP showing requested QoS Parameters
The P-GW sends back a Gx Re-Auth Answer, and gets to work actually setting up these bearers.
With the rule installed on the PCEF, it’s time to get this new bearer set up on the UE / eNodeB.
The P-GW sends a GTPv2 “Create Bearer Request” to the S-GW which forwards it onto the MME, to setup / define the Dedicated Bearer to be setup on the eNodeB.
GTPv2 “Create Bearer Request” sent by the P-Gw to the S-GW forwarded from the S-GW to the MME
The MME translates this into an S1 “E-RAB Setup Request” which it sends to the eNodeB to setup,
S1 E-RAB Setup request showing the E-RAB to be setup
Assuming the eNodeB has the resources to setup this bearer, it provides the details to the UE and sets up the bearer, sending confirmation back to the MME in the S1 “E-RAB Setup Response” message, which the MME translates back into GTPv2 for a “Create Bearer Response”
All this effort to keep your VoLTE calls sounding great!
SMS by default uses the GSM-7 bit alphabet, thanks to the fact each letter is only 7 bits long, this means you can cram 160 characters into a 140 byte message body.
However, this 7-bit alphabet is, well, limited, because it’s 7 bits long it means we can only have 128 different combinations of these bits, or to put it another way, with only 128 different unique combinations of these bits, we can only define 128 characters.
You have the standard 26 latin alphabet characters that Sesame Street drilled into you, some characters with accents, digits, and a limited set of symbols.
The GSM 7 bit alphabet does not include is character sets and symbols common for non-English written languages.
Shift Tables
To deal with this 3GPP introduced “National Language Shift Tables”, which are enable a sort of find-and-replace approach to the 7-bit alphabet, where certain characters that are unused in one alphabet, take the value of characters from the local alphabet.
So if you want to send the character Ğ (Found in the Turkish and Azerbaijani alphabets) you’d select the Turkish language Shift table, that replaces the capital G (71) with Ğ.
Of course you need to have two things to do this, you need the Language Shift Table to tell you what local-language letters replace what default letters, and a mechanism to state that you’re using a language shift table.
3GPP define the National Language Shift tables in TS 23.038, where you can lookup the character you want to encode, so you know what 7 bit value it uses, for example our character Ğ is 1000111 in the 7-bit alphabet.
Next we need to indicate that we don’t want 1000111 in the 7-bit alphabet to be rendered as “G”, we want to use the “Turkish National Language Single Shift Table” which will render it as “Ğ”. We do this in the User Data Header of the SMS Body, the same way we’d indicate that an SMS is a concatenated SMS.
But by adding a header in the User Data Header of the SMS Body, we eat into the space we can use to send the message body, with a single User Data Header indicating that the Turkish National Language Single Shift Table is being used, we go from a maximum of 160 characters without the User Data Header, to 134 characters.
I’ve shared a lot more information on the User Data Header in this post on Concatenated SMS, should you be interested.
No matter how many shift tables you define, you’re not going to cover all of these in a 7-bit alphabet.
So all this encoding falls to 💩 when someone adds an Emoji.
The “😀” Emoji, represented as U+1F600 in Unicode, can be encoded as 0xF09F9880 in UTF-8 or 0xD83DDE00 in UTF-16.
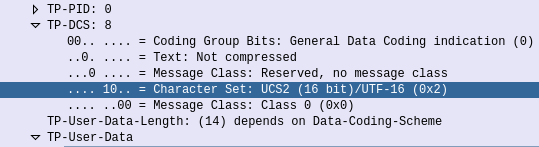
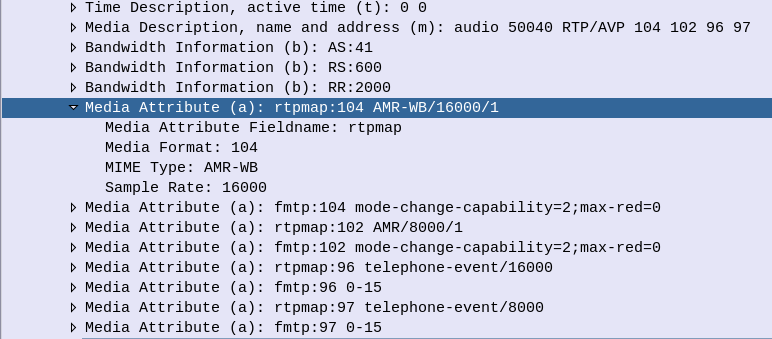
So in 3GPP Networks, when you need more than 128 characters to work with, and when shift tables won’t cut the mustard, you can change the encoding used to use the International Standards Organisations’ “Universal coded character set 2” (UCS-2).
Unfortunately UCS-2 never really took off, but luckily it overlaps with UTF-16 character set, which is a lot more common.
So if you’ve got a “😀” Emoji in your SMS body the encoding of the message will be changed from GSM-7 to use a different encoding -UTF-16 / UCS2.
SMS Body showing TP-DCS character set is UCS2 / UTF-16 as Emojis are present
There’s a catch here, if you’re moving from a 7-bit alphabet to a 16 bit alphabet, you’re going to have a lot less space to work with.
A single SMS contains 1120 bits for the user data (The actual message).
With GSM-7 bit encoding, each letter takes up 7 bits, so 1120÷7 gives us 160 characters.
With UTF-16/UCS2 encoding, each letter takes up 16 bits so 1120÷16 only give us 70 characters.
So what happens next?
Often when Emojis are used, as our message is now limited to 70 characters concatenated messages are used, which takes a further 8 bytes of our message body if concatenated messages are used, further limiting the message length.
Most people think of 160 characters as the length of an SMS. But the payload is actually 140 bytes, but with better encoding 1 character doesn’t require 1 byte.
The above paragraph is exactly 160 characters. It would fit into a standard SMS.
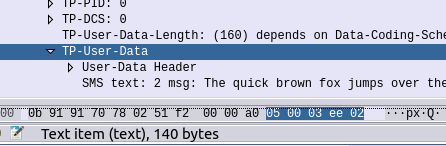
By using the GSM 7 bit alphabet, you can cram 16 characters into 140 bytes (octets) of space, which is kind of cool.
140 bytes of data containing 160 characters of text
You’d think if you took a 160 character SMS, and concatenated it onto another 160 character SMS, you’d get a total of 320 characters, right (160+160=320)? Alas it’s not that simple.
In order to achieve the concatenation of messages in a way that’s transparent to the users (rather than a series of SMSes coming through one-after-the-ther) a User-Data Header (TP-User-Data-Header-Indicator aka TP-UHDI) is added to the TP-User Data of the TPDU (the part that actually contains the user message).
This User-Data Header takes up 7 bytes, which with GSM encoding robs us of 6 characters from the message length. (Not a typo, GSM7 encoding does not mean 1 character = 1 byte, hence we can get 160 characters into 140 bytes of space) So a two SMS concatenated message would only allow 268 characters to be sent (134 characters + 134 characters).
Let’s take a look at this header that’s robbing us of message length, but enabling us to concatenate messages.
For starters, the information about how many parts in the concatenated message, and what part number this one is, is located in the message body, hence robbing us of characters.
But we only know about the presence of this header being in the message body because the SMS-SUBMIT TPDU has the TP-UDHI flag (TP-User-Data-Header-Indicator) set, so we know the User Data is prefixed with the User-Data-Header.
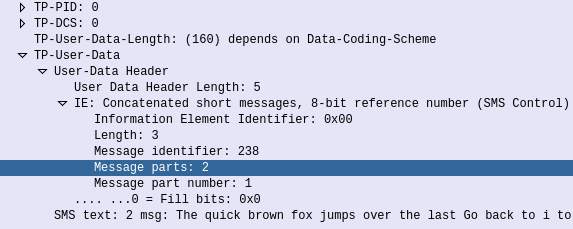
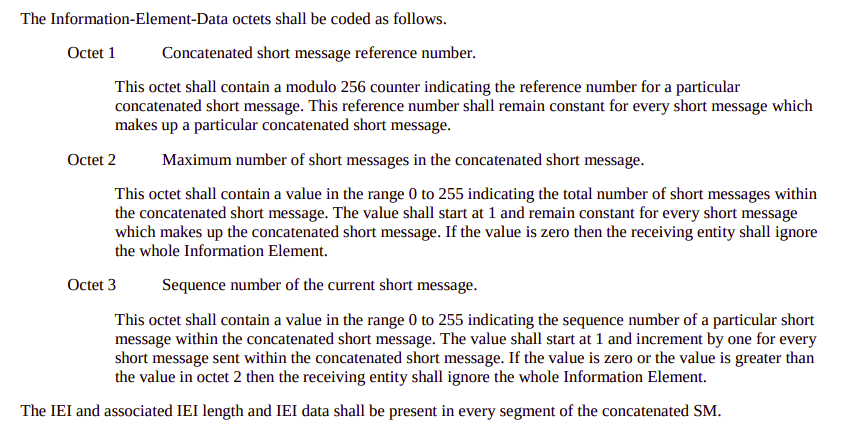
Now if we have a look in the TP-User-Data we can see the User-Data Header, this can actually carry a few different payloads, but in our case, it’s carrying the Concatenated Short Messages IE, which tells us the message identifier (unique per single-but-multi-part message, the number of parts in the message (in this case 2) and the part number this is (part 1 of 2).
First part of a two part SMS
Now the phone has indicated this is a multipart message, the length of the data is still 160, but the length of the actual message is now limited to 134 characters with GSM7 encoding.
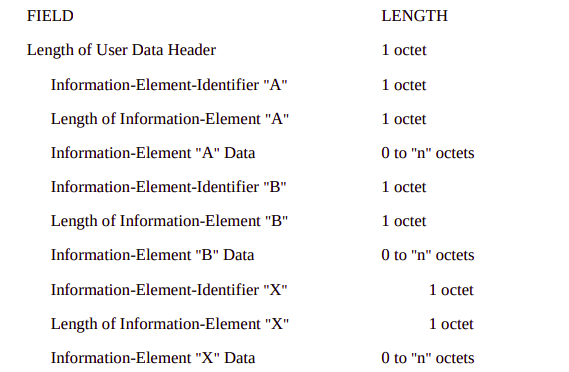
The encoding isn’t as bad as you might expect: 1st byte indicates the total length of the User Data Headers (After this the actual user data begins), 2nd byte is the IE identifier, for Concatenated Short Messages, this is 00, 3rd byte is the length of the Concatenated Short Messages IE, 4th byte is the message identifier in hex, 5th byte is the number of message parts in hex (So up to 255 message parts) 6th byte is the message part number, to aid in putting it back together in order.
3GPP TS 23.040 – 9.2.3.24 TP-User Data (TP-UD) – Encoding of User Data Header and generic IEConcatenated short message IE encoding
So what we end up with is a header inside our user payload, advising that this is a concatenated SMS, the message identifier, the number of parts in the message, and the part number of this particular message.
Last part of two part SMS
The SMSc on receipt of these has to spool them back out to the destination with the same message part number, and same headers in place.
The phone receiving the SMS has to wait for all the parts to come through and then reassemble before rendering to the user.
So that’s how concatenated SMS works. While this may seem convoluted and silly in a world where transfering more than 140 bytes of data is trivial, SMS was introduced in the early 1990s, and in theory at least, a user with a phone that supported SMS purchased when SMS was introduced, should still be able to interwork with phones today.
DNS is commonly used for resolving domain names to IP Addresses, and is often described as being like “the phone book of the Internet”.
So what’s the phone book of phone books?
The answer, is (kind of) DNS. With the aid of E.164 number to URI mapping (ENUM), DNS can be used to resolve phone numbers into SIP URIs to route the traffic to.
So what is ENUM?
ENUM allows us to bypass the need for a central switch for routing calls to numbers, and instead, through a DNS lookup, resolve a phone number into a reachable SIP URI that is the ultimate destination for the traffic.
Imagine you want to call a company, you dial the phone number for that company, your phone does a DNS query against the phone number, which returns the SIP URI of the company’s PBX, and your phone sends the SIP INVITE directly to the company’s PBX, with no intermediary party carrying the call.
3GPP have specified ENUM as the prefered mechanism for resolving phone numbers into SIP addresses, and while it’s widespread adoption on the public Internet is still in its early days (See my post on The Sad story of ENUM in Australia) it is increasingly common in IMS networks and inside operator networks.
ENUM allow us to lookup a phone number on a DNS server and find the SIP URI a server that will handle traffic for the phone number, but it’s a bit more complicated than the A or AAAA records you’d use to resolve a website, ENUM relies on NAPTR records.
Let’s look at the steps involved in taking an E.164 number and knowing where to send it.
Step 1 – Reverse the Numbers
We read phone numbers from left to right.
This is because historically the switch needs to get all the long-distance routing sorted first. The switch has to route your call to the exchange that serves that subscriber, which is what all the area codes and prefixes assigned to areas are all about (Throwback to SZU for any old Telco buffs).
For an E.164 number you’ve got a Country Code, Area Code and then the Subscriber Number. The number gets more specific as it goes along.
But getting more specific as you go along is the opposite how how DNS works, millions of domains share the .com suffix, and the unique / specific part is the bits before that.
So the first step in the ENUM process is to reverse the phone number, so let’s take phone number (03) 5550 0912, which in E.164 is +61 3 5550 0912.
As the spaces in the phone numbers are there for the humans, we’ll drop all of them and reverse the number, as DNS is more specific right-to-left, so we end up with
2.1.9.0.0.5.5.5.3.1.6
Step 2 – Add the Suffix
The ITU ENUM specifies the suffix e164.arpa be assigned for public ENUM entries. Private ENUM deployments may use their own suffix, but to make life simple I’m going to use e164.arpa as if it were public.
So we’ll append the e164.arpa domain onto our reversed and formatted E.164 phone number:
2.1.9.0.0.5.5.5.3.1.6.e164.arpa
Step 3 – Query it
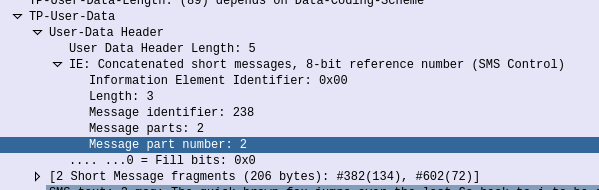
Next we’ll run a Naming Authority Pointer (NAPTR) query against the domain, to get back a list of records for that number.
DNS is a big topic, and NAPTR and SRV takes up a good chunk of it, but what you need to know is that by using NAPTR we’re not limited to just a single response, we could have a weighted pool of servers handling traffic for this phone number, and be able to control load through the use of NAPTR, amongst other things.
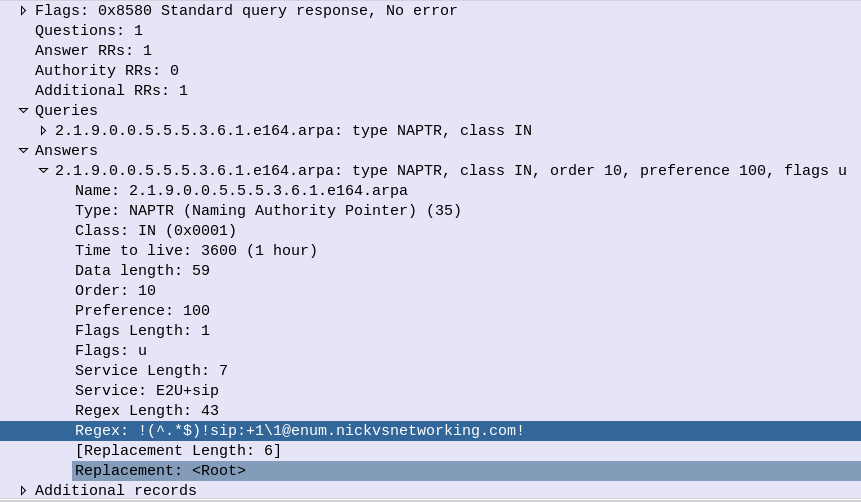
DNS NAPTR QueryDNS NAPTR Response
Of course, if our phone can query the public NAPTR records, then so can anyone else, so we can just use a tool like Dig to query the record ourselves,
In the answers section I’ve setup this DNS server to only return a single response, with the regex SIP URI to use, in my case that’s sip:[email protected]
You’ll obviously need to replace the DNS server with your DNS server, and the query with the reversed and formatted version of the E.164 number you wish to query.
Step 4 – Send SIP traffic
After looking at the NAPTR records returned and using the weight and priority to determine which server/s to send to first, our phone forwards an INVITE to the URI returned in the NAPTR record.
How to interpret the returned results?
The first thing to keep in mind when working with ENUM is multiple records being returned is supported, and even encouraged.
NAPTR results return 7 fields, which define how it should be handled.
The host part is fairly obvious, and defines the host / DNS entry we’re talking about.
The Service defines what type of service this is. ENUM can be expanded beyond just voice, for example you may want to also return an email address or IM address as well as a SIP Address on an ENUM query, which you can do. By default voice uses the “E2U+sip” service to identify SIP URIs to route calls to, so in this context that’s what we’re interested in, but keep in mind there are other types out there,
Example ENUM query against a phone number showing other types of services (Email & Web)
The Order simply defines the order in which the rules are to be parsed. Lower numbers are processed first, if no matches then the next lowest, and so on until the highest number is reached.
The Pref is the processing preference. For load balancing 50/50 between two sites say a Melbourne and Sydney site, we’d return two results, with the same Order, and the same Pref, would see traffic split 50/50 between the two sites. We could split this further, a Pref value of 10 for Melbourne, 10 for Sydney, 5 for Brisbane and 5 for Perth would see 33% of calls route to Melbourne, 33% of calls route to Sydney, 16.5% of calls route to Brisbane and 16.5% of calls route to Perth. This is because we’d have a total preference value of 30, and the individual preference for each entry would work out as the fraction of the total (ie Pref 10 out of 30 = 10/30 or 33.3%).
The Flags denote the type of record we’re going to get, for most ENUM traffic this is going to be set to U, to denote a SIP URI with Regex.
The regexp field contains our SIP URI in the form of a Regular expression, which can include pattern matching and replacement. This is most commonly used to fill in the phone number into the SIP URI, for example instead of hardcoding the phone number into the response, we could use a Regular expression to fill in the requested number into the SIP URI.
If you’re looking to implement ENUM for an internal network, great, I’ll have some more posts here over the next few weeks covering off configuration of a DNS server to support ENUM lookups, and using Kamailio to lookup ENUM routes.
In terms of public ENUM, while many carriers are using ENUM inside their networks, public adoption of ENUM in most markets has been slow, for a number of reasons.
Many incumbent operators have been reluctant to embrace public ENUM as their role as an operator would be relegated to that of a Domain registrar. Additionally, there’s real security risks involved in moving to ENUM – opening your phone system up to the world to accept inbound calls from anywhere. This could lead to DOS-style attacks of flooding phone numbers with automatically generated traffic, privacy risks and even less validation in terms of caller ID trust.
RIPE maintains the EnumData.org website listing the status of ENUM for each country / region.
SIP routing is complicated, there’s edge cases, traffic that can be switched locally and other traffic that needs to be proxied off to another Proxy or Application server. How can you define these rules and logic in a flexible way, that allows these rules to be distributed out to multiple different network elements and adjusted on a per-subscriber basis?
Enter iFCs – The Initial Filter Criteria.
iFCs are XML encoded rules to define which servers should handle traffic matching a set of rules.
Let’s look at some example rules we might want to handle through iFCs:
Send all SIP NOTIFY, SUBSCRIBE and PUBLISH requests to a presence server
Any Mobile Originated SMS to an SMSc
Calls to a specific destination to a MGC
Route any SIP INVITE requests with video codecs present to a VC bridge
Send calls to Subscribers who aren’t registered to a Voicemail server
Use 3rd party registration to alert a server that a Subscriber has registered
All of these can be defined and executed through iFCs, so let’s take a look,
iFC Structure
iFCs are encoded in XML and typically contained in the Cx-user-data AVP presented in a Cx Server Assignment Answer response.
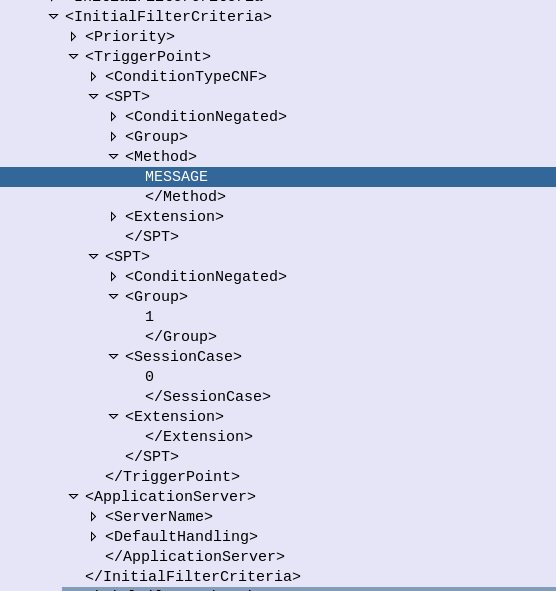
Let’s take a look at an example iFC and then break down the details as to what we’re specifying.
Each rule in an iFC is made up of a Priority, TriggerPoint and ApplicationServer.
So for starters we’ll look at the Priority tag. The Priority tag allows us to have multiple-tiers of priority and multiple levels of matching, For example if we had traffic matching the conditions outlined in this rule (TriggerPoint) but also matching another rule with a lower priority, the lower priority rule would take precedence.
Inside our <TriggerPoint> tag contains the specifics of the rules and how the rules will be joined / matched, which is what we’ll focus on predominantly, and is followed by the <ApplicationServer> which is where we will route the traffic to if the TriggerPoint is matched / triggered.
So let’s look a bit more about what’s going on inside the TriggerPoint.
Each TriggerPoint is made up of Service Point Trigger (SPTs) which are individual rules that are matched or not matched, that are either combined as logical AND or logical OR statements when evaluated.
By using fairly simple building blocks of SPTs we can create a complex set of rules by joining them together.
Service Point Triggers (SPTs)
Let’s take a closer look at what goes on in an SPT. Below is a simple SPT that will match all SIP requests using the SIP MESSAGE method request type:
So as you may have guessed, the <Method> tag inside the SPT defines what SIP request method we’re going to match.
But Method is only one example of the matching mechanism we can use, but we can also match on other attributes, such as Request URI, SIP Header, Session Case (Mobile Originated vs Mobile Terminated) and Session Description such as SDP.
Or an example of a SPT for anything Originating from the Subscriber utilizing the <SessionCase> tag inside the SPT.
Having <Header> will match if the header is present, while the optional Content tag can be used to match
In terms of the Content this is matched using Regular Expressions, but in this case, not so regular regular expressions. 3GPP selected Extended Regular Expressions (ERE) to be used (IEEE POSIX) which are similar to the de facto standard PCRE Regex, but with a few fewer parameters.
Condition Negated
The <ConditionNegated> tag inside the SPT allows us to do an inverse match.
In short it will match anything other than what is specified in the SPT.
For example if we wanted to match any SIP Methods other than MESSAGE, setting <ConditionNegated>1</ConditionNegated> would do just that, as shown below:
Finally the <Group> tag allows us to group together a group of rules for the purpose of evaluating. We’ll go into it more in in the below section.
ConditionTypeCNF / ConditionTypeDNF
As we touched on earlier, <TriggerPoints> contain all the SPTs, but also, very importantly, specify how they will be interpreted.
SPTs can be joined in AND or OR conditions.
For some scenarios we may want to match where METHOD is MESSAGE and RequestURI is sip:[email protected], which is different to matching where the METHOD is MESSAGE or RequestURI is sip:[email protected].
This behaviour is set by the presence of one of the ConditionTypeCNF (Conjunctive Normal Form) or ConditionTypeDNF (Disjunctive Normal Form) tags.
If each SPT has a unique number in the GroupTag and ConditionTypeCNF is set then we evaluate as AND.
If each SPT has a unique number in the GroupTag and ConditionTypeDNF is set then we evaluate as OR.
Let’s look at how the below rule is evaluated as AND as ConditionTypeCNF is set:
This means we will match if the method is MESSAGE and Session Case is 0 (Mobile Originated) as each SPT is in a different Group which leads to “and” behaviour.
If we were to flip to ConditionTypeDNF each of the SPTs are evaluated as OR.
If you’re building IMS Networks, the AMR config is a must, but FreeSWITCH does not ship with AMR due to licencing constraints, but has all the hard work done, you just need to add the headers for AMR support and compile.
LibOpenCore has support for AMR which we build, and then with a few minor tweaks to copy the C++ header files over to the FreeSWITCH source directory, and enable support in modules.conf.
Then when building FreeSWITCH you’ve got the AMR Codec to enable you to manage IMS / VoLTE media streams from mobile devices.
Instead of copying and pasting a list of commands to do this, I’ve published a Dockerfile here you can use to build a Docker image, or on a straight Debian Buster machine if you’re working on VMs or Bare Metal if you run the commands from the Dockerfile on the VM / bare metal.
Since the beginning of time, SIP has used the 2xx responses to confirm all went OK.
If you thought sending an SMS in a VoLTE/IMS network would see a 2xx OK response and then that’s the end of it, you’d be wrong.
So let’s take a look into sending SMS over VoLTE/IMS networks!
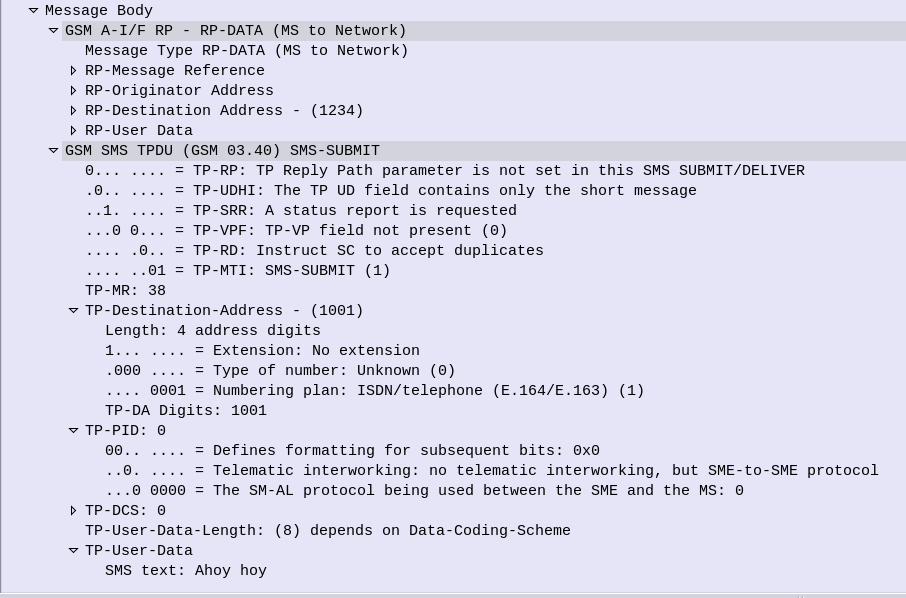
So our story starts with the Subscriber sending an SMS, which generate a SIP MESSAGE.
The Content-Type of this SIP MESSAGE is set to application/vnd.3gpp.sms rather than Text, and that’s because SMS over IMS uses the Short Message Transfer Protocol (SM-TP) inherited from GSM.
The Short Message Transfer Protocol (SM-TP) (Not related to Simple Message Transfer Protocol used in Email clients) is made up of Transfer Protocol Data Units (TPDU) that contain our message information, even though we have the Destination in our SIP headers, it’s again defined in the SM-TP body.
At first this may seem like a bit of duplication, but this allows older SMS Switching Centers (SMSc) to add support for IMS networks without any major changes, just what the SM-TP payload is wrapped up in changes.
SIP MESSAGE Request Body encoded in SM-TP
So back to our SIP MESSAGE request, typed out by the Subscriber, the UE sends this a SIP MESSAGE onto our IMS Network.
The IMS network follows it’s IFCs and routing rules, and makes it to the termination points for SMS traffic – the SMSc.
The SMSc sends back either a 200 OK or a 202 Accepted, and you’d think that’s the end of it, but no.
Our Subscriber still sees “Sending” on the screen, and the SMS is not shown as sent yet.
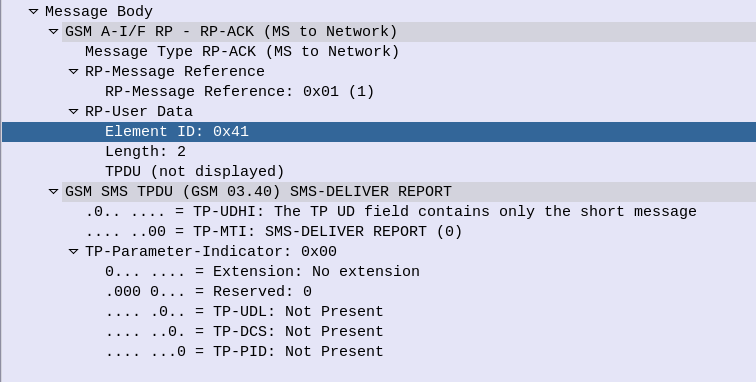
Instead, when the SMS has been delivered or buffered, relayed, etc, the SMSc generates a new SIP request, (as in new Call-ID / Dialog) with the request type MESSAGE, addressed to the Subscriber.
The payload of this request is another application/vnd.3gpp.sms encoded request body, again, containing SM-TP encoded data.
When the UE receives this, it will then consider the message delivered.
SM-TP encoded Delivery Report
Of course things change slightly when delivery reports are enabled, but that’s another story!
So a problem had arisen, carriers wanted to change certain carrier related settings on devices (Specifically the Carrier Config Manager) in the Android ecosystem. The Android maintainers didn’t want to open the permissions to change these settings to everyone, only the carrier providing service to that device.
And if you purchased a phone from Carrier A, and moved to Carrier B, how do you manage the permissions for Carrier B’s app and then restrict Carrier A’s app?
The carrier loads a certificate onto the SIM Cards, and signing Android Apps with this certificate, allowing the Android OS to verify the certificate on the card and the App are known to each other, and thus the carrier issuing the SIM card also issued the app, and presto, the permissions are granted to the app.
Carriers have full control of the UICC, so this mechanism provides a secure and flexible way to manage apps from the mobile network operator (MNO) hosted on generic app distribution channels (such as Google Play) while retaining special privileges on devices and without the need to sign apps with the per-device platform certificate or preinstall as a system app.
These posts focus on the use of Diameter and SIP in an IMS / VoLTE context, however these practices can be equally applied to other networks.
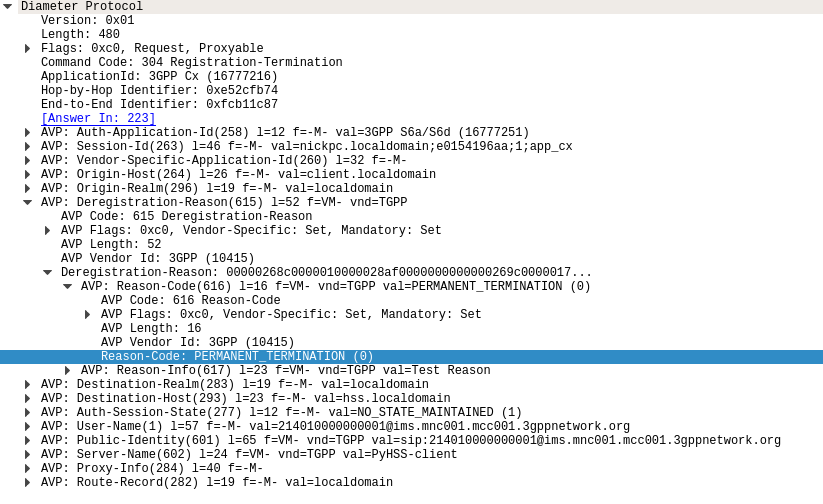
The Registration-Termination Request / Answer allow a Diameter Client (S-CSCF) to indicate to the HSS (Diameter Server) that it is no longer serving that user and the registration has been terminated.
Basics:
The RFC’s definition is actually pretty succinct as to the function of the Server-Assignment Request/Answer:
The Registration-Termination-Request is sent by a Diameter Multimedia server to a Diameter Multimedia client in order to request the de-registration of a user.
Reference: TS 29.229
The Registration-Termination-Request commands are sent by a S-CSCF to indicate to the Diameter server that it is no longer serving a specific subscriber, and therefore this subscriber is now unregistered.
There are a variety of reasons for this, such as PERMANENT_TERMINATION, NEW_SIP_SERVER_ASSIGNED and SIP_SERVER_CHANGE.
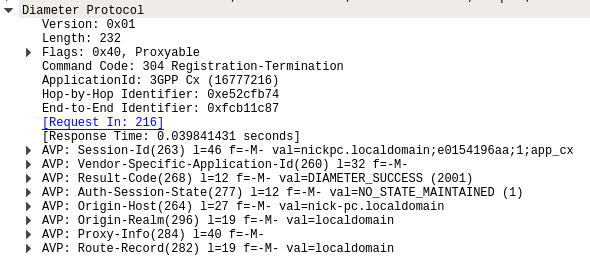
The Diameter Server (HSS) will typically send the Diameter Client (S-CSCF) a Registration-Termination-Answer in response to indicate it has updated it’s internal database and will no longer consider the user to be registered at that S-CSCF.
Packet Capture
I’ve included a packet capture of these Diameter Commands from my lab network which you can find below.
These posts focus on the use of Diameter and SIP in an IMS / VoLTE context, however these practices can be equally applied to other networks.
The Diameter User-Authorization-Request and User-Authorization-Answer commands are used as the first line of authorization of a user and to determine which Serving-CSCF to forward a request to.
Basics
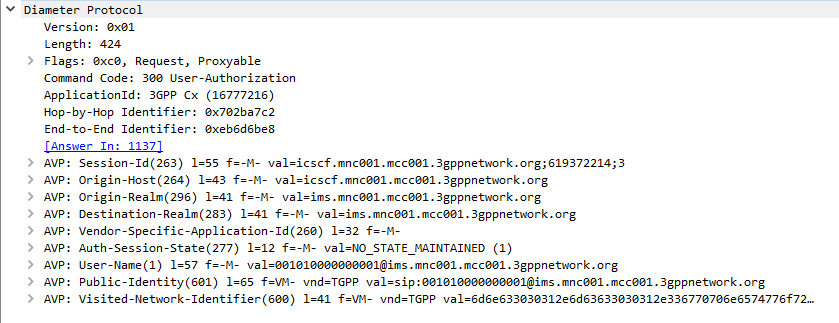
When a SIP Proxy (I-CSCF) receives an incoming SIP REGISTER request, it sends a User-Authorization-Request to a Diameter server to confirm if the user exists on the network, and which S-CSCF to forward the request to.
When the Diameter server receives the User-Authorization-Request it looks at the User-Name (1) AVP to determine if the Domain / Realm is served by the Diameter server and the User specified exists.
Assuming the user & domain are valid, the Diameter server sends back a User-Authorization-Answer, containing a Server-Capabilities (603) AVP with the Server-Name of the S-CSCF the user will be served by.
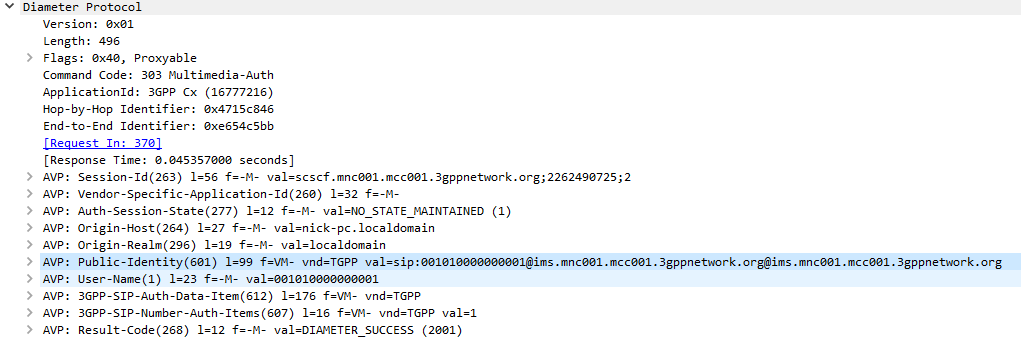
I always find looking at the packets puts everything in context, so here’s a packet capture of both the User-Authorization-Request and the User-Authorization-Answer.
Wireshark display of User-Authorization-Request packet
Wireshark display of User-Authorization-Answer packet
First Registration
If this is the first time this Username / Domain combination (Referred to in the RFC as an AOR – Address of Record) is seen by the Diameter server in the User-Authorization-Request it will allocate a S-CSCF address for the subscriber to use from it’s pool / internal logic.
The Diameter server will store the S-CSCF it allocated to that Username / Domain combination (AoR) for subsequent requests to ensure they’re routed to the same S-CSCF.
The Diameter server indicates this is the first time it’s seen it by adding the DIAMETER_FIRST_REGISTRATION (2001) AVP to the User-Authorization-Answer.
Subsequent Registration
If the Diameter server receives another User-Authorization-Request for the same Username / Domain (AoR) it has served before, the Diameter server returns the same S-CSCF address as it did in the first User-Authorization-Answer.
It indicates this is a subsequent registration in much the same way the first registration is indicated, by adding an DIAMETER_SUBSEQUENT_REGISTRATION (2002) AVP to the User-Authorization-Answer.
User-Authorization-Type (623) AVP
An optional User-Authorization-Type (623) AVP is available to indicate the reason for the User-Authorization-Request. The possible values / reasons are:
Creating / Updating / Renewing a SIP Registration (REGISTRATION (0))
Establishing Server Capabilities & Registering (CAPABILITIES (2))
Terminating a SIP Registration (DEREGISTRATION (1))
If the User-Authorization-Type is set to DEREGISTRATION (1) then the Diameter server returns the S-CSCF address in the User-Authorization-Answer and then removes the S-SCSF address it had associated with the AoR from it’s own records.
These posts focus on the use of Diameter and SIP in an IMS / VoLTE context, however these practices can be equally applied to other networks.
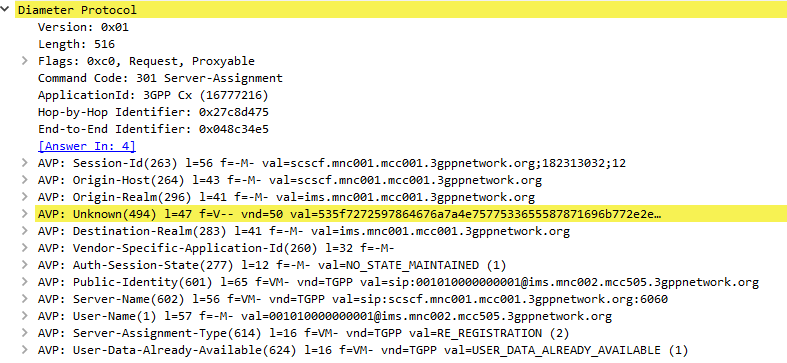
The Server-Assignment-Request/Answer commands are used so a SIP Server can indicate to a Diameter server that it is serving a subscriber and pull the profile information of the subscriber.
Basics:
The RFC’s definition is actually pretty succinct as to the function of the Server-Assignment Request/Answer:
The main functions of the Diameter SAR command are to inform the Diameter server of the URI of the SIP server allocated to the user, and to store or clear it from the Diameter server.
Additionally, the Diameter client can request to download the user profile or part of it.
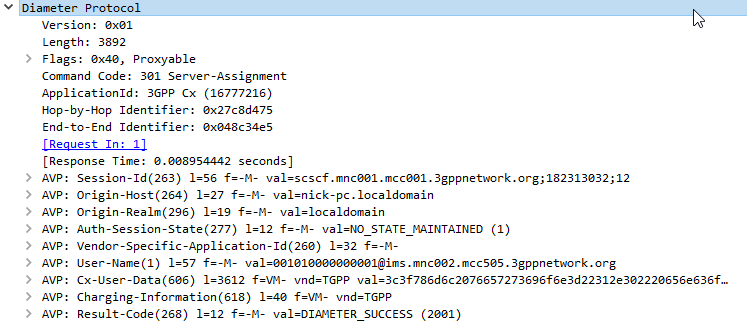
The Server-Assignment-Request/Answer commands are sent by a S-CSCF to indicate to the Diameter server that it is now serving a specific subscriber, (This information can then be queried using the Location-Info-Request commands) and get the subscriber’s profile, which contains the details and identities of the subscriber.
Typically upon completion of a successful SIP REGISTER dialog (Multimedia-Authentication Request), the SIP Server (S-CSCF) sends the Diameter server a Server-Assignment-Request containing the SIP Username / Domain (referred to as an Address on Record (SIP-AOR) in the RFC) and the SIP Server (S-CSCF)’s SIP-Server-URI.
The Diameter server looks at the SIP-AOR and ensures there are not currently any active SIP-Server-URIs associated with that AoR. If there are not any currently active it then stores the SIP-AOR and the SIP-Server-URI of the SIP Server (S-CSCF) serving that user & sends back a Server-Assignment-Answer.
For most request the Subscriber’s profile is also transfered to the S-SCSF in the Server-Assignment-Answer command.
SIP-Server-Assignment-Type AVP
The same Server-Assignment-Request command can be used to register, re-register, remove registration bindings and pull the user profile, through the information in the SIP-Server-Assignment-Type AVP (375),
Common values are:
NO_ASSIGNMENT (0) – Used to pull just the user profile
The Cx-User-Data profile contains the subscriber’s profile from the Diameter server in an XML formatted dataset, that is contained as part of the Server-Assignment-Answer in the Cx-User-Data AVP (606).
The profile his tells the S-CSCF what services are offered to the subscriber, such as the allowed SIP Methods (ie INVITE, MESSAGE, etc), and how to handle calls to the user when the user is not registered (ie send calls to voicemail if the user is not there).
There’s a lot to cover on the user profile which we’ll touch on in a later post.
These posts focus on the use of Diameter and SIP in an IMS / VoLTE context, however these practices can be equally applied to other networks.
The Location-Information-Request/Answer commands are used so a SIP Server query a Diameter to find which P-CSCF a Subscriber is being served by
Basics:
The RFC’s definition is actually pretty succinct as to the function of the Server-Assignment Request/Answer:
The Location-Info-Request is sent by a Diameter Multimedia client to a Diameter Multimedia server in order to request name of the server that is currently serving the user.Reference: 29.229-
The Location-Info-Request is sent by a Diameter Multimedia client to a Diameter Multimedia server in order to request name of the server that is currently serving the user.
Reference: TS 29.229
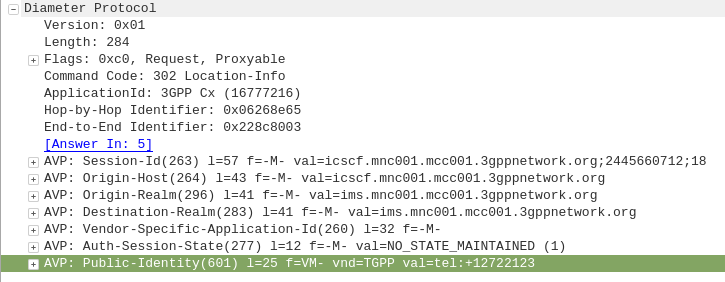
The Location-Info-Request commands is sent by an I-CSCF to the HSS to find out from the Diameter server the FQDN of the S-CSCF serving that user.
The Public-Identity AVP (601) contains the Public Identity of the user being sought.
Here you can see the I-CSCF querying the HSS via Diameter to find the S-CSCF for public identity 12722123
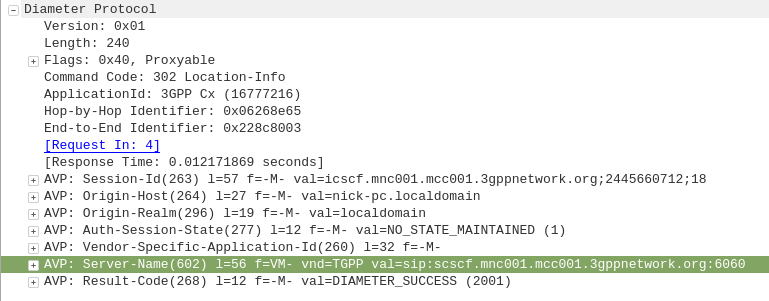
The Diameter server sends back the Location-Info-Response containing the Server-Name AVP (602) with the FQDN of the S-CSCF.
Packet Capture
I’ve included a packet capture of these Diameter Commands from my lab network which you can find below.
These posts focus on the use of Diameter and SIP in an IMS / VoLTE context, however these practices can be equally applied to other networks.
The Multimedia-Authentication-Request/Answer commands are used to Authenticate subscribers / UAs using a variety of mechanisms such as straight MD5 and AKAv1-MD5.
Basics:
When a SIP Server (S-CSCF) receives a SIP INVITE, SIP REGISTER or any other SIP request, it needs a way to Authenticate the Subscriber / UA who sent the request.
We’ve already looked at the Diameter User-Authorization-Request/Answer commands used to Authorize a user for access, but the Multimedia-Authentication-Request / Multimedia-Authentication-Answer it used to authenticate the user.
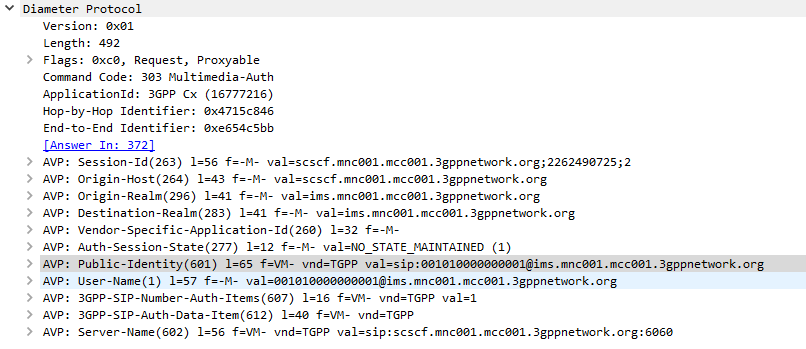
The SIP Server (S-CSCF) sends a Multimedia-Authentication-Request to the Diameter server, containing the Username of the user attempting to authenticate and their Public Identity.
The Diameter server generates “Authentication Vectors” – these are Precomputed cryptographic challenges to challenge the user, and the correct (“expected”) responses to the challenges. The Diameter puts these Authentication Vectors in the 3GPP-SIP-Auth-Data (612) AVP, and sends them back to the SIP server in the Multimedia-Authentication-Answer command.
The SIP server sends the Subscriber / UA a SIP 401 Unauthorized response to the initial request, containing a WWW-Authenticate header containing the challenges.
SIP 401 Response with WWW-Authenticate header populated with values from Multimedia-Auth-Answer
The Subscriber / UA sends back the initial request with the WWW-Authenticate header populated to include a response to the challenges. If the response to the challenge matches the correct (“expected”) response, then the user is authenticated.
Multimedia-Authentication-Request
Multimedia-Authentication-Answer
I always find it much easier to understand what’s going on through a packet capture, so here’s a packet capture showing the two Diameter commands,
Note: There is a variant of this process allows for stateless proxies to handle this by not storing the expected authentication values sent by the Diameter server on the SIP Proxy, but instead sending the received authentication values sent by the Subscriber/UA to the Diameter server to compare against the expected / correct values.
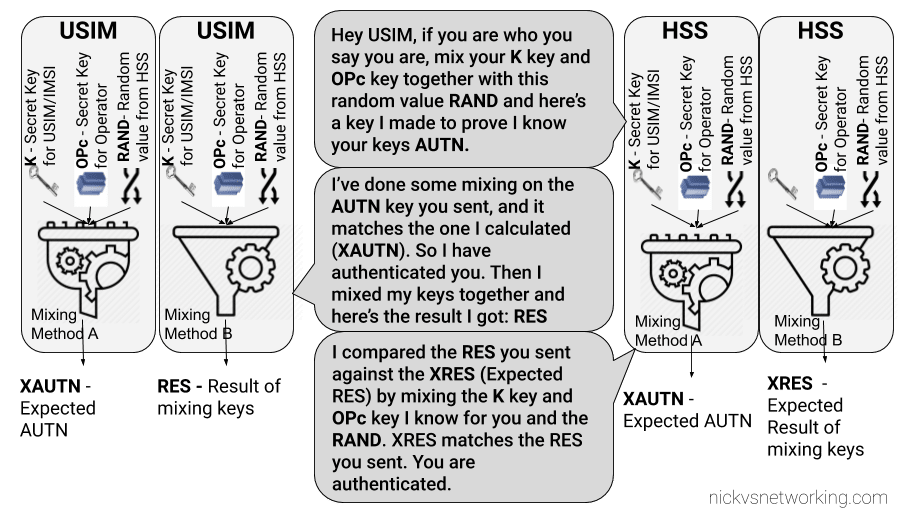
The Cryptography
The Cryptography for IMS Authentication relies on AKAv1-MD5 which I’ve written about before,
Essentially it’s mutual network authentication, meaning the network authenticates the subscriber, but the subscriber also authenticates the network.
One nifty feature of this interface is that you can send SMS using the MSC to switch the SMS traffic and the LTE/EUTRAN to transfer the messaging.
This means you don’t need Circuit Switched Fallback to send or receive SMS on LTE.
I assume this functionality was added to avoid the signalling load of constantly changing RAN technologies each time a subscriber sent or received an SMS, but I couldn’t find much about it’s history.
In order to get this to work you’ll essentially need the exact same setup I outlined in my CSFB example (Osmo-MSC, Osmo-STP, Osmo-HLR populated with the IMSI and MSISDN values you want to use for SMS), although you won’t actually need a GERAN / GSM radio network.
Once that’s in place you can just send SMS between subscribers,
Plus from the VTY terminal of OsmoMSC you can send SMS too:
So we’ve got a functional network, but let’s dive deeper into what we can do to connect it with other networks and how things work in “the real world”.
Media Handling – OsmoMGW
The Audio/Voice (media stream) data on a call between subscribers does not go directly between the subscribers and instead needs to be proxed relayed. The reason for this is because there’s no direct link from one BTS to another BTS (even if they are served by the same BSC) and as our subscribers can move from cell to cell while on a call – which may mean moving from one BSC to another depending on where they’re heading – we need to have a single point for the audio to remain.
To handle this a Media Gateway is used, a single point for call audio to be “anchored” – meaning regardless of which BTS/BSC is serving the subscribers on either end of the call, the media will be sent by both parties to a single destination (The Media Gateway), and that destination will send the audio to the other party.
The Media gateway relays / proxies the Media Stream – the RTP packets containing the call audio. OsmoMSC provides the SDP payload containing the codecs and RTP details for the session via MGCP (Media Gateway Control Protocol) to the OsmoMGW which relays the audio.
In terms of running osmo-mgw we installed it earlier,
The only parameter you really need to change is the rtp bind-ip,
On the MGW you can also limit and restrict the codecs supported and also allow or disallow transcoding.
MNCC-SAP & Call Routing
In it’s default mode, the OsmoMSC will look at the destination a call is being sent to, and if the destination is a subscriber on the network (in it’s VLR), will route the call to that subscriber
This on-net only mode is great but it puts our network on an island – cut off from the outside world.
Calls between MSCs, to the PSTN and users everywhere else are not possible in this scenario.
3GPP defined “MNCC-SAP” (Mobile Network Call Control – Service Access Point) a protocol for handling calls to/from destinations outside of the local MSC.
When in MNCC-SAP mode all calls (even on-net calls between subscribers on the same MSC) are routed to the external MNCC-SAP, and left up to it to determine how to route the call.
Configuring Osmo-MSC to talk MNCC
As we just covered by default Osmo-MSC only switches calls internally between subscribers, so we’ll need to turn off this behaviour and isntead reconfigure it to talk MNCC-SAP.
To do this we’ll telnet / VTY into Osmo-MSC;
root@gsm-bts:/etc/osmocom# telnet localhost 4254
Welcome to the OsmoMSC VTY interface
OsmoMSC - Osmocom Circuit-Switched Core Network implementation
OsmoMSC> enable
OsmoMSC# configure terminal
OsmoMSC(config)# msc
OsmoMSC(config-msc)# mncc external /tmp/msc_mncc
OsmoMSC(config-msc)# end
OsmoMSC# cop run st
Configuration saved to /etc/osmocom/osmo-msc.cfg
After making this change we have to restart OsmoMSC;
systemctl restart osmo-msc
Now OsmoMSC will not switch calls locally, but instead when a mobile originated call comes to the MSC, it will signal to the external MNCC via the file sock at /tmp/msc_mncc,
MNCC-SAP sounds great but platform X only speaks SIP
Enter the Osmo-SIP-Connector, which takes the MNCC-SAP messages and converts them to SIP.
From here you can tie the call control functions of the MNC into any SIP software such as Kamailio, FreeSwitch, Asterisk, etc, to handle call routing, number translation, application services like voicemail and conferencing, etc, etc.
On my to-do list is to make a call between one subscriber on GSM and one on VoLTE, I’ll cover that in a subsequent post.
So anywho, let’s get Osmo-SIP-Connector setup, I’m running it on the same box as the MSC on 10.0.1.201, My softphone client is running on 10.0.1.252
root@gsm-bts:/etc/osmocom# apt-get install osmo-sip-connector
root@gsm-bts:/etc/osmocom# telnet localhost 4256
Welcome to the OsmoSIPcon VTY interface
OsmoSIPcon> enable
OsmoSIPcon# configure t
OsmoSIPcon(config)# mncc
OsmoSIPcon(config-mncc)# socket-path /tmp/msc_mncc
OsmoSIPcon(config-mncc)# exit
OsmoSIPcon(config)# sip
OsmoSIPcon(config-sip)# local 10.0.1.201 5060
OsmoSIPcon(config-sip)# remote 10.0.1.252 5060
OsmoSIPcon(config-sip)# end
OsmoSIPcon# cop run st
Configuration saved to /etc/osmocom/osmo-sip-connector.cfg
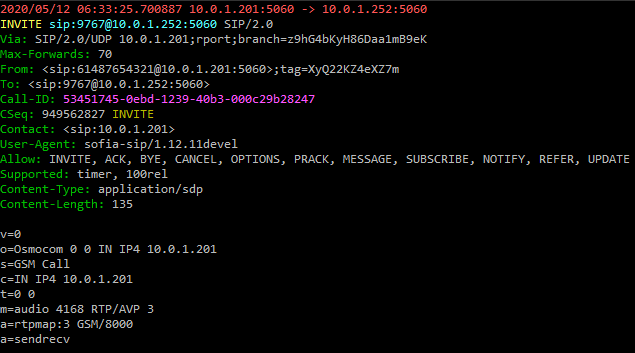
Now any Mobile Originated calls will result in a SIP INVITE being sent to 10.0.1.252 port 5060 (using UDP).
Any SIP INVITES where the request URI is a valid MSISDN @ 10.0.1.201 from 10.0.1.252 will be routed to the correct subscriber for that MSISDN.
A small note – The GSM codec is (unsurprisingly) used as the codec for GSM calls by default.
Some handsets support different codecs, but many off-the-shelf IP phones don’t include GSM support, so you may find you’re required to transcode between codecs if there is no support for the other codecs.
So now we’re able to define our call routing logic in something that speaks SIP and connect calls between multiple MSCs, VoLTE / IMS networks and fixed networks, all based on what we do with the SIP.
Local Call, Local Switch
If two subscribers on the same BSC call each other, the RTP / call audio will route to the MGW where it’s anchored.
This makes sense from a mobility standpoint, but adds load to the MGW and relies on a quality A interface connection, which may be an issue depending on what backhaul options you have.
Local Call, Local Switch is a 3GPP spec to allow the RTP / call audio to act as the RTP proxy instead of the MGW.
So now we’ve covered the basics of what’s involved let’s get some traffic on our network.
For starters we’ll need to start each of our network elements and bring up whichever BTS hardware we’re using.
In order for our calls to have audio, we’ll need to set a parameter on the Media Gateway. We’ll cover the Media Gateway in more detail down the line, but there’s one value in the MGW we’ll need to set in order to have calls working, and that’s the rtp bind-ip value. You can either set it in the config file or via VTY/Telnet on port 4243.
We’ve talked about using systemctl to start all the services, but there’s a script in the /etc/osmocom directory called osmocom-all.sh which starts all the network elements for us.
Once you’ve got all the services started I’d suggest hopping onto the OsmoBSC and enabling all the logging you can, then connecting / starting your BTS.
You should see the Abis over IP connection & OML link come up as the BTS connects to the BSC.
And then, hold your breath, power up a phone and search for networks.
All going well you’ll see OsmoMSC in the network search, select it and you should see log data flying by as the phone (“terminal”) connects to the network.
Assuming you configured the IMSI of the SIM on the HLR you should be connected to the network and showing bars on the phone.
You can check your phone number (MSISDN) by dialling the USSD code *#100#
But it’s not a network with just one phone connected, connect a second phone, check it’s phone number the same way and call from one to the other.
SMS should also just work.
And there you have it, a functional GSM network!
But this isn’t the end for us, it’s really just the beginning.
There’s still so much more to learn and work on – Over the next few weeks / months we’ll add packet data to the network with GPRS or EDGE, connect into external call routing and SMS routing interfaces, use Circuit Switched Fallback to provide voice service to users on LTE networks and roam between them.