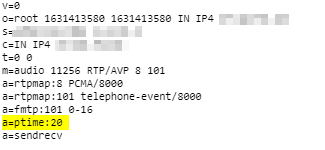
ptime is the packetization timer in VoIP, it’s set in the SDP message and defines the length of each RTP packet that’s sent;
This gives the length of time in milliseconds represented by the media in a packet. This is probably only meaningful for audio data, but may be used with other media types if it makes sense. It should not be necessary to know ptime to decode RTP or vat audio, and it is intended as a recommendation for the encoding/packetisation of audio. It is a media-level attribute, and it is not dependent on charset.
A lower ptime value leads to more packet per second, while longer ptime leads to fewer packets per second.
In a Toll Quality (TDM) network 8000 samples per second are taken, this is reflected in PCM (Pulse Code Modulation) encoding of the data, see in PCMA / G.711 a-law for example.
But if each of these 8,000 samples per second were sent on an individual packet, we’d be seeing a huge number of tiny RTP packets where the header is a lot larger than the payload.
Instead endpoints generally wait until they’ve got a certain number of theses samples and then send them at once, every X milliseconds as defined by the ptime value.
A ptime of 1000ms would mean 1 packet per second.
A ptime of 20ms would mean 50 packets per second.
A ptime of 50ms would mean 20 packets per second.
ptime headaches
Some VoIP endpoints have issues with varied ptime (*cough Cisco SPA series cough*), and if you’re interconnecting with other carrier networks you have no real control as to what ptime endpoints use (except if you have a B2Bua that can resample / restuff the packets, or you use maxptime which really just limits more than fixes) so it’s worth understanding well.
International carrier trunks often have higher ptime values as they're often dealing with lower quality links, so they want to cut down the packets per second and often have jitter buffers in place to compensate for poor quality links.
RFC4566 (the second version of SDP) introduced the maxptime value.
This optional header in the SDP body allows an endpoint to specify the maximum ptime value it supports.
Older endpoints often don’t have much memory or processing power, so have very small buffers to store the received audio in before playing it to the user, and store the audio to be transmitted before sending it down the wire.
Mismatched ptime or a ptime that’s out of bounds for one endpoint can lead to some strange issues. Often an endpoint will ring, answer the call and even get a 200 OK, but immediately followed by a BYE from the incompatible end instead of an ACK.
In the initial INVITE ptime is not mandatory, meaning you may not know the caller has limits to the ptime values they can support, and the endpoint hangs up the calls straight after the 200 OK.
Identifying these issues may take some time, but here’s some good places to look:
SDP ptime value on INVITE and 200 OK
Time between RTP packets
Timestamp difference between RTP packets
Although it seems pretty self evident, if your endpoint only supports up to 20ms ptime, set the maxptime header to 20ms. You’d be surprised how often this isn’t the case.
One of the most searched keywords that leads to this site is Kamailio vs Asterisk, so I thought I’d expand upon this a bit more as I’m a big fan of both, and it’s somewhat confusing.
(Almost everything in this post I talk about on Asterisk is roughly true for FreeSWITCH as well, although FS is generally more stable and scalable than Asterisk. )
Asterisk
Asterisk is a collection of PBX / softswitch components that you can configure and put together to create a large number of different products with the use of config files and modules.
Asterisk can read and write the RTP media stream, allowing it to offer services like Voicemail, B2B-UA, Conferencing, Playing back audio, call recording, etc.
It’s easy to learn and clear to understand how it handles “calls”.
Kamailio
Kamailio is a SIP proxy, from which you can modify SIP headers and then forward them on or process them and generate a response.
Kamailio is unable to do manipulate the RTP media stream. It can’t listen to, modify or add to the call audio, it only cares about SIP and not the media stream. This means it can’t playback an audio file, record a call or serve voicemail.
Kamailio has a bit of a steep learning curve, which I’ve tried to cover in my Kamailio 101 series, but even so, Kamailio doesn’t understand the concept of a “call”, it deals in Sessions, as in SIP, and everything you want to do, you have to write into Kamailio’s logic. Awesome power but a lot to take in.
Note – RTPengine is growing in capabilities and integrates beautifully into Kamailio, so for some applications you may be able to use RTPengine for media handling.
Scale
Speed
Stability
Media Functions
Ease
Asterisk
X
X
Kamailio
X
X
X
Working Together
Asterisk has always had issues at scale. This is for a variety of reasons, but the most simplistic explanation is that Asterisk is fairly hefty software, and that each subscriber you add to the system consumes resources at a rate where once your system reaches a few hundred users you start to see issues with stability.
Kamailio works amazingly at scale, it’s architecture was designed with running at scale in mind, and it’s super lightweight footprint means the load on the box between handling 1,000 sessions and handling 100,000 sessions isn’t that much.
Because Asterisk has the feature set, and Kamailio has the scalability, so the the two can be used together really effectively. Let’s look at some examples of Asterisk and Kamailio working together:
Asterisk Clustering
You have a cluster of Asterisk based Voicemail servers, serving your softswitch environment. You can use a Kamailio instance to sit in front of them and route INVITEs evenly throughout the cluster of Asterisk instances.
You’d be using Asterisk’s VM functions (because Asterisk can do media functions) and Kamailio’s SIP routing functions.
You have a Kamailio based Softswitch that routes SIP traffic from customers to carriers, customers want a hosted Conference Bridge. You offer this by routing any SIP INVITES to the address of the conference bridge to an Asterisk server that serves as the conference bridge.
You’d be using Kamialio to route the SIP traffic and using Asterisk’s ability to be aware of the media stream and join several sources to offer the conference bridge.
Which should I use?
It all depends on what you need to do.
If you need to do anything with the audio stream you probably need to use something like Asterisk, FreeSwitch, YaTE, etc, as Kamailio can’t do anything with the audio stream.*
If it’s just signalling, both would generally be able to work, Asterisk would be easier to setup but Kamailio would be more scaleable / stable.
Asterisk is amazingly quick and versatile when it comes to solving problems, I can whip something together with Asterisk that’ll fix an immediate need in a faction of the time I can do the same thing in Kamailio.
On the other hand I can fix a problem with Kamailio that’ll scale to hundreds of thousands of users without an issue, and be lightning fast and rock solid.
Summary
Kamailio only deals with SIP signalling. It’s very fast, very solid, but if you need to do anything with the media stream like mixing, muxing or transcoding (RTP / audio) itself, Kamailio can’t help you.*
Asterisk is able to deal with the media stream, and offer a variety of services through it’s rich module ecosystem, but the trade-off is less stability and more resource intensive.
If you do require Asterisk functionality it’s worth looking into FreeSWITCH, although slightly harder to learn it’s generally regarded as superior in a lot of ways to Asterisk.
I don’t write much about Asterisk these days – the rest of the internet has that pretty well covered, but I regularly post about Kamailio and other facets of SIP.
I’m not a fan of Transcoding. It costs resources, often leads to reduced quality and adds latency.
Through some fancy SDP manipulating footwork we can often rejig the SDP order or limit the codecs we don’t support to cut down, or even remove entirely, the need for transcoding in the network.
There are no module parameters for SDP ops, we’ve just got to load the module with loadmodule “sdpops.so”
Use in Routing Logic
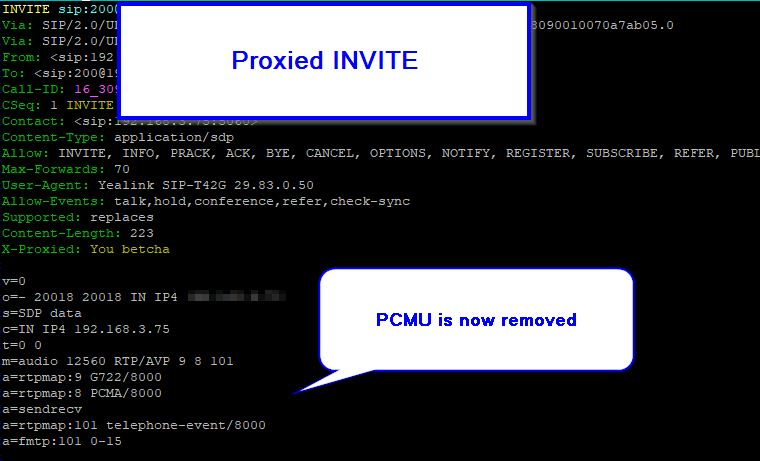
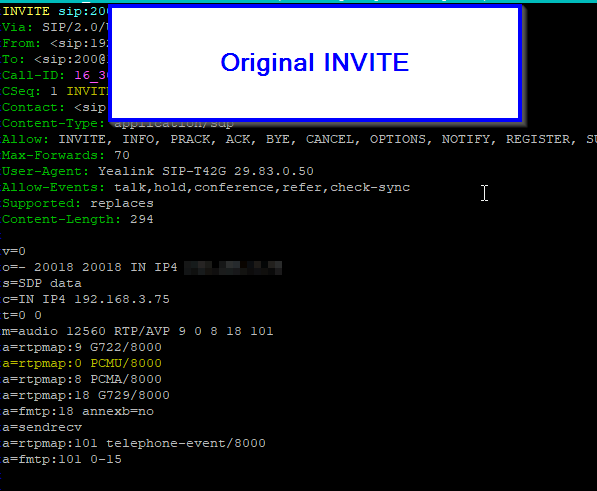
We’ll pickup where we left off on the Basic Stateless SIP Proxy use case (You can grab the basic code from that post), but this time we’ll remove PCMU (Aka G.711 μ-law) from the SDP body:
loadmodule "sdpops.so"
####### Routing Logic ########
/* Main SIP request routing logic
* - processing of any incoming SIP request starts with this route
* - note: this is the same as route { ... } */
request_route {
if(is_method("REGISTER")){
sl_reply("200", "Ok");
}
xlog("Received $rm to $ru - Forwarding");
append_hf("X-Proxied: You betcha\r\n");
#Remove PCMU (G.711 u-law) by it's SDP Payload ID
sdp_remove_codecs_by_id("0");
#Remove PCMU by name
sdp_remove_codecs_by_name("PCMU");
#Forard to new IP
forward("192.168.3.110");
}
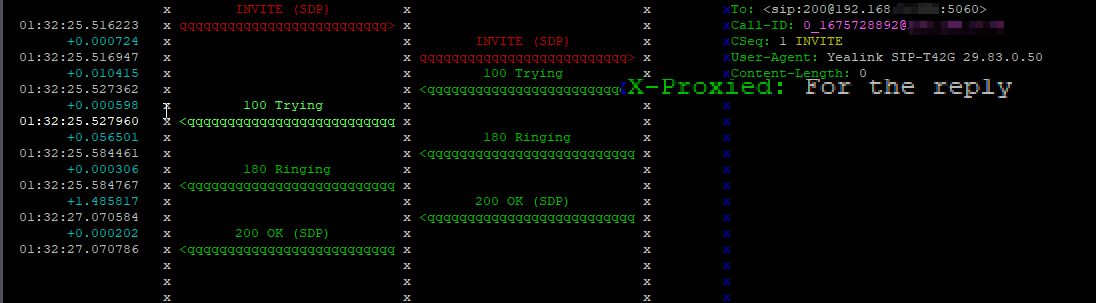
onreply_route{
xlog("Got a reply $rs");
append_hf("X-Proxied: For the reply\r\n");
}
We can remove the codec either by it’s name (PCMU) or by it’s payload ID.
Before traversing the ProxyAfter traversing the proxy
For removing it by name we just specify the name:
#Remove PCMU by name
sdp_remove_codecs_by_name("PCMU");
And by payload ID:
#Remove PCMU (G.711 u-law) by it's SDP Payload ID
sdp_remove_codecs_by_id("0");
We may want to remove all but one codec, again super simple:
That’s obviously a bit of a problem, as we build out our network we might have a series of load balancers that send traffic to a pool of Registrars, but according to RFC3261 this can’t be done, the SIP REGISTER request would need to go direct to one of these Registrars.
To get around this the SIP Path extensions, officially called “Session Initiation Protocol (SIP) Extension Header Field for Registering Non-Adjacent Contacts” (catchy title) was defined under RFC 3327.
An additional header is introduced called “Path:” for each proxy between the UA and the Registrar,
As the SIP REGISTER request passes through each proxy, each proxy appends the Path header with the value of it’s own SIP URI.
Let’s take a look at an example call flow from [email protected] who sends his REGISTER to atlanta.com, which is proxied by atlanta.com to registrar1.atlanta.com:
Bob to atlanta.com:
[email protected] > atlanta.com
      REGISTER sip:atlanta.com SIP/2.0
      Via: SIP/2.0/UDP 192.0.2.4:5060;branch=z9hG4bKnashds7
      To: Bob <sip:[email protected]>
      From: Bob <sip:[email protected]>;tag=456248
      Call-ID: 843817637684230@998sdasdh09
      CSeq: 1826 REGISTER
      Contact: <Bob <sip:[email protected]>>
      Supported: path
The REGISTER request is received by atlanta.com, which forwards it to registrar1.atlanta.com after adding it’s own URI as a Path header.
A seemingly simple question is how many concurrent calls can a system handle.
Sadly the answer to that question is seldom simple and easy to say, even more so when we talk about transcoding.
Transcoding is the process of taking a media stream encoded in one codec (format) and transferring it to a different codec (hence trans-coding).
This can be a very resource intensive process, so there’s a large number of hardware based solutions (PCI cards / network devices) that use FGPAs and clever processor arrangements to handle the transcoding. These products are made by a multitude of different vendors but are generally called hardware transcoders.
Today we’ll talk a bit about software based transcoding, and how many concurrent calls you can transcode on common VM configurations.
These stats will translate fairly well to their dedicated hardware counterparts, but a VM provides us with a consistent hardware environment so makes it a bit easier.
For these tests I created the baseline VM to run in VMWare Workstation with the below settings:
We’ll be transcoding using RTPengine, which recently added transcoding capabilities, so I set that up as per my post on setting up RTPengine for Transcoding.
Next I setup some SIPp scenarios to simulate call loads, from G.711 a-law to G.711 u-law (the simplest of transcoding (well re-compounding)) and used glances to get the max CPU usage and logged the results.
PCMA to PCMU (Re-companding)
PCMA to PCMU
RTPengine fared significantly better than I expected, I stopped at 150 concurrent transcoding sessions as that’s when call quality was really starting to degrade, but I was still achieving MOS of 4.3+ up to 130 concurrent sessions.
For what I needed to do, running this in a virtualised environment allowed 150 transcoding sessions before the MOS started to drop and call quality was adversely affected. Either way I was pretty amazed at how efficiently RTPengine managed to handle this.
Transcoding from one codec to a different codec was a different matter, and I’ll post the results from that another day.
We’ve talked a bit in the Kamailio Bytes series about different modules we can use, but I thought it’d be useful to talk about setting up a SIP Proxy using Kamailio, and what’s involved in routing a message from Host A to Host B.
When we talk about proxying for the most part we’re talking about forwarding, let’s look at the steps involved:
Our Kamailio instance receives a SIP request (for simplicity we’ll assume an INVITE).
Kamailio looks at it’s routing logic to lookup where to forward the request to. You could find out where to send the request to from a lot of different sources, you could consult the Dialplan Module or Dispatcher Module, perform an SQL lookup, consult UsrLoc table to find a AoR, etc.
Add it’s own Via header (more on that later)
Forward the Request (aka Proxy it) to the destination selected
Let’s take a look at a very simple way we can do this with two lines in Kamailio to forward any requests to 192.168.1.110:
####### Routing Logic ########


/* Main SIP request routing logic
 * - processing of any incoming SIP request starts with this route
 * - note: this is the same as route { ... } */
request_route {

        xlog("Received $rm to $ru - Forwarding");

        #Forard to new IP
        forward("192.168.1.110");

}
After we restart Kamailio and send a call (INVITE) to it let’s see how it handles it:
Let’s make a small modification, we’ll add a header called “X-Proxied” to the request before we forward it.
####### Routing Logic ########


/* Main SIP request routing logic
 * - processing of any incoming SIP request starts with this route
 * - note: this is the same as route { ... } */
request_route {

        xlog("Received $rm to $ru - Forwarding");

        append_hf("X-Proxied: You betcha\r\n");
        #Forard to new IP
        forward("192.168.1.110");

}
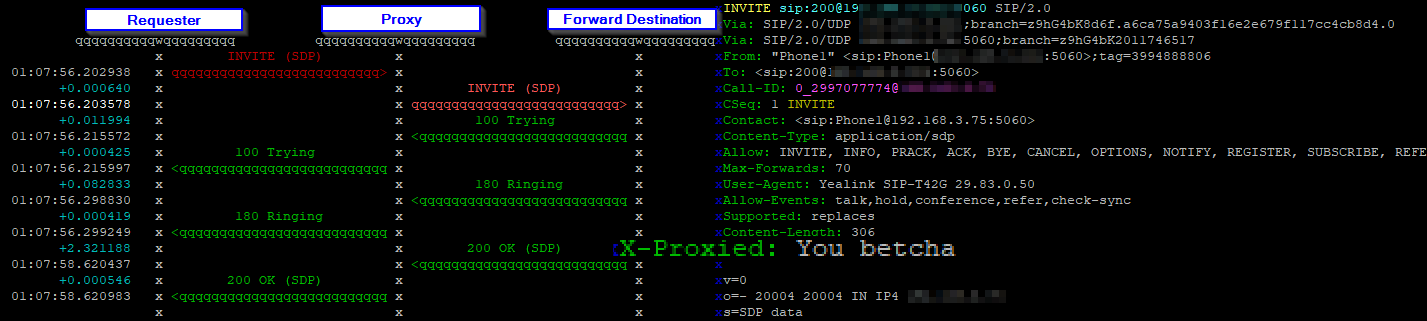
On the wire the packets still come from the requester, to the Proxy (Kamailio) before being forwarded to the forward destination (192.168.1.110):
We’ve now got a basic proxy that takes all requests to the proxy address and forwards it to an IP Address.
If you’re very perceptive you might have picked up the fact that the in-dialog responses, like the 100 Trying, the 180 Ringing and the 200 Ok also all went through the proxy, but if you look at syslog you’ll only see the initial request.
/usr/sbin/kamailio: Received INVITE to sip:[email protected]:5060 - Forwarding
So why didn’t we hit that xlog() route and generate a log entry for the replies?
But before we can talk too much about managing replies, let’s talk about Via…
It’s all about the Via
Before we can answer that question let’s take a look at Via headers.
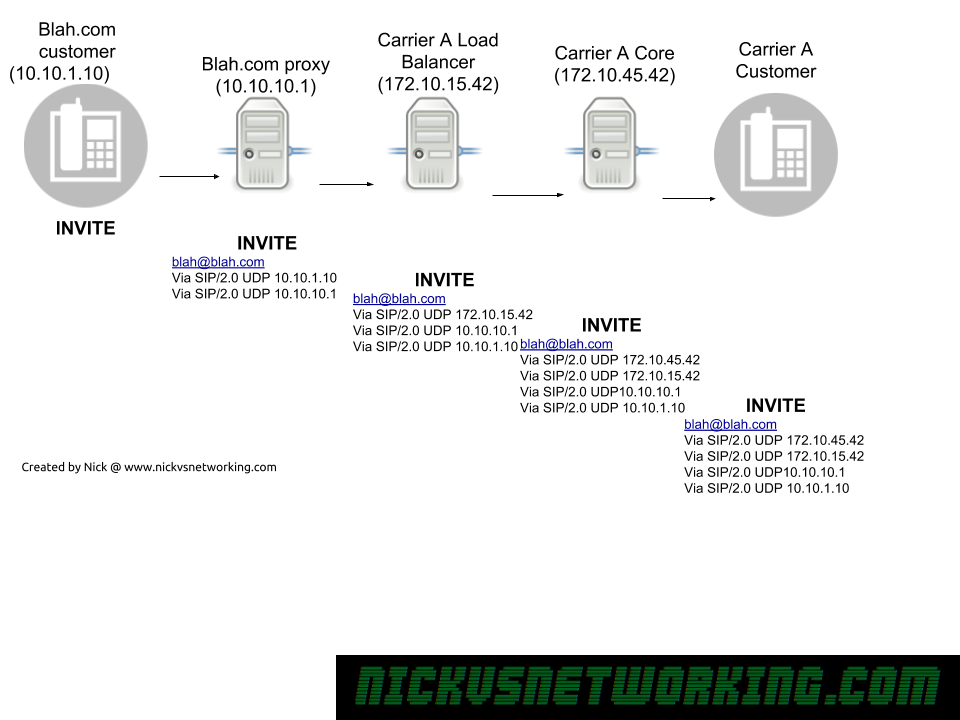
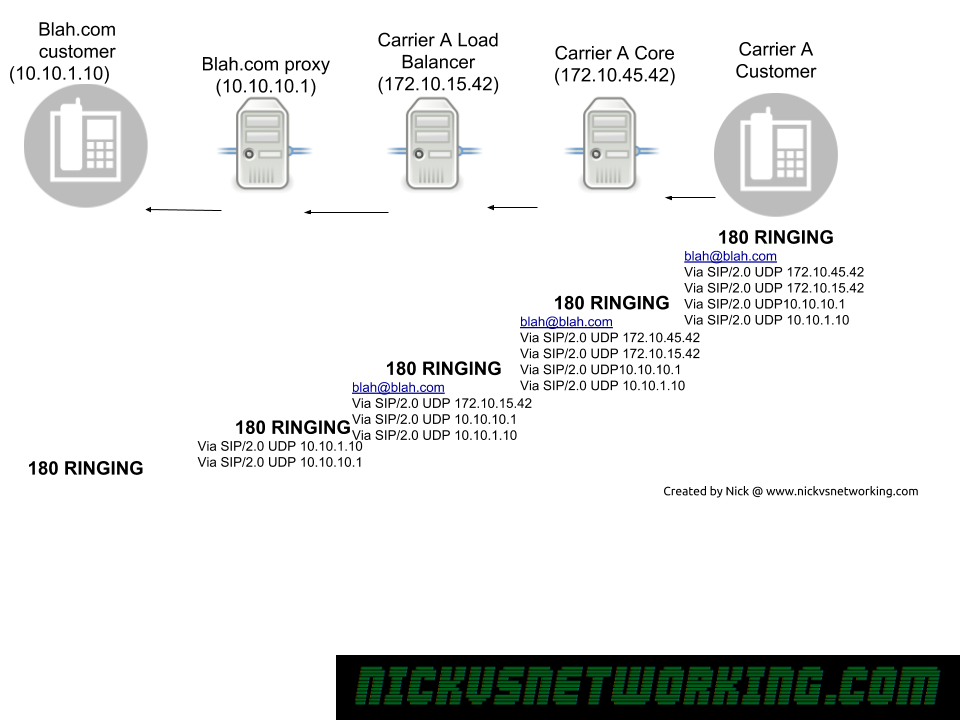
The SIP Via header is added by a proxy when it forwards a SIP message onto another destination,
When a response is sent the reverse is done, each SIP proxy removes their details from the Via header and forwards to the next Via header along.
SIP Via headers in action
As we can see in the example above, each proxy adds it’s own address as a Via header, before it uses it’s internal logic to work out where to forward it to, and then forward on the INVITE.
Now because all our routing information is stored in Via headers when we need to route a Response back, each proxy doesn’t need to consult it’s internal logic to work out where to route to, but can instead just strip it’s own address out of the Via header, and then forward it to the next Via header IP Address down in the list.
Via headers are also used to detect looping, a proxy can check when it receives a SIP message if it’s own IP address is already in a Via header, if it is, there’s a loop there.
Managing Responses in Kamailio
By default Kamailio manages responses by looking at the Via header, if the top Via header is its own IP address, it strips it’s own Via header and forwards it onto the next destination in the Via header.
We can add our own logic into this by adding a new route called onreply_route{}
onreply_route{
        xlog("Got a reply $rs");
        append_hf("X-Proxied: For the reply\r\n");
}
Now we’ll create a log entry with the response code in syslog for each response we receive, and we’ll add a header on the replies too:
Recap
A simple proxy to forward INVITEs is easy to implement in Kamailio, the real tricky question is what’s the logic involved to make the decision,
Now we’ll put both together to create something functional you could use in your own deployments. (You’d often find it’s faster to use HTable to store and retrieve data like this, but that’s a conversation for another day)
The Project
We’ll build a SIP honeypot using Kamailio. It’ll listen on a Public IP address for SIP connections from people scanning the internet with malicious intent and log their IPs, so our real SIP softswitches know to ignore them.
We’ll use GeoIP2 to lookup the location of the IP and then store that data into a MySQL database.
Lastly we’ll create a routing block we can use on another Kamailio instance to verify if that the IP address of the received SIP message is not in our blacklist by searching the MySQL database for the source IP.
The Database
In this example I’m going to create a database called “blacklist” with one table called “baddies”, in MySQL I’ll run:
CREATE database blacklist;
CREATE TABLE `baddies` (
	`id` INT NOT NULL AUTO_INCREMENT PRIMARY KEY,
	`ip_address` INT unsigned UNIQUE,
	`hits` INT,
	`last_seen` DATETIME,
	`ua` TEXT,
	`country` TEXT,
	`city` TEXT
);
I’ll setup a MySQL user to INSERT/UPDATE/SELECT data from the MySQL database.
For storing IP addresses in the database we’ll store them as unsigned integers, and then use the INET_ATON('127.0.0.1') MySQL command to encode them from dotted-decimal format, and the INET_NTOA('2130706433') to put them back into dotted decimal.
Modparams
Now we’ll need to configure Kamailio, I’ll continue on from where we left off in the last post on GeoIP2 as we’ll use that to put Geographic data about the IP before adding the MySQL and SQLOps modules:
# ----- SQL params -----
loadmodule "db_mysql.so"
loadmodule "sqlops.so"

#Create a new MySQL database connection called blacklist_db
modparam("sqlops","sqlcon","blacklist_db=>mysql://root:yourpassword@localhost/blacklist")

#Set timeouts for MySQL Connections
modparam("db_mysql", "ping_interval", 60)
modparam("db_mysql", "auto_reconnect", 1)
modparam("db_mysql", "timeout_interval", 2)
After loading db_mysql and sqlops we create a new object / connection called blacklist_db with our MySQL Database parameters.
Now after a restart we’ll be connected to our MySQL database.
Honeypot Routing Logic
Now we’ll create a route to log the traffic:
####### Routing Logic ########


/* Main SIP request routing logic
 * - processing of any incoming SIP request starts with this route
 * - note: this is the same as route { ... } */
request_route {

        route(AddToBlacklist);
        sl_reply('200', 'Sure thing boss!');

}
route[AddToBlacklist]{
        xlog("Packet received from IP $si");
        sql_xquery("blacklist_db", "insert into baddies (ip_address, hits, last_seen, ua, country, city) values (2130706433, 10, NOW(), 'testua2', 'Australia', 'Hobart');");
}
Now for each SIP message received a new record will be inserted into the database:
 root@ip-172-31-8-156:/etc/kamailio# mysql -u root -p blacklist -e "select * from baddies;"
 Enter password:
 +----+------------+------+---------------------+---------+-----------+--------+
 | id | ip_address | hits | last_seen           | ua      | country   | city   |
 +----+------------+------+---------------------+---------+-----------+--------+
 |  1 | 2130706433 |   10 | 2019-08-13 02:52:57 | testua2 | Australia | Hobart |
 |  2 | 2130706433 |   10 | 2019-08-13 02:53:01 | testua2 | Australia | Hobart |
 |  3 | 2130706433 |   10 | 2019-08-13 02:53:05 | testua2 | Australia | Hobart |
 +----+------------+------+---------------------+---------+-----------+--------+
This is great but we’re not actually putting the call variables in here, and we’ve got a lot of duplicates, let’s modify our sql_xquery() to include the call variables:
Now we’re setting the IP Address value to the Source IP psedovariable ($si) and formatting it using the INET_ATON function in MySQL, setting the last_seen to the current timestamp and setting the user agent to the User Agent psedovariable ($ua).
Let’s restart Kamailio, truncate the data that’s currently in the DB, send some SIP traffic to it and then check the contents:
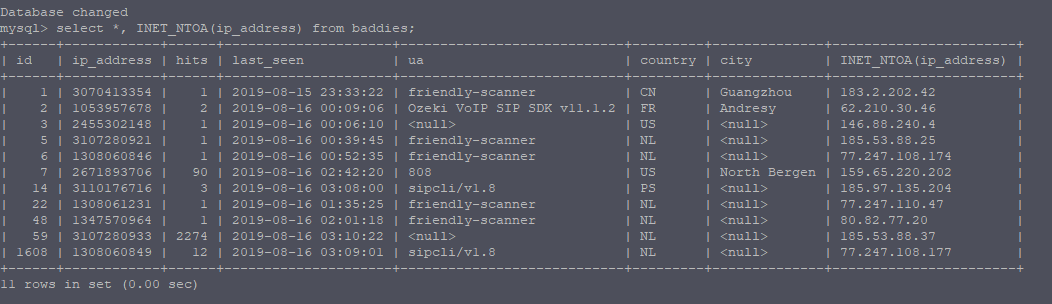
mysql -u root -p blacklist -e "select *, INET_NTOA(ip_address) from baddies;"
Here you can see we’re starting to get somewhere, the IP, UA and last_seen values are all now correct.
We’re getting multiple entries from the same IP though, instead we just want to increment the hits counter and set the last_seen to the current time, for that we’ll just update the SQL query to set the time to be NOW() and if that IP is already in the database to update the last_seen value and incriment the hits counter:
route[AddToBlacklist]{
        xlog("Packet received from IP $si");
        geoip2_match("$si", "src"))
        sql_xquery("blacklist_db", "insert into baddies (ip_address, hits, last_seen, ua, country, city) values (INET_ATON('$si'), 1, NOW(), '$ua', '$gip2(src=>cc)', '$gip2(src=>city)') ON DUPLICATE KEY UPDATE last_seen = NOW(), hits = hits + 1;", "r_sql");

}
The only issue with this is if GeoIP2 doesn’t have a match, no record will be added in the database, so we’ll add a handler for that:
route[AddToBlacklist]{
        xlog("Packet received from IP $si");
        if(geoip2_match("$si", "src")){
                sql_xquery("blacklist_db", "insert into baddies (ip_address, hits, last_seen, ua, country, city) values (INET_ATON('$si'), 1, NOW(), '$ua', '$gip2(src=>cc)', '$gip2(src=>city)') ON DUPLICATE KEY UPDATE last_seen = NOW(), hits = hits + 1;", "r_sql");
        }else{          ##If no match in GeoIP2 leave Country & City fields blank
                sql_xquery("blacklist_db", "insert into baddies (ip_address, hits, last_seen, ua, country, city) values (INET_ATON('$si'), 1, NOW(), '$ua', '', '') ON DUPLICATE KEY UPDATE last_seen = NOW(), hits = hits + 1;", "r_sql");
        }
}
Now let’s check our database again and see how the data looks:
mysql -u root -p blacklist -e "select *, INET_NTOA(ip_address) from baddies;"
Perfect! Now we’re inserting data into our blacklist from our honeypot. Now we’ll configure a new routing block we can use on another Kamailio instance to see if an IP is in the blacklist.
I left this running on my AWS box for a few hours, and lots of dodgy UAs dropped in to say hello, one of which was very insistent on making calls to Poland…
Querying the Data
Now we’ve got a blacklist it’s only useful if we block the traffic from our malicous actors who we’ve profiled in the database.
You could feed this into BGP to null route the traffic, or hook this into your firewall’s API, but we’re going to do this in Kamailio, so we’ll create a new routing block we can use on a different Kamailio instance – Like a production one – to see if the IP it just received traffic from is in the blacklist.
We’ve already spoken about querying databases in the SQLops Kamailio bytes, but this routing block will query the blacklist database, and if the sender is in the database, one or more records will be returned, so we know they’re bad and will drop their traffic:
route[CheckBlacklist]{

        xlog("Checking blacklist for ip $si");

        #Define a variable containing the SQL query we'll run
        $var(sql) = "select INET_NTOA(ip_address) as ip_address from baddies;";

        #Log the SQL query we're going to run to syslog for easy debugging
        xlog("Query to run is $var(sql)");

        #Query blacklist_db running the query stored in $var(sql) and store the result of the query to result_sql
        sql_query("blacklist_db", "$var(sql)", "result_sql");

        #If more than 0 records were returned from the database, drop the traffic
        if($dbr(result_sql=>rows)>0){
                xlog("This guy is bad news. Dropping traffic from $si");
                exit;
        }else{
                xlog("No criminal record for $si - Allowing to progress");
        }


}
This Honeypot use case just put those elements together.
In reality a far better implementation of this would use HTable to store this data, but hopefully this gives you a better understanding of how to actually work with data.
Final Note
I wrote this post about a week ago, and left the config running on an AWS box. I was getting hits to it within the hour, and in the past week I’ve had 172 IPs come and say hello, and some like the FriendlyScanner instance at 159.65.220.215 has sent over 93,000 requests:
RTPengine has an API / control protocol, which is what Kamailio / OpenSER uses to interact with RTPengine, called the ng Control Protocol.
Connection is based on Bencode encoded data and communicates via a UDP socket.
I wrote a simple Python script to pull active calls from RTPengine, code below:
#Quick Python library for interfacing with Sipwise's fantastic rtpengine - https://github.com/sipwise/rtpengine
#Bencode library from https://pypi.org/project/bencode.py/ (Had to download files from webpage (PIP was out of date))

import bencode
import socket
import sys
import random
import string

sock = socket.socket(socket.AF_INET, socket.SOCK_DGRAM)
server_address = ('188.0.169.13', 2224)     #Your server address

cookie = "0_2393_6"
data = bencode.encode({'command': 'list'})

message = str(cookie) + " " + str(data)
print(message)


sent = sock.sendto(message, server_address)

print('waiting to receive')
data, server = sock.recvfrom(4096)
print('received "%s"' % data)
data = data.split(" ", 1)       #Only split on first space
print("Cookie is: " + str(data[0]))
print("Data is: " + str(bencode.decode(data[1])))
print("There are " + str(len(bencode.decode(data[1])['calls'])) + " calls up on RTPengine at " + str(server_address[0]))
for calls in bencode.decode(data[1])['calls']:
    print(calls)
    cookie = "1_2393_6"
    data = bencode.encode({'command': 'query', 'call-id': str(calls)})
    message = str(cookie).encode('utf-8') + " ".encode('utf-8') + str(data).encode('utf-8')
    sent = sock.sendto(message, server_address)
    print('\n\nwaiting to receive')
    data, server = sock.recvfrom(8192)

    data = data.split(" ", 1)       #Only split on first space
    bencoded_data = bencode.decode(data[1])

    for keys in bencoded_data:
        print(keys)
        print("\t" + str(bencoded_data[keys]))

sock.close()
We’ve touched a tiny bit on basic database functionality in Kamailio, using MySQL to store User Data for authentication, ACLs or Dispatcher entries.
But with all those we were using Databases to load the config / dynamic data for a module.
We’ll build upon that, to connect to a Database that we can INSERT, UPDATE and SELECT data from within the dialplan.
For today’s example we’ll lookup the To address from a SIP INVITE and send back
Heads Up
There’s a lot of different use cases for reading and writing data from a database, but Kamailio also has a lot of native modules that handle this better, for example:
You might want to store a record of each INVITE and BYE you recieve for accounting, a better option is to use the Accounting Module in Kamailio.
You might want to authenticate user’s based on ACLs stored in a database, a better option would be to use Permissions Module.
User authentication info is best handled by Auth DB module.
The Dialplan module handles number translation really well and is lightning quick.
Just keep this in mind before jumping in that a lot of use cases have already been covered by a Kamailio module.
The Architecture
For today’s example we’ll be using MySQL as the database backend (db_mysl), but the db_mysql module simply connects us to a database, a bit like ODBC.
The real MVP is the SQLops module, that does all the heavy lifting by running the queries and managing the responses.
The majority of this config would work fine for other database backends, like PostGres, MongoDB, Oracle, etc.
I’ll demonstrate this same setup using different database backends in future posts.
MySQL Database
Before we get too excited we’ll need to setup a database to query. I’ll create a database called dyamic_routing with a table called routing storing source / destinations.
CREATE DATABASE phonebook;
USE  phonebook;
CREATE TABLE contacts (
     id INT NOT NULL AUTO_INCREMENT PRIMARY KEY,
     source TEXT,
     name TEXT
 );
INSERT INTO contacts VALUES (1, '200', 'Nick Deskphone');
I’ll setup a MySQL user to INSERT/UPDATE/SELECT data from the MySQL database the normal way.
Modparam
The module parameters for connecting to a database backend are fairly straight forward, but we’ll go into a bit of depth here to drive home the point.
# ----- SQL params -----
loadmodule "db_mysql.so"
loadmodule "sqlops.so"

#Create a new MySQL database connection called contacts_db
modparam("sqlops","sqlcon","contacts_db=>mysql://root:youshouldntrealluseroot@localhost/phonebook")

#Set timeouts for MySQL Connections
modparam("db_mysql", "ping_interval", 60)
modparam("db_mysql", "auto_reconnect", 1)
modparam("db_mysql", "timeout_interval", 2)
First off we load the two modules we need for this, db_mysql and sqlops. This is fairly self explanatory, if we were using db_postgres, db_mongodb or even db_text we’d load them instead of db_mysql.
The sqlops “sqlcon” modparam is where we define our MySQL database connection.
In this case we create a new database connection object called contacts_db– We can have connections to multiple databases, hence requiring a name.
The MySQL URL is fairly straightforward, database type, username, password, host and database:
mysql://root:password@localhost/phonebook
In production obviously you shouldn’t use root as the user account to log into the database, and lock it down to only the source IP of your Kamailio instance and with only the permissions it needs. (If it’s just selecting data there’s no need for GRANT…)
Basic Query
Now we’ve created a database connection it’s time to start using it.
request_route {
        if(method=="INVITE"){
                xlog("New request to $tU");

                #Query database object called "contacts_db", run the below query and store the output to a variable called result_sql
                sql_query("contacts_db", "select * from contacts;", "result_sql");

                #output number of rows in database returned
                xlog("number of rows in table is $dbr(result_sql=>rows)\n");
}
}
If the method is an INVITE we’ll query the database object called “contacts_db” to run the query select * from contacts;
We’ll then output the number of rows in the table to xlog.
The query actually happens in the sql_query() command, which takes the name of the database object ( contacts_db ), the query itself ( select * from contacts; ) and stores it into a variable called result_sql.
Finally xlog references the variable we stored our result in (result_sql) using the $dbr() handler to output the number of rows in the table.
If you save this and send an INVITE to any destination and watch the syslog you should see something along the lines of this:
/usr/sbin/kamailio[7815]: ERROR: : New request to 200
/usr/sbin/kamailio[7815]: ERROR: <script>: number of rows in table is 1
This means we’ve got a connection to the database and we can run queries.
Accessing the Output
Now we’ve got the data back from the database and stored it in result_sql we probably want to do something with the outputted data.
By wrapping the result_sql variable in the $dbr() tags we can access it’s jucy insides, let’s take a look:
                #output number of columns
                xlog("Result has $dbr(result_sql=>cols) Columns");
                #output number of rows
                xlog("Result has $dbr(result_sql=>rows) rows");
                #output contents of row 0, column 2
                xlog("Contents of row 0 col 2 is $dbr(result_sql=>[0,2]) ");
                #output name of column 2
                xlog("name of column 2 is $dbr(result_sql=>colname[2]) ");
If we add this after our last xlog line, restart Kamailio and view syslog it should look something like this:
/usr/sbin/kamailio[8249]: ERROR: <script>: New request to 200
/usr/sbin/kamailio[8249]: ERROR: <script>: number of rows in table is 1
/usr/sbin/kamailio[8249]: ERROR: <script>: Result has 3 Columns
/usr/sbin/kamailio[8249]: ERROR: <script>: Result has 1 rows
/usr/sbin/kamailio[8249]: ERROR: <script>: Contents of row 0 column 2 is Nick Deskphone
Now we can see the data in the result we’ll start to refine this down a bit, we’ll begin by limiting the SQL query to search for the called number.
For this we’ll update the sql_query(); function to:
sql_query("contacts_db", "select * from contacts where source = $tU;", "result_sql");
This will include the the To URI Username pseudo variable in our query, so will only return results if the number we dial has one or more matching “source” entries in the database.
If we dial 200 the query that’s actually run against the database will look like this:
select * from contacts where source = '200';
Now once we save and try again our traffic will look the same, except it’ll only return data if we dial 200, if we dial 201 the SQL server won’t have any matching results to return:
/usr/sbin/kamailio[9069]: ERROR: : New request from 2029
/usr/sbin/kamailio[9069]: ERROR: number of rows in table is 0
/usr/sbin/kamailio[9069]: ERROR: Result has 0 Columns
So that’s all well and good but we haven’t really got the data easily yet, while we’re outputting the contents of row 0 col 2 to syslog, it’s not going to handle multiple results being returned, or 0 results being returned, so we need a better way to handle this.
We’ll use a for loop to loop through all the results returned and output the second column of each (the “name” field in the database).
                #Loop through results
                #Create variable i to use as the counter
                $var(i) = 0;
                #While the contents of row i, position 2, is not null:
                while ($dbr(result_sql=>[$var(i),2]) != $null) {
                        #Output row i, position 2 (name)
                        xlog("name is $dbr(result_sql=>[$var(i),2])");
                        #increment i by 1
                        $var(i) = $var(i) + 1;
                }
So while the contents of row i, position 2, is not null, we’ll output the contents and increment i to get the next row in the database until there are none left.
Now we can give our code a bit of a clean up:
request_route {
        if(method=="INVITE"){
                xlog("New request from $tU");

                #Query database object called "contacts_db", run the below query and store the output to a variable called result_sql
                sql_query("contacts_db", "select * from contacts where source = $tU;", "result_sql");

                #Loop through results
                #Create variable i to use as the counter
                $var(i) = 0;
                #While the contents of row i, position 2, is not null:
                while ($dbr(result_sql=>[$var(i),2]) != $null) {
                        #Output row i, position 2 (name)
                        xlog("name $dbr(result_sql=>[$var(i),2])");
                        #increment i by 1
                        $var(i) = $var(i) + 1;
                }


        }
        if(method=="REGISTER"){ sl_reply('200', 'OK'); }
}
I’ve removed many of our xlog entries we put in for debugging and also added a handler to handle REGISTER requests to keep my IP phone happy.
Now if we make a call to number 200:
/usr/sbin/kamailio[9686]: ERROR: New request from 200
/usr/sbin/kamailio[9686]: ERROR: name Nick Deskphone
And for comparison a call to 201 (no matching database entry):
/usr/sbin/kamailio[9686]: ERROR: New request from 200
Using the Resulting Output
Now we’ve got access to the data from the database let’s do something with it.
Inside our loop we’ll send a reply to the SIP requester, with a 410 “Gone” response with the body containing the data returned from the database:
                        #Loop through results
                        #Create variable i to use as the counter
                        $var(i) = 0;
                        #While the contents of row i, position 2, is not null:
                        while ($dbr(result_sql=>[$var(i),2]) != $null) {
                                #Output row i, position 2 (name)
                                xlog("name $dbr(result_sql=>[$var(i),2])");
                                $var(name) = $dbr(result_sql=>[$var(i),2]);
                                #increment i by 1
                                $var(i) = $var(i) + 1;

                                #Reply with a 410 (User Gone) response with the name returned from the database
                                sl_reply("410", "Sorry $var(name) has gone home");
                                exit;
                        }
Now calls to 200 will get the message “Sorry Nick desk phone has gone home”.
Lastly we probably want to only loop through the output if there’s more than one row returned from the database, so we’ll put the looping code in an if statement that evaluates if the number of returned rows from the database is 1 or more, and if not just send a 404 response:
                #if one or more results are returned from the database
                if($dbr(result_sql=>rows)>0){

                        #Loop through results
                        #Create variable i to use as the counter
                        $var(i) = 0;
                        #While the contents of row i, position 2, is not null:
                        while ($dbr(result_sql=>[$var(i),2]) != $null) {
                                #Output row i, position 2 (name)
                                xlog("name $dbr(result_sql=>[$var(i),2])");
                                $var(name) = $dbr(result_sql=>[$var(i),2]);
                                #increment i by 1
                                $var(i) = $var(i) + 1;

                                #Reply with a 410 (User Gone) response with the name returned from the database
                                sl_reply("410", "Sorry $var(name) has gone home");
                                exit;
                        }
                }else{
                        #if 0 results are returned from database
                        sl_reply("404", "Never heard of them");
                }
INSERT, DELETE, UPDATE, etc
Although we only covered SELECT, queries that don’t return data like an INSERT, UPDATE, DELETE etc, can all be run the same way but we just don’t need to worry about managing the returned data.
For example we could delete a record using:
sql_query("contacts_db", "delete * from contacts where source = $tU;");
We don’t even need to store the output unless we need to.
Summary
Hopefully you’ve now got an idea how to query data from a database and view / manipulated the returned data.
If you’re planning on using this in production you probably want to automate the pulling of this data on a regular basis and keep it in a different directory.
I’ve made a very simple example Kamailio config that shows off some of the features of GeoIP2’s logic and what can be shown, so let’s look at the basics of the module:
if(geoip2_match("$si", "src")){
                xlog("Packet received from IP $si");
                xlog("Country is: $gip2(src=>cc)\n");
}
If we put this at the top of our request_route block every time we recieve a new request we can see the country from which the packet came from.
Let’s take a look at the output of syslog (with my IP removed):
#> tail -f /var/log/syslog
ERROR: <script>: Packet received from IP 203.###.###.###
ERROR: <script>: Country is: AU
ERROR: <script>: City is:  Melbourne
ERROR: <script>: ZIP is:  3004
ERROR: <script>: Regc is:  VIC
ERROR: <script>: Regn is:  Victoria
ERROR: <script>: Metro Code is:  <null>
We can add a bunch more smarts to this and get back a bunch more variables, including city, ZIP code, Lat & Long (Approx), timezone, etc.
        if(geoip2_match("$si", "src")){
                xlog("Packet received from IP $si");
                xlog("Country is: $gip2(src=>cc)\n");
                xlog("City is:  $gip2(src=>city)");
                xlog("ZIP is:  $gip2(src=>zip)");
                xlog("Regc is:  $gip2(src=>regc)");
                xlog("Regn is:  $gip2(src=>regn)");
                xlog("Metro Code is:  $gip2(src=>metro)");

                if($gip2(src=>cc)=="AU"){
                        xlog("Traffic is from Australia");
                }
        }else{
                xlog("No GeoIP Match for  $si");
        }
#> tail -f /var/log/syslog
ERROR: <script>: Packet received from IP ###.###.###.###
ERROR: <script>: Country is: AU
ERROR: <script>: City is:  Melbourne
ERROR: <script>: ZIP is:  3004
ERROR: <script>: Regc is:  VIC
ERROR: <script>: Regn is:  Victoria
ERROR: <script>: Metro Code is:  <null>
Using GeoIP2 you could use different rate limits for domestic users vs overseas users, guess the dialling rules based on the location of the caller and generate alerts if accounts are used outside their standard areas.
We’ll touch upon this again in our next post on RTPengine where we’ll use an RTPengine closes to the area in which the traffic originates.
I’m a big fan of RTPengine, and I’ve written a bit about it in the past.
Let’s say we’re building an Australia wide VoIP network. It’s a big country with a lot of nothing in the middle. We’ve got a POP in each of Australia’s capital cities, and two core softswitch clusters, one in Melbourne and one in Sydney.
These two cores will work fine, but a call from a customer in Perth, WA to another customer in Perth, WA would mean their RTP stream will need to go across your inter-caps to Sydney or Melbourne only to route back to Perth.
That’s 3,500Km each way, which is going to lead to higher latency, wasted bandwidth and decreased customer experience.
What if we could have an RTPengine instance in our Perth POP, handling RTP proxying for our Perth customers? Another in Brisbane, Canberra etc, all while keeping our complex expensive core signalling in just the two locations?
RTPengine to the rescue!
Preparing our RTPEngine Instances
In each of our POPs we’ll spin up a box with RTPengine,
The only thing we’d do differently is set the listen-ng value to be 0.0.0.0:2223 and the interface to be the IP of the box.
By setting the listen-ng value to 0.0.0.0:2223 it’ll mean that RTPengine’s management port will be bound to any IP, so we can remotely manage it via it’s ng-control protocol, using the rtpengine Kamailio module.
Naturally you’d limit access to port 2223 only to allowed devices inside your network.
Next we’ll need to add the details of each of our RTP engine instances to MySQL, I’ve used a different setid for each of the RTPengines. I’ve chosen to use the first digit of the Zipcode for that state (WA’s Zipcodes / Postcodes are in the format 6xxx while NSW postcodes are look like 2xxx), we’ll use this later when we select which RTPengine instances to use.
I’ve also added localhost with setid of 0, we’ll use this as our fallback route if it’s not coming from Australia.
Bingo, we’re connected to three RTPengine instances,
Next up we’ll use the Geoip2 module to determine the source of the traffic and route to the correct, I’ve touched upon the Geoip2 module’s basic usage in the past, so if you’re not already familiar with it, read up on it’s usage and we’ll build upon that.
We’ll load GeoIP2 and run some checks in the initial request_route{} block to select the correct RTPengine instance:
        if(geoip2_match("$si", "src")){
                if($gip2(src=>cc)=="AU"){
                        $var(zip) =  $gip2(src=>zip);
                        $avp(setid) = $(var(zip){s.substr,0,1});
                        xlog("rtpengine setID is $avp(setid)");
                }else{
                        xlog("GeoIP not in Australia - Using default RTPengine instance");
                        set_rtpengine_set("0");
                }
        }else{
                xlog("No GeoIP Match - Using default RTPengine instance");
                set_rtpengine_set("0");
        }
In the above example if we have a match on source, and the Country code is Australia, the first digit of the ZIP / Postcode is extracted and assigned to the AVP “setid” so RTPengine knows which set ID to use.
In practice an INVITE from an IP in WA returns setID 6, and uses our RTPengine in WA, while one from NSW returns 2 and uses one in NSW. In production we’d need to setup rules for all the other states / territories, and generally have more than one RTPengine instance in each location (we can have multiple instances with the same setid).
Hopefully you’re starting to get an idea of the fun and relatively painless things you can achieve with RTPengine and Kamailio!
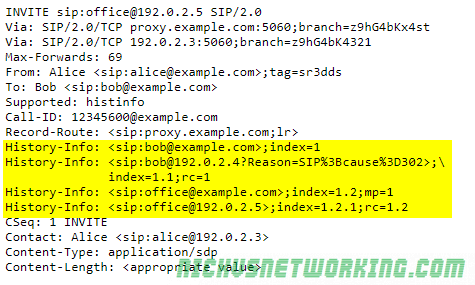
The History Info extension defined in RFC7044 sets a way for an INVITE to include where the session (call) has been before that.
For example a call may be made to a desk phone, which is forwarded (302) to a home phone. The History Info extension would add a History Info header to the INVITE to the home phone, denoting the call had come to it via the desk phone.
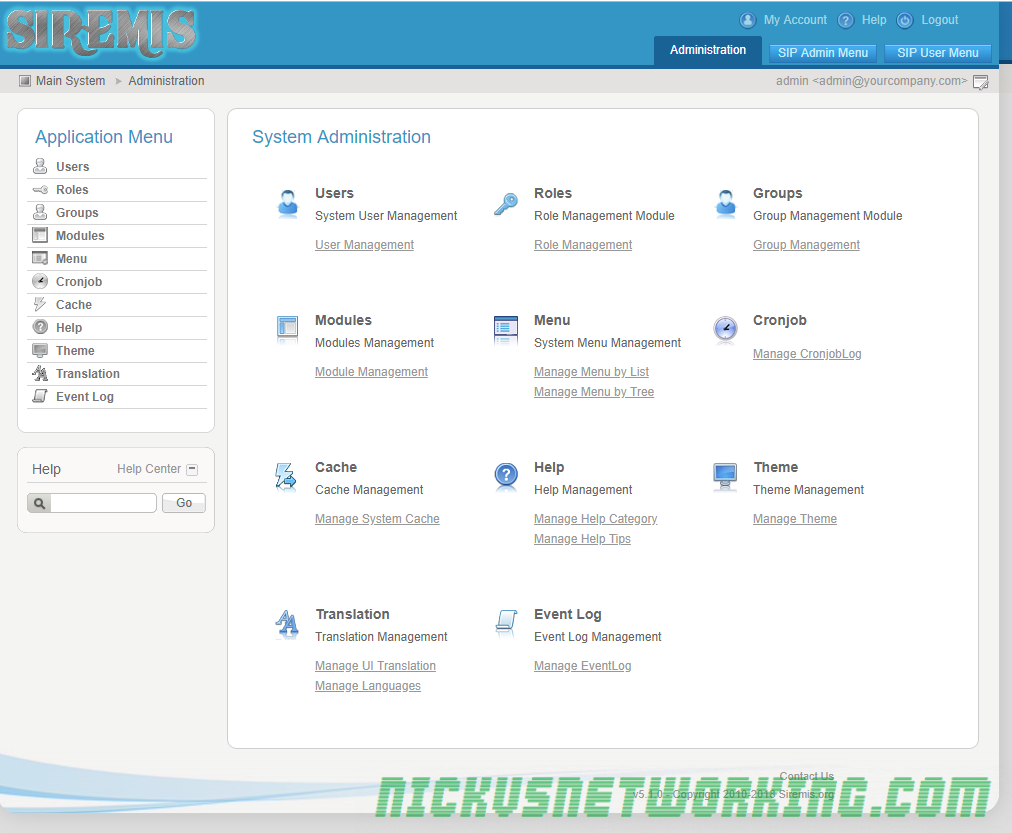
Siremis is a web interface for Kamailio, created by the team at Asipto, who contribute huge amounts to the Kamailio project.
Siremis won’t create your Kamailio configuration file for you, but allows you to easily drive the dynamic functions like dialplan, subscribers, dispatcher, permissions, etc, from a web interface.
Siremis essentially interfaces with the Kamailio database, kamcmd and kamctl to look after your running Kamailio instance.
Installation
I’ll be installing on Ubuntu 18.04, but for most major distributions the process will be the same. We’re using PHP7 and Apache2, which are pretty much universal available on other distros.
First we need to install all the packages we require:
Next we’ll download Siremis from the Git repo, and put it into a folder, which I’ve named the same as my Kamailio version.
cd /var/www/html/
git clone https://github.com/asipto/siremis kamailio-5.1.2
Now we’ll move into the directory we’ve created (called kamailio-5.1.2) and build the apache2 config needed:
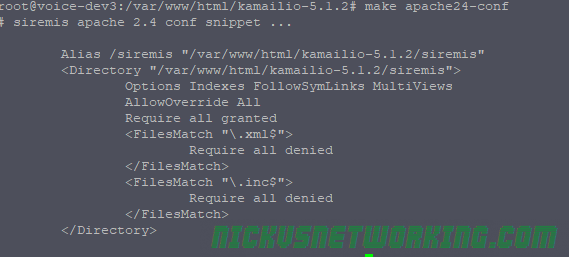
cd kamailio-5.1.2/
make apache24-conf
This then gives us a config except we can put into our Apache virtual host config file:
We can now copy and paste this into the end of an existing or new Apache virtual host file.
If this is a fresh install you can just pipe the output of this into the config file directly:
make apache24-conf >> /etc/apache2/sites-available/000-default.conf
service apache2 restart
Now if you browse to http://yourserverip/siremis you should be redirected to http://yourserverip/siremis/install and have a few errors, that’s OK, it means our Apache config is working.
Next we’ll set the permissions, create the folders and .htaccess. The Siremis team have also created make files to take care of this too, so we can just run them to set everything up:
make prepare24
make chown
With that done we can try browsing to our server again ( http://yourserverip/siremis ) and you should hit the installation wizard:
Now we’ll need to setup our database, so we can read and write from it.
We’ll create new MySQL users for Kamailio and Seremis:
mysql> GRANT ALL PRIVILEGES ON siremis.* TO siremis@localhost IDENTIFIED BY 'siremisrw';

mysql> CREATE USER 'kamailio'@'localhost' IDENTIFIED BY 'my5yhtY7zPJzV8vu';

mysql> GRANT ALL PRIVILEGES ON * . * TO 'kamailio'@'localhost';

mysql>  FLUSH PRIVILEGES;
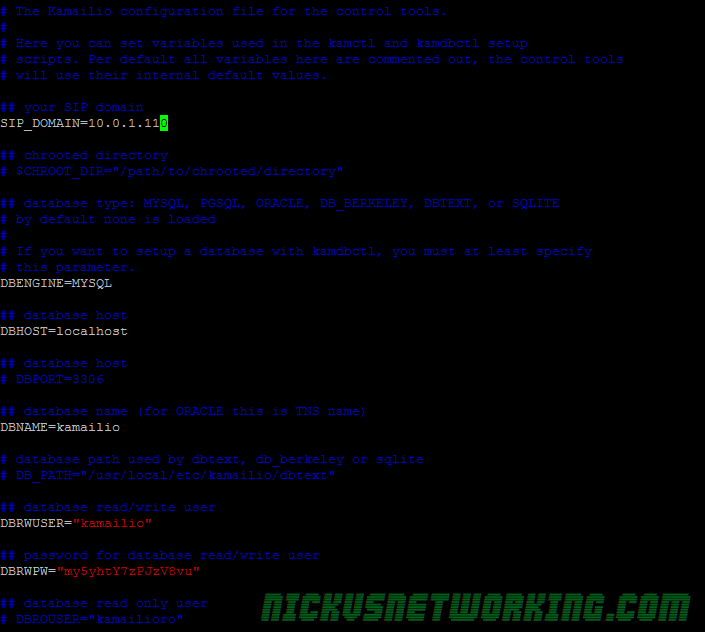
Next up we’ll need to configure kamctlrc so it knows the database details, we covered this the Security in Practice tutorial.
We’ll edit /etc/kamalio/kamctlrc and add our database information:
Once that’s done we can create the database and tables using kamdbctl the database tool:
kamdbctl create
I’ve selected to install the optional tables for completeness.
Once this is done we can go back to the web page and complete the installation wizard:
We’ll need to fill the password for the Siremis DB we created and for the Kamailio DB, and ensure all the boxes are ticked.
Next, Next, Next your way through until you hit the login page, login with admin/admin and you’re away!
Troubleshooting
If you have issues during the installation you can re-run the installation web wizard by removing the install.lock file in /var/www/html/kamailio-5.1.2/siremis
You can also try dropping the Siremis database and getting the installer to create it again for you:
HTable is Kamailio’s implimentation of Hash Tables a database-like data structure that runs in memory and is very quick.
It’s uses only become apparent when you’ve become exposed to it.
Let’s take an example of protecting against multiple failed registration attempts.
We could create a SQL database called registration attempts, and each time one failed log the time and attempted username.
Then we could set it so before we respond to traffic we query the database, find out how many rows there are that match the username being attempted and if it’s more than a threshold we set we send back a rate limit response.
The problem is that’s fairly resource intensive, the SQL data is read and written from disks and is slow to do both.
Enter HTable, which achieves the same thing with an in-memory database, that’s lightning fast.
Basic Setup
We’ll need to load htable and create an htable called Table1 to store data in:
$sht(MessageCount=>test) is the logical link to the Htable called MessageCount with a key named test. We’re making that equal itself + 1.
We’re then outputting the content of $sht(MessageCount=>test) to xlog too so we can see it’s value in Syslog.
Now each time a new dialog is started the MessageCount htable key “test” will be incremented.
We can confirm this in Syslog:
ERROR: : MessageCount is 1
ERROR: : MessageCount is 2
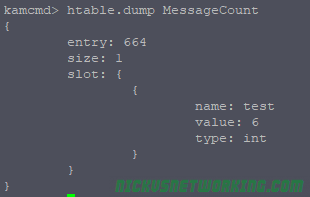
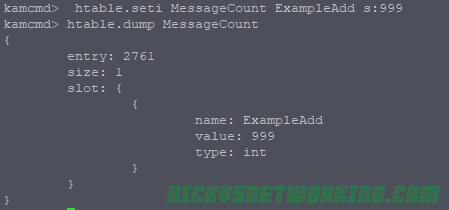
We can also check this in kamcmd too:
htable.dump MessageCount
Here we can see in MessageCount there is one key named “test” with a value of 6, and it’s an integer. (You can also store Strings in HTable).
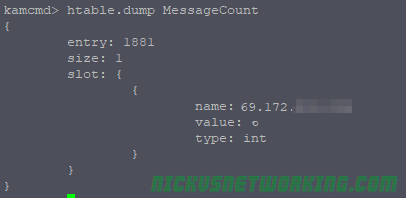
So that’s all well and pointless, but let’s do make it a bit more useful, report on how many SIP transactions we get per IP. Instead of storing our values with the name key “test” we’ll name it based on the Source IP of the message, which lives in Psedovariable $si for Source IP Address.
I’m calling the boilerplate AUTH block, and I’ve added some logic to increment the AuthCount for each failed auth attempt, and reset it to $null if authentication is successful, thus resetting the counter for that IP Address.
Now we’ve done that we need to actually stop the traffic if it’s failed too many times. I’ve added the below check into REQINIT block, which I call at the start of processing:
if($sht(AuthCount=>$si) > 5){
        xlog("$si is back again, rate limiting them...");
        sl_send_reply("429", "Rate limiting");
        exit;
}
Now if AuthCount is more than 5, it’ll respond with a Rate Limiting response.
Because in our modparam() setup for AuthCount we set an expiry, after 360 seconds (10 minutes), after 10 minutes all will be forgiven and our blocked UA can register again.
Advanced Usage / Notes
So now we’ve got Kamailio doing rate limiting, it’s probably worth mentioning the Pike module, which can also be used.
You’ll notice if you reboot Kamailio all the htable values are lost, that’s because the hashes are stored in memory, so aren’t persistent.
You have a few options for making this data persistent,
By using DMQ you can Sync data between Kamailio instances including htable values.
kamcmd can view, modify & manipulate htable values.
As we’ve seen before we can dump the contents of an htable using:
kamcmd htable.dump MessageCount
We can also add new entries & modify existing ones:
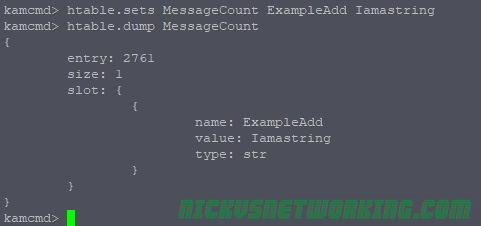
kamcmd htable.seti MessageCount ExampleAdd s:999
htable.seti is for setting integer values, we can also use htable.sets to set string values:
htable.sets MessageCount ExampleAdd Iamastring
We can also delete values from here too, which can be super useful for unblocking destinations manually:
htable.delete MessageCount ExampleAdd
As always code from this example is on GitHub. (Please don’t use it in production without modification, Authentication is only called on Register, and it’s just built upon the previous tutorials).
There are a number of ways to feed Homer data, in this case we’re going to use Kamailio, which has a HEP module, so when we feed Kamailio SIP data it’ll use the HEP module to encapsulate it and send it to the database for parsing on the WebUI.
We won’t actually do any SIP routing with Kamailio, we’ll just use it to parse copies of SIP messages sent to it, encapsulate them into HEP and send them to the DB.
We’ll be doing this on the same box that we’re running the HomerUI on, if we weren’t we’d need to adjust the database parameters in Kamailio so it pushes the data to the correct MySQL database.
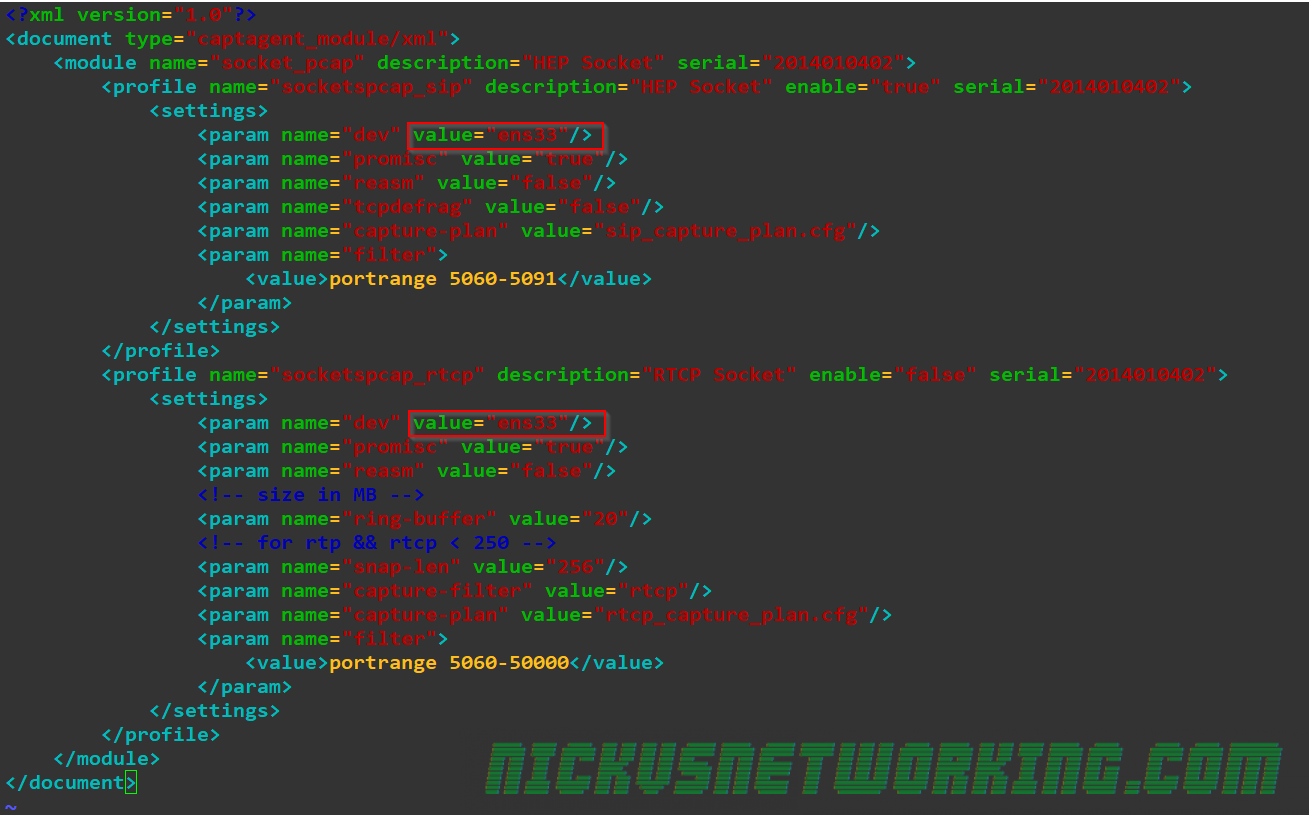
Next we’ll need to configure captagent to capture data and feed it to Kamailio. There’s two things we’ll need to change from the default, the first is the interface we capture on (By default it’s eth0, but Ubuntu uses eth33 as the first network interface ID) and the second is the HEP destination we send our data to (By default it’s on 9061 but our Kamailio instance is listening on 9060).
We’ll start by editing captagent’s socket_pcap.xml file to change the interface we capture on:
vi /etc/captagent/socket_pcap.xml
HOMER Captagent Interface Setup
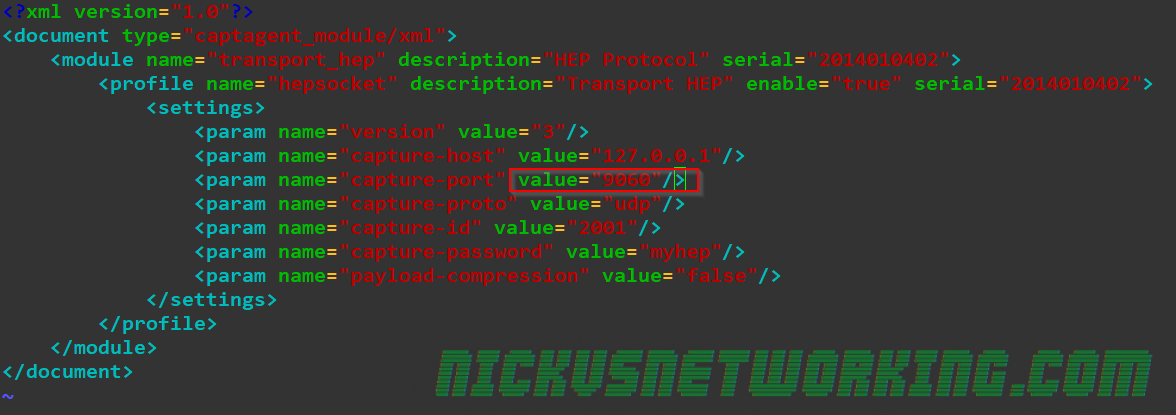
Next we’ll edit the port that we send HEP data on
vi /etc/captagent/transport_hep.xml
Set HEP Port for Transport
And finally we’ll restart captagent
/etc/init.d/captagent
Now if we send SIP traffic to this box it’ll be fed into HOMER.
In most use cases you’d use a port mirror so you may need to define the network interface that’s the destination of the port mirror in socket_pcap.xml
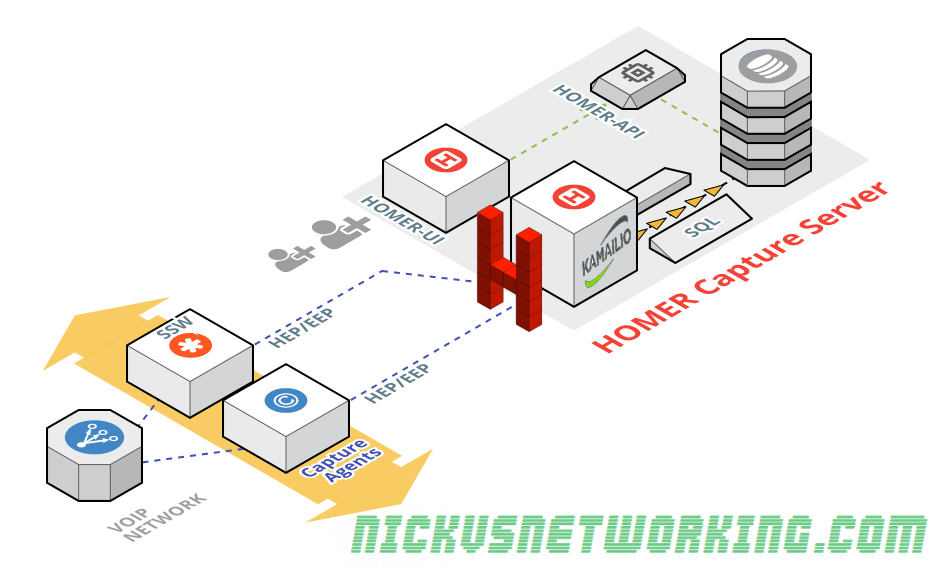
HOMER is a popular open source SIP / RTP debug / recording tool.
It’s architecture is pretty straight forward, we have a series of Capture Agents feeding data into a central HOMER Capture Server, which runs a database (today we’re using MySQL), a Homer-UI (Running on Apache), a Homer-API (Also running on Apache) and a HEP processor, which takes the HEP encoded data from the Capture Agents and runs on Kamailio. (That’s right, I’m back rambling about Kamailio)
So this will get the web interface and DB backend of HOMER setup,
For HOMER to actually work you’ll need to feed it data, in the next tutorial we’ll cover configuring a capture agent to feed the HEP processor (Kamailio) which we’ll also setup, but for now we’ll just setup the web user interface for HOMER, API and Database.
Caller-ID spoofing has been an issue in most countries since networks went digital.
SS7 doesn’t provide any caller ID validation facilities, with the assumption that everyone you have peered with you trust the calls from. So because of this it’s up to the originating switch to verify the caller ID selected by the caller is valid and permissible, something that’s not often implemented. Some SIP providers sell the ability to present any number as your CLI as a “feature”.
There’s heaps of news articles on the topic, but I thought it’d be worth talking about RFC4474 – Designed for cryptographically identifying users that originate SIP requests. While almost never used it’s a cool solution to a problem that didn’t take off.
It does this by adding a new header field, called Identity, for conveying a signature used for validating the identity of the caller, and Identity-Info for a reference to the certificate signing authority.
The calling proxy / UA creates a hash of it’s certificate, and inserts that into the SIP message in the Identity header.
The calling proxy / UA also inserts a “Identity-Info” header containing
The called party can then independently get the certificate, create it’s own hash of it, and if they match, then the identity of the caller has been verified.
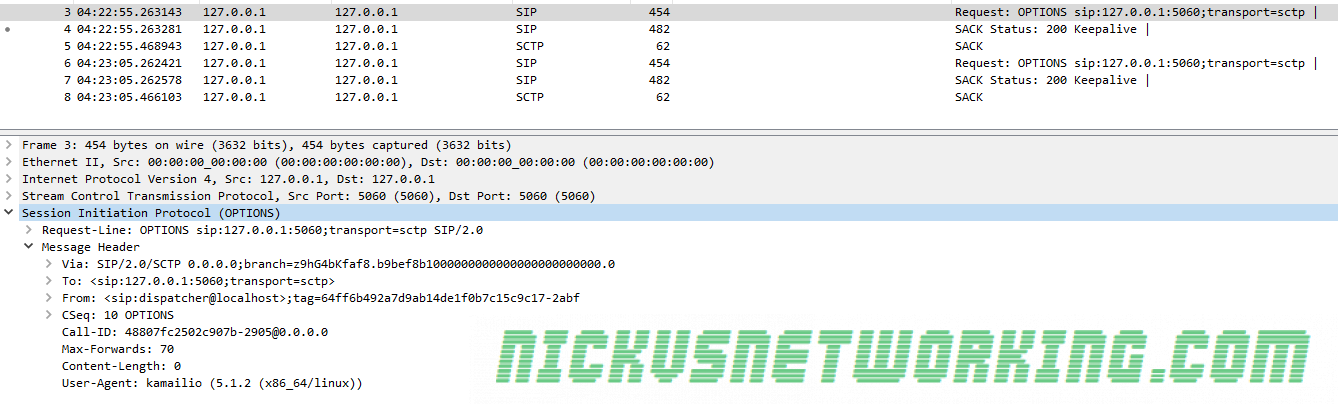
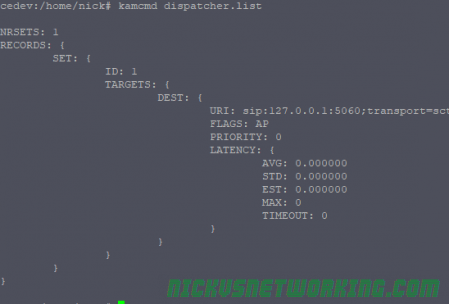
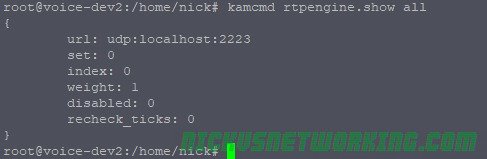
Now we’ll restart Kamailio and use kamcmd to check the status of our rtpengine instance:
kamcmd rtpengine.show all
All going well you’ll see something like this showing your instance:
Putting it into Practice
If you’ve ever had experience with the other RTP proxies out there you’ll know you’ve had to offer, rewrite SDP and accept the streams in Kamailio.
Luckily rtpengine makes this a bit easier, we need to call rtpengine_manage(); when the initial INVITE is sent and when a response is received with SDP (Like a 200 OK).
So for calling on the INVITE I’ve done it in the route[relay] route which I’m using:
And for the reply I’ve simply put a conditional in the onreply_route[MANAGE_REPLY] for if it has SDP:
SIP Proxies are simple in theory but start to get a bit more complex when implemented.
When a proxy has a response to send back to an endpoint, it can have multiple headers with routing information for how to get that response back to the endpoint that requested it.
So how to know which header to use on a new request?
Routing SIP Requests
Record-Route
If Route header is present (Like Record-Route) the proxy should use the contents of the Record-Route header to route the traffic back.
The Record-Route header is generally not the endpoint itself but another proxy, but that’s not an issue as the next proxy will know how to get to the endpoint, or use this same logic to know how to get it to the next proxy.
Contact
If no Route headers are present, the contact header is used.
The contact provides an address at which a endpoint can be contacted directly, this is used when no Record-Route header present.
From
If there is no Contact or Route headers the proxy should use the From address.
A note about Via
Via headers are only used in getting responses back to a client, and each hop removes it’s own IP on the response before forwarding it onto the next proxy.
This means the client doesn’t know all the Via headers that were on this SIP request, because by the time it gets back to the client they’ve all been removed one by one as it passed through each proxy.
A client can’t send a SIP request using Via’s as it hasn’t been through the proxies for their details to be added, so Via is only used in responding to a request, for example responding with a 404 to an INVITE, but cannot be used on a request itself (For example an INVITE).