SIP Proxies are simple in theory but start to get a bit more complex when implemented.
When a proxy has a response to send back to an endpoint, it can have multiple headers with routing information for how to get that response back to the endpoint that requested it.
So how to know which header to use on a new request?
Routing SIP Requests
Record-Route
If Route header is present (Like Record-Route) the proxy should use the contents of the Record-Route header to route the traffic back.
The Record-Route header is generally not the endpoint itself but another proxy, but that’s not an issue as the next proxy will know how to get to the endpoint, or use this same logic to know how to get it to the next proxy.
Contact
If no Route headers are present, the contact header is used.
The contact provides an address at which a endpoint can be contacted directly, this is used when no Record-Route header present.
From
If there is no Contact or Route headers the proxy should use the From address.
A note about Via
Via headers are only used in getting responses back to a client, and each hop removes it’s own IP on the response before forwarding it onto the next proxy.
This means the client doesn’t know all the Via headers that were on this SIP request, because by the time it gets back to the client they’ve all been removed one by one as it passed through each proxy.
A client can’t send a SIP request using Via’s as it hasn’t been through the proxies for their details to be added, so Via is only used in responding to a request, for example responding with a 404 to an INVITE, but cannot be used on a request itself (For example an INVITE).
If you, like me, spend a lot of time looking at SIP logs, sngrep is an awesome tool for debugging on remote machines. It’s kind of like if VoIP Monitor was ported back to the days of mainframes & minimal remote terminal GUIs.
Installation
It’s in the Repos for Debian and Ubuntu:
apt-get install sngrep
GUI Usage
sngrep can be used to parse packet captures and create packet captures by capturing off an interface, and view them at the same time.
We’ll start by just calling sngrep on a box with some SIP traffic, and waiting to see the dialogs appear.
Here we can see some dialogs, two REGISTERs and 4 INVITEs.
By using the up and down arrow keys we can select a dialog, hitting Enter (Return) will allow us to view that dialog in more detail:
Again we can use the up and down arrow keys to view each of the responses / messages in the dialog.
Hitting Enter again will show you that message in full screen, and hitting Escape will bring you back to the first screen.
From the home screen you can filter with F7, to find the dialog you’re interested in.
Command Line Parameters
One of the best features about sngrep is that you can capture and view at the same time.
As a long time user of TCPdump, I’d been faced with two options, capture the packets, download them, view them and look for what I’m after, or view it live with a pile of chained grep statements and hope to see what I want.
By adding -O filename.pcap to sngrep you can capture to a packet capture and view at the same time.
You can use expression matching to match only specific dialogs.
Kamailio’s permissions module is simple to use, and we’ve already touched upon it in the security section in our Kamailio 101 series, but I thought I’d go over some of it’s features in more detail.
At it’s core, Kamailio’s Permissions module is a series of Access Control Lists (ACLs) that can be applied to different sections of your config.
We can manage permissions to do with call routing, for example, is that source allowed to route to that destination.
We can manage registration permissions, for example, is this subnet allowed to register this username.
We can manage URI permissions & address permissions to check if a specific SIP URI or source address is allowed to do something.
We’ll touch on a simple IP Address based ACL setup in this post, but you can find more information in the module documentation itself.
The Setup
We’ll be using a database backend for this (MySQL), setup the usual way.
We’ll need to load the permissions module and setup it’s basic parameters, for more info on setting up the database side of things have a look here.
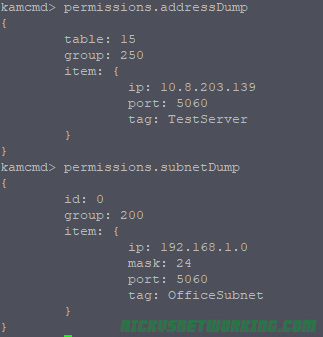
Next we’ll need to add some IPs, we could use Serimis for this, or a straight MySQL INSERT, but we’ll use kamctl to add them. (kamcmd can reload addresses but doesn’t currently have the functionality to add them)
The above example we added a two new address entries,
The first one added a new entry in group 250 of “10.8.203.139”, with a /32 subnet mask (Single IP), on port 5060 with the label “TestServer”,
The second one we added to group 200 was a subnet of 192.168.1.0 with a /24 subnet mask (255 IPs), on port 5060 with the label “OfficeSubnet”
On startup, or when we manually reload the addressTable, Kamailio grabs all the records and stores them in RAM. This makes lookup super fast, but the tradeoff is you have to load the entries, so changes aren’t immediate.
Let’s use Kamcmd to reload the entries and check their status.
kamcmd permissions.addressReload

kamcmd permissions.addressDump

kamcmd permissions.subnetDump
You should see the single IP in the output of the permissions.addressDump and see the subnet on the subnetDump:
Usage
It’s usage is pretty simple, combined with a simple nested if statement.
if (allow_source_address("200")) {
	xlog("Coming from address group 200");
};
if (allow_source_address("250")) {
	xlog("Coming from address group 250");
};
The above example just outputs to xlog with the address group, but we can expand upon this to give us our ACL service.
if (allow_source_address("200")) {
	xlog("Coming from address group 200");
}else if (allow_source_address("250")) {
	xlog("Coming from address group 250");
}else{
        sl_reply("401", "Address not authorised");
        exit;
}
If we put this at the top of our Kamailio config we’ll reply with a 401 response to any traffic not in address group 200 or 250.
If you’ve ever phoned a big company like a government agency or an ISP to get something resolved, and been transferred between person to person, having to start again explaining the problem to each of them, then you know how frustrating this can be.
If they stored information about your call that they could bring up later during the call, it’d make your call better.
If the big company, started keeping a record of the call that could be referenced as the call progresses, they’d be storing state for that call.
Let’s build on this a bit more,
You phone Big Company again, the receptionist answers and says “Thank you for calling Big Company, how many I direct your call?”, and you ask to speak to John Smith.
The receptionist puts you through to John Smith, who’s not at his desk and has setup a forward on his phone to send all his calls to reception, so you ring back at reception.
A stateful receptionist would say “Hello again, it seems John Smith isn’t at his desk, would you like me to take a message?”.
A stateless receptionist would say “Thank you for calling Big Company, how many I direct your call?”, and you’d start all over again.
Our stateful receptionist remembered something about our call, they remembered they’d spoken to you, remembered who you were, that you were trying to get to John Smith.
While our stateless receptionist remembered nothing and treated this like a new call.
In SIP, state is simply remembering something about that particular session (series of SIP messages).
SIP State just means bits of information related to the session.
Stateless SIP Proxy
A Stateless SIP proxy doesn’t remember anything about the messages (sessions), no state information is kept. As soon as the proxy forwards the message, it forgets all about it, like our receptionist who just forwards the call and doesn’t remember anything.
Going back to our Big Company example, as you can imagine, this is much more scaleable, you can have a pool of stateless receptionists, none of whom know who you are if you speak to them again, but they’re a lot more efficient because they don’t need to remember any state information, and they can quickly do their thing without looking stuff up or memorising it.
The same is true of a Stateless SIP proxy.
Stateless proxies are commonly used for load balancing, where you want to just forward the traffic to another destination (maybe using the Dispatcher module) and don’t need to remember anything about that session.
It sounds obvious, but because a Stateless SIP proxy it stateless it doesn’t store state, but that also means it doesn’t need to lookup state information or write it back, making it much faster and generally able to handle larger call loads than a stateful equivalent.
Dialog Stateful SIP Proxy
A dialog stateful proxy keeps state information for the duration of that session (dialog).
By dialog we mean for the entire duration on the call/session (called a dialog) from beginning to end, INVITE to BYE.
While this takes more resources, it means we can do some more advanced functions.
For example if we want to charge based on the length of a call/session, we’d need to store state information, like the Call-ID, the start and end time of the call. We can only do this with a stateful proxy, as a stateless proxy wouldn’t know what time the call started.
Also if we wanted to know if a user was on a call or not, a Dialog Stateful proxy knows there’s been a 200 OK, but no Bye yet, so knows if a user is on a call or not, this is useful for presence. We could tie this in with a NOTIFY so other users could know their status.
A Dialog Stateful Proxy is the most resource intensive, as it needs to store state for the duration of the session.
Transaction Stateful SIP Proxy
A transactional proxy keeps state until a final response is received, and then forgets the state information after the final response.
A Transaction Stateful proxy stores state from the initial INVITE until a 200 OK is received. As soon as the session is setup it forgets everything. This means we won’t have any state information when the BYE is eventually received.
While this means we won’t be able to do the same features as the Dialog Stateful Proxy, but you’ll find that most of the time you can get away with just using Transaction Stateful proxies, which are less resource intensive.
For example if we want to send a call to multiple carriers and wait for a successful response before connecting it to the UA, a Transactional proxy would do the trick, with no need to go down the Dialog Stateful path, as we only need to keep state until a session is successfully setup.
For the most part, SIP is focused on setting up sessions, and so is a Transaction Stateful Proxy.
Kamalio’s dialplan is a bit of a misleading title, as it can do so much more than just act as a dialplan.
At it’s core, it runs transformations. You feed it a value, if the value matches the regex Kamailio has it can either apply a transformation to that value or return a different value.
Adding to Config
For now we’ll just load the dialplan module and point it at our DBURL variable:
loadmodule "dialplan.so"
modparam("dialplan", "db_url", DBURL);                 #Dialplan database from DBURL variable
Restart Kamailio and we can get started.
Basics
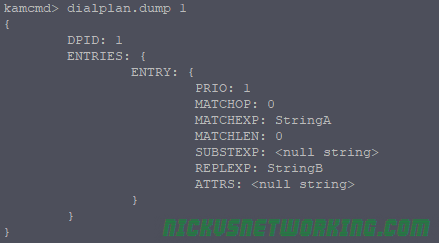
Let’s say we want to take StringA and translate it in the dialplan module to StringB, so we’d add an entry to the database in the dialplan table, to take StringA and replace it with StringB.
We’ll go through the contents of the database in more detail later in the post
Now we’ll fire up Kamailio, open kamcmd and reload the dialplan, and dump out the entries in Dialplan ID 1:
dialplan.reload
dialplan.dump 1
You should see the output of what we just put into the database reflected in kamcmd:
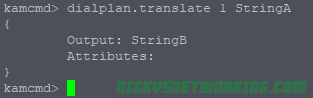
Now we can test our dialplan translations, using Kamcmd again.
dialplan.translate 1 StringA
All going well Kamailio will match StringA and return StringB:
So we can see when we feed in String A, to dialplan ID 1, we get String B returned.
Database Structure
There’s a few fields in the database we populated, let’s talk about what each one does.
dpid
dpid = Dialplan ID. This means we can have multiple dialplans, each with a unique dialplan ID. When testing we’ll always need to specific the dialplan ID we’re using to make sure we’re testing with the right rules.
priority
Priorities in the dialplan allow us to have different weighted priorities. For example we might want a match all wildcard entry, but more specific entries with lower values. We don’t want to match our wildcard failover entry if there’s a more specific match, so we use priorities to run through the list, first we try and match the group with the lowest number, then the next lowest and so on, until a match is found.
match_op
match_op = Match Operation. There are 3 options:
0 – string comparison;
1 – regular expression matching (pcre);
2 – fnmatch (shell-like pattern) matching
In our first example we had match_op set to 0, so we exactly matched “StringA”. The real power comes from Regex Matching, which we’ll cover soon.
match_exp
match_exp = Match expression. When match_op is set to 0 this matches exactly the string in match_exp, when match_op is set to 1 this will contain a regular expression to match.
match_len
match_len = Match Length. Allows you to match a specific length of string.
subst_exp
subst_exp = Substitute Expression. If match_op is set to 0 this will contain be empty If match_op is 1 this will contain the same as match_exp.
repl_exp
repl_exp = replacement expression. If match_op is set to 0 this will contain the string to replace the matched string.
If match_op is set to 1 this can contain the regex group matching (\1, \2, etc) and any suffixes / prefixes (for example 61\1 will prefix 61 and add the contents of matched group 1).
attrs
Attributes. Often used as a descriptive name for the matched rule.
Getting Regex Rules Setup
The real power of the dialplan comes from Regular Expression matching. Let’s look at some use cases and how to solve them with Dialplans.
Note for MySQL users: MySQL treats \ as the escape character, but we need it for things like matching a digit in Regex (that’s \d ) – So keep in mind when inserting this into MySQL you may need to escale the escape, so to enter \d into the match_exp field in MySQL you’d enter \\d – This has caught me in the past!
The hyperlinks below take you to the examples in Regex101.com so you can preview the rules and make sure it’s matching what it should prior to putting it into the database.
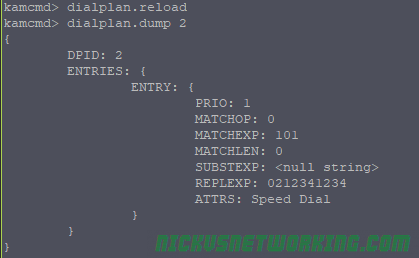
Speed Dial
Let’s start with a simple example of a speed dial. When a user dials 101 we want to translate it to a PSTN number of 0212341234.
Without Regex this looks very similar to our first example, we’ve just changed the dialplan id (dpid) and the match_op and repl_exp.
Once we’ve added it to the database we’ll reload the dialplan module and dump dialplan 2 to check it all looks correct:
Now let’s test what happens if we do a dialplan translate on dialplan 2 with 101.
Tip: If you’re testing a dialplan and what you’re matching is a number, add s: before it so it matches as a number, not a string.
dialplan.translate 2 s:101
Here we can see we’ve matched 101 and the output is the PSTN number we wanted to translate too.
Interoffice Dial
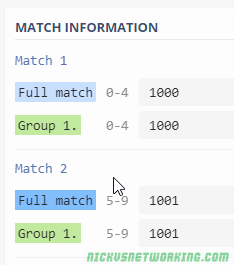
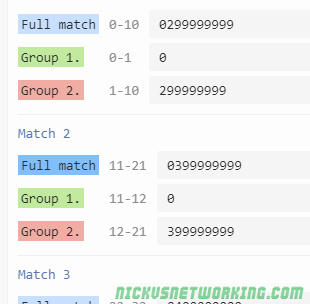
Let’s take a slightly more complex example. We’ve got an office with two branches, office A’s phone numbers start with 0299991000, and they have 4 digit extensions, so extension 1002 maps to 0299991002, 0299991003 maps to extension 1003, etc.
From Office B we want to be able to just dial the 4 digit extensions of a user in Office A.
This means if we receive 1003 we need to prefix 029999 + 10003.
Then another reload and translate, and we can test again.
dialplan.reload dialplan.translate 3 s:1003 (Translates to 0299991003) dialplan.translate 3 s:1101 (no translation)
Interoffice Dial Failure Route (Priorities)
So let’s say we’ve got lots of branches configured like this, and we don’t want to just get “No Translation” if a match isn’t found, but rather send it to a specific destination, say reception on extension 9000.
So we’ll keep using dpid 3 and we’ll set all our interoffice dial rules to have priority 1, and we’ll create a new entry to match anything 4 digits long and route it to the switch.
This entry will have a higher priority value than the other so will only mach if nothing else with a lower priority number matches.
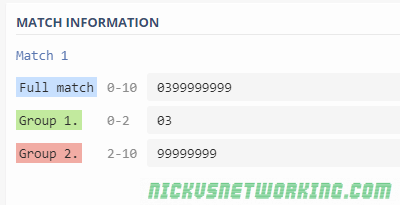
Now we’ve got Group 2 containing the data we need, we just need to prefix 613 in front of it.
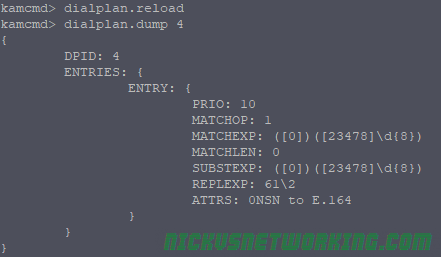
Let’s go ahead an put this into the database, with dialplan ID set to 4, match_op set to 1 (for regex)
Then we’ll do a dialplan reload and a dialplan dump for dialplan ID 4 to check everything is there:
Now let’s put it to the test.
dialplan.translate 4 s:0399999999
Bingo, we’ve matched the regex, and returned 613 and the output of Regex Match group 2. (999999999)
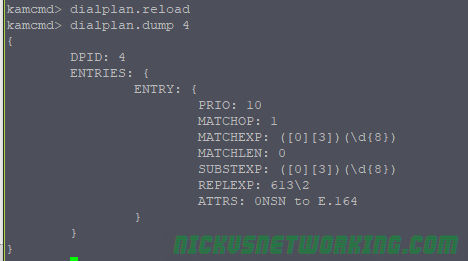
Let’s expand upon this a bit, a valid 0NSN number could also be a mobile (0400000000) or a local number in a different area code (0299999999, 0799999999 or 0899999999).
We could create a dialplan entry for each, our we could expand upon our regex to match all these scenarios.
Now let’s update the database so that once we’re matched we’ll just prefix 61 and the output of regex group 2.
Again we’ll do a dialplan reload and a dialplan dump to check everything.
Now let’s run through our examples to check they correctly translate:
And there you go, we’re matched and the 0NSN formatted number was translated to E.164.
Adding to Kamailio Routing
So far we’ve just used kamcmd’s dialplan.translate function to test our dialplan rules, now let’s actually put them into play.
For this we’ll use the function
dp_translate(id, [src[/dest]])
dp_translate is dialplan translate. We’ll feed it the dialplan id (id) and a source variable and destination variable. The source variable is the equivalent of what we put into our kamcmd dialplan.translate, and the destination is the output.
In this example we’ll rewrite the Request URI which is in variable $rU, we’ll take the output of $rU, feed it through dialplan translate and save the output as $rU (overwrite it).
Let’s start with the Speed Dial example we setup earlier, and put that into play.
   if(method=="INVITE"){
                xlog("rU before dialplan translation is $rU");
                dp_translate("2", "$rU/$rU");
                xlog("rU after dialplan translation is $rU");
}
The above example will output our $rU variable before and after the translation, and we’re using Dialplan ID 2, which we used for our speed dial example.
So let’s send an INVITE from our Softphone to our Kamailio instance with to 101, which will be translated to 0212341234.
Before we do we can check it with Kamcmd to see what output we expect:
dialplan.translate 2 s:101
Let’s take a look at the out put of Syslog when we call 101.
But our INVITE doesn’t actually go anywhere, so we’ll add it to our dispatcher example from the other day so you can see it in action, we’ll relay the INVITE to an active Media Gateway, but the $rU will change.
   if(method=="INVITE"){
                xlog("rU before dialplan translation is $rU");
                dp_translate("2", "$rU/$rU");
                xlog("rU after dialplan translation is $rU");
                ds_select_dst(1, 12);
                t_on_failure("DISPATCH_FAILURE");
                route(RELAY);
        }
Let’s take a look at how the packet captures now look:
UA > Kamailio: INVITE sip:101@kamailio SIP/2.0
Kamailio > UA: SIP/2.0 100 trying -- your call is important to us
Kamailio > MG1: INVITE sip:0212341234@MG1 SIP/2.0
So as you can see we translated 101 to 0212341234 based on the info in dialplan id 2 in the database.
That’s all well and good if we dial 101, but what if we dial 102, there’s no entry in the database for 102, as we see if we try it in Kamcmd:
dialplan.translate 2 s102
And if we make a call to 102 and check syslog:
rU before dialplan translation is 102
rU after dialplan translation is 102
Let’s setup some logic so we’ll respond with a 404 “Not found in Dialplan” response if the dialplan lookup doesn’t return a result:
if(dp_translate("2", "$rU/$rU")){
  xlog("Successfully translated rU to $rU using dialplan ID 2");
}else{
  xlog("Failed to translate rU using dialplan ID 2");
  sl_reply("404", "Not found in dialplan");
  exit;
}
By putting dp_translate inside an if we’re saying “if dp_translate is successful then do {} and the else will be called if dp_translate wasn’t successful.
Let’s take a look at a call to 101 again.
UA > Kamailio: INVITE sip:101@kamailio SIP/2.0
Kamailio > UA: SIP/2.0 100 trying -- your call is important to us
Kamailio > MG1: INVITE sip:0212341234@MG1 SIP/2.0
Still works, and a call to 102 (which we don’t have an entry for in the dialplan).
UA > Kamailio: INVITE sip:102@kamailio SIP/2.0
Kamailio > UA: SIP/2.0 404 Not found in dialplan
Hopefully by now you’ve got a feel for the dialplan module, how to set it up, debug it, and use it.
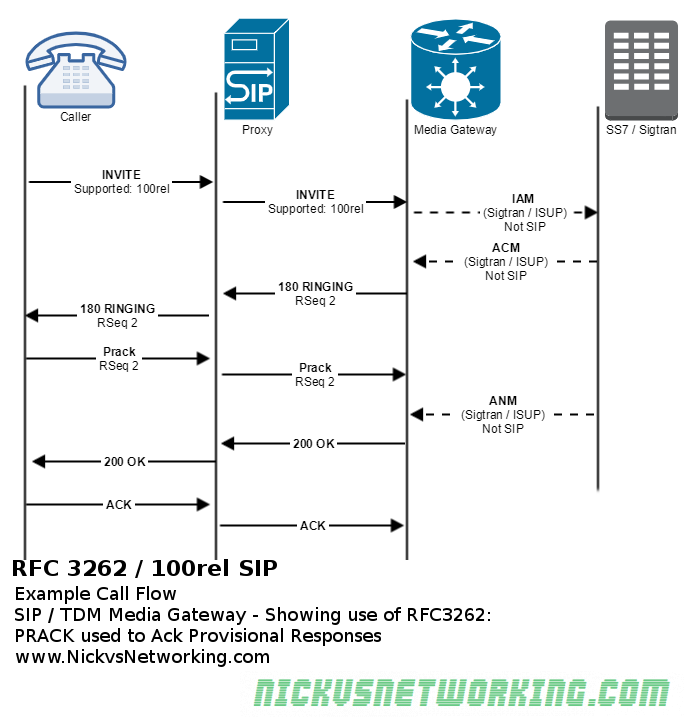
When a final response, like a 200 OK, or a 404, etc, is sent, the receiving party acknowledges that it received this with an ACK.
By provisional responses, such as 180 RINGING, are not acknowledged, this means we have no way of knowing for sure if our UAC received the provisional response.
The issues start to arise when using SIP on Media Gateways or inter-operating with SS7 / ISUP / PSTN, all of which have have guaranteed delivery of a RINGING response, but SIP doesn’t. (Folks from the TDM world will remember ALERTING messages)
The IETF saw there was in some cases, a need to confirm these provisional responses were received, and so should have an ACK.
They created the Reliability of Provisional Responses in the Session Initiation Protocol (SIP) under RFC3262 to address this.
This introduced the Provisional Acknowledgement (PRACK) and added the 100rel extension to Supported / Requires headers where implemented.
This means when 100rel extension is not used a media gateway that generates a 180 RINGING or a 183 SESSION PROGRESS response, sends it down the chain of proxies to our endpoint, but could be lost anywhere along the chain and the media gateway would never know.
When the 100rel extension is used, our media gateway generates a 18x response, and forwards it down the chain of proxies to our endpoint, and our 18x response now also includes a RSeq which is a reliable sequence number.
The endpoint receives this 18x response and sends back a Provisional Acknowledgement or PRACK, with a Rack header (Reliable Acknowledgement) header with the same value as the RSeq of the received 18x response.
The media gateway then sends back a 200 OK for the PRACK.
In the above example we see a SIP call to a media gateway,
The INVITE is sent from the caller to the Media Gateway via the Proxy. The caller has included value “100rel” in the Supported: header, showing support for RFC3262.
The Media gateway looks at the destination and knows it needs to translate this SIP message to a different a different protocol. Our media gateway is translating our SIP INVITE message into it’s Sigtran equivalent (IAM), and forward it on, which it does, sending an IAM (Initial Address Message) via Sigtran.
When the media gateways gets confirmation the remote destination is ringing via Sigtran (ACM ISUP message), it translates that to it’s SIP equivalent message which is, 180 RINGING.
The Media Gateway set a reliable sequence number on this provisional response, contained in the RSeq header.
This response is carried through the proxy back to the caller, who signals back to the media gateway it got the 180 RINGING message by sending a PRACK (Provisional ACK) with the same RSeq number.
The Dispatcher module is used to offer load balancing functionality and intelligent dispatching of SIP messages.
Let’s say you’ve added a second Media Gateway to your network, and you want to send 75% of traffic to the new gateway and 25% to the old gateway, you’d use the load balancing functionality of the Dispatcher module.
Let’s say if the new Media Gateway goes down you want to send 100% of traffic to the original Media Gateway, you’d use the intelligent dispatching to detect status of the Media Gateway and manage failures.
These are all problems the Dispatcher Module is here to help with.
Before we get started….
Your Kamailio instance will need:
Installed and running Kamailio instance
Database configured and tables created (We’ll be using MySQL but any backed is fine)
kamcmd & kamctl working (kamctlrc configured)
Basic Kamailio understanding
The Story
So we’ve got 4 players in this story:
Our User Agent (UA) (Softphone on my PC)
Our Kamailio instance
Media Gateway 1 (mg1)
Media Gateway 2 (mg2)
Our UA will make a call to Kamailio. (Send an INVITE)
Kamailio will keep track of the up/down status of each of the media gateways, and based on rules we define pick one of the Media Gateways to forward the INVITE too.
The Media Gateways will playback “Media Gateway 1” or “Media Gateway 2” depending on which one we end up talking too.
Configuration
Parameters
You’ll need to load the dispatcher module, by adding the below line with the rest of your loadmodules:
loadmodule "dispatcher.so"
Next we’ll need to set the module specific config using modparam for dispatcher:
modparam("dispatcher", "db_url", DBURL)                 #Use DBURL variable for database parameters
modparam("dispatcher", "ds_ping_interval", 10)          #How often to ping destinations to check status
modparam("dispatcher", "ds_ping_method", "OPTIONS")     #Send SIP Options ping
modparam("dispatcher", "ds_probing_threshold", 10)      #How many failed pings in a row do we need before we consider it down
modparam("dispatcher", "ds_inactive_threshold", 10)     #How many sucessful pings in a row do we need before considering it up
modparam("dispatcher", "ds_ping_latency_stats", 1)      #Enables stats on latency
modparam("dispatcher", "ds_probing_mode", 1)            #Keeps pinging gateways when state is known (to detect change in state)
Most of these are pretty self explanatory but you’ll probably need to tweak these to match your environment.
Destination Setup
Like the permissions module, dispatcher module has groups of destinations.
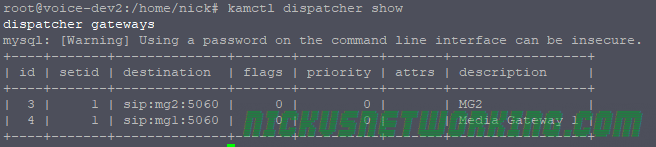
For this example we’ll be using dispatch group 1, which will be a group containing our Media Gateways, and the SIP URIs are sip:mg1:5060 and sip:mg2:5060
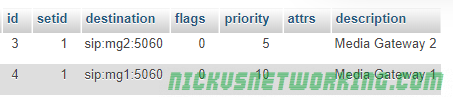
From the shell we’ll use kamctl to add a new dispatcher entry.
You can use kamctl to show you the database entries:
kamctl dispatcher show
A restart to Kamailio will make our changes live.
Destination Status / Control
Checking Status
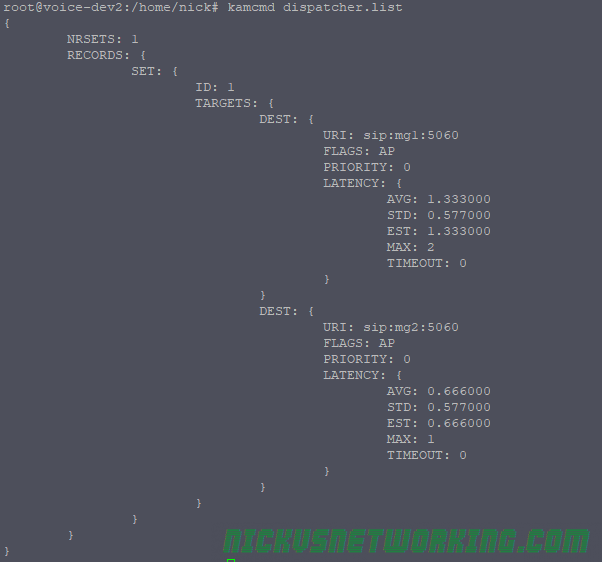
Next up we’ll check if our gateways are online, we’ll use kamcmd to show the current status of the destinations:
kamcmd dispatcher.list
Here we can see our two media gateways, quick response times to each, and everything looks good.
Take a note of the FLAGS field, it’s currently set to AP which is good, but there’s a few states:
AP – Active Probing – Destination is responding to pings & is up
IP – Inactive Probing – Destination is not responding to pings and is probably unreachable
DX – Destination is disabled (administratively down)
AX – Looks like is up or is coming up, but has yet to satisfy minimum thresholds to be considered up (ds_inactive_threshold)
TX – Looks like or is, down. Has stopped responding to pings but has not yet satisfied down state failed ping count (ds_probing_threshold)
Adding Additional Destinations without Restarting
If we add an extra destination now, we can add it without having to restart Kamailio, by using kamcmd:
kamcmd dispatcher.reload
There’s some sanity checks built into this, if the OS can’t resolve a domain name in dispatcher you’ll get back an error:
Administratively Disable Destinations
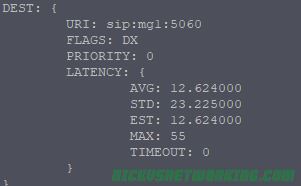
You may want to do some work on one of the Media Gateways and want to nicely take it offline, for this we use kamcmd again:
kamcmd dispatcher.set_state dx 1 sip:mg1:5060
Now if we check status we see MG1’s status is DX:
Once we’re done with the maintenance we could force it into the up state by replacing dx with ap.
It’s worth noting that if you restart Kamailio, or reload dispatcher, the state of each destination is reset, and starts again from AX and progresses to AP (Up) or IP (Down) based on if the destination is responding.
Routing using Dispatcher
The magic really comes down to single simple line, ds_select_dst();
The command sets the destination address to an address from the pool of up addresses in dispatcher.
You’d generally give ds_select_dst(); two parameters, the first is the destination set, in our case this is 1, because all our Media Gateway destinations are in set ID 1. The next parameter is is the algorithm used to work out which destination from the pool to use for this request.
Some common entries would be random, round robin, weight based or priority value.
In our example we’ll use a random selection between up destinations in group 1:
if(method=="INVITE"){
   ds_select_dst(1, 4);    #Get a random up destination from dispatcher
   route(RELAY);           #Route it
}
Now let’s try and make a call:
UA > Kamailio: SIP: INVITE sip:1111111@Kamailio SIP/2.0
Kamailio > UA: SIP: SIP/2.0 100 trying -- your call is important to us
And bingo, we’re connected to a Media Gateway 1. If I try it again I’ll get MG2, then MG1, then MG2, as we’re using round robin selection.
Destination Selection Algorithm
We talked a little about the different destination select algorithm, let’s dig a little deeper into the common ones, this is taken from the Dispatcher documentation:
“0” – hash over callid
“4” – round-robin (next destination).
“6” – random destination (using rand()).
“8” – select destination sorted by priority attribute value (serial forking ordered by priority).
“9” – use weight based load distribution.
“10” – use call load distribution.
“12” – dispatch to all destination in setid at once
For select destination sorted by priority (8) to work you need to include a priority, you can do this when adding the dispatcher entry or after the fact by editing the data. In the below example if MG1 is up, calls will always go to MG1, if MG1 is down it’ll go to the next highest priority (MG2).
The higher the priority the more calls it will get
For use weight based load distribution (9) to work, you’ll need to set a weight as well, this is similar to priority but allows you to split load, for example you could put weight=25 on a less powerful or slower destination, and weight=75 for a faster or more powerful destination, so the better destination gets 75% of traffic and the other gets 25%. (You don’t have to do these to add to 100%, I just find it easier to think of them as percentages).
use call load distribution (10) allows you to evenly split the number of calls to each destination. This could be useful if you’ve got say 2 SIP trunks with x channels on each trunk, but only x concurrent calls allowed on each. Like adding a weight you need to set a duid= value with the total number of calls each destination can handle.
dispatch to all destination in setid at once (12) allows you to perform parallel branching of your call to all the destinations in the address group and whichever one answers first will handle the call. This adds a lot of overhead, as for each destination you have in that set will need a new dialog to be managed, but it sure is quick for the user. The other major issue is let’s say I have three carriers configured in dispatcher, and I call a landline.
That landline will receive three calls, which will ring at the same time until the called party answers one of the calls. When they do the other two calls will stop ringing. This can get really messy.
Managing Failure
Let’s say we try and send a call to one of our Media Gateways and it fails, we could forward that failure response to the UA, or, better yet, we could try on another Media Gateway.
Let’s set a priority of 10 to MG1 and a priority of 5 to MG2, and then set MG1 to reject the call.
We’ll also need to add a failure route, so let’s tweak our code:
So now we’ve made a functional bare-bones PBX using Kamailio, and we’ve touched upon a few of the key functions Kamailio can do, but let’s go over them again to recap.
Future Kamailio posts I’ll be talking about using specific modules and using Kamailio for specific use cases, such as load balancing traffic between carriers and monitoring their up/down status, scaling Asterisk by front ending it with Kamailio, adding/rewriting/removing headers with Kamailio and stateful vs stateless operation, so stick around, but here’s an overview of what we’ve learned.
Routing blocks make code cleaner and allow reuse of the same blocks, you can call a route to do a function without having to write out what to do every time.
In the below example we go from the default “request_route” block, where all new messages start, and jump to the block named “RESPOND_501”.
request_route {
        route(RESPOND_501);    #Jump to the RESPOND_501 block
}

route[RESPOND_501]{
        sl_reply("501", "Not Implemented");   #Send 501 reply
}
From RESPOND_501 we send a stateless reply to whoever sent us the message.
We introduced xlog to write data to the log, and then viewed that data in Syslog.
Building upon having saved the location of registered endpoints we looked up the locations we had Address on Record entries for and forwarded the traffic to them, to allow to make calls between registered UAs.
Quickly we saw issues with this though, if the UA we wanted to reach wasn’t registered, if we hung up before the called party answered, and a host of other scenarios,
We addressed the user not registered scenario and then talked briefly about the routing blocks that come with Kamailio and how they’ll be our savoir.
We put back the default routing blocks that come with Kamailio after highlighting the difficulties with trying to do everything yourself.
We talked about how route(RELAY); will better handle message relaying than tm_relay(); alone, and using route(WITHINDLG); to manage within dialog requests & branching.
Using a database back-end (MySQL) we setup our UAs to be authenticated when registering and before making calls, and listed our Carrier’s IPs so we’d only accept inbound calls from our carrier, not random folks online.
We used kamctl to add users and manage address groups.
route(REQINIT); was used to manage traffic validation.
auth_challenge(“$fd”, “0”); was used to authenticate UAs
and (allow_source_address(“200”)) was used to authenticate carriers.
So by now we’ve secured our box and we’re able to route calls between registered endpoints.
Next up we’ll need to add some external connectivity, meaning we can reach destinations that aren’t directly registered on our Kamailio instance.
We’ve signed up with imaginary carrier at “imaginarycarrier.com” so we can make / receive calls from the PSTN using them as a trunk. They’ll be authenticating us based on our Source IP which we’ve let them know.
At the moment, when we receive an INVITE where the destination isn’t registered, we respond with a 404:
sl_reply("404", "User not Registered"); #If looking up location fails reply with 404
But now we’ve got a carrier we can send calls to if the destination isn’t on our PBX, so we won’t need to reply 404 anymore for calls from our users.
So let’s only give the 404 reply to calls in from our carrier (inbound calls), and instead of giving a 404 response to callers from within our organisation, let’s send the calls to the carrier to make an outbound call.
This means calls to any destination that isn’t registered on Kamailio will go to the Carrier.
But we’ll need to still respond with the 404 response if a carrier sends us a call to a destination that isn’t registered, like an inbound call to a user who isn’t registered.
route[ONNETINVITE]{
if(!lookup("location")){ #Try looking up location
#If looking up location fails then:
if(allow_source_address("200")){ #Check if the request has come from a carrier
sl_reply("404", "User not Registered"); #If if it is from a carrier to a destination we don't have registered reply with 404
exit; #And exit
}else{ #If it's not from a carrier
route(TOCARRIER); #Route the call out to the carrier (to make an external call)
}
}
route(RELAY); #Relay traffic to endpoint
exit(); #Exit
}
Next we’ll need to create our TOCARRIER route,
route[TOCARRIER]{ #Route to send calls to a carrier at 192.168.200.130
rewritehost("imaginarycarrier.com"); #Rewrite host to be the carrier's IP
route(RELAY); #Route relay
}
So let’s put this together and try and make an outbound call.
Call Flow
Outbound call to Carrier
First we see our UA make the call leg to Kamailio
UA to Kamailio: SIP: INVITE sip:61299999999@kamailio SIP/2.0
Kamailio asks the UA to authenticate itself and send that again, the UA does:
It’s not in address group 200, as the from address isn’t one of our Carrier’s IPs, so it ends up at
route(TOCARRIER);
The route block itself rewrites the host part of the request to be the Carrier’s IP, and then forwards it on to the carrier.
route[TOCARRIER]{ #Route to send calls to a carrier at 192.168.200.130
rewritehost("imaginarycarrier.com"); #Rewrite host to be the carrier's IP
route(RELAY); #Route relay
}
So now the INVITE has been forwarded to imaginarycarrier.com, and because we called route(RELAY); it’ll handle all the in dialog requests.
Inbound call from Carrier
So now we know how an outbound call flows, let’s look at inbound calls from the carrier.
Carrier to Kamailio: INVITE sip:61312341234@kamailio SIP/2.0
Kamailio responds with a provisional response of 100 Trying
Kamailio to Carrier: SIP: SIP/2.0 100 trying -- your call is important to us
Now Kamailio checks to see the method type – It’s INVITE, and if the source address is in Address Group 200 (As we defined in Part 8), it is, so it calls the route(ONNETINVITE) block.
if(method=="INVITE"){
if(allow_source_address("200")){ #If from a Carrier IP
route(ONNETINVITE); #Call INVITE handling bloc
Once we get to the ONNETINVITE block Kamailio tries to lookup the location, to see if there’s a device registered with a username that matches 61312341234, using:
lookup("location")
There is, so the route(relay) is called, which forwards the INVITE to the IP it has an Address on Record for for 61312341234.
The carrier sends the INVITE to Kamailio, Kamailio calls lookup location, which fails to return a location as 61299999999 isn’t registered.
Next we check to see if the call is from a carrier by checking if the source address of the INVITE is equal to address group 200.
if(allow_source_address("200")){ #Check if the request has come from a carrier
sl_reply("404", "User not Registered"); #If if it is from a carrier to a destination we don't have registered reply with 404
exit;
As the source address is in address group 200, the carrier gets the 404 “User not Registered” reply, as we see in the packet capture:
Kamailio > Carrier: SIP: SIP/2.0 404 User not Registered
SIP was written to be fast and resonably lightweight.
Motorola StarTAC
At the time SIP was created in 1996, Motorola just had launched it’s first flip phone, the web was only 100,000 websites online and I was playing Pokémon.
Security wasn’t so much an afterthought, but rather not something everyone was as conscious of as they are today.
UDP is the protocol of choice for most SIP deployments, which opens it up for Message Amplification attacks.
As the world saw a few years back with DNS Amplification attacks (Good explanation of how Message Amplification works courtesy of Cloudflare), amplification attacks are enabled by DNS requests being smaller than DNS responses, and carrier networks that don’t verify the source of their traffic allowing someone to request a DNS lookup saying they’re from an IP that isn’t theirs, and that IP getting flooded.
SIP is vulnerable to this too, not exactly zero-day exploits, but something that hasn’t been looked at outside of the theoretical sphere, so I thought I’d roll up my sleeves and see how bad it can look.
For starters it’s worth remembering for a Message Amplification attack to work, it’s got to amplify. RF Engineering will teach you that amplification is the ratio of power in to power out, and it’s the same for Message Amplification, the size of the packet we send has to be smaller than the packet received, else we’re just using someone else to do our dirty work, but not amplifying.
Typical Response Sizes
These are small SIP messages I created in Python using sockets, they’re not the absolute smallest you could go, but they were as small as I could go and still get through the basic packet validation / sanity checks.
Some SIP Proxies drop traffic missing required headers while some don’t, I’ve included the required headers.
I’ve pointed the traffic at a Kamailio instance and measured the bytes sent vs bytes returned.
Method
Request Size (bytes)
Response Size (bytes)
Gain
OPTIONS
168
209
1.2x
REGISTER
380
411
1x
INVITE
197
377
1.9x
Content Length Mismatch
339
400 Missing Required Header in Request
300
Max Forwards Exceeded
213
So the best we can get is a packet 1.9 times the size of the packet we put in, which means SIP isn’t the best for Message Amplification attacks, but passable, so long as it keeps responding.
INVITE gets our best amplification and we can tune this to get the request smaller.
The Workhorse
Carrier grade SIP servers are pretty powerful machines, able to handle huge amounts of traffic, quite literally hundreds of millions a day, generally split across geographic areas and clustered, all on high quality low loss, low latency IP links.
If you have 20,000 subscribers sending a keep alive every 60 seconds, you’re at 72 million dialogs consisting of two packets each (144,000,000 SIP messages).
So after some stripping down I managed to get a valid INVITE that would be responded too with an auth challenge (407 Proxy Authentication Required) which was 125 bytes on the wire, while the response was 330, giving me a gain of 2.64 times what I put in. (I send 125 bytes, I get back 330)
The Setup
We’ve got 3 IPs we’re dealing with here,
Our victim is on 10.0.1.15. UDP port 5060 won’t even be open for this poor fellow, but he’ll get flooded.
Next is our attacker who’s machine is on 10.0.1.12, but claiming their source IP is 10.0.1.15 (the Victim’s IP)
From here our attacker will be sending SIP traffic to 10.0.1.110 (our “carrier” / SIP server), which will send it’s responses to the victim. I’ve spun up an Asterisk instance because it’s the voice eng version of sticky tape, I’d love to test this against something a Broadsoft platform, but licences are hard to come by.
I setup the Asterisk instance to be single threaded, on a box with just enough resources to run, to try this small scale.
I wrote a threaded Python script that will ramp up the number of messages exponentially, we’ll start by sending one message per second, then two messages per second, and so on.
And we’ll do this until something breaks.
The Results
In short – inconclusive at first, but kinda scary after that.
Asterisk died really quickly. “Exceptionally long queue length” popped up after the first second. Interestingly, the box eventually came good and actually replied to every one of our requests, and even sent a BYE. Cute.
So I modified the script to be a bit less aggressive, a random wait time between 0 and 1 seconds between loops for each thread.
Struggling under the load.
I got about 60 seconds in before Asterisk really stopped responding to traffic.
So I tweaked my script again, enabled multi threading on the “carrier” and tried again.
So here’s the best rate (packets per second) I could get after a lot of tweaking:
Packets per Second – Red = Sent, Green = Received
Peak Receive: 14,000 packets per second Peak Send: 20,000 packets per second
In terms of packet size – what we really care about, the results were actually pretty promising:
Click for full size
Peak receive rate of 67Mbps, for which we were putting in ~25Mbps.
So can SIP be used for message amplification attacks? Sure.
Is it particulary practical? Not really. There’s easier targets out there for the time being, so VoIP will be spared the worst of it.
But for a carrier weaponisation of carrier SIP server should be a real fear.
Protection for Carriers
Don’t use UDP for your SIP traffic.
It’s easier said than done, I know… But the reasoning for putting SIP on UDP was primarily speed and limited bandwidth, but with more and more fibre in the ground it’s no longer the case.
SIP over TCP (better yet use it as an excuse to move to TLS), will protect you from some of these attacks.
Flood protection is built into most SBCs these days, if your box is being used to hit a specific target, the source IP will be masquerading as the target. So blocking that and not responding is your best bet. Lots of SBCs still respond with a 4xx “Rate Limiting” response instead of just dropping the traffic, ideally you’d disable the nice “Rate liming” response and just drop the traffic.
Traffic modeling, GeoIP blocking and rate limiting per IP & destination port will also help, as well as monitoring.
Ultimately you can’t stop spoofed UDP traffic coming into your network, but you can stop UDP traffic leaving your network, and if everyone did that we wouldn’t be in this mess.
UDP spoofing is made possible by networks that don’t verify that the traffic that’s leaving their network is traffic that is sourced from your network.
Your core routers know what IPs are assigned to your network, and should be configured to drop traffic that’s leaving the network but not coming from those IPs.
IETF came up with this solution, and it’s built into all major router OSes:
In our last post we went over all the theory, now let’s get started implementing these security features.
Kamailio’s core is a basis to start from, but many common needs are covered by special modules that we need to load to handle certain scenarios.
In order to authenticate traffic, we’ll need to have a source of authentication info (auth_db module) and authorization (permissions module). For this we’ll be using MySQL (although you could use text files, PostGres, etc) to store both sets of data, and using phpMyAdmin to make everything a bit more accessible.
We’ll build upon our last tutorial but we’ll install MySQL and phpMyAdmin:
apt-get install mysql-server phpmyadmin
After following along the install prompts we’ll setup our database connection.
Each of the two modules we’ll be using (auth_db and permissions) require a database source. In each we could specify our database info but instead we’ll create a new variable and fill it with our database info so we only need to update it in one place.
Let’s setup a new MySQL user for our Kamailio instance (in production you’d only grant privileges on the DB we’re going to use):
mysql> CREATE USER 'kamailio'@'localhost' IDENTIFIED BY 'my5yhtY7zPJzV8vu';
mysql> GRANT ALL PRIVILEGES ON * . * TO 'kamailio'@'localhost';
mysql> FLUSH PRIVILEGES;
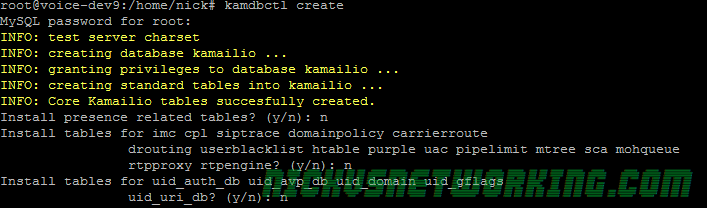
We’ll now use the kamdbctl tool, bundled with Kamailio to create the database tables for us:
kamdbctl create
You’ll be asked for the root password for MySQL and if you want some optional tables (we don’t just yet) and presto, all the tables are now created!
Using kamdbctl
We can now login with phpMyAdmin and see the tables we just added:
Adding Database Connectivity to Kamailio
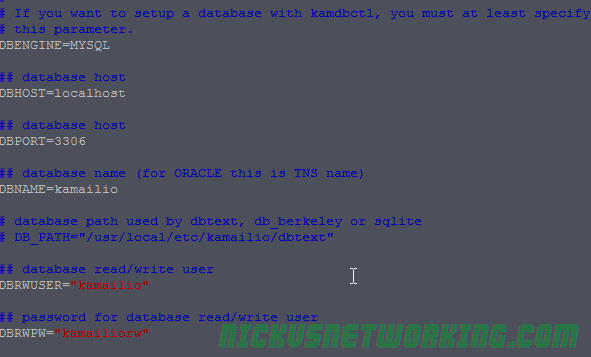
The example config is designed to be nice and modular, so by simply un-commenting the WITH_MYSQL variable and setting the DBURL variable we’ll have set our MySQL database up for the modules we need.
We’ll change:
# *** To enable mysql:
# - define WITH_MYSQL
#
To:
# *** To enable mysql:
#!define WITH_MYSQL
#
So now we’ve defined an variabled named WITH_MYSQL
You’ll see later in the config there’s conditional (if statement) that looks at if WITH_MYSQL has been defined:
# *** Value defines - IDs used later in config
#!ifdef WITH_MYSQL
# - database URL - used to connect to database server by modules such
# as: auth_db, acc, usrloc, a.s.o.
#!ifndef DBURL
#!define DBURL "mysql://kamailio:my5yhtY7zPJzV8vu@localhost/kamailio"
#!endif
#!endif
We’ll change the !define DBURL to include the password in the Database connection string,
It breaks up like this:
mysql:// is the database type (you could use text:// for text based DB or pgsql:// for Postgres)
First part is the username:password@host/table
In this case, our username is kamailio, our password is the one we created (my5yhtY7zPJzV8vu), our host is localhost and our table is kamailio
Adding IP Authentication & Challenge / Response Auth
Like we defined the #!define WITH_MYSQL we’ll define two other blocks to add Authentication:
# *** To enable authentication execute:
# - enable mysql
# - define WITH_AUTH
# - add users using 'kamctl'
#
# *** To enable IP authentication execute:
# - enable mysql
# - enable authentication
# - define WITH_IPAUTH
We’ll change to:
# *** To enable authentication execute:
# - enable mysql
#!define WITH_AUTH
# - add users using 'kamctl'
#
# *** To enable IP authentication execute:
# - enable mysql
# - enable authentication
#!define WITH_IPAUTH
Adding Users & IP Addresses
Now we’ve gone and added these blocks to the code we’ll go about adding some users and IP addresses, to do this we’ll use the kamctl tool.
kamctl is another tool (like kamcmd) used to modify / change the Kamailio config, it’s a shell wrapper for managing Kamailio database among other things.
We do need to setup a few things to get the kamctl working, and to do that we’ve got to edit the kamctlrtc file in the /etc/kamailio directory, to include the details of the database we just setup.
Edit the file to define our database details
Adding Users
Now we can get to work adding some users from the command line:
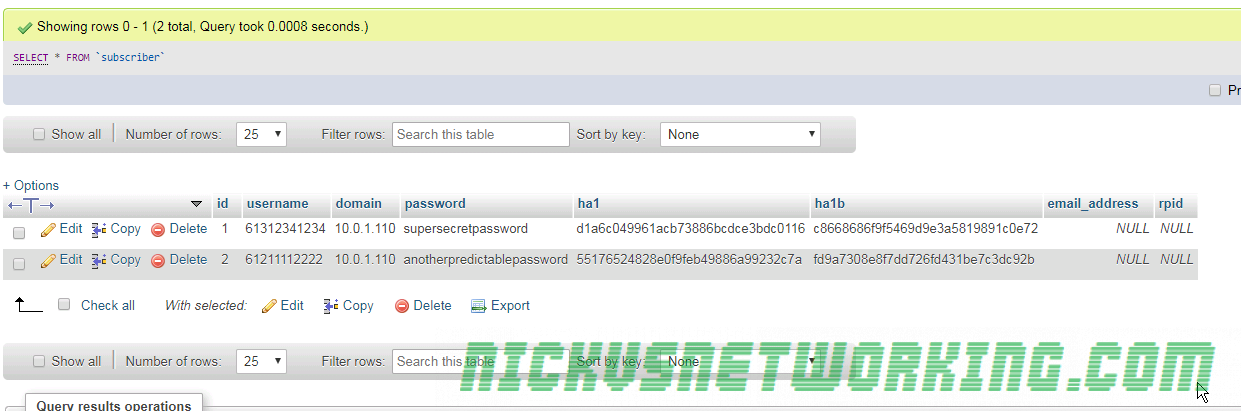
kamctl add 61312341234 supersecretpassword
Here we can see adding a user with the username 61312341234 and the password supersecretpassword. These will makeup the username and password we’ll have on our SIP endpoints. (We’ll make them match the phone numbers of our trunks to make the routing easier down the track)
We’ll add another user so we can make calls between users when we’re testing later too, we’ll add them using kamctl add USERNAME PASSWORD again.
Now if we have a look in the subscriber table in phpMyAdmin we can see the users we created:
Adding Carrier IPs
Next we’ll add the IP Address our carrier is going to send us calls from, so we can allow them call our users.
Kamailio’s permissions module relies on address groups – This means we could have address group (we’ll just use the number 200), which we decide is for our carriers, and add all our carrier’s IP addresses in here, without needing to put each of them into the config.
We could create another address group 300 and put the subnets of our offices in there and only allow REGISTER messages from IPs in those groups.
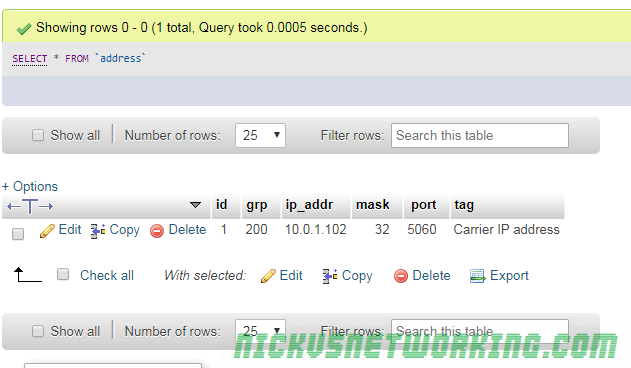
We’ll go through how to use the groups later on, but for now we’ll just add a new IP address to group 200, with a /32 subnet mask, on port 5060 with the name “Carrier IP address” so we know what it is.
kamctl address add 200 10.0.1.102 32 5060 "Carrier IP address"
Now if we have a look in the permissions table in Kamailio you’ll see the info we just added.
By now you’ve probably caught on to the fact kamctl is just a command line tool to add data to the database, but it’s useful none the less.
The final step is to reload the permissions address table – This is done when we restart but it’s good to know you can update it without a restart.
kamctl address reload
Adding authentication / authorization to REGISTER messages
Now let’s actually put this all into practice, the first thing we’ll do is call the REQINIT route to make sure our traffic if (reasonably) clean and take care of the basics.
request_route {
route(REQINIT); #Call REQINIT (Request Initial) route to filter out the worst of the bad traffic and take care of the basics.
Next we’ll setup how we handle REGISTER traffic, adding an auth challenge and only saving the location if the UA successfully responds to the challenge.
if(method=="REGISTER"){ # authenticate requests
if (!auth_check("$fd", "subscriber", "1")) { #If credentials don't match what we have in Subscriber table
auth_challenge("$fd", "0"); #Send an Auth Challenge
exit; #Stop processing
}
save("location"); #Save the location as an AoR
exit; #Stop processing
}
This may all seem a bit backward, but this is an example from the Kamailio devs we’re using, so it shows “the right way” of doing this, let’s break it down.
We know our if(method==”REGISTER”) means we’ll only do this check for REGISTER messages.
The auth_check checks to see if the presented credentials in our auth header are correct. For the first INVITE we don’t have an auth header so it’s not correct, and if we have an invalid password it’s also not correct. You’ll notice it’s prefixed with a if(!auth_check) meaning this if conditional block is only called if it fails the authentication check, and if we do fail the authentication check we issue an auth_challenge to generate a 401 response with an authentication header and send it back to the UA. Then we exit (stop processing).
As the above had an exit we know we’ll only hit blocks below if our credentials are correct, otherwise we’d just get the auth_challenge and exit from the auth_check block.
So as we know these credentials are correct we’ll save the location as an address on record using the save(“location”) function and exit.
So that’s our REGISTER block now handling & requiring authentication, now after restarting Kamailio we can register SIP devices with the username and password we setup, but if we get the username or password wrong, we’ll get rejected.
We can add extra users using the kamctl add command we touched on earlier.
Authorising / Authenticating INVITE messages
INVITE messages are used to setup sessions (calls), so it’s important we secure this too. At this point we’re authenticating to REGISTER, but not create a call (INVITE).
First let’s add a simple check to see if the INVITE has come from the IP of one of the carriers we defined earlier.
For this we’ll use the allow_source_address() command to see if the source address matches what we defined earlier using kamctl address add to address group 200 in the MySQL database.
if(method=="INVITE"){
if(allow_source_address("200")){ #If from a Carrier IP
if(!lookup("location")){ #Try looking up location
sl_reply("404", "User not Registered"); #If looking up location fails reply with 404
exit; #And exit
}
t_relay(); #Relay traffic to endpoint
exit(); #Exit
}else{
sl_reply("403", "Nope. Don't know who you are");
}
}
So we’ve got a simple if for if the source address is in group 200.
Presto, this works for calls from carriers coming in to registered endpoints! We can get inbound calls.
Small catch is our users can’t dial each other any more, as their IP isn’t in address group 200, they just get the 403 “Don’t know who you are” response.
Now we could go and add the subnet where our users are located, but then there’d be no point in using passwords at all. But before we do this let’s create a new routing module, called INVITE to keep everything pretty.
At the very bottom of our config we’ll add
route[ONNETINVITE]{
if(!lookup("location")){ #Try looking up location
sl_reply("404", "User not Registered"); #If looking up location fails reply with 404
exit; #And exit
}
t_relay(); #Relay traffic to endpoint
exit(); #Exit
}
And then we’ll remove most of the code in our if(method==”INVITE”){ block and replace it with this:
if(method=="INVITE"){
if(allow_source_address("200")){ #If from a Carrier IP
route(ONNETINVITE); #Call INVITE handling bloc
}else{
sl_reply("403", "Nope. Don't know who you are");
}
}
Now we’ve made it so we just call ROUTE(INVITE);when we have an INVITE we’ve authenticated. This will save us a lot of extra code when we add our checks to see if the call is from a user we recognize, instead of running through the lookup(“location”) code and relying, we’ll just call route(ONNETINVITE); when we’re happy we know who they are and off we go.
if(method=="INVITE"){
if(allow_source_address("200")){ #If from a Carrier IP
route(ONNETINVITE); #Call INVITE handling bloc
}else{
if (!auth_check("$fd", "subscriber", "1")) { #If credentials don't match what we have in Subscriber table
auth_challenge("$fd", "0"); #Send an Auth Challenge
exit; #Stop processing
}
route(ONNETINVITE); #Call invite handling block
}
}
You may recognize the !auth_check blocks as the same code we used for authenticating REGISTER messages, we’re using it again as it’s the same auth mechanism.
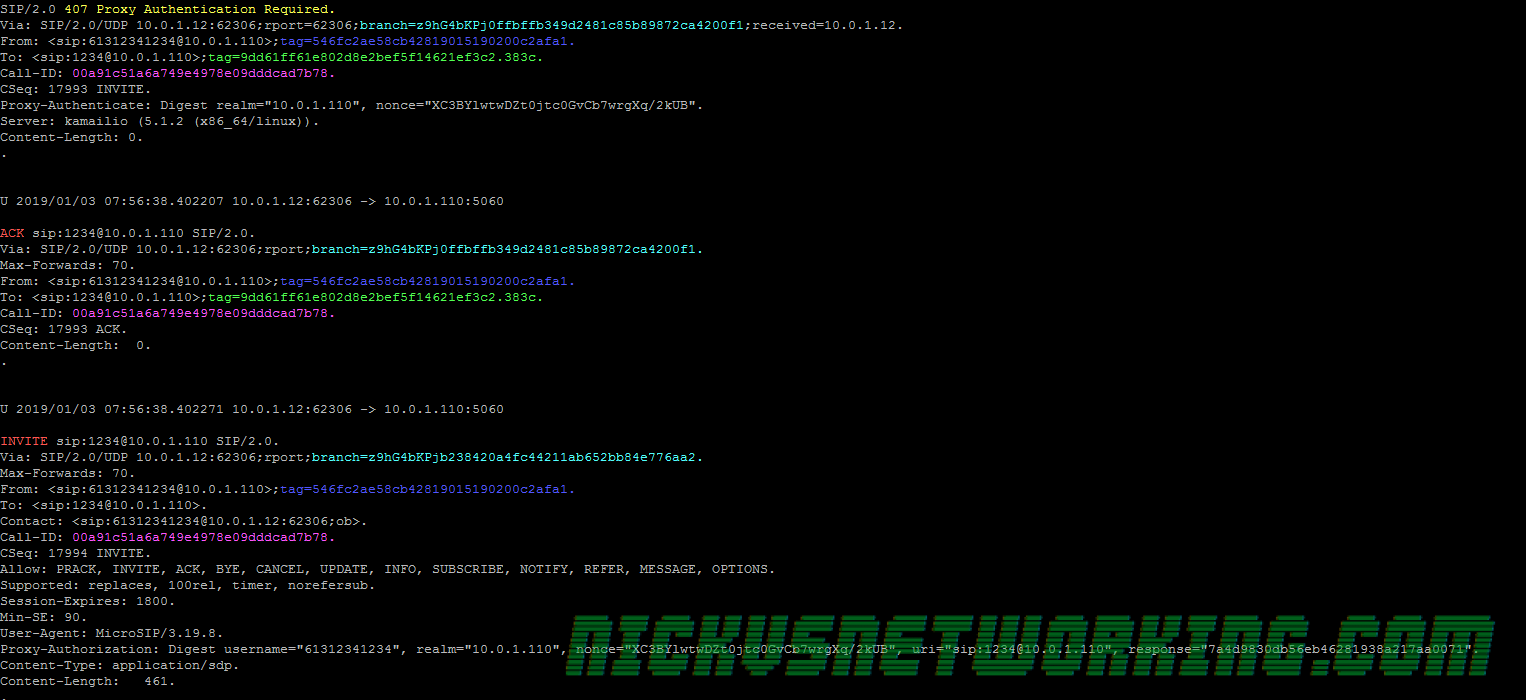
If we pass it we call the route(ONNETINVITE);
If we look at the packet captures we can see our INVITE gets a 407 “Proxy Authentication required” response back from Kamailio.
And the UA then resends the INVITE with an authentication header with correct username and password and we’re on our way!
And that’s it! Phew.
In production we’d want to handle other types of messages that we’d also want to authenticate, we’ll talk about that further down the line, but keep in mind every feature you add what the security ramifications might be.
Next up we’ll use our new found sense of security to add the ability to call numbers off-net (on the PSTN) via a SIP provider!
Before we get too much further, we’ll take a breather and talk about security. We saw in the last tutorial how we’ve got to have a way to handle every scenario, like how to handle a CANCEL to an INVITE, and security is the same.
You are responsible for the code you write being secure.
In this series we’ll ultimately end up with a basic PBX with the ability to make and receive calls between registered users and via trunks from a carrier.
Soon we’ll add the ability to call numbers not registered on our system (trunks) to our system, but now is a good time to talk about securing your system, as the threat of toll fraud is very real, as well as calls from random devices waking you up in the middle of the night.
VoIP security is a big topic, there’s a whole lot of wrong ways to do things, so think before you do.
Authentication, Authorisation and Accounting
Most telephony platforms employ some form of AAA, it’s a good minimum starting point for our system to ensure we Authenticate traffic, to make sure it is who it claims to be, we Authorise traffic to make sure it’s allowed to traverse this part of the network and use theses resources, and finally we’ll Account for resources used, for example recording CDRs and cost for the services used.
Authentication
Authentication in this example we’ll using the Challenge / Response based authentication for traffic from users (Such as REGISTER and INVITE messages), as shown in this example.
When we get an INVITE or a REGISTER from a user, we’ll check their username / password matches what we’ve got on record.
We’ll use IP Address authorisation for inbound traffic from carriers (so we can make sure that we’ll only allow calls from carriers, not just any IP on the internet sending INVITES).
This means when we get an INVITE from a Carrier to send us an inbound call, we’ll make sure it’s from the Carrier’s IP address before we start our user’s phones ringing.
So it’s important we filter everything, and make sure the traffic is valid.
SQL injection is a fun example, but more common examples could include not checking the Max Forwards header and looping packets out and back in infinitely (imagine no spanning tree and plugging a switch into itself) and not responding to known bad user agents like sipcli and sipvicious.
Luckily again the Kamailio team have covered this before, Kamailio comes with a module for handling a lot of the common threats.
With the boilerplate routes we talked about in the last tutorial all you have to do is add route(REQINIT); at the start of your routing block and you’ll get:
Dodgy UA filtering (You may want to add your own)
Basics of Flood Prevention (if you want it)
max_forward checking (for handling routing loops)
OPTIONS response handling
Sanity checking
In the next post we’ll go about putting these things into practice.
In the last tutorial we saw some issues, calls hung up before they were answered (CANCEL), we also would have run into issues with timeouts, issues if the remote end was registered but no longer responding, behind a NAT etc.
We saw a real example of what I touched on on the opener to this series, that you have to deal with everything, and it’s a daunting task.
Kamailio allows you to deal with all these problems yourself, writing your own routing blocks, but it also comes with a bunch of useful routing blocks in the example config, that we can re-use so we don’t need to specify how to manage every little thing ourselves – unless we want to.
So lets add some of these useful routing blocks,
We’ll add this at the start of our request_route{ block
request_route {
if (is_method("CANCEL")) {
if (t_check_trans()) {
route(RELAY);
}
exit;
}
if (!is_method("ACK")) {
if(t_precheck_trans()) {
t_check_trans();
exit;
}
t_check_trans();
}
# handle requests within SIP dialogs
route(WITHINDLG);
So now our config looks like this:
request_route {
if (is_method("CANCEL")) {
if (t_check_trans()) {
route(RELAY);
}
exit;
}
if (!is_method("ACK")) {
if(t_precheck_trans()) {
t_check_trans();
exit;
}
t_check_trans();
}
# handle requests within SIP dialogs
route(WITHINDLG);
if(method=="INVITE"){
if(!lookup("location")){
sl_reply("404", "User not Registered");
exit;
}
lookup("location");
t_relay();
exit();
}
        if(method=="REGISTER"){
                save("location");
                exit;
        }
xlog("No idea how to respond to method $rm");
sl_reply("501", "Not Implemented");
}
As you can see we’ve added an if statement to match if the method is CANCEL or ACK, and referenced some routing blocks:
route(RELAY)
route(WITHINDLG);
We’ve also added some code to manage ACKs, but we’ll go through that on our lesson on Statefulness, for now just roll with it.
You’ll probably notice if you try and use this config that it won’t work, that’s because we’re referencing these two routing blocks without actually having defined them.
To keep us moving I’ve added all the routing blocks that come with the default Kamailio config, and added in our code to the link below;
To recap, we added the boilerplate routes that come with Kamailio and referenced them in our code to better handle in dialog responses.
This is because handling all these possible scenarios, like NAT, cancel, no response, REINVITE, UPDATE, etc, etc, would take us ages to cover, and require a pretty good understanding of Kamailio and of SIP in practice.
So use the example I’ve linked above and tune in next time, where we’ll talk about adding security and authentication to our system before we connect it to the outside world.
So now we’ve got Kamailio handling REGISTER traffic, and we know what IPs endpoints are on, so let’s join this together and let’s route a call between two endpoints via our Proxy!
We’ll work on the config we were working on in the previous tutorial:
/* Main SIP request routing logic
 * - processing of any incoming SIP request starts with this route
 * - note: this is the same as route { ... } */
request_route {
        if(method=="INVITE"){
                sl_reply("480", "Temporarily Unavailable");
                exit;
        }
        if(method=="REGISTER"){
                save("location");
                exit;
        }
        sl_reply("501", "Not Implemented");
}
Let’s change how we handle the INVITE messages in our if(method==”INVITE”) block so instead of responding with a 480 Unavailable response, let’s lookup the location we saved if it was a REGISTER and forward the INVITE to the IP we’ve got.
Let’s break down each of the new functions we’ve introduced:
lookup(“location”);
In the last post we introduced save(“location”); which saves an Address on Record for the URI. lookup(“location”); looks up the IP address of the URI we’re after in the Address on Record table we wrote to with our save(“location”); call and automatically sets it as the destination IP of where we’re going to send the message.
When a user registered via a SIP REGISTER request, we saved their details, now we’re looking them up.
You could even replace the lookup(“location”) call with say a SQL lookup on an address book, and save the output to the IP the INVITE will be forwarded to, but lookup(“location”); does this it all in one function.
t_relay();
t_relay is transactional relay function. By transactional it means Kamailio remembers this session next time it’s referenced, we’ll touch upon transaction aware / stateful SIP proxies later, but for now what you need to know is it forwards the INVITE we just received to the address we got from our lookup(“location”).
exit();
Exit bails out so we won’t keep processing after that, it doesn’t just bail out of our current conditional but stops processing this request further. Without it we’d still go on and send the 501 Not Implemented reply.
The Setup
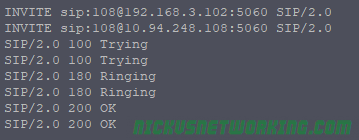
I’ve setup two phones – One using the username 106 and the other using 108, I’ve pointed both to the IP of our Kamailio instance and they’ve registered. Keep in mind if you’ve restarted Kamailio it’ll lose it’s location table, as it’s stored in memory, so you’ll have to force the phones to register again.
You can check you’ve got devices registered by using kamcmd ul.dump at the command line to confirm you’ve got entries for both. I have so I’ll try dialling 108 from 106:
Here we can see the INVITE coming in, the lookup(“location”) doing it’s magic and forwarding the messages to the IP of 108.
The 100 Trying, 180 Ringing and 200 OK messages all go through on their own as they’re part of an existing dialog which we’ll touch on why later in the series,
So we’re done here right? Well, not quite…
What if a call is made to an endpoint that isn’t registered? Or if they send a CANCEL before the call is answered?
Let’s take a look at what happens if we try this:
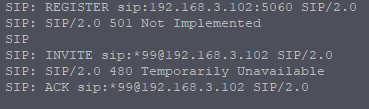
The INVITE is received by Kamailio, a 100 TRYING response is sent back, but Kamailio isn’t really doing anything, after about 10 seconds I try and end the call from my softphone (CANCEL) and I get a 501 response back as we haven’t defined how to handle CANCEL messages, so there’s no way to end the call, and we’re stuck…
When things don’t go to plan…
As I said in the Introduction to Kamailio post, the power in Kamailio is the ability to define how every part functions, but to quote Spiderman – With great power comes great responsibility, and Peter Parker didn’t have the 269 pages of RFC3261 to grapple with…
We know the above example works fine when there’s a device registered on the other end and if they answer, but if they don’t? As we’ve seen, we’ve got to cater for every scenario.
Handling no registered user
Instead of just lookup(“location”) to lookup location we can put it in an if statement with some code to be run if it fails.
We’ll use the the if(!lookup(“location”)){ } call to create a new conditional for if lookup location fails, and inside it we can reply with a 404 and exit.
The if(!){} block can be used to try and run a command, and if it fails, it’ll run what’s between the {}.
In our scenario we try and lookup the location, if that fails, for example because we don’t have an Address on Record for that destination, it executes what’s between the {} in this case we use sl_reply to send a 404 error back and then exit:
So now if an INVITE is received to a destination we can’t find via a lookup(“location”); we respond with a 404 and exit.
Handling CANCEL (Calls terminated before answered)
So now we’ve specified how we’ll handle calling a device that isn’t registered, next we have to specify how we deal with CANCEL messages, so if the calling party hangs up (cancels) the call before it’s answered by the called party, it stops ringing the called party.
This means our SIP server has to get the CANCEL message from the caller who’s given up, respond with it with a 200 OK to the caller, before forwarding that CANCEL onto the next hop (the user we were trying to call).
By this point you’re probably dreading your work ahead of you as you try and understand how to handle every scenario, every eventuality and all the weird gotchas like CANCEL.
If only there was someone else that had done this before…
“Homer the Vigilante” Season 5 / Episode 11
Luckily the Kamailio team have got pretty great examples in thekamailio.cfg file that ships by default (that one we ruthlessly gutted to keep it simple in the second tutorial) and now is a good time to re-introduce some of these routing blocks, that are reused in most Kamailio instances.
The boilerplate that gets you up and running faster and means you don’t have to worry about quite as many possible scenarios or read about how to handle CANCELS ad nauseam.
In the next tutorial we’ll talk about these routing blocks, and add them to our code to manage scenarios like CANCEL, timeouts to the remote destination, and how you can use these blocks to speed things up and keep everything RFC compliant.
As we talked about in the post onSIP Registrars, SIP Registrars take the REGISTER requests from SIP endpoints and store their contact details in the form of an Address on Record (AoR). This AoR contains the URI and the endpoints’ current IP it just sent the REGISTER message from.
The primary use of this is it allow us to know how to reach people. It’s kind of like an address book for mapping current IP against a SIP URI, as IP Addresses of SIP endpoints may change often.
So our Kamailio instance is going to receive an REGISTER message, store the Contact as an address on record, and respond 200 OK. Let’s build upon the config we started with in the last tutorial:
/* Main SIP request routing logic
 * - processing of any incoming SIP request starts with this route
 * - note: this is the same as route { ... } */
request_route {
        if(method=="INVITE"){
                sl_reply("480", "Temporarily Unavailable");
                exit;
        }
        sl_reply("501", "Not Implemented");
}
So let’s add an if statement to manage REGISTER messages, and save their location:
/* Main SIP request routing logic
 * - processing of any incoming SIP request starts with this route
 * - note: this is the same as route { ... } */
request_route {
        if(method=="INVITE"){
                sl_reply("480", "Temporarily Unavailable");
                exit;
        }
        if(method=="REGISTER"){
                save("location");
                exit;
        }
        sl_reply("501", "Not Implemented");
}
So we’ve added an IF statement to find if the SIP method is a REGISTER message, and if it is, we’ll call the save(“location”); function.
The save() function saves the Contact address we just received to a database (in this case one in memory) in the form of a SIP URI and current Contact location, these two bits of info combined are known as an address on record (AoR) and the save function, if successful, responds with a 200 OK automatically.
I’ve pointed a SIP endpoint at it again, we revive the REGISTER, respond with 200 OK,
As you can see REGISTER sent to us, 200 OK responded.
So that’s it – Our SIP endpoint is happy and by calling the save(“location”) we’ve called the built in function to store the Contact as an Address on Record and respond with 200 OK.
So how do we access this information and what can we do with it?
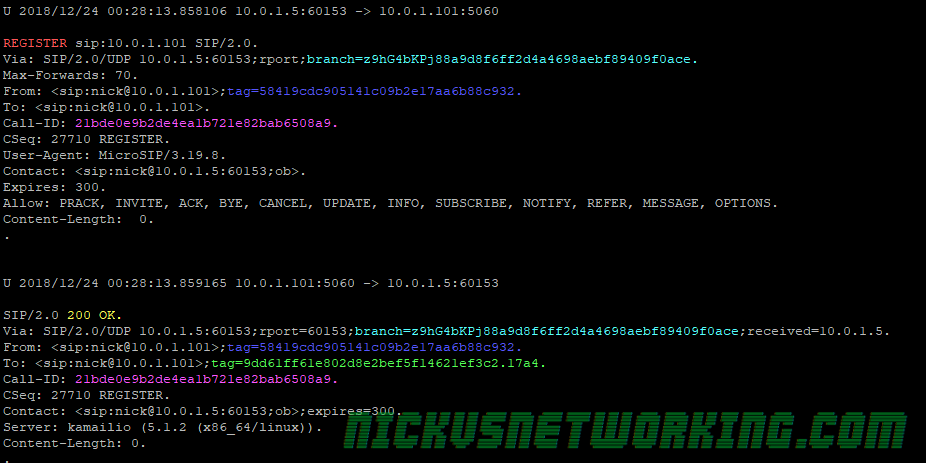
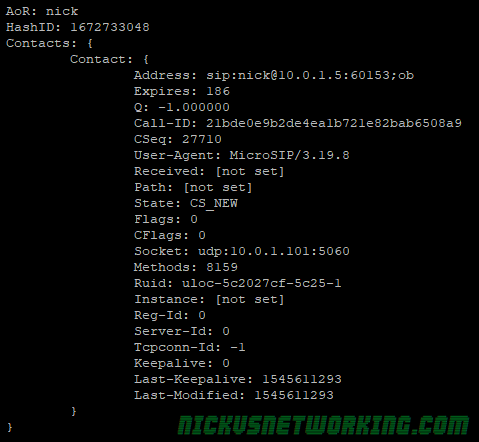
Kamailio comes with two tools for accessing Kamailio while it’s running. In this example we’ll use kamcmd to check what’s registered on our system. After we’ve seen a device register, from command line we’ll run:
kamcmd ul.dump
This calls kamcmd the Kamailio command line tool, and calls the ul.dump function. ul is short for userloc – The module for user location management, and dump outputs all the contents of the userloc table.
Here we can see the info we’ve stored from the URI of the user (sip:[email protected]:60153) who sent a REGISTER at the Unix timestamp in “Last-Modified”.
So now we’ve created a SIP registrar, in the next tutorial we’ll use this information to route SIP INVITE messages to a registered endpoint, looking up it’s IP and get a call happening!
In production you’d generally not have a SIP registrar like this open to accept any registrations, you’d authenticate SIP endpoints using the REGISTER -> 401 Unauthorised -> REGISTER -> 200 OK process outlined here. To do this using the usrloc module we’d need to introduce the concept of a stateful proxy, as we need to remember what the challenge we sent them was to compare it with what we’re expecting, but we’ll touch upon this later in the series.
I know when I look back on code I’ve written in the past I cringe a little. As you go along you learn more efficient ways to do things, so before we hop to far into Kamailio we’re going to talk about how we’ll write our kamailio.cfg file.
General Rules
Some rules of thumb to get you started with writing Kamailio configs:
All lines that do things (instructions) have to end with a semicolon
Comments start with # if single line or /* blah */ for multi-line
Changes to the config only take effect when you restart Kamailio
Now we’ve got that out of the way let’s continue on from our last tutorial and start routing requests!
(We’ll skip all the config above the request_route{} block that configures the modules and their setup, it’s all very important, but we’ll touch upon that in a later tutorial I promise)
As I touched upon in the Introduction post, you define what Kamailio is and does in terms of routing SIP requests, so let’s jump straight in and get started on the blocks that take care of this.
The request_route{} Block
The request_route{} block is where all our incoming SIP requests start off. Replies / responses are handled a bit differently (more on that later), but essentially every new SIP request / message / dialog starts off here.
We can create new blocks other than request_route{} to help keep our code clean, in the same way we might define functions while programming.
Let’s take a look:
request_route {
        route(RESPOND_501);    #Jump to the RESPOND_501 block
}

route[RESPOND_501]{
        sl_reply("501", "Not Implemented");   #Send 501 reply
}
We can see in the above example, any SIP Request coming in will enter our request_route{},
In our request_route{} block we only have one instruction, which is route().
The route() command allows us to then specify another block of the config file / code to continue on from. Think of it kind of like calling a function or god forbid – a GoTo. So in this example the call comes in and then routed off to a new routing block called route[RESPOND_501],
This allows us to reuse bits of code multiple times and generally keep everything a lot cleaner.
It’s worth noting that unless you tell it to, routing to another block won’t stop Kamailio from continuing to execute it’s way through the code, it’ll do what it’s told in the other routing block and then finish what it started.
Let’s look at an example:
request_route {
        xlog("Hello, I am in the request_route");
        route(RESPOND_501);    #Jump to the RESPOND_501 block
        xlog("Back in request_route");
}

route[RESPOND_501]{
        xlog("Now I am in the respond 501 route");
        sl_reply("501", "Not Implemented");   #Send 501 reply
}
If we’re to run this code and send a SIP Request to it, we’d see each of these xlog entries in your syslog,
As the message firsts hits the xlog(“Hello, I am in the request_route”);, then is routed off to route[RESPOND_501]
In route[RESPOND_501] we’ll see the xlog(Now I am in the respond 501 route”); – Kamailio has now executed the route[RESPOND_501] block and resumes from where it was in request_route{}
When we get back to request_route we get the final xlog(“Back in request_route”);.
We can stop routing in a specific block using the exit; command which stops processing that request once hit. For example:
request_route {
        xlog("Hello, I am in the request_route");
        route(RESPOND_501);    #Jump to the RESPOND_501 block
        xlog("Back in request_route");
}

route[RESPOND_501]{
        xlog(Now I am in the respond 501 route");
        sl_reply("501", "Not Implemented");   #Send 501 reply
        exit;
}
Because of the exit we added in the route[RESPOND_501] Kamailio stops executing at that point, so we don’t continue passing through the config file and this time we won’t get the final xlog(“Back in request_route”); call.
Boilerplate Routes
Kamailio’s example config by default comes with a lot of preconfigured routes that can be reused over and over again, so you don’t have to create everything from scratch if you don’t want to. We’ll talk about using these in an upcoming tutorial, but for now just keep in mind there’s pre-written routing blocks for things like managing NAT, sanity checking traffic, etc.
Basic Message Routing
Let’s take a very basic use case, and write some code in the request_route{} block.
We’ll set it up so if we receive an INVITE request, we’re going to respond with a 480 Temporarily Unavailable message, and for everything else, we’ll respond with 501 “Not Implemented”.
/* Main SIP request routing logic
 * - processing of any incoming SIP request starts with this route
 * - note: this is the same as route { ... } */
request_route {
        if(method=="INVITE"){
                sl_reply("480", "Temporarily Unavailable");
                exit;
        }
        sl_reply("501", "Not Implemented");
}
So let’s break this down,
First we have a an if statement – If the method of the SIP message is an INVITE request, then execute the code inside the curly brackets.
Inside the curly brackets we’ll respond with 480 Temporarily Unavailable, using sl_reply() (You may remember from the last post that sl_reply sends a reply back to the sender of the message with the response code and text specified) and then exit, meaning we won’t continue executing what’s next in the config.
Finally outside of our if statement (so catching any SIP requests who’s method isn’t INVITE) we’ll respond with 501 “Not Implemented”.
This tutorial will use Kamailio on Ubuntu 18.04, installed from the default repos using apt-get, but these concepts will apply to any version 4.x Kamailio instance, though some of your directories & file names may differ.
After setting up our Ubuntu box we’ll update our repos and install Kamailio
apt-get update
apt-get install kamailio*
Now we’ve installed Kamailio with all the extra modules and plugins.
In production you’d only install what you need, but this would mean our development environment won’t be complaining about not having modules, so we’re installing the lot.
So now Kamailio is installed we can get to work making it do something.
Kamailio is driven by a text based config file that defines the routing rules and how we’ll handle SIP messages.
You need to specify how to handle the different types of SIP messages (aka SIP methods / requests), in a way the other devices communicating with it will understand and that generally follows the standards.
But for our example, we’ll create a really basic config that replies to any SIP message sent to it, saying it doesn’t know how to handle that message.
We’ll open kamailio.cfg – the text file that contains all our routing info, and get to work.
vi /etc/kamailio/kamailio.cfg
You’ll see the config starts by defining what modules to load, and the config for each of these modules. For us, the defaults will work for now, let’s get to the juicy bits. Keep moving down the config file until you hit this section:
/* Main SIP request routing logic
 * - processing of any incoming SIP request starts with this route
 * - note: this is the same as route { ... } */
request_route {
The request_route section is what handles the initial SIP message that comes through.
We’ll remove all the text after request_route { leaving us with a blank canvas in terms of how we handle messages. We’ll then put in a single line to log to syslog when we get a SIP message:
/* Main SIP request routing logic
 * - processing of any incoming SIP request starts with this route
 * - note: this is the same as route { ... } */
request_route {
        xlog("I got a message");
}
If we were to stop here and restart Kamailio, when a SIP message comes into our SIP server, we’d just write an entry to syslog saying “I got a message” each time we get a SIP message, but Kamailio won’t respond to the received SIP message, it’ll just enter a log entry each time it gets a SIP message. So let’s respond to any SIP message we get with a 501 “Not Implemented” message.
/* Main SIP request routing logic
 * - processing of any incoming SIP request starts with this route
 * - note: this is the same as route { ... } */
request_route {
        xlog("I got a message");
        sl_reply("501", "Not Implemented");
}
So let’s break down the two functions we just used.
xlog(“”);
xlog is your friend. Put simply xlog prints whatever you put inside the parenthesis to syslog. You can use it to check to see if your messages are getting to the part of the config you want, check what pseudovariables are doing and many other things, but I’m getting ahead of myself. For now you just need to know xlog is like NoOp() in Asterisk, print() in Python, etc.
sl_reply();
sl_reply is stateless reply. It takes two parameters, the SIP Response Code and the text to go with it, when called it sends the SIP response code and text back to the requester. In this case we’re using SIP Response Code 501, which translates to Not Implemented, meaning the server does not support the functionality required to fulfill the request aka:
Essentially what a 501 response translates to
Putting it into Play
Now let’s restart Kamailio to make our config live, point a SIP endpoint at it and see what happens!
First we’ll restart Kamailio:
/etc/init.d/kamailio restart
All going well you’ll restart Kamailio and be good to go:
After restarting via init.d you should see [ok] if it restarted sucesfully
Now let’s fire some traffic at it and see what happens. I’m using tcpdump to capture traffic on port 5060, and I’ve setup a SIP endpoint that’s going to try and register to our IP to see what we get:
Presto – REGISTER message received and 501 response
So this is exciting, we now have a SIP server that can do nothing except let people know it can do nothing.
Let’s dig a bit deeper into the fundamentals and then we’ll have a good foundation to start building from, and get to work on stitching everything together to create something useful.
Kamailio (formerly OpenSER) is an open source SIP server, but Kamailio is a bit difficult to grasp what “it is“, but once you understand it’s all very logical.
Over this series I’ll attempt to explain what Kamailio is (and isn’t), and through a series of examples, show you how to use Kamailio to build cool stuff.
I’ll try and make it accessible for people with a background / understanding of VoIP, specifically with an understanding of SIP.
There’s a lot of meticulous documentation out there on specific Kamailio modules, but not much I could find that gives an overview of how the platform works, so over this series of Tutorials, I’ll attempt to cover the basics of using Kamailio to solve problems, as together we build a basic PBX with Kamailio, touching upon some of the common modules and core concepts of Kamailio.
So what is Kamailio ?
Kamailio is a SIP Server.
It’s a bit confusing at the start, because Kamailio isn’t like FreeSWITCH, Asterisk, YATE, an SBC, a PBX or any of other telephony platforms you may have encountered before, because out of the box, Kamailio doesn’t really do anything.
You’ve got to tell Kamailio how to do everything.
Let’s take a SIP INVITE message, used to start a call (aka session) that we might send to a PBX with the domain name biloxi.example.com and a SIP endpoint registered as ‘101’:
If we sent this message to a generic PBX, the PBX would have the logic to know that it has an extension 101 and the PBX would ring extension 101.
Our generic PBX looks at the Request URI in the INVITE message it received and has the logic predefined to know that 101 is a device it has registered and that we want to connect to that device, so sends the call to the matching device.
If we sent the same INVITE to an Asterisk box, Asterisk would take a look at our SIP INVITE message, and see if there’s an entry in the dialplan under the current context for 101. Asterisk doesn’t assume if you have a user registered on SIP/101 and receive a SIP INVITE to 101 that you want to get to SIP/101, it’d need to be told this through the dialplan.
Kamailio takes this example even further.
If we want to dial 101 on Kamailio and have it ring the device registered on 101, you have to tell Kamailio what to do when it receives an INVITE message in the first place, lookup if that destination is in our AOR (we’ll get to that) table, and then forward the INVITE to the destination if it exists, and forward the provisional responses (1xx) and finally the final response (200 OK) from the remote end back to the originator. Plus we’ve got to think about how we handle a scenario where the destination doesn’t exist, or isn’t registered, of if the destination returns a 4xx response to the INVITE, how we handle provisional responses and CANCEL messages and finally the BYE message (if we’re record routing).
Phew. This seems like a lot to handle.
It all seems pretty daunting at first, calling from one SIP Endpoint to another seems like a pretty rudimentary thing in a telephony product, but by putting how the system thinks, routes and manipulates messages up to you, we open the doors to all the possibilities.
What if you want something to sit in front of your servers and only allow certain SIP User Agents? Or load balance between several soft-switches? Or route least-cost between connected carriers and seamlessly failover if one is lost? Rate limit dodgy traffic before it hits your environment? Manage hundreds of thousands of registrations?
Kamailio can do all of that.
Kamailio can do anything you can think of (to do with signaling).
And that’s the awesome part of Kamailio. It is, what you define it to be.
If we want to send a SIP message to Bob’s phone, we needs to know the IP Address of Bob’s phone. There are 4,294,967,296 IPv4 addresses, so finding Bob may take a while.
Bob could let us know his IP address, but what if Bob’s IP changes? If he’s using a Softphone while he’s out to lunch and a desk phone once he gets back to the office. How do we find Bob?
SIP manages this using a SIP Registrar, essentially, when Bob goes out to lunch and starts his softphone app, the softphone checks in with the Registrar and lets the Registrar know what IP to find Bob on now (the softphone’s IP).
When he gets back to the office he closes the softphone app, as it shuts down it checks in with the Registrar again to let it know Bob’s not using the softphone any more.
So our Registrar keeps track of the IP address you can find a SIP endpoint on.
It does this using an Address on Record (AoR). It’s a record of a contact – Like Bob, and the IP Addresses to contact Bob, kind of like DNS is a record of the domain name and the IP it translates to.
A simplified example AoR might look like:
Bob | 192.168.1.2 | Expires 1800
So if we want to send a SIP message to Bob, we look up Bob’s IP in our Address on Record list, and send it to that IP.
A Registrar takes the info received in a SIP REGISTER messages and stores the IP Address and contact info in the form of an Address on Record (AoR).
Registrars also manage expiry, if Bob’s softphone sends a SIP REGISTER message letting us know we’re on one IP address, and then his phone runs out of battery or drops out of coverage, we don’t want to keep sending SIP messages that are going to be lost, so in this case Bob has 1800 seconds left, after which his Address on Record will be discarded if he doesn’t send another REGISTER message before then.
Different SIP Registrars use different ways to store this information, and some store more info, like User-Agent, NAT information and multiple contact IP addresses. Most implementations of a SIP Registrar use some form of database back end or another to store this information. In my Kamailio Registrar example we store it in memory, but you could store it in some form of SQL database, text files, post it notes or punch card, so long a you have a quick way to look it up when needed.
So that’s a SIP Registrar in a nutshell, we’ll talk more about the REGISTER process and flow, including what the www-auth header does, the Contact header and multi endpoint registration in future posts.
I can see it’s registered, but when I call it it’s not ringing, what’s wrong?
Support team
It’s a question I get every so often, and it generally comes down to a misunderstanding in the way the SIP Register mechanism works.
When a UA registers to a SIP server it includes an “Expires:” header, which means it’s registration will expire after that time.
It doesn’t mean it’ll be active that whole time, just that for the time specified it intends to be at that address, but life, and networks, often have other plans.
Let’s jump out of SIP for a minute and imagine you’re going to give me a package, I leave you a note saying:
I’ll be waiting outside the station in a trench-coat under the lamp post between 7:00 and 7:15
You get there at 7:12 but you can’t deliver the package. I’m nowhere to be seen.
The note I left says I’ll be there during that time, but I’ve disappeared, and no you can’t hand the package to me.
Just because you have a note saying I’ll be there, doesn’t mean I still will be. It was my intention to be there, but I’m obviously not.
The SIP register is the same as the note left on the desk. I intended to be there, but I’m now obviously not, and I haven’t had a way to reach you to let you know this has changed, or I myself don’t know.
You see this in SIP from time to time, generally it’s due to the connection the UA is coming from dropping or it’s public IP changing.
For example, a REGISTER is sent with an Expires of 3600 seconds (An hour) to a SIP switch from IP address 1.2.3.4.
Half an hour later your connection drops.
As far as the SIP switch is concerned it’s going to send any incoming messages to 1.2.3.4, as 1.2.3.4 said it’d be there for the next hour.
So even though the connection is dropped to 1.2.3.4 the SIP Switch has no way of knowing this and continues to forward any traffic for that user to 1.2.3.4 until the 3600 seconds is up since it last tried to REGISTER.
Same thing could happen if our UA is behind a NAT and the external IP changes or the connection is changed. The UA doesn’t know anything has changed, so no REGISTER is sent to refresh, and messages from the SIP server are sent to the old address.
A lot of SIP switching platforms allow you to view register status, but just keep in mind it doesn’t mean the device is still answerable at that address, only that it intended to be.