Namespace(k='11111111111111111111111111111111', op='22222222222222222222222222222222', opc=None) Generating OPc key from OP & K Generating Multimedia Authentication Vector Input K: b'11111111111111111111111111111111' Input OPc: b'2f3466bd1bea1ac9a8e1ab05f6f43245' Input AMF: b'\x80\x00'
Of course, being open source, you can grab the functions out of this and make a little script to convert everything in a CSV or whatever format your key data is in.
So what about OPc to OP? Well, this is a one-way transaction, we can’t get the OP Key from an OPc & Ki.
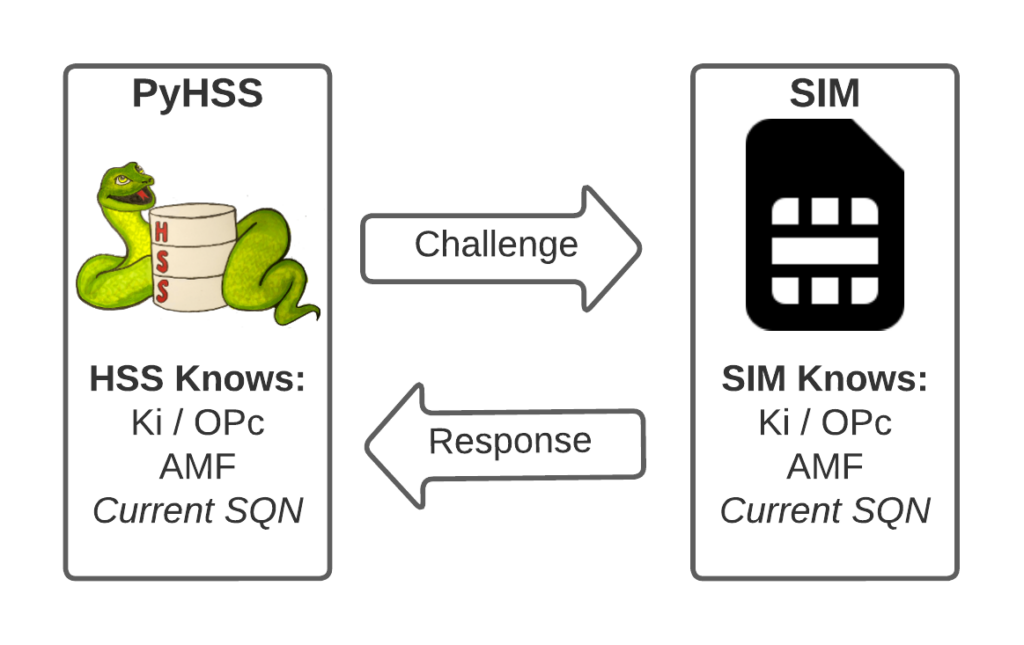
I’ve written about Milenage and SIM based security in the past on this blog, and the component that prevents replay attacks in cellular network authentication is the Sequence Number (Aka SQN) stored on the SIM.
Think of the SQN as an incrementing odometer of authentication vectors. Odometers can go forward, but never backwards. So if a challenge comes in with an SQN behind the odometer (a lower number), it’s no good.
Why the SQN is important for Milenage Security
Every time the SIM authenticates it ticks up the SQN value, and when authenticating it checks the challenge from the network doesn’t have an SQN that’s behind (lower than) the SQN on the SIM.
Let’s take a practical example of this:
The HSS in the network has SQN for the SIM as 8232, and generates an authentication challenge vector for the SIM which includes the SQN of 8232. The SIM receives this challenge, and makes sure that the SQN in the SIM, is equal to or less than 8232. If the authentication passes, the new SQN stored in the SIM is equal to 8232 + 1, as that’s the next valid SQN we’d be expecting, and the HSS incriments the counters it has in the same way.
By constantly increasing the SQN and not allowing it to go backwards, means that even if we pre-generated a valid authentication vector for the SIM, it’d only be valid for as long as the SQN hasn’t been authenticated on the SIM by another authentication request.
Imagine for example that I get sneaky access to an operator’s HSS/AuC, I could get it to generate a stack of authentication challenges that I could use for my nefarious moustache-twirling purposes whenever I wanted.
This attack would work, but this all comes crumbling down if the SIM was to attach to the real network after I’ve generated my stack of authentication challenges.
If the SQN on the SIM passes where it was when the vectors were generated, those vectors would become unusable.
It’s worth pointing out, that it’s not just evil purposes that lead your SQN to get out of Sync; this happens when you’ve got subscriber data split across multiple HSSes for example, and there’s a mechanism to securely catch the HSS’s SQN counter up with the SQN counter in the SIM, without exposing any secrets, but it just ticks the HSS’s SQN up – It never rolls back the SQN in the SIM.
The Flaw – Draining the Pool
The Authentication Information Request is used by a cellular network to authenticate a subscriber, and the Authentication Information Answer is sent back by the HSS containing the challenges (vectors).
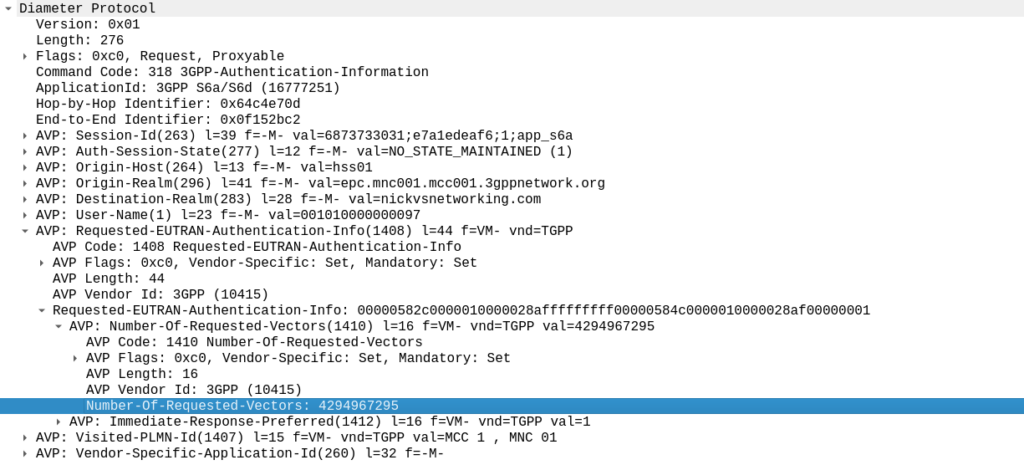
When we send this request, we can specify how many authentication challenges (vectors) we want the HSS to generate for us, so how many vectors can you generate?
TS 129 272 says the Number-of-Requested-Vectors AVP is an Unsigned32, which gives us a possible pool of 4,294,967,295 combinations. This means it would be legal / valid to send an Authentication Information Request asking for 4.2 billion vectors.
It’s worth noting that that won’t give us the whole pool.
While the SQN in the SIM is 48 bits, that gives us a maximum number of values before we “tick over” the odometer of 281,474,976,710,656.
If we were to send 65,536 Authentication-Information-Requests asking for 4,294,967,295 a piece, we’d have got enough vectors to serve the sub for life.
Except the standard allows for an unlimited number of vectors to be requested, this would allow us to “drain the pool” from an HSS to allow every combination of SQN to be captured, to provide a high degree of certainty that the SQN provided to a SIM is far enough ahead of the current SQN that the SIM does not reject the challenges.
Can we do this?
Our lab has access to HSSes from several major vendors of HSS.
Out of the gate, the Oracle HSS does not allow more than 32 vectors to be requested at the same time, so props to them, but the same is not true of the others, all from major HSS vendors (I won’t name them publicly here).
For the other 3 HSSes we tried from big vendors, all eventually timed out when asking for 4.2 billion vectors (don’t know why that would be *shrug*) from these HSSes, it didn’t get rejected.
This is a lab so monitoring isn’t great but I did see a CPU spike on at least one of the HSSes which suggests maybe it was actually trying to generate this.
Of course, we’ve got PyHSS, the greatest open source HSS out there, and how did this handle the request?
Well, being standards compliant, it did what it was asked – I tested with 1024 vectors I’ll admit, on my little laptop it did take a while. But lo, it worked, spewing forth 1024 vectors to use.
So with that working, I tried with 4,294,967,295…
And I waited. And waited.
And after pegging my CPU for a good while, I had to get back to real life work, and killed the request on the HSS.
In part there’s the fact that PyHSS writes back to a database for each time the SQN is incremented, which is costly in terms of resources, but also that generating Milenage vectors in LTE is doing some pretty heavy cryptographic lifting.
The Risk
Dumping a complete set of vectors with every possible SQN would allow an attacker to spoof base stations, and the subscriber would attach without issue.
Historically this has been very difficult to do for LTE, due to the mutual network authentication, however this would be bypassed in this scenario.
The UE would try for a resync if the SQN is too far forward, which mitigates this somewhat.
Cryptographically, I don’t know enough about the Milenage auth to know if a complete set of possible vectors would widen the attack surface to try and learn something about the keys.
Mitigations / Protections
So how can operators protect ourselves against this kind of attack?
Different commercial HSS vendors handle this differently, Oracle limits this to 32 vectors, and that’s what I’ve updated PyHSS to do, but another big HSS vendor (who I won’t publicly shame) accepts the full 4294967295 vectors, and it crashes that thread, or at least times it out after a period.
If you’ve got a decent Diameter Routing Agent in place you can set your DRA to check to see if someone is using this exploit against your network, and to rewrite the number of requested vectors to a lower number, alert you, or drop the request entirely.
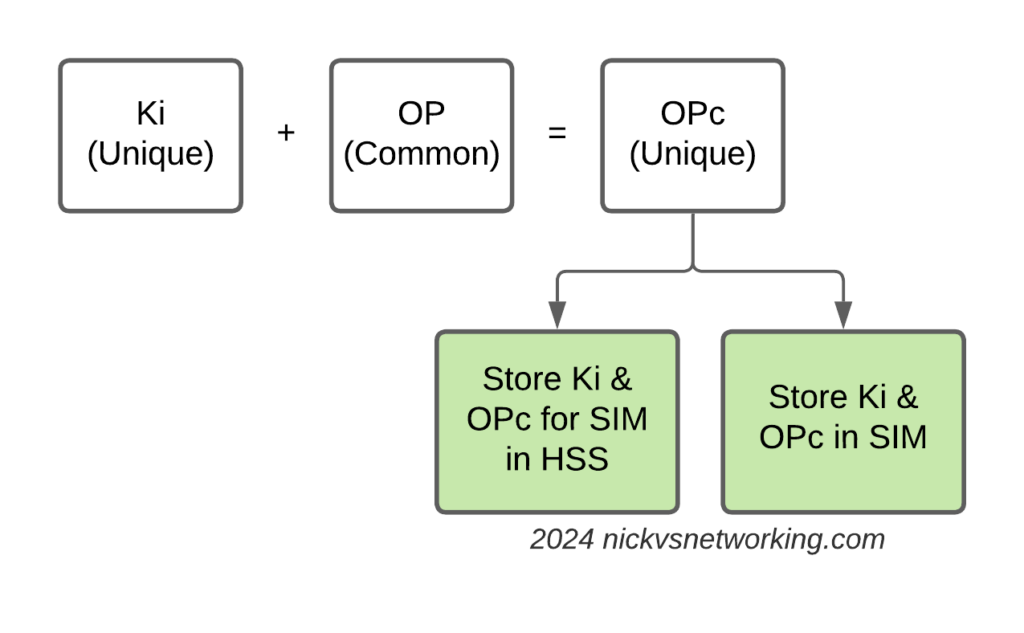
Having common OP keys is dumb, and I advocate to all our operator customers to use OP keys that are unique to each SIM, and use the OPc key derived anyway. This means if one SIM spilled it’s keys, the blast doesn’t extend beyond that card.
In the long term, it’d be good to see 3GPP limit the practical size of the Number-of-Requested-Vectors AVP.
2G/3G Impact
Full disclosure – I don’t really work with 2G/3G stacks much these days, and have not tested this.
MAP is generally pretty bandwidth constrained, and to transfer 280 billion vectors might raise some eyebrows, burn out some STPs and take a long time…
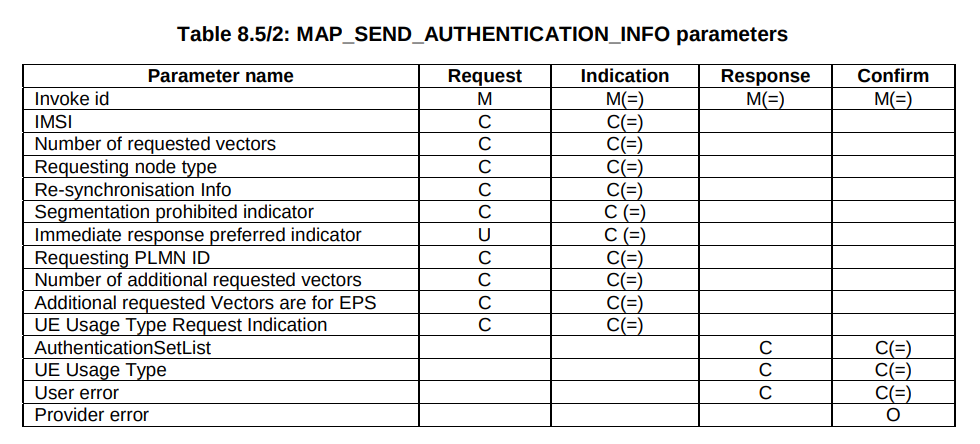
But our “Send Authentication Info” message functions much the same as the Authentication Information Request in Diameter, 3GPP TS 29.002 shows we can set the number of vectors we want:
5GC Vulnerability
This only impacts LTE and 5G NSA subscribers.
TS 29.509 outlines the schema for the Nausf reference point, used for requesting vectors, and there is no option to request multiple vectors.
Summary
If you’ve got baddies with access to your HSS / HLR, you’ve got some problems.
But, with enough time, your pool could get drained for one subscriber at a time.
This isn’t going to get the master OP Key or plaintext Ki values, but this could potentially weaken the Milenage security of your system.
If you’re working with the larger SIM vendors, there’s a good chance they key material they send you won’t actually contain the raw Ki values for each card – If it fell into the wrong hands you’d be in big trouble.
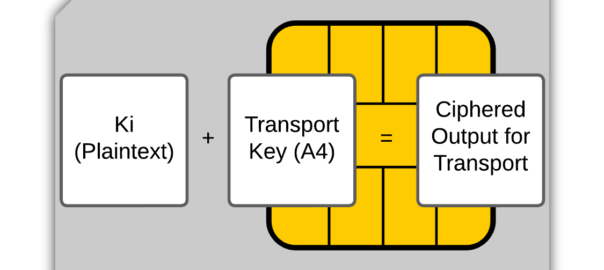
Instead, what is more likely is that the SIM vendor shares the Ki generated when mixed with a transport key – So what you receive is not the plaintext version of the Ki data, but rather a ciphered version of it.
But as long as you and the SIM vendor have agreed on the ciphering to use, an the secret to protect it with beforehand, you can read the data as needed.
This is a tricky topic to broach, as transport key implementation, is not covered by the 3GPP, instead it’s a quasi-standard, that is commonly used by SIM vendors and HSS vendors alike – the A4 / K4 Transport Encryption Algorithm.
It’s made up of a few components:
K2 is our plaintext key data (Ki or OP)
K4 is the secret key used to cipher the Ki value.
K7 is the algorithm used (Usually AES128 or AES256).
It’s important when defining your electrical profile and the reuqired parameters, to make sure the operator, HSS vendor and SIM vendor are all on the same page regarding if transport keys will be used, what the cipher used will be, and the keys for each batch of SIMs.
Here’s an example from a Huawei HSS with SIMs from G&D:
We’re using AES128, and any SIMs produced by G&D for this batch will use that transport key (transport key ID 1 in the HSS), so when adding new SIMs we’ll need to specify what transport key to use.
Hello Nick, thank you for the article. What is the use of the OPc key to be derived from OP key ? Why can’t it just be a random key like Ki ?
It’s a super good question, and something I see a lot of operators get “wrong” from a security best practices perspective.
Refresher on OP vs OPc Keys
The “OP Key” is the “operator” key, and was (historically) common for an operator.
This meant all SIMs in the network had a common OP Key, and each SIM had a unique Ki/K key.
The SIM knew both, and the HSS only needed to know what the Ki was for the SIM, as they shared a common OP Key (Generally you associate an index which translates to the OP Key for that batch of SIMs but you get the idea).
But having common key material is probably not the best idea – I’m sure there was probably some reason why using a common key across all the SIMs seemed like a good option, and the K / Ki key has always been unique, so there was one unique key per SIM, but previously, OP was common.
Over time, the issues with this became clear, so the OPc key was introduced. OPc is derived from mushing the K & OP key together. This means we don’t need to expose / store the original OP key in the SIM or the HSS just the derived OPc key output.
This adds additional security, if the Ki for a SIM were to be exposed along with the OP for that operator, that’s half the entropy lost. Whereas by storing the Ki and OPc you limit the blast radius if say a single SIMs data was exposed, to only the data for that particular SIM.
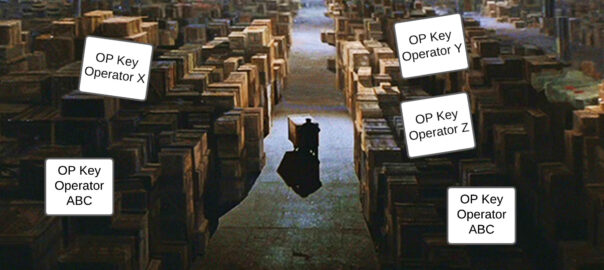
This is how most operators achieve this today; there is still a common OP Key, locked away in a vault alongside the recipe for Coca-cola and the moon landing set.
But his OP Key is no longer written to the SIMs or stored in the HSS.
Instead, during the personalization process (The bit in manufacturing where SIMs get the unique data written to them (The IMSI & keys)) a derived OPc key is written to the card itself, and to the output files the operator then loads into their HSS/HLR/AuC.
This is not my preferred method for handling key material however, today we get our SIM manufacturers to randomize the OP key for every card and then derive an OPc from that.
This means we have two unique keys for each SIM, and even if the Ki and OP were to become exposed for a SIM, there is nothing common between that SIM, and the other SIMs in the network.
Do we want our Ki to leak? No. Do we want an OP Key to leak? No. But if we’ve got unique keys for everything we minimize the blast radius if something were to happen – Just minimizes the risk.
SIP routing is complicated, there’s edge cases, traffic that can be switched locally and other traffic that needs to be proxied off to another Proxy or Application server. How can you define these rules and logic in a flexible way, that allows these rules to be distributed out to multiple different network elements and adjusted on a per-subscriber basis?
Enter iFCs – The Initial Filter Criteria.
iFCs are XML encoded rules to define which servers should handle traffic matching a set of rules.
Let’s look at some example rules we might want to handle through iFCs:
Send all SIP NOTIFY, SUBSCRIBE and PUBLISH requests to a presence server
Any Mobile Originated SMS to an SMSc
Calls to a specific destination to a MGC
Route any SIP INVITE requests with video codecs present to a VC bridge
Send calls to Subscribers who aren’t registered to a Voicemail server
Use 3rd party registration to alert a server that a Subscriber has registered
All of these can be defined and executed through iFCs, so let’s take a look,
iFC Structure
iFCs are encoded in XML and typically contained in the Cx-user-data AVP presented in a Cx Server Assignment Answer response.
Let’s take a look at an example iFC and then break down the details as to what we’re specifying.
Each rule in an iFC is made up of a Priority, TriggerPoint and ApplicationServer.
So for starters we’ll look at the Priority tag. The Priority tag allows us to have multiple-tiers of priority and multiple levels of matching, For example if we had traffic matching the conditions outlined in this rule (TriggerPoint) but also matching another rule with a lower priority, the lower priority rule would take precedence.
Inside our <TriggerPoint> tag contains the specifics of the rules and how the rules will be joined / matched, which is what we’ll focus on predominantly, and is followed by the <ApplicationServer> which is where we will route the traffic to if the TriggerPoint is matched / triggered.
So let’s look a bit more about what’s going on inside the TriggerPoint.
Each TriggerPoint is made up of Service Point Trigger (SPTs) which are individual rules that are matched or not matched, that are either combined as logical AND or logical OR statements when evaluated.
By using fairly simple building blocks of SPTs we can create a complex set of rules by joining them together.
Service Point Triggers (SPTs)
Let’s take a closer look at what goes on in an SPT. Below is a simple SPT that will match all SIP requests using the SIP MESSAGE method request type:
So as you may have guessed, the <Method> tag inside the SPT defines what SIP request method we’re going to match.
But Method is only one example of the matching mechanism we can use, but we can also match on other attributes, such as Request URI, SIP Header, Session Case (Mobile Originated vs Mobile Terminated) and Session Description such as SDP.
Or an example of a SPT for anything Originating from the Subscriber utilizing the <SessionCase> tag inside the SPT.
Having <Header> will match if the header is present, while the optional Content tag can be used to match
In terms of the Content this is matched using Regular Expressions, but in this case, not so regular regular expressions. 3GPP selected Extended Regular Expressions (ERE) to be used (IEEE POSIX) which are similar to the de facto standard PCRE Regex, but with a few fewer parameters.
Condition Negated
The <ConditionNegated> tag inside the SPT allows us to do an inverse match.
In short it will match anything other than what is specified in the SPT.
For example if we wanted to match any SIP Methods other than MESSAGE, setting <ConditionNegated>1</ConditionNegated> would do just that, as shown below:
Finally the <Group> tag allows us to group together a group of rules for the purpose of evaluating. We’ll go into it more in in the below section.
ConditionTypeCNF / ConditionTypeDNF
As we touched on earlier, <TriggerPoints> contain all the SPTs, but also, very importantly, specify how they will be interpreted.
SPTs can be joined in AND or OR conditions.
For some scenarios we may want to match where METHOD is MESSAGE and RequestURI is sip:[email protected], which is different to matching where the METHOD is MESSAGE or RequestURI is sip:[email protected].
This behaviour is set by the presence of one of the ConditionTypeCNF (Conjunctive Normal Form) or ConditionTypeDNF (Disjunctive Normal Form) tags.
If each SPT has a unique number in the GroupTag and ConditionTypeCNF is set then we evaluate as AND.
If each SPT has a unique number in the GroupTag and ConditionTypeDNF is set then we evaluate as OR.
Let’s look at how the below rule is evaluated as AND as ConditionTypeCNF is set:
This means we will match if the method is MESSAGE and Session Case is 0 (Mobile Originated) as each SPT is in a different Group which leads to “and” behaviour.
If we were to flip to ConditionTypeDNF each of the SPTs are evaluated as OR.
One feature I’m pretty excited to share is the addition of a single config file for defining how PyHSS functions,
In the past you’d set variables in the code or comment out sections to change behaviour, which, let’s face it – isn’t great.
Instead the config.yaml file defines the PLMN, transport time (TCP or SCTP), the origin host and realm.
We can also set the logging parameters, SNMP info and the database backend to be used,
HSS Parameters
hss:
transport: "SCTP"
#IP Addresses to bind on (List) - For TCP only the first IP is used, for SCTP all used for Transport (Multihomed).
bind_ip: ["10.0.1.252"]
#Port to listen on (Same for TCP & SCTP)
bind_port: 3868
#Value to populate as the OriginHost in Diameter responses
OriginHost: "hss.localdomain"
#Value to populate as the OriginRealm in Diameter responses
OriginRealm: "localdomain"
#Value to populate as the Product name in Diameter responses
ProductName: "pyHSS"
#Your Home Mobile Country Code (Used for PLMN calcluation)
MCC: "999"
#Your Home Mobile Network Code (Used for PLMN calcluation)
MNC: "99"
#Enable GMLC / SLh Interface
SLh_enabled: True
logging:
level: DEBUG
logfiles:
hss_logging_file: log/hss.log
diameter_logging_file: log/diameter.log
database_logging_file: log/db.log
log_to_terminal: true
database:
mongodb:
mongodb_server: 127.0.0.1
mongodb_username: root
mongodb_password: password
mongodb_port: 27017
Stats Parameters
redis:
enabled: True
clear_stats_on_boot: False
host: localhost
port: 6379
snmp:
port: 1161
listen_address: 127.0.0.1
A seperate server (hss_sctp.py) is run to handle SCTP connections, and if you’re looking for Multihoming, we got you dawg – Just edit the config file and set the bind_ip list to include each of your IPs to multi home listen on.
These posts focus on the use of Diameter and SIP in an IMS / VoLTE context, however these practices can be equally applied to other networks.
Basics:
The RFC’s definition is actually pretty succinct as to the function of the Server-Assignment Request/Answer:
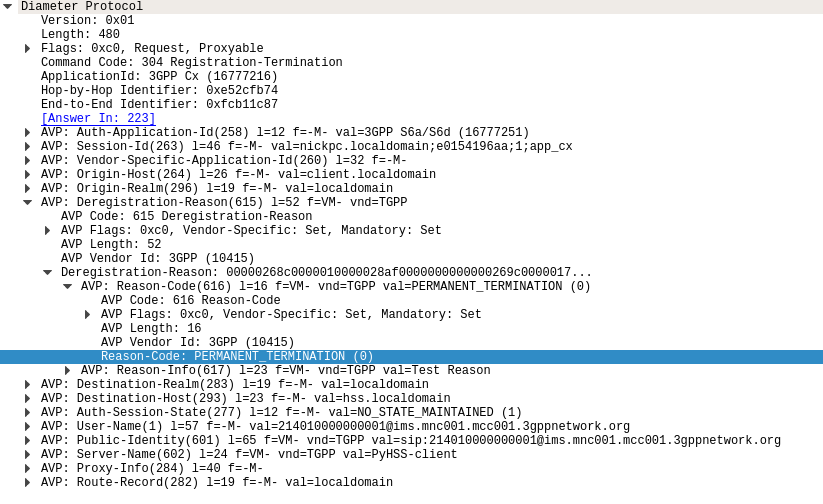
The Registration-Termination-Request is sent by a Diameter Multimedia server to a Diameter Multimedia client in order to request the de-registration of a user.
Reference: TS 29.229
The Registration-Termination-Request commands are sent by a S-CSCF to indicate to the Diameter server that it is no longer serving a specific subscriber, and therefore this subscriber is now unregistered.
There are a variety of reasons for this, such as PERMANENT_TERMINATION, NEW_SIP_SERVER_ASSIGNED and SIP_SERVER_CHANGE.
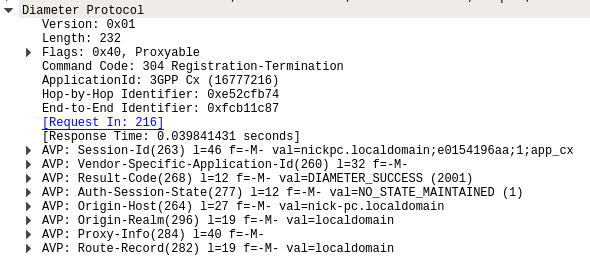
The Diameter Server (HSS) will typically send the Diameter Client (S-CSCF) a Registration-Termination-Answer in response to indicate it has updated it’s internal database and will no longer consider the user to be registered at that S-CSCF.
Packet Capture
I’ve included a packet capture of these Diameter Commands from my lab network which you can find below.
These posts focus on the use of Diameter and SIP in an IMS / VoLTE context, however these practices can be equally applied to other networks.
Basics
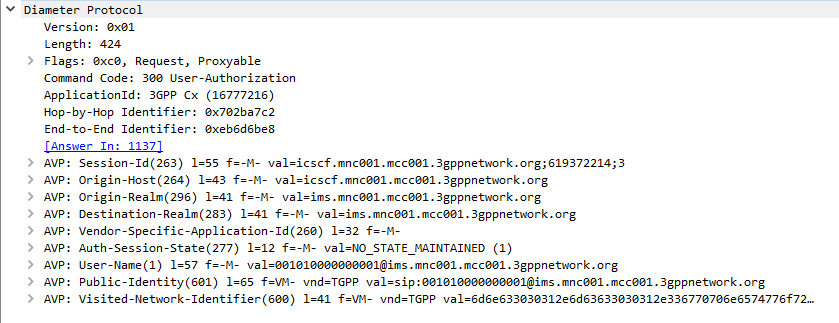
When a SIP Proxy (I-CSCF) receives an incoming SIP REGISTER request, it sends a User-Authorization-Request to a Diameter server to confirm if the user exists on the network, and which S-CSCF to forward the request to.
When the Diameter server receives the User-Authorization-Request it looks at the User-Name (1) AVP to determine if the Domain / Realm is served by the Diameter server and the User specified exists.
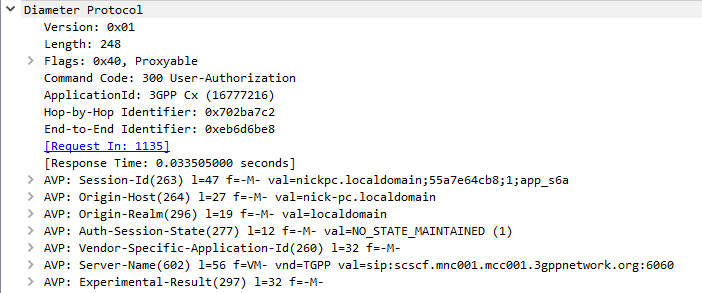
Assuming the user & domain are valid, the Diameter server sends back a User-Authorization-Answer, containing a Server-Capabilities (603) AVP with the Server-Name of the S-CSCF the user will be served by.
I always find looking at the packets puts everything in context, so here’s a packet capture of both the User-Authorization-Request and the User-Authorization-Answer.
If this is the first time this Username / Domain combination (Referred to in the RFC as an AOR – Address of Record) is seen by the Diameter server in the User-Authorization-Request it will allocate a S-CSCF address for the subscriber to use from it’s pool / internal logic.
The Diameter server will store the S-CSCF it allocated to that Username / Domain combination (AoR) for subsequent requests to ensure they’re routed to the same S-CSCF.
The Diameter server indicates this is the first time it’s seen it by adding the DIAMETER_FIRST_REGISTRATION (2001) AVP to the User-Authorization-Answer.
Subsequent Registration
If the Diameter server receives another User-Authorization-Request for the same Username / Domain (AoR) it has served before, the Diameter server returns the same S-CSCF address as it did in the first User-Authorization-Answer.
It indicates this is a subsequent registration in much the same way the first registration is indicated, by adding an DIAMETER_SUBSEQUENT_REGISTRATION (2002) AVP to the User-Authorization-Answer.
User-Authorization-Type (623) AVP
An optional User-Authorization-Type (623) AVP is available to indicate the reason for the User-Authorization-Request. The possible values / reasons are:
Creating / Updating / Renewing a SIP Registration (REGISTRATION (0))
Establishing Server Capabilities & Registering (CAPABILITIES (2))
Terminating a SIP Registration (DEREGISTRATION (1))
If the User-Authorization-Type is set to DEREGISTRATION (1) then the Diameter server returns the S-CSCF address in the User-Authorization-Answer and then removes the S-SCSF address it had associated with the AoR from it’s own records.
These posts focus on the use of Diameter and SIP in an IMS / VoLTE context, however these practices can be equally applied to other networks.
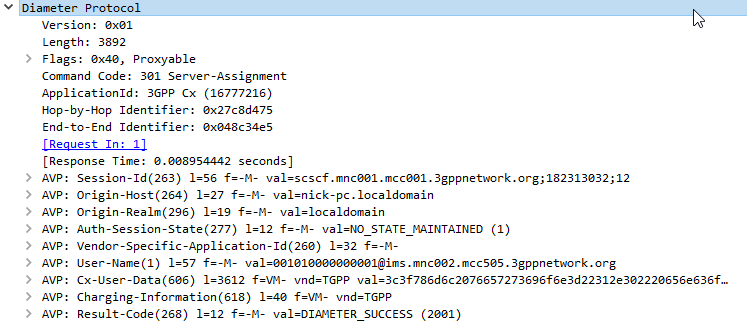
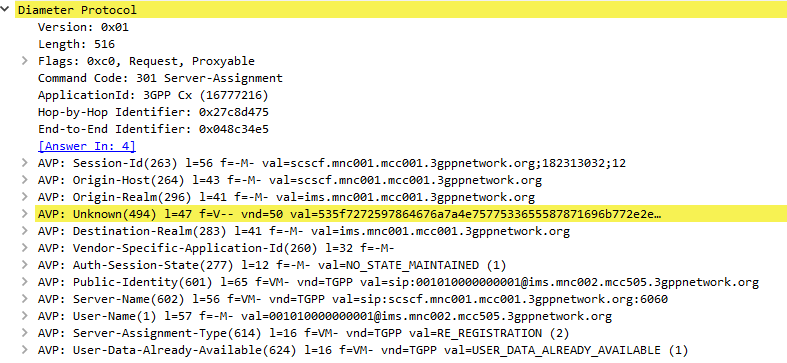
The Server-Assignment-Request/Answer commands are used so a SIP Server can indicate to a Diameter server that it is serving a subscriber and pull the profile information of the subscriber.
Basics:
The RFC’s definition is actually pretty succinct as to the function of the Server-Assignment Request/Answer:
The main functions of the Diameter SAR command are to inform the Diameter server of the URI of the SIP server allocated to the user, and to store or clear it from the Diameter server.
Additionally, the Diameter client can request to download the user profile or part of it.
The Server-Assignment-Request/Answer commands are sent by a S-CSCF to indicate to the Diameter server that it is now serving a specific subscriber, (This information can then be queried using the Location-Info-Request commands) and get the subscriber’s profile, which contains the details and identities of the subscriber.
Typically upon completion of a successful SIP REGISTER dialog (Multimedia-Authentication Request), the SIP Server (S-CSCF) sends the Diameter server a Server-Assignment-Request containing the SIP Username / Domain (referred to as an Address on Record (SIP-AOR) in the RFC) and the SIP Server (S-CSCF)’s SIP-Server-URI.
The Diameter server looks at the SIP-AOR and ensures there are not currently any active SIP-Server-URIs associated with that AoR. If there are not any currently active it then stores the SIP-AOR and the SIP-Server-URI of the SIP Server (S-CSCF) serving that user & sends back a Server-Assignment-Answer.
For most request the Subscriber’s profile is also transfered to the S-SCSF in the Server-Assignment-Answer command.
SIP-Server-Assignment-Type AVP
The same Server-Assignment-Request command can be used to register, re-register, remove registration bindings and pull the user profile, through the information in the SIP-Server-Assignment-Type AVP (375),
Common values are:
NO_ASSIGNMENT (0) – Used to pull just the user profile
The Cx-User-Data profile contains the subscriber’s profile from the Diameter server in an XML formatted dataset, that is contained as part of the Server-Assignment-Answer in the Cx-User-Data AVP (606).
The profile his tells the S-CSCF what services are offered to the subscriber, such as the allowed SIP Methods (ie INVITE, MESSAGE, etc), and how to handle calls to the user when the user is not registered (ie send calls to voicemail if the user is not there).
There’s a lot to cover on the user profile which we’ll touch on in a later post.
These posts focus on the use of Diameter and SIP in an IMS / VoLTE context, however these practices can be equally applied to other networks.
The Location-Information-Request/Answer commands are used so a SIP Server query a Diameter to find which P-CSCF a Subscriber is being served by
Basics:
The RFC’s definition is actually pretty succinct as to the function of the Server-Assignment Request/Answer:
The Location-Info-Request is sent by a Diameter Multimedia client to a Diameter Multimedia server in order to request name of the server that is currently serving the user.Reference: 29.229-
The Location-Info-Request is sent by a Diameter Multimedia client to a Diameter Multimedia server in order to request name of the server that is currently serving the user.
Reference: TS 29.229
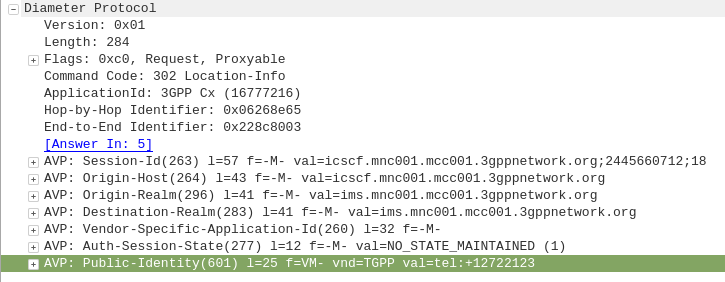
The Location-Info-Request commands is sent by an I-CSCF to the HSS to find out from the Diameter server the FQDN of the S-CSCF serving that user.
The Public-Identity AVP (601) contains the Public Identity of the user being sought.
Here you can see the I-CSCF querying the HSS via Diameter to find the S-CSCF for public identity 12722123
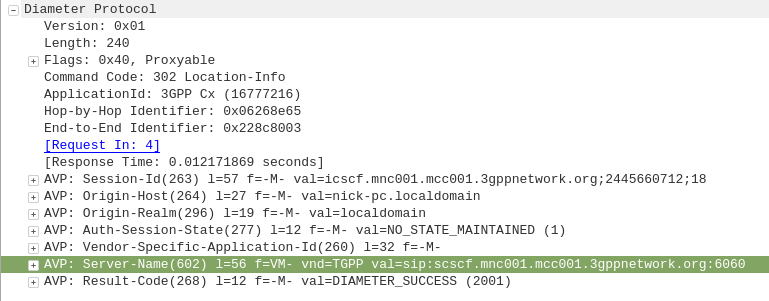
The Diameter server sends back the Location-Info-Response containing the Server-Name AVP (602) with the FQDN of the S-CSCF.
Packet Capture
I’ve included a packet capture of these Diameter Commands from my lab network which you can find below.
These posts focus on the use of Diameter and SIP in an IMS / VoLTE context, however these practices can be equally applied to other networks.
The Multimedia-Authentication-Request/Answer commands are used to Authenticate subscribers / UAs using a variety of mechanisms such as straight MD5 and AKAv1-MD5.
Basics:
When a SIP Server (S-CSCF) receives a SIP INVITE, SIP REGISTER or any other SIP request, it needs a way to Authenticate the Subscriber / UA who sent the request.
We’ve already looked at the Diameter User-Authorization-Request/Answer commands used to Authorize a user for access, but the Multimedia-Authentication-Request / Multimedia-Authentication-Answer it used to authenticate the user.
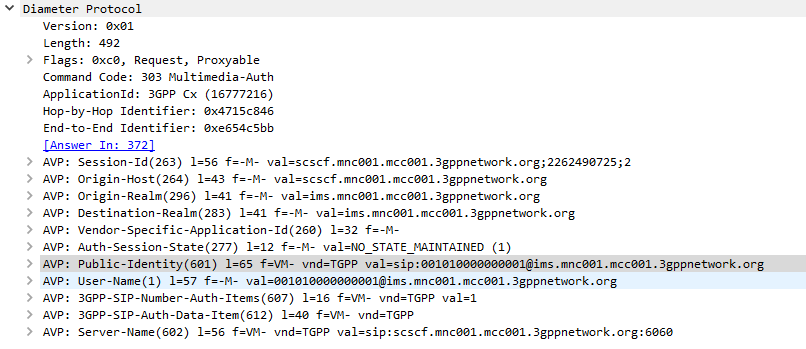
The SIP Server (S-CSCF) sends a Multimedia-Authentication-Request to the Diameter server, containing the Username of the user attempting to authenticate and their Public Identity.
The Diameter server generates “Authentication Vectors” – these are Precomputed cryptographic challenges to challenge the user, and the correct (“expected”) responses to the challenges. The Diameter puts these Authentication Vectors in the 3GPP-SIP-Auth-Data (612) AVP, and sends them back to the SIP server in the Multimedia-Authentication-Answer command.
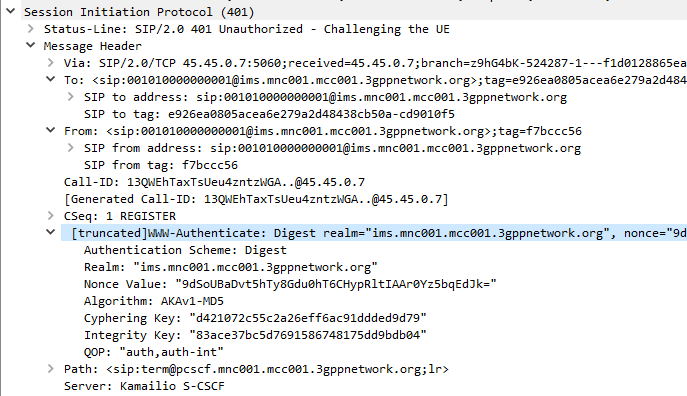
The SIP server sends the Subscriber / UA a SIP 401 Unauthorized response to the initial request, containing a WWW-Authenticate header containing the challenges.
SIP 401 Response with WWW-Authenticate header populated with values from Multimedia-Auth-Answer
The Subscriber / UA sends back the initial request with the WWW-Authenticate header populated to include a response to the challenges. If the response to the challenge matches the correct (“expected”) response, then the user is authenticated.
Multimedia-Authentication-Request
Multimedia-Authentication-Answer
I always find it much easier to understand what’s going on through a packet capture, so here’s a packet capture showing the two Diameter commands,
Note: There is a variant of this process allows for stateless proxies to handle this by not storing the expected authentication values sent by the Diameter server on the SIP Proxy, but instead sending the received authentication values sent by the Subscriber/UA to the Diameter server to compare against the expected / correct values.
The Cryptography
The Cryptography for IMS Authentication relies on AKAv1-MD5 which I’ve written about before,
Essentially it’s mutual network authentication, meaning the network authenticates the subscriber, but the subscriber also authenticates the network.
You may want to connect Open5GS’ MME to a different Home Subscriber Server (HSS),
To do it we need a few bits of information:
The Domain Name of the HSS
The Realm of the HSS
The IP of the HSS
The Transport Used (TCP/SCTP)
If TLS is used
With these bits of information we can go about modifying the Open5GS MME config to talk to our different HSS.
Edit FreeDiameter Config
The config for the Open5GS MME’s Diameter peers is handled by the FreeDimaeter library,
You can find it’s config files in:
/etc/freediameter/mme.conf
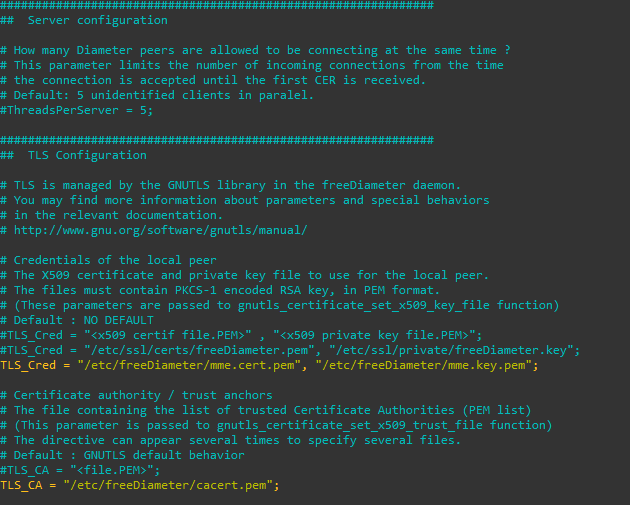
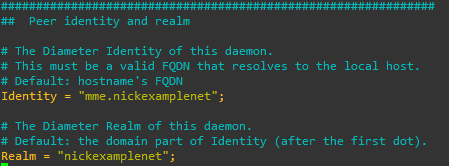
We’ll start by changing the realm to match the realm of the HSS and the identity to match the identity configured as the MME peer on the HSS.
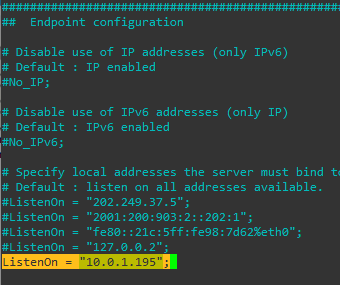
We’ll next set the ListenOn address to be a reachable IP address isntead of just a loopback address,
If you’re using TLS you’ll need to put your certificates and private key files into the TLS config,
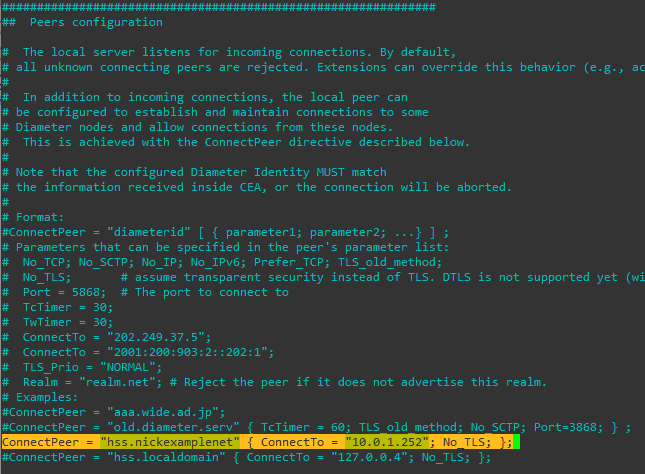
Finally we’ll put our HSS details in the Peer Configuration;
Once all this is done we’ll need to restart our MME and you should see the Diameter Capabilities Exchange / Answer commands between the HSS and the MME if all was successful,
And that’s it! We’re connected to an external HSS.
Through the freeDiameter config file you can specify multiple ConnectPeer() entries to connect to multiple HSS (like a pool of them), and requests will be distributed evenly between them.
After a few quiet months I’m excited to say I’ve pushed through some improvements recently to PyHSS and it’s growing into a more usable HSS platform.
MongoDB Backend
This has a few obvious advantages – More salable, etc, but also opens up the ability to customize more of the subscriber parameters, like GBR bearers, etc, that simple flat text files just wouldn’t support, as well as the obvious issues with threading and writing to and from text files at scale.
Knock knock.
Race condition.
Who’s there?
— Threading Joke.
For now I’m using the Open5GS MongoDB schema, so the Open5Gs web UI can be used for administering the system and adding subscribers.
The CSV / text file backend is still there and still works, the MongoDB backend is only used if you enable it in the YAML file.
The documentation for setting this up is in the readme.
SQN Resync
If you’re working across multiple different HSS’ or perhaps messing with some crypto stuff on your USIM, there’s a chance you’ll get the SQN (The Sequence Number) on the USIM out of sync with what’s on the HSS.
This manifests itself as an Update Location Request being sent from the UE in response to an Authentication Information Answer and coming back with a Re-Syncronization-Info AVP in the Authentication Info AVP. I’ll talk more about how this works in another post, but in short PyHSS now looks at this value and uses it combined with the original RAND value sent in the Authentication Information Answer, to find the correct SQN value and update whichever database backend you’re using accordingly, and then send another Authentication Information Answer with authentication vectors with the correct SQN.
SQN Resync is something that’s really cryptographically difficult to implement / confusing, hence this taking so long.
What’s next? – IMS / Multimedia Auth
The next feature that’s coming soon is the Multimedia Authentication Request / Answer to allow CSCFs to query for IMS Registration and manage the Cx and Dx interfaces.
Code for this is already in place but failing some tests, not sure if that’s to do with the MAA response or something on my CSCFs,
LTE has great concepts like NAS that abstract the actual transport layers, so the NAS packet is generated by the UE and then read by the MME.
One thing that’s a real headache about private LTE is the authentication side of things. You’ll probably bash your head against a SIM programmer for some time.
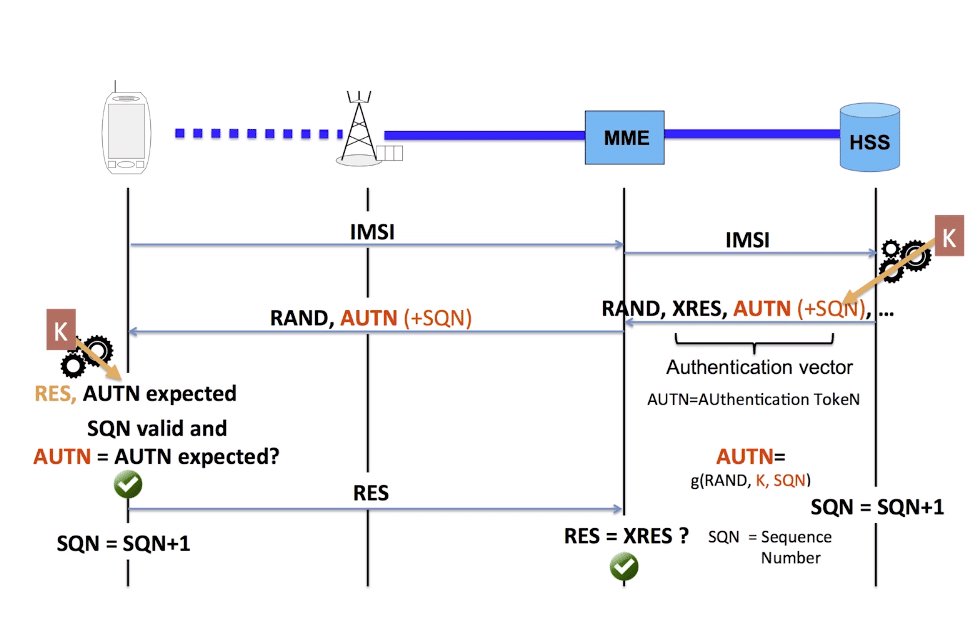
As your probably know when connecting to a network, the UE shares it’s IMSI / TIMSI with the network, and the MME requests authentication information from the HSS using the Authentication Information Request over Diameter.
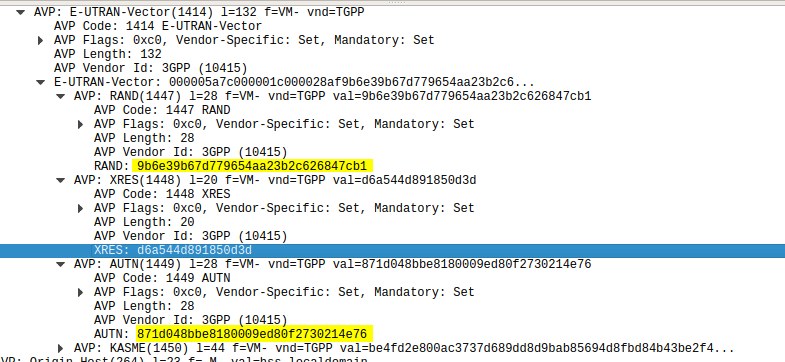
The HSS then returns a random value (RAND), expected result (XRES), authentication token (AUTN) and a KASME for generating further keys,
The RAND and AUTN values are sent to the UE, the USIM in the UE calculates the RES (result) and sends it back to the MME. If the RES value received by the MME is equal to the expected RES (XRES) then the subscriber is mutually authenticated.
Using this tool I was able to plug a USIM into my USIM reader, using the Diameter client built into PyHSS I was able to ask for Authentication vectors for a UE using the Authentication Information Request to the HSS and was sent back the Authentication Information Answer containing the RAND and AUTN values, as well as the XRES value.
Diameter – Authentication Information Response showing E-UTRAN Vectors
Then I used the osmo-sim-auth app to query the RES and RAND values against the USIM.
The RES I got back matched the XRES, meaning the HSS and the USIM are in sync (SQNs match) and they mutually authenticated.
I thought I’d expand a little on how the Crypto side of things works in LTE & NR (also known as 4G & 5G).
Authentication primarily happens in two places, one at each end of the network, the Home Subscriber Server and in the USIM card. Let’s take a look at each of them.
On the USIM
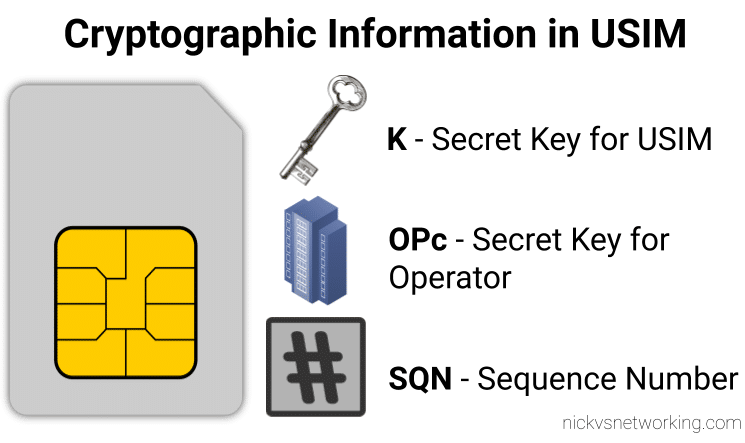
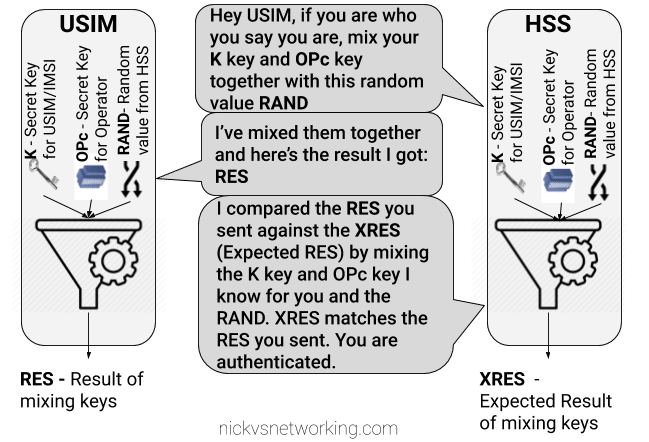
On the USIM we’ve got two values that are entered in when the USIM is provisioned, the K key – Our secret key, and an OPc key (operator key).
These two keys are the basis of all the cryptography that goes on, so should never be divulged.
The only other place to have these two keys in the HSS, which associates each K key and OPc key combination with an IMSI.
The USIM also stores the SQN a sequence number, this is used to prevent replay attacks and is incremented after each authentication challenge, starting at 1 for the first authentication challenge and counting up from there.
On the HSS
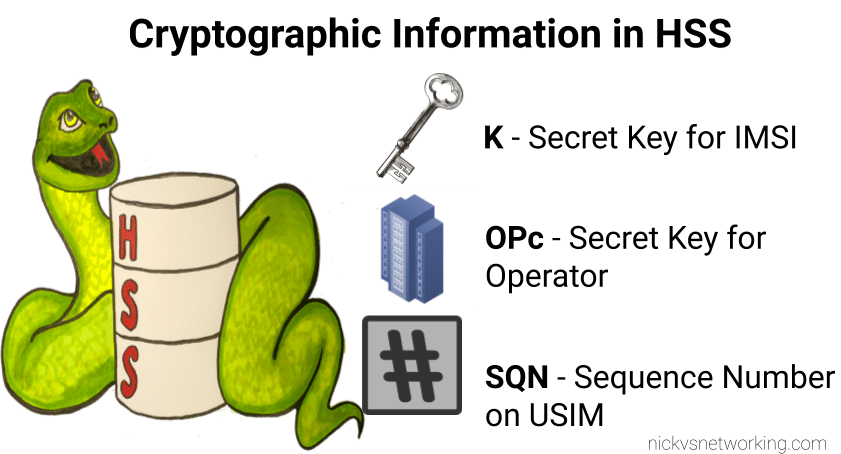
On the HSS we have the K key (Secret key), OPc key (Operator key) and SQN (Sequence Number) for each IMSI on our network.
Each time a IMSI authenticates itself we increment the SQN, so the value of the SQN on the HSS and on the USIM should (almost) always match.
Authentication Options
Let’s imagine we’re designing the authentication between the USIM and the Network; let’s look at some options for how we can authenticate everyone and why we use the process we use.
Failed Option 1 – Passwords in the Clear
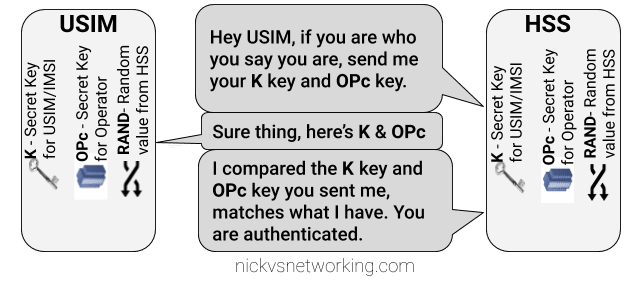
The HSS could ask the USIM to send it’s K and OPc values, compare them to what the HSS has in place and then either accept or reject the USIM depending on if they match.
The obvious problem with this that to send this information we broadcast our supposedly secret K and OPc keys over the air, so anyone listening would get our secret values, and they’re not so secret anymore.
This is why we don’t use this method.
Failed Option 2 – Basic Crypto
So we’ve seen that sending our keys publicly, is out of the question.
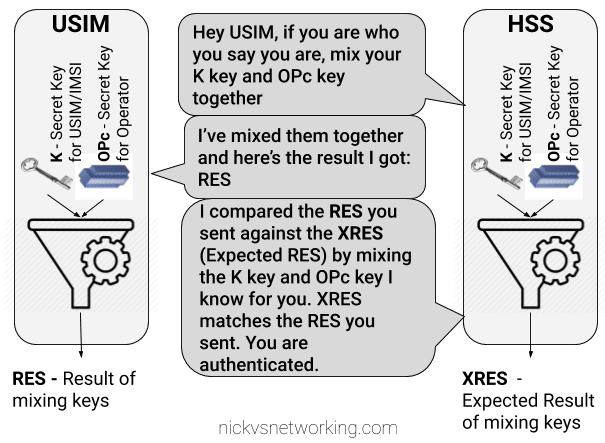
The HSS could ask the USIM to mix it’s K key and OPc key in such a way that only someone with both keys could unmix them.
This is done with some cryptographic black magic, all you need to know is it’s a one way function you enter in values and you get the same result every time with the same input, but you can’t work out the input from the result.
The HSS could then get the USIM to send back the result of mixing up both keys, mix the two keys it knows and compare them.
The HSS mixes the two keys itself, and get’s it’s own result called XRES (Expected Result). If the RES (result) of mixing up the keys by the USIM is matches the result when the HSS mixes the keys in the same way (XRES (Expected Result)), the user is authenticated.
The result of mixing the keys by the USIM is called RES (Result), while the result of the HSS mixing the keys is called XRES (Expected Result).
This is abetter solution but has some limitations, because our special mixing of keys gets the same RES each time we put in our OPc and K keys each time a subscriber authenticates to the network the RES (result) of mixing the keys is going to be the same.
This is vulnerable to replay attacks. An attacker don’t need to know the two secret keys (K & OPc) that went into creating the RES (resulting output) , the attacker would just need to know the result of RES, which is sent over the air for anyone to hear. If the attacker sends the same RES they could still authenticate.
This is why we don’t use this method.
Failed Option 3 – Mix keys & add Random
To prevent these replay attacks we add an element of randomness, so the HSS generates a random string of garbage called RAND, and sends it to the USIM.
The USIM then mixes RAND (the random string) the K key and OPc key and sends back the RES (Result).
Because we introduced a RAND value, every time the RAND is different the RES is different. This prevents against the replay attacks we were vulnerable to in our last example.
If the result the USIM calculated with the K key, OPc key and random data is the same as the USIM calculated with the same K key, OPc key and same random data, the user is authenticated.
While an attacker could reply with the same RES, the random data (RAND) will change each time the user authenticates, meaning that response will be invalid.
The problem here is now the network has authenticated the USIM, the USIM hasn’t actually verified it’s talking to the real network.
This is why we don’t use this method.
GSM authentication worked like this, but in a GSM network you could setup your HLR (The GSM version of a HSS) to allow in every subscriber regardless of what the value of RES they sent back was, meaning it didn’t look at the keys at all, this meant attackers could setup fake base stations to capture users.
Option 4 – Mutual Authentication (Real World*)
So from the previous options we’ve learned:
Our network needs to authenticate our subscribers, in a way that can’t be spoofed / replayed so we know who to bill & where to route traffic.
Our subscribers need to authenticate the network so they know they can trust it to carry their traffic.
So our USIM needs to authenticate the network, in the same way the network authenticates the USIM.
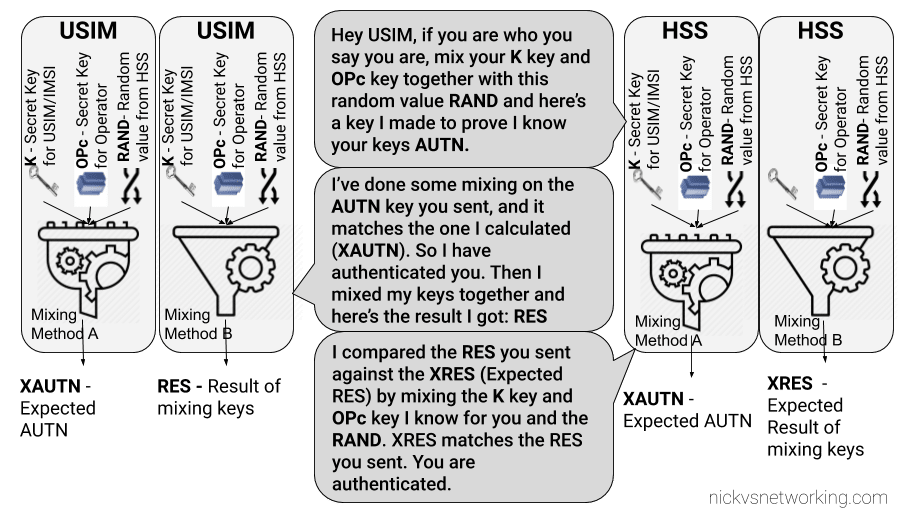
To do this we introduce a new key for network authentication, called AUTN.
The AUTN key is generated by the HSS by mixing the secret keys and RAND values together, but in a different way to how we mix the keys to get RES. (Otherwise we’d get the same key).
This AUTN key is sent to the USIM along with the RAND value. The USIM runs the same mixing on it’s private keys and RAND the HSS did to generate the AUTN , except this is the USIM generated – An Expected AUTN key (XAUTN). The USIM compares XAUTN and AUTN to make sure they match. If they do, the USIM then knows the network knows their secret keys.
The USIM then does the same mixing it did in the previous option to generate the RES key and send it back.
The network has now authenticated the subscriber (HSS has authenticated the USIM via RES key) and the subscriber has authenticated the USIM (USIM authenticates HSS via AUTN key).
*This is a slightly simplified version of how EUTRAN / LTE authentication works between the HSS and the USIM – In reality there are a few extra values, such as SQN to take into consideration and the USIM talks to to the MME not the HSS directly.
I’ll do a follow up post covering the more nitty-gritty elements, AMF and SQN fields, OP vs OPc keys, SQN Resync, how this information is transfered in the Authentication Information Answer and how KASME keys are used / distributed.
Recently we saw Open5Gs’s Update Location Answer response putting the Subscribed-Periodic-RAU-TAU-Timer AVP in the top level and not in the AVP Code 1400 (APN Configuration) Diameter payload from the HSS to the MME.
But what exactly does the Subscribed-Periodic-RAU-TAU-Timer AVP in the Update Location Answer response do?
Folks familiar with EUTRAN might recognise TAU as Tracking Area Update, while RAU is Routing Area Update in GERAN/UTRAN (UMTS).
Periodic tracking area updating is used to periodically notify the availability of the UE to the network. The procedure is controlled in the UE by the periodic tracking area update timer (timer T3412). The value of timer T3412 is sent by the network to the UE in the ATTACH ACCEPT message and can be sent in the TRACKING AREA UPDATE ACCEPT message. The UE shall apply this value in all tracking areas of the list of tracking areas assigned to the UE, until a new value is received.
Section 5.3.5 of 24301-9b0 (3GPP TS 24.301 V9.11.0)
So the Periodic Tracking Area Update timer simply defines how often the UE should send a Tracking Area Update when stationary (not moving between cells / tracking area lists).
Note: NextEPC the Open Source project rebranded as Open5Gs in 2019 due to a naming issue. The remaining software called NextEPC is a branch of an old version of Open5Gs. This post was written before the rebranding.
I’ve been working for some time on Private LTE networks, the packet core I’m using is NextEPC, it’s well written, flexible and well supported.
I joined the Open5Gs group and I’ve contributed a few bits and pieces to the project, including a Python wrapper for adding / managing subscribers in the built in Home Subscriber Server (HSS).
Basic Python library to interface with MongoDB subscriber DB in NextEPC HSS / PCRF. Requires Python 3+, mongo, pymongo and bson. (All available through PIP)
If you are planning to run this on a different machine other than localhost (the machine hosting the MongoDB service) you will need to enable remote access to MongoDB by binding it’s IP to 0.0.0.0:
This is done by editing /etc/mongodb.conf and changing the bind IP to: bind_ip = 0.0.0.0