Diameter is used extensively in 3GPP networks (Especially LTE) to provide the AAA services.
The Diameter protocol is great, and I’ve sung it’s praises before, but one issue operators start to face is that there are a lot of diameter peers, each of which needs a connection to other diameter peers.
This diagram is an “Overview” showing one of each network element – In reality almost all network elements will exist more than once for redundancy and scalability.
What you start to end up with is a rats nest of connections, lines drawn everywhere and lots of manual work and room for human error when it comes to setting up the Diameter Peer relationships.
Let’s say you’ve got 5x MME, 5x PCRF, 2x HSS, 5x S-SCSF and 5x Packet Gateways, each needing Diameter peer relationships setup, it starts to get really messy really quickly.
Enter the Diameter Routing Agent – DRA.
Now each device only needs a connection to the DRA, which in turn has a connection to each Diameter peer. Adding a new MME doesn’t mean you need to reconfigure your HSS, just connect the MME to the DRA and away you go.
I’ll cover using Kamailio to act as a Diameter routing agent in a future post.
ENUM was going to change telephone routing. No longer would you need to pay a carrier to take your calls across the PSTN, but rather through the use of DNS your handset would look up a destination and route in a peer to peer fashion.
Number porting would just be a matter of updating NAPTR records, almost all calls would be free as there’s no way/need to charge and media would flow directly from the calling party to the called party.
In 2005 ACMA became the Tier 1 provider from RIPE for the ENUM zone 4.6.e164.arpa
A trial was run and Tier 2 providers were sought to administer the system and to verify ownership of services before adding NAPTR records for individual services and referral records for ranges / delegation.
In 2007 the trial ended with only two CSPs having signed up and a half a dozen test calls made between them.
Now, over a decade later as we prepare for the ISDN switch off, NBN is almost finished rolling out, the Comms Alliance porting specs remain as rigid as ever, it might be time to look again at ENUM in Australia…
I recently started working on an issue that I’d seen was to do with the HSS response to the MME on an Update Location Answer.
I took some Wireshark traces of a connection from the MME to the HSS, and compared that to a trace from a different HSS. (Amarisoft EPC/HSS)
The Update Location Answer sent by the Amarisoft HSS to the MME over the S6a (Diameter) interface includes an AVP for “Multiple APN Configuration” which has the the dedicated bearer for IMS, while the HSS in the software I was working on didn’t.
After a bit of bashing trying to modify the S6a responses, I decided I’d just implement my own Home Subscriber Server.
I’m a big fan of RTPengine, and I’ve written a bit about it in the past.
Let’s say we’re building an Australia wide VoIP network. It’s a big country with a lot of nothing in the middle. We’ve got a POP in each of Australia’s capital cities, and two core softswitch clusters, one in Melbourne and one in Sydney.
These two cores will work fine, but a call from a customer in Perth, WA to another customer in Perth, WA would mean their RTP stream will need to go across your inter-caps to Sydney or Melbourne only to route back to Perth.
That’s 3,500Km each way, which is going to lead to higher latency, wasted bandwidth and decreased customer experience.
What if we could have an RTPengine instance in our Perth POP, handling RTP proxying for our Perth customers? Another in Brisbane, Canberra etc, all while keeping our complex expensive core signalling in just the two locations?
RTPengine to the rescue!
Preparing our RTPEngine Instances
In each of our POPs we’ll spin up a box with RTPengine,
The only thing we’d do differently is set the listen-ng value to be 0.0.0.0:2223 and the interface to be the IP of the box.
By setting the listen-ng value to 0.0.0.0:2223 it’ll mean that RTPengine’s management port will be bound to any IP, so we can remotely manage it via it’s ng-control protocol, using the rtpengine Kamailio module.
Naturally you’d limit access to port 2223 only to allowed devices inside your network.
Next we’ll need to add the details of each of our RTP engine instances to MySQL, I’ve used a different setid for each of the RTPengines. I’ve chosen to use the first digit of the Zipcode for that state (WA’s Zipcodes / Postcodes are in the format 6xxx while NSW postcodes are look like 2xxx), we’ll use this later when we select which RTPengine instances to use.
I’ve also added localhost with setid of 0, we’ll use this as our fallback route if it’s not coming from Australia.
Bingo, we’re connected to three RTPengine instances,
Next up we’ll use the Geoip2 module to determine the source of the traffic and route to the correct, I’ve touched upon the Geoip2 module’s basic usage in the past, so if you’re not already familiar with it, read up on it’s usage and we’ll build upon that.
We’ll load GeoIP2 and run some checks in the initial request_route{} block to select the correct RTPengine instance:
        if(geoip2_match("$si", "src")){
                if($gip2(src=>cc)=="AU"){
                        $var(zip) =  $gip2(src=>zip);
                        $avp(setid) = $(var(zip){s.substr,0,1});
                        xlog("rtpengine setID is $avp(setid)");
                }else{
                        xlog("GeoIP not in Australia - Using default RTPengine instance");
                        set_rtpengine_set("0");
                }
        }else{
                xlog("No GeoIP Match - Using default RTPengine instance");
                set_rtpengine_set("0");
        }
In the above example if we have a match on source, and the Country code is Australia, the first digit of the ZIP / Postcode is extracted and assigned to the AVP “setid” so RTPengine knows which set ID to use.
In practice an INVITE from an IP in WA returns setID 6, and uses our RTPengine in WA, while one from NSW returns 2 and uses one in NSW. In production we’d need to setup rules for all the other states / territories, and generally have more than one RTPengine instance in each location (we can have multiple instances with the same setid).
Hopefully you’re starting to get an idea of the fun and relatively painless things you can achieve with RTPengine and Kamailio!
Forsk Atoll is software for wireless network planning, simulation and optimization.
Atoll can do some amazingly powerful things, especially when you start feeding real world data and results back into it, but for today we’ll be touching upon the basics.
As I’m learning it myself I thought I’d write up a basic tutorial on setting up the environment, importing some data, adding some sites and transmitters to your network and then simulating it.
We’ll be using Christmas Island, a small island in the Indian ocean that’s part of Australia, as it’s size makes it easy and the files small.
The Environment (Geographic Data)
The more data we can feed into Atoll the more accurate the predictions that come out of it.
Factors like terrain, obstructions, population density, land usage (residential, agricultural, etc) will all need to be modeled to produce accurate results, so getting your geographic data correct is imperative.
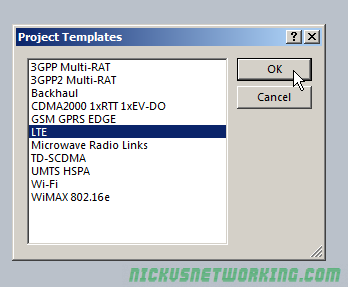
Starting a new Document
We’ll start by creating a new document:
We’ll simulate an LTE network, so we’ll create it using the LTE project template.
Coordinate Reference
Before we can get to that we’re going to have to tell Atoll where we are and what datum we’re working in.
The data sets we’re working were provided by the Government, who use the Australian Geodetic Datum, and Christmas Island is in Zone 48.
We’ll select Document -> Properties
We’ll set the projection first.
Once that’s set we’ll set our display coordinates, this is what we’ll actually work in.
I’m using WGS 84 in the -xx.xxxxxx format, aka Lat & Long in decimal format.
Elevation
Elevation data is hugely important when network planning, your point-to-point links need LOS, and if your modeling / simulation doesn’t know there’s a hill or obstruction between the two sites, it’s not going to work.
There’s plenty of online sources for this data, some of which is paid, but others are provided free by Government agencies.
In this case the Digital Elevation Models for Christmas Island data can be downloaded from Geo-science Australia.
We’ll download the 5m DEM GDA94 UTM zone 48 Christmas Island.
The real reason I picked Christmas Island is that it’s DEM data is 16Mb instead of many Gigabytes and I didn’t want to wait for the download…
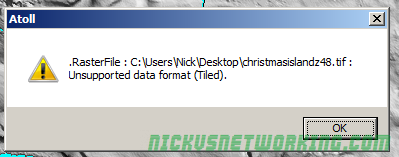
After a lot of messing around I found I couldn’t import the multi layered TIF provided by Geo Science Australia, Atoll gave me this error:
I found I could the TIFF formatted DEM files it in a package called VTBuilder, export it as a PNG and then import it into Atoll.
Using VTBuilder to convert DEMs in TIFF to PNG for importing into Atoll
To save some steps I’ve attached a copy of the converted file here.
You can then import the files straight into Atoll,
We’ll need to define what this dataset is, in our cases our Digital Elevation Models (aka Digital Terrain Models) contain Altitude information, so we’ll select Altitude (DTM)
We know from the metadata on the Geo Science Australia site we got the files from the resolution is 5m, so we’ll set pixel size to 5m (Each pixel represents 5 meters).
We’ll need a Geographic Coordinate, this is the Easting and Westing in relation to UTM Zone 48. The values are:
West
557999.9999999991
North
8849000
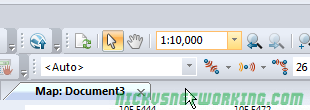
All going well you should see the imported topography showing up in Atoll.
I’ve noticed on the version I’m on I had some weirdness when zoomed out, if you try Zooming in to more than 1:10,000 you should see the terrain data. Not sure why this is but I’ve attached a copy of my Atoll config so far so you in case you get stuck with this.
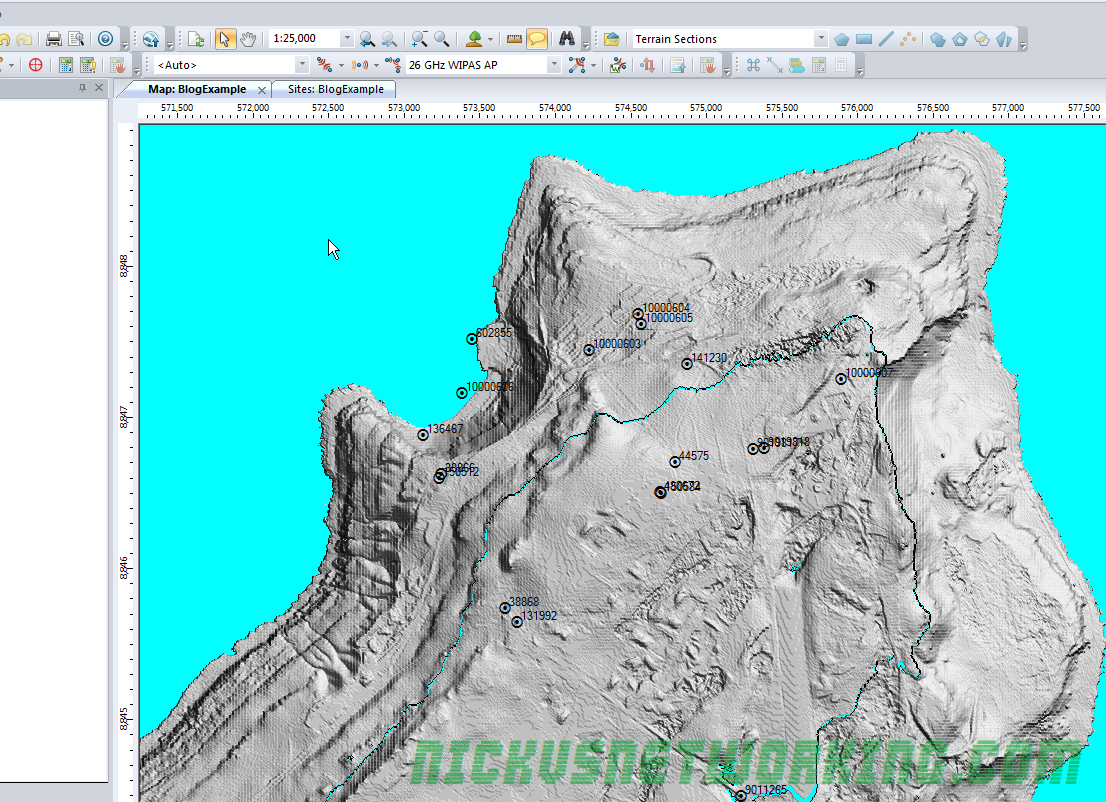
We’ll download real world sites from the ACMA’s database,
I’ll use the cheat way by just looking it up on their map and exporting the data.
We’ll download the CSV file from the Map.
One thing we’ll need to change in the CSV is that when no Altitude is set for the site ACMA puts “undefined” which Atoll won’t be able to parse. So I’ve just opened it up in N++ and replaced undefined with 0.
I’ve attached a copy here for you to import / skip this step. Mastering messing with CSV is a super useful skill to have anyways, but that’s a topic for another day.
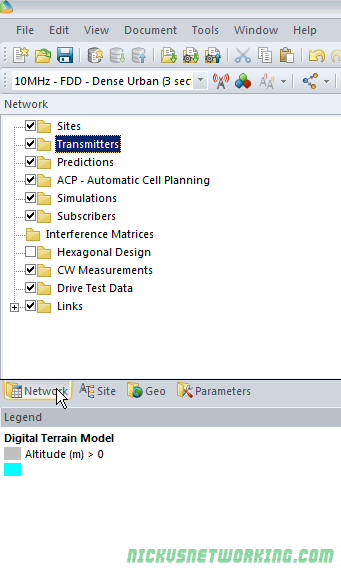
Next we’ll import the sites into Atoll, to define our sites, we’ll jump to the Network Tab and double click on Sites.
Now we’ll import our CSV file
Next we’ll need to define the fields for the import
All going well you’ll now have a populated site list.
Now if we go back to view we should see these points plotted.
Clutter
Forested areas, large bodies of water, urban sprawl, farmland, etc, all have different characteristics and will cause different interference patterns, refraction, shadow fading, etc.
Clutter Data is the classification of land use or land cover which impacts on RF propagation.
However this dataset doesn’t include Christmas Island. Really shot myself in the foot there, huh?
For examples’ sake we’ll import the terrain data again as clutter.
We’d normally define terrain classes, for example, this area is residential low rise etc, but as we don’t have areas set out we’ll skip that for now.
You can set different layer visibility by enabling and disabling layers in the Geo tab, in this case I’ve disabled my Digital Terrain Model layer and just left the Clutter Heights we just imported.
I got hit with the same Zoom bug here, not sure if it’s still loading in the background or something but the clutter data is only visible when zoomed to 1:10,000 or more, but after doing so you should see the clutter data:
So now we’ve got our environment stuff we can start to add some cell sites and model the propagation & expected signal levels throughout the island in the next post.
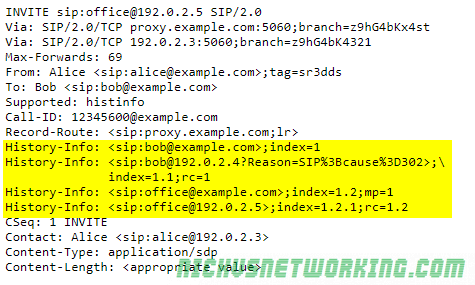
The History Info extension defined in RFC7044 sets a way for an INVITE to include where the session (call) has been before that.
For example a call may be made to a desk phone, which is forwarded (302) to a home phone. The History Info extension would add a History Info header to the INVITE to the home phone, denoting the call had come to it via the desk phone.


