Tag Archives: PyHSS

Creating a Fixed Line IMS subscriber in PyHSS

I generally do this with Python or via the Swagger UI for the Web UI, but here’s how we can create a fixed-line IMS subscriber in PyHSS, so we can register it with a softphone, without using EAP-AKA.


Firstly we create the AuC object for this password combo.

curl -X 'PUT' \
'http://10.97.0.36:8080/auc/' \
-H 'accept: application/json' \
-H 'Content-Type: application/json' \
-d '{
"ki": "yoursippassword123",
"opc": "",
"amf": "8000",
"sqn": "1"
}'

Get back the AuC ID from the JSON body, we’ll use this to provision the Sub:

 "auc_id": 110,

Next we create the subscriber, the speeds will be 0 as there is no data on the service, but we will add an default APN so the validation passes:

curl -X 'PUT' \
'http://10.97.0.36:8080/subscriber/' \
-H 'accept: application/json' \
-H 'Content-Type: application/json' \
-d '{
"default_apn": 1,
"roaming_rule_list": null,
"apn_list": "0",
"subscribed_rau_tau_timer": 600,
"msisdn": "123451000001",
"ue_ambr_dl": 0,
"ue_ambr_ul": 0,
"imsi": "001001000090001",
"nam": 2,
"enabled": true,
"roaming_enabled": null,
"auc_id": 110
}'

Alright, that’s the basics done, now we’ll create the IMS subscriber.

Provision it:

curl -X 'PUT' \
'http://10.97.0.36:8080/ims_subscriber/' \
-H 'accept: application/json' \
-H 'Content-Type: application/json' \
-d '{
"pcscf_realm": null,
"scscf_realm": null,
"pcscf_active_session": null,
"scscf_peer": null,
"msisdn": "123451000001",
"pcscf_timestamp": null,
"sh_template_path": "default_sh_user_data.xml",
"msisdn_list": "123451000001",
"pcscf_peer": null,
"last_modified": "2024-04-25T00:33:37Z",
"imsi": "001001000090001",
"xcap_profile": null,
"ifc_path": "default_ifc.xml",
"sh_profile": "\n<!-- This container for the XCAP Data for the Subscriber -->\n<RepositoryData>\n <ServiceIndication>ApplicationServer</ServiceIndication>\n <SequenceNumber>0</SequenceNumber>\n <ServiceData>\n <!-- This is the actual XCAP Data for the Subscriber -->\n \n <!-- XCAP Default Template (no XCAP Data stored in Database) -->\n <simservs xmlns=\"http://uri.etsi.org/ngn/params/xml/simservs/xcap\" xmlns:cp=\"urn:ietf:params:xml:ns:common-policy\">\n <originating-identity-presentation active=\"true\" />\n <originating-identity-presentation-restriction active=\"true\">\n <default-behaviour>presentation-not-restricted</default-behaviour>\n </originating-identity-presentation-restriction>\n <communication-diversion active=\"true\">\n <!-- No Answer Time -->\n <NoReplyTimer>20</NoReplyTimer>\n <cp:ruleset>\n <!-- Call Forward All Rule -->\n <cp:rule id=\"rule0\">\n <cp:conditions>\n <communication-diverted />\n </cp:conditions>\n <cp:actions>\n <forward-to>\n <target>sip:[email protected]</target>\n </forward-to>\n </cp:actions>\n </cp:rule>\n <!-- Call Forward Not Registered Rule -->\n <cp:rule id=\"rule1\">\n <cp:conditions>\n <not-registered />\n </cp:conditions>\n <cp:actions>\n <forward-to>\n <target>sip:[email protected]</target>\n </forward-to>\n </cp:actions>\n </cp:rule>\n <!-- Call Forward No Answer Rule -->\n <cp:rule id=\"rule2\">\n <cp:conditions>\n <no-answer />\n </cp:conditions>\n <cp:actions>\n <forward-to>\n <target>sip:[email protected]</target>\n </forward-to>\n </cp:actions>\n </cp:rule>\n <!-- Call Forward Busy Rule -->\n <cp:rule id=\"rule3\">\n <cp:conditions>\n <busy />\n </cp:conditions>\n <cp:actions>\n <forward-to>\n <target>sip:[email protected]</target>\n </forward-to>\n </cp:actions>\n </cp:rule>\n <!-- Call Forward Unreachable Rule -->\n <cp:rule id=\"rule4\">\n <cp:conditions>\n <not-reachable />\n </cp:conditions>\n <cp:actions>\n <forward-to>\n <target>sip:[email protected]</target>\n </forward-to>\n </cp:actions>\n </cp:rule>\n </cp:ruleset>\n </communication-diversion>\n \n <incoming-communication-barring active=\"true\">\n <cp:ruleset>\n <cp:rule id=\"rule0\">\n <cp:conditions />\n <cp:actions>\n <allow>true</allow>\n </cp:actions>\n </cp:rule>\n </cp:ruleset>\n </incoming-communication-barring>\n\n <outgoing-communication-barring active=\"false\">\n </outgoing-communication-barring>\n </simservs>\n\n </ServiceData>\n \n</RepositoryData>\n",
"pcscf": null,
"scscf": null,
"scscf_timestamp": null
}'

And with that we’re done,

We can now register 001001000090001 at our IMS, with password yoursippassword123 which has the MSISDN / phone number 123451000001.

Easy!

Getting started with PyHSS

PyHSS is our open source Home Subscriber Server, it’s written in Python, has a variety of different backends, and is highly perforate (We benchmark to 10K transactions per second) and infinitely scaleable.

In this post I’ll cover the basics of setting up PyHSS in your enviroment and getting some Diameter peers connected.

For starters, we’ll need a database (We’ll use MySQL for this demo) and an account on that database for a MySQL user.

So let’s get that rolling (I’m using Ubuntu 24.04):

sudo apt update
sudo apt install mysql-server

Next we’ll create the MySQL user for PyHSS to use:

CREATE USER 'pyhss_user'@'%' IDENTIFIED BY 'pyhss_password';
GRANT ALL PRIVILEGES ON *.* TO 'pyhss_user'@'%' WITH GRANT OPTION;
FLUSH PRIVILEGES;

We’ll also need Redis as well (PyHSS uses Redis for inter-service communications and for caching), so go ahead an install that for your distro:

sudo apt install redis-server

So that’s our prerequisites sorted, let’s clone the PyHSS repo:

git clone https://github.com/nickvsnetworking/pyhss /etc/pyhss

And install the requirements with pip from the PyHSS repo:

pip3 install -r requirements.txt

Next we’ll need to configure PyHSS, for that we update the config file (config.yaml) with the settings we want to use.

We’ll start by setting the bind_ip to a list of IPs you want to listen on, and your transport – We can use either TCP or SCTP.

For Diameter, we will set OriginHost and OriginRealm to match the Diameter hostname you want to use for this peer, and the Realm of your Diameter network.

Lastly we’ll need to set the database parameters, updating the database: section to populate your credentials, setting your username and password and the database to match your SQL installation we setup at the start.

With that done, we can start PyHSS, which we do using systemctl.

Because there’s multiple microservices that make up PyHSS, there’s multiple systemctl files use to run PyHSS as a service, they’re all in the /systemd folder.

We’ll copy them all to our systemd folder.

cp /etc/pyhss/systemd/ /lib/systemd/system/
systemctl daemon-reload
systemctl start pyhss

And with that we’ve got PyHSS running and ready for a Diameter peer to connect.

Now you should be able to bring our Diameter peers up.

If you’re using something like Kamailio, with C-Diameter Peer, you can read about the config for that here, or FreeDiameter you can read about here.

In the next post, we’ll cover subscriber provisioning via the API.

The power of the PyHSS EIR

The Equipment Identity Register (EIR) is a pretty handy function in 3GPP networks.

Via the Diameter based S13 interface, the MME, is able to query the EIR to ask if a given IMEI & IMSI combination should be allowed to attach.

This allows stolen / grey market / unauthorized devices (IMEIs) to be rejected from the network, the EIR can have a list of “bad” IMEIs that if seen will reject the request.

It also allows us to lock a SIM (IMSI) to a given device (IMEI) or type of device – We can use this for say a Fixed Wireless service, to lock the SIMs (IMSIs) to a range of modems (IMEI Prefixes).

Lastly it gives us insight and analytics into the devices used on the network, by mapping the IMEI to a device, we can say that IMEI 1234567890 is an Apple iPhone 12 Pro Max, or a Nokia Fastmile 5G-24W-A.

PyHSS supports all these capabilities, so let’s have a look at how we’d manage / access them.

Setting up EIR Rules

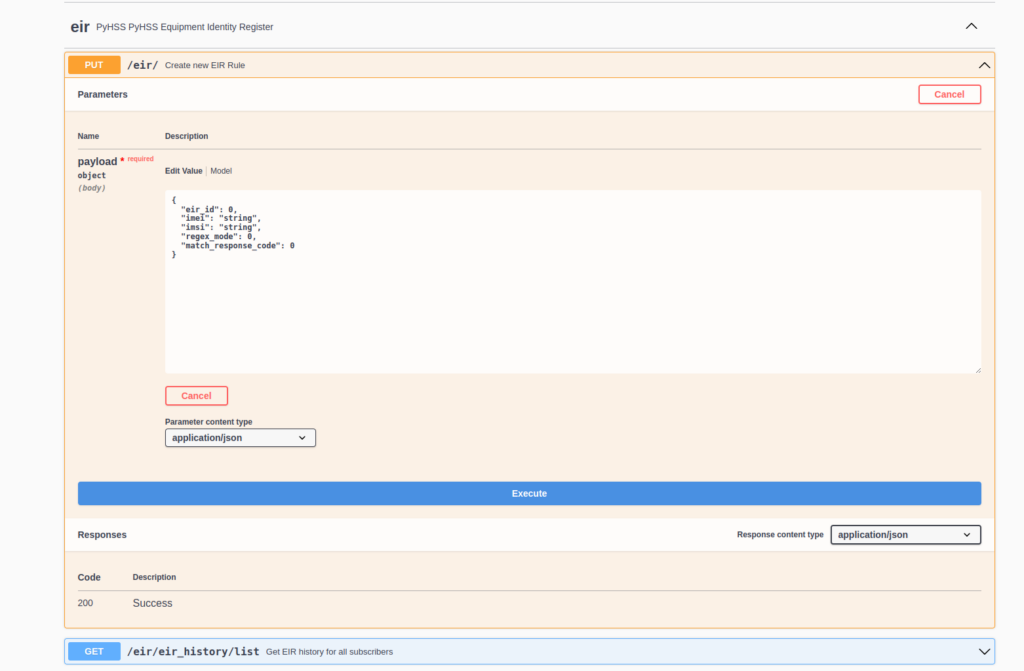
These rules are set via the RESTful API in PyHSS.

The Equipment Identity Register built into PyHSS supports matching in one of two modes, set by regex_mode.

In Exact Mode (regex_mode: 0) matches are based on an exact matching IMEI, and matching the IMSI if set (If IMSI is set to nothing (”), then only the IMEI is evaluated).

Exact Mode is suited for IMEI/IMSI locking, to ensure a SIM is locked to a particular device, or to blacklist stolen devices.

Regex Mode (regex_mode: 1) matches based on Regex, this is suited for whitelisting IMEI prefixes for say, specific validated vendors.

The match_response_code maps to the Equipment-Status AVP output, so specified values are:

  • 0 : ‘Whitelist’
  • 1: ‘Blacklist’
  • 2: ‘Greylist’

Some end to end examples of this provisioned into the API:

IMSI / IMEI Binding

{
      'imei': '1234', 
      'imsi': '567',
      'regex_mode': 0, 
      'match_response_code': 0
}

If IMSI is equal to 567 and is in use in IMEI 1234, then the response code returned is 0 (Whitelist).

IMEI Matching (Blacklist lost / stolen devices)

{
      'imei': '99881232',
      'imsi': '', 
      'regex_mode': 0, 
      'match_response_code': 1
}

If the IMEI is equal to 99881232 used with any IMSI, then the response code returned is 1 (Blacklist). This would be used for devices reported stolen.

IMEI Prefix Match (Blacklist / Whitelist all devices of type)

{
      'imei': '^666.*',
      'imsi': '', 
      'regex_mode': 1, 
      'match_response_code': 1
}

If the IMEI starts with 666, then the response code returned is 1 (Blacklist).

IMEI & IMSI Regex Match

{
      'imei': '^777.*',
      'imsi': '^1234123412341234$', 
      'regex_mode': 1, 
      'match_response_code': 2
}

If the IMEI starts with 777 and the IMSI is 1234123412341234 then return 2 (Greylist).

No Match Behaviour

If there is no match from the backend, then the config parameter no_match_response dictates the response code returned (Blacklist/Whitelist/Greylist).

Mapping Type Allocation Codes (TACs) to IMEIs

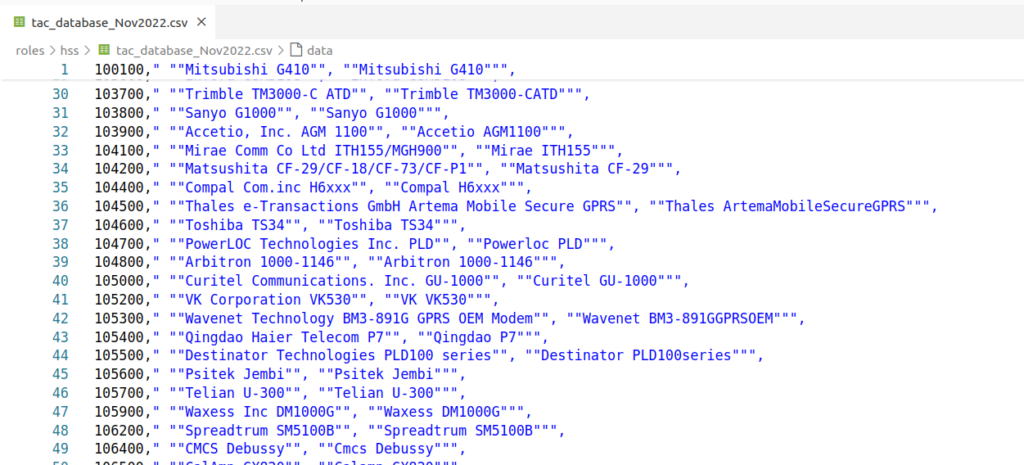
There are several data feeds of the Type Allocation Codes (TACs) which map a given IMEI prefix to a model number.

TAC database extract

Unfortunately, this data is not freely available, so we can’t bundle it with PyHSS, but if you have the IMEI Database, you can load it into PyHSS using Redis, to allow us to report on this data.

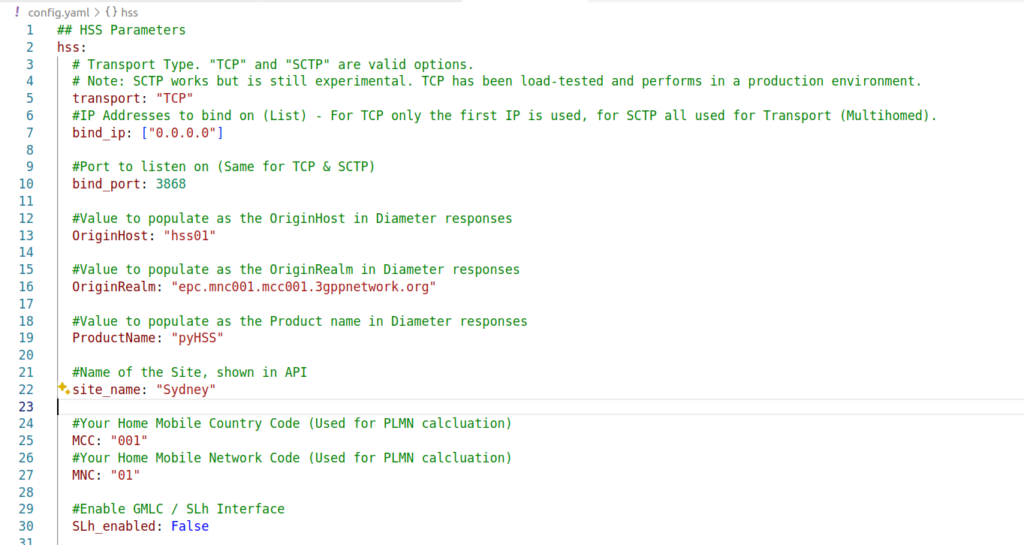
In your config.yaml you’ll just need to set the tac_database parameter, which will read the data on startup.

PyHSS YAML Config extract

Triggering on SIM Swap

If we keep track of the current IMSI/IMEI combination used for each SIM/Device, we can get notified every time it changes.

You might want to use this to trigger OTA provisioning or clear old data in your IMS.

For that we can use the sim_swap_notify_webhook in the config to send a HTTP POST to a given endpoint to inform it that a SIM is now in a different device.

We also have to have imsi_imei_logging set to true in the Config in order to log the history.

Reporting on IMEIs

We can also log/capture historical data about IMSI/IMEI combinations.

We use this from a customer support perspective to be able to see if a customer has recently changed phones, so if they call support, our staff can ask the customer about it to help troubleshoot.

“I can see you were connected previously on a Samsung Galaxy S22, but now you’re using a Nokia 3310, did the issues happen before you moved phones?”

This is super handy.

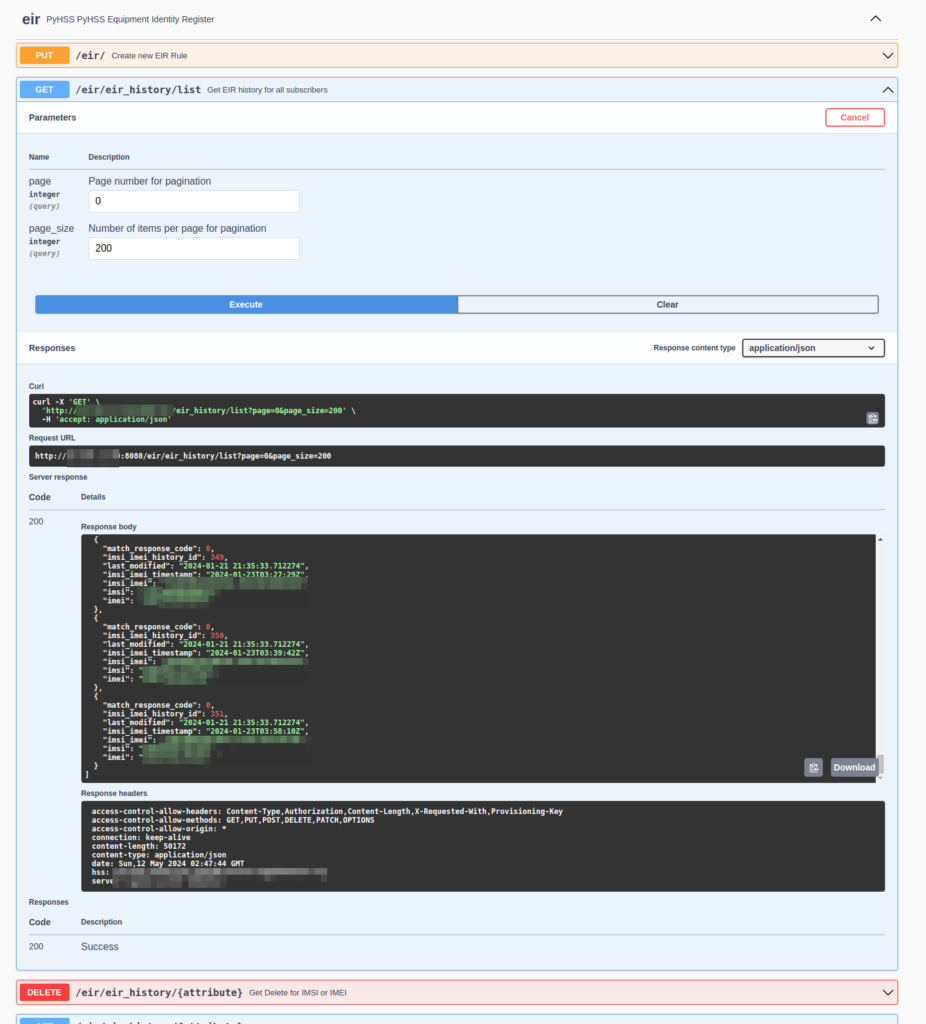
We can get a general log of IMSI vs IMEI like this:

Feed of IMSI vs IMEI along with a timestamp and the response that was sent back

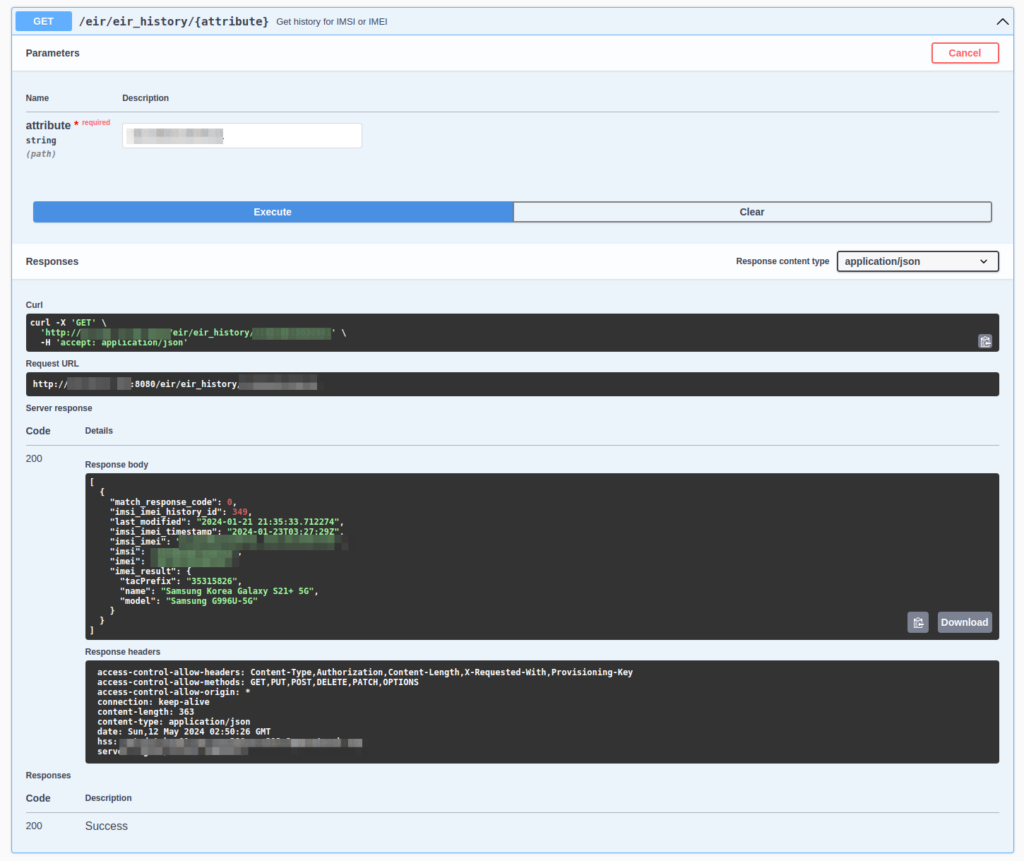
But what’s more useful is searching for a IMSI or an IMEI and then getting back a full list of devices / SIMs that have been used.

Searching for an IMSI I can see it’s only ever been used in this Samsung Galaxy

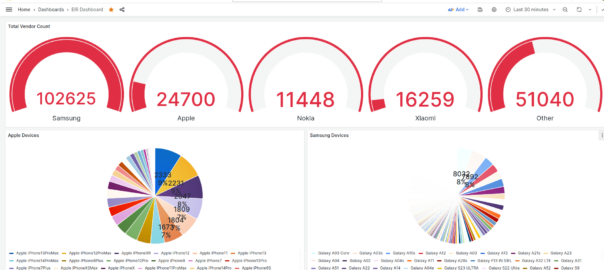
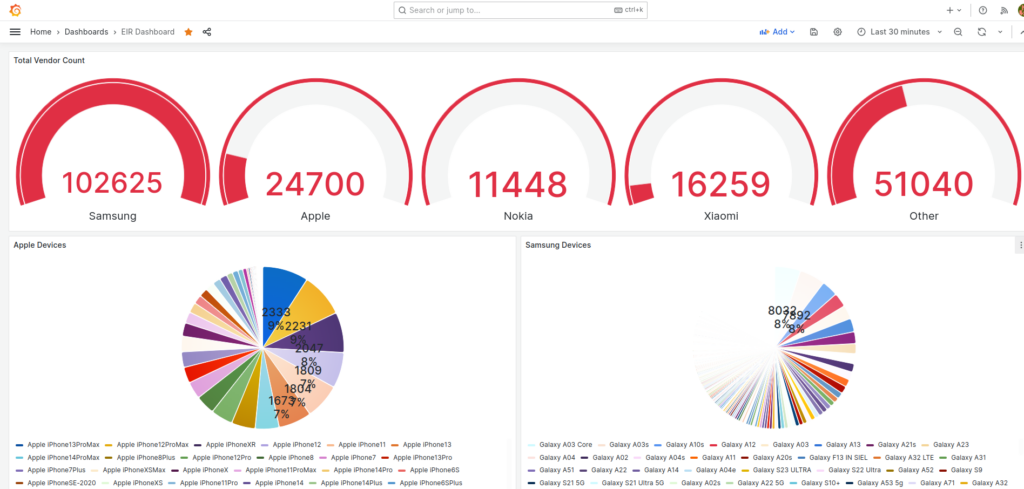
Lastly via Grafana we export all this data, which allows us to visualize this data and build dashboards showing the devices on the network.

Visualizing EIR Data in Grafana

PyHSS includes a Promethues exporter, when it comes to prom_eir_devices_total it lists each seen Type Allocation Code / UE in the network, along with the number we’ve seen of each.

Raw it looks like this:

But visualized in Grafana we can get a dashboard to give us a breakdown per vendor:

PyHSS Update – YAML Config Files

One feature I’m pretty excited to share is the addition of a single config file for defining how PyHSS functions,

In the past you’d set variables in the code or comment out sections to change behaviour, which, let’s face it – isn’t great.

Instead the config.yaml file defines the PLMN, transport time (TCP or SCTP), the origin host and realm.

We can also set the logging parameters, SNMP info and the database backend to be used,

HSS Parameters
 hss:
   transport: "SCTP"
   #IP Addresses to bind on (List) - For TCP only the first IP is used, for SCTP all used for Transport (Multihomed).
   bind_ip: ["10.0.1.252"]
 #Port to listen on (Same for TCP & SCTP)
   bind_port: 3868
 #Value to populate as the OriginHost in Diameter responses
   OriginHost: "hss.localdomain"
 #Value to populate as the OriginRealm in Diameter responses
   OriginRealm: "localdomain"
 #Value to populate as the Product name in Diameter responses
   ProductName: "pyHSS"
 #Your Home Mobile Country Code (Used for PLMN calcluation)
   MCC: "999"
   #Your Home Mobile Network Code (Used for PLMN calcluation)
   MNC: "99"
 #Enable GMLC / SLh Interface
   SLh_enabled: True


 logging:
   level: DEBUG
   logfiles:
     hss_logging_file: log/hss.log
     diameter_logging_file: log/diameter.log
     database_logging_file: log/db.log
   log_to_terminal: true

 database:
   mongodb:
     mongodb_server: 127.0.0.1
     mongodb_username: root
     mongodb_password: password
     mongodb_port: 27017

 Stats Parameters
 redis:
   enabled: True
   clear_stats_on_boot: False
   host: localhost
   port: 6379
 snmp:
   port: 1161
   listen_address: 127.0.0.1

PyHSS Update – SCTP Support

Pleased to announce that PyHSS now supports SCTP for transport.

If you’re not already aware SCTP is the surprisingly attractive cousin of TCP, that addresses head of line blocking and enables multi-homing,

The fantastic PySCTP library from P1sec made adding this feature a snap. If you’re looking to add SCTP to a Python project, it’s surprisingly easy,

A seperate server (hss_sctp.py) is run to handle SCTP connections, and if you’re looking for Multihoming, we got you dawg – Just edit the config file and set the bind_ip list to include each of your IPs to multi home listen on.

PyHSS New Features

Thanks to some recent developments, PyHSS has had a major overhaul recently, and is getting better than ever,

Some features that are almost ready for public release are:

Config File

Instead of having everything defined all over the place a single YAML config file is used to define how the HSS should function.

SCTP Support

No longer just limited to TCP, PyHSS now supports SCTP as well for transport,

SLh Interface for Location Services

So the GMLC can query the HSS as to the serving MME of a subscriber.

Additional Database Backends (MSSQL & MySQL)

No longer limited to just MongoDB, simple functions to add additional backends too and flexible enough to meet your existing database schema.

All these features will be merged into the mainline soon, and documented even sooner. I’ll share some posts on each of these features as I go.

Diameter and SIP: Registration-Termination-Request / Answer

These posts focus on the use of Diameter and SIP in an IMS / VoLTE context, however these practices can be equally applied to other networks.

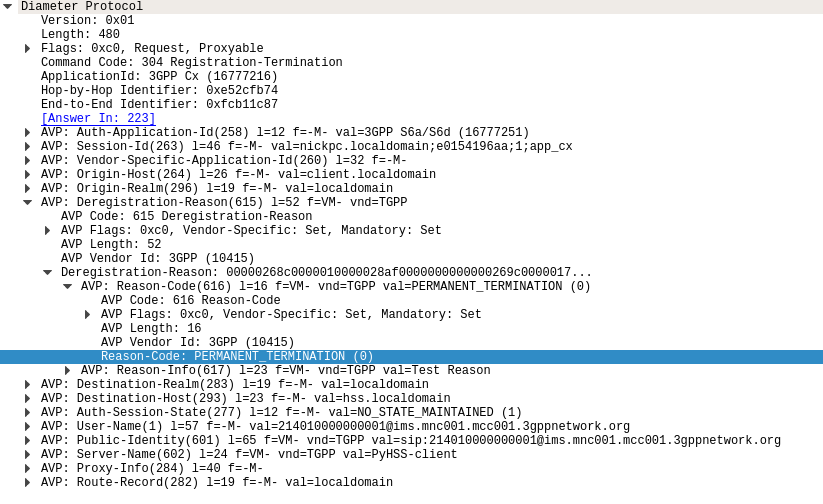
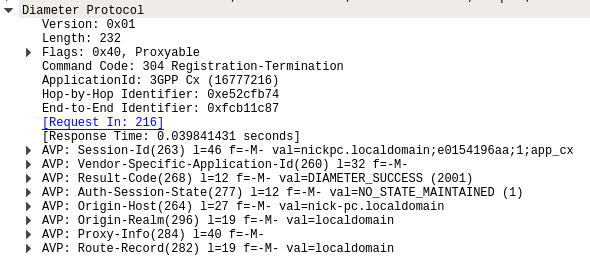
The Registration-Termination Request / Answer allow a Diameter Client (S-CSCF) to indicate to the HSS (Diameter Server) that it is no longer serving that user and the registration has been terminated.

Basics:

The RFC’s definition is actually pretty succinct as to the function of the Server-Assignment Request/Answer:

The Registration-Termination-Request is sent by a Diameter Multimedia server to a Diameter Multimedia client in order to request the de-registration of a user.

Reference: TS 29.229

The Registration-Termination-Request commands are sent by a S-CSCF to indicate to the Diameter server that it is no longer serving a specific subscriber, and therefore this subscriber is now unregistered.

There are a variety of reasons for this, such as PERMANENT_TERMINATION, NEW_SIP_SERVER_ASSIGNED and SIP_SERVER_CHANGE.

The Diameter Server (HSS) will typically send the Diameter Client (S-CSCF) a Registration-Termination-Answer in response to indicate it has updated it’s internal database and will no longer consider the user to be registered at that S-CSCF.

Packet Capture

I’ve included a packet capture of these Diameter Commands from my lab network which you can find below.

Other Diameter Cx (IMS) Calls

User-Authorization-Request / User-Authorization-Answer
Server-Assignment-Request / Server-Assignment-Answer
Location-Info-Request / Location-Info-Answer
Multimedia-Auth-Request / Multimedia-Auth-Answer
Registration-Termination-Request / Registration-Termination-Answer
Push-Profile-Request / Push-Profile-Answer

References:

3GPP Specification #: 29.229

RFC 4740 – Diameter Session Initiation Protocol (SIP) Application

Diameter-User-Authorization-Request-Command-Code-300-Packet-Capture

Diameter and SIP: User-Authorization-Request/Answer

These posts focus on the use of Diameter and SIP in an IMS / VoLTE context, however these practices can be equally applied to other networks.

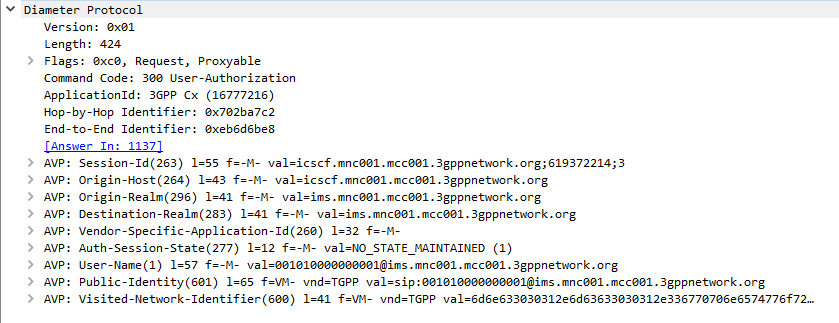
The Diameter User-Authorization-Request and User-Authorization-Answer commands are used as the first line of authorization of a user and to determine which Serving-CSCF to forward a request to.

Basics

When a SIP Proxy (I-CSCF) receives an incoming SIP REGISTER request, it sends a User-Authorization-Request to a Diameter server to confirm if the user exists on the network, and which S-CSCF to forward the request to.

When the Diameter server receives the User-Authorization-Request it looks at the User-Name (1) AVP to determine if the Domain / Realm is served by the Diameter server and the User specified exists.

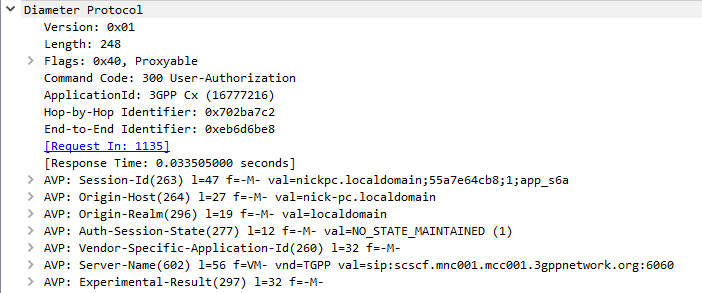
Assuming the user & domain are valid, the Diameter server sends back a User-Authorization-Answer, containing a Server-Capabilities (603) AVP with the Server-Name of the S-CSCF the user will be served by.

I always find looking at the packets puts everything in context, so here’s a packet capture of both the User-Authorization-Request and the User-Authorization-Answer.

First Registration

If this is the first time this Username / Domain combination (Referred to in the RFC as an AOR – Address of Record) is seen by the Diameter server in the User-Authorization-Request it will allocate a S-CSCF address for the subscriber to use from it’s pool / internal logic.

The Diameter server will store the S-CSCF it allocated to that Username / Domain combination (AoR) for subsequent requests to ensure they’re routed to the same S-CSCF.

The Diameter server indicates this is the first time it’s seen it by adding the DIAMETER_FIRST_REGISTRATION (2001) AVP to the User-Authorization-Answer.

Subsequent Registration

If the Diameter server receives another User-Authorization-Request for the same Username / Domain (AoR) it has served before, the Diameter server returns the same S-CSCF address as it did in the first User-Authorization-Answer.

It indicates this is a subsequent registration in much the same way the first registration is indicated, by adding an DIAMETER_SUBSEQUENT_REGISTRATION (2002) AVP to the User-Authorization-Answer.

User-Authorization-Type (623) AVP

An optional User-Authorization-Type (623) AVP is available to indicate the reason for the User-Authorization-Request. The possible values / reasons are:

  • Creating / Updating / Renewing a SIP Registration (REGISTRATION (0))
  • Establishing Server Capabilities & Registering (CAPABILITIES (2))
  • Terminating a SIP Registration (DEREGISTRATION (1))

If the User-Authorization-Type is set to DEREGISTRATION (1) then the Diameter server returns the S-CSCF address in the User-Authorization-Answer and then removes the S-SCSF address it had associated with the AoR from it’s own records.

Other Diameter Cx (IMS) Calls

User-Authorization-Request / User-Authorization-Answer
Server-Assignment-Request / Server-Assignment-Answer
Location-Info-Request / Location-Info-Answer
Multimedia-Auth-Request / Multimedia-Auth-Answer
Registration-Termination-Request / Registration-Termination-Answer
Push-Profile-Request / Push-Profile-Answer

References:

3GPP Specification #: 29.229

RFC 4740 – Diameter Session Initiation Protocol (SIP) Application

Diameter - Server Assignment Answer - All

Diameter and SIP: Server-Assignment-Request/Answer

These posts focus on the use of Diameter and SIP in an IMS / VoLTE context, however these practices can be equally applied to other networks.

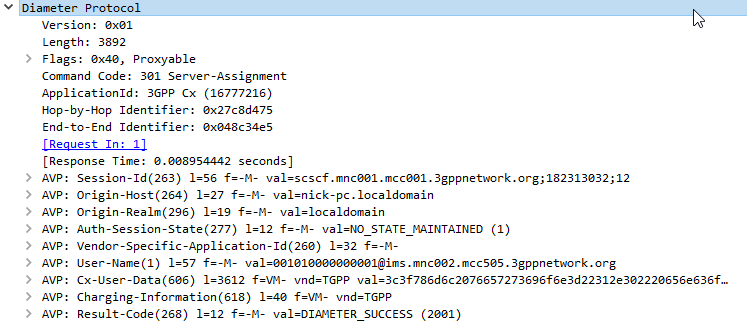
The Server-Assignment-Request/Answer commands are used so a SIP Server can indicate to a Diameter server that it is serving a subscriber and pull the profile information of the subscriber.

Basics:

The RFC’s definition is actually pretty succinct as to the function of the Server-Assignment Request/Answer:

The main functions of the Diameter SAR command are to inform the Diameter server of the URI of the SIP server allocated to the user, and to store or clear it from the Diameter server.

Additionally, the Diameter client can request to download the user profile or part of it.

RFC 4740 – 8.3

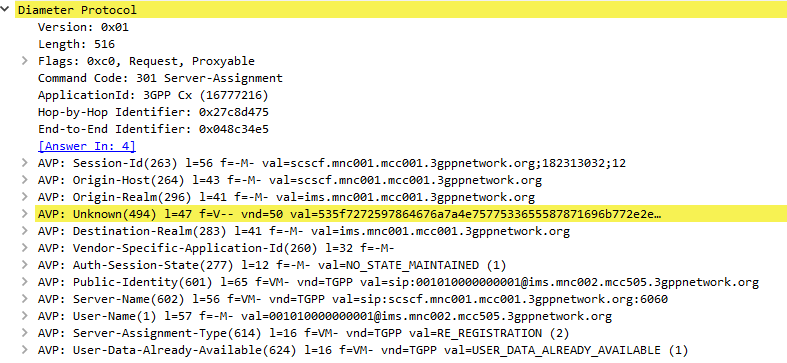
The Server-Assignment-Request/Answer commands are sent by a S-CSCF to indicate to the Diameter server that it is now serving a specific subscriber, (This information can then be queried using the Location-Info-Request commands) and get the subscriber’s profile, which contains the details and identities of the subscriber.

Typically upon completion of a successful SIP REGISTER dialog (Multimedia-Authentication Request), the SIP Server (S-CSCF) sends the Diameter server a Server-Assignment-Request containing the SIP Username / Domain (referred to as an Address on Record (SIP-AOR) in the RFC) and the SIP Server (S-CSCF)’s SIP-Server-URI.

The Diameter server looks at the SIP-AOR and ensures there are not currently any active SIP-Server-URIs associated with that AoR. If there are not any currently active it then stores the SIP-AOR and the SIP-Server-URI of the SIP Server (S-CSCF) serving that user & sends back a Server-Assignment-Answer.

For most request the Subscriber’s profile is also transfered to the S-SCSF in the Server-Assignment-Answer command.

SIP-Server-Assignment-Type AVP

The same Server-Assignment-Request command can be used to register, re-register, remove registration bindings and pull the user profile, through the information in the SIP-Server-Assignment-Type AVP (375),

Common values are:

  • NO_ASSIGNMENT (0) – Used to pull just the user profile
  • REGISTRATION (1) – Used for first registration
  • RE_REGISTRATION (2) – Updating / renewing registration
  • USER_DEREGISTRATION (5) – User has deregistered

Complete list of values available here.

Cx-User-Data AVP (User Profile)

The Cx-User-Data profile contains the subscriber’s profile from the Diameter server in an XML formatted dataset, that is contained as part of the Server-Assignment-Answer in the Cx-User-Data AVP (606).

The profile his tells the S-CSCF what services are offered to the subscriber, such as the allowed SIP Methods (ie INVITE, MESSAGE, etc), and how to handle calls to the user when the user is not registered (ie send calls to voicemail if the user is not there).

There’s a lot to cover on the user profile which we’ll touch on in a later post.

Other Diameter Cx (IMS) Calls

User-Authorization-Request / User-Authorization-Answer
Server-Assignment-Request / Server-Assignment-Answer
Location-Info-Request / Location-Info-Answer
Multimedia-Auth-Request / Multimedia-Auth-Answer
Registration-Termination-Request / Registration-Termination-Answer
Push-Profile-Request / Push-Profile-Answer

References:

3GPP Specification #: 29.229

RFC 4740 – Diameter Session Initiation Protocol (SIP) Application

Diameter and SIP: Location-Info-Request / Answer

These posts focus on the use of Diameter and SIP in an IMS / VoLTE context, however these practices can be equally applied to other networks.

The Location-Information-Request/Answer commands are used so a SIP Server query a Diameter to find which P-CSCF a Subscriber is being served by

Basics:

The RFC’s definition is actually pretty succinct as to the function of the Server-Assignment Request/Answer:

The Location-Info-Request is sent by a Diameter Multimedia client to a Diameter Multimedia server in order to request name of the server that is currently serving the user.Reference: 29.229-

The Location-Info-Request is sent by a Diameter Multimedia client to a Diameter Multimedia server in order to request name of the server that is currently serving the user.

Reference: TS 29.229

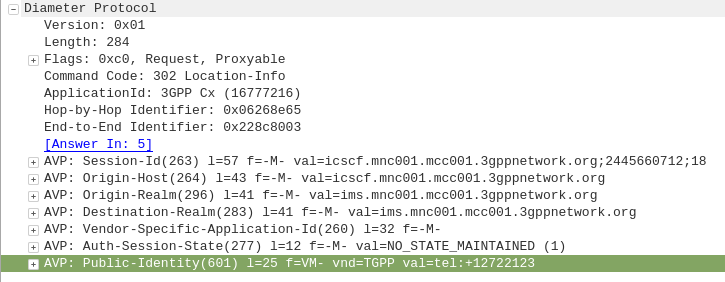
The Location-Info-Request commands is sent by an I-CSCF to the HSS to find out from the Diameter server the FQDN of the S-CSCF serving that user.

The Public-Identity AVP (601) contains the Public Identity of the user being sought.

Here you can see the I-CSCF querying the HSS via Diameter to find the S-CSCF for public identity 12722123

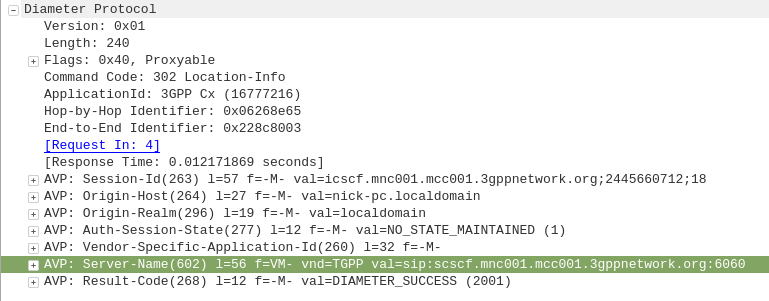
The Diameter server sends back the Location-Info-Response containing the Server-Name AVP (602) with the FQDN of the S-CSCF.

Packet Capture

I’ve included a packet capture of these Diameter Commands from my lab network which you can find below.

Other Diameter Cx (IMS) Calls

User-Authorization-Request / User-Authorization-Answer
Server-Assignment-Request / Server-Assignment-Answer
Location-Info-Request / Location-Info-Answer
Multimedia-Auth-Request / Multimedia-Auth-Answer
Registration-Termination-Request / Registration-Termination-Answer
Push-Profile-Request / Push-Profile-Answer

References:

3GPP Specification #: 29.229

RFC 4740 – Diameter Session Initiation Protocol (SIP) Application

Screenshot of packet capture of Diameter Multimedia-Auth-Request (Diameter Command Code 303) used for IMS authentication

Diameter and SIP: Multimedia-Authentication-Request/Answer

These posts focus on the use of Diameter and SIP in an IMS / VoLTE context, however these practices can be equally applied to other networks.

The Multimedia-Authentication-Request/Answer commands are used to Authenticate subscribers / UAs using a variety of mechanisms such as straight MD5 and AKAv1-MD5.

Basics:

When a SIP Server (S-CSCF) receives a SIP INVITE, SIP REGISTER or any other SIP request, it needs a way to Authenticate the Subscriber / UA who sent the request.

We’ve already looked at the Diameter User-Authorization-Request/Answer commands used to Authorize a user for access, but the Multimedia-Authentication-Request / Multimedia-Authentication-Answer it used to authenticate the user.

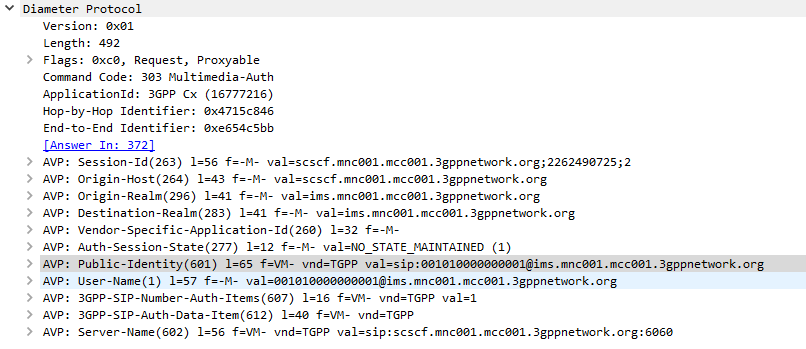
The SIP Server (S-CSCF) sends a Multimedia-Authentication-Request to the Diameter server, containing the Username of the user attempting to authenticate and their Public Identity.

The Diameter server generates “Authentication Vectors” – these are Precomputed cryptographic challenges to challenge the user, and the correct (“expected”) responses to the challenges. The Diameter puts these Authentication Vectors in the 3GPP-SIP-Auth-Data (612) AVP, and sends them back to the SIP server in the Multimedia-Authentication-Answer command.

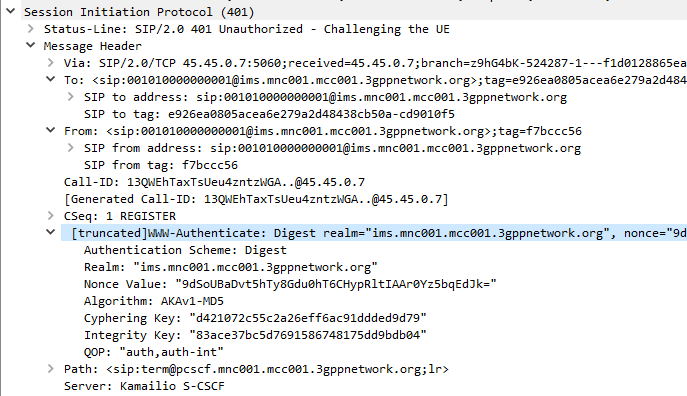
The SIP server sends the Subscriber / UA a SIP 401 Unauthorized response to the initial request, containing a WWW-Authenticate header containing the challenges.

SIP 401 Response with WWW-Authenticate header populated with values from Multimedia-Auth-Answer

The Subscriber / UA sends back the initial request with the WWW-Authenticate header populated to include a response to the challenges. If the response to the challenge matches the correct (“expected”) response, then the user is authenticated.

I always find it much easier to understand what’s going on through a packet capture, so here’s a packet capture showing the two Diameter commands,

Note: There is a variant of this process allows for stateless proxies to handle this by not storing the expected authentication values sent by the Diameter server on the SIP Proxy, but instead sending the received authentication values sent by the Subscriber/UA to the Diameter server to compare against the expected / correct values.

The Cryptography

The Cryptography for IMS Authentication relies on AKAv1-MD5 which I’ve written about before,

Essentially it’s mutual network authentication, meaning the network authenticates the subscriber, but the subscriber also authenticates the network.

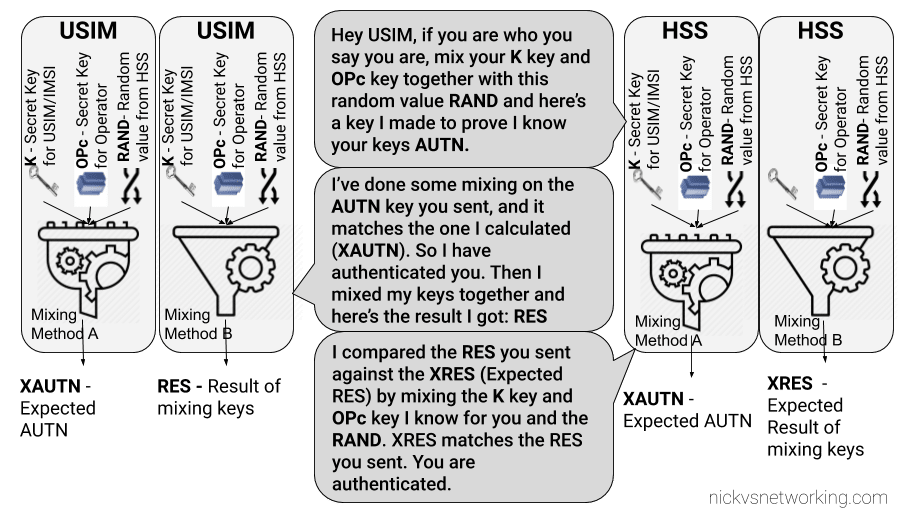
LTE USIM Authentication - Mutual Authentication of the Network and Subscriber

Other Diameter Cx (IMS) Calls

User-Authorization-Request / User-Authorization-Answer
Server-Assignment-Request / Server-Assignment-Answer
Location-Info-Request / Location-Info-Answer
Multimedia-Auth-Request / Multimedia-Auth-Answer
Registration-Termination-Request / Registration-Termination-Answer
Push-Profile-Request / Push-Profile-Answer

References:

3GPP Specification #: 29.229

RFC 4740 – Diameter Session Initiation Protocol (SIP) Application

PyHSS Update – IMS Cx Support!

As I’ve been doing more and more work with IMS / VoLTE, the requirements / features on PyHSS has grown.

Some key features I’ve added recently:

IMS HSS Features

IMS Cx Server Assignment Request / Answer

IMS Cx Multimedia Authentication Request / Answer

IMS Cx User Authentication Request / Answer

IMS Cx Location Information Request / Answer

General HSS Features

Better logging (IPs instead of Diameter hostnames)

Better Resync Support (For USIMs with different sync windows)

ToDo

There’s still some functions in the 3GPP Cx interface description I need to implement:

IMS Cx Registration-Termination Request / Answer

IMS Cx Push-Profile-Request / Answer

Support for Resync in IMS Cx Multimedia Authentication Answer

Keep an eye on the GitLab repo where I’m pushing the changes.

If you’re leaning about VoLTE & IMS networks, or building your own, I’d suggest checking out my other posts on the topic.

PyHSS Update – MongoDB Backend & SQN Resync

After a few quiet months I’m excited to say I’ve pushed through some improvements recently to PyHSS and it’s growing into a more usable HSS platform.

MongoDB Backend

This has a few obvious advantages – More salable, etc, but also opens up the ability to customize more of the subscriber parameters, like GBR bearers, etc, that simple flat text files just wouldn’t support, as well as the obvious issues with threading and writing to and from text files at scale.

Knock knock.

Race condition.

Who’s there?

— Threading Joke.

For now I’m using the Open5GS MongoDB schema, so the Open5Gs web UI can be used for administering the system and adding subscribers.

The CSV / text file backend is still there and still works, the MongoDB backend is only used if you enable it in the YAML file.

The documentation for setting this up is in the readme.

SQN Resync

If you’re working across multiple different HSS’ or perhaps messing with some crypto stuff on your USIM, there’s a chance you’ll get the SQN (The Sequence Number) on the USIM out of sync with what’s on the HSS.

This manifests itself as an Update Location Request being sent from the UE in response to an Authentication Information Answer and coming back with a Re-Syncronization-Info AVP in the Authentication Info AVP. I’ll talk more about how this works in another post, but in short PyHSS now looks at this value and uses it combined with the original RAND value sent in the Authentication Information Answer, to find the correct SQN value and update whichever database backend you’re using accordingly, and then send another Authentication Information Answer with authentication vectors with the correct SQN.

SQN Resync is something that’s really cryptographically difficult to implement / confusing, hence this taking so long.

What’s next? – IMS / Multimedia Auth

The next feature that’s coming soon is the Multimedia Authentication Request / Answer to allow CSCFs to query for IMS Registration and manage the Cx and Dx interfaces.

Code for this is already in place but failing some tests, not sure if that’s to do with the MAA response or something on my CSCFs,

Keep an eye on the GitLab repo!

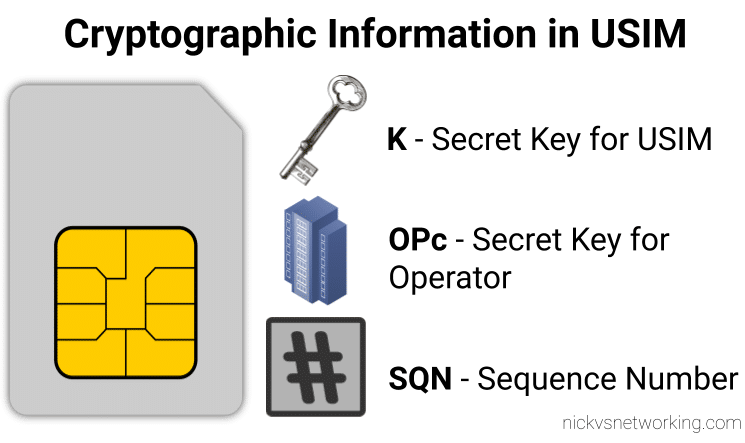
Information stored on USIM / SIM Card for LTE / EUTRAN / EPC - K key, OP/OPc key and SQN Sequence Number

HSS & USIM Authentication in LTE/NR (4G & 5G)

I talked a bit in my last post about using osmo-sim-auth to authenticate against a USIM / SIM card when it’s not in a phone,

I thought I’d expand a little on how the Crypto side of things works in LTE & NR (also known as 4G & 5G).

Authentication primarily happens in two places, one at each end of the network, the Home Subscriber Server and in the USIM card. Let’s take a look at each of them.

On the USIM

On the USIM we’ve got two values that are entered in when the USIM is provisioned, the K key – Our secret key, and an OPc key (operator key).

These two keys are the basis of all the cryptography that goes on, so should never be divulged.

The only other place to have these two keys in the HSS, which associates each K key and OPc key combination with an IMSI.

The USIM also stores the SQN a sequence number, this is used to prevent replay attacks and is incremented after each authentication challenge, starting at 1 for the first authentication challenge and counting up from there.

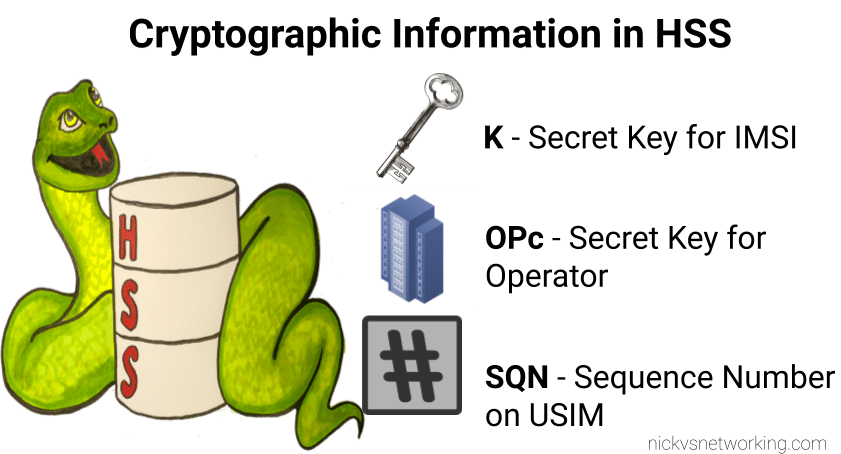
On the HSS

On the HSS we have the K key (Secret key), OPc key (Operator key) and SQN (Sequence Number) for each IMSI on our network.

Each time a IMSI authenticates itself we increment the SQN, so the value of the SQN on the HSS and on the USIM should (almost) always match.

Authentication Options

Let’s imagine we’re designing the authentication between the USIM and the Network; let’s look at some options for how we can authenticate everyone and why we use the process we use.

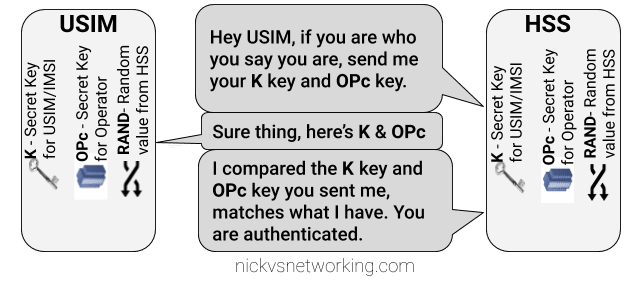
Failed Option 1 – Passwords in the Clear

The HSS could ask the USIM to send it’s K and OPc values, compare them to what the HSS has in place and then either accept or reject the USIM depending on if they match.

The obvious problem with this that to send this information we broadcast our supposedly secret K and OPc keys over the air, so anyone listening would get our secret values, and they’re not so secret anymore.

This is why we don’t use this method.

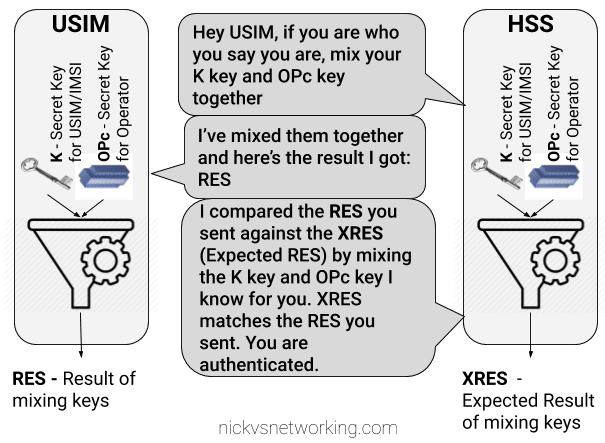
Failed Option 2 – Basic Crypto

So we’ve seen that sending our keys publicly, is out of the question.

The HSS could ask the USIM to mix it’s K key and OPc key in such a way that only someone with both keys could unmix them.

This is done with some cryptographic black magic, all you need to know is it’s a one way function you enter in values and you get the same result every time with the same input, but you can’t work out the input from the result.

The HSS could then get the USIM to send back the result of mixing up both keys, mix the two keys it knows and compare them.

The HSS mixes the two keys itself, and get’s it’s own result called XRES (Expected Result). If the RES (result) of mixing up the keys by the USIM is matches the result when the HSS mixes the keys in the same way (XRES (Expected Result)), the user is authenticated.

The result of mixing the keys by the USIM is called RES (Result), while the result of the HSS mixing the keys is called XRES (Expected Result).

This is a better solution but has some limitations, because our special mixing of keys gets the same RES each time we put in our OPc and K keys each time a subscriber authenticates to the network the RES (result) of mixing the keys is going to be the same.

This is vulnerable to replay attacks. An attacker don’t need to know the two secret keys (K & OPc) that went into creating the RES (resulting output) , the attacker would just need to know the result of RES, which is sent over the air for anyone to hear.
If the attacker sends the same RES they could still authenticate.

This is why we don’t use this method.

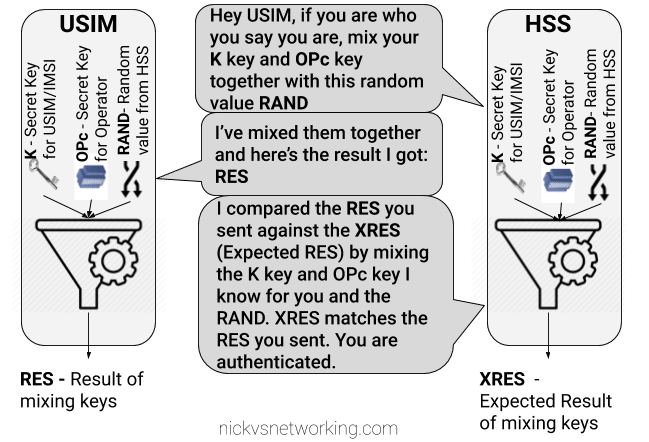
Failed Option 3 – Mix keys & add Random

To prevent these replay attacks we add an element of randomness, so the HSS generates a random string of garbage called RAND, and sends it to the USIM.

The USIM then mixes RAND (the random string) the K key and OPc key and sends back the RES (Result).

Because we introduced a RAND value, every time the RAND is different the RES is different. This prevents against the replay attacks we were vulnerable to in our last example.

If the result the USIM calculated with the K key, OPc key and random data is the same as the USIM calculated with the same K key, OPc key and same random data, the user is authenticated.

While an attacker could reply with the same RES, the random data (RAND) will change each time the user authenticates, meaning that response will be invalid.

While an attacker could reply with the same RES, the random data (RAND) will change each time the user authenticates, meaning that response will be invalid.

The problem here is now the network has authenticated the USIM, the USIM hasn’t actually verified it’s talking to the real network.

This is why we don’t use this method.

GSM authentication worked like this, but in a GSM network you could setup your HLR (The GSM version of a HSS) to allow in every subscriber regardless of what the value of RES they sent back was, meaning it didn’t look at the keys at all, this meant attackers could setup fake base stations to capture users.

Option 4 – Mutual Authentication (Real World*)

So from the previous options we’ve learned:

  • Our network needs to authenticate our subscribers, in a way that can’t be spoofed / replayed so we know who to bill & where to route traffic.
  • Our subscribers need to authenticate the network so they know they can trust it to carry their traffic.

So our USIM needs to authenticate the network, in the same way the network authenticates the USIM.

To do this we introduce a new key for network authentication, called AUTN.

The AUTN key is generated by the HSS by mixing the secret keys and RAND values together, but in a different way to how we mix the keys to get RES. (Otherwise we’d get the same key).

This AUTN key is sent to the USIM along with the RAND value. The USIM runs the same mixing on it’s private keys and RAND the HSS did to generate the AUTN , except this is the USIM generated – An Expected AUTN key (XAUTN). The USIM compares XAUTN and AUTN to make sure they match. If they do, the USIM then knows the network knows their secret keys.

The USIM then does the same mixing it did in the previous option to generate the RES key and send it back.

The network has now authenticated the subscriber (HSS has authenticated the USIM via RES key) and the subscriber has authenticated the USIM (USIM authenticates HSS via AUTN key).

*This is a slightly simplified version of how EUTRAN / LTE authentication works between the HSS and the USIM – In reality there are a few extra values, such as SQN to take into consideration and the USIM talks to to the MME not the HSS directly.

I’ll do a follow up post covering the more nitty-gritty elements, AMF and SQN fields, OP vs OPc keys, SQN Resync, how this information is transfered in the Authentication Information Answer and how KASME keys are used / distributed.