Monthly Archives: February 2019

Kamailio Bytes – Dialplan Module

Kamalio’s dialplan is a bit of a misleading title, as it can do so much more than just act as a dialplan.

At it’s core, it runs transformations. You feed it a value, if the value matches the regex Kamailio has it can either apply a transformation to that value or return a different value.

Adding to Config

For now we’ll just load the dialplan module and point it at our DBURL variable:

loadmodule "dialplan.so"
modparam("dialplan", "db_url", DBURL);                 #Dialplan database from DBURL variable

Restart Kamailio and we can get started.

Basics

Let’s say we want to take StringA and translate it in the dialplan module to StringB, so we’d add an entry to the database in the dialplan table, to take StringA and replace it with StringB.

We’ll go through the contents of the database in more detail later in the post

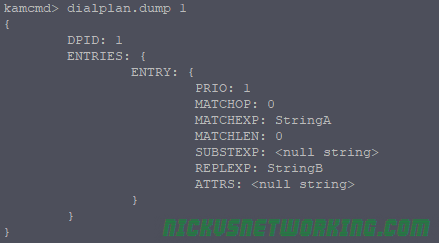
Now we’ll fire up Kamailio, open kamcmd and reload the dialplan, and dump out the entries in Dialplan ID 1:

dialplan.reload
dialplan.dump 1

You should see the output of what we just put into the database reflected in kamcmd:

Now we can test our dialplan translations, using Kamcmd again.

dialplan.translate 1 StringA

All going well Kamailio will match StringA and return StringB:

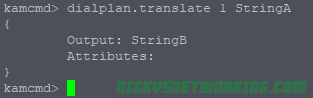
So we can see when we feed in String A, to dialplan ID 1, we get String B returned.

Database Structure

There’s a few fields in the database we populated, let’s talk about what each one does.

dpid

dpid = Dialplan ID. This means we can have multiple dialplans, each with a unique dialplan ID. When testing we’ll always need to specific the dialplan ID we’re using to make sure we’re testing with the right rules.

priority

Priorities in the dialplan allow us to have different weighted priorities. For example we might want a match all wildcard entry, but more specific entries with lower values. We don’t want to match our wildcard failover entry if there’s a more specific match, so we use priorities to run through the list, first we try and match the group with the lowest number, then the next lowest and so on, until a match is found.

match_op

match_op = Match Operation. There are 3 options:

  • 0 – string comparison;
  • 1 – regular expression matching (pcre);
  • 2 – fnmatch (shell-like pattern) matching

In our first example we had match_op set to 0, so we exactly matched “StringA”. The real power comes from Regex Matching, which we’ll cover soon.

match_exp

match_exp = Match expression. When match_op is set to 0 this matches exactly the string in match_exp, when match_op is set to 1 this will contain a regular expression to match.

match_len

match_len = Match Length. Allows you to match a specific length of string.

subst_exp

subst_exp = Substitute Expression. If match_op is set to 0 this will contain be empty If match_op is 1 this will contain the same as match_exp.

repl_exp

repl_exp = replacement expression. If match_op is set to 0 this will contain the string to replace the matched string.

If match_op is set to 1 this can contain the regex group matching (\1, \2, etc) and any suffixes / prefixes (for example 61\1 will prefix 61 and add the contents of matched group 1).

attrs

Attributes. Often used as a descriptive name for the matched rule.

Getting Regex Rules Setup

The real power of the dialplan comes from Regular Expression matching. Let’s look at some use cases and how to solve them with Dialplans.

Note for MySQL users: MySQL treats \ as the escape character, but we need it for things like matching a digit in Regex (that’s \d ) – So keep in mind when inserting this into MySQL you may need to escale the escape, so to enter \d into the match_exp field in MySQL you’d enter \\d – This has caught me in the past!

The hyperlinks below take you to the examples in Regex101.com so you can preview the rules and make sure it’s matching what it should prior to putting it into the database.

Speed Dial

Let’s start with a simple example of a speed dial. When a user dials 101 we want to translate it to a PSTN number of 0212341234.

Without Regex this looks very similar to our first example, we’ve just changed the dialplan id (dpid) and the match_op and repl_exp.

Once we’ve added it to the database we’ll reload the dialplan module and dump dialplan 2 to check it all looks correct:

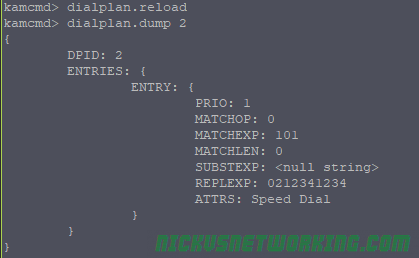
Now let’s test what happens if we do a dialplan translate on dialplan 2 with 101.

Tip: If you’re testing a dialplan and what you’re matching is a number, add s: before it so it matches as a number, not a string.

dialplan.translate 2 s:101

Here we can see we’ve matched 101 and the output is the PSTN number we wanted to translate too.

Interoffice Dial

Let’s take a slightly more complex example. We’ve got an office with two branches, office A’s phone numbers start with 0299991000, and they have 4 digit extensions, so extension 1002 maps to 0299991002, 0299991003 maps to extension 1003, etc.

From Office B we want to be able to just dial the 4 digit extensions of a user in Office A.

This means if we receive 1003 we need to prefix
029999 + 10003.

We’ll use Regular Expressions to achieve this.

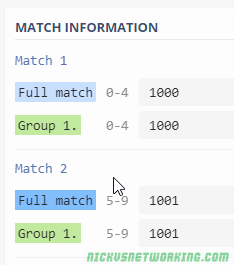
We can use a simple Regular Expression to match any number starting with 1 with 3 digits after it.

But the problem here is we want to collect the output into a Regex Group, and then prefix 029999 and the output of that group.

So let’s match it using a group.

([1]\d{3})

So let’s put this into the database and prefix everything in matching group 1 with 029999.

We’ll use dialplan ID 3 to separate it from the others, and we’ll set match_op to 1 to use Regex.

As you can see in repl_exp we’ve got our prefix and then \1.

\1 just means the contents of regex matching group 1.

After running dialplan reload let’s try this one out:

dialplan.reload
dialplan.translate 3 s:1003

We tested with 1003, but we could use 1000 through to 1999 and all would match.

But if we’ve only got a 100 number range (0299991000 to
0299991099) we’ll only want to match the first 100 numbers, so let’s tweak our regex to only allow the first two digits to be wildcards.

([1][0]\d{2})

Now let’s update the database:

Then another reload and translate, and we can test again.

dialplan.reload
dialplan.translate 3 s:1003 (Translates to 0299991003)
dialplan.translate 3 s:1101 (no translation)

Interoffice Dial Failure Route (Priorities)

So let’s say we’ve got lots of branches configured like this, and we don’t want to just get “No Translation” if a match isn’t found, but rather send it to a specific destination, say reception on extension 9000.

So we’ll keep using dpid 3 and we’ll set all our interoffice dial rules to have priority 1, and we’ll create a new entry to match anything 4 digits long and route it to the switch.

This entry will have a higher priority value than the other so will only mach if nothing else with a lower priority number matches.

We’ll use this simple regex to match anything 4 digits long into group 1.

 (\d{4})

Now let’s run through some test again.

dialplan.reload
dialplan.translate 3 s:1003 (Translates to 0299991003)
dialplan.translate 3 s:1101 (Translates to 9000 (Attributes: Interoffice Dial - Backup to Reception)

Translate 0NSN to E.164 format numbers

Let’s say we’ve got a local 10 digit number. In 0NSN format it looks like 0399999999 but we want it in E.164 so it looks like 613999999999.

Let’s use Kamailio to translate this from 0NSN to E.164.

The first thing we’ll need to do is create a regular expression to match
0399999999.

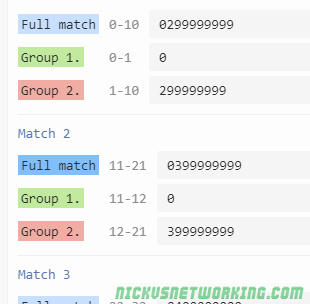
We’ll match anything starting with 03, with 9 digits after the 0 matched in Group 2.

([0][3])(\d{8})

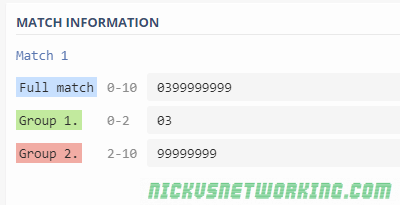
Now we’ve got Group 2 containing the data we need, we just need to prefix 613 in front of it.

Let’s go ahead an put this into the database, with dialplan ID set to 4, match_op set to 1 (for regex)

Then we’ll do a dialplan reload and a dialplan dump for dialplan ID 4 to check everything is there:

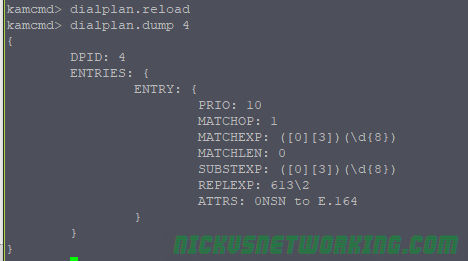
Now let’s put it to the test.

dialplan.translate 4 s:0399999999

Bingo, we’ve matched the regex, and returned 613 and the output of Regex Match group 2. (999999999)

Let’s expand upon this a bit, a valid 0NSN number could also be a mobile (0400000000) or a local number in a different area code (0299999999, 0799999999 or 0899999999).

We could create a dialplan entry for each, our we could expand upon our regex to match all these scenarios.
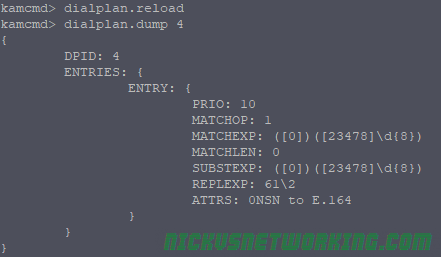
So let’s update our regex to match anything starting with 0 followed by either a 2, 3, 4, 7 or 8, and then 8 digits after that. 

([0])([23478]\d{8})

Now let’s update the database so that once we’re matched we’ll just prefix 61 and the output of regex group 2.

Again we’ll do a dialplan reload and a dialplan dump to check everything.

Now let’s run through our examples to check they correctly translate:

And there you go, we’re matched and the 0NSN formatted number was translated to E.164.

Adding to Kamailio Routing

So far we’ve just used kamcmd’s dialplan.translate function to test our dialplan rules, now let’s actually put them into play.

For this we’ll use the function

dp_translate(id, [src[/dest]])

dp_translate is dialplan translate. We’ll feed it the dialplan id (id) and a source variable and destination variable. The source variable is the equivalent of what we put into our kamcmd dialplan.translate, and the destination is the output.

In this example we’ll rewrite the Request URI which is in variable $rU, we’ll take the output of $rU, feed it through dialplan translate and save the output as $rU (overwrite it).

Let’s start with the Speed Dial example we setup earlier, and put that into play.

   if(method=="INVITE"){
                xlog("rU before dialplan translation is $rU");
                dp_translate("2", "$rU/$rU");
                xlog("rU after dialplan translation is $rU");
}

The above example will output our $rU variable before and after the translation, and we’re using Dialplan ID 2, which we used for our speed dial example.

So let’s send an INVITE from our Softphone to our Kamailio instance with to 101, which will be translated to 0212341234.

Before we do we can check it with Kamcmd to see what output we expect:

dialplan.translate 2 s:101

Let’s take a look at the out put of Syslog when we call 101.

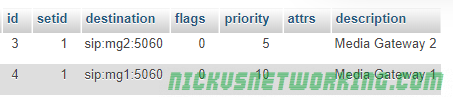
But our INVITE doesn’t actually go anywhere, so we’ll add it to our dispatcher example from the other day so you can see it in action, we’ll relay the INVITE to an active Media Gateway, but the $rU will change.

   if(method=="INVITE"){
                xlog("rU before dialplan translation is $rU");
                dp_translate("2", "$rU/$rU");
                xlog("rU after dialplan translation is $rU");
                ds_select_dst(1, 12);
                t_on_failure("DISPATCH_FAILURE");
                route(RELAY);
        }

Let’s take a look at how the packet captures now look:

UA > Kamailio: INVITE sip:101@kamailio SIP/2.0
Kamailio > UA: SIP/2.0 100 trying -- your call is important to us
Kamailio > MG1: INVITE sip:0212341234@MG1 SIP/2.0

So as you can see we translated 101 to 0212341234 based on the info in dialplan id 2 in the database.

That’s all well and good if we dial 101, but what if we dial 102, there’s no entry in the database for 102, as we see if we try it in Kamcmd:

dialplan.translate 2 s102

And if we make a call to 102 and check syslog:

rU before dialplan translation is 102
rU after dialplan translation is 102

Let’s setup some logic so we’ll respond with a 404 “Not found in Dialplan” response if the dialplan lookup doesn’t return a result:

if(dp_translate("2", "$rU/$rU")){
  xlog("Successfully translated rU to $rU using dialplan ID 2");
}else{
  xlog("Failed to translate rU using dialplan ID 2");
  sl_reply("404", "Not found in dialplan");
  exit;
}

By putting dp_translate inside an if we’re saying “if dp_translate is successful then do {} and the else will be called if dp_translate wasn’t successful.

Let’s take a look at a call to 101 again.

UA > Kamailio: INVITE sip:101@kamailio SIP/2.0
Kamailio > UA: SIP/2.0 100 trying -- your call is important to us
Kamailio > MG1: INVITE sip:0212341234@MG1 SIP/2.0

Still works, and a call to 102 (which we don’t have an entry for in the dialplan).

UA > Kamailio: INVITE sip:102@kamailio SIP/2.0
Kamailio > UA: SIP/2.0 404 Not found in dialplan

Hopefully by now you’ve got a feel for the dialplan module, how to set it up, debug it, and use it.

As always I’ve put my working code on GitHub.

SIP Extensions – 100rel SIP (RFC3262)

When a final response, like a 200 OK, or a 404, etc, is sent, the receiving party acknowledges that it received this with an ACK.

By provisional responses, such as 180 RINGING, are not acknowledged, this means we have no way of knowing for sure if our UAC received the provisional response.

The issues start to arise when using SIP on Media Gateways or inter-operating with SS7 / ISUP / PSTN, all of which have have guaranteed delivery of a RINGING response, but SIP doesn’t. (Folks from the TDM world will remember ALERTING messages)

The IETF saw there was in some cases, a need to confirm these provisional responses were received, and so should have an ACK.

They created the Reliability of Provisional Responses in the Session Initiation Protocol (SIP) under RFC3262 to address this.

This introduced the Provisional Acknowledgement (PRACK) and added the 100rel extension to Supported / Requires headers where implemented.

This means when 100rel extension is not used a media gateway that generates a 180 RINGING or a 183 SESSION PROGRESS response, sends it down the chain of proxies to our endpoint, but could be lost anywhere along the chain and the media gateway would never know.

When the 100rel extension is used, our media gateway generates a 18x response, and forwards it down the chain of proxies to our endpoint, and our 18x response now also includes a RSeq which is a reliable sequence number.

The endpoint receives this 18x response and sends back a Provisional Acknowledgement or PRACK, with a Rack header (Reliable Acknowledgement) header with the same value as the RSeq of the received 18x response.

The media gateway then sends back a 200 OK for the PRACK.

In the above example we see a SIP call to a media gateway,

The INVITE is sent from the caller to the Media Gateway via the Proxy. The caller has included value “100rel” in the Supported: header, showing support for RFC3262.

The Media gateway looks at the destination and knows it needs to translate this SIP message to a different a different protocol. Our media gateway is translating our SIP INVITE message into it’s Sigtran equivalent (IAM), and forward it on, which it does, sending an IAM (Initial Address Message) via Sigtran.

When the media gateways gets confirmation the remote destination is ringing via Sigtran (ACM ISUP message), it translates that to it’s SIP equivalent message which is, 180 RINGING.

The Media Gateway set a reliable sequence number on this provisional response, contained in the RSeq header.

This response is carried through the proxy back to the caller, who signals back to the media gateway it got the 180 RINGING message by sending a PRACK (Provisional ACK) with the same RSeq number.

The call is eventually answered and goes on.

Kamailio Bytes – Dispatcher Module

The Dispatcher module is used to offer load balancing functionality and intelligent dispatching of SIP messages.

Let’s say you’ve added a second Media Gateway to your network, and you want to send 75% of traffic to the new gateway and 25% to the old gateway, you’d use the load balancing functionality of the Dispatcher module.

Let’s say if the new Media Gateway goes down you want to send 100% of traffic to the original Media Gateway, you’d use the intelligent dispatching to detect status of the Media Gateway and manage failures.

These are all problems the Dispatcher Module is here to help with.

Before we get started….

Your Kamailio instance will need:

  • Installed and running Kamailio instance
  • Database configured and tables created (We’ll be using MySQL but any backed is fine)
  • kamcmd & kamctl working (kamctlrc configured)
  • Basic Kamailio understanding

The Story

So we’ve got 4 players in this story:

  • Our User Agent (UA) (Softphone on my PC)
  • Our Kamailio instance
  • Media Gateway 1 (mg1)
  • Media Gateway 2 (mg2)

Our UA will make a call to Kamailio. (Send an INVITE)

Kamailio will keep track of the up/down status of each of the media gateways, and based on rules we define pick one of the Media Gateways to forward the INVITE too.

The Media Gateways will playback “Media Gateway 1” or “Media Gateway 2” depending on which one we end up talking too.

Configuration

Parameters

You’ll need to load the dispatcher module, by adding the below line with the rest of your loadmodules:

loadmodule "dispatcher.so"

Next we’ll need to set the module specific config using modparam for dispatcher:

modparam("dispatcher", "db_url", DBURL)                 #Use DBURL variable for database parameters
modparam("dispatcher", "ds_ping_interval", 10)          #How often to ping destinations to check status
modparam("dispatcher", "ds_ping_method", "OPTIONS")     #Send SIP Options ping
modparam("dispatcher", "ds_probing_threshold", 10)      #How many failed pings in a row do we need before we consider it down
modparam("dispatcher", "ds_inactive_threshold", 10)     #How many sucessful pings in a row do we need before considering it up
modparam("dispatcher", "ds_ping_latency_stats", 1)      #Enables stats on latency
modparam("dispatcher", "ds_probing_mode", 1)            #Keeps pinging gateways when state is known (to detect change in state)

Most of these are pretty self explanatory but you’ll probably need to tweak these to match your environment.

Destination Setup

Like the permissions module, dispatcher module has groups of destinations.

For this example we’ll be using dispatch group 1, which will be a group containing our Media Gateways, and the SIP URIs are sip:mg1:5060 and sip:mg2:5060

From the shell we’ll use kamctl to add a new dispatcher entry.

kamctl dispatcher add 1 sip:mg1:5060 0 0 '' 'Media Gateway 1'
kamctl dispatcher add 1 sip:mg2:5060 0 0 '' 'Media Gateway 2'

Alternately you could do this in the database itself:

INSERT INTO `dispatcher` (`id`, `setid`, `destination`, `flags`, `priority`, `attrs`, `description`) VALUES (NULL, '1', 'sip:mg3:5060', '0', '0', '', 'Media Gateway 3'); 

Or you could use Siremis GUI to add the entries.

You can use kamctl to show you the database entries:

kamctl dispatcher show

A restart to Kamailio will make our changes live.

Destination Status / Control

Checking Status

Next up we’ll check if our gateways are online, we’ll use kamcmd to show the current status of the destinations:

kamcmd dispatcher.list

Here we can see our two media gateways, quick response times to each, and everything looks good.

Take a note of the FLAGS field, it’s currently set to AP which is good, but there’s a few states:

  • AP – Active Probing – Destination is responding to pings & is up
  • IP – Inactive Probing – Destination is not responding to pings and is probably unreachable
  • DX – Destination is disabled (administratively down)
  • AX – Looks like is up or is coming up, but has yet to satisfy minimum thresholds to be considered up (ds_inactive_threshold)
  • TX – Looks like or is, down. Has stopped responding to pings but has not yet satisfied down state failed ping count (ds_probing_threshold)

Adding Additional Destinations without Restarting

If we add an extra destination now, we can add it without having to restart Kamailio, by using kamcmd:

kamcmd dispatcher.reload

There’s some sanity checks built into this, if the OS can’t resolve a domain name in dispatcher you’ll get back an error:

Administratively Disable Destinations

You may want to do some work on one of the Media Gateways and want to nicely take it offline, for this we use kamcmd again:

kamcmd dispatcher.set_state dx 1 sip:mg1:5060

Now if we check status we see MG1’s status is DX:

Once we’re done with the maintenance we could force it into the up state by replacing dx with ap.

It’s worth noting that if you restart Kamailio, or reload dispatcher, the state of each destination is reset, and starts again from AX and progresses to AP (Up) or IP (Down) based on if the destination is responding.

Routing using Dispatcher

The magic really comes down to single simple line, ds_select_dst();

The command sets the destination address to an address from the pool of up addresses in dispatcher.

You’d generally give ds_select_dst(); two parameters, the first is the destination set, in our case this is 1, because all our Media Gateway destinations are in set ID 1. The next parameter is is the algorithm used to work out which destination from the pool to use for this request.

Some common entries would be random, round robin, weight based or priority value.

In our example we’ll use a random selection between up destinations in group 1:

if(method=="INVITE"){
   ds_select_dst(1, 4);    #Get a random up destination from dispatcher
   route(RELAY);           #Route it
}

Now let’s try and make a call:

UA > Kamailio: SIP: INVITE sip:1111111@Kamailio SIP/2.0

Kamailio > UA: SIP: SIP/2.0 100 trying -- your call is important to us

Kamailio > MG1: SIP: INVITE sip:1111111@MG1 SIP/2.0

MG1 > Kamailio: SIP: SIP/2.0 100 Trying

Kamailio > UA : SIP: SIP/2.0 100 Trying

MG1 > Kamailio: SIP: SIP/2.0 200 OK

Kamailio > UA : SIP: SIP/2.0 200 OK

And bingo, we’re connected to a Media Gateway 1.
If I try it again I’ll get MG2, then MG1, then MG2, as we’re using round robin selection.

Destination Selection Algorithm

We talked a little about the different destination select algorithm, let’s dig a little deeper into the common ones, this is taken from the Dispatcher documentation:

  • “0” – hash over callid
  • “4” – round-robin (next destination).
  • “6” – random destination (using rand()).
  • “8” – select destination sorted by priority attribute value (serial forking ordered by priority).
  • “9” – use weight based load distribution.
  • “10” – use call load distribution. 
  • “12” – dispatch to all destination in setid at once

For select destination sorted by priority (8) to work you need to include a priority, you can do this when adding the dispatcher entry or after the fact by editing the data. In the below example if MG1 is up, calls will always go to MG1, if MG1 is down it’ll go to the next highest priority (MG2).

The higher the priority the more calls it will get

For use weight based load distribution (9) to work, you’ll need to set a weight as well, this is similar to priority but allows you to split load, for example you could put weight=25 on a less powerful or slower destination, and weight=75 for a faster or more powerful destination, so the better destination gets 75% of traffic and the other gets 25%. (You don’t have to do these to add to 100%, I just find it easier to think of them as percentages).

use call load distribution (10) allows you to evenly split the number of calls to each destination. This could be useful if you’ve got say 2 SIP trunks with x channels on each trunk, but only x concurrent calls allowed on each. Like adding a weight you need to set a duid= value with the total number of calls each destination can handle.

dispatch to all destination in setid at once (12) allows you to perform parallel branching of your call to all the destinations in the address group and whichever one answers first will handle the call. This adds a lot of overhead, as for each destination you have in that set will need a new dialog to be managed, but it sure is quick for the user. The other major issue is let’s say I have three carriers configured in dispatcher, and I call a landline.

That landline will receive three calls, which will ring at the same time until the called party answers one of the calls. When they do the other two calls will stop ringing. This can get really messy.

Managing Failure

Let’s say we try and send a call to one of our Media Gateways and it fails, we could forward that failure response to the UA, or, better yet, we could try on another Media Gateway.

Let’s set a priority of 10 to MG1 and a priority of 5 to MG2, and then set MG1 to reject the call.

We’ll also need to add a failure route, so let’s tweak our code:

   if(method=="INVITE"){
                ds_select_dst(1, 12);
                t_on_failure("DISPATCH_FAILURE");
                route(RELAY);
        }

And the failure route:

route[DISPATCH_FAILURE]{
        xlog("Trying next destination");
        ds_next_dst();
        route(RELAY);

}

ds_next_dst() gets the next available destination from dispatcher. Let’s see how this looks in practice:

 
UA > Kamailio: SIP: INVITE sip:1111111@Kamailio SIP/2.0

Kamailio > UA: SIP: SIP/2.0 100 trying -- your call is important to us

Kamailio > MG1: SIP: INVITE sip:1111111@MG1 SIP/2.0

MG1 > Kamailio: SIP: SIP/2.0 100 Trying

MG1 > Kamailio: SIP: SIP/2.0 404 Not Found

Kamailio > MG1 : SIP: SIP/2.0 ACK

Kamailio > MG2: SIP: INVITE sip:1111111@MG2 SIP/2.0

MG2 > Kamailio: SIP: SIP/2.0 100 Trying

MG2 > Kamailio: SIP: SIP/2.0 200 OK

Kamailio > UA : SIP: SIP/2.0 200 OK

Here’s a copy of my entire code as a reference.

PMG / Erricson 3 line 8 ext PMBX

It’s no great secret I collect old phone stuff, I got this Melbourne made PMBX (Private Manual Branch Exchange) a while back, and I finally got around to doing something with it.

I’ve cleaned all the relays, got all the electronics happy (still need to replace the ring generator), taken everything out, sanded it, varnished it, 3D printed replacement knobs, cleaned the glass and got it looking all schmick.

Before

During

After

Glass replaced, contacts cleaned, wooden case taken apart, treated for boras, sanded and stained.

Next up fit all the 3D printed knobs, and repaint all the switch assemblies

IBM Watson – Speech to Text (SST)

I’ve been using IBM’s Watson’s Speech to Text engine for transcribing call audio, some possible use cases are speech driven IVRs, Voicemail to Email transcription, or making Call Recordings text-searchable.

The last time I’d played with Speech Recognition on Voice Platforms was in 2012, and it’s amazing to see how far the technology has evolved with the help of AI.

IBM’s offering is a bit more flexible than the Google offering, and allows long transcription (>1 minutes) without uploading the files to external storage.

Sadly, Watson doesn’t have Australian language models out of the box (+1 point to Google which does), but you can add Custom Language Models & train it.

Input formats support PCM coded data, so you can pipe PCMA/PCMU (Aka G.711 µ-law 7 a-law) audio straight to it.

Getting Setup

The first thing you’re going to need are credentials.

For this you’ll need to sign into https://console.bluemix.net

Select “Speech to Text” and you can view / copy your API key from the Credentials header.

Once you’ve grabbed your API key we can start transcribing.

Basic Transcription

I’ve got an Asterisk instance that manages Voicemail, so let’s fire the messages to Watson and get it to transcribe the deposited messages:

curl -X POST -u "apikey:yourapikey" --header "Content-Type: audio/wav" --data-binary @msg0059.wav "https://stream.watsonplatform.net/speech-to-text/api/v1/recognize?model=en-US_NarrowbandModel"
“confidence”: 0.831,
“transcript”: “hi Nick this is Nick leaving Nick a test voice mail “

Common Transcription Options

speaker_labels=true

Speaker labels enable you to identify each speaker in a multi-party call.

This makes the transcription read more like a script with “Speaker 1: Hello other person” “Speaker 2: Hello there Speaker 1”, makes skimming through much easier.

timestamps=true

Timestamps timestamp each word based on the start of the audio file,

This reads poorly in CURL but when used with speaker_labels allows you to see the time and correlate it with a recording.

One useful use case is searching through a call recording transcript, and then jumping to that timestamp in the audio.

For example in a long conference call recording you might be interested in when people talked about “Item X”, you can search the call recording for “Item” “X” and find it’s at 1:23:45 and then jump to that point in the call recording audio file, saving yourself an hour and bit of listening to a conference call recording.

Audio formats (content types)

Unfortunately Watson, like GCP, only has support for MULAW (μ-law compounding) and not PCMA as used outside the US.

Luckily it has wide ranging WAV support, something GCP doesn’t, as well as FLAC, G.729, mpg, mp3, webm and ogg.

Speech Recognition Model

Watson has support for US and GB variants of speech recognition, wideband, narrowband and adaptive rate bitrates.

word_confidence=true

Per word confidence allows you to see a per word confidence breakdown, so you can mark unknown words in the final output with question marks or similar to denote if it’s not confident it has transcribed correctly.

Voice and mail Watson wasn’t sure of

max_alternatives

This allows you to specify on either a per-word basis or as a whole, the maximum number of alternatives Watson has for the conversation.

This is Neck a test voicemail