Content-Type application/sdp is something you’ll see a whole lot when using SIP for Voice over IP, especially in INVITEs and 200 OK responses.
This is because SIP uses SDP to negotiate the media setup.
While Voice over IP uses RTP for media, and SIP for signalling, the meat in this sandwich is SDP, used to negotiate the RTP parameters and payloads before going ahead.
Without SDP you’d just have random unidentified RTP streams going everywhere and no easy way to correlate them back to a Session (SIP) or guarantee both endpoints support the same codec (RTP payload).
Enter SDP, the Session Description Protocol, before any RTP is sent, SDP advertises capabilities (which codecs to use), contact information, port information (which port to send the RTP stream to) and attempts to negotiate a media session both endpoints can support.
SDP is designed to be lightweight, while SIP uses human readable headers like To and From, SDP does away with this in favour of single letters representing what that header contains.
As an interesting aside, SIP at one stage also offered one-letter headers to make it smaller on the wire, but this never really took off.
Here we can see what an SDP header looks like, showing the Session ID, Session Name, Connection Information and Media Descriptions.
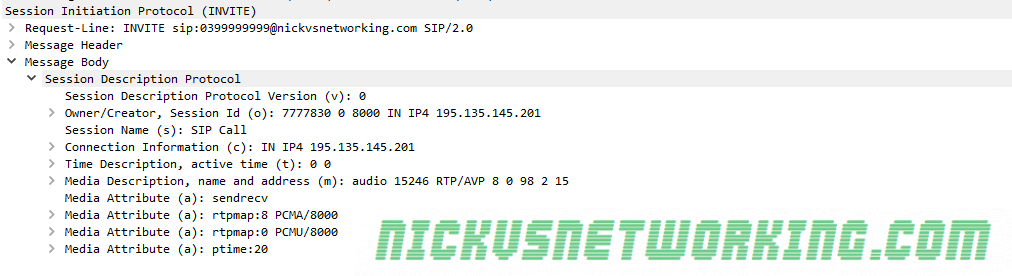
Let’s dig a little deeper and have a look at what this SDP header actually shows that’s useful to us.
The SDP Offer
Session Identifiers
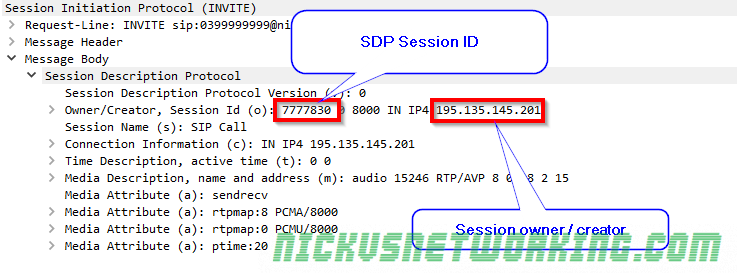
The Owner / Creator & Session ID header (abbreviated to o=) contains the SDP session ID and the session owner / creator information. This contains the SDP Session ID and the IP Address / FQDN of the owner or creator of this session. In this case the SDP Session ID is 777830 and the Session owner / creator is 195.135.145.201.
Connection Information
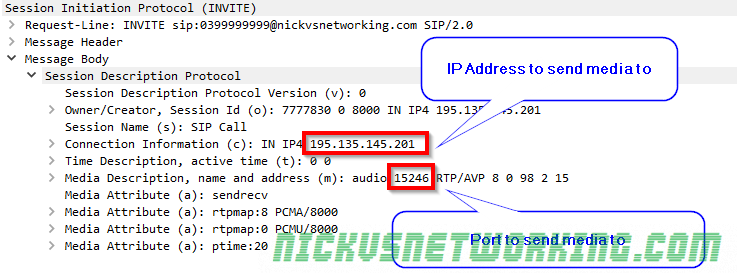
Next up we’ve got the connection information header (abbreviated to c=) which contains the IP Address we want the incoming RTP stream sent to. In this example it’s coming IN on IPv4 address 192.135.154.201.
The Media Description header (m=) also contains the port we want to receive the audio on, 15246.
So in summary we’re telling the called party that we’ll be listening on IP Address 192.135.154.201 on port 15246, so they should send their RTP audio stream to that address & port.
Media Attributes
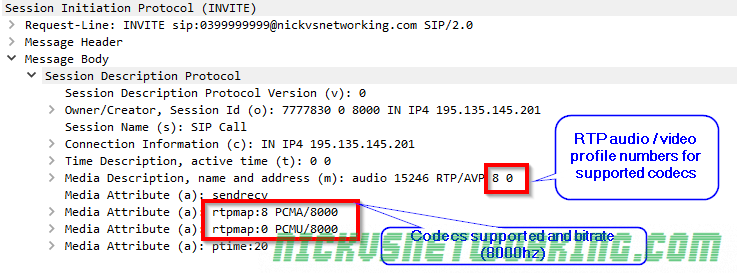
The Media Description header (abbreviated to m=) contains a name and address, in this case it’s audio, and sent to address (port) 15246.
After that we’ve got the RTP Audio / Video profile numbers. Because SDP is designed to be lightweight instead of saying PCMA, PCMU here each codec is assigned a number by IANA that translates to a codec. The full list is here, but 8 is equal to PCMA and 0 is equal to PCMU.
So from the Media Description header we can learn that it’s an Audio session, with media to be sent to port 15246, via RTP using PCMA or PCMU.
Different codecs can have different bitrates, so by using the Media Attribute header (Abbreviated to a=) we can set the bitrates for each. In this case both PCMA and PCMU are using a bitrate of 8000.
Summary
So to summarise we’ve told the party we’re calling our session ID is 777830 and it’s owned / created by 195.135.145.201. We support PCMA and PCMU at 8000Hz, and we’ll be listening on IPv4 on 195.135.145.201 on port 15246 for them to send their audio stream to.
The SDP Answer
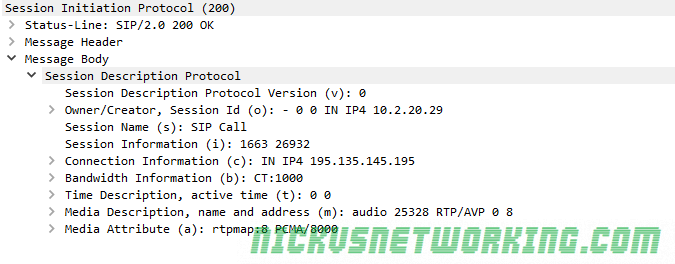
Next we’ll take a look at the SDP from a 200 OK response, and work out what our session will look like.
Codec Selection
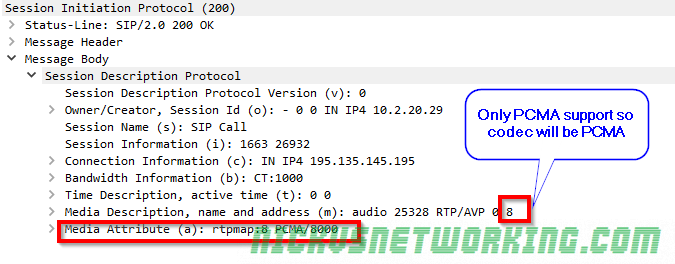
We can see this device only supports PCMA, which makes codec selection pretty easy, it’s going to be PCMA as that was also supported in the SDP offer contained in the initial INVITE.
In the scenario where both devices support the same codecs, the order in which the codecs are listed defines what codec is selected.
Connection Information
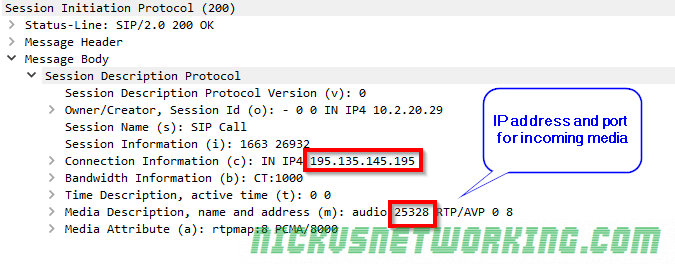
Like in the SDP offer we can see that we’re requesting incoming RTP / media to be sent to, in this case we’re asking for the RTP / media on 195.135.145.195 port 25328
Final Steps
Generally after the 200 OK is received an ACK is sent and media starts flowing in both directions between endpoints.
In this example 195.135.145.195 will send their audio (aka media / RTP) to 195.135.145.201 on port 15246 (called party to the caller) and 195.135.145.201 will send their audio to 195.135.145.195 on port 25328 (calling party to the called party).
It’s always worth keeping in mind that SIP doesn’t have to be used for Voice, nor does it have to use SDP, nor does SDP have to be used with SIP, it can be used with other protocols (IAX, H.323), and doesn’t have to negotiate RTP sessions, but could negotiate anything.
That said, the SIP – SDP – RTP sandwich is pretty ubiquitous for good reason, and while it’s true that none of these protocols require each other, the truth is, most of their usage is with one-another and it’s easier to just say “SIP uses SDP” and “SDP uses RTP” than continually saying “SIP can use SDP” and “SDP can use RTP” etc.