You may find you need to move your Open5GS deployments from one server to another, or split them between servers. This post covers the basics of migrating Open5GS config and data between servers by backing up and restoring it elsewhere.
The Database
Open5GS uses MongoDB as the database for the HSS and PCRF. This database contains all our SDM data, like our SIM Keys, Subscriber profiles, PCC Rules, etc.
Backup Database
To backup the MongoDB database run the below command (It doesn’t need sudo / root to run):
mongodump -o Open5Gs_"`date +"%d-%m-%Y"`"
You should get a directory called Open5Gs_todaysdate, the files in that directory are the output of the MongoDB database.
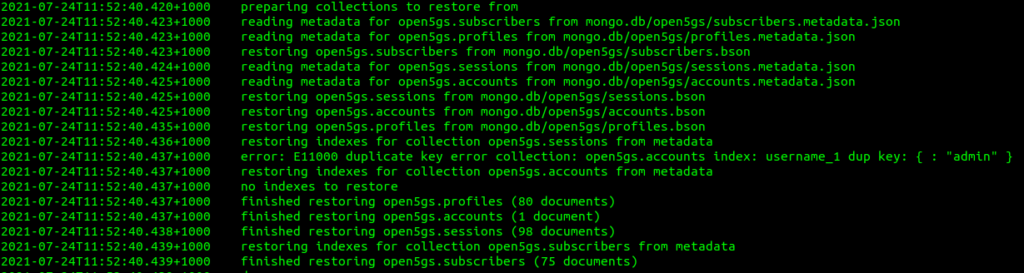
Restore Database
If you copy the backup we just took (the directory named Open5Gs_todaysdate) to the new server, you can restore the complete database by running:
mongorestore Open5Gs_todaysdate
This restores everything in the database, including profiles and user accounts for the WebUI,
You may instead just restore the Subscribers table, leaving the Profiles and Accounts unchanged with:
The database schema used by Open5GS changed earlier this year, meaning you cannot migrate directly from an old database to a new one without first making a few changes.
While most users of Open5GS EPC will use NAT on the UPF / P-GW-U but you don’t have to.
While you can do NAT on the machine that hosts the PGW-U / UPF, you may find you want to do the NAT somewhere else in the network, like on a router, or something specifically for CG-NAT, or you may want to provide public addresses to your UEs, either way the default config assumes you want NAT, and in this post, we’ll cover setting up Open5GS EPC / 5GC without NAT on the P-GW-U / UPF.
Before we get started on that, let’s keep in mind what’s going to happen if we don’t have NAT in place,
Traffic originating from users on our network (UEs / Subscribers) will have the from IP Address set to that of the UE IP Pool set on the SMF / P-GW-C, or statically in our HSS.
This will be the IP address that’s sent as the IP Source for all traffic from the UE if we don’t have NAT enabled in our Core, so all external networks will see that as the IP Address for our UEs / Subscribers.
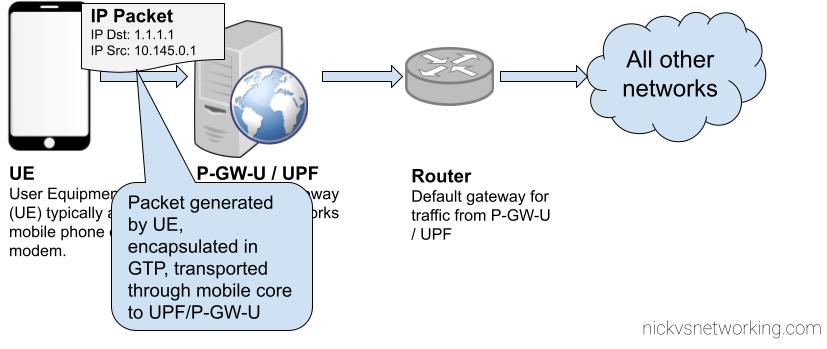
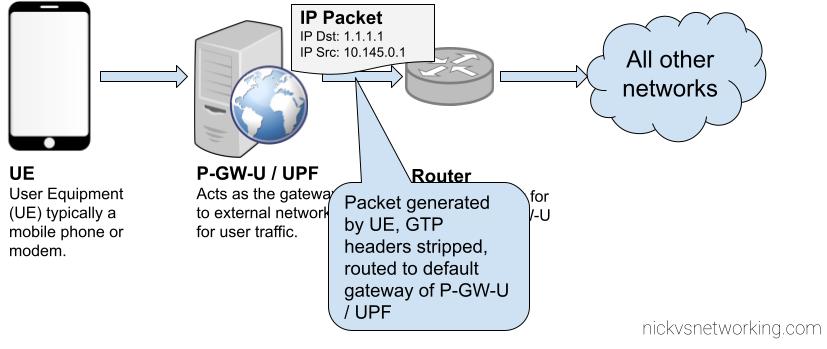
UE Generates packet
Core Network transports GTP encapsulated traffic to P-GW-U / UPF
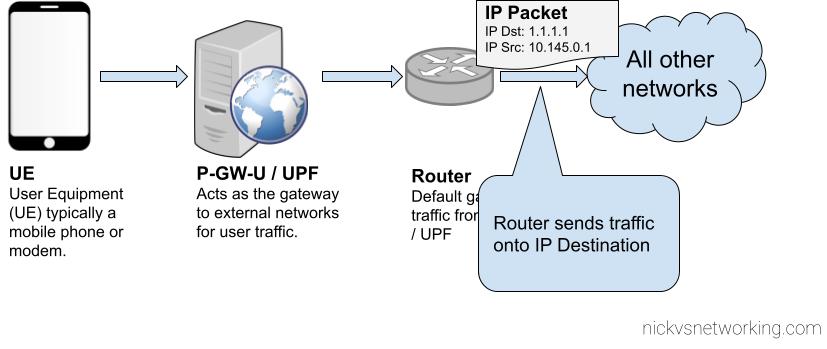
UPF/P-GW-U routes the traffic to it’s default gateway
The above example shows the flow of a packet from UE with IP Address 10.145.0.1 sending something to 1.1.1.1.
This is all well and good for traffic originating from our 4G/5G network, but what about traffic destined to our 4G/5G core?
Well, the traffic path is backwards. This means that our router, and external networks, need to know how to reach the subnet containing our UEs. This means we’ve got to add static routes to point to the IP Address of the UPF / P-GW-U, so it can encapsulate the traffic and get the GTP encapsulated traffic to the UE / Subscriber.
For our example packet destined for 1.1.1.1, as that is a globally routable IP (Not an internal IP) the router will need to perform NAT Translation, but for internal traffic within the network (On the router) the static route on the router should be able to route traffic to the UE Subnets to the UPF / P-GW-U’s IP Address, so it can encapsulate the traffic and get the GTP encapsulated traffic to the UE / Subscriber.
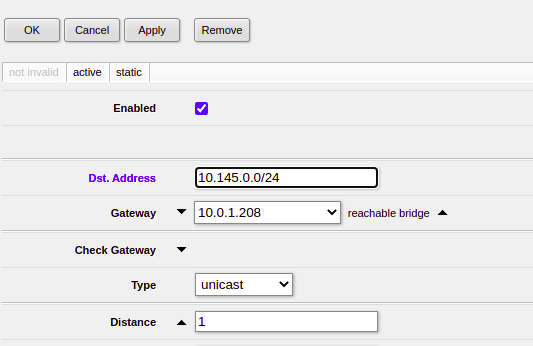
Setting up static routes on your router is going to be different on what you use, in my case I’m using a Mikrotik in my lab, so here’s a screenshot from that showing the static route point at my UPF/P-GW-U. I’ve got BGP setup to share routes around, so all the neighboring routers will also have this information about how to reach the subscriber.
Next up we’ve got to setup IPtables on the server itself running our UPF/P-GW-U, to route traffic addressed to the UE and encapsulate it.
sudo ip route add 10.145.0.0/24 dev ogstun
sudo echo 1 > /proc/sys/net/ipv4/ip_forward
sudo iptables -A FORWARD -i ogstun -o osgtun -s 10.145.0.0/24 -d 0.0.0.0/0 -j ACCEPT
And that’s it, now traffic coming from UEs on our UPF/P-GW will leave the NIC with their source address set to the UE Address, and so long as your router is happily configured with those static routes, you’ll be set.
If you want access to the Internet, it then just becomes a matter of configuring traffic from that subnet on the router to be NATed out your external interface on the router, rather than performing the NAT on the machine.
In an upcoming post we’ll look at doing this with OSPF and BGP, so you don’t need to statically assign routes in your routers.
As Open5Gs has introduced network slicing, which led to a change in the database used,
Alas many users had subscribers provisioned in the old DB schema and no way to migrate the SDM data between the old and new schema,
If you’ve created subscribers on the old schema, and now after the updates your Subscriber Authentication is failing, check out this tool I put together, to migrate your data over.
Note: As this space develops so quickly I’ve refreshed the original post from November 2021 in March 2021 with updated instructions.
While 5G SA devices are still in their early stages, and 5G RAN hardware / gNodeBs are hard to come by, so today we’ll cover using UERANSIM to simulate UEs and 5G RAN, to put test calls through our 5GC.
Bringing your 5G Core Online
We’ll use Open5Gs for all the 5GC components, and install on any recent Ubuntu distribution.
The first point of contact we’ll need to talk about is the AMF,
The AMF – the Access and Mobility Function is reached by the gNodeB over the N2 interface. The AMF handles our 5G NAS messaging, which is the messaging used by the UEs / Devices to request data services, manage handovers between gNodeBs when moving around the network, and authenticate to the network.
By default the AMF binds to a loopback IP, which is fine if everything is running on the same box, but becomes an issue for real gNodeBs or if we’re running UERANSIM on a different machine.
This means we’ll need to configure our AMF to bind to the IP of the machine it’s running on, by configuring the AMF in /etc/open5gs/amf.yaml, so we’ll change the ngap addr to bind the AMF to the machine’s IP, for me this is 10.0.1.207,
ngap:
  - addr: 10.0.1.207
In the amf.conf there’s a number of things we can change and configure; such as the PLMN and network name, the NRF parameters, however for now we’ll keep it simple and leave everything else as default.
To allow the changes to take effect, we’ll restart the Open5GS AMF service to make our changes take effect;
$ sudo systemcl restart open5gs-amfd
Setting up the Simulator
We’re using UERANSIM as our UE & RAN Simulator, so we’ll need to get it installed. I’m doing this on an Ubuntu system as we’re using Snaps.
Once we’ve got the software installed we’ll need to put together the basic settings.
You should see these files in the /build/ directory and they should be executable.
Running the Simulator (UERANSIM)
UERANSIM has two key parts, like any RAN,
The first is the gNodeB, that connects to our AMF and handles subscriber traffic over our (simulated) radio link,
The other is our subscribers themselves – the UEs.
Both are defined and setup through config files in the config/ directory,
Configuring & Starting the gNodeB
While we’re not actually going to bring anything “on air” in the RF sense, we’ll still need to configure and start our gNodeB.
All the parameters for our gNodeB are set in the config/open5gs-gnb.yaml file,
Inside here we’ll need to set the the parameters of our simulated gNodeB, for us this means (unless you’ve changed the PLMN etc) just changing the Link IPs that the gNodeB binds to, and the IP of the AMFs (for me it’s 10.0.1.207) – you’ll need to substitute these IPs with your own of course.
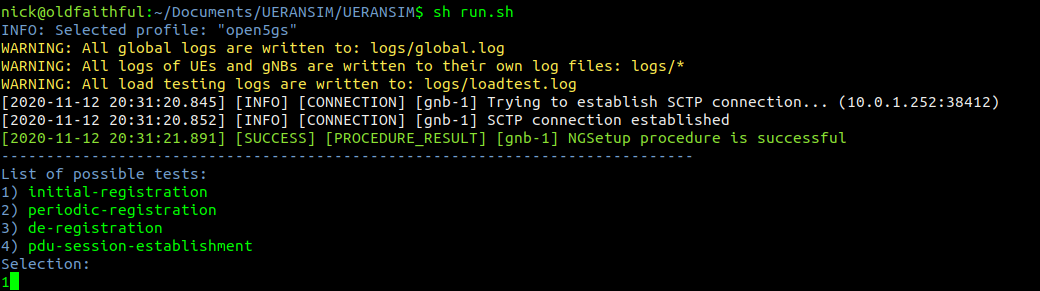
Now we should be able to start the gNodeB service and see the connection, let’s take a look,
We’ll start the gNodeB service from the UERANSIM directory by running the nr-gnb service with the config file we just configured in config/open5gs-gnb.yaml
$ build/nr-gnb -c config/open5gs-gnb.yaml
All going well you’ll see something like:
[2021-03-08 12:33:46.433] [ngap] [info] NG Setup procedure is successful
And if you’re running Wireshark you should see the NG-AP (N2) traffic as well;
If we tail the logs on the Open5GS AMF we should also see the connection too:
Configuring the UE Simulator
So with our gNodeB “On the air” next up we’ll connect a simulated UE to our simulated gNodeB.
We’ll leave the nr-gnb service running and open up a new terminal to start the UE with:
$ build/nr-gnb -c config/open5gs-gnb.yaml
But if you run it now, you’ll just see errors regarding the PLMN search failing,
So why is this? We need to tell our UE the IP of the gNodeB (In reality the UE would scan the bands to find a gNB to serve it, but we’re simulating hre).
So let’s correct this by updating the config file to point to the IP of our gNodeB, and trying again,
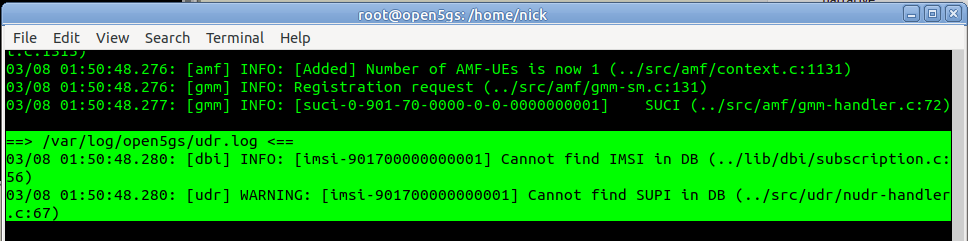
So better but not working, we see the RRC was released with error “FIVEG_SERVICES_NOT_ALLOWED”, so why is this?
A quick look at the logs on Open5Gs provides the answer,
Of course, we haven’t configured the subscriber in Open5Gs’s UDM/UDR.
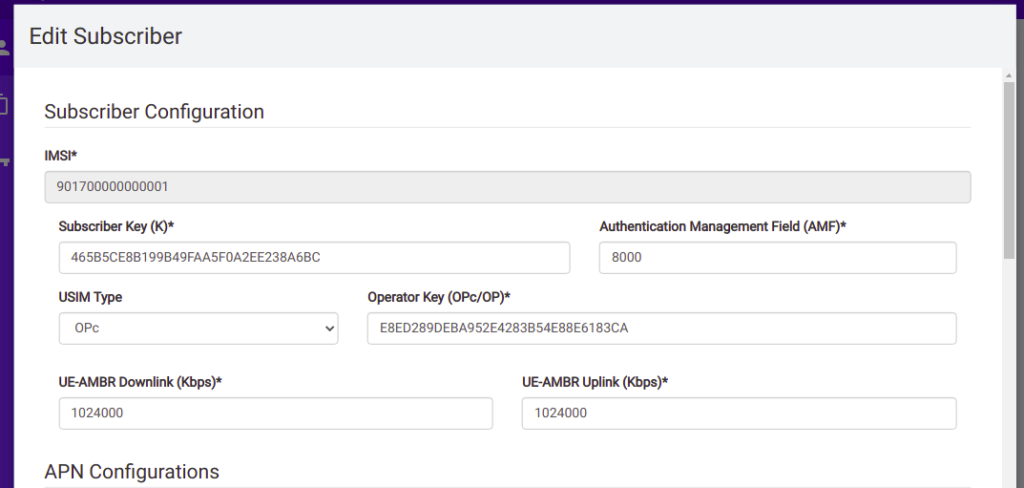
So we’ll browse to the web interface for Open5GS HSS/UDR and add a subscriber,
We’ll enter the IMSI, K key and OP key (make sure you’ve selected OPc and not OP), and save. You may notice the values match the defaults in the Open5GS Web UI, just without the spaces.
Running the UE Simulator
So now we’ve got all this configured we can run the UE simulator again, this time as Sudo, and we should get a very different ouput;
$ build/nr-gnb -c config/open5gs-gnb.yaml
Now when we run it we should see the session come up, and a new NIC is present on the machine, uesimtun0,
A question that seems to come up often, is how to provide a static IPs to UEs on Open5GS EPC.
By default all UEs are allocated an internal IP that the server the P-GW is running on NATs out, but many users want to avoid NAT, for obvious reasons.
Open5GS has the ability to set a Static IP for each APN a subscriber has, but let’s get one thing out of the way first;
LTE is not Ethernet. No broadcast, no multicast. Each IP Address is best thought of as a single /32 network. This means you can’t have the UEs in your LTE network in the same 192.168.1.x subnet as your home network along with your laptop and printer, it’s not how it works.
So with that out of the way, let’s talk about how to do static IP address allocation in Open5GS EPC.
Assigning a Subscriber a Static IP Address
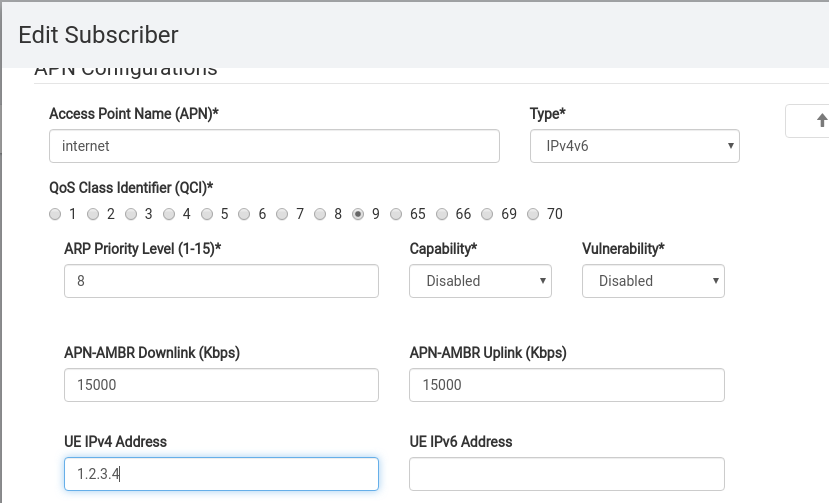
From the HSS edit the Subscriber and in the UE IPv4 or UE IPv6 address, set the static address you want to use.
You can set any UE IP Address here and it’ll get allocated to that UE.
But – there’s an issue.
The problem is not so much on the Open5GS P-GW implementation, but just how TCP/IP routing works in general.
Let’s say I assign the UE IPv4 address 1.2.3.4 to my UE. From the UE it sends a packet with the IPv4 Source address of 1.2.3.4 to anywhere on the internet, the eNB puts the packet in GTP and eventually the it gets to the P-GW which sends it out onto the internet from the source address 1.2.3.4.
The problem is that the response will never get back to me, as 1.2.3.4 is not allocated to me and will never make it back to my P-GW, so never relayed back to the UE.
For TCP traffic this means I can send the SYN with the source address of 1.2.3.4, but the SYN/ACK will be routed back to the real 1.2.3.4, and not to me, so the TCP socket will never get opened.
So while we can set a static IPs to be allocated to UEs in Open5GS, unless the traffic can be routed back to these IPs it’s not much use.
Routing
So let’s say we have assigned IP 1.2.3.4 to the UE, we’d need to put a static route on our routers to route traffic to the IP of the PGW. In my case the PGW is 10.0.1.121, so I’ll need to add a static route to get traffic destined 1.2.3.4/32 to 10.0.1.121.
In a more common case we’d assign internal IP subnets for the UE pool, and then add routes for the entire subnet to the IP of the PGW.
This is a really useful Feature that allows you to break up your S-GW (And by extension P-GW) selection based on geographical areas.
This can be used to enable Local Breakout to a S/P-GW located at the same site as the tower, but controlled by a central MME / HSS.
After updating to the latest version the configuration is pretty straightforard,
P-GW Selection based on eNB ID
# o SGW selection by eNodeB ID (either single enb_id or multiple enb_ids, decimal or hex representation)
#
   selection_mode: enb_id
   gtpc:
     - addr: 127.0.2.3
       enb_id: [9413, 0x98765]
The above config will send any traffic from eNBs with the eNB ID 9413 (encoded as an intiger) or 0x98765 (Encoded as hex int equivilent 624485) to an S-GW at 127.0.2.3.
P-GW Selection based on TAC
# SGW selection by eNodeB TAC (either single TAC or multiple TACs)
#
selection_mode: tac
   gtpc:
     - addr: 127.0.2.2
       tac: [25000, 27000, 28000]
The above config will send any traffic from eNBs with TACs of 25000, 27000, 28000 to an S-GW at 127.0.2.2.
You may want to connect Open5GS’ MME to a different Home Subscriber Server (HSS),
To do it we need a few bits of information:
The Domain Name of the HSS
The Realm of the HSS
The IP of the HSS
The Transport Used (TCP/SCTP)
If TLS is used
With these bits of information we can go about modifying the Open5GS MME config to talk to our different HSS.
Edit FreeDiameter Config
The config for the Open5GS MME’s Diameter peers is handled by the FreeDimaeter library,
You can find it’s config files in:
/etc/freediameter/mme.conf
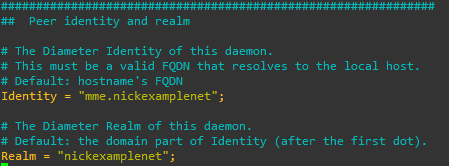
We’ll start by changing the realm to match the realm of the HSS and the identity to match the identity configured as the MME peer on the HSS.
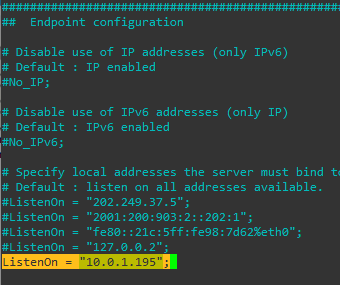
We’ll next set the ListenOn address to be a reachable IP address isntead of just a loopback address,
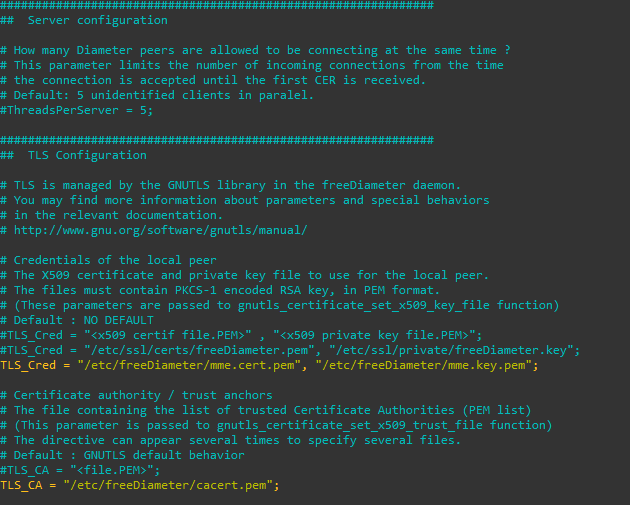
If you’re using TLS you’ll need to put your certificates and private key files into the TLS config,
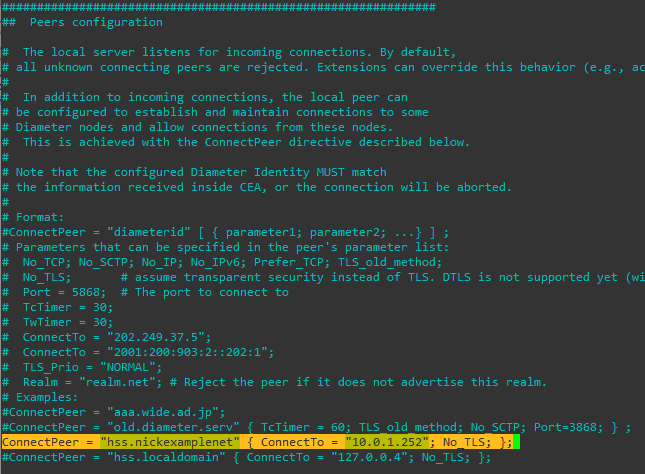
Finally we’ll put our HSS details in the Peer Configuration;
Once all this is done we’ll need to restart our MME and you should see the Diameter Capabilities Exchange / Answer commands between the HSS and the MME if all was successful,
And that’s it! We’re connected to an external HSS.
Through the freeDiameter config file you can specify multiple ConnectPeer() entries to connect to multiple HSS (like a pool of them), and requests will be distributed evenly between them.
There’s always lots of talk of Network Function Virtualization (NFV) in the Telco space, but replacing custom hardware with computing resources is only going to get you so far, if every machine has to be configured manually.
Ansible is a topic I’ve written a little bit about in terms of network automation / orchestration.
I wanted to test limits of Open5gs EPC, which led me to creating a lot of Packet Gateways, so I thought I’d share a little Ansible Playbook I wrote for deploying P-GWs.
It dynamically sets the binding address and DHCP servers, and points to each PCRF in the defined pool.
You can obviously build upon this too, creating another playbook to deploy PCRFs, MMEs and S-GWs will allow you to reference the hosts in each group to populate the references.
logger:
    file: /var/log/open5gs/pgw.log

parameter:

pgw:
    freeDiameter: /etc/freeDiameter/pgw.conf
    gtpc:
      - addr: {{hostvars[inventory_hostname]['ansible_default_ipv4']['address']}}

    gtpu:
      - addr: {{hostvars[inventory_hostname]['ansible_default_ipv4']['address']}}

    ue_pool:
      - addr: 45.45.0.1/16
      - addr: cafe::1/64
    dns:
{% for dns in dns_servers %}
      - {{ dns }}
{% endfor %}
Diameter Config (pgw.conf.j2)
# This is a sample configuration file for freeDiameter daemon.

# Most of the options can be omitted, as they default to reasonable values.
# Only TLS-related options must be configured properly in usual setups.

# It is possible to use "include" keyword to import additional files
# e.g.: include "/etc/freeDiameter.d/*.conf"
# This is exactly equivalent as copy & paste the content of the included file(s)
# where the "include" keyword is found.


##############################################################
##  Peer identity and realm

# The Diameter Identity of this daemon.
# This must be a valid FQDN that resolves to the local host.
# Default: hostname's FQDN
#Identity = "aaa.koganei.freediameter.net";
Identity = "{{ inventory_hostname  }}.{{ diameter_realm }}";

# The Diameter Realm of this daemon.
# Default: the domain part of Identity (after the first dot).
#Realm = "koganei.freediameter.net";
Realm = "{{ diameter_realm }}";
##############################################################
##  Transport protocol configuration

# The port this peer is listening on for incoming connections (TCP and SCTP).
# Default: 3868. Use 0 to disable.
#Port = 3868;

# The port this peer is listening on for incoming TLS-protected connections (TCP and SCTP).
# See TLS_old_method for more information about TLS flavours.
# Note: we use TLS/SCTP instead of DTLS/SCTP at the moment. This will change in future version of freeDiameter.
# Default: 5868. Use 0 to disable.
#SecPort = 5868;

# Use RFC3588 method for TLS protection, where TLS is negociated after CER/CEA exchange is completed
# on the unsecure connection. The alternative is RFC6733 mechanism, where TLS protects also the
# CER/CEA exchange on a dedicated secure port.
# This parameter only affects outgoing connections.
# The setting can be also defined per-peer (see Peers configuration section).
# Default: use RFC6733 method with separate port for TLS.
#TLS_old_method;

# Disable use of TCP protocol (only listen and connect over SCTP)
# Default : TCP enabled
#No_TCP;

# Disable use of SCTP protocol (only listen and connect over TCP)
# Default : SCTP enabled
#No_SCTP;
# This option is ignored if freeDiameter is compiled with DISABLE_SCTP option.

# Prefer TCP instead of SCTP for establishing new connections.
# This setting may be overwritten per peer in peer configuration blocs.
# Default : SCTP is attempted first.
#Prefer_TCP;

# Default number of streams per SCTP associations.
# This setting may be overwritten per peer basis.
# Default : 30 streams
#SCTP_streams = 30;

##############################################################
##  Endpoint configuration

# Disable use of IP addresses (only IPv6)
# Default : IP enabled
#No_IP;

# Disable use of IPv6 addresses (only IP)
# Default : IPv6 enabled
#No_IPv6;

# Specify local addresses the server must bind to
# Default : listen on all addresses available.
#ListenOn = "202.249.37.5";
#ListenOn = "2001:200:903:2::202:1";
#ListenOn = "fe80::21c:5ff:fe98:7d62%eth0";
ListenOn = "{{hostvars[inventory_hostname]['ansible_default_ipv4']['address']}}";


##############################################################
##  Server configuration

# How many Diameter peers are allowed to be connecting at the same time ?
# This parameter limits the number of incoming connections from the time
# the connection is accepted until the first CER is received.
# Default: 5 unidentified clients in paralel.
#ThreadsPerServer = 5;

##############################################################
##  TLS Configuration

# TLS is managed by the GNUTLS library in the freeDiameter daemon.
# You may find more information about parameters and special behaviors
# in the relevant documentation.
# http://www.gnu.org/software/gnutls/manual/

# Credentials of the local peer
# The X509 certificate and private key file to use for the local peer.
# The files must contain PKCS-1 encoded RSA key, in PEM format.
# (These parameters are passed to gnutls_certificate_set_x509_key_file function)
# Default : NO DEFAULT
#TLS_Cred = "<x509 certif file.PEM>" , "<x509 private key file.PEM>";
#TLS_Cred = "/etc/ssl/certs/freeDiameter.pem", "/etc/ssl/private/freeDiameter.key";
TLS_Cred = "/etc/freeDiameter/pgw.cert.pem", "/etc/freeDiameter/pgw.key.pem";

# Certificate authority / trust anchors
# The file containing the list of trusted Certificate Authorities (PEM list)
# (This parameter is passed to gnutls_certificate_set_x509_trust_file function)
# The directive can appear several times to specify several files.
# Default : GNUTLS default behavior
#TLS_CA = "<file.PEM>";
TLS_CA = "/etc/freeDiameter/cacert.pem";

# Certificate Revocation List file
# The information about revoked certificates.
# The file contains a list of trusted CRLs in PEM format. They should have been verified before.
# (This parameter is passed to gnutls_certificate_set_x509_crl_file function)
# Note: openssl CRL format might have interoperability issue with GNUTLS format.
# Default : GNUTLS default behavior
#TLS_CRL = "<file.PEM>";

# GNU TLS Priority string
# This string allows to configure the behavior of GNUTLS key exchanges
# algorithms. See gnutls_priority_init function documentation for information.
# You should also refer to the Diameter required TLS support here:
#   http://tools.ietf.org/html/rfc6733#section-13.1
# Default : "NORMAL"
# Example: TLS_Prio = "NONE:+VERS-TLS1.1:+AES-128-CBC:+RSA:+SHA1:+COMP-NULL";
#TLS_Prio = "NORMAL";

# Diffie-Hellman parameters size
# Set the number of bits for generated DH parameters
# Valid value should be 768, 1024, 2048, 3072 or 4096.
# (This parameter is passed to gnutls_dh_params_generate2 function,
# it usually should match RSA key size)
# Default : 1024
#TLS_DH_Bits = 1024;

# Alternatively, you can specify a file to load the PKCS#3 encoded
# DH parameters directly from. This accelerates the daemon start
# but is slightly less secure. If this file is provided, the
# TLS_DH_Bits parameters has no effect.
# Default : no default.
#TLS_DH_File = "<file.PEM>";


##############################################################
##  Timers configuration

# The Tc timer of this peer.
# It is the delay before a new attempt is made to reconnect a disconnected peer.
# The value is expressed in seconds. The recommended value is 30 seconds.
# Default: 30
#TcTimer = 30;

# The Tw timer of this peer.
# It is the delay before a watchdog message is sent, as described in RFC 3539.
# The value is expressed in seconds. The default value is 30 seconds. Value must
# be greater or equal to 6 seconds. See details in the RFC.
# Default: 30
#TwTimer = 30;

##############################################################
##  Applications configuration

# Disable the relaying of Diameter messages?
# For messages not handled locally, the default behavior is to forward the
# message to another peer if any is available, according to the routing
# algorithms. In addition the "0xffffff" application is advertised in CER/CEA
# exchanges.
# Default: Relaying is enabled.
#NoRelay;

# Number of server threads that can handle incoming messages at the same time.
# Default: 4
#AppServThreads = 4;

# Other applications are configured by loaded extensions.

##############################################################
##  Extensions configuration

#  The freeDiameter framework merely provides support for
# Diameter Base Protocol. The specific application behaviors,
# as well as advanced functions, are provided
# by loadable extensions (plug-ins).
#  These extensions may in addition receive the name of a
# configuration file, the format of which is extension-specific.
#
# Format:
#LoadExtension = "/path/to/extension" [ : "/optional/configuration/file" ] ;
#
# Examples:
#LoadExtension = "extensions/sample.fdx";
#LoadExtension = "extensions/sample.fdx":"conf/sample.conf";

# Extensions are named as follow:
# dict_* for extensions that add content to the dictionary definitions.
# dbg_*  for extensions useful only to retrieve more information on the framework execution.
# acl_*  : Access control list, to control which peers are allowed to connect.
# rt_*   : routing extensions that impact how messages are forwarded to other peers.
# app_*  : applications, these extensions usually register callbacks to handle specific messages.
# test_* : dummy extensions that are useful only in testing environments.


# The dbg_msg_dump.fdx extension allows you to tweak the way freeDiameter displays some
# information about some events. This extension does not actually use a configuration file
# but receives directly a parameter in the string passed to the extension. Here are some examples:
## LoadExtension = "dbg_msg_dumps.fdx" : "0x1111"; # Removes all default hooks, very quiet even in case of errors.
## LoadExtension = "dbg_msg_dumps.fdx" : "0x2222"; # Display all events with few details.
## LoadExtension = "dbg_msg_dumps.fdx" : "0x0080"; # Dump complete information about sent and received messages.
# The four digits respectively control: connections, routing decisions, sent/received messages, errors.
# The values for each digit are:
#  0 - default - keep the default behavior
#  1 - quiet   - remove any specific log
#  2 - compact - display only a summary of the information
#  4 - full    - display the complete information on a single long line
#  8 - tree    - display the complete information in an easier to read format spanning several lines.

LoadExtension = "/usr/lib/x86_64-linux-gnu/freeDiameter/dbg_msg_dumps.fdx" : "0x8888";
LoadExtension = "/usr/lib/x86_64-linux-gnu/freeDiameter/dict_rfc5777.fdx";
LoadExtension = "/usr/lib/x86_64-linux-gnu/freeDiameter/dict_mip6i.fdx";
LoadExtension = "/usr/lib/x86_64-linux-gnu/freeDiameter/dict_nasreq.fdx";
LoadExtension = "/usr/lib/x86_64-linux-gnu/freeDiameter/dict_nas_mipv6.fdx";
LoadExtension = "/usr/lib/x86_64-linux-gnu/freeDiameter/dict_dcca.fdx";
LoadExtension = "/usr/lib/x86_64-linux-gnu/freeDiameter/dict_dcca_3gpp.fdx";


##############################################################
##  Peers configuration

#  The local server listens for incoming connections. By default,
# all unknown connecting peers are rejected. Extensions can override this behavior (e.g., acl_wl).
#
#  In addition to incoming connections, the local peer can
# be configured to establish and maintain connections to some
# Diameter nodes and allow connections from these nodes.
#  This is achieved with the ConnectPeer directive described below.
#
# Note that the configured Diameter Identity MUST match
# the information received inside CEA, or the connection will be aborted.
#
# Format:
#ConnectPeer = "diameterid" [ { parameter1; parameter2; ...} ] ;
# Parameters that can be specified in the peer's parameter list:
#  No_TCP; No_SCTP; No_IP; No_IPv6; Prefer_TCP; TLS_old_method;
#  No_TLS;       # assume transparent security instead of TLS. DTLS is not supported yet (will change in future versions).
#  Port = 5868;  # The port to connect to
#  TcTimer = 30;
#  TwTimer = 30;
#  ConnectTo = "202.249.37.5";
#  ConnectTo = "2001:200:903:2::202:1";
#  TLS_Prio = "NORMAL";
#  Realm = "realm.net"; # Reject the peer if it does not advertise this realm.
# Examples:
#ConnectPeer = "aaa.wide.ad.jp";
#ConnectPeer = "old.diameter.serv" { TcTimer = 60; TLS_old_method; No_SCTP; Port=3868; } ;
{% for pcrf in pcrf_hosts %}
ConnectPeer = "{{ pcrf }}" { ConnectTo = "{{ pcrf }}"; No_TLS; };
{% endfor %}


##############################################################