
Like a lot of companies, we’re moving away from VMware, and in our case, shifting to Proxmox.
But that doesn’t mean we can get entirely away from VMware, but more that it’s not our hypervisor of choice anymore, and this means shifting our dev environments and lab off VMware to Proxmox first.
So today I sat down to try and shift everything to Proxmox, while keeping the VMware based VMs accessible until they can slowly die of bitrot.
A sane person would probably utilize Proxmox’s fancy new tool for migrating VMs from VMware to Proxmox, and it’s great, but in our case at least, it required logging into each VM and remapping NICs, etc, which is tricky on boxes I don’t have access to – Plus we need to keep some VMware capability for testing / labbing stuff up.
So I decided into install Proxmox onto the bare metal servers, and then create a VMware virtual machine inside the Proxmox stack, to host a VMware ESXi instance.

I started off inside VMware (Before installing any Proxmox) by moving all the VMs onto a single physical disk, which I then removed from the server, so as to not accidentally format the one disk I didn’t want to format.
Next I nuked the server and setup the new stack with Proxmox, which is a doddle, and not something I’ll cover.
Then I loaded a VMware ISO into Proxmox and started setting up the VM.
Now, nested virtualization is a real pain in the behind.
VMware doesn’t like not being run on bare metal, and it took me a good long amount of time to find the hardware config that I could setup in Proxmox that VMware would accept.
Create the VM in the Web UI; I found using a SATA drive worked while SCSI failed, so create a SATA based LVM image to use, and mount the datastore ISO.
Then edit /etc/pve/qemu-server/your_id.conf and replace the netX, args, boot and ostype to match the below:
args: -cpu host,+invtsc,-vmx
boot: order=ide2;net0
cores: 32
cpu: host
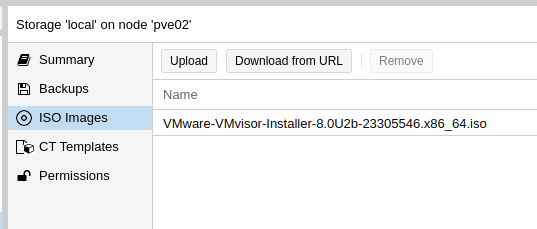
ide2: local:iso/VMware-VMvisor-Installer-8.0U2b-23305546.x86_64.iso,media=cdrom,size=620274K
memory: 128000
meta: creation-qemu=8.1.5,ctime=1717231453
name: esxi
net0: vmxnet3=BC:24:11:95:8A:50,bridge=vmbr0
numa: 0
ostype: l26
sata0: ssd-3600gb:vm-100-disk-1,size=32G
scsihw: pvscsi
smbios1: uuid=6066a9cd-6910-4902-abc7-dfb223042630
sockets: 1
vmgenid: 6fde194f-9932-463e-b38a-82d2e7e1f2dd
Now you can go and start the VM, but once you’ve got the VMware splash screen, you’ll need to press Shift + O to enter the boot options.
At the runweasle cdromBoot after it add allowLegacyCPU=true – This will allow ESXi to use our (virtual) CPU.

Next up you’ll install VMware ESXi just like you’ve probably done 100 times before (is this the last time?), and once it’s done installing, power off, we’ll have to make few changes to the VM definition file.
Then after install we need to change the boot order, by updating:
boot: order=sata0
And unmount the ISO:
ide2: none,media=cdrom
Now remember how I’d pulled the hard disk containing all the VMware VMs out so I couldn’t break it? Well, don’t drop that, because now we’re going to map that physical drive into the VM for VMware, so I can boot all those VMs.
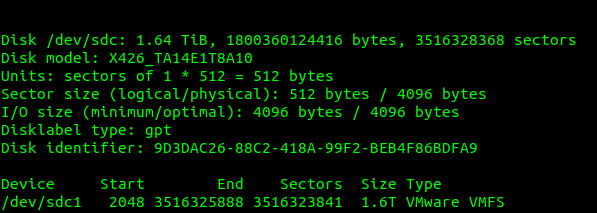
I plugged in the drive and I used this to find the drive I’d just inserted:
fdisk -l
Which showed the drive I’d just added last, with it’s VMware file system.
So next we need to map this through the VM we just created inside Proxmox, so VMware inside Proxmox can access the VMware file system on the disk filled with all our old VMware VMs.
VM. VM. VM. The word has lost all meaning to me at this stage.
We can see the mount point of our physical disk; in our case is /dev/sdc so that’s what we’ll pass through to the VM.
Here’s my final .conf file for the Proxmox VM:
args: -cpu host
balloon: 1024
boot: order=sata0
cores: 32
ide2: none,media=cdrom
kvm: 1
memory: 128000
meta: creation-qemu=8.1.5,ctime=1717231453
name: esxi
net0: vmxnet3=BC:24:11:95:8A:50,bridge=vmbr0
numa: 0
ostype: l26
sata0: ssd-3600gb:vm-100-disk-1,size=32G
sata1: /dev/sda
scsihw: pvscsi
smbios1: uuid=6066a9cd-6910-4902-abc7-dfb223042630
sockets: 1
vmgenid: 6fde194f-9932-463e-b38a-82d2e7e1f2dd
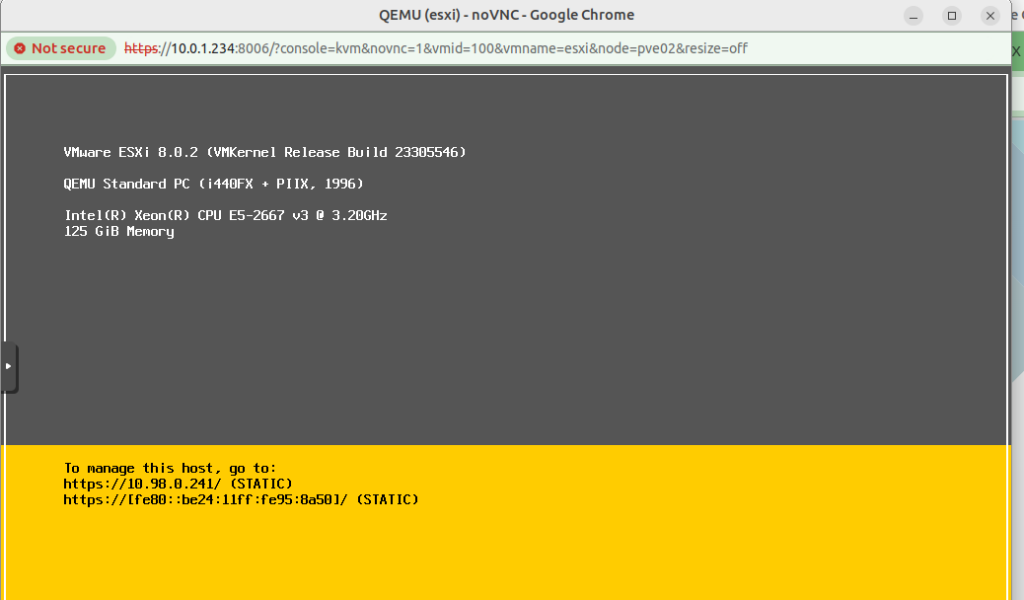
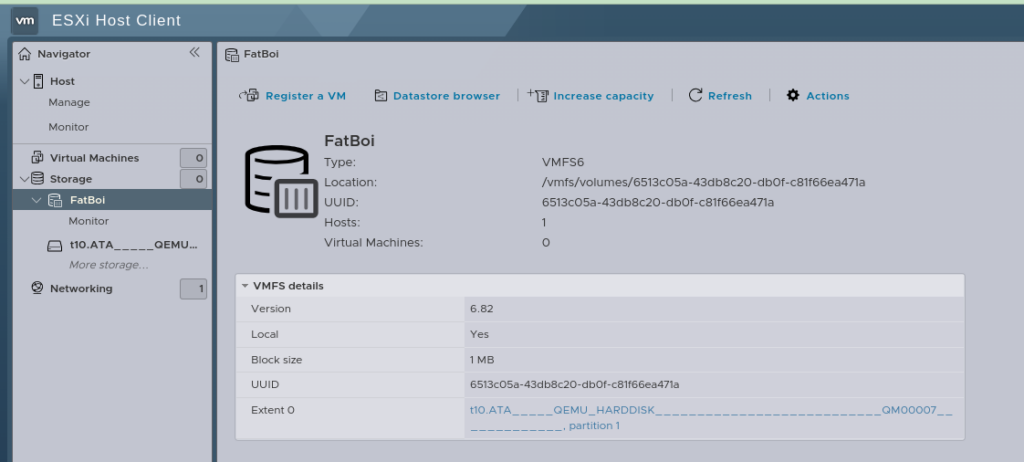
Now I can boot up the VM, log into VMware and behold, our disk is visible:
Last thing we need to do is get it mounted as a VMware Datastore so we can boot all those VMs.
For that, we’ll enable SSH on the ESXi box and SSH into it.
We’ll use the esxcfg-volume -l command to get the UUID of our drive
[root@localhost:~] esxcfg-volume -l
Scanning for VMFS-6 host activity (4096 bytes/HB, 1024 HBs).
VMFS UUID/label: 6513c05a-43db8c20-db0f-c81f66ea471a/FatBoy
Can mount: Yes
Can resignature: Yes
Extent name: t10.ATA_____QEMU_HARDDISK___________________________QM00007_____________:1 range: 0 - 1716735 (MB)
In my case the drive is aptly named “FatBoy”, so we’ll grab the UUID up to the slash, and then use that as the Mount parameter:
[root@localhost:~] esxcfg-volume -M 6513c05a-43db8c20-db0f-c81f66ea471a
Persistently mounting volume 6513c05a-43db8c20-db0f-c81f66ea471a
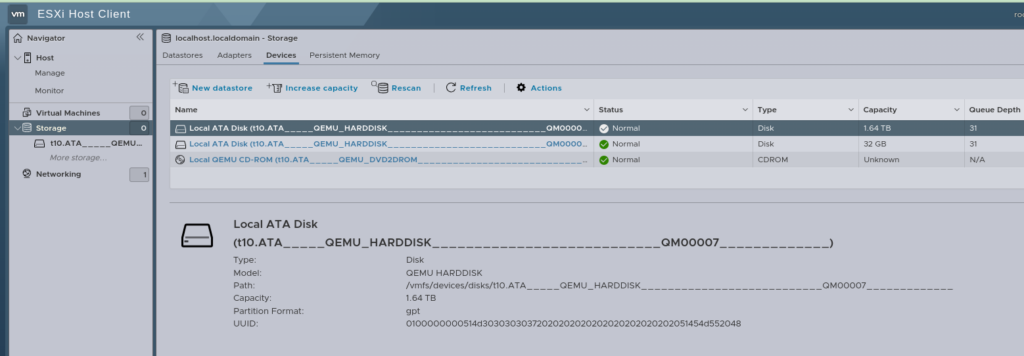
And now, if everything has gone well, after logging into the Web UI, you’ll see this:
Then the last step is going to be re-registering all the VMs, you can do this by hand, by selecting the .vmx file and adding it.
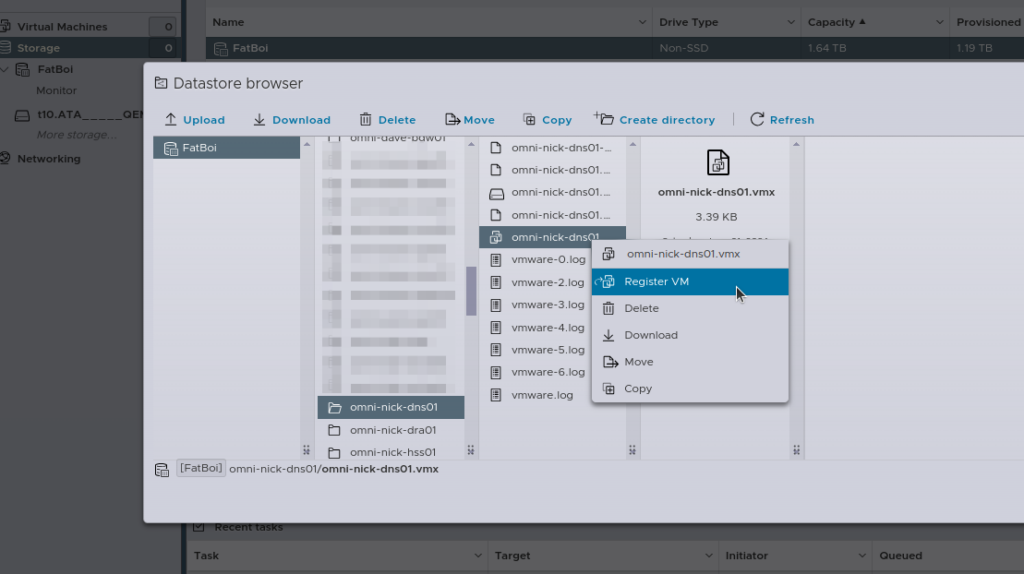
Alternately, if you’re lazy like me, I wrote a little script to do the same thing:
[root@localhost:~] cat load_vms3.sh


#!/bin/bash

# Datastore name
DATASTORE="FatBoi/"

# Log file to store the output
LOG_FILE="/var/log/register_vms.log"

# Clear the log file
> $LOG_FILE

echo "Starting VM registration process on datastore: $DATASTORE" | tee -a $LOG_FILE

# Check if datastore directory exists
if [ ! -d "/vmfs/volumes/$DATASTORE" ]; then
    echo "Datastore $DATASTORE does not exist!" | tee -a $LOG_FILE
    exit 1
fi

# Find all .vmx files in the datastore and register them
find /vmfs/volumes/$DATASTORE -type f -name "*.vmx" | while read VMX_PATH; do
    echo "Registering VM: $VMX_PATH" | tee -a $LOG_FILE
    vim-cmd solo/registervm "$VMX_PATH" | tee -a $LOG_FILE
done

echo "VM registration process completed." | tee -a $LOG_FILE

[root@localhost:~] sh load_vms3.sh
Now with all your VMs loaded, you should almost be ready to roll and power them all back on.
And here’s where I ran into another issue:

Luckily the Proxmox wiki had the answer:
For an Intel CPU here’s what you run on the Proxmox hypervisor:
echo "options kvm-intel nested=Y" > /etc/modprobe.d/kvm-intel.conf
But before we reboot the Hypervisor (Proxmox) we’ll have to reboot the VMware hypervisor too, because here’s something else to make you punch the screen:

Luckily we can fix this one globaly.
SSH into the VMware box, edit /etc/vmware/config.xml file and add:
vhv.enable = "FALSE"
Which will disable the performance counters.
Now power off the VMware VM, and reboot the Proxmox hypervisor, when it powers on again, Proxmox will allow nested virtualization, and when you power back on the VMware VM, you’ll have performance counters disabled, and then, you will be done.
Yeah, not a great use of my Saturday, but here we are…