Monthly Archives: April 2020

GSM with Osmocom Part 4: The Base Station Controller (BSC)

So in our last post we finished setting up a Base Transceiver Station (BTS) but it’s no use unless it can home itself to a Base Station Controller (BSC).

So what does a BSC do?

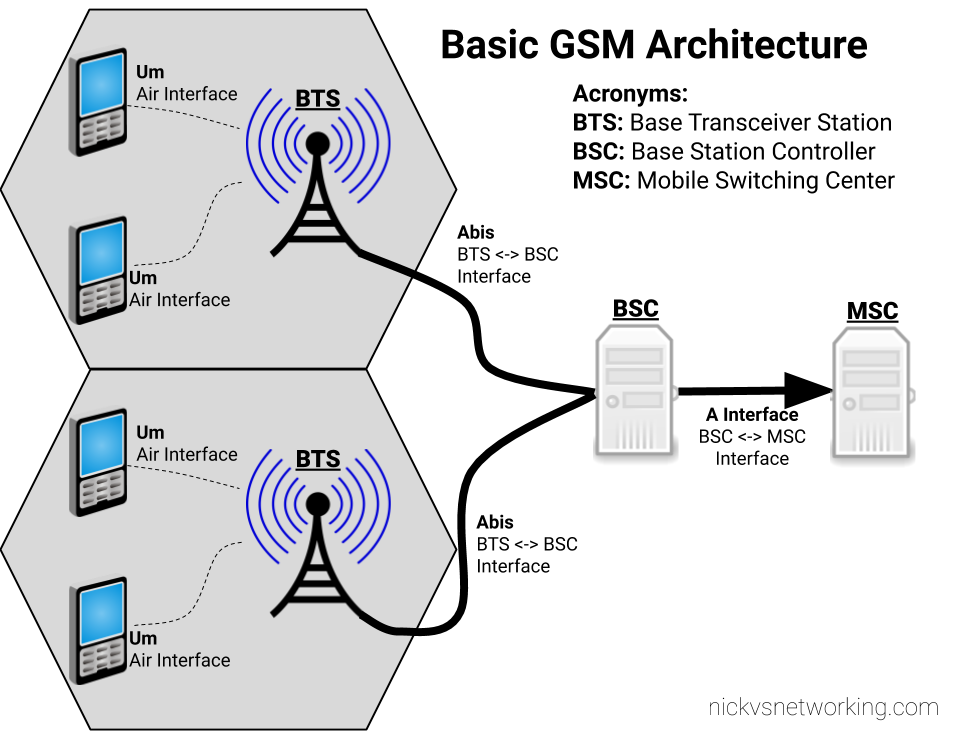
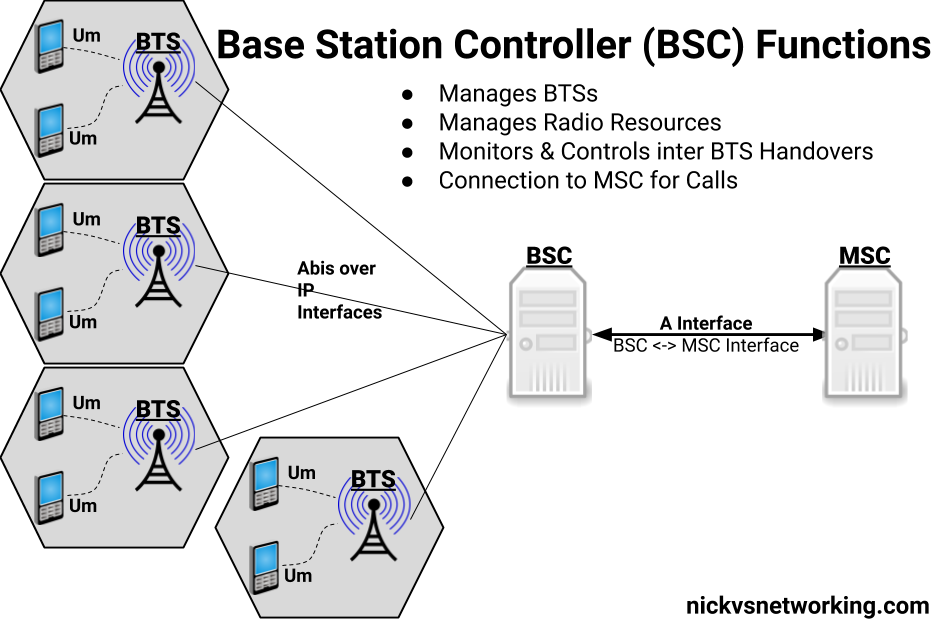
The BSC acts as a central controller for one or more BTS.

In practice this means the BSC configures most of the parameters on the BTS and brings each one up onto the air when they’re ready.

The BSC monitors measurements from users to work out when to hand off from one BTS to neighboring BTS,

The BSC also handles the allocation of radio channels and radio resources across the BTSs it manages.

In short, it does pretty much everything radio related for the BTS except transmitting and receiving data over the Air (Um) interface.

As well as managing the BTS under it, the other other equally important role of the BSC is to provide connectivity to the rest of the GSM network, by connecting to a Mobile Switching Center (MSC) which handles calls to and from our mobile subscribers and authenticating them.

By acting as a funnel of sorts, the MSC only needs a connection to each BSC instead of to each BTS (Which would be an impractically large number of connections)

Osmo BSC Install

Osmocom have their own BSC – Aptly called Osmo-BSC.

Installation is pretty straightforward, assuage you’ve got the Osmocom repo in your sources list:

apt-get install osmo-bsc 
systemctl stop osmo-bsc

In order to serve the BTSs it controls, Osmo-BSC relies on connectivity to a Mobile Switching Center (MSC), which in turn connects to a HLR (Home Location Register). The BSC and MSC communicate via SS7, and the routing is done by a Signal Transfer Points (STP).

We’ll go into each of these elements in more detail, but in order to bring our BSC up in a useful way, we’ll need to install and start these applications.

We’ll talk about the MSC, the basics of SS7 / Sigtran and the HLR later in the series, but for now we’ll blindly install and start them:

apt-get install osmo-stp osmo-msc osmo-hlr
systemctl start osmo-stp
systemctl start osmo-msc
systemctl start osmo-hlr

We’ll come back and cover each of these elements in more detail in due course.

Osmo Config – Telnet Interactive Terminal

So now we’ve got the BSC installed we’ve pointed our BTS at the IP of the BSC, we’ll need to get osmo-bsc running and add the config for our new BTS.

Instead of working with the text file we’ll start the service and work on it through Telnet, like we would for many common network devices.

Osmo-BSC listens on port 4242, so we’ll start Osmo-BSC and connect to it via Telnet:

systemctl start osmo-bsc
telnet localhost 4242

The interface should come pretty naturally to anyone who’s spent much time setting up other network devices, a lot of the commands are similar and yes – tab completion is a thing!

We’ll start by enabling logging so we can get an idea of what’s going on:

OsmoBSC> enable
OsmoBSC# logging enable
OsmoBSC# logging filter all 1
OsmoBSC# logging color 1

Next up in a new terminal / SSH session, we’ll run our virtual BTS again;

 osmo-bts-virtual -c osmo-bts-virtual.cfg 

This time we’ll get a different output from the BTS when we try to start it:

root@gsm-bts:/etc/osmocom# osmo-bts-virtual -c osmo-bts-virtual.cfg
 ((*))
   |
  / \ OsmoBTS
<0010> telnet_interface.c:104 Available via telnet 127.0.0.1 4241
<0012> input/ipaccess.c:901 enabling ipaccess BTS mode, OML connecting to 127.0.0.1:3002
<0012> input/ipa.c:128 127.0.0.1:3002 connection done
<0012> input/ipaccess.c:724 received ID_GET for unit ID 4242/0/0
<0012> input/ipa.c:63 127.0.0.1:3002 lost connection with server
<000d> abis.c:142 Signalling link down
<000d> abis.c:156 OML link was closed early within 0 seconds. If this situation persists, please check your BTS and BSC configuration files for errors. A common error is a mismatch between unit_id configuration parameters of BTS and BSC.

root@gsm-bts:/etc/osmocom#

We’ll also see errors in the terminal on the BSC too:

<0016> input/ipa.c:287 0.0.0.0:3002 accept()ed new link from 10.0.1.252:39383
<0016> bts_ipaccess_nanobts.c:480 Unable to find BTS configuration for 4242/0/0, disconnecting

So what’s happening here?

Well our virtual BTS is trying to connect to our BSC, and this time it’s able to, but our BSC doesn’t have any config in place for that BTS, so the BSC has rejected the connection.

So now we’ve got to configure a the BSC to recognise our BTS.

Provisioning a new BTS in the BSC

So as to keep this tutorial generic enough for anyone to follow along, we’re first going to configure a virtual BTS in our BSC to begin with. I wrote about installing Osmo-BTS-Virtual in this post.

We can get the information about the rejected BTS connection attempt from the BSC terminal:

OsmoBSC# show rejected-bts
 Date                Site ID BTS ID IP
2020-03-29 01:32:37    4242      0      10.0.1.252

So we know the Site-ID is 4242 (we set it earlier) and the BTS ID for that site is 0, so let’s create a BTS in the BSC;

OsmoBSC> enable
OsmoBSC# configure terminal
OsmoBSC(config)# network
OsmoBSC(config-net)# bts 1
OsmoBSC(config-net-bts)# type sysmobts
OsmoBSC(config-net-bts)# description "Virtual BTS"
OsmoBSC(config-net-bts)# ipa unit-id 4242 0
OsmoBSC(config-net-bts)# band DCS1800 
OsmoBSC(config-net-bts)# codec-support fr hr efr amr
OsmoBSC(config-net-bts)# cell_identity 4242
OsmoBSC(config-net-bts)# location_area_code 4242
OsmoBSC(config-net-bts)# base_station_id_code 4242
OsmoBSC(config-net-bts)# base_station_id_code 42
OsmoBSC(config-net-bts)# ms max power 40
OsmoBSC(config-net-bts)# trx 0
OsmoBSC(config-net-bts-trx)# max_power_red 20
OsmoBSC(config-net-bts-trx)# arfcn 875
OsmoBSC(config-net-bts-trx)# timeslot 0
OsmoBSC(config-net-bts-trx-ts)# phys_chan_config CCCH+SDCCH4
OsmoBSC(config-net-bts-trx-ts)# exit
OsmoBSC(config-net-bts-trx)# timeslot 1
OsmoBSC(config-net-bts-trx-ts)# phys_chan_config TCH/F
OsmoBSC(config-net-bts-trx-ts)# exit
OsmoBSC(config-net-bts-trx)# timeslot 2
OsmoBSC(config-net-bts-trx-ts)# phys_chan_config TCH/F
OsmoBSC(config-net-bts-trx-ts)# exit
OsmoBSC(config-net-bts-trx)# timeslot 3
OsmoBSC(config-net-bts-trx-ts)# phys_chan_config TCH/F
OsmoBSC(config-net-bts-trx-ts)# exit
OsmoBSC(config-net-bts-trx)# timeslot 4
OsmoBSC(config-net-bts-trx-ts)# phys_chan_config TCH/F
OsmoBSC(config-net-bts-trx-ts)# exit
OsmoBSC(config-net-bts-trx)# timeslot 5
OsmoBSC(config-net-bts-trx-ts)# phys_chan_config TCH/F
OsmoBSC(config-net-bts-trx-ts)# exit
OsmoBSC(config-net-bts-trx)# timeslot 6
OsmoBSC(config-net-bts-trx-ts)# phys_chan_config TCH/F
OsmoBSC(config-net-bts-trx-ts)# exit
OsmoBSC(config-net-bts-trx)# timeslot 7
OsmoBSC(config-net-bts-trx-ts)# phys_chan_config TCH/F
OsmoBSC(config-net-bts-trx-ts)# exit 
OsmoBSC(config-net-bts-trx)# exit
OsmoBSC(config-net-bts)# exit
OsmoBSC(config-net)# exit
OsmoBSC(config)# exit 
OsmoBSC# copy running-config startup-config

Phew,

So what did we actually do here?

Well as we’re getting the majority of the smarts for the BTS from the BSC, we’ve got to tell the BSC all about how we want the BTS setup. (Believe it or not this is the most abridged setup I could muster.)

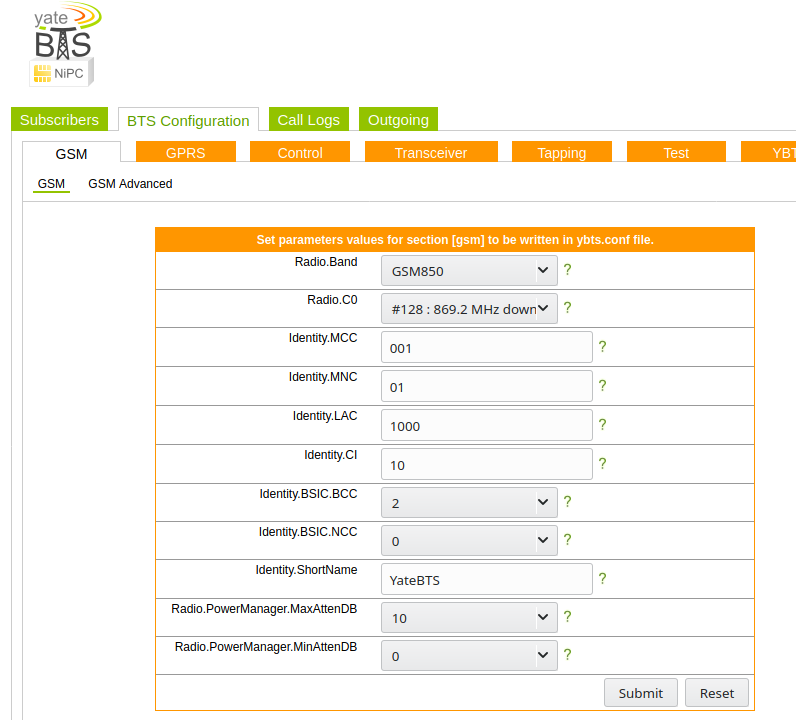
The type, IPA Unit ID, band and Cell Identity make up some of the parameters we need to identify the BTS (IPA Unit ID) and give it it’s basic identity parameters.

Next up in the trx 0 section we set the contents of the 8 GSM timeslots. Our first time slot we configure as CCCH+SDCCH4 meaning the first timeslot will contain the Common Control Channel and 4 Standalone dedicated control channels, used for signalling, while the reamining 7 timeslots will be used with traffic channels for full-rate speech (TCH/F).

It’s important that what we tell the BSC the capabilities of the BTS are match the actual capabilities of the BTS. For example there’s no point configuring GPRS or EDGE support on the BSC if the BTS doesn’t support it.

If you’ve got logging enabled when the BTS connects to the BSC you’ll see errors listing the features mismatch between the two.

As you can imagine there’s better options than this for adding BTS in bulk – Osmocom Control Interface exposes these functions in an API like way, but before you start on network orchestration it’s good to know the basics.

Connecting the BTS to the BSC

So let’s go ahead and connect our BTS to the BSC.

If you’ve closed the BSC terminal since we enabled logging you’ll need to enable it again:

OsmoBSC> logging enable
OsmoBSC> logging filter all 1
OsmoBSC> logging color 1

And next up we’ll try and start the BTS again:

root@gsm-bts:/etc/osmocom# osmo-bts-virtual -c osmo-bts-virtual.cfg
 ((*))
   |
  / \ OsmoBTS
<0010> telnet_interface.c:104 Available via telnet 127.0.0.1 4241
<0012> input/ipaccess.c:901 enabling ipaccess BTS mode, OML connecting to 127.0.0.1:3002
<0012> input/ipa.c:128 127.0.0.1:3002 connection done
<0012> input/ipaccess.c:724 received ID_GET for unit ID 4242/0/0

And on the BSC you’ll see roughly the same thing:

OsmoBSC# 
<0016> input/ipa.c:287 0.0.0.0:3002 accept()ed new link from 127.0.0.1:40193
<0004> abis_nm.c:490 BTS1 reported variant: omso-bts-virtual
<0004> abis_nm.c:578 OC=BASEBAND-TRANSCEIVER(04) INST=(00,00,ff): BTS1: ARI reported sw[0/1]: TRX_PHY_VERSION is Unknown
<0016> input/ipa.c:287 0.0.0.0:3003 accept()ed new link from 127.0.0.1:44053
<0003> osmo_bsc_main.c:291 bootstrapping RSL for BTS/TRX (1/0) on ARFCN 0 using MCC-MNC 001-01 LAC=4242 CID=4242 BSIC=42

If you’ve made it this far, congratulations. Our virtual BTS is now connected to our BSC – If it wasn’t virtual we’d be on the air!

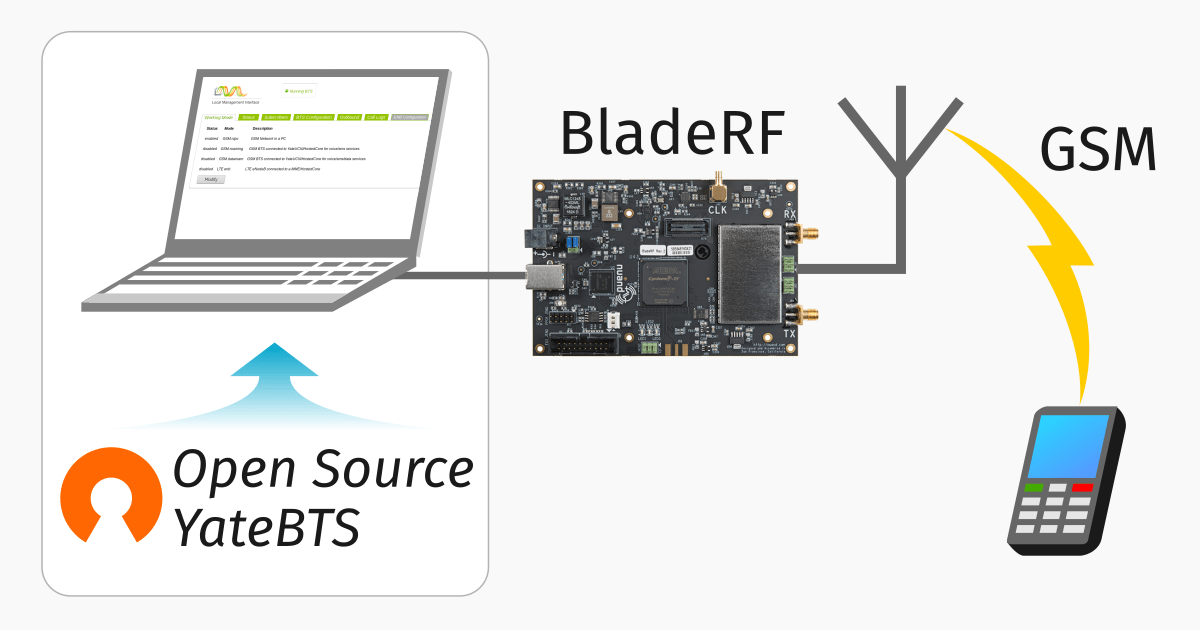
So in the next post we’ll setup our SDR hardware as a BTS, then provision it on the BSC, and then our cell will be on the air.

Basic GSM Architecture

GSM with Osmocom Part 3: Introduction to Osmo Software & Virtual BTS

So this series of posts will focus on using Osmocom software to create a GSM network, so let’s get some Osmocom software installed, and talk about how we run and configure each network element / node.

Osmocom Packages

For this tutorial series I’ll be using Ubuntu 18.04 and trying where possible to use packages from Repos instead of compiling from source.

This will get the Osmocom key added to your package manager and the Osmocom sources in apt ready for us to install.

wget https://download.opensuse.org/repositories/network:/osmocom:/latest/Debian_10/Release.key
apt-key add Release.key && rm Release.key
echo "deb https://download.opensuse.org/repositories/network:/osmocom:/latest/xUbuntu_18.04/ ./" > /etc/apt/sources.list.d/osmocom-latest.list
apt-get update

Osmo-BTS-Virtual

To get started we’ll install a virtual BTS. This virtual BTS won’t simulate the Um (air) interface, but it will simulate the Abis interface towards the BSC so we can configure this virtual BTS in our BSC.

Installation is pretty straightforward:

apt-get install osmo-bts-virtual

By default Osmocom software runs as a daemon in systemctl, we’ll disable and stop this behaviour for now so we can better understand it running in the foreground:

systemctl stop osmo-bts-virtual
systemctl disable osmo-bts-virtual

Osmo Config – Text Files

If you have a look in /etc/osmocom/ you’ll see .cfg files that contain our config in text files.

But that’s not the only way (or even the recommended way) that we’ll put together the config for Osmocom software, but we’ll get started by editing the config file manually.

We’ll start by setting a Unit ID of the BTS and setting the IP of the BSC.

cd /etc/osmocom/
vi osmo-bts-virtual.cfg

We’ll edit the oml remote-ip to point to the IP of the server that will run our BSC, if you’re planning on running the BTS and BSC on the same machine you can leave it as localhost (127.0.0.1).

Next up we’ll set the Unit-ID of the BTS, this identifies the BTS inside the BSC,

I’ll set it to unit-id 4242 by changing ipa unit-id 4242 0

Finally we’ll change the logging config to show everything by changing it to:

log stderr
 logging filter all 1
!

So that’s it in terms of config for our virtual BTS through text files, so we’ll save the file and try starting up osmo-bts-virtual.

osmo-bts-virtual -c osmo-bts-virtual.cfg

You should get a result similar to this:

root@gsm-bts:/etc/osmocom# osmo-bts-virtual -c osmo-bts-virtual.cfg
 ((*))
   |
  / \ OsmoBTS
<0010> telnet_interface.c:104 Available via telnet 127.0.0.1 4241
<0012> input/ipaccess.c:901 enabling ipaccess BTS mode, OML connecting to 127.0.0.1:3002
<000d> abis.c:142 Signalling link down
<0001> bts.c:292 Shutting down BTS 0, Reason Abis close
Shutdown timer expired

root@gsm-bts:/etc/osmocom#

So what are we seeing here?

Well Osmo-BTS-Virtual is trying to bring up it’s Abis interface but it’s not getting a connection to the the BSC (We haven’t set one up yet). No connection to a BSC means the BTS won’t go on the air as it doesn’t have any processing for itself, so it eventually times out and shuts down.

In the next post we’ll move from using osmo-bts-virtual to using a SDR to run Osmo-BTS. If you’re using commercial RAN hardware, or just playing along without any RAN, skip straight to the post on Base Station Controllers where we’ll pick up again adding our Virtual BTS to the BSC.

GSM base Station

GSM with Osmocom Part 2: BTS Basics

By far the most visable part of any mobile network (apart from your phone!) is the Base (Transciver) Stations.

Dotted around the countryside, on masts, towers and monopoles, whether you notice them or not, base stations are everywhere.

The Architecture

The RF side of LTE has an eNodeB, which is a smart device. – You connect it to a TCP/IP network, it establishes a connection with your MME(s) and away you go.

A GSM BTS (Base Transceiver Station) isn’t all that clever…

The BTS is a similar to the WiFi access points that talk to a centralised controller for all their thinking.
A BTS gets most of its brains from elsewhere and essentially just handles the TX/RX of baseband data.

That elsewhere is the BSC – Base Station Controller. Each BTS connects to a BSC, and a BSC would typically control a number of BTS.

We’ll explore the BSC and it’s connections in depth, but I’ve put together a basic diagram of how everything fits together below.

Basic GSM Access Architecture

Um Interface

The Um interface is the Air Interface of GSM. It’s what takes the data and sends it out “over the air”.

There’s a lot to know about air interfaces, and I know very little. What I do know is I need to set the Um interface to use a frequency band my mobile phone supports (so I can see and connect to the network).

The Abis Interface

The fact that GSM was first deployed in 1991, explains why the Abis interface used ISDN E1/T1 TDM links to connect the Base Transceiver Stations (BTSs) to the Base Station Controller (BSC).

While now looking back you may ask why TCP/IP wasn’t used for the Abis interface, keep in mind that Windows 95 was the first version to include TCP/IP support, and that gives you an idea of the state of play. ISDN is very reliable and was well known in the telco space at that time.

I no longer have any ISDN hardware, so for me this is all going to be built using packet switched networks working as circuit switched.

Osmocom does have support for E1/T1 interfaces, so if you’ve got BTS hardware that only communicates over TDM links, that’s an option too.

GSMA never wrote a standard for taking Abis over IP, so as such each vendor has implemented it differently.

Osmocom have a flavour of Abis over IP protocol they’ve developed based on traces from a commercial implementation which we’ll be using. You can find the full protocol spec for Osmocom’s Abis over IP interface here.

OML Interface

With all the brains for the BTS residing in the BSC, there’s a need to control the BTS from the BSC. The Operation and Maintenance Link (OML) is a protocol for changing certain parameters of the BTS from the BSC.

A prime example of use of the OML would be the BSC turning the BTS off/on.

We’ll see a tiny bit of OML usage in the next post, just for turning the BTS off and on.

So let’s put this into practice and setup a virtual BTS with Osmocom.

Osmocom Logo

GSM with Osmocom Part 1: Intro

Meta

Like most people at the moment because of the lockdown I’ve got a bit more time at home than normal.

Because of this I thought I’d finally dive into GSM/UMTS and all that circuit switched tech you skip out on when getting started with LTE.

Please excuse the loving tone I use when describing some older tech, it’s a result of being a telephony tragic who gets all reminiscent thinking about the first phones they interacted with & wondered about how it all worked…

So why learn GSM?

My best friend is a translator of technical documents. In University, what’s the first language they study? Latin. Because it’s the root of so many languages.

While a lot of carriers have already switched off their GSM networks (There are no public GSM networks in Australia), the core of GSM is essentially shared with that of UMTS / 3G, which is still going to be around for the foreseeable future.

Circuit Switched Fallback (CSFB) is still common today for voice calls for a great many LTE handsets without VoLTE support. GSM powers GSM-R, the rail specific standard of GSM used across Europe. The uplink power of GSM can be up to 8 Watts (while in LTE it’s 20 dBm – 0.1W) which means it’s effective service area could be larger than 3G and 4G air interfaces.

GSM isn’t as dead as it might seem, so let’s have a Weekend at Bernie’s!

Disclaimer: Please let me know if I’ve got anything wrong! These posts will focus on the Omsocom network elements which do handle a few things the “non standard” way.

Platforms

I wrote last week about using YateBTS to get a functional GSM / GPRS network online,

It’s great that it works from a Um interface perspective; your UE / terminal can see and connect to the network. But it’s sort of an all-in-one solution; there’s no Mobile Switching Center, Base Station Controller, Sigtran, HLR or Media Gateway; Yate ties all this up into a single easy to use package.

This gets you on the air in no time, but unfortunately you don’t get exposed to how GSM / UMTS works in the real world – real networks don’t look like YateBTS NITPC.

Enter Osmocom

Osmocom (and the Sysmocom team driving many of the projects) have done a phenomenal job of building each of the network elements I just talked about pretty much “by the book”, meaning most should interop with commercial equipment and comply to the standards.

Over the next few weeks I’ll cover setting up each of the network elements, talking about what they do and how they work, and use them to create a functional GSM network (2G / Circuit Switched) using the software from Osmocom.

Once we’ve got our network functional we’ll be adding SMS, Data (GPRS / EDGE), USSD codes and even inter-RAT handover with LTE.

For this series of posts I’ll be using a mix of hardware. At the start I’ll be using a Software Defined Radio (LimeSDR) to do the RF side of the network (BTS). Osmocom has support for a lot of common SDR hardware, so hopefully for anyone wanting to follow along at home you’ll have access to a LimeSDR or USRP.

Osmocom supports many commercial BTS vendors products, as well as Sysmocom’s hardware, hardware from Range Networks. Osmocom also supports the NanoBTS range from ip.access – which are available second hand quite cheaply, which I’ll be adding to our network as well.

So buy some cheap programmable SIM cards, grab your SDR hardware or order cheap second hand GSM BTS online, and let’s get building a GSM network!

Topics Covered

I’ll update the links in here as I publish these posts, I may forget so if there’s something missing search the site or drop me a line.

My Osmocom Config Files on GitHub

Radio Access Network

BTS Basics

BTS In Practice with LimeSDR & osmo-bts-trx

The Base Station Controller (BSC)

Integrating our LimeSDR BTS with OsmoBSC

Integrating an ipaccess NanoBTS with OsmoBSC

Channel Types

Switching & Signaling

Home Location Register (HLR) (with EIR & AuC)

The SS7 Signaling Transfer Point

The Mobile Switching Center

Basic calls & SMS

Call Routing

SMS Routing

Distributed GSM

Cell Broadcast Center

External USSD Interfaces

Data Services

GPRS & Packet Data Basics

Serving Gateway Support Node

Gateway GPRS Support Node

Call Flows & Handovers

Basic GSM Calls

Basic GSM SMS

Basic GSM Packet Bearers

Inter BSC

Inter MSC

Inter-RAT

Inter RAT between LTE and GSM

GSM CSFB with OmsmoMSC and Open5GS LTE

SGs Interface for SMS over LTE

Decoding MAC LTE Frames in Wireshark

Working with LTE MAC traces in Wireshark

I recently pulled MAC layer traces off an eNB and wanted to view them,

In Wireshark this shows up as raw data, and there’s no option to decode as LTE MAC from the Decode As menu.

Instead you’ve got to go to Preferences -> Protocols and select DLT_USER and then edit the encapsulation table.

For DLT_147 enter:

mac-lte-framed

Now you’ll have your MAC frames decoded:

On top of this there’s also now the option to run analysis on these traces,

By selecting Telephony -> LTE -> MAC Statistics you’re able to view stats for each RNTI connected to the eNB.

I’ve attached a copy of my trace for reference.

Magic SIM Card Art

16 in 1 Magic SIM Card Revisited

I found a “16-in-1 Super SIM X-SIM” in my SIM card drawer, I think I ordered these when I was first playing with GSM and never used it.

I was kind of curious about how these actually worked, so after some online sleuthing I found a very suspicious looking rar file, which I ended up running in a VM and mapping the Card Reader to the VM.

What a treat I was in for in terms of UI.

The concept is quite simple, you program a series of IMSI and K key values onto the SIM card, and then using a SIM Toolkit application, you’re able to select which IMSI / K key combination you want to use.

A neat trick, I’d love a LTE version of this for changing values on the fly, but it’d be a pretty niche item considering no operator is going to give our their K and OPc keys,

But come to think of it, no GSM operator would give out K keys, so how do you get the K key from your commercial operator?

I noticed the grayed out “Crack” icon on the menu.

After rifling through my SIM drawer I found a few really old 2G SIMs, stuck one in, reconnected and clicked “Crack” and then start.

I left it running in the background after the manual suggested it could take up to 24 hours to run through all the codes.

To my surprise after 2 minutes the software was requesting I save the exported data, which I did.

Then I put the 16 in 1 back in, selected Magic and then imported the cracked SIM data (IMSI, ICCID, Ki & SMSp).

By the looks of it the software is just running a brute force attack on the SIM card, and the keyspace is only so large meaning it can be reversed in.

I did a bit of research to find out if this is exploiting any clever vulnerabilities in UCCID cards, but after running some USB Pcap traces it looks like it’s just plain old brute force, which could be easily defended against by putting a pause between auth attempts on the SIM.

I’ve no idea if that’s the actual K value I extracted from the SIM – The operator that issued the SIM doesn’t even exist anymore, but I’ll add the details to the HLR of my Osmocom GSM lab and see if it matches up.

Out of curiosity I also connected some of my development USIM/ISIM/SIM cards that I can program, the software is amazing in it’s response:

Configuring YateBTS for Software Defined GSM/GPRS

I did a post yesterday on setting up YateBTS, I thought I’d cover the basic setup I had to do to get everything humming;

Subscribers

In order to actually accept subscribers on the network you’ll need to set a Regex pattern to match the prefix of the IMSI of the subscribers you want to connect to the network,

In my case I’m using programmable SIMs with MCC / MNC 00101 so I’ve put the regex pattern matching starting with 00101.

BTS Configuration

Next up you need to set the operating frequency (radio band), MNC and MCC of the network. I’m using GSM850,

Next up we’ll need to set the device we’re going to use for the TX/RX, I’m using a BladeRF Software Defined Radio, so I’ve selected that from the path.

Optional Steps

I’ve connected Yate to a SIP trunk so I can make and receive calls,

I’ve also put a tap on the GSM signaling, so I can see what’s going on, to access it just spin up Wireshark and filter for GSMMAP

Compiling YateBTS NIPC for Software Defined GSM / GPRS

A lot of the Yate tutorials are a few years old, so I thought I’d put together the steps I used on Ubuntu 18.04:

Installing Yate

apt-get install subversion autoconf build-essential
cd /usr/src svn checkout http://voip.null.ro/svn/yate/trunk yate 
cd yate
./autogen.sh
./configure
make
make install-noapi

Installing YateBTS

cd /usr/src 
svn checkout http://voip.null.ro/svn/yatebts/trunk yatebts
cd yatebts/ 
./autogen.sh 
./configure
make install

Defining location of libyate

On Ubuntu I found I had to add the library location in ldconf:

echo "include /usr/local/lib/" > /etc/ld.so.conf
ldconfig

Installing Web Interface for NIB / NIPC

apt-get install apache2 php
cd /usr/src/yatebts/nipc
make install
cd /var/www/html
ln -s /usr/local/share/yate/nipc_web nipc
chmod a+rw /usr/local/etc/yate/